


一、MongoDB简介
英文文档地址:https://www.mongodb.com/docs/manual/
中文文档地址:https://docs.mongoing.com/
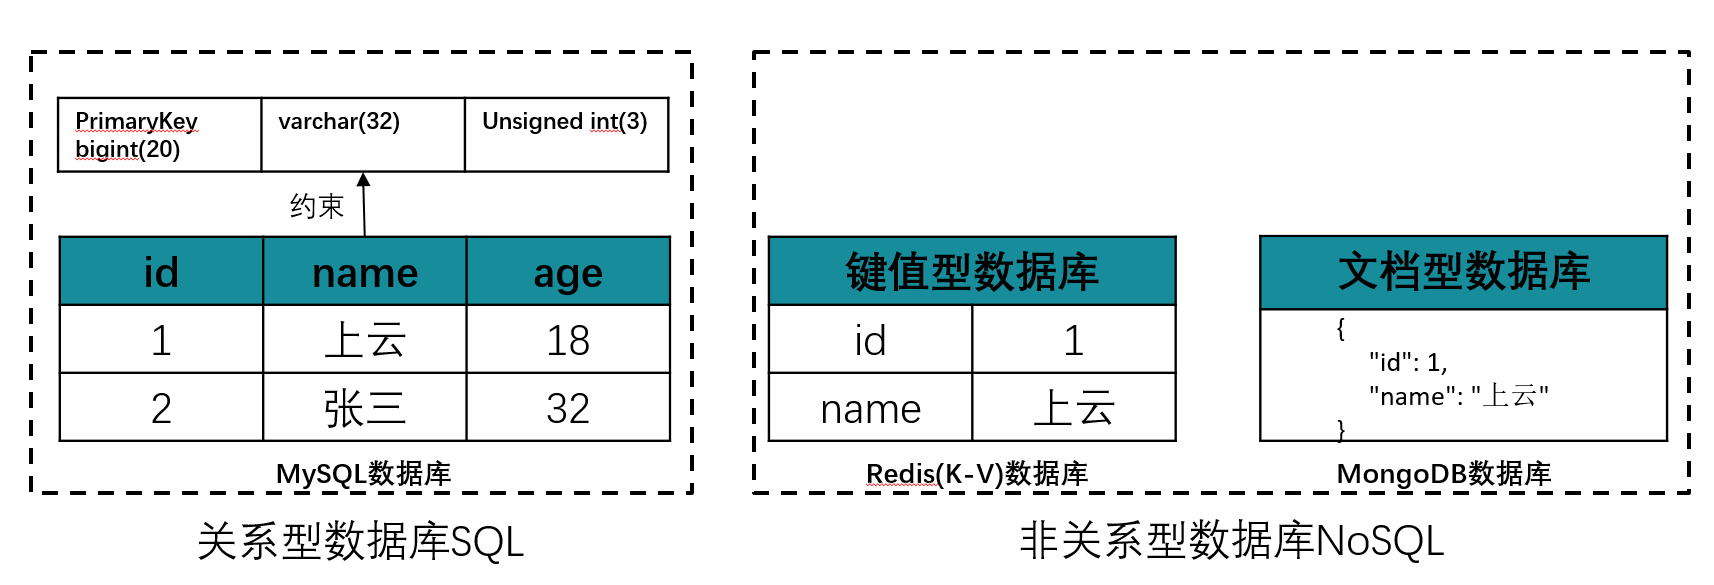
1.认识NoSQL
NoSQL最常见的解释是“non-relational”,“Not Only SQL”也被很多人接受。NoSQL仅仅是一个概念,泛指非关系型的数据库,区别于关系数据库,它不保证关系数据的ACID特性。
1.1关系型与非关系型对比
传统关系型数据库数据存储是结构化的,每一张表都有严格的约束信息;而对于NoSQL数据库没有严格的约束信息,数据存储自由松散。
结构化是指每一张表都有严格的约束信息。比如很受企业欢迎的MySQL数据库,每一列都由字段名,字段数据类型,字段约束等信息构成,数据插入必须遵守这些约束和规范。
非结构化是存储数据没有固定的字段名称,没有固定的长度、没有字段约束的存储格式。非结构化存储的常见类型有:键值型、文档存储型、图存储型数据库。
2.常见应用场景存在问题
2.1常见应用场景
- 社交场景:
- 存储用户与好友间聊天消息
- 存储朋友圈海量数据
- 搜索附近的人
- 电商场景:
- 查询快递位置
- 金融场景:
- 查询用户征信信息
- 查询用户运营商数据

2.2常见应用场景特点
- 数据量大
- 读写操作频繁
- 价值较低的数据,对事务性要求低
2.3产生问题
这些应用场景产生了”三高”问题:
- High performance - 对数据库高并发读写的需求。
- Huge Storage - 对海量数据的高效率存储和访问的需求。
- High Scalability && High Availability- 对数据库的高可扩展性和高可用性的需求。
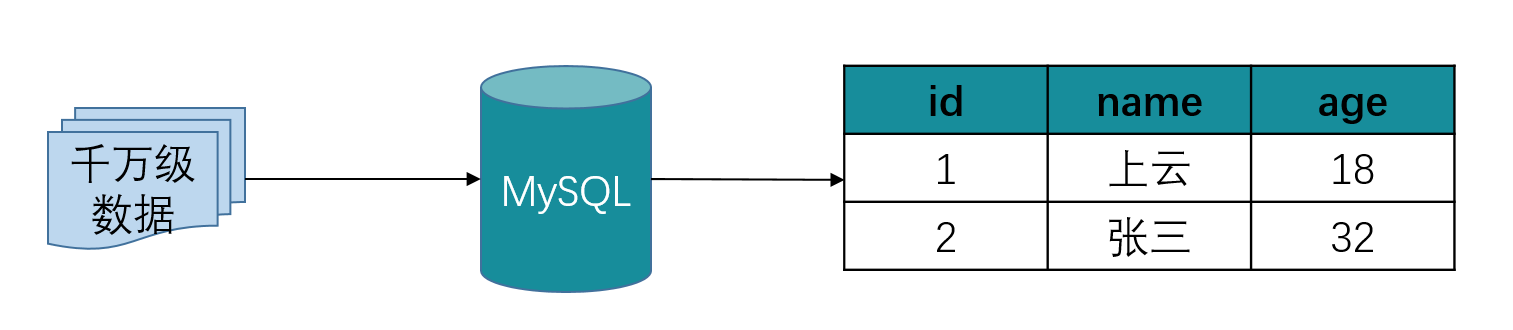
2.4三高问题解决方式
-
千万级数据量,单机MySQL服务就很香
-
上亿数量级,使用MySQL分库分表解决
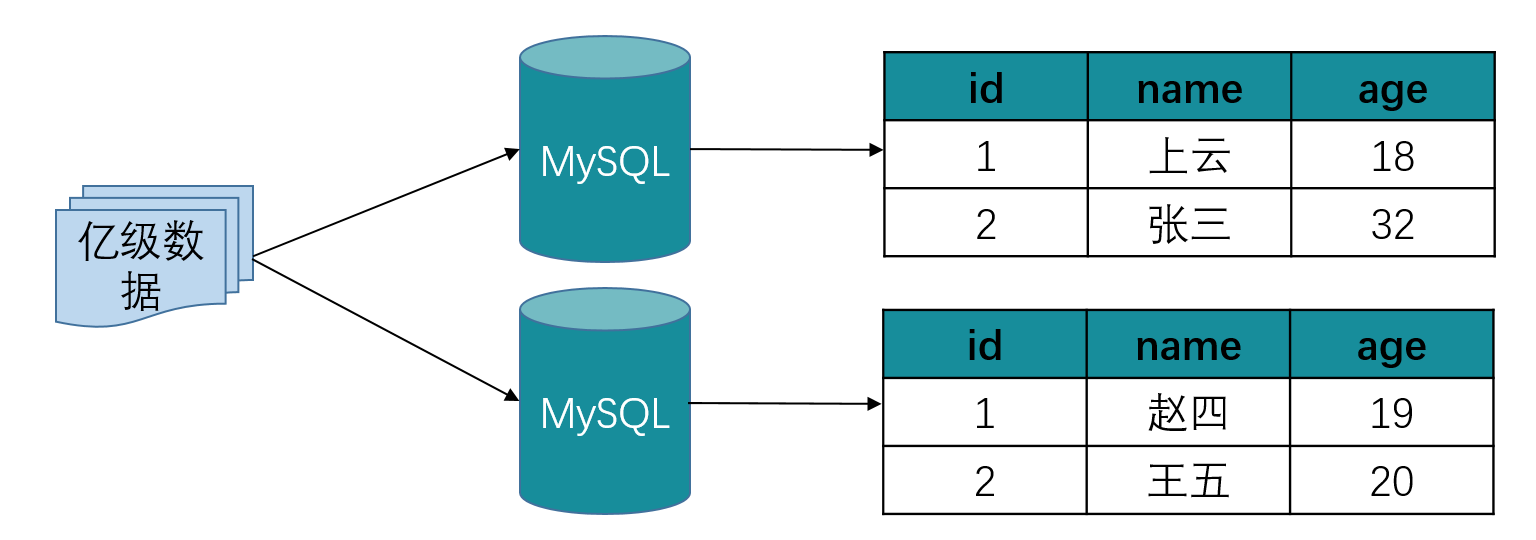
分库分表解决存在运维复杂,拓展不方便的问题,那有没有一种更高效、更低成本的技术来解决呢?答案是有的,使用MongoDB就可以很好解决这一问题。
3.MongoDB概述
MongoDB是基于分布式文件存储的数据库,是一个开源、高性能、无模式的文档型数据库,是一个介于关系数据库和非关系数据库之间的产品,是非关系数据库当中功能最丰富,最像关系数据库的。
3.1MongoDB与MySQL对比
- 结构上
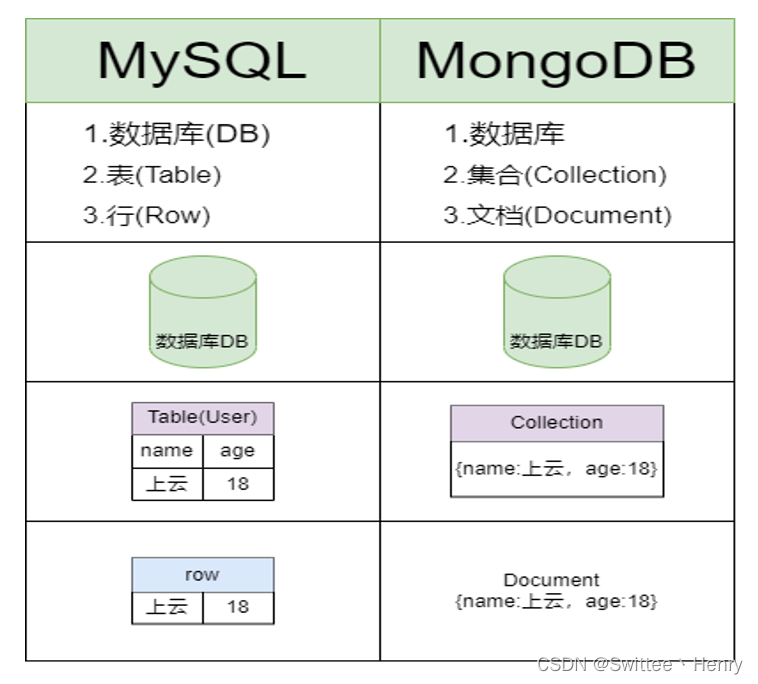
-
数据查询上
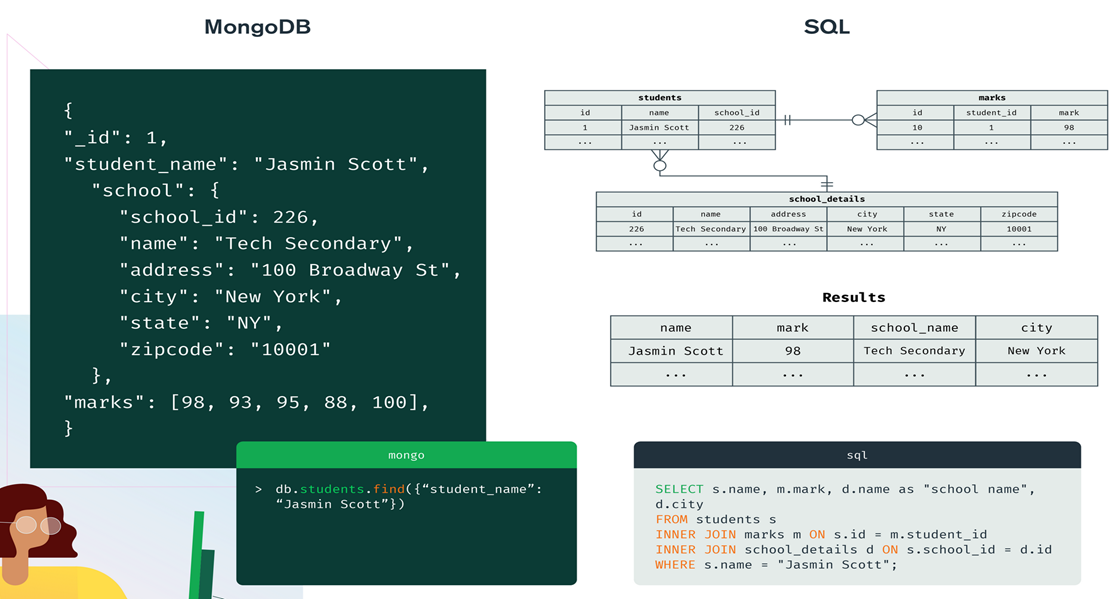
-
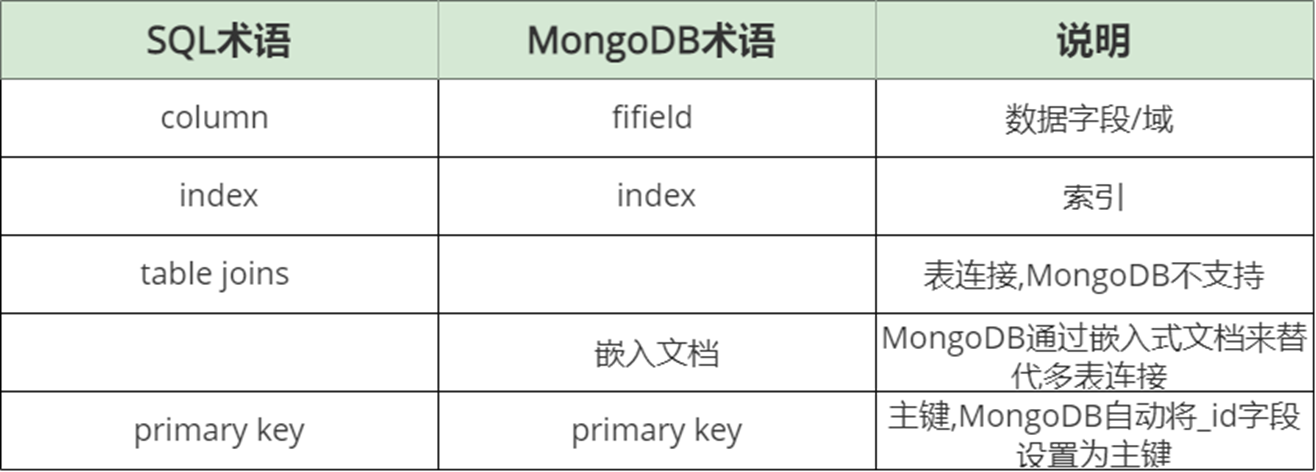
术语上
3.2MongoDB数据模型
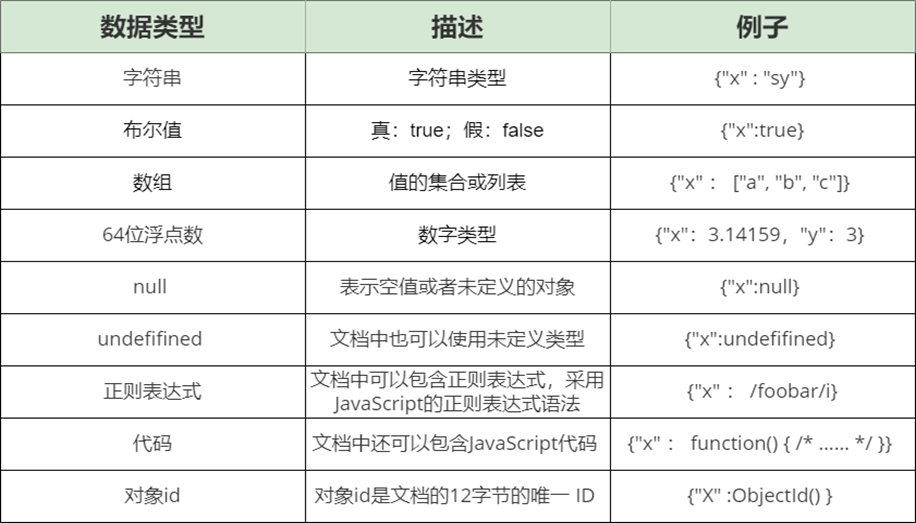
MongoDB的最小存储单位就是文档(document)对象。文档(document)对象对应于关系型数据库的行。数据在MongoDB中以 BSON(Binary-JSON)文档的格式存储在磁盘上。BSON和JSON一样,支持内嵌的文档对象和数组对象,但是BSON有JSON没有的一些数据类型,如定义代码。
BSON数据类型参考列表:
3.3MongoDB特点
-
高性能
- MongoDB提供高性能的数据持久性
- 对嵌入式数据模型的支持减少了数据库系统上的I/O活动
- 支持索引查询,并且可以包含来自嵌入式文档和数组的键。(文本索引解决搜索的需求、TTL索引解决历史数据自动过期的需求、地理位置索引可用于构建各种 O2O 应用)
-
高可用性
- MongoDB提供了复制功能副本集(replica set),提供自动故障转移
-
高扩展性
- MongoDB提供了水平可扩展性,提供了分片集群功能,能实现服务能力水平扩展,实现海量数据的存储
-
丰富的查询支持
- MongoDB支持丰富的查询语言,支持读和写操作(CRUD),比如数据聚合、文本搜索和地理空间查询等
-
其他特点:如无模式(动态模式)、灵活的文档模型
4.MongoDB单机版安装
4.1下载MongoDB安装包
MongoDB下载地址:https://www.mongodb.com/try/download/community
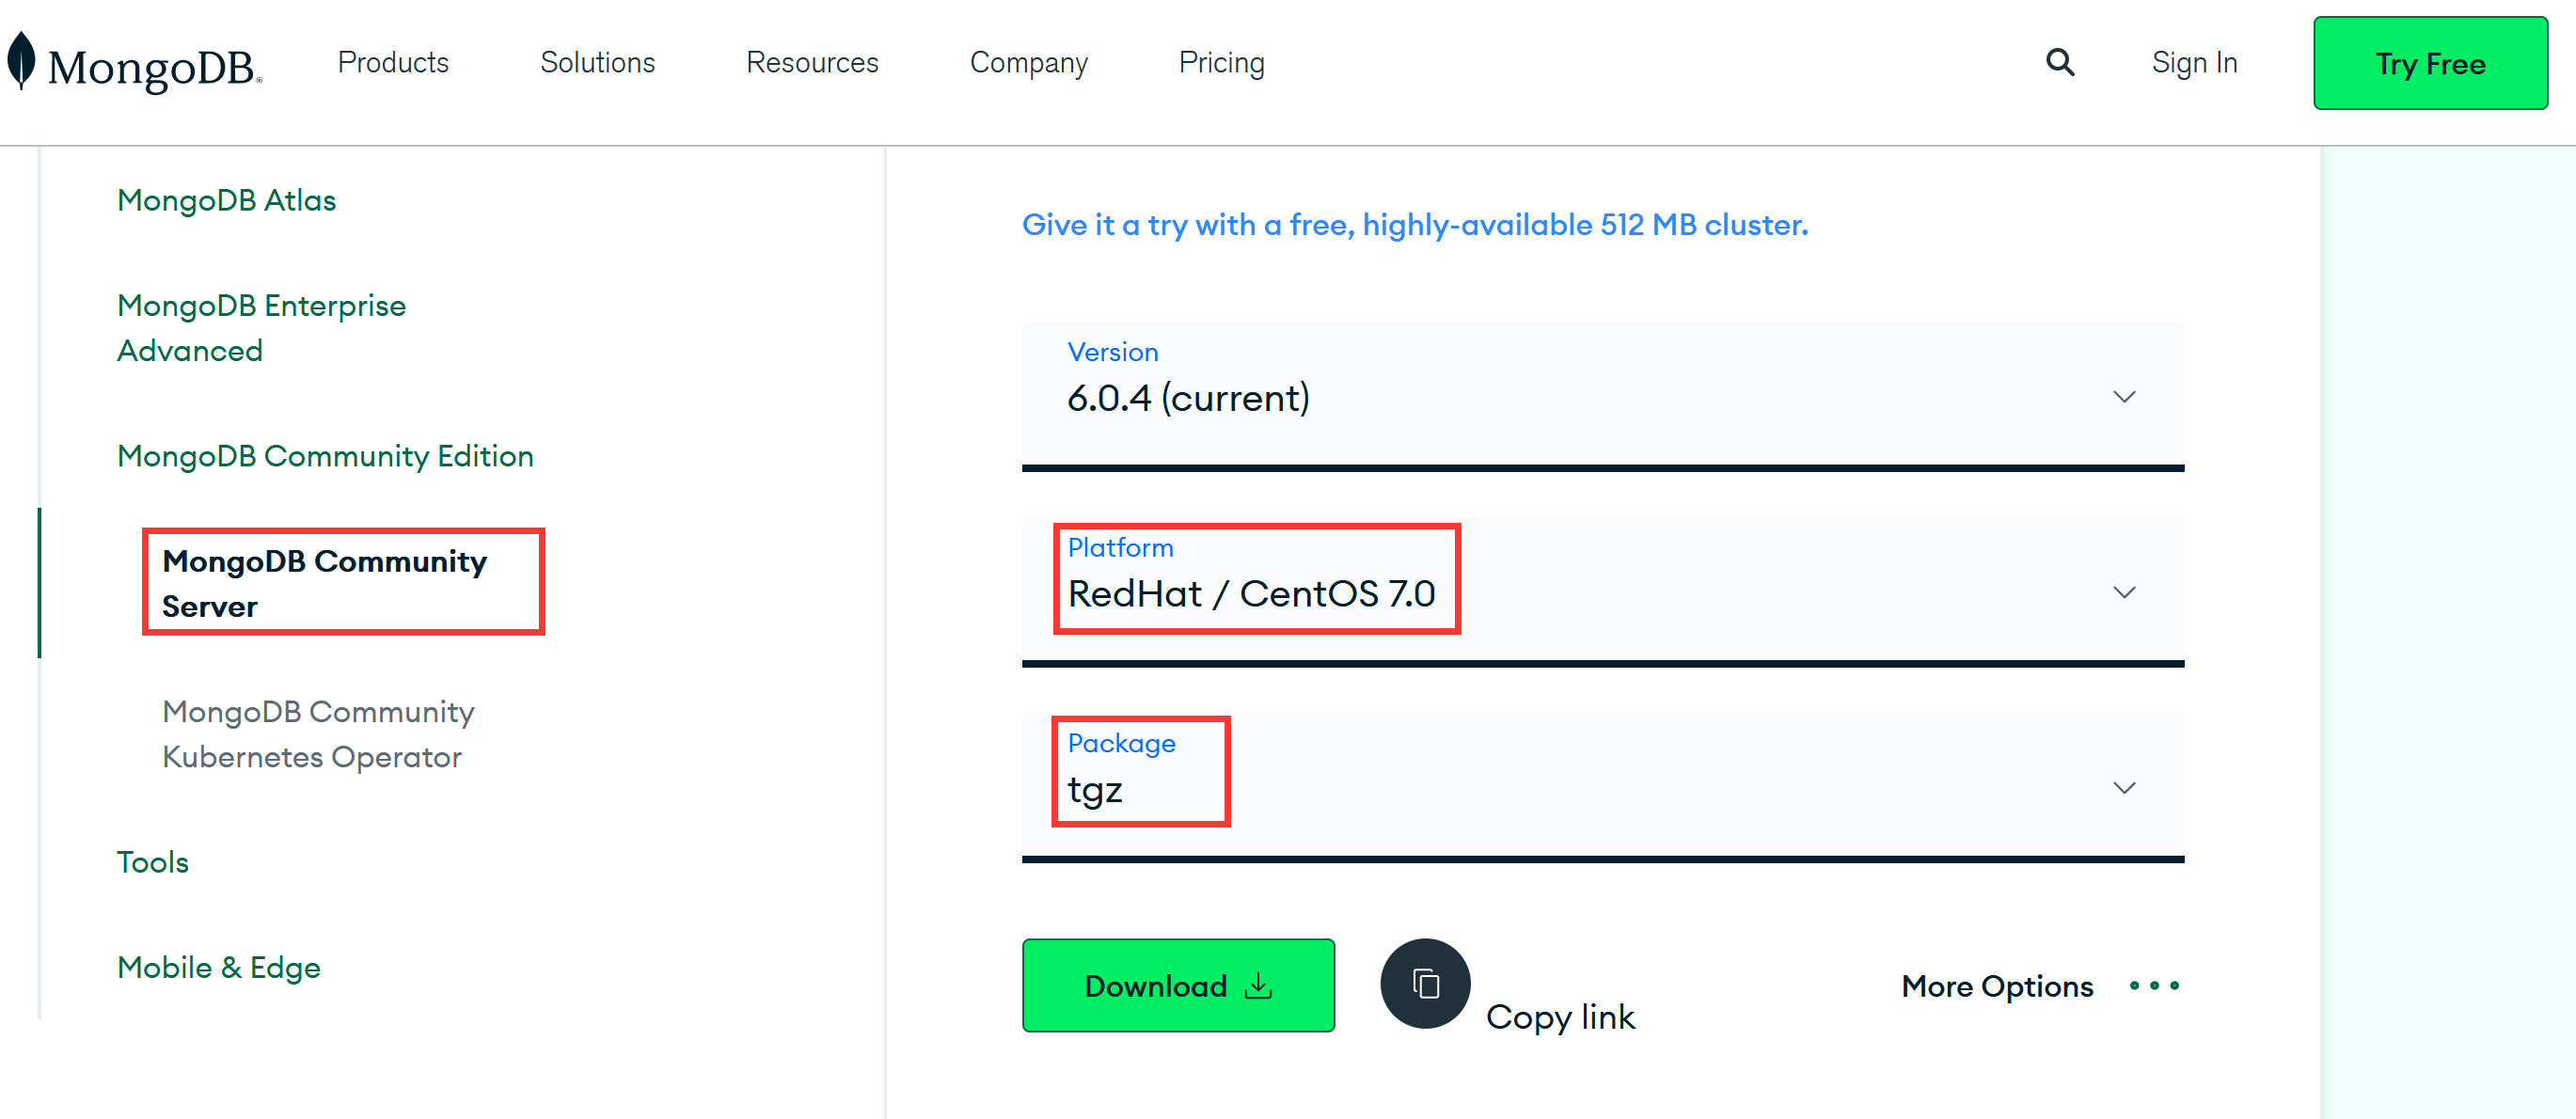
MongoDB的版本命名规范如:x.y.z;
- y为奇数时表示当前版本为开发版,如:1.5.2、4.1.13;
- y为偶数时表示当前版本为稳定版,如:1.6.3、4.0.10;
- z是修正版本号,数字越大越好。

4.2上传解压
-
解压压缩包到指定位置
#解压到刚创建好的目录 tar -xvf mongodb-linux-x86_64-rhel70-6.0.4.tgz -C /usr/local #重命名 mv mongodb-linux-x86_64-rhel70-6.0.4/ ./mongodb -
创建目录存放数据和日志文件
#创建单机版数据存放文件夹 mkdir -p /usr/local/mongodb/single/data/db #创建单机版日志存放文件夹 mkdir -p /usr/local/mongodb/single/log -
创建配置文件
vim /usr/local/mongodb/single/mongod.conf -
配置文件内容如下
systemLog:
  #MongoDB发送所有日志输出的目标指定为文件
  #The path of the log file to which mongod or mongos should send all diagnostic logging information
  destination: file
  #mongod或mongos应向其发送所有诊断日志记录信息的日志文件的路径
  path: "/usr/local/mongodb/single/log/mongod.log"
  #当mongos或mongod实例重新启动时,mongos或mongod会将新条目附加到现有日志文件的末尾。
  logAppend: true
storage:
  #mongod实例存储其数据的目录。storage.dbPath设置仅适用于mongod。
  ##The directory where the mongod instance stores its data.Default Value is "/data/db".
  dbPath: "/usr/local/mongodb/single/data/db"
  journal:
    #启用或禁用持久性日志以确保数据文件保持有效和可恢复。
    enabled: true
processManagement:
  #启用在后台运行mongos或mongod进程的守护进程模式。
  fork: true
net:
  #服务实例绑定的IP,默认是localhost
  bindIp: 192.168.222.135
  #bindIp
  #绑定的端口,默认是27017
  port: 27017
4.3安装MongoDB Shell
下载地址:https://www.mongodb.com/try/download/shell
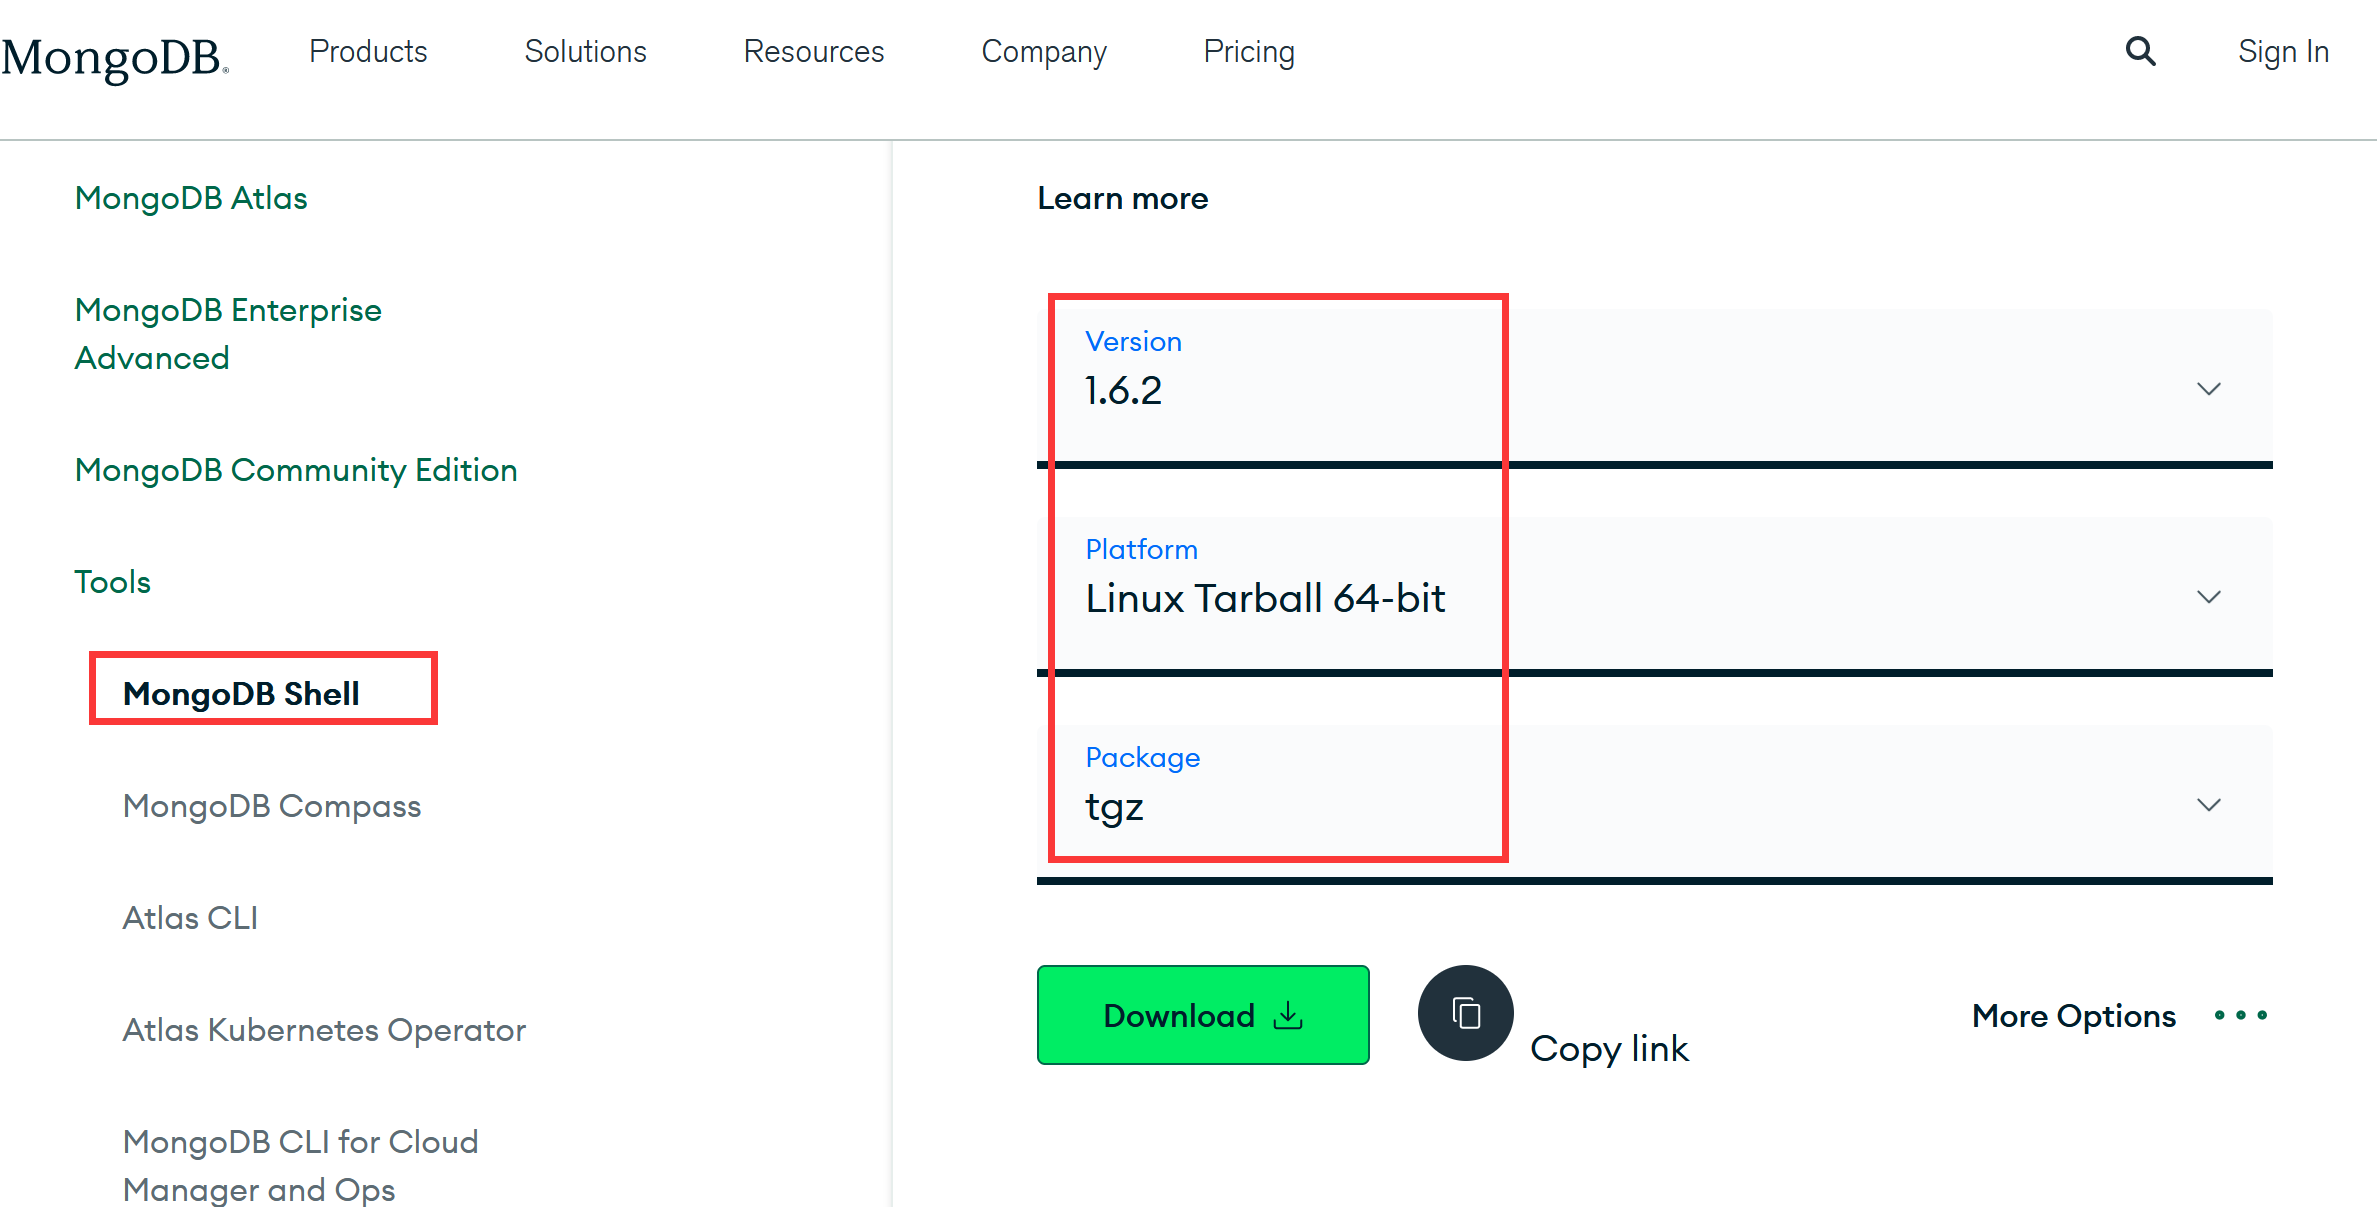
-
上传解压
tar -xvf mongosh-1.6.2-linux-x64.tgz -C /usr/local/ #重命名 mv mongosh-1.6.2-linux-x64/ mongosh -
添加命令到环境变量
vim ~/.bash_profile#添加值如下 PATH=$PATH:$HOME/bin:/usr/local/mongodb/bin:/usr/local/mongosh/bin -
重新加载环境变量
source ~/.bash_profile
4.4启动MongoDB服务
-
命令
/usr/local/mongodb/bin/mongod -f /usr/local/mongodb/single/mongod.conf -
查看是否启动成功
ps -ef|grep mongodb
-
开放端口方便windows远程访问
firewall-cmd --zone=public --add-port=27017/tcp --permanent
firewall-cmd --reload
4.5Shell 连接 MongoDB服务
-
通过mongosh 连接到 MongoDB连接
#默认连接到 mongodb:localhost:27017 mongosh #或者指定ip + port mongosh --host=192.168.222.135 --port=27017 -
查看所有数据库
show databases -
退出
test> exit
#或者按两次 ctrl + c
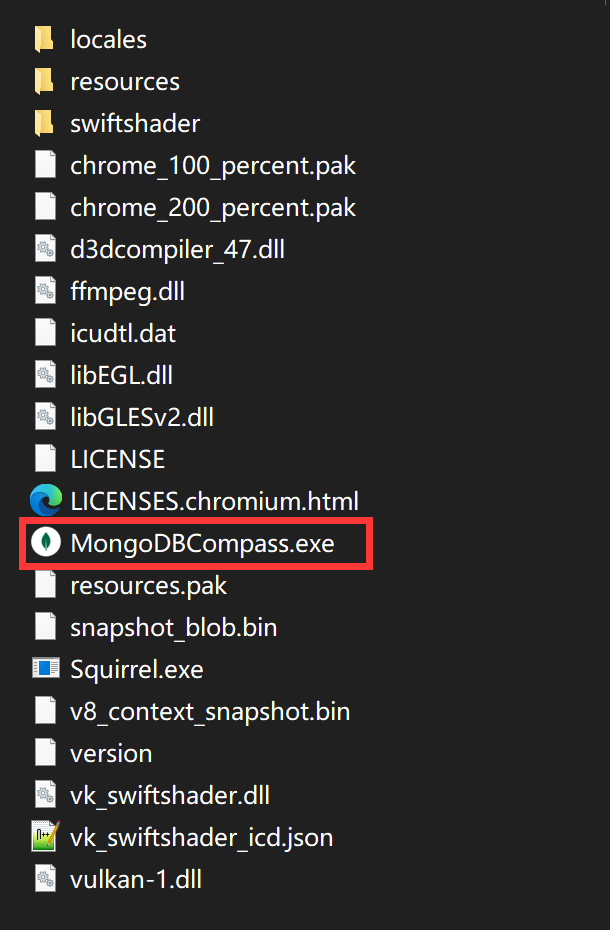
4.4compass客户端
- 下载MongoDB客户端连接工具 https://www.mongodb.com/try/download/compass
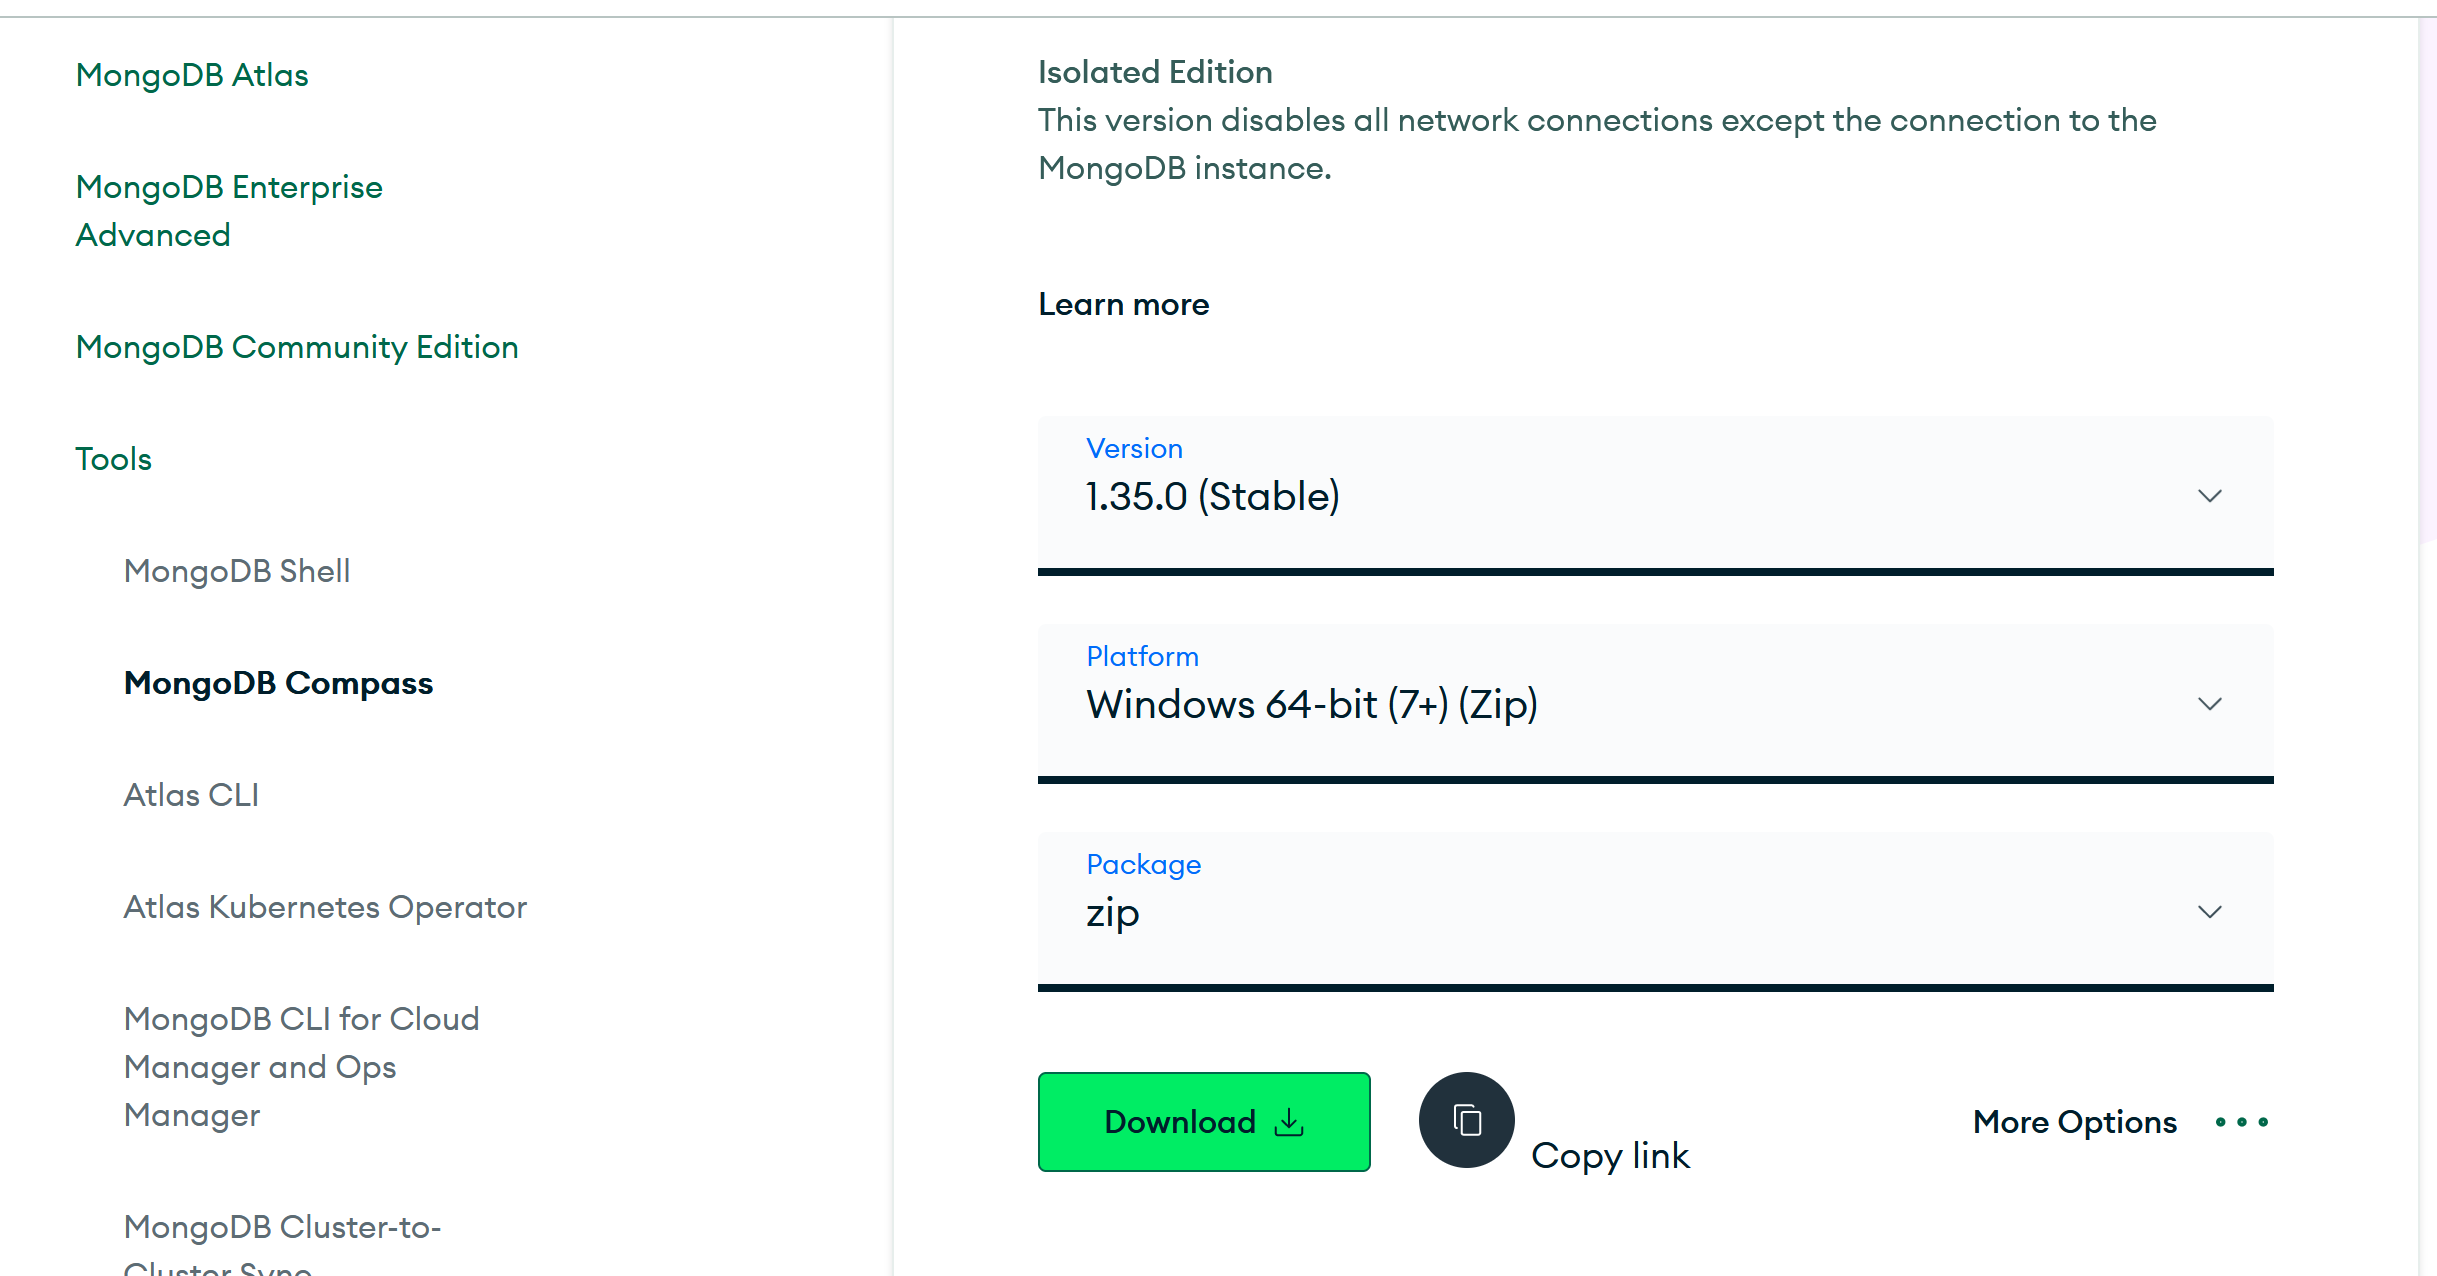
- 运行客户端
二、MongoDB CRUD操作
1.数据库操作
-
查看所有数据库
show dbs
或
show databases
默认数据库说明:
- ① admin 管理每个数据库用户名密码,权限相关。
- ② config 使用分片的时候保存分片相关信息。
- ③ local 集合不会被复制,用来存储本地单台服务器的任意集合。
-
选择和创建数据库
use 数据库名称注:如果数据库不存在,则新建,只有插入内容之后,才会真正创建数据库
-
查看正在使用的数据库
db注:MongoDB 中默认的数据库为 test,如果你没有选择数据库,集合将存放在 test 数据库中
-
删除数据库
db.dropDatabase()(主要用来删除已经持久化的数据库)
2.集合操作
-
显示创建集合
db.createCollection(“name”)name 表示集合名称
-
查看当前数据库中的集合
show collections show tables -
隐示创建集合
#向一个集合中插入一个文档的时候,如果集合不存在,则会自动创建集合 -
删除集合
db.集合.drop()
#删除成功返回 true
3.文档CRUD
3.1新增操作
-
插入单个文档
db.collection.insertOne()db.sytest.insertOne({"name":"sy"})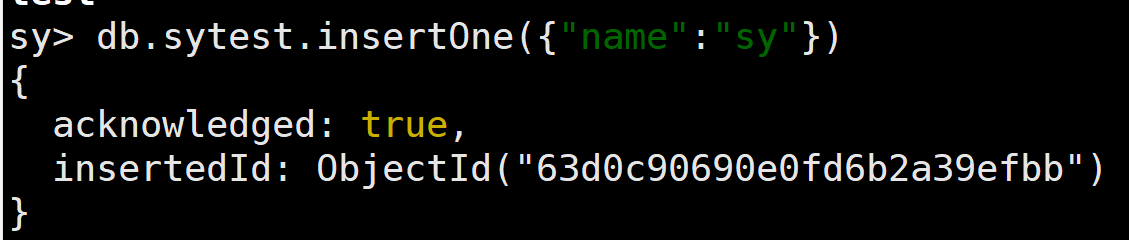
-
插入多个文档
db.collection.insertMany([])db.sytest.insertMany([{"name":"sy"},{"name":"zs"}])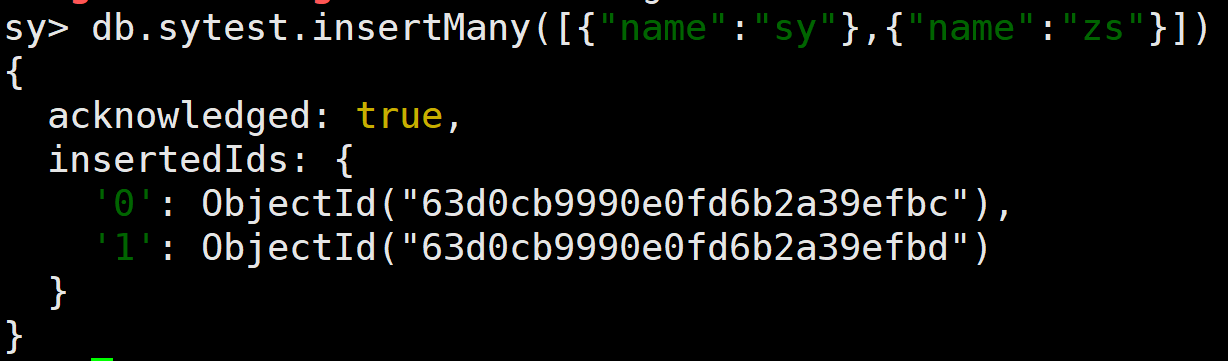
3.2查询操作
先添加数据进 mongoDB 中
db.sytest.insertMany([
   { item: "journal", qty: 25, size: { h: 14, w: 21, uom: "cm" }, status: "A" },
   { item: "notebook", qty: 50, size: { h: 8.5, w: 11, uom: "in" }, status: "A" },
   { item: "paper", qty: 100, size: { h: 8.5, w: 11, uom: "in" }, status: "D" },
   { item: "planner", qty: 75, size: { h: 22.85, w: 30, uom: "cm" }, status: "D" },
   { item: "postcard", qty: 45, size: { h: 10, w: 15.25, uom: "cm" }, status: "A" }
]);
-
全部查询
db.collection.find({}) -
条件查询
-
等值查询 { : , … } 只需要在{}中添加查询条件即可
db.sytest.find({"name":"sy"})
-
in 操作
db.sytest.find( { status: { $in: [ "A", "D" ] } } ) -
and 操作
db.sytest.find( { status: "A", qty: { $lt: 30 } } )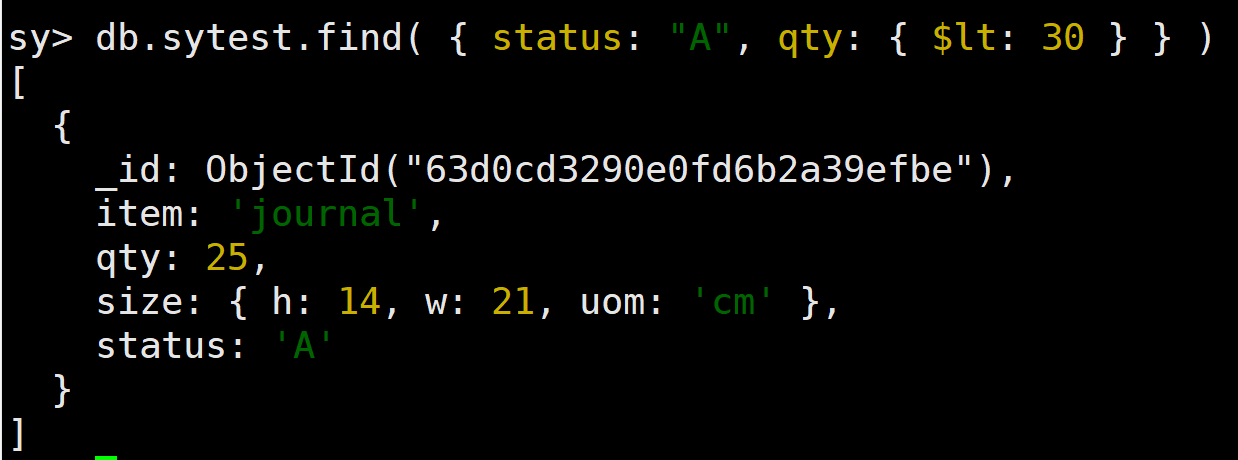
-
or 操作
db.sytest.find( { $or: [ { status: "A" }, { qty: { $lt: 30 } } ] } ) -
同时使用AND和OR条件
db.sytest.find( { status: "A", $or: [ { qty: { $lt: 30 } }, { item: /^p/ } ] } ) -
查询只想要返回部分数据字段
db.sytest.find({ status: "A", $or: [{ qty: { $lt: 30 } }, { item: /^p/ }] },{item:1,size:1,_id:0})
-
3.3更新操作
-
全覆盖修改
db.sytest.replaceOne({_id:ObjectId("63d0cb9990e0fd6b2a39efbc")},{qty:NumberInt(1)})
-
局部修改
db.sytest.updateOne({_id:ObjectId("63d0cb9990e0fd6b2a39efbc")},{$set:{qty:222}})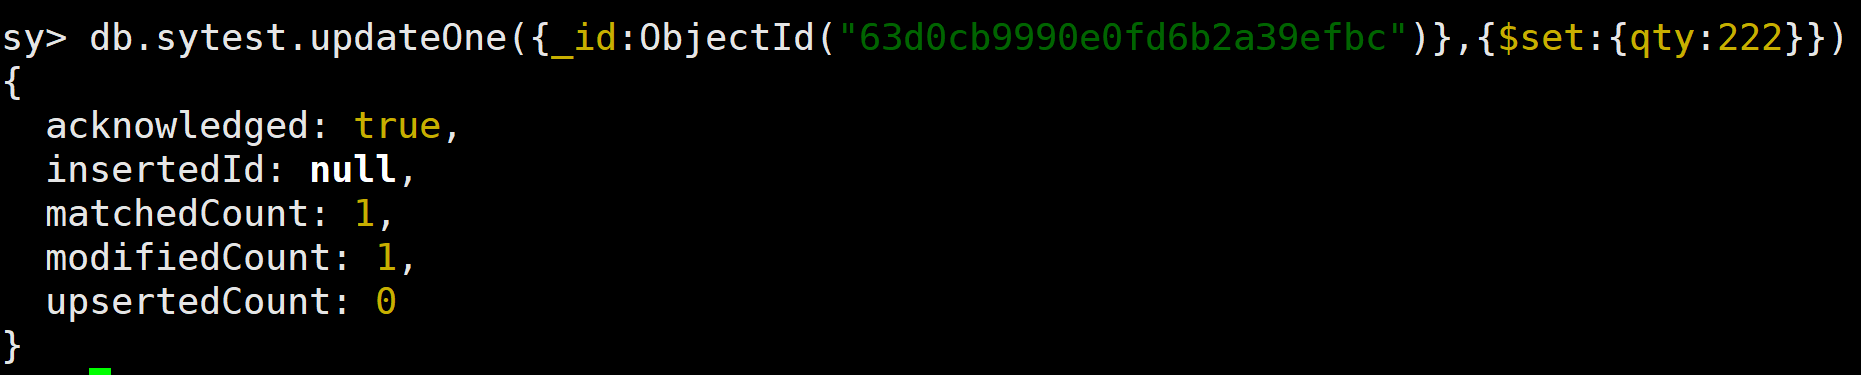

-
更新多个文档
db.sytest.updateMany(
  { "qty": { $gt: 100 } },
  {
      $set: { "size.uom": "in", status: "P" },
      $currentDate: { lastModified: true }
  }
)
-
列值增长操作
db.sytest.updateOne({_id:ObjectId("63d0cb9990e0fd6b2a39efbc")},{$inc:{qty:1}})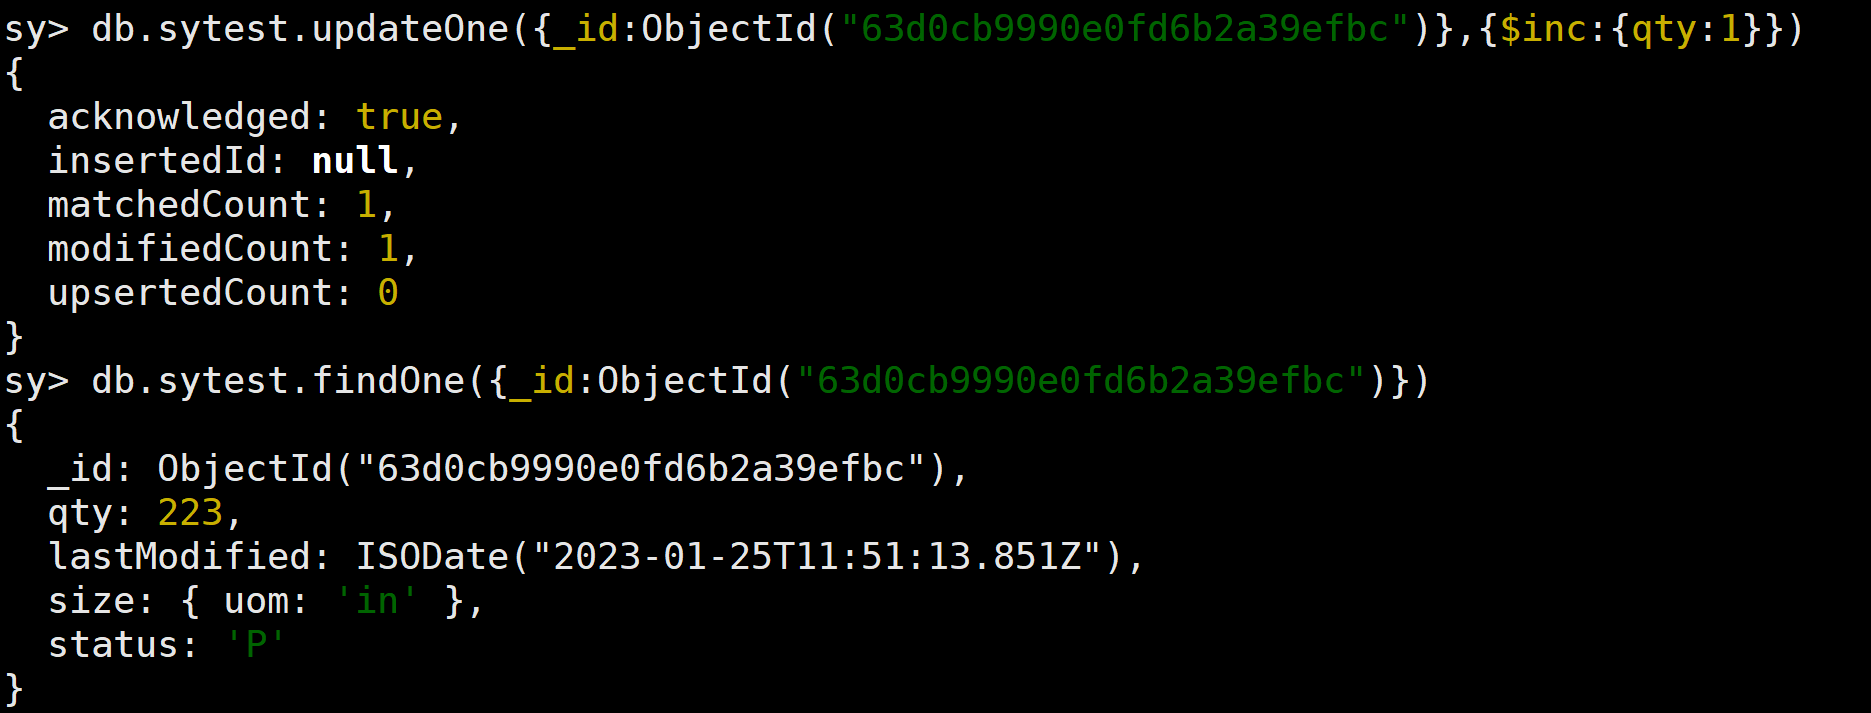
3.4删除操作
-
删除一个文档(注意:哪怕条件匹配多个也只删除一个)
db.sytest.deleteOne({_id:ObjectId("63d0cb9990e0fd6b2a39efbc")})
-
删除多个文档
db.sytest.deleteMany({item:"postcard"})
-
删除满足条件的文档
db.sytest.remove({status:"D"})
3.5分页操作
-
查询总条数
db.sytest.countDocuments() -
带条件查询总条数
db.sytest.countDocuments({status:"A"})
-
分页查询:使用limit做过滤操作,skip 跳过某些条数
db.COLLECTION_NAME.find().limit(NUMBER).skip(NUMBER)-
每页查询2条
db.sytest.find().limit(2)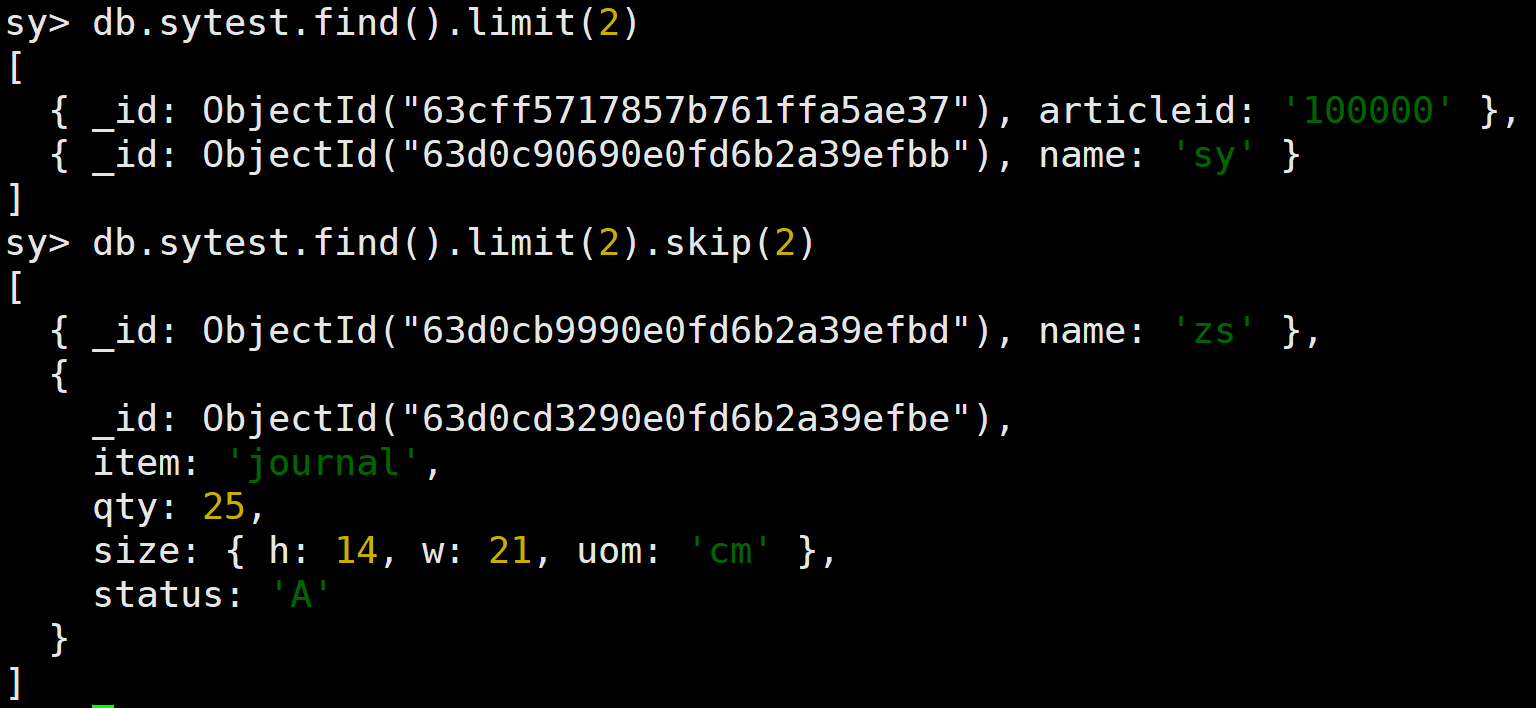
-
3.6排序操作
-
排序查询
#升序 db.sytest.find().sort({qty:1}) #降序 db.sytest.find().sort({qty:-1}) -
注意:skip()、 limilt()、 sort()三个放在一起执行的时候,执行的顺序是先 sort(), 然后是 skip(),最后是显示的 limit(),和命令编写顺序无关。
3.7模糊查询
-
正则查询
db.集合.find({字段:/正则表达式/}) -
查询名字是z开头的
db.sytest.find({name:/^z/})
-
查询名字包含s的
db.sytest.find({name:/s/})
三、索引
1.索引的概述
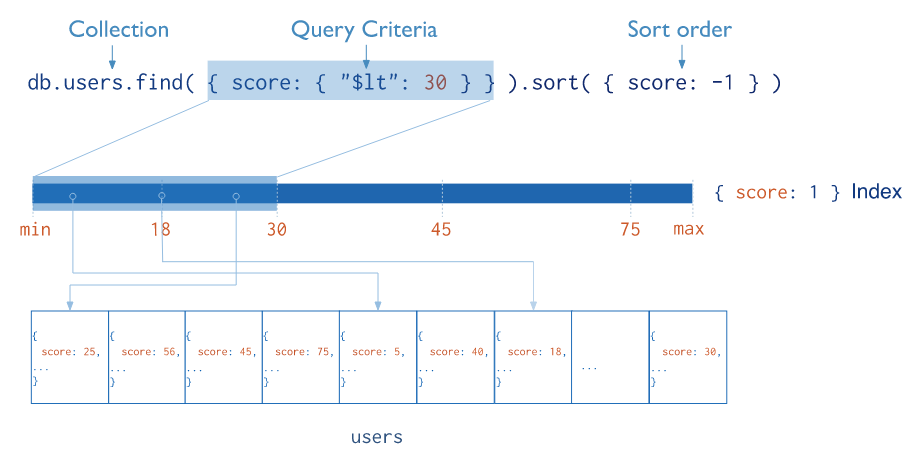
索引支持在MongoDB中有效地执行查询。如果没有索引,MongoDB必须执行集合扫描,即扫描集合中的每个文档,以选择那些与查询语句匹配的文档。如果一个查询存在适当的索引,MongoDB可以使用该索引来限制它必须检查的文档数量。
索引是特殊的数据结构,它以一种易于遍历的形式存储集合数据集的一小部分。MongoDB使用B树数据结构做为索引,索引存储一个或一组特定字段的值,按字段的值排序。索引项的排序支持有效的相等匹配和基于范围的查询操作。此外,MongoDB可以通过使用索引中的排序返回排序后的结果。
可以参见官方下图:
db.student.find({name:"sy"},{_id:0,name:1})
默认的Id索引。在创建集合期间,MongoDB 在_id字段上创建唯一索引。该索引可以防止客户端插入两个具有相同值的文档。你不能将 _id字段上的index删除。
索引分类:
- 单字段索引
- 复合索引
- 多键索引
- 地理空间索引
- 文本索引
- Hashed索引
2.索引的基本操作
2.1查看索引
-
查看sytest集合中的索引信息
db.sytest.getIndexes()
MongoDB在创建集合的过程中,在 _id 字段上创建一个唯一的索引,默认名字为 id ,该索引可防止客户端插入两个具有相同值的文档,您不能在_id字段上删除此索引。
2.2创建索引
-
给qty建立索引(对应的值1表示升序,-1表示降序)
db.sytest.createIndex({qty:1})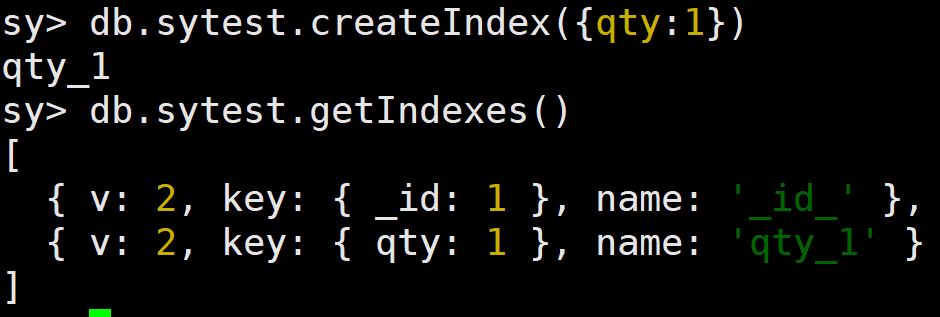
2.3创建复合索引
-
按照item升序,按照status降序建立索引(Compound索引)
db.sytest.createIndex({userid:1,nickname:-1})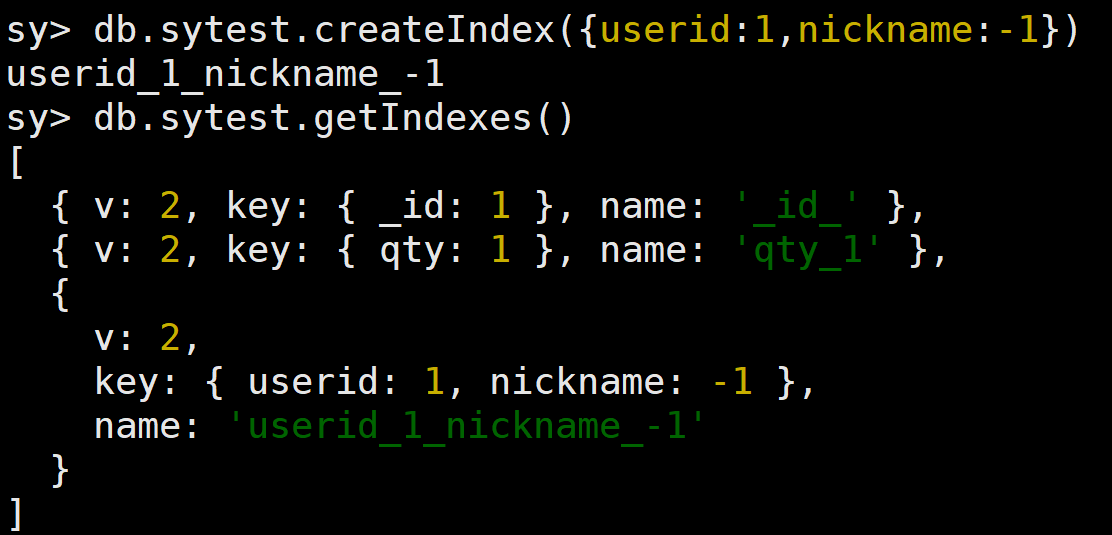
2.4删除索引
-
具体索引删除
-
db.collection.dropIndex(index)
-
删除索引qty
db.sytest.dropIndex({qty:1})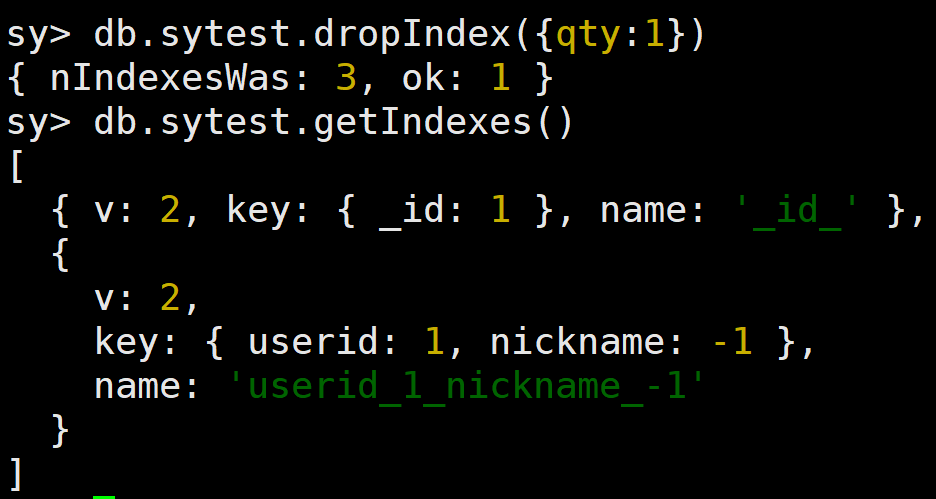
-
-
删除全部索引
-
db.collection.dropIndexes()
-
删除sytest中全部索引
db.sytest.dropIndexes()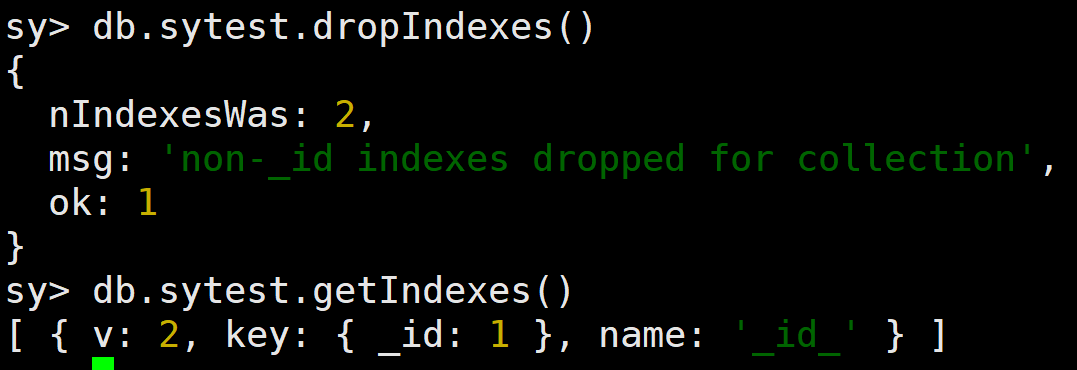
-
注意:_id 索引是不会被删除的
-
3.执行计划
分析查询性能(Analyze Query Performance)通常使用执行计划(解释计划、Explain Plan)来查看查询的情况,如查询耗费的时间、是否基于索引查询等。
3.1explain
-
查看某条查询执行计划
-
db.collection.find(query,options).explain(options)
-
根据name:sy来查询一条信息**(关键点看: “stage” : “COLLSCAN”, 表示全集合扫描)**
db.sytest.find({"name":"sy"}).explain()sy> db.sytest.find({"name":"sy"}).explain() { explainVersion: '1', queryPlanner: { namespace: 'sy.sytest', indexFilterSet: false, parsedQuery: { name: { '$eq': 'sy' } }, queryHash: '64908032', planCacheKey: '64908032', maxIndexedOrSolutionsReached: false, maxIndexedAndSolutionsReached: false, maxScansToExplodeReached: false, winningPlan: { stage: 'COLLSCAN', filter: { name: { '$eq': 'sy' } }, direction: 'forward' }, rejectedPlans: [] }, command: { find: 'sytest', filter: { name: 'sy' }, '$db': 'sy' }, serverInfo: { host: 'rabbit1@localhost', port: 27017, version: '6.0.4', gitVersion: '44ff59461c1353638a71e710f385a566bcd2f547' }, serverParameters: { internalQueryFacetBufferSizeBytes: 104857600, internalQueryFacetMaxOutputDocSizeBytes: 104857600, internalLookupStageIntermediateDocumentMaxSizeBytes: 104857600, internalDocumentSourceGroupMaxMemoryBytes: 104857600, internalQueryMaxBlockingSortMemoryUsageBytes: 104857600, internalQueryProhibitBlockingMergeOnMongoS: 0, internalQueryMaxAddToSetBytes: 104857600, internalDocumentSourceSetWindowFieldsMaxMemoryBytes: 104857600 }, ok: 1 }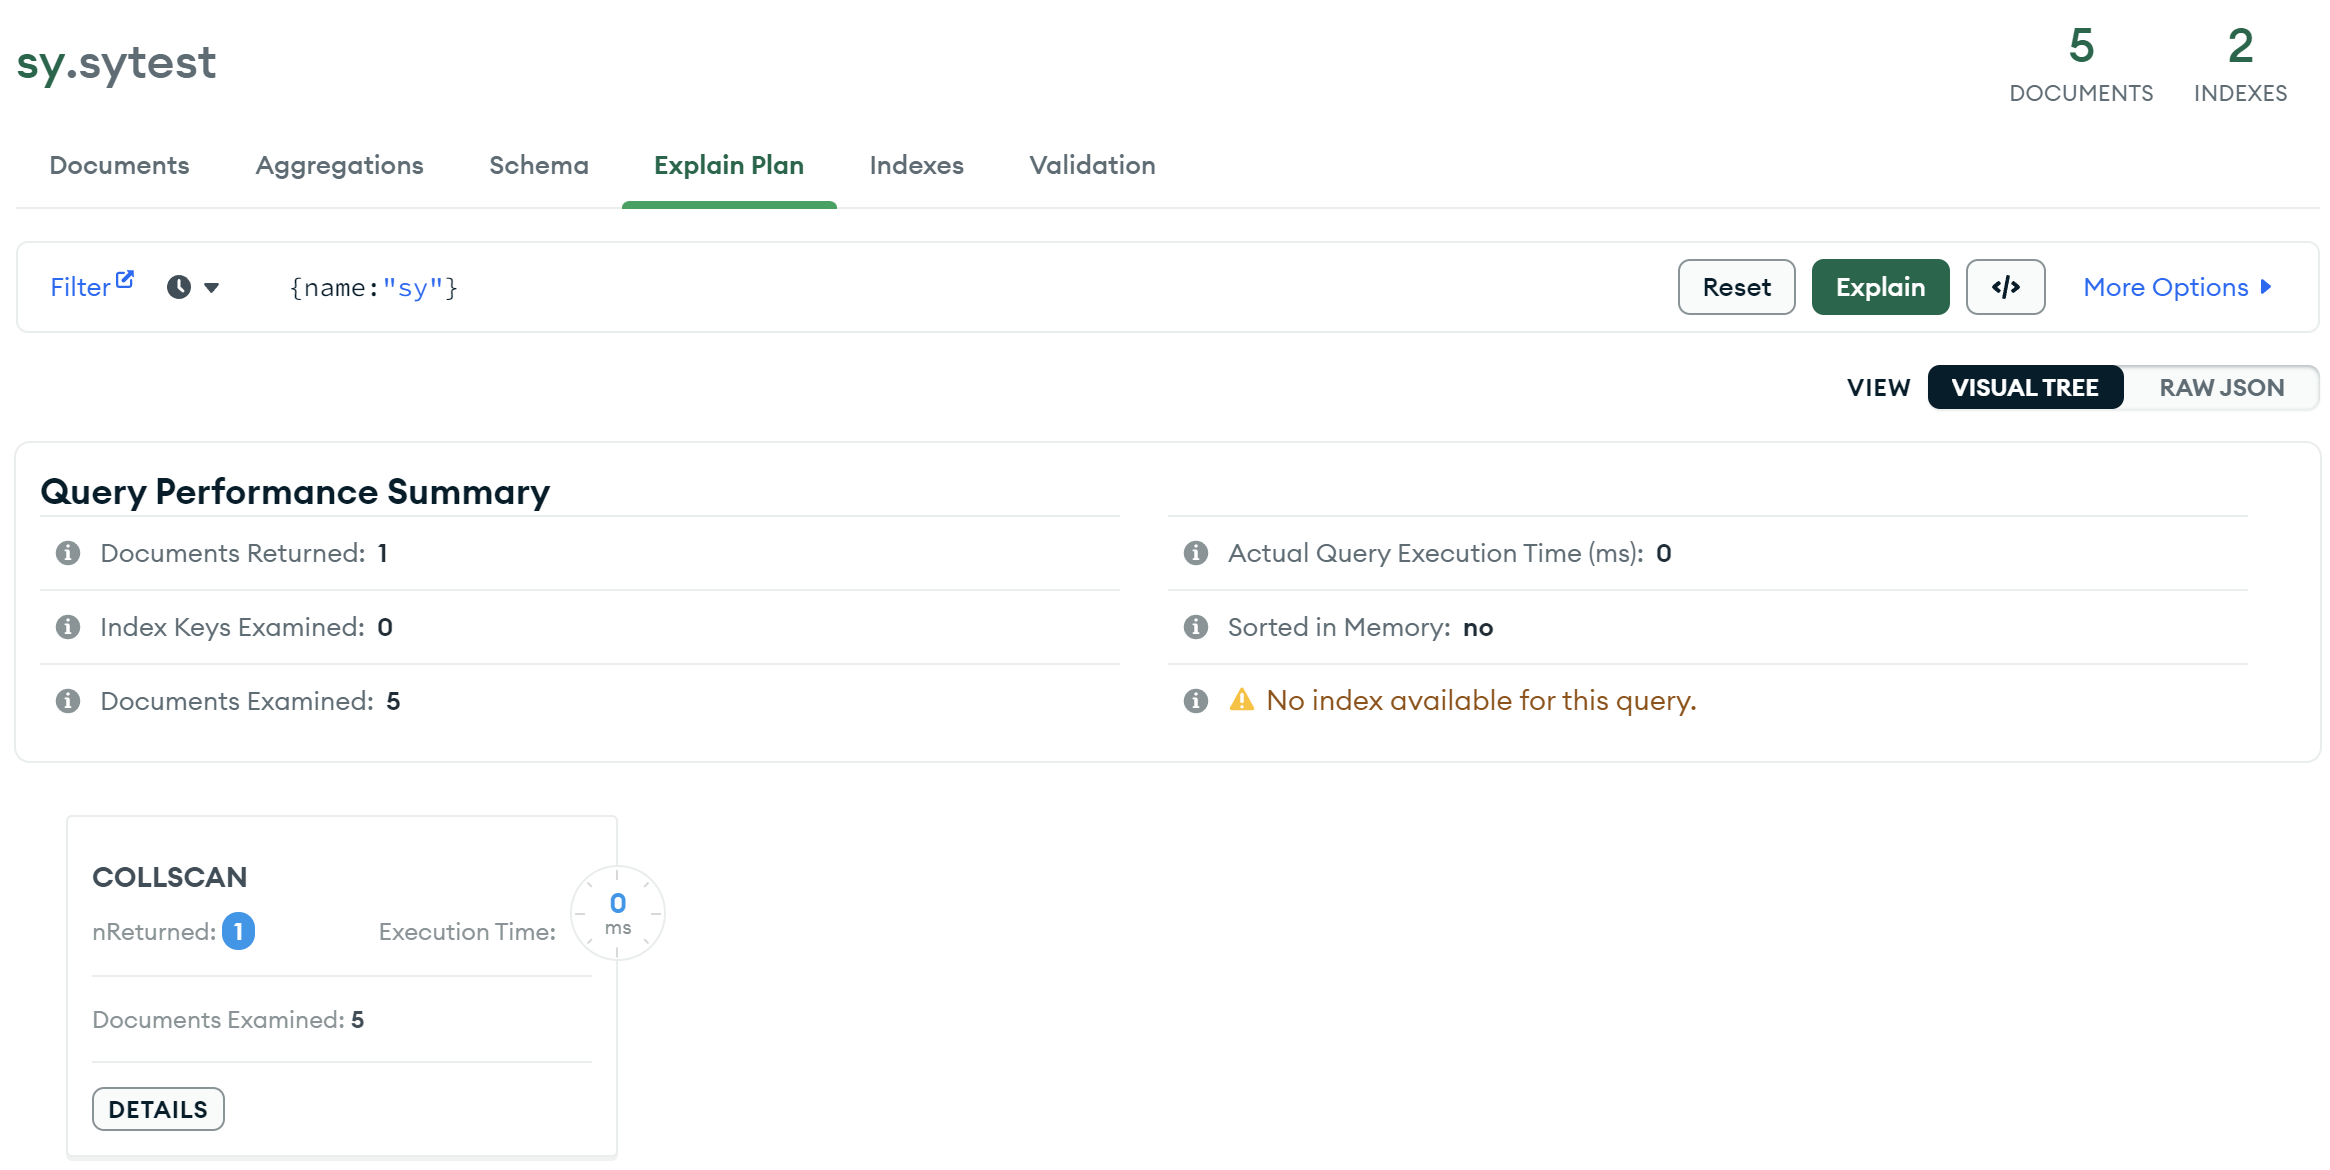
-
3.2建立索引后观察
-
给name建立索引**(关键点看: “stage” : “IXSCAN” ,基于索引的扫描)**
db.sytest.createIndex({name:1})sy> db.sytest.createIndex({name:1}) name_1 sy> db.sytest.find({"name":"sy"}).explain() { explainVersion: '1', queryPlanner: { namespace: 'sy.sytest', indexFilterSet: false, parsedQuery: { name: { '$eq': 'sy' } }, queryHash: '64908032', planCacheKey: 'A6C0273F', maxIndexedOrSolutionsReached: false, maxIndexedAndSolutionsReached: false, maxScansToExplodeReached: false, winningPlan: { stage: 'FETCH', inputStage: { stage: 'IXSCAN', keyPattern: { name: 1 }, indexName: 'name_1', isMultiKey: false, multiKeyPaths: { name: [] }, isUnique: false, isSparse: false, isPartial: false, indexVersion: 2, direction: 'forward', indexBounds: { name: [ '["sy", "sy"]' ] } } }, rejectedPlans: [] }, command: { find: 'sytest', filter: { name: 'sy' }, '$db': 'sy' }, serverInfo: { host: 'rabbit1@localhost', port: 27017, version: '6.0.4', gitVersion: '44ff59461c1353638a71e710f385a566bcd2f547' }, serverParameters: { internalQueryFacetBufferSizeBytes: 104857600, internalQueryFacetMaxOutputDocSizeBytes: 104857600, internalLookupStageIntermediateDocumentMaxSizeBytes: 104857600, internalDocumentSourceGroupMaxMemoryBytes: 104857600, internalQueryMaxBlockingSortMemoryUsageBytes: 104857600, internalQueryProhibitBlockingMergeOnMongoS: 0, internalQueryMaxAddToSetBytes: 104857600, internalDocumentSourceSetWindowFieldsMaxMemoryBytes: 104857600 }, ok: 1 }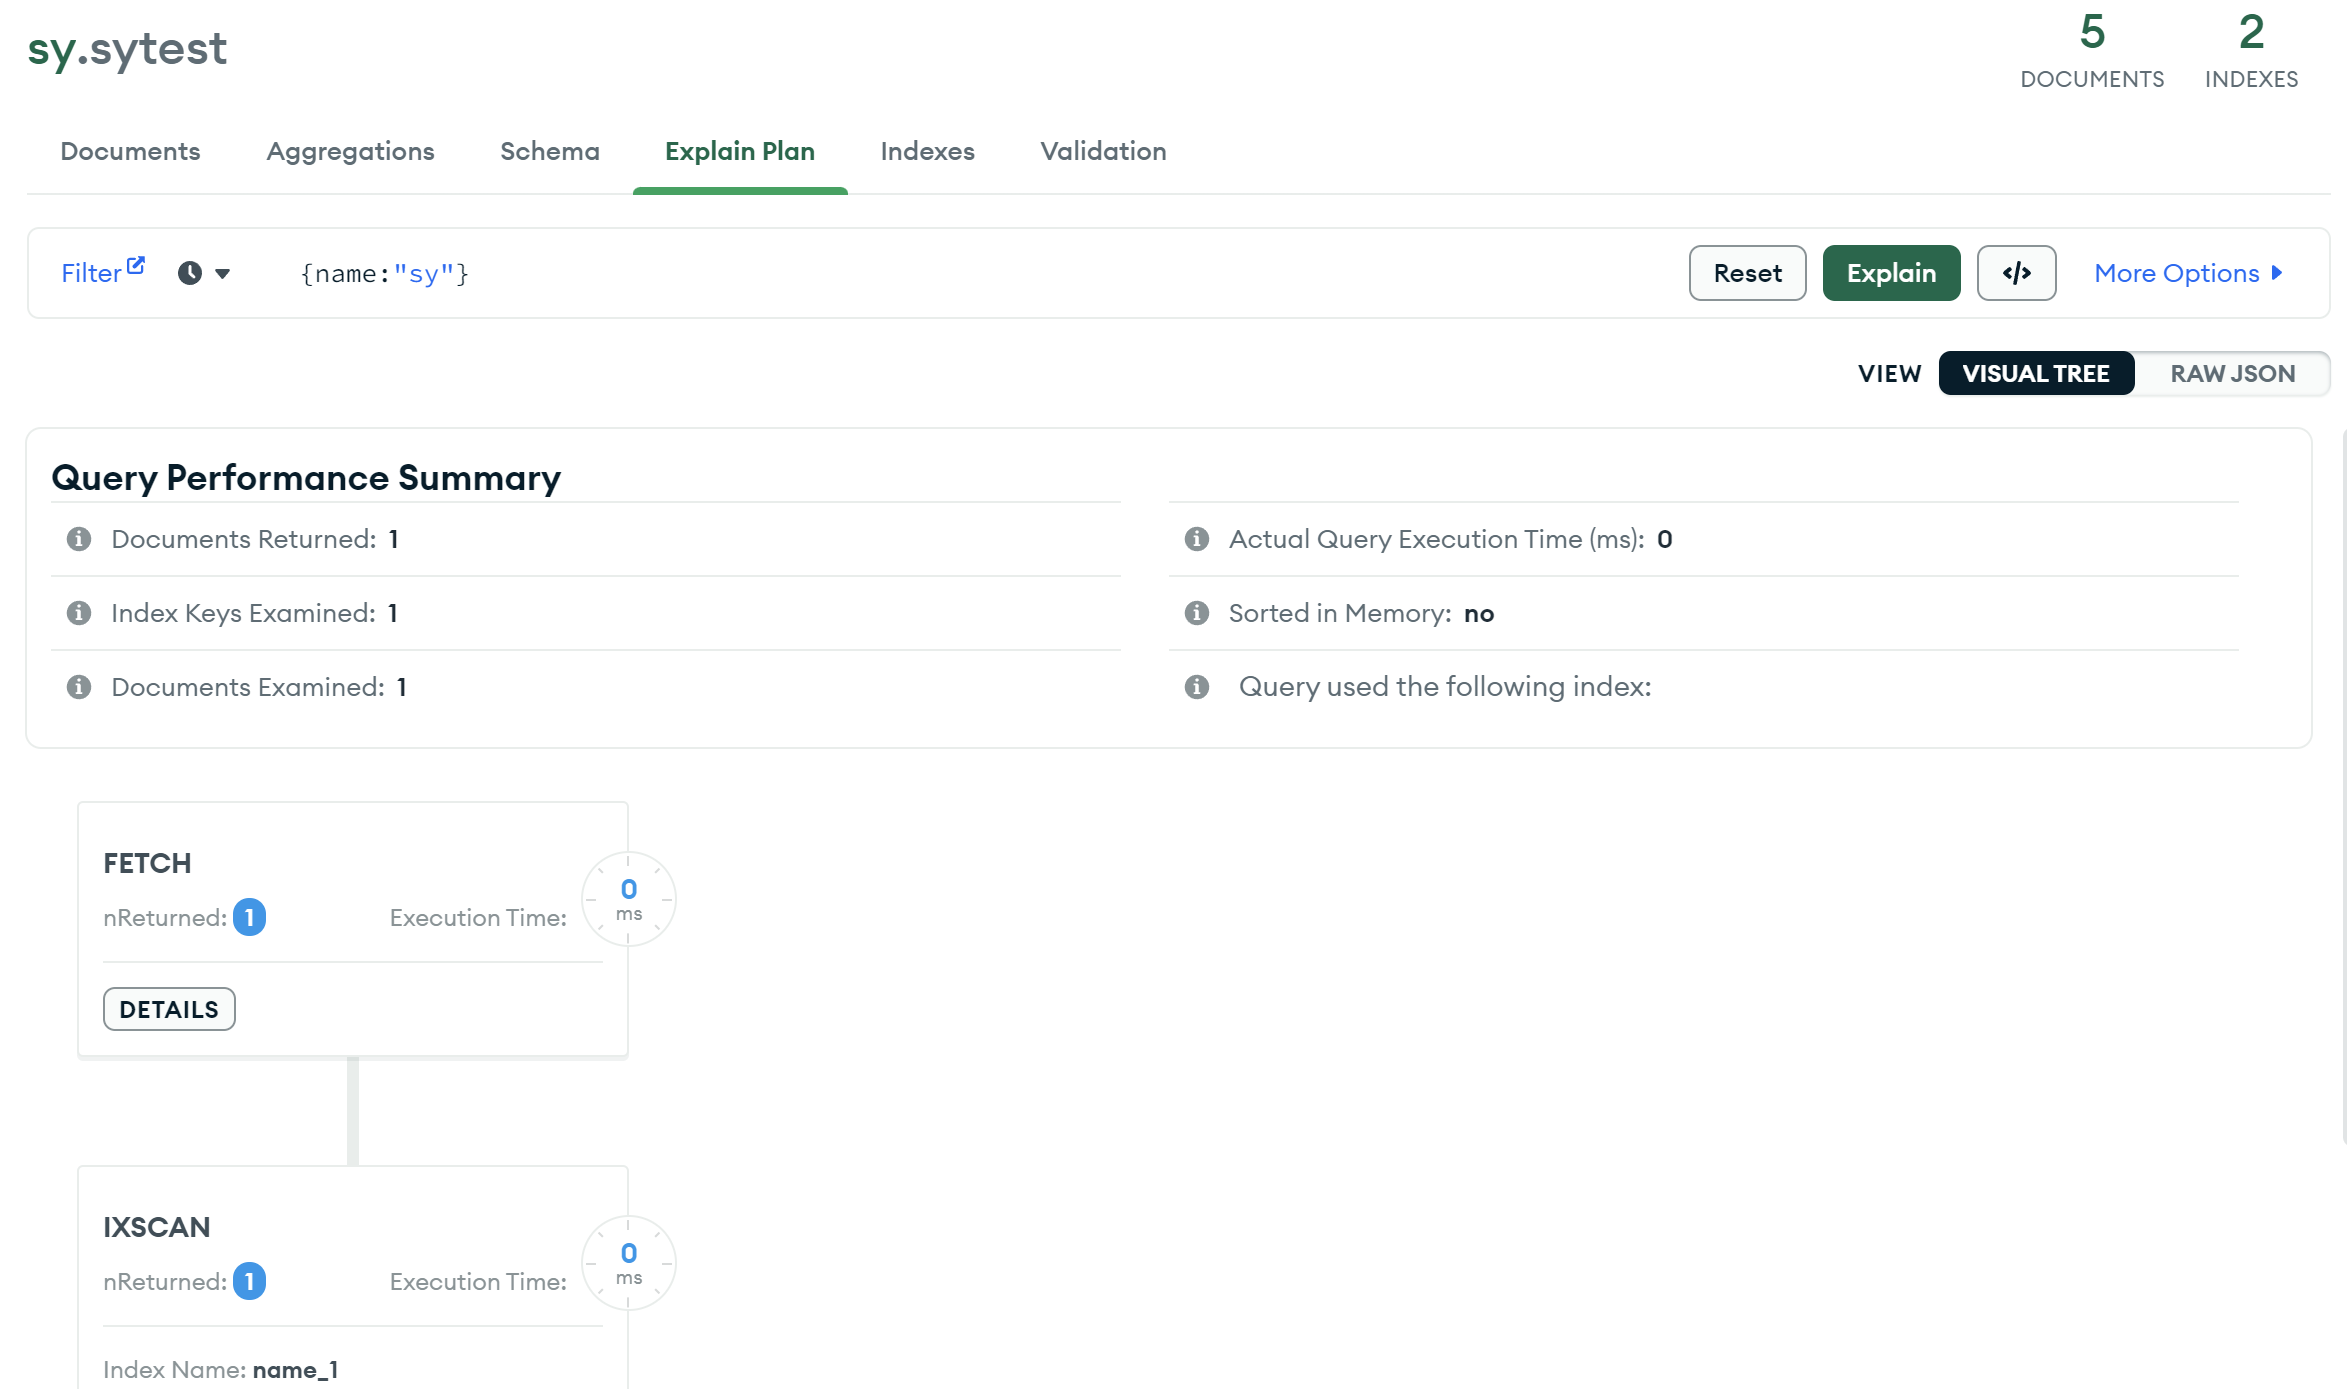
3.3回表查询
Covered Queries 当查询条件和查询的投影仅包含索引字段时,MongoDB直接从索引返回结果,而不扫描任何文档或将文档带入内存。 这些覆盖的查询可以非常有效。
-
查询name:sy 的信息
db.sytest.find({name:"sy"},{name:1,_id:0}).explain()
{
  explainVersion: '1',
  queryPlanner: {
    namespace: 'sy.sytest',
    indexFilterSet: false,
    parsedQuery: { name: { '$eq': 'sy' } },
    queryHash: '4B1D5B79',
    planCacheKey: 'A40C523D',
    maxIndexedOrSolutionsReached: false,
    maxIndexedAndSolutionsReached: false,
    maxScansToExplodeReached: false,
    winningPlan: {
      stage: 'PROJECTION_COVERED',
      transformBy: { name: 1, _id: 0 },
      inputStage: {
        stage: 'IXSCAN',
        keyPattern: { name: 1 },
        indexName: 'name_1',
        isMultiKey: false,
        multiKeyPaths: { name: [] },
        isUnique: false,
        isSparse: false,
        isPartial: false,
        indexVersion: 2,
        direction: 'forward',
        indexBounds: { name: [ '["sy", "sy"]' ] }
      }
    },
    rejectedPlans: []
  },
  command: {
    find: 'sytest',
    filter: { name: 'sy' },
    projection: { name: 1, _id: 0 },
    '$db': 'sy'
  },
  serverInfo: {
    host: 'rabbit1@localhost',
    port: 27017,
    version: '6.0.4',
    gitVersion: '44ff59461c1353638a71e710f385a566bcd2f547'
  },
  serverParameters: {
    internalQueryFacetBufferSizeBytes: 104857600,
    internalQueryFacetMaxOutputDocSizeBytes: 104857600,
    internalLookupStageIntermediateDocumentMaxSizeBytes: 104857600,
    internalDocumentSourceGroupMaxMemoryBytes: 104857600,
    internalQueryMaxBlockingSortMemoryUsageBytes: 104857600,
    internalQueryProhibitBlockingMergeOnMongoS: 0,
    internalQueryMaxAddToSetBytes: 104857600,
    internalDocumentSourceSetWindowFieldsMaxMemoryBytes: 104857600
  },
  ok: 1
}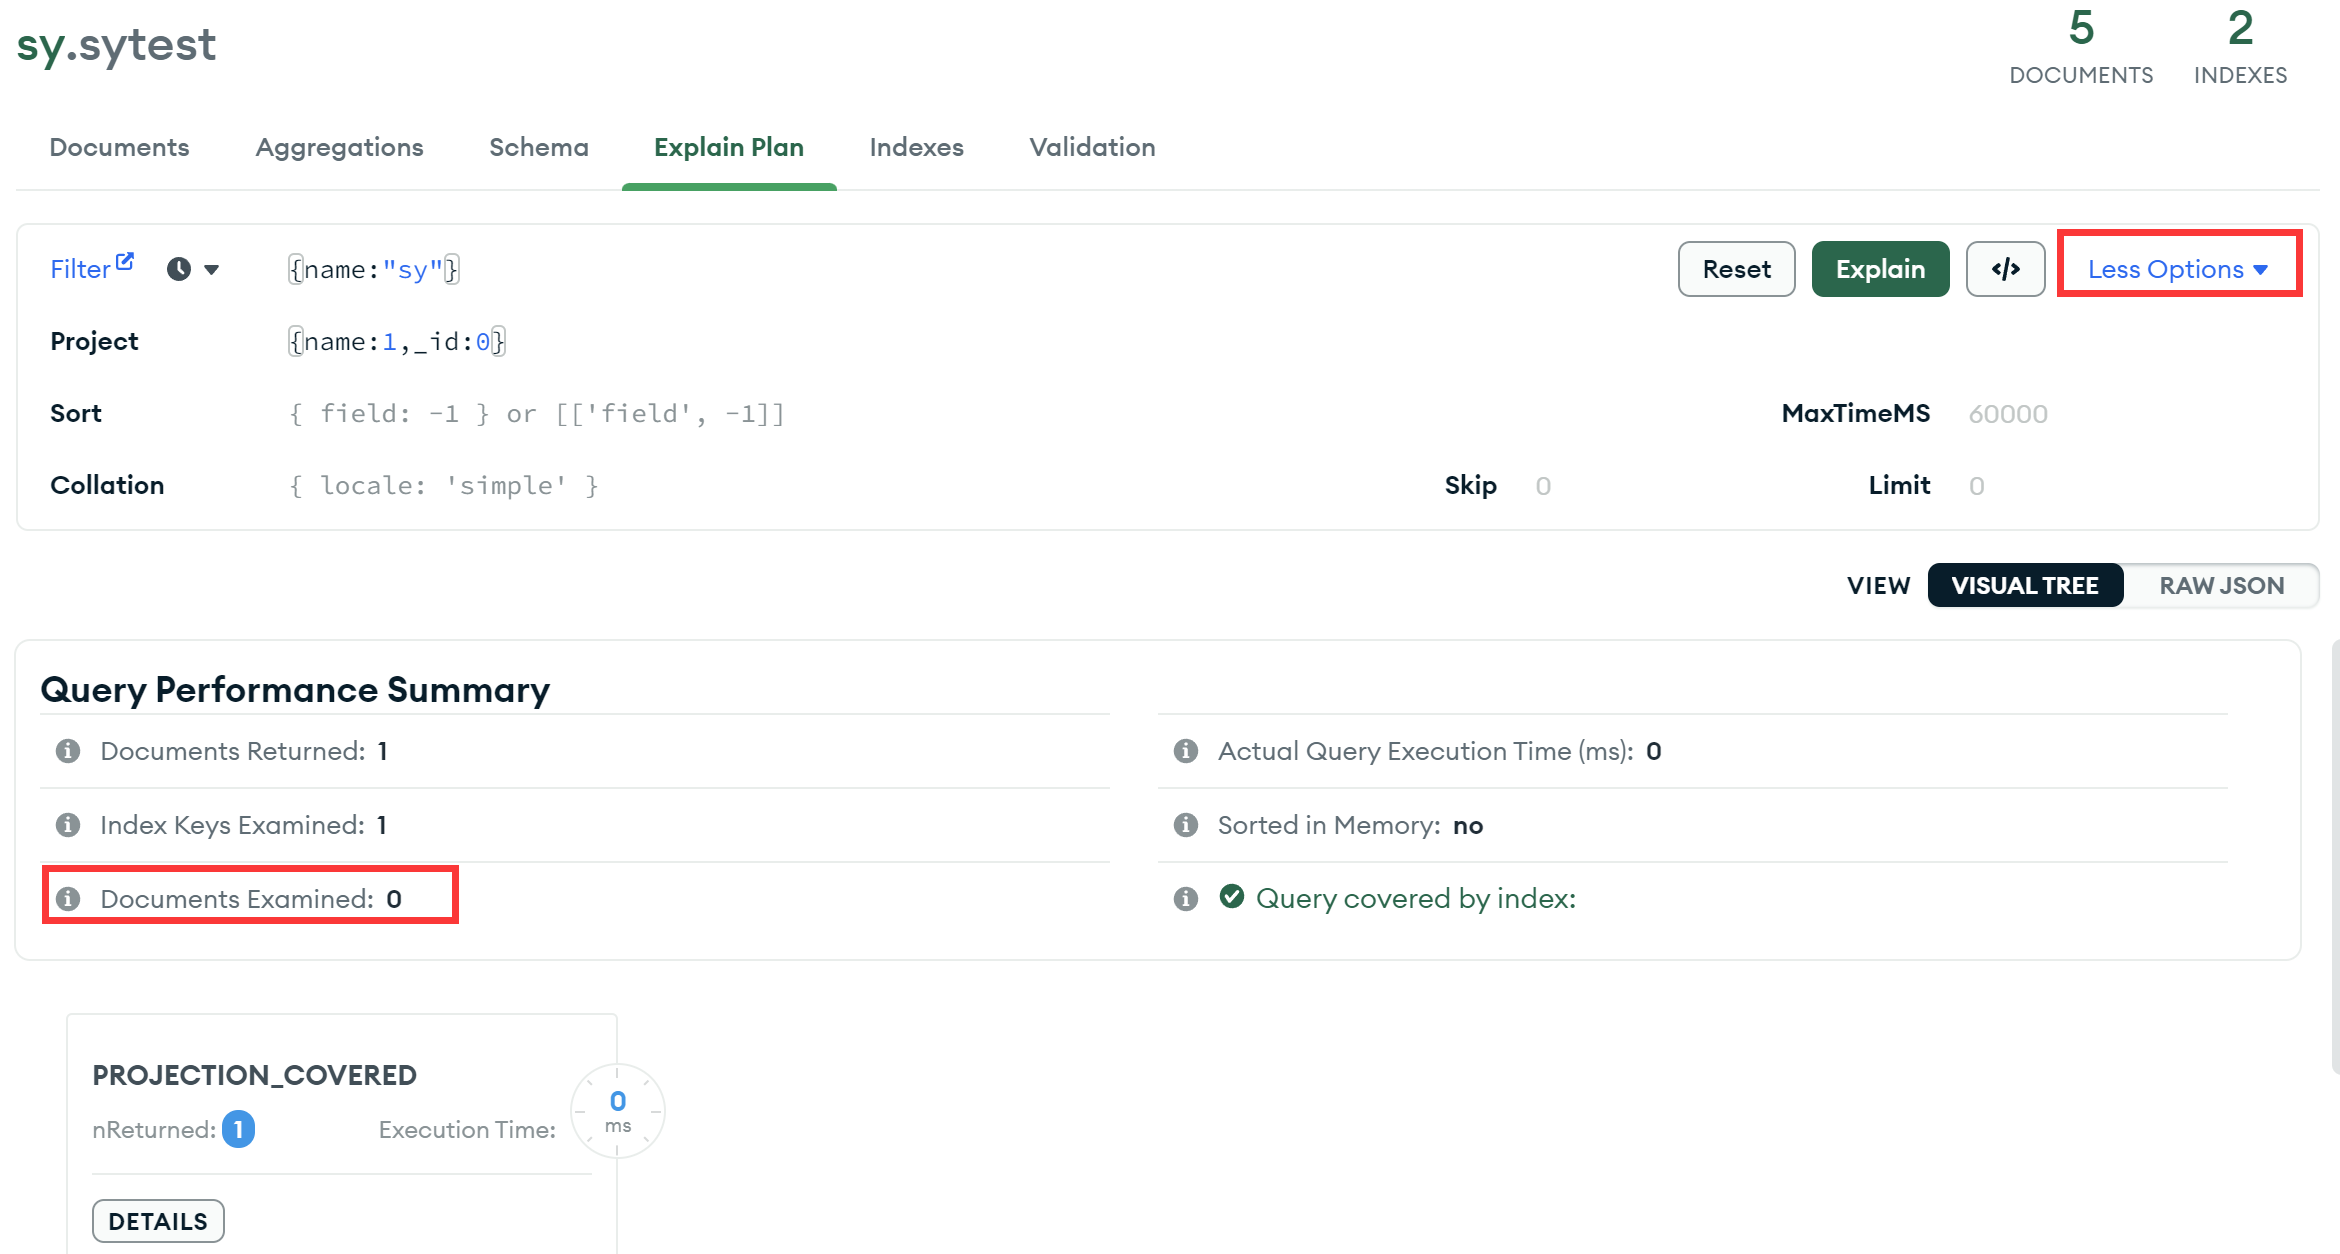
四、SpringBoot整合MongoDB
1.模仿实现知乎文字评论点赞功能
- 单个文章信息
- 文字评论信息
2.需要实现功能点分析
-
基本增删改查
-
根据文章id查询评论信息
-
用户评论点赞
3.表结构设计
-
问题文章表设计
字段名称 字段说明 字段类型 说明 id 文章id String 每一个文章标识 title 文章标题 String content 文章内容 String nickname 发布人名称 String totalLikeCount 总点赞数 Int32 totalReplyCount 总评论数 Int32 createDatetime 文章发布时间 Date -
评论表设计
字段名称 字段说明 字段类型 说明 id 评论id String 每一个评论标识 content 评论内容 String publishTime 评论发布日期 Date userId 评论人id String nickname 评论人名称 String likeCount 点赞数 Int32 replyCount 回复数 Int32 parentId 上级id String ""表示第一层 articleId 文章id String
4.SpringDataMongoDB
SpringData家族成员之一,用于操作MongoDB的持久层框架,封装了底层的mongodb-driver(mongodb-driver和jdbc驱动一样,比较原生,我不做讲解了,直接用spring家族现成产品)。
官网主页:
https://projects.spring.io/spring-data-mongodb/
5.搭建springboot项目
5.1引入pom依赖
<dependency>
    <groupId>org.springframework.boot</groupId>
    <artifactId>spring-boot-starter-test</artifactId>
    <scope>test</scope>
</dependency>
<dependency>
    <groupId>org.springframework.boot</groupId>
	<artifactId>spring-boot-starter-data-mongodb</artifactId>
</dependency>
5.2创建application.yml
spring:
  data:
    mongodb:
      host: 192.168.222.128
      database: articleData
      port: 27017
      #也可以使用uri连接
      #uri: mongodb://192.168.222.128:27017/articleData
6.功能实现
6.1新增文章
6.2文章点赞
6.3评论文章
6.4评论评论
6.5给评论点赞
6.6查看文章的直接评论
6.7查询评论下的评论
| 文章id | String | |
4.SpringDataMongoDB
SpringData家族成员之一,用于操作MongoDB的持久层框架,封装了底层的mongodb-driver(mongodb-driver和jdbc驱动一样,比较原生,我不做讲解了,直接用spring家族现成产品)。
官网主页:
https://projects.spring.io/spring-data-mongodb/
5.搭建springboot项目
5.1引入pom依赖
<dependency>
    <groupId>org.springframework.boot</groupId>
    <artifactId>spring-boot-starter-test</artifactId>
    <scope>test</scope>
</dependency>
<dependency>
    <groupId>org.springframework.boot</groupId>
	<artifactId>spring-boot-starter-data-mongodb</artifactId>
</dependency>
5.2创建application.yml
spring:
  data:
    mongodb:
      host: 192.168.222.128
      database: articleData
      port: 27017
      #也可以使用uri连接
      #uri: mongodb://192.168.222.128:27017/articleData


 311
311


 被折叠的 条评论
为什么被折叠?
被折叠的 条评论
为什么被折叠?
 到【灌水乐园】发言


