


SpringBoot整合ElasticSearch7.8
所有的教程都参考于官方文档,这里给大家说明文档位置,搜索elasticsearch官网的Docs界面,找到ElasticSearch Client这个选项,图中也有位置,根据图中的位置找就行了。
前提是要安装好ES,挺简单的,这里就不说了。
添加依赖
根据官方文档导入对应架包
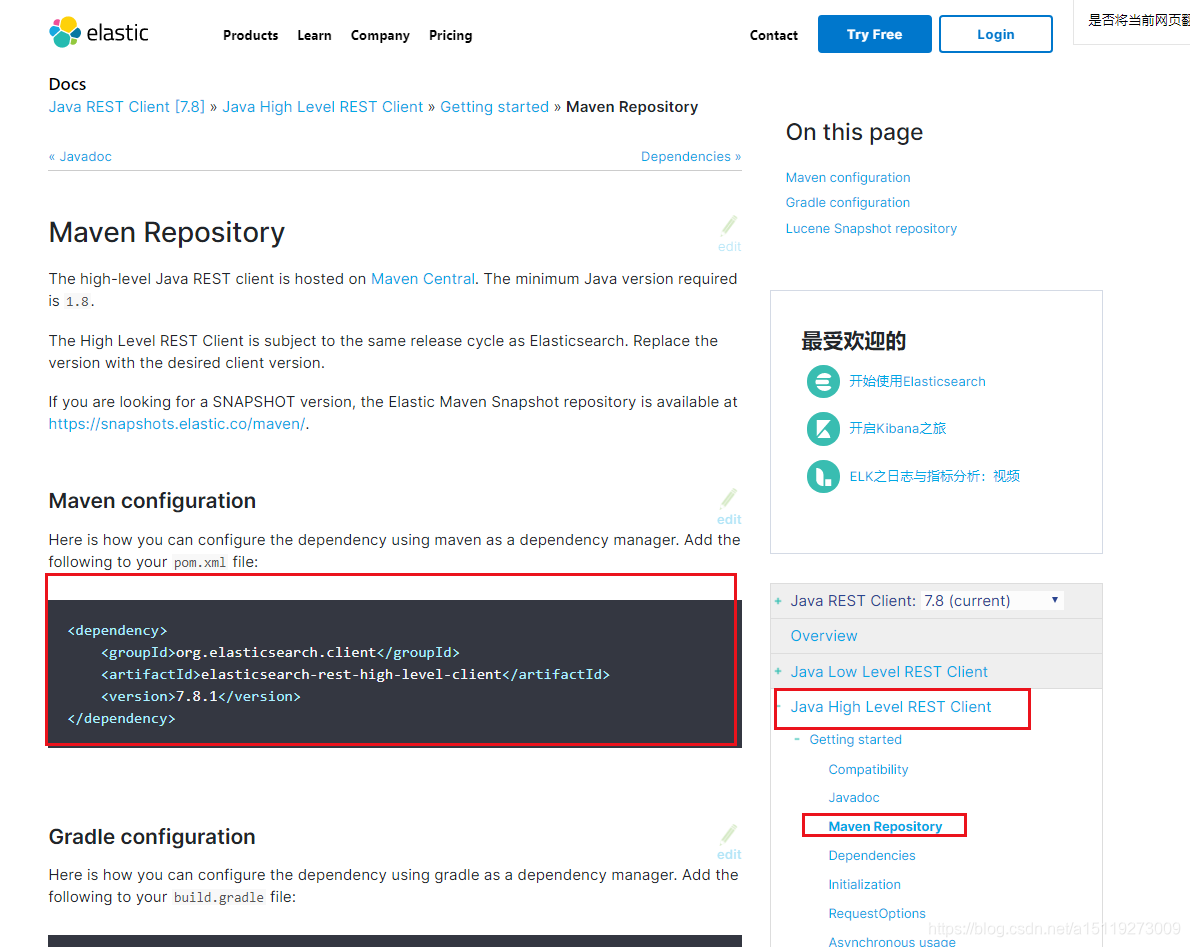
<dependency>
    <groupId>org.elasticsearch.client</groupId>
    <artifactId>elasticsearch-rest-high-level-client</artifactId>
    <version>7.8.1</version>
</dependency>
初始化
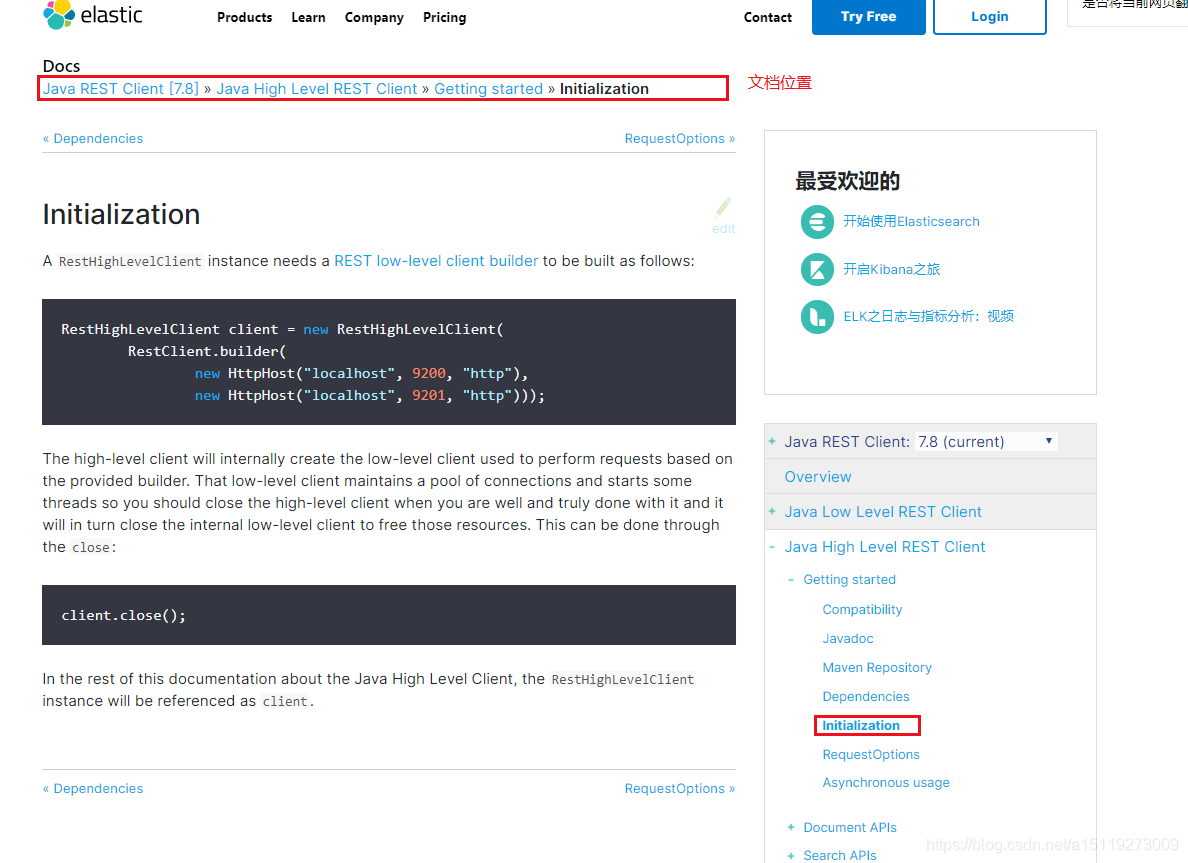
RestHighLevelClient client = new RestHighLevelClient(
        RestClient.builder(
                new HttpHost("localhost", 9200, "http"),
                new HttpHost("localhost", 9201, "http")));
//使用完后关闭资源
client.close();
所有的方法都在RestHighLevelClient类中了,直接去使用即可
创建SpringBoot项目
SpringBoot中已经有了starter,直接选择NoSQL里面导入启动依赖就可以了


创建配置类
@Configuration
public class ElasticConfig {

    @Bean
    public RestHighLevelClient getRestHighLevelClient(){
        RestHighLevelClient client = new RestHighLevelClient(
                //如果是集群再配置多个
                RestClient.builder(new HttpHost("127.0.0.1",9200,"http"))
        );

        return client;
    }
}
测试案例
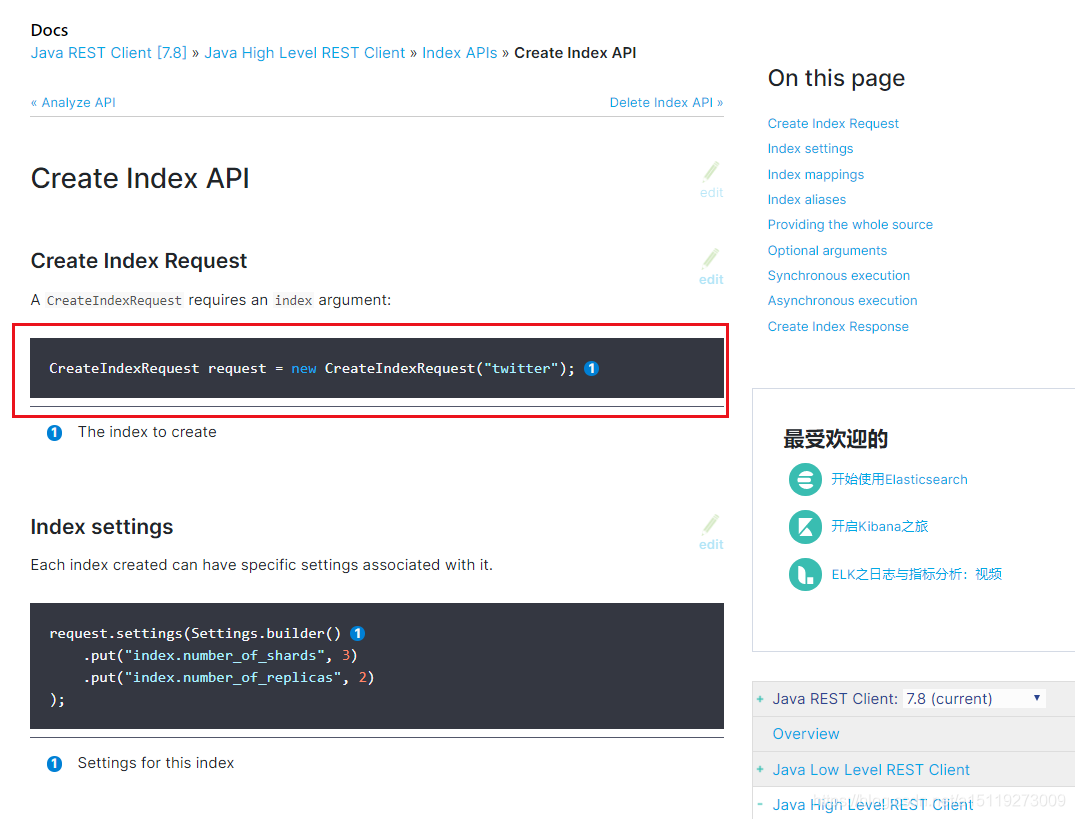
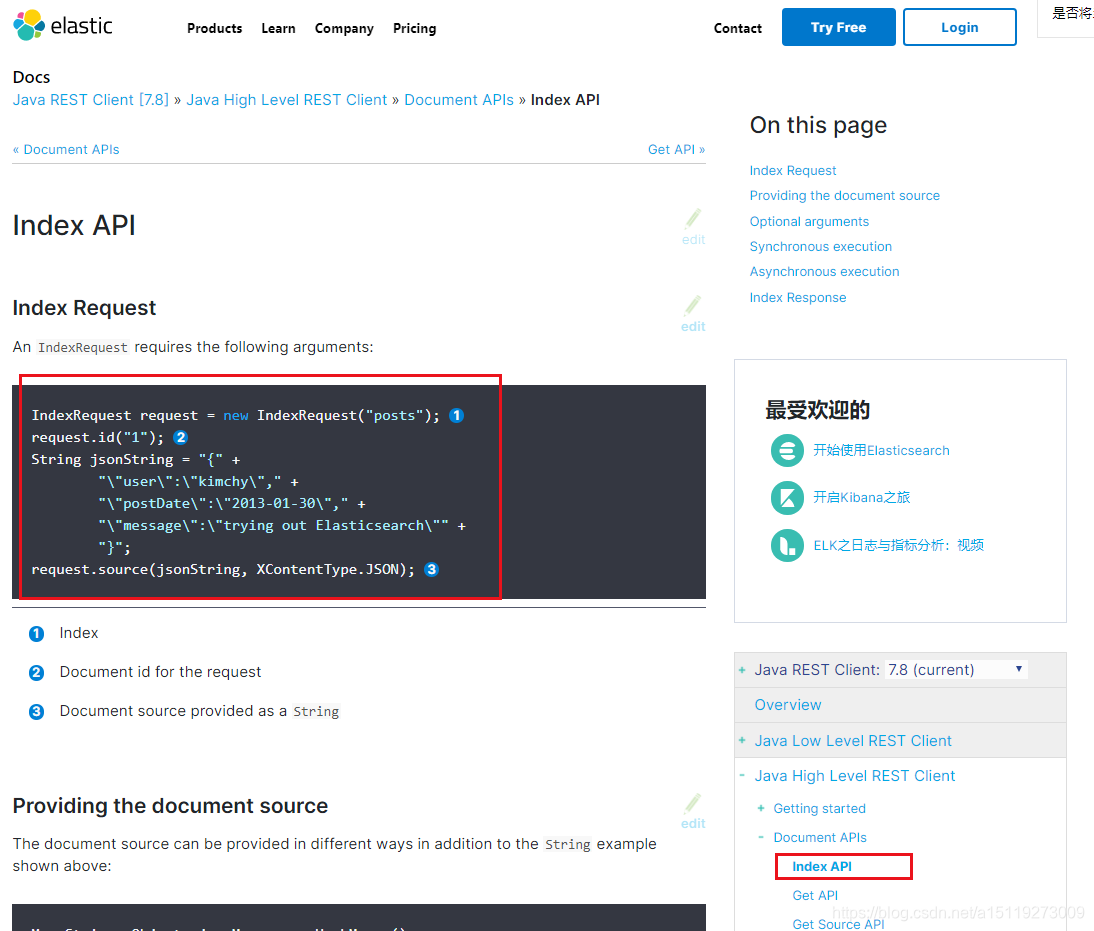
创建索引
查看官方手册
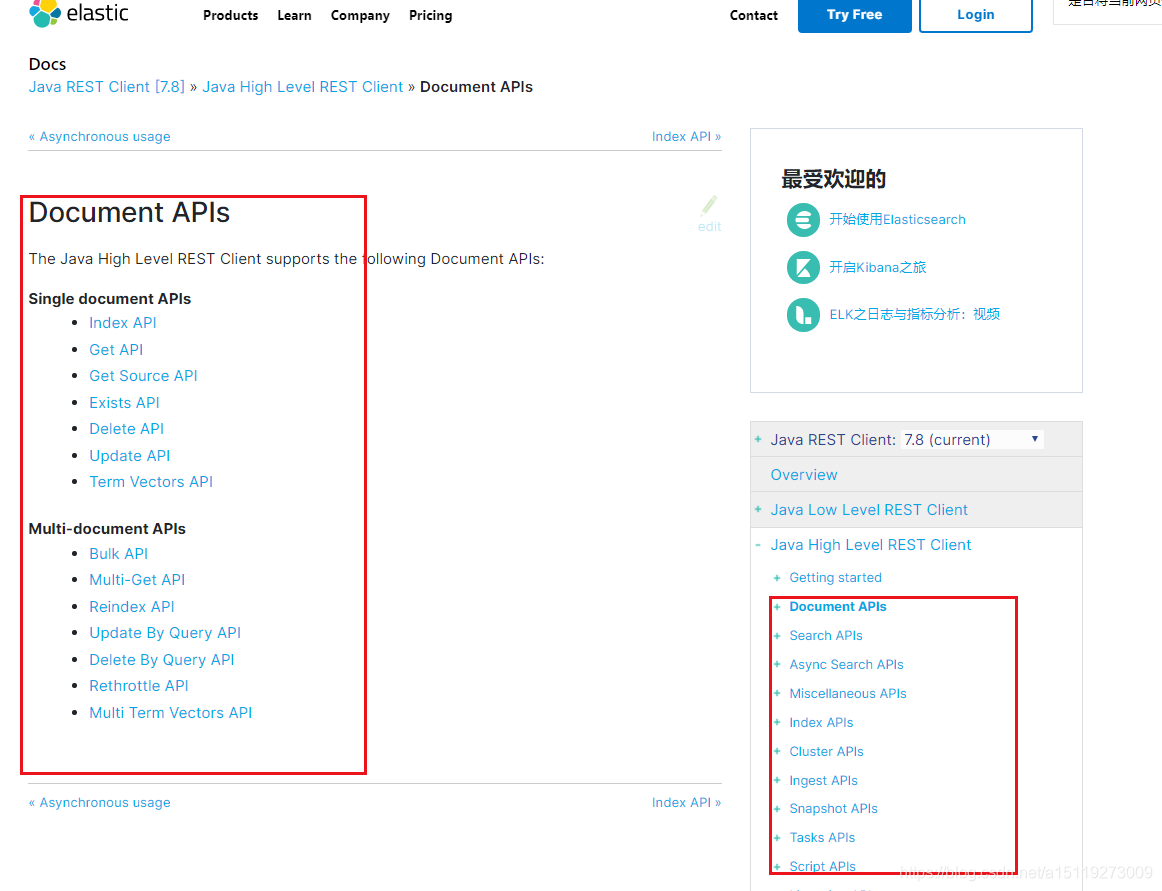
可以看到很多的API,我们试试索引API,点击Index APIs
第一个是创建索引的简单方式,创建完成后还要发送指令过去,发送方式拉到最下就可以看到一个同步和异步的发送,我们使用同步就行了。

我们直接在test目录测试下
@SpringBootTest
class ElasticsearchDemoApplicationTests {

    @Test
    void contextLoads() {
    }

    @Qualifier("getRestHighLevelClient")
    @Autowired
    private RestHighLevelClient client;

    /**
     * 创建索引
     */
    @Test
    public void test1(){
        //注意索引名要小写
        CreateIndexRequest request = new CreateIndexRequest("springboot_es_test1");
        try {
            CreateIndexResponse createIndexResponse = client.indices().create(request, RequestOptions.DEFAULT);
        } catch (IOException e) {
            e.printStackTrace();
        }
    }
}
如果执行不报错,那就可以打开可视化工具查看或者kibana去查看索引创建情况

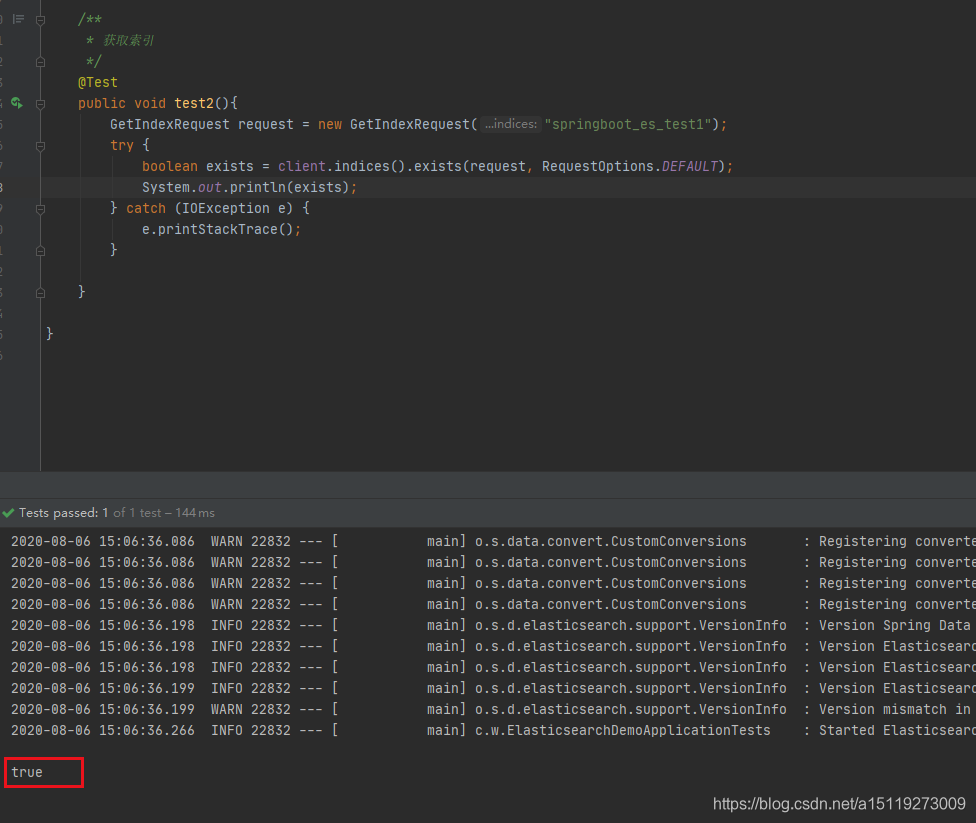
获取索引
我们也可以直接通过java代码获取索引去检测,这个代码也是可以从官方获取的
 /**
     * 获取索引
     */
    @Test
    public void test2(){
        GetIndexRequest request = new GetIndexRequest("springboot_es_test1");
        try {
            boolean exists = client.indices().exists(request, RequestOptions.DEFAULT);
            System.out.println(exists);
        } catch (IOException e) {
            e.printStackTrace();
        }

    }
创建索引并加入对象的属性和值
1、查看官方案例
2、创建实体类
这里使用的lombok,不会使用的小伙伴手动添加get/set全参构造和无参构造方法
@Data
@NoArgsConstructor
@AllArgsConstructor
public class User {
    private String username;
    private Integer age;
}
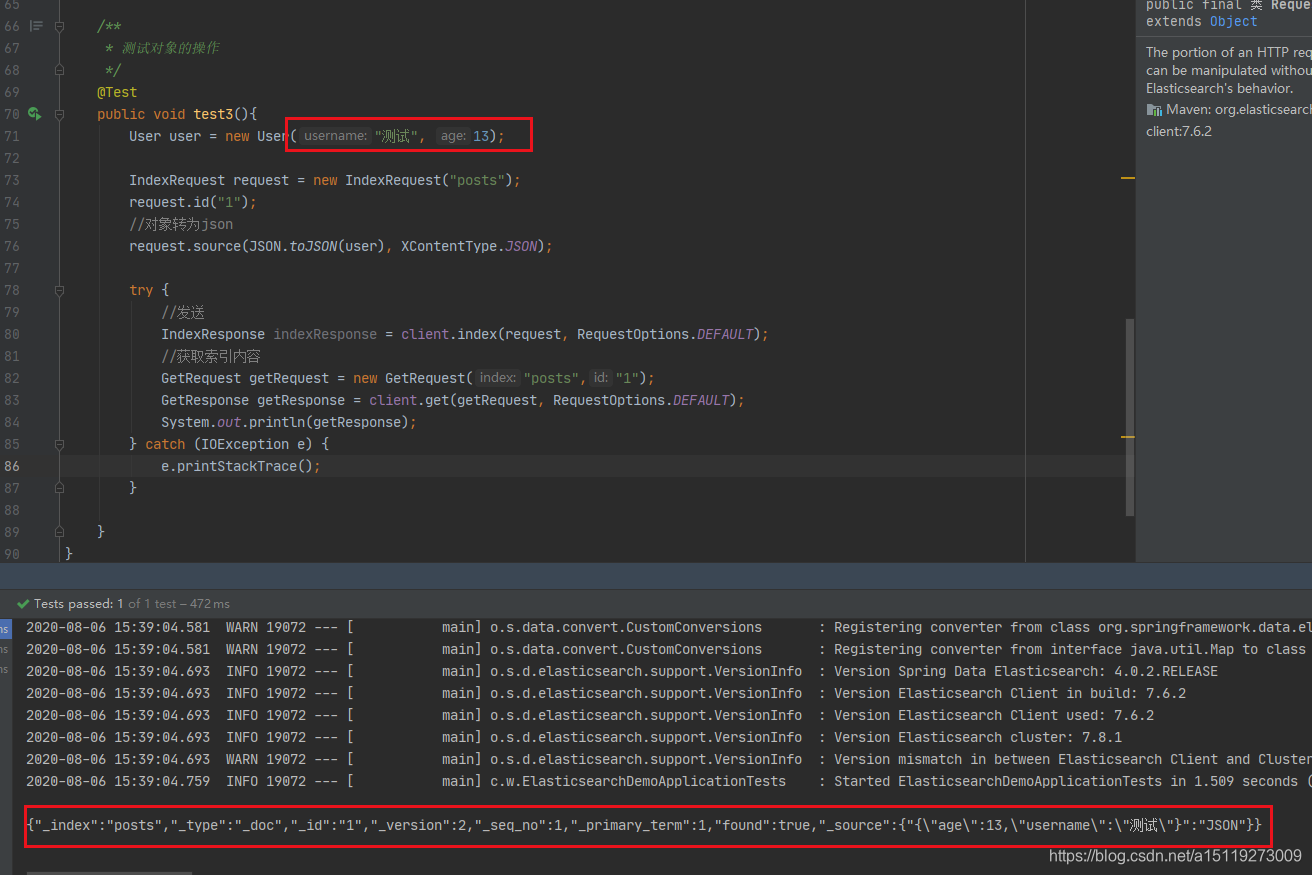
3、测试方法
 /**
     * 测试对象的操作
     */
    @Test
    public void test3(){
        //创建对象
        User user = new User("测试", 13);

        IndexRequest request = new IndexRequest("posts");
        request.id("1");
        //对象转为json
        request.source(JSON.toJSON(user), XContentType.JSON);

        try {
            //发送
            IndexResponse indexResponse = client.index(request, RequestOptions.DEFAULT);
            //获取索引内容看看
            GetRequest getRequest = new GetRequest("posts","1");
            GetResponse getResponse = client.get(getRequest, RequestOptions.DEFAULT);
            System.out.println(getResponse);
        } catch (IOException e) {
            e.printStackTrace();
        }

    }
批量插入数据
真实的项目一般都是大批量的插入数据,比如从数据库中、消息队列或者缓存中获取数据插入等等,ES也提供了批量插入的方法,BulkRequest类。
    /**
     * 设置批量插入
     */
    @Test
    public void test4(){
        //创建批量请求
        BulkRequest bulkRequest = new BulkRequest();
        //超时时间
        bulkRequest.timeout("10s");
        //模拟数据
        ArrayList<User> users = new ArrayList<>();
        users.add(new User("张1",1));
        users.add(new User("张2",2));
        users.add(new User("张3",3));
        users.add(new User("张4",4));
        int i=0 ;
        //批量插入
        for(User user:users){
            bulkRequest.add(
                    new IndexRequest("test2")
                            .id(""+i++)
                            .source(JSON.toJSONString(user), XContentType.JSON)
            );
        }
        try {
            //发送请求
            BulkResponse bulk = client.bulk(bulkRequest, RequestOptions.DEFAULT);
            //获取是否失败标志
            System.out.println(bulk.hasFailures());
        } catch (IOException e) {
            e.printStackTrace();
        }

    }


 1804
1804


 被折叠的 条评论
为什么被折叠?
被折叠的 条评论
为什么被折叠?
 到【灌水乐园】发言


