


-
- 1. 简介
- 2. pair类型
- 3. map基本操作
-
- 3.1 头文件
- 3.2 创建map对象
- 3.3 map元素访问
- 3.4 map中元素的插入
- 3.4 erase() 删除元素
- 3.5 count(k) 查找关键字k出现的次数
- 3.6 find(k) 查找元素
- 3.7 lower_bound(k) 返回关键字>=k的元素的第一个位置(是一个迭代器)
- 3.8 upper_bound(k) 返回关键字>k的元素的第一个位置(是一个迭代器)
- 3.9 equal_range() 返回一个迭代器pair,表示关键字 == k的元素的范围。若k不存在,pair的两个成员均等于c.end()
- 3.10 empty() 容器是否为空
- 3.11 clear() 清空容器
- 3.12 size() 容器的大小
- 3.13 max_size() 容器可以容纳的最大元素个数
- 3.14 **swap**() 交换两个map
- 3.15 begin() 返回指向map头部的迭代器
- 3.16 end() 返回指向map末尾的迭代器
- 3.17 rbegin() 返回一个指向map尾部的逆向迭代器
- 3.18 rend() 返回一个指向map头部的逆向迭代器
- 3.19 关联容器额外的类型别名
- 3.20 key_comp() 比较key_type值大小
- 3.21 value_comp() 比较value_type值大小
- 4. map遍历
- 5. Reference
说明:以下笔记大部分参考文末的Reference,并结合自己的理解进行整理
1. 简介
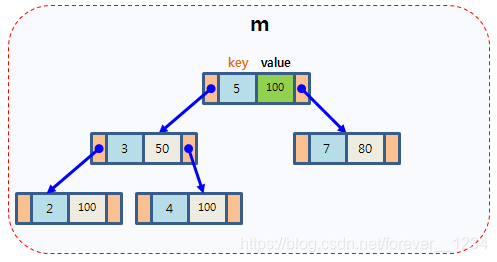
map 是 STL 的一个关联容器,它提供一对一的hash
- 第一个称为关键字(key),每个关键字只能在map中出现一次;
- 第二个称为该关键字的值(value);
map以模板(泛型)方式实现,可以存储任意类型的数据,包括使用者自定义的数据类型。Map主要用于资料一对一映射(one-to-one)的情況,map內部的实现自建一颗红黑树,这颗树具有对数据自动排序的功能。在map内部所有的数据都是有序的,后边我们会见识到有序的好处。比如一个班级中,每个学生的学号跟他的姓名就存在著一对一映射的关系。
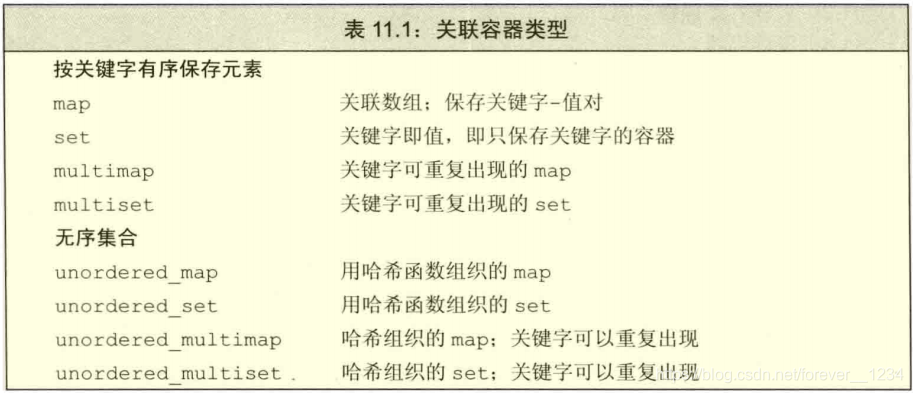
标准卡提供8个关联容器

2. pair类型
在介绍关联容器操作之前,先了解一下 pair 的标准库类型。pair类型是在有文件 utility 中定义的,pair是将2个数据组合成一组数据,当需要这样的需求时就可以使用pair,如STL中的map就是将key和value放在一起来保存。另一个应用是,当一个函数需要返回2个数据的时候,可以选择pair。 pair的实现是一个结构体,主要的两个成员变量是first ,second 因为是使用struct不是class,所以可以直接使用pair的成员变量。
2.1 pair类型的定义和初始化
pair类型包含了两个数据值,通常有以下的一些定义和初始化的一些方法:
pair<T1, T2> p;: 定义了一个空的pair对象p,T1和T2的成员都进行了值初始化pair<T1, T2> p(v1, v2);: p是一个成员类型为T1和T2的pair; first和second成员分别用v1和v2进行初始化。pair<T1, T2> p = {v1, v2}:等价于p(v1, v2)make_pair(v1, v2): 以v1和v2值创建的一个新的pair对象
2.2 pair对象的一些操作
除此之外,pair对象还有一些方法,如取出pair对象中的每一个成员的值:
p.first
返回p的名为 first 的(公有)数据成员
p.second
返回p的名为second的(公有)数据成员
p1 relop p2
关系运算符 (<、>、<= 、>=) 按字典序定义。例如,当 p1.first < p2.first 或 !(p2.first < p1.first) && p1.second < p2.second 成立时, p1 < p2 为 true。关系运算利用元素的 < 运算符来实现
p1 == p2
当 first 和 second 成员分别相等时,两个pair相等
p1 != p2
若不能达到以上要求,则不相等
例如:
#include <stdio.h>
#include <string.h>
#include <string>
#include <utility>
using namespace std;

int main(){
    pair<int, string> p1(0, "Hello");
    printf("%d, %s
", p1.first, p1.second.c_str());
    pair<int, string> p2 = make_pair(1, "World");
    printf("%d, %s
", p2.first, p2.second.c_str());
    return 0;
}
3. map基本操作
3.1 头文件
#include <map>
3.2 创建map对象
map是键-值对的组合,即map的元素是pair,其有以下的一些定义的方法:
map<k, v> m;: 定义了一个名为m的空的map对象map<k, v> m2(m);: 创建了m的副本m2map<k, v> m3(b, e);: 创建了map对象m3,并且存储迭代器b和e范围内的所有元素的副本
map的 value_type 是存储元素的键以及值的pair类型,键为const。
map<int, char> m; 						// 定义了一个名为m的空的map
map<int, char> m2(m); 					// 创建了m的副本m2
map<int, char> m3(m.begin(), m.end()); 	// 创建了map对象m3,并且存储迭代器范围内的所有元素的副本
3.3 map元素访问
注意:下标[] 和 at() 操作,只使用与非 const 的 map 和 unordered_map
3.3.1 使用下标 [ ] 访问
#include <iostream>
#include <map>
#include <string>

int main() {
    std::map<char, std::string> mymap;

    mymap['a'] = "an element";
    mymap['b'] = "another element";
    mymap['c'] = mymap['b'];

    std::cout << "mymap['a'] is " << mymap['a'] << '
';
    std::cout << "mymap['b'] is " << mymap['b'] << '
';
    std::cout << "mymap['c'] is " << mymap['c'] << '
';
    std::cout << "mymap['d'] is " << mymap['d'] << '
';

    std::cout << "mymap now contains " << mymap.size() << " elements.
";
    return 0;
}
/*
mymap['a'] is an element
mymap['b'] is another element
mymap['c'] is another element
mymap['d'] is 					// 下标访问不会进行下标检查
mymap now contains 4 elements.
*/
注意:下标访问不会做下标检查,如上第4行打印的语句不会报错,但打印结果为空,因为下标访问会插入不存在的key,对应的value为默认值
而使用 at() 访问则会做下标检查,若不存在该key会报错
3.3.2 使用 at() 方法访问
#include <iostream>
#include <map>
#include <string>

int main() {
    std::map<std::string, int> mymap = {
        {"alpha", 0}, {"beta", 0}, {"gamma", 0}};

    mymap.at("alpha") = 10;
    mymap.at("beta") = 20;
    mymap.at("gamma") = 30;

    for (auto& x : mymap) {
        std::cout << x.first << ": " << x.second << '
';
    }

    return 0;
}
/*
alpha: 10
beta: 20
gamma: 30
*/
3.4 map中元素的插入
在map中元素有两种插入方法:1. 使用下标 [] 2. 使用 insert() 函数
3.4.1 使用下标[]插入
使用下标访问不存在的元素,将会在map容器中添加一个新的元素;
使用下标访问存在的元素,将会覆盖map容器中的该元素
#include <iostream>
#include <map>
using namespace std;

int main() {
    map<int, char> mymap;
    mymap[0] = 'a';
    mymap[1] = 'b';
    mymap[2] = 'c';
    mymap[0] = 'x';
    for (map<int, char>::iterator iter = mymap.begin(); iter != mymap.end(); iter++)
        cout << iter->first << " ==> " << iter->second << endl;
    return 0;
}
3.4.2 使用insert()插入元素
insert函数的插入方法主要有如下:
pair<iterator,bool> insert (const value_type& val);- 插入单个键值对,并返回插入位置和成功标志,插入位置已经存在值时,插入失败
iterator insert (const_iterator position, const value_type& val);- 在指定位置插入,在不同位置插入效率是不一样的,因为涉及到重排
void insert (InputIterator first, InputIterator last);- 插入迭代器范围内键值对
几种插入方法如下面的例子所示:
#include <iostream>
#include <map>

int main()
{
    std::map<char, int> mymap;

    // (1)插入单个值
    mymap.insert(std::pair<char, int>('a', 100));
    mymap.insert(std::pair<char, int>('z', 200));
    mymap.insert(std::make_pair('f', 300));	// pair方式和make_pair功能是一样的

    // 返回插入位置以及是否插入成功
    std::pair<std::map<char, int>::iterator, bool> ret;
    ret = mymap.insert(std::pair<char, int>('z', 500));
    if (ret.second == false) {
        std::cout << "element 'z' already existed";
        std::cout << " with a value of " << ret.first->second << '
';
    }

    // (2)指定位置插入
    std::map<char, int>::iterator it = mymap.begin();
    mymap.insert(it, std::pair<char, int>('b', 300));  //效率更高
    mymap.insert(it, std::pair<char, int>('c', 400));  //效率非最高

    // (3)范围多值插入
    std::map<char, int> anothermap;
    anothermap.insert(mymap.begin(), mymap.find('c'));

    // (4)列表形式插入
    anothermap.insert({ { 'd', 100 }, {'e', 200} });

    return 0;
}
3.4 erase() 删除元素
从map中删除元素的函数是erase(),该函数有如下的三种形式:
-
size_t erase( const key_type& key );- 根据key来进行删除, 返回删除的元素数量,在map里结果非0即1
-
iterator erase( iterator pos )- 删除迭代器指向位置的键值对,并返回一个指向下一元素的迭代器
-
iterator erase( const_iterator first, const_iterator last );- 删除一定范围内的元素,并返回一个指向下一元素的迭代器
#include
#includeint main() {
map<int, int> mymap;
for (int i = 0; i < 20; i++) {
mymap.insert(make_pair(i, i));
}
mymap.erase(0); // (1)删除key为0的元素
mymap.erase(mymap.begin()); // (2)删除迭代器指向的位置元素
map<int, int>::iterator it;
for (it = mymap.begin(); it != mymap.end(); it++) {
cout << it->first << “==>” << it->second << endl;
}
return 0;
}
3.5 count(k) 查找关键字k出现的次数
-
size_type count (const key_type& k) const;mymap.count(1); // 查找关键字1在容器map中出现的次数,如果不存在则为0
3.6 find(k) 查找元素
iterator find (const key_type& k);const_iterator find (const key_type& k) const;
若存在,返回指向该key的迭代器
若不存在,则返回迭代器的尾指针,即 mymap.end(),即 -1
#include <iostream>
#include <map>
using namespace std;

int main() {
    map<int, int> mp;
    for (int i = 0; i < 20; i++) {
        mp.insert(make_pair(i, i));
    }

    if (mp.count(0)) {
        cout << "yes!" << endl;
    } else {
        cout << "no!" << endl;
    }

    map<int, int>::iterator it_find;
    it_find = mp.find(0);
    if (it_find != mp.end()) {
        it_find->second = 20;
    } else {
        cout << "no!" << endl;
    }

    map<int, int>::iterator it;
    for (it = mp.begin(); it != mp.end(); it++) {
        cout << it->first << " ==> " << it->second;
    }
    return 0;
}
3.7 lower_bound(k) 返回关键字>=k的元素的第一个位置(是一个迭代器)
-
iterator lower_bound (const key_type& k); -
const_iterator lower_bound (const key_type& k) const;c.lower_bound(k)
3.8 upper_bound(k) 返回关键字>k的元素的第一个位置(是一个迭代器)
-
iterator upper_bound (const key_type& k); -
const_iterator upper_bound (const key_type& k) const;c.upper_bound(k)
注意:lower_bound 和 upper_bound 不适用与无序容器
3.9 equal_range() 返回一个迭代器pair,表示关键字 == k的元素的范围。若k不存在,pair的两个成员均等于c.end()
-
pair<const_iterator,const_iterator> equal_range (const key_type& k) const; -
pair<iterator,iterator> equal_range (const key_type& k);#include
#includeint main() {
map<char, int> mymap;
mymap[‘a’] = 3;
mymap[‘b’] = 4;
mymap[‘c’] = 5;
mymap[‘d’] = 6;cout << mymap.lower_bound('c')->first << endl; // 返回key >= 'c'第一个元素的迭代器 cout << mymap.upper_bound('c')->first << endl; // 返回key > 'c'第一个元素的迭代器 pair<map<char, int>::iterator, map<char, int>::iterator> ret; ret = mymap.equal_range('c'); cout << "lower bound points to: "; cout << ret.first->first << " => " << ret.first->second << '';
cout << "upper bound points to: ";
cout << ret.second->first << " => " << ret.second->second << '
';
return 0;
}
/*
c
d
lower bound points to: c => 5
upper bound points to: d => 6
*/
3.10 empty() 容器是否为空
mymap.enpty();
3.11 clear() 清空容器
mymap.clear();
3.12 size() 容器的大小
mymap.size();
3.13 max_size() 容器可以容纳的最大元素个数
mymap.max_size();
3.14 swap() 交换两个map
A.swap(B);
3.15 begin() 返回指向map头部的迭代器
3.16 end() 返回指向map末尾的迭代器
3.17 rbegin() 返回一个指向map尾部的逆向迭代器
3.18 rend() 返回一个指向map头部的逆向迭代器
3.19 关联容器额外的类型别名
3.20 key_comp() 比较key_type值大小
// 比较两个关键字在map中位置的先后
key_compare key_comp() const;


map<char,int> mymap;
map<char,int>::key_compare mycomp = mymap.key_comp();

mymap['a']=100;
mymap['b']=200;
mycomp('a', 'b');  // a排在b前面,因此返回结果为true
3.21 value_comp() 比较value_type值大小
#include <iostream>
#include <map>

int main() {
    std::map<char, int> mymap;

    mymap['x'] = 1001;
    mymap['y'] = 2002;
    mymap['z'] = 3003;

    std::cout << "mymap contains:
";
    std::pair<char, int> highest = *mymap.rbegin();  // last element
    std::map<char, int>::iterator it = mymap.begin();
    do {
        std::cout << it->first << " => " << it->second << '
';
    } while (mymap.value_comp()(*it++, highest));	// 注意这里只会比较value_type中的key

    return 0;
}
4. map遍历
4.1 使用迭代器遍历
#include <iostream>
#include <string>
#include <map>
using namespace std;
int main() {
    map<string, int> word_count;
    string word;
    while (cin >> word && word != "-1")		// 统计每个单词出现的次数
        word_count[word]++;

    // 使用迭代器遍历
    map<string, size_t>::iterator iter;
    for (iter = word_count.begin(); iter != word_count.end(); iter++) {
        cout << iter->first << " occurs " << iter->second
             << ((iter->second) > 1 ? " times" : " time") << endl;
    }

    // 当key是int类型的话,还可以使用下标迭代访问
    return 0;
}
4.2 使用下标访问
// easy to understand


 6097
6097


 被折叠的 条评论
为什么被折叠?
被折叠的 条评论
为什么被折叠?
 到【灌水乐园】发言


