


本文基于CentOS7.6,部署ElasticSearch7.6.1,详细过程如下:
一、准备工作
1、准备机器
准备3台机器,安装CentOS7.6。ip计划如下:
192.168.2.11 es-master
192.168.2.12 es-node1
192.168.2.13 es-node2
2、关闭防火墙
systemctl stop firewalld
systemctl disable firewalld
3、安装JDK
本处安装jdk-8u231-linux-x64,并配置好环境变量。
4、禁用SELINUX
vim /etc/selinux/config
将SELINUX设置为disabled:
SELINUX=disabled
5、修改主机名
#设置主机名
hostnamectl set-hostname es-node1
通过hostname命令查看主机名。
6、配置IP映射
vim /etc/hosts
最后增加以下内容:
192.168.2.11 es-master
192.168.2.12 es-node1
192.168.2.13 es-node2
7、创建用户
在root用户下添加es用户:
#添加组
groupadd es
#添加用户
adduser es -g es
#设置密码
passwd es
给es用户赋予权限:
#编辑/etc/sudoers
vi /etc/sudoers
#在root    ALL=(ALL)       ALL下增加es配置,最终如下
root    ALL=(ALL)       ALL
es      ALL=(ALL)       ALL
切换到es用户,配置免密登录:
#切换es用户
su es
#切换到es用户根目录
cd ~
#查看根目录
pwd
#生成rsa
ssh-keygen -t rsa
#生成公钥
cat .ssh/id_rsa.pub >> .ssh/authorized_keys
切换到root用户,设置免密权限:
#文件夹权限
chmod 700 /home/es/.ssh
#文件权限
chmod 600 /home/es/.ssh/authorized_keys
把.ssh文件夹拷贝到其他节点上:
su es
cd ~
scp -r .ssh/ es@es-node2:/home/es/
在es-master、es-node1、es-node2上执行ssh相互验证免密访问。
二、部署es
1、部署es
在es用户下,从https://www.elastic.co/cn/downloads/elasticsearch下载elasticsearch-7.6.1-linux-x86_64.tar.gz,上传到服务器,并解压缩。/data目录为大容量磁盘,创建数据文件和日志文件目录:
#创建数据目录
mkdir -p /data/es/data
#创建日志目录
mkdir -p /data/es/logs
#修改目录所有者
chown es:es -R /data/es
配置es-master,编辑elasticsearch-7.6.1/config/elasticsearch.yml,修改内容如下:
#集群名称
cluster.name: sdc-es-cluster
#节点名称
node.name: es-master
#数据目录
path.data: /data/es/data
#日志目录
path.logs: /data/es/logs
#本节点ip
network.host: 0.0.0.0
#端口
http.port: 9200
#集群主节点候选列表
discovery.seed_hosts: ["es-master"]
#集群初始主结点列表
cluster.initial_master_nodes: ["es-master"]
#集群启动到2个节点之前,阻止数据恢复
gateway.recover_after_nodes: 3
#跨域访问设置
http.cors.enabled: true
http.cors.allow-origin: "*"
配置es-node1,编辑elasticsearch-7.6.1/config/elasticsearch.yml,修改内容如下:
#集群名称
cluster.name: sdc-es-cluster
#节点名称
node.name: es-node1
#数据目录
path.data: /data/es/data
#日志目录
path.logs: /data/es/logs
#本节点ip
network.host: 0.0.0.0
#端口
http.port: 9200
#集群主节点候选列表
discovery.seed_hosts: ["es-master"]
#集群初始主结点列表
cluster.initial_master_nodes: ["es-master"]
#集群启动到2个节点之前,阻止数据恢复
gateway.recover_after_nodes: 3
#跨域访问设置
http.cors.enabled: true
http.cors.allow-origin: "*"
#数据结点
node.master: false
配置es-node2,编辑elasticsearch-7.6.1/config/elasticsearch.yml,修改内容如下:
#集群名称
cluster.name: sdc-es-cluster
#节点名称
node.name: es-node2
#数据目录
path.data: /data/es/data
#日志目录
path.logs: /data/es/logs
#本节点ip
network.host: 0.0.0.0
#端口
http.port: 9200
#集群主节点候选列表
discovery.seed_hosts: ["es-master"]
#集群初始主结点列表
cluster.initial_master_nodes: ["es-master"]
#集群启动到2个节点之前,阻止数据恢复
gateway.recover_after_nodes: 3
#跨域访问设置
http.cors.enabled: true
http.cors.allow-origin: "*"
#数据结点
node.master: false
启动es:
[es@es-master elasticsearch-7.6.1]$ ./bin/elasticsearch
ERROR: [2] bootstrap checks failed
[1]: max file descriptors [4096] for elasticsearch process is too low, increase to at least [65535]
[2]: max virtual memory areas vm.max_map_count [65530] is too low, increase to at least [262144]
ERROR: Elasticsearch did not exit normally - check the logs at /data/es/logs/sdc-es-cluster.log
启动失败,显示2个错误。
解决:max file descriptors [4096] for elasticsearch process is too low, increase to at least [65535],在root用户下,编辑/etc/security/limits.conf文件,在文件最后增加以下内容:
*               soft    nofile          65536
*               hard    nofile          65536
解决:max virtual memory areas vm.max_map_count [65530] is too low, increase to at least [262144],在root用户下,编辑/etc/sysctl.conf文件,在文件最后增加以下内容:
vm.max_map_count=262144
命令行执行命令:sysctl -p,让配置生效。
切换到es用户,启动es:
[root@es-master elasticsearch-7.6.1]# su es
[es@es-master elasticsearch-7.6.1]$ ./bin/elasticsearch
启动成功,在浏览器输入:http://192.168.2.11:9200,返回如下内容:
{
  "name" : "es-master",
  "cluster_name" : "sdc-es-cluster",
  "cluster_uuid" : "kzGmp801R_CSLHdo9j0pHQ",
  "version" : {
    "number" : "7.6.1",
    "build_flavor" : "default",
    "build_type" : "tar",
    "build_hash" : "aa751e09be0a5072e8570670309b1f12348f023b",
    "build_date" : "2020-02-29T00:15:25.529771Z",
    "build_snapshot" : false,
    "lucene_version" : "8.4.0",
    "minimum_wire_compatibility_version" : "6.8.0",
    "minimum_index_compatibility_version" : "6.0.0-beta1"
  },
  "tagline" : "You Know, for Search"
}
通过配置es-node1,切换到es用户,启动es,在浏览器输入:http://192.168.2.12:9200,返回如下内容:
{
  "name" : "es-node1",
  "cluster_name" : "sdc-es-cluster",
  "cluster_uuid" : "YTOwCEiDToi2eitZaqCurA",
  "version" : {
    "number" : "7.6.1",
    "build_flavor" : "default",
    "build_type" : "tar",
    "build_hash" : "aa751e09be0a5072e8570670309b1f12348f023b",
    "build_date" : "2020-02-29T00:15:25.529771Z",
    "build_snapshot" : false,
    "lucene_version" : "8.4.0",
    "minimum_wire_compatibility_version" : "6.8.0",
    "minimum_index_compatibility_version" : "6.0.0-beta1"
  },
  "tagline" : "You Know, for Search"
}
通过配置es-node2,切换到es用户,启动es,在浏览器输入:http://192.168.2.13:9200,返回如下内容:
{
  "name" : "es-node2",
  "cluster_name" : "sdc-es-cluster",
  "cluster_uuid" : "YTOwCEiDToi2eitZaqCurA",
  "version" : {
    "number" : "7.6.1",
    "build_flavor" : "default",
    "build_type" : "tar",
    "build_hash" : "aa751e09be0a5072e8570670309b1f12348f023b",
    "build_date" : "2020-02-29T00:15:25.529771Z",
    "build_snapshot" : false,
    "lucene_version" : "8.4.0",
    "minimum_wire_compatibility_version" : "6.8.0",
    "minimum_index_compatibility_version" : "6.0.0-beta1"
  },
  "tagline" : "You Know, for Search"
}
es后台启动:
#后台启动
[es@es-master elasticsearch-7.6.1]$ ./bin/elasticsearch -d
#查看进程
[es@es-master elasticsearch-7.6.1]$ jps
13441 Elasticsearch
13477 Jps
2、部署elasticsearch-analysis-ik
es内置的分词器对中文不友好,从https://github.com/medcl/elasticsearch-analysis-ik/releases下载es中文分词插件elasticsearch-analysis-ik.zip。
解压缩elasticsearch-analysis-ik.zip,复制到插件到es的plugins目录下,如:
[es@es-master elasticsearch-7.6.1]$ pwd
/data/soft/elasticsearch-7.6.1
[es@es-master elasticsearch-7.6.1]$ ll plugins/analysis-ik/
总用量 1428
-rw-r--r-- 1 es es 263965 3月  30 13:47 commons-codec-1.9.jar
-rw-r--r-- 1 es es  61829 3月  30 13:47 commons-logging-1.2.jar
drwxr-xr-x 2 es es    299 3月  30 13:47 config
-rw-r--r-- 1 es es  54598 3月  30 13:47 elasticsearch-analysis-ik-7.6.1.jar
-rw-r--r-- 1 es es 736658 3月  30 13:47 httpclient-4.5.2.jar
-rw-r--r-- 1 es es 326724 3月  30 13:47 httpcore-4.4.4.jar
-rw-r--r-- 1 es es   1805 3月  30 13:47 plugin-descriptor.properties
-rw-r--r-- 1 es es    125 3月  30 13:47 plugin-security.policy
重启启动es。
分词策略支持ik_max_word 和 ik_smart ,调用analyze接口测试, 如:
curl -XGET "http://192.168.2.11:9200/_analyze?pretty=true" -H 'Content-Type: application/json' -d'
{
   "text":"陕西省人民医院","tokenizer": "ik_smart"
}'
返回结果如下:
{
  "tokens" : [
    {
      "token" : "陕西省",
      "start_offset" : 0,
      "end_offset" : 3,
      "type" : "CN_WORD",
      "position" : 0
    },
    {
      "token" : "人民医院",
      "start_offset" : 3,
      "end_offset" : 7,
      "type" : "CN_WORD",
      "position" : 1
    }
  ]
}
ik_max_word:会将文本做最细粒度的拆分,比如会将“陕西省人民医院”拆分为“陕西省,陕西,省人民医院,人民医院,人民,民医院,医院”,会穷尽各种可能的组合,适合 Term Query;
ik_smart: 会做最粗粒度的拆分,比如会将“陕西省人民医院”拆分为“陕西省,人民医院”,适合 Phrase 查询。
3、集群可视化访问
从http://nodejs.cn/download/下载node-v12.16.1-linux-x64.tar.xz,上传es-master并解压缩。配置nodejs环境变量:
#配置环境变量
vim /etc/profile
#增加以下内容
#nodejs
export NODE_HOME=/data/soft/nodejs
export PATH=$PATH:$NODE_HOME/bin
#让配置生效
source /etc/profile
#查看node版本
node -v
v12.16.1
#查看npm版本
npm -v
6.13.4
从https://github.com/mobz/elasticsearch-head下载elasticsearch-head-master.zip,上传es-master并解压缩,在elasticsearch-head根目录下命令行执行:npm install下载相关依赖。
#编辑./_site/app.js
vim ./_site/app.js
#替换http://localhost:9200为http://192.168.2.11:9200
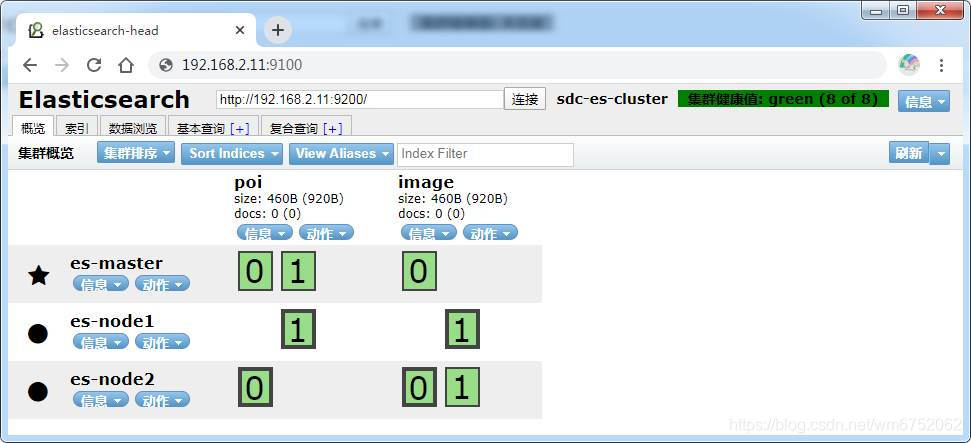
在root用户下,命令行执行:npm run start(后台启动命令:nohup npm run start &),启动elasticsearch-head。在浏览器输入:http://192.168.2.11:9100,如下所示:
三、简单使用
es空间几何字段包括geo_point和geo_shape。空间几何坐标最好采用WGS-84坐标系,即经度[-180,180],纬度:[-90,90],涉及到空间索引。
1、创建索引点
1.1、创建索引
curl -XPUT http://192.168.2.11:9200/poi
参数如下:
{
  "settings": {
    "index": {
      "number_of_shards": 2,
      "number_of_replicas": 1
    }
  },
  "mappings": {
    "properties": {
      "name": {
        "type": "text",
        "analyzer": "ik_max_word",
        "search_analyzer": "ik_smart"
      },
      "type": {
        "type": "keyword"
      },
      "geom": {
        "type": "geo_point"
      }
    }
  }
}
1.2、插入数据
curl -XPOST http://192.168.2.11:9200/poi/_doc/1
参数如下:
{
  "name": "颐和园",
  "type": "公园",
  "geom": {"lon": 116.272362,"lat": 39.99299}
}
curl -XPOST http://192.168.2.11:9200/poi/_doc/2
参数如下:
{
  "name": "陕西省人民医院",
  "type": "医院",
  "geom": [108.930479,34.239695]
}
1.3、查询
空间查询包括:box查询、distance查询、polygon查询:
box查询:
"filter": {
    "geo_bounding_box": {
        "geom": {
            "top": 45,"left": 100,"bottom": 30,"right": 120
        }
    }
}
distance查询:
"filter": {
  "geo_distance": {
    "distance": "5km",
    "geom": [108.947028,34.259424]
  }
}
polygon查询:
"filter": {
    "geo_polygon": {
        "geom": {
            "points": [[100,30],[120,30],[120,45],[100,45]]
        }
    }
}
curl -XPOST http://192.168.2.11:9200/poi/_search
参数如下:
{
  "query": {
    "bool": {
      "must": {
        "match": {
          "name": "人民医院"
        }
      },
      "filter": {
        "geo_polygon": {
          "geom": {
            "points": [[100,30],[120,30],[120,45],[100,45]]
          }
        }
      }
    }
  }
}
2、创建索引面
2.1、创建索引
curl -XPUT http://192.168.2.11:9200/image
参数如下:
{
  "settings": {
    "index": {
      "number_of_shards": 2,
      "number_of_replicas": 1
    }
  },
  "mappings": {
    "properties": {
      "name": {
        "type": "text"
      },
      "geom": {
        "type": "geo_shape"
      }
    }
  }
}
2.2、插入数据
支持常用的wkt和geojson格式插入空间几何图形,要求点个数大于3,且首尾相同:
geojson:
{
  "name": "GF1_PMS2",
  "geom": {
       "type" : "polygon",
        "coordinates" : [
            [[100.0, 30.0], [101.0, 30.0], [101.0, 31.0], [100.0, 31.0], [100.0, 30.0]]
        ]
   }
}
gwt:
{
  "name": "GF4_PMS",
  "geom": "POLYGON ((116.0 39.0, 117.0 39.0, 117.0 40.0, 116.0 40.0, 116.0 39.0))"
}
2.3、查询
常用空间查询,空间图形由geojson、wkt构建,空间关系支持:intersects(默认)、disjoint、within、contains。
envelope查询:
"filter": {
    "geo_shape": {
        "geom": {
            "shape": {
                "type": "envelope",
                "coordinates": [[100.0,50.0],[120.0,30.0]]
            },
            "relation": "within"
        }
    }
}
geojson查询:
"filter": {
    "geo_shape": {
        "geom": {
            "shape": {
                "type": "polygon",
                "coordinates": [[[100.0,30.0], [120.0,30.0], [120.0, 50.0], [100.0, 50.0], [100.0,30.0]]]
            },
            "relation": "intersects"
        }
    }
}
wkt查询:
"filter": {
    "geo_shape": {
        "geom": {
            "shape":"POLYGON ((100.0 30.0, 120.0 30.0, 120.0 50.0, 100.0 50.0, 100.0 30.0))"
        }
    }
}


 297
297


 被折叠的 条评论
为什么被折叠?
被折叠的 条评论
为什么被折叠?
 到【灌水乐园】发言


