


新建一个实体类(如Student,Teacher),从配置文件中读取数据,使用Thymeleaf模板,将数据显示在一张网页上。
前言
在springboot的刚刚开始的学习中,老师布置了一个作业。如下:
新建一个实体类(如Student,Teacher),从配置文件中读取数据,使用Thymeleaf模板,将数据显示在一张网页上。
本人也是第一次想在csdn上写一些什么来记录对于springboot的学习。所以作为一个初学者,如果在文章中有什么不合适或者出错的地方也欢迎各位前辈指出纠正!那么我们就正式开始了。
一、使用工具
idea
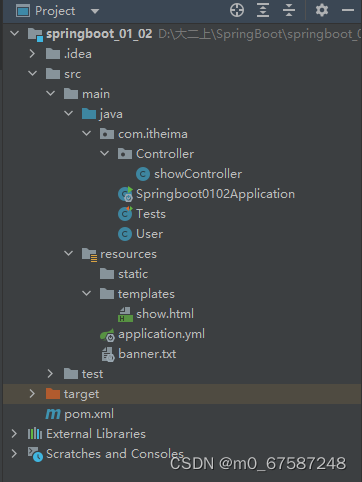
二、项目结构
三、总体过程
1.在com.itheima下建立一个User类
在此处我们选用的是@Value的用法来注入属性,因此我们就不用在添加setter了。
package com.itheima;
import org.springframework.beans.factory.annotation.Value;
import org.springframework.stereotype.Component;
@Component
public class User {
   @Value("${user.thisname}")
    private  String thisname;
    @Value("${user.age}")
    private Integer age;
    @Value("${user.sex}")
    private  String sex;

    public String getName() {
        return thisname;
    }

    public Integer getAge() {
        return age;
    }

    public String getSex() {
        return sex;
    }

    @Override
    public String toString() {
        return "User{" +
                "name='" + thisname + '\'' +
                ", age=" + age +
                ", sex=" + sex +
                '}';
    }
public User(){

}
    public User(String name, Integer age, String sex) {
        this.thisname = name;
        this.age = age;
        this.sex = sex;
    }
}
2.编写全局配置文件application.yaml
开始建立项目时一般在resources下生成的是application.properties文件,但是呢使用yaml会看起来更简洁.所以这里我们可以直接改变application的后缀为yaml(yml)或新建一个application.yaml文件来配置。
server:
  port: 8081
user:
  age: 20
  sex: male
  thisname: 阿伟
spring:
  thymeleaf:
    cache: false
3.修改pom.xml添加依赖
由于老师要求使用Thymeleaf模板,所以我们可以直接在pom.xml中手动添加依赖或者在项目创立时勾选Thymeleaf。而其他的依赖根据自己的需要添加即可。(每每想到此处不禁感慨,springboot配置好累啊!)
<dependency>
            <groupId>org.springframework.boot</groupId>
            <artifactId>spring-boot-starter-thymeleaf</artifactId>
        </dependency>
4.在resources下的templates下新建一个show.html作为我们要来渲染的页面。
这里我们用${Student.getName()}来获得对象的属性,其他方法就不阐述了。
<!doctype html>
<html lang="cn" xmlns:th="http://www.thymeleaf.org">
<head>
<meta charset="UTF-8">
<title></title>
</head>
<body>
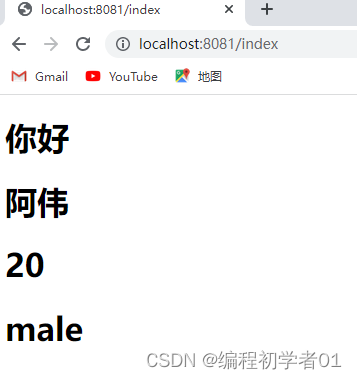
<h1>你好</h1>
<h1 th:text="${Student.getName()}"></h1>
<h1 th:text="${Student.getAge()}"></h1>
<h1 th:text="${Student.getSex()}"></h1>
</body>
</html>
5.在com.itheima下新建一个Controller包,在该包下建一个showController类
这里是用的Thymeleaf模板来做的,具体的我还在慢慢学习中。要记得这里使用的是@Controller而不是@Restcontroller。我这里使用Student代替user对象。在网页打开的地址设置为http://localhost:8081/index.
其实按照书上使用的@Autowired是会被标下划波浪线的,提示不推荐使用,而我查了一下可以使用@Resource,那么具体的原因还需慢慢了解呀,读者可以自行研究。
package com.itheima.Controller;
import com.itheima.User;
import org.springframework.beans.factory.annotation.Autowired;
import org.springframework.stereotype.Controller;
import org.springframework.ui.Model;
import org.springframework.web.bind.annotation.GetMapping;
import javax.annotation.Resource;
@Controller
public class showController {
  // @Resource
    @Autowired
    private User user;
    @GetMapping("/index")
    public String index(Model model){
        model.addAttribute("Student",user);
        return "show";
    }
}
5.打开http://localhost:8081/index.
这样就可以得到老师要求的页面了,当然可以自己添加一些其他的东西来美化一下页面。这样我们的作业也就完成了。
四、收获总结
我也是第一次写博客,很多写作技巧也没有,所以整体呈现的效果也不是很好,希望有幸可以读到我们文章的同学或者前辈们多多包涵,我会继续学习进步的。当然这个小作业的过程可能没有讲的非常仔细,因为这也仅仅是我做的一个小过程分析,有遗漏之处欢迎补充!


 7万+
7万+


 被折叠的 条评论
为什么被折叠?
被折叠的 条评论
为什么被折叠?
 到【灌水乐园】发言


