


 本文详细介绍了在Qt中使用QObject和QTimer两种方法实现定时器,通过定时器控制图片的切换,并展示了如何操作开始、暂停和单次显示图片的功能。
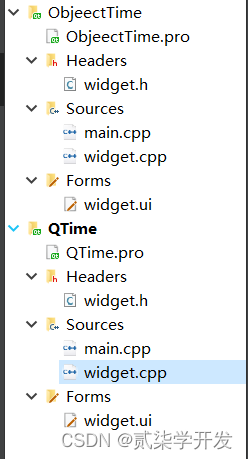
项目架构
1、首先创建好两个Qt项目 ,一个是QObjectTime, 一个是QTime
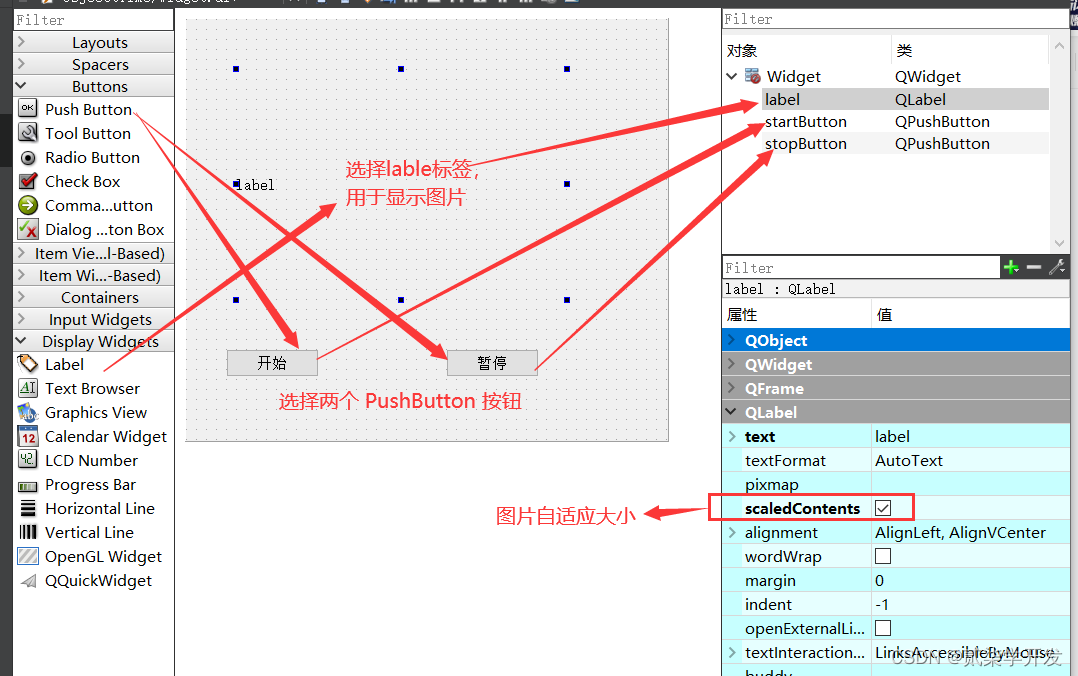
2、制作ui界面

一、使用QObject实现
定义定时器时间 :
#define TIMEOUT 1*1000widget.h中:
private slots:
    void on_startButton_clicked();

    void on_stopButton_clicked();

private:
    Ui::Widget *ui;
    int myTimeId ;   // 定时器编号
    int picID;       // 记录是第几张图片
widget.cpp 中:
#include "widget.h"
#include "ui_widget.h"

Widget::Widget(QWidget *parent)
    : QWidget(parent)
    , ui(new Ui::Widget)
{
    ui->setupUi(this);
    picID = 2 ;    // 图片id从2开始

    // // 图片的路径
    QPixmap pix("C:\\test\\1.jpg");
    ui->label->setPixmap(pix) ;
}

Widget::~Widget()
{
    delete ui;
}


void Widget::on_startButton_clicked()
{
    // 开始定时器,返回定时器编号
    myTimeId = this->startTimer(TIMEOUT) ;
}

void Widget::timerEvent(QTimerEvent *event)
{
    if( event->timerId() != myTimeId )
    {
        return ;
    }

    // 图片的路径
    QString path("C:\\test\\\");

    path += QString::number(picID);
    path += ".jpg" ;

    QPixmap pix(path);
    ui->label->setPixmap(pix) ;


    // 图片Id 加1
    picID ++ ;

    // 图片可以循环
    if( picID == 5)
    {
        picID = 1 ;
    }

}


// 暂停
void Widget::on_stopButton_clicked()
{
    this->killTimer(myTimeId) ;
}
二、使用QTimer实现
定义定时器时间 :
#include <QTimer>   // 添加头文件

#define TIMEOUT 1*1000  // 定义定时器时间
widget.h中:
private slots:
    void on_startButton_clicked();     // 开始

    void timeOutSlot() ;               // 自定义槽函数

    void on_stopButton_clicked();      // 暂停

    void on_singleButton_clicked();    // 单次

private:
    Ui::Widget *ui;

    QTimer *timer ;     // 指针
    int picID ;         // 图片编号
widget.cpp 中:
#include "widget.h"
#include "ui_widget.h"

Widget::Widget(QWidget *parent)
    : QWidget(parent)
    , ui(new Ui::Widget)
{
    ui->setupUi(this);

    timer = new QTimer; // 创建定时器对象

    picID = 2 ;

    QImage img ;

    // 加载图片
    img.load("C:\\test\\1.jpg");

    // 显示图片
    ui->label->setPixmap(QPixmap::fromImage(img)) ;

    // 定时器时间到, 发出timeout信号
    connect(timer, &QTimer::timeout, this, &Widget::timeOutSlot ) ;
}

Widget::~Widget()
{
    delete ui;
}


void Widget::on_startButton_clicked()
{
    // 开始定时器
    timer->start(TIMEOUT) ;
}

void Widget::timeOutSlot()
{
    // 图片路径
    QString path("C:test\\");
    path += QString::number(picID);
    path += ".jpg" ;

    // 加载显示图片
    QImage img ;
    img.load(path);
    ui->label->setPixmap(QPixmap::fromImage(img)) ;

    // 图片Id 加1
    picID ++ ;
    if( 5 == picID )
    {
        picID = 1 ;
    }

}


//  暂停
void Widget::on_stopButton_clicked()
{
    timer->stop() ;
}


// 单次
void Widget::on_singleButton_clicked()
{
    // 单次显示图片
    QTimer::singleShot(1000, this, SLOT(timeOutSlot())) ;

}
三、效果展示
视频没有弄好,就不放上来了,大家自行尝试。

未完待续
有疑问的小伙伴可以留言一起交流讨论!!!


 2万+
2万+


 被折叠的 条评论
为什么被折叠?
被折叠的 条评论
为什么被折叠?
 到【灌水乐园】发言


