


el-popover背景颜色的修改
需要注意popover组件生效后会被渲染在最外层,所以要在外层指定.el-popover的样式,例如放在app.vue里面,不要放在任何css之下
.el-popover {
  background-color: #000000 !important;
  color: #fff !important;
  border: none;
}

.el-popover[x-placement^=top] .popper__arrow::after {
  /*el-popover上边三角表层的颜色---也就是视觉上的角*/
  border-top-color: #000000;
}
根据条件修改el-table-column的字体颜色
直接修改color是不可以的,但是我们可以用插槽来修改
<el-table-column
            prop="situation"
            align="center"
            width="60px">
          <template slot-scope="scope">
            <div :style="{ color: scope.row.situation =='警报' ? 'orange' :(scope.row.situation =='异常' ?'red':'#67C23A' )}">
              {{ scope.row.situation }}
            </div>
          </template>
</el-table-column>
在el-popover中使用close-delay时浏览器报错
使用close-delay时需要注意要动态绑定,要不然浏览器会报错
<el-popover trigger="hover" placement="top" :close-delay="0">
	<p>{{ scope.row.explain }}</p>
	<div slot="reference" class="name-wrapper">
		<span>{{ scope.row.explain }}</span>
	</div>
</el-popover>
el-drawer定位到内容区外
原先的内容区被设置为超出框就隐藏,即overflow:hidden;所以只需要设置为inherit即可
.el-drawer {
    overflow: inherit;
  }
使用el-date-picker 日期选择器时浏览器报错
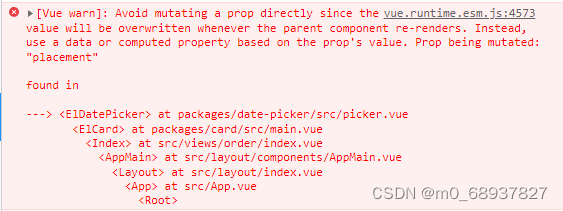
这是elment-ui的版本有问题,安装2.15.8版本的就可以了
el-navMenu鼠标移动时改变颜色
/deep/ .el-menu-item:hover {
  background: #00bfff !important;
}

/deep/ .el-menu-item.is-active {
  background-color: #00bfff !important;
}
/deep/ .el-submenu__title:hover{
  background-color: #00bfff!important;
}
/deep/ .el-submenu__title.is-active{
  background-color: #00bfff!important;
}
el-navMenu使用多级菜单展开时有一个下巴
解决方法:
/deep/ .el-menu-item-group__title{
      padding: 0px;
    }
el-form表单验证规则的注意事项
rules中的命名要与需验证的input框的v-model的命名一样
<el-form ref="ruleForm" :rules="rules" :model="productTemp">
  <el-form-item label="手机编号" prop="code" :label-width="formLabelWidth">
    <el-input type="age" clearable v-model="productTemp.code" autocomplete="off"></el-input>
  </el-form-item>
</el-form>


data(){
	return {
		rules: {
	        code: [
	          {required: true, message: '请输入手机编号', trigger: 'blur'}
	        ],
        }
	}
}
el-table隐藏内容过多时的滚动条
<style lang="scss">
    .el-table__body-wrapper::-webkit-scrollbar {
      /*width: 0;宽度为0隐藏*/
      width: 0px;
    }
    .el-table__body-wrapper::-webkit-scrollbar-thumb {
      border-radius: 2px;
      height: 50px;
      background: #eee;
    }
    .el-table__body-wrapper::-webkit-scrollbar-track {
      box-shadow: inset 0 0 5px rgba(0, 0, 0, 0.2);
      border-radius: 2px;
      background: rgba(0, 0, 0, 0.4);
    }
  }
</style>
注意不要在style里加scope
使用表单验证button或其它组件
使用表单验证时同样的方法对input有用,但是对其他组件不一样有用,这时我们可以用el-checkbox-group代理
<el-checkbox-group v-model="Form.imageUrl" v-show="false"></el-checkbox-group>
注意要用v-show="false"将其隐藏
将表格中的多选框改成单选框
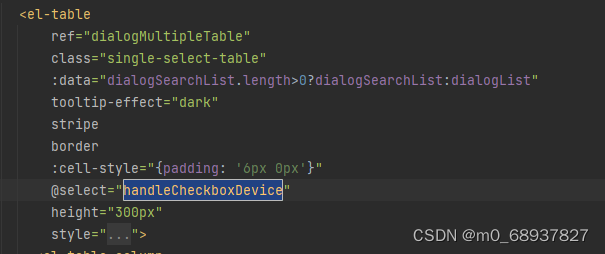
其中@select是点击多选框时触发的函数,后续的操作都是在这个函数中进行
handleCheckboxDevice(selection) {
     //将多选框的最后一个数据赋值给addDevice,后续需要就可以直接调用addDevice
      this.addDevice = selection.slice(-1)[0];
      if (selection.length > 1) {
        //将所有的多选框置于未选择的状态
        this.$refs.dialogMultipleTable.clearSelection();
        //选中最后点击的多选框的选中状态
        this.$refs.dialogMultipleTable.toggleRowSelection(selection.slice(-1)[0]);
      }
 }
el-table合并列
//在el-table标签中添加方法 :span-method="arraySpanMethod"

//在methods中
//rowIndex当前行号;columnIndex当前列号
arraySpanMethod({ rowIndex, columnIndex }){
      if (columnIndex === 1) {
        if (columnIndex === 1 && rowIndex === 0) {
          return {
            rowspan: this.routing.list.length,//数据的长度
            colspan: 1
          };
        } else {
          return {
            rowspan: 0,
            colspan: 0
          };
        }
      }
    },
el-table翻页记忆勾选状态
<el-table :row-key="getRowKey">
	<el-table-column type="selection" :reserve-selection="true"></el-table-column>
</el-table>

getRowKey(row) {
	return row.id;
},
清空已勾选的数据
//设置ref属性,然后哪里需要清空就哪里调用这个函数
clearAllSelection(){
	this.$nextTick(()=>{
		this.$refs.table.clearSelection()  //elementUI 官方文档的方法 不过直接使用会报错
	})
}


 7859
7859


 被折叠的 条评论
为什么被折叠?
被折叠的 条评论
为什么被折叠?
 到【灌水乐园】发言


