


目录
1.创建Maven项目
2.把前端博客系统代码复制到webapp目录下
3.数据库设计
4.实现博客列表页
5.实现博客详情页
6.实现博客登录页
7.实现用户信息界面修改
8.实现博客注销
9.实现博客删除
10.发布博客
11.对博客进行测试
1.创建Maven项目
- 创建webapp目录,在webapp里面创建WEB-INF目录,在WEB-INF里面创建web.xml(Tomcat 找到这个文件才能正确处理 webapp 中的动态资源.

- 配置web.xml
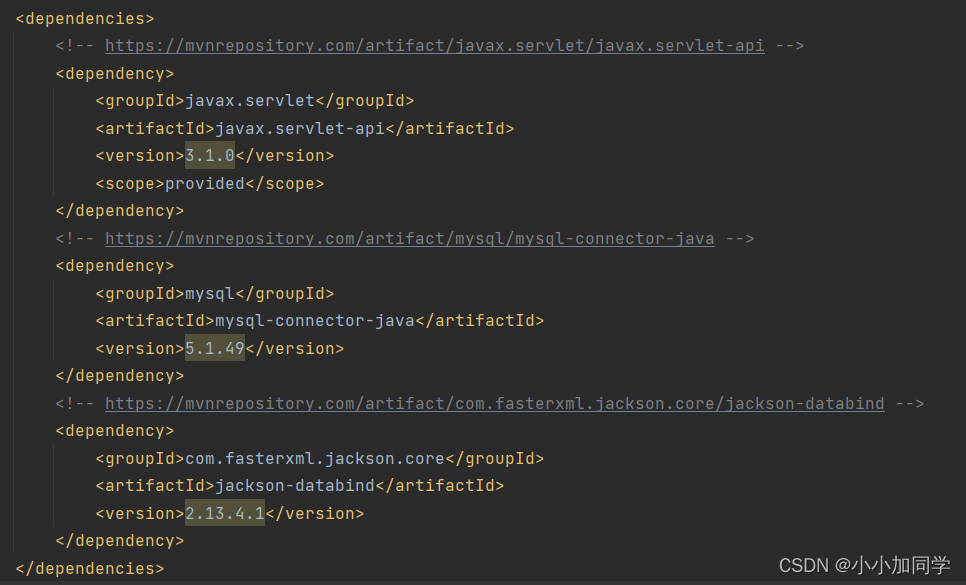
<!DOCTYPE web-app PUBLIC "-//Sun Microsystems, Inc.//DTD Web Application 2.3//EN" "http://java.sun.com/dtd/web-app_2_3.dtd" > <web-app> <display-name>Archetype Created Web Application</display-name> </web-app> - 在 pom.xml 中引入 Servlet API 依赖的 jar 包(把中央仓库中提供的 xml 复制到项目的 pom.xml 中)
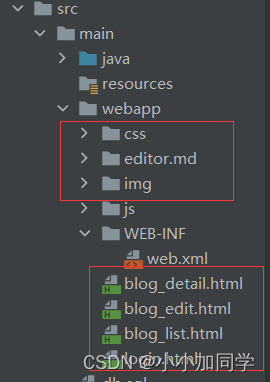
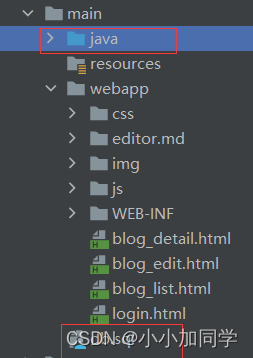
2.把前端博客系统代码复制到webapp目录下
3.数据库设计
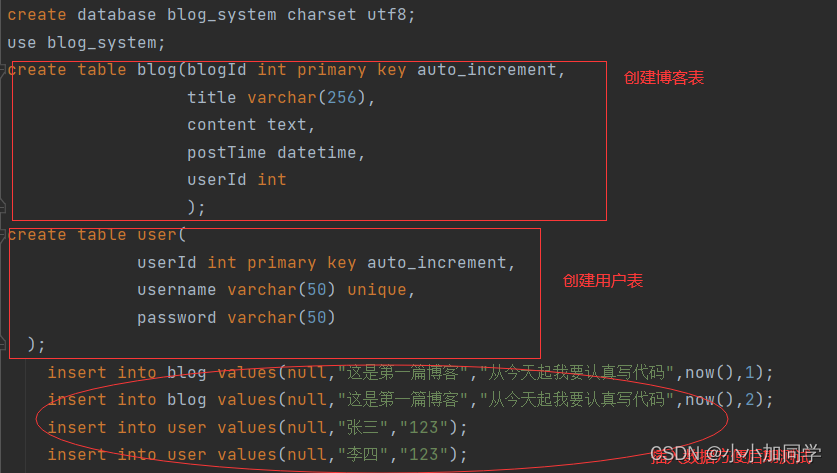
- 在main目录下创建db.sql来存放设计的表(博客表,用户表)
建立DBUtil类来封装数据库,实现数据库的连接和断开代码
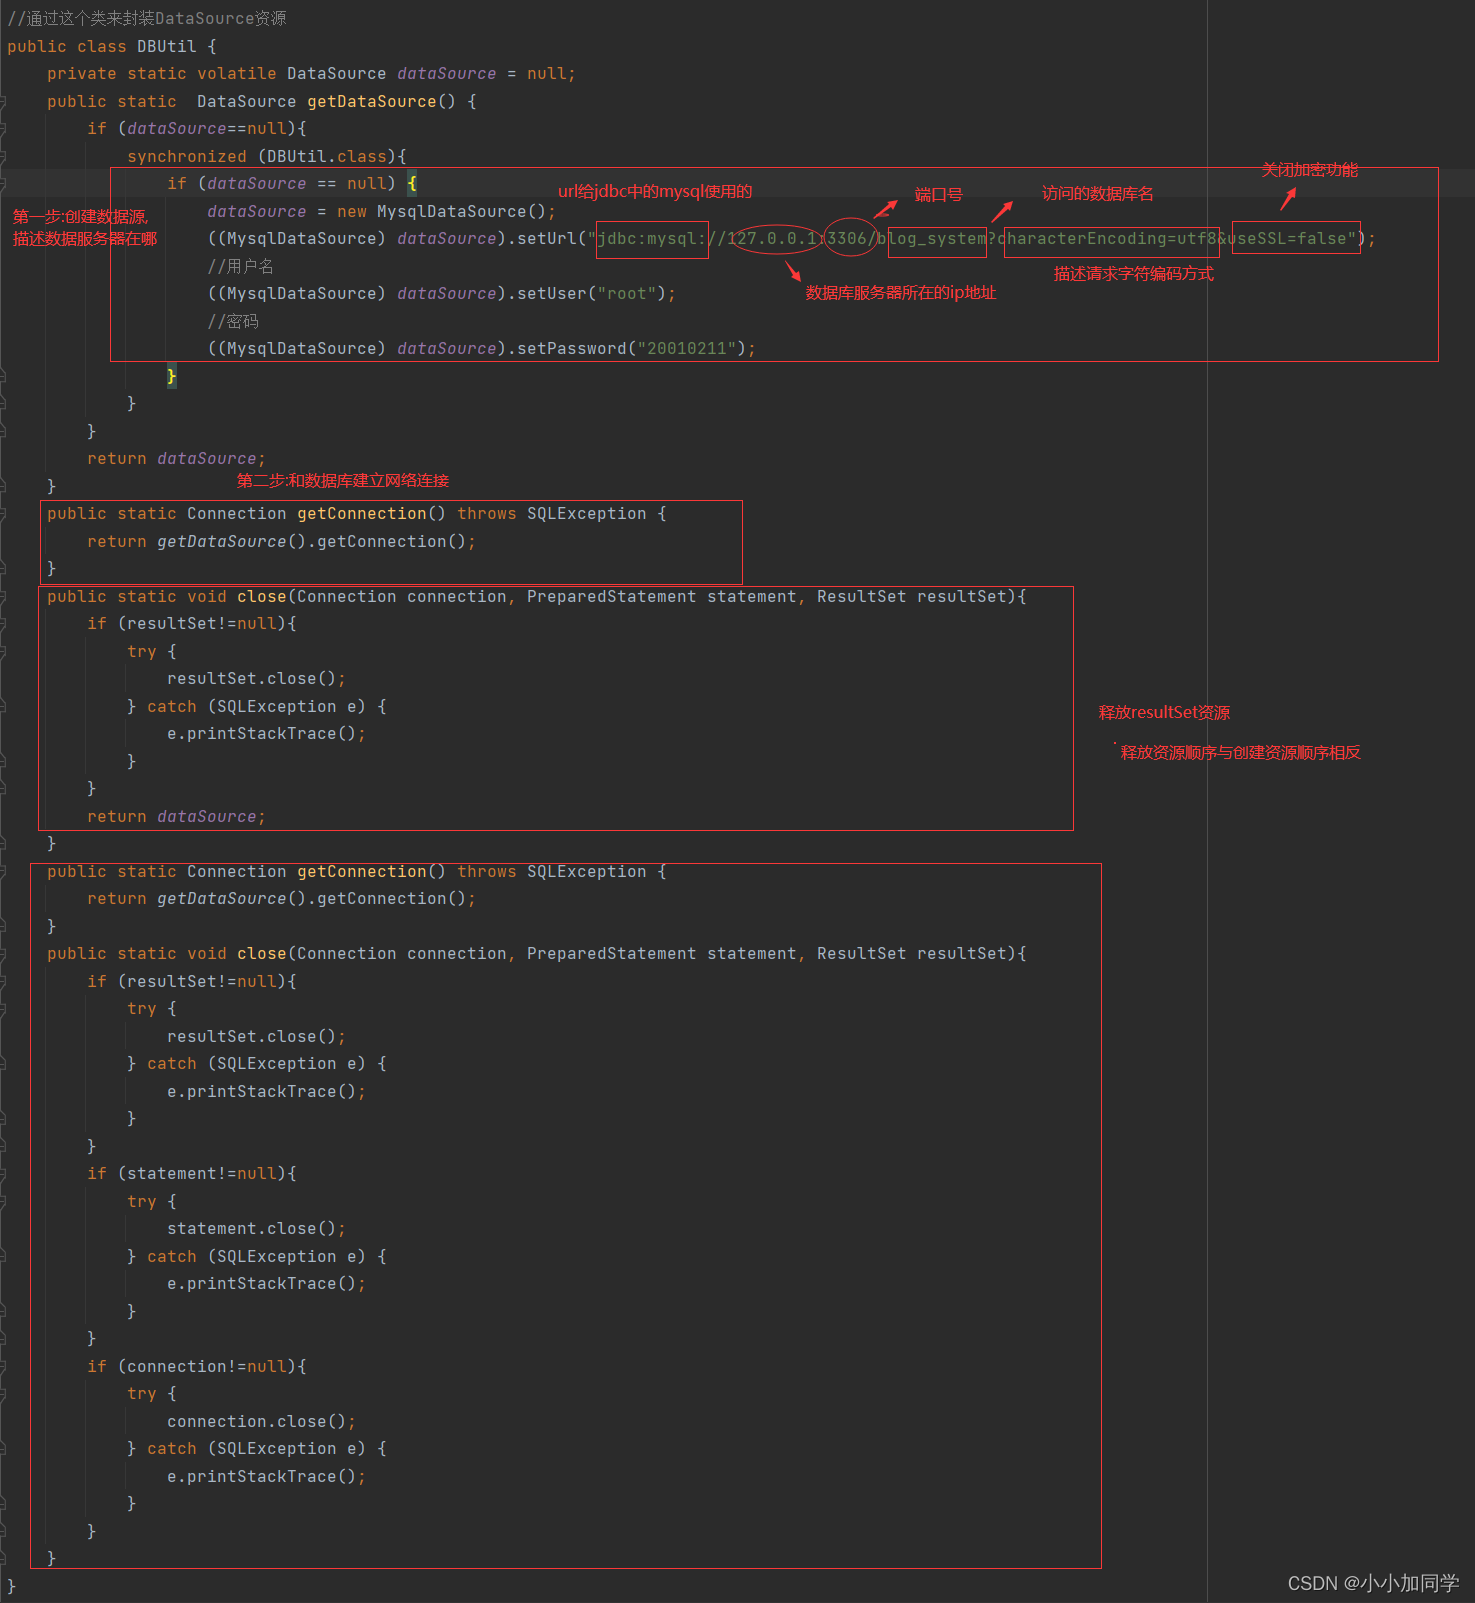
代码如下:
//通过这个类来封装DataSource资源
public class DBUtil {
    private static volatile DataSource dataSource = null;
    public static  DataSource getDataSource() {
        if (dataSource==null){
            synchronized (DBUtil.class){
                if (dataSource == null) {
                    dataSource = new MysqlDataSource();
                    ((MysqlDataSource) dataSource).setUrl("jdbc:mysql://127.0.0.1:3306/blog_system?characterEncoding=utf8&useSSL=false");
                    //用户名
                    ((MysqlDataSource) dataSource).setUser("root");
                    //密码
                    ((MysqlDataSource) dataSource).setPassword("20010211");
                }
            }
        }
        return dataSource;
    }
    public static Connection getConnection() throws SQLException {
        return getDataSource().getConnection();
    }
    public static void close(Connection connection, PreparedStatement statement, ResultSet resultSet){
        if (resultSet!=null){
            try {
                resultSet.close();
            } catch (SQLException e) {
                e.printStackTrace();
            }
        }
        if (statement!=null){
            try {
                statement.close();
            } catch (SQLException e) {
                e.printStackTrace();
            }
        }
        if (connection!=null){
            try {
                connection.close();
            } catch (SQLException e) {
                e.printStackTrace();
            }
        }
    }
}- 创建两个实体类,设计的表结构怎么设计就怎么实现,每一个实体类对应表结构的一条记录.
博客类(博客id,文章标题,文章内容,发布时间,用户id)
public class Blog {
    private int blogId;
    private String title;
    private String content;
    //MySQL的有关时间都是使用Timestamp来表示
    private Timestamp postTime;
    private int userId;

    public int getBlogId() {
        return blogId;
    }

    public void setBlogId(int blogId) {
        this.blogId = blogId;
    }

    public String getTitle() {
        return title;
    }

    public void setTitle(String title) {
        this.title = title;
    }

    public String getContent() {
        return content;
    }

    public void setContent(String content) {
        this.content = content;
    }

    public String getPostTime() {
        //魔改一下时间日期,格式化时间
        SimpleDateFormat simpleDateFormat=new SimpleDateFormat("yyyy-MM-dd HH:mm:ss");
        return simpleDateFormat.format(postTime);
    }

    public void setPostTime(Timestamp postTime) {
        this.postTime = postTime;
    }

    public int getUserId() {
        return userId;
    }

    public void setUserId(int userId) {
        this.userId = userId;
    }
}
用户类(用户名,密码,用户id)
public class User {
    private int userId;
    private String username;
    private String password;

    public int getUserId() {
        return userId;
    }

    public void setUserId(int userId) {
        this.userId = userId;
    }

    public String getUsername() {
        return username;
    }

    public void setUsername(String username) {
        this.username = username;
    }

    public String getPassword() {
        return password;
    }

    public void setPassword(String password) {
        this.password = password;
    }
}
- 针对数据库增删改查操作分别对两个实体类进行封装
- 对博客类进行封装
- 插入一个博客到数据库中 -- 发布博客
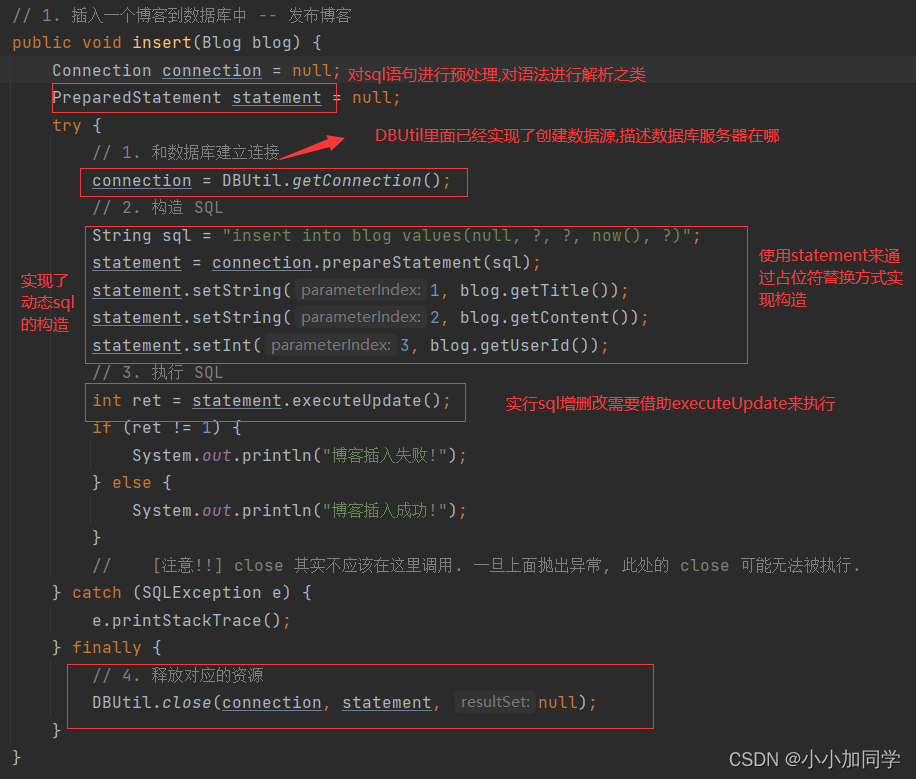
代码如下:
 // 1. 插入一个博客到数据库中 -- 发布博客
    public void insert(Blog blog) {
        Connection connection = null;
        PreparedStatement statement = null;
        try {
            // 1. 和数据库建立连接
            connection = DBUtil.getConnection();
            // 2. 构造 SQL
            String sql = "insert into blog values(null, ?, ?, now(), ?)";
            statement = connection.prepareStatement(sql);
            statement.setString(1, blog.getTitle());
            statement.setString(2, blog.getContent());
            statement.setInt(3, blog.getUserId());
            // 3. 执行 SQL
            int ret = statement.executeUpdate();
            if (ret != 1) {
                System.out.println("博客插入失败!");
            } else {
                System.out.println("博客插入成功!");
            }
            //    [注意!!] close 其实不应该在这里调用. 一旦上面抛出异常, 此处的 close 可能无法被执行.
        } catch (SQLException e) {
            e.printStackTrace();
        } finally {
            // 4. 释放对应的资源
            DBUtil.close(connection, statement, null);
        }
    }
2.根据博客 id 来查询指定博客 -- 博客详情页
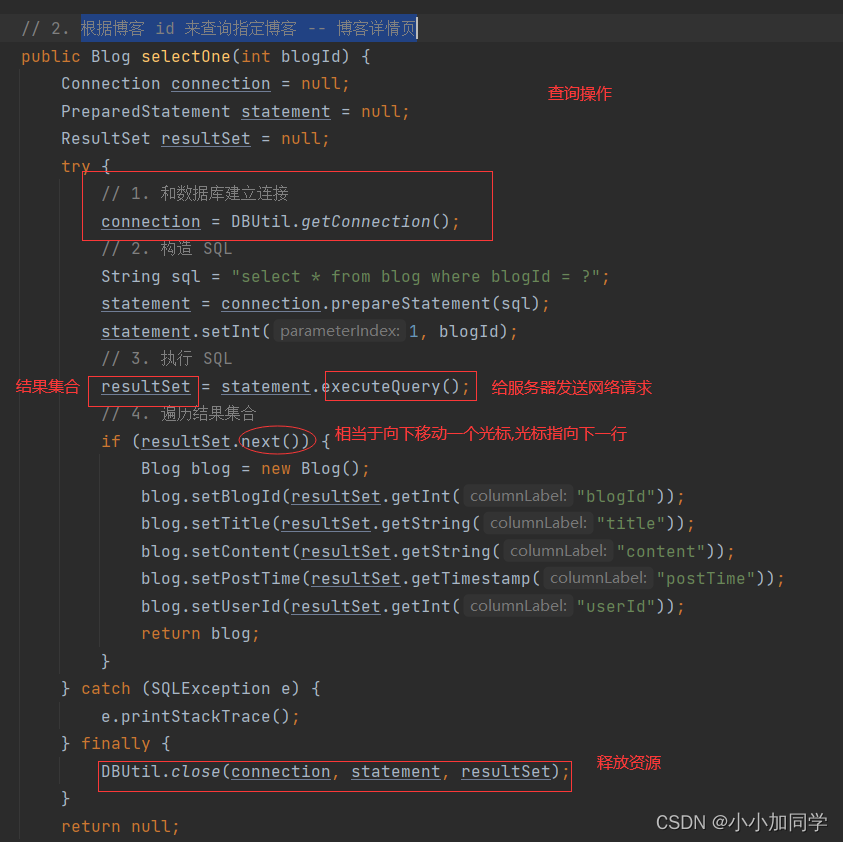
代码如下:
// 2. 根据博客 id 来查询指定博客 -- 博客详情页
public Blog selectOne(int blogId) {
Connection connection = null;
PreparedStatement statement = null;
ResultSet resultSet = null;
try {
// 1. 和数据库建立连接
connection = DBUtil.getConnection();
// 2. 构造 SQL
String sql = "select * from blog where blogId = ?";
statement = connection.prepareStatement(sql);
statement.setInt(1, blogId);
// 3. 执行 SQL
resultSet = statement.executeQuery();
// 4. 遍历结果集合
if (resultSet.next()) {
Blog blog = new Blog();
blog.setBlogId(resultSet.getInt("blogId"));
blog.setTitle(resultSet.getString("title"));
blog.setContent(resultSet.getString("content"));
blog.setPostTime(resultSet.getTimestamp("postTime"));
blog.setUserId(resultSet.getInt("userId"));
return blog;
}
} catch (SQLException e) {
e.printStackTrace();
} finally {
DBUtil.close(connection, statement, resultSet);
}
return null;
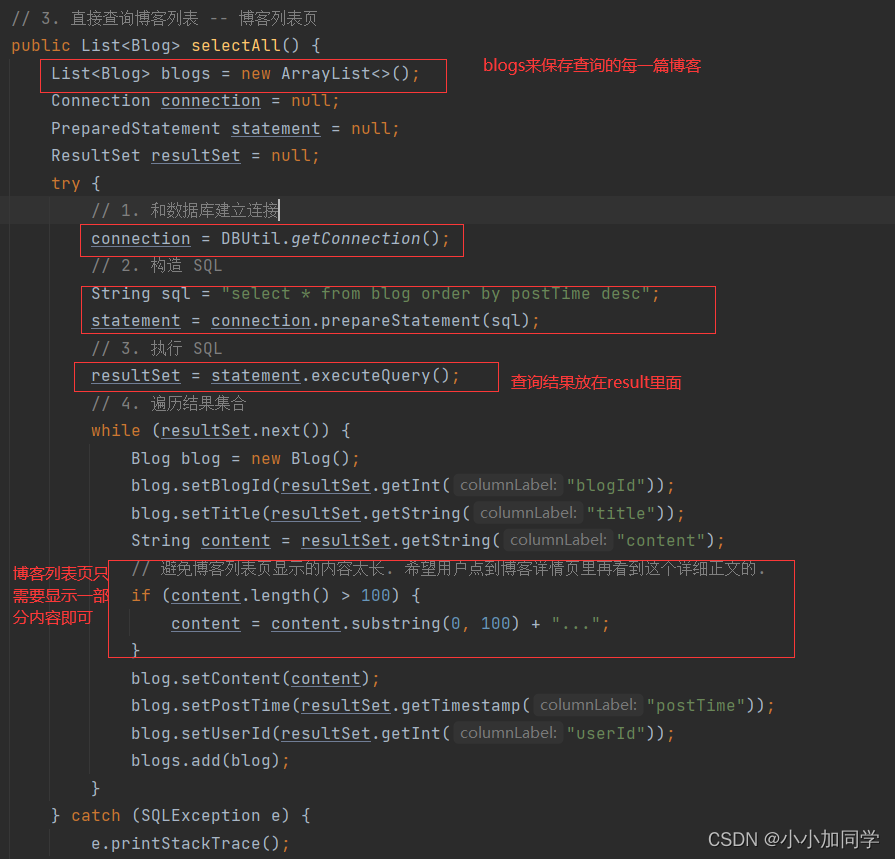
}3.直接查询博客列表 -- 博客列表页
4.删除指定博客 -- 删除博客
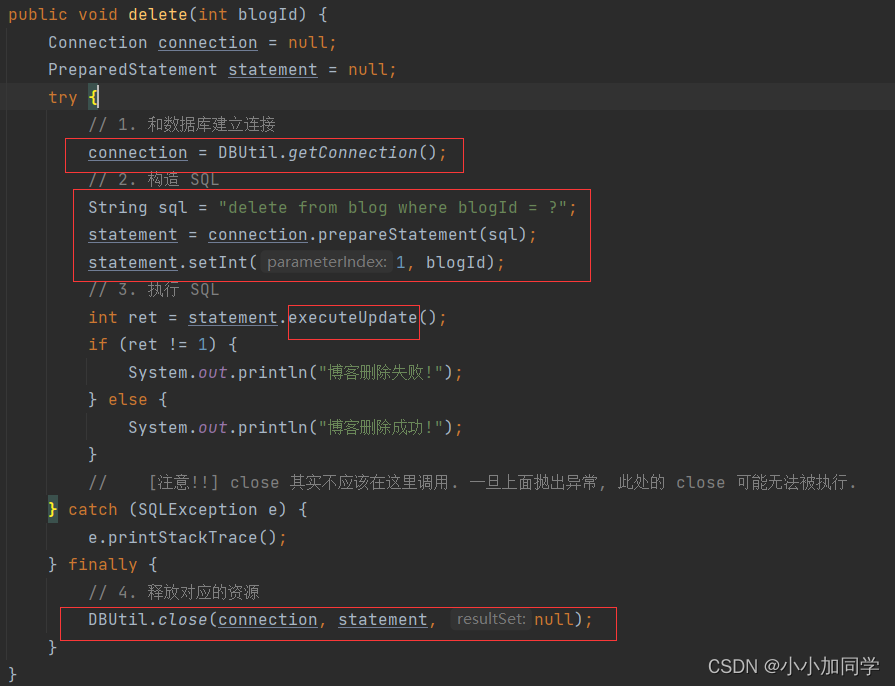
- 针对用户类的增删改查封装
1.根据用户名来查询用户的详情 -- 登陆(用户名需要唯一)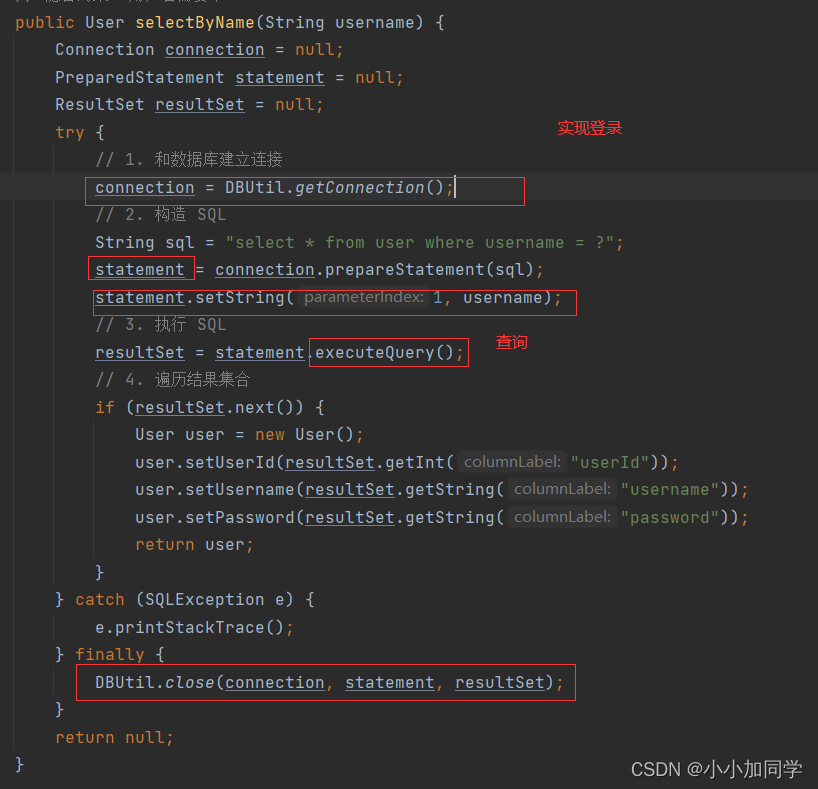
2.根据用户 id 来查询用户详情 -- 在获取用户信息的时候, 需要用到.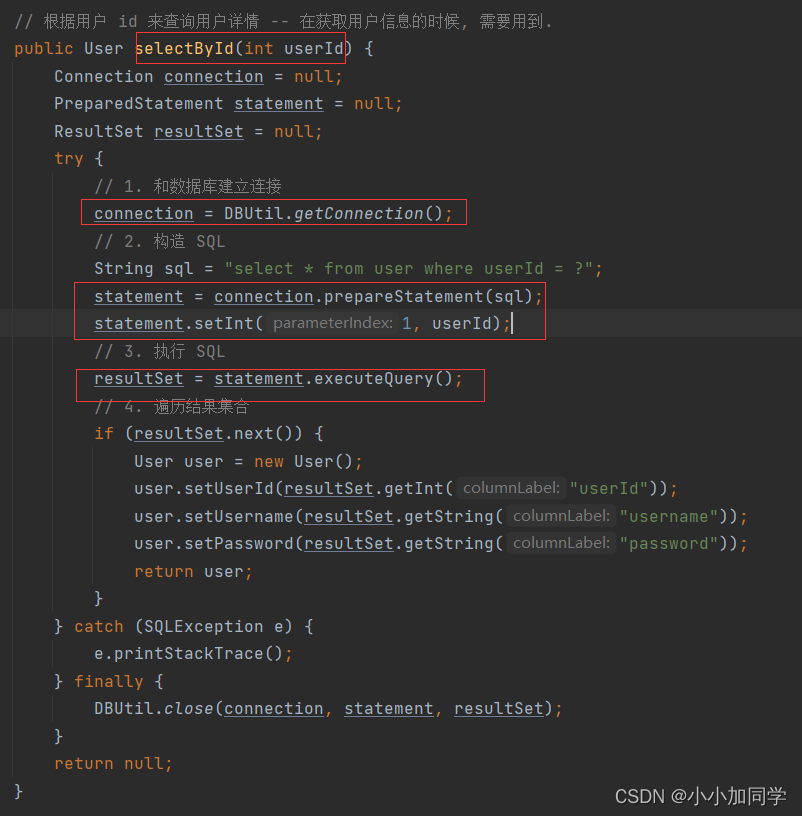
4.实现博客列表页(进行前后端交互,页面发送http请求,服务器返回http请求)
- 约定前后端接口(页面加载时通过ajax发起http请求,服务器获取到博客列表数据,考虑好要发送什么样的请求,返回什么样的响应)
请求:GET/blog
响应: HTTP/1.1 200 OK Content-Type:application/json
[
{
blogId:1,
title:"第一篇",
context::这是正文1"
posttime:"2020-11-24 12:00:01"
userid:1
},
{
blogId:2,
title:"第二篇",
context::这是正文2"
posttime:"2020-11-25 12:05:01"
userid:2
},
..................................................
]
- 先获取博客数据库列表,把它转换成json格式(服务器)
@WebServlet("/blog")
public class BlogServlet extends HttpServlet {
    private ObjectMapper objectMapper = new ObjectMapper();
    @Override
    protected void doGet(HttpServletRequest req, HttpServletResponse resp) throws ServletException, IOException {//从数据库中查询到博客列表,转成json 格式
      //获取博客列表
       BlogDao blogDao = new BlogDao();
       List<Blog> blogs = blogDao.selectAll();
       //转换
       String respJson = objectMapper.writeValueAsString(blogs);
       resp.setContentType("application/json;charset=utf8");
       resp.getWriter().write(respJson);

    }
}
- 修改博客列表页的客户端代码(之前的博客列表页内容是固定的,现在需要去修改这部分固定代码) 使用ajax给服务器发送http请求, 服务器返回json格式数据
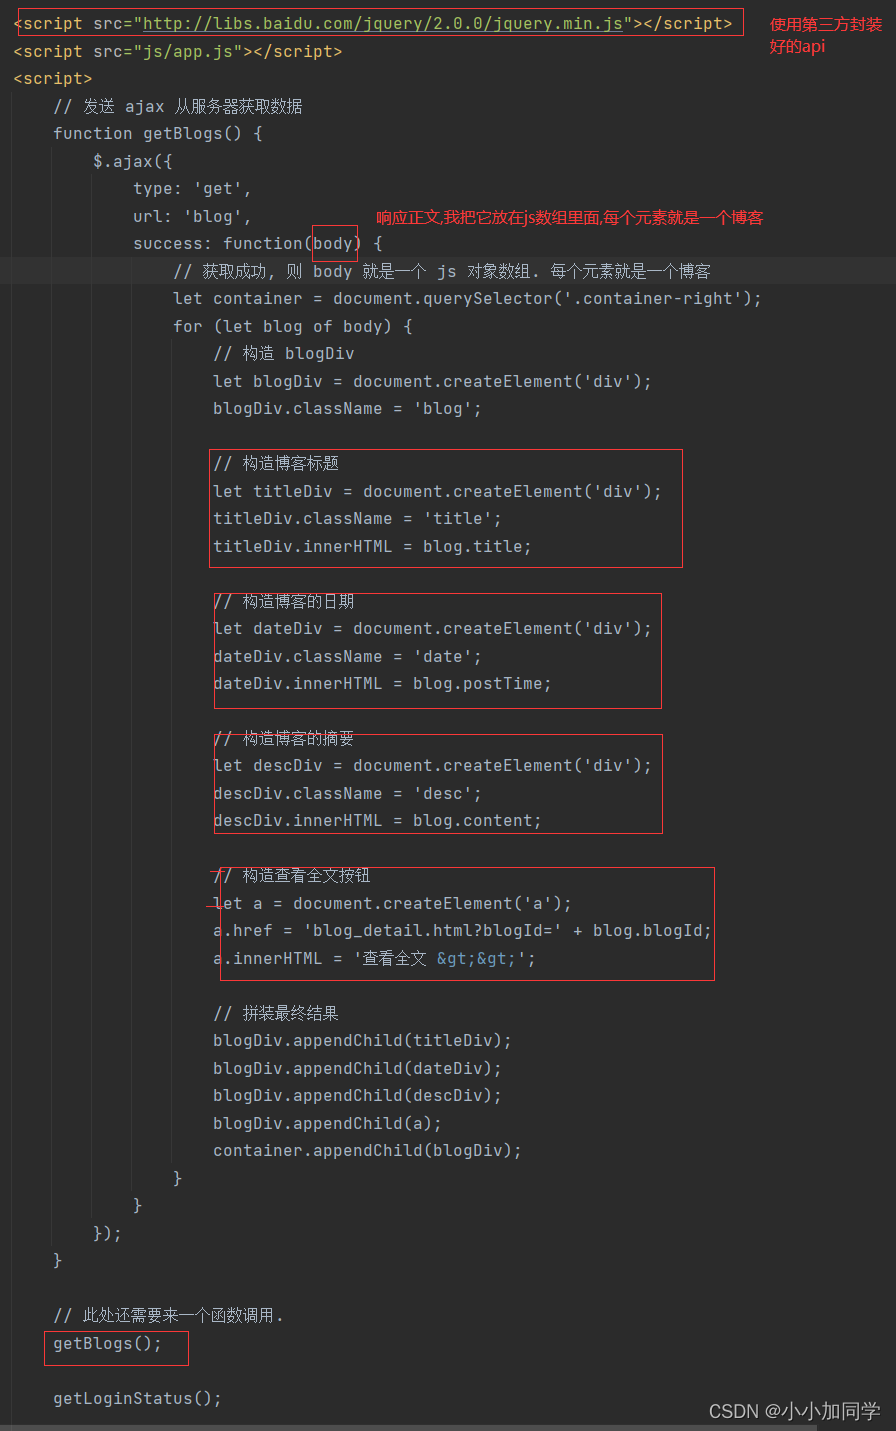
代码如下:
<script src="http://libs.baidu.com/jquery/2.0.0/jquery.min.js"></script>
<script src="js/app.js"></script>
<script>
// 发送 ajax 从服务器获取数据
function getBlogs() {
$.ajax({
type: 'get',
url: 'blog',
success: function(body) {
// 获取成功, 则 body 就是一个 js 对象数组. 每个元素就是一个博客
//清空右半部分内容
let container = document.querySelector('.container-right');
//遍历body,构造出一个个bodyDive
for (let blog of body) {
// 构造 blogDiv
let blogDiv = document.createElement('div');
blogDiv.className = 'blog';
// 构造博客标题
let titleDiv = document.createElement('div');
titleDiv.className = 'title';
titleDiv.innerHTML = blog.title;
// 构造博客的日期
let dateDiv = document.createElement('div');
dateDiv.className = 'date';
dateDiv.innerHTML = blog.postTime;
// 构造博客的摘要
let descDiv = document.createElement('div');
descDiv.className = 'desc';
descDiv.innerHTML = blog.content;
// 构造查看全文按钮
let a = document.createElement('a');
a.href = 'blog_detail.html?blogId=' + blog.blogId;
a.innerHTML = '查看全文 >>';
// 拼装最终结果
blogDiv.appendChild(titleDiv);
blogDiv.appendChild(dateDiv);
blogDiv.appendChild(descDiv);
blogDiv.appendChild(a);
container.appendChild(blogDiv);
}
}
});
}
// 此处还需要来一个函数调用.
getBlogs();
5.实现博客详情页(点击查看全文按钮,就会发送一个get请求,这个请求需要告诉服务器要请求哪篇博客,进入博客详情页,需要让博客详情页再次发送ajax请求,向服务器获取到当前blogid对应的博客内容)
- 约定前后端接口相比于博客列表页请求,此时博客详情页在blog里面多加了一个参数
[ 请求 ]
GET / blog ? blogId = 1
[ 响应 ]
{
blogId : 1 ,
title : " 第一篇博客 " ,
content : " 博客正文 " ,
userId : 1 ,
postTime : "2022-07-06 12:00:00"
},
- 修改服务器代码,通过blogid参数来判断是获取列表还是详情页
WebServlet("/blog")
public class BlogServlet extends HttpServlet {
    private ObjectMapper objectMapper = new ObjectMapper();

    @Override
    protected void doGet(HttpServletRequest req, HttpServletResponse resp) throws ServletException, IOException {
        // 按照约定的接口格式返回数据
        // 在博客列表页中, 已经使用了 BlogServlet.doGet 方法了.
        // 博客详情页, 也想用. 就需要做出区分. 使用 query string 来区分.
        // 如果请求带有 query string , 有 blogId 这个参数, 就认为是博客详情页的请求.
        // 如果请求不带有 query string, 就认为是博客列表页的请求.
        resp.setContentType("application/json; charset=utf8");

        BlogDao blogDao = new BlogDao();
        String blogId = req.getParameter("blogId");
        if (blogId == null) {
            // 博客列表页发起的请求
            List<Blog> blogs = blogDao.selectAll();
            resp.getWriter().write(objectMapper.writeValueAsString(blogs));
        } else {
            // 博客详情页发起的请求
            Blog blog = blogDao.selectOne(Integer.parseInt(blogId));
            resp.getWriter().write(objectMapper.writeValueAsString(blog));
        }
}- 修改博客详情页的代码,改变其中不变的内容(博客的正文是markdown格式,数据库存的也是markdown格式,根据获取到的响应数据, 通过 editor.md 转换成 html, 并显示)
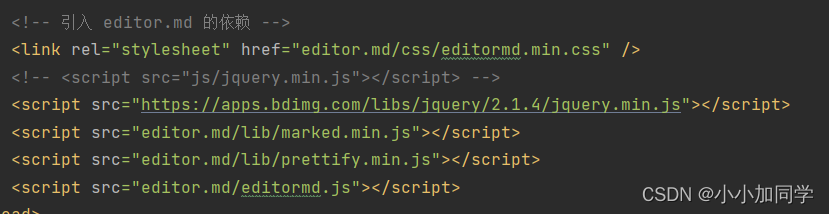
<!-- 通过 ajax 获取到博客详情内容 -->
<script src="js/app.js"></script>
<script>
        function getBlog() {
            $.ajax({
                type: 'get',
                //location.search 拿到了形如 '?blogId=1' 这样的一段内容
                url: 'blog' + location.search,
                success: function(body) {
                    let h3 = document.querySelector('.blog-detail>h3');
                    h3.innerHTML = body.title;
                    let dateDiv = document.querySelector('.blog-detail>.date');
                    dateDiv.innerHTML = body.postTime;
                    let contentDiv = document.querySelector('#content');
                    contentDiv.innerHTML = body.content;
                    // 构造博客正文
                    // 如果直接把 content 设为 innerHTML, 此时展示在界面上的内容, 是原始的 markdown 字符串
                    // 此处需要的是渲染后的, 带有格式的效果


                    // 第一个参数对应 id=content 的 html 标签. 渲染后得到的 html 片段就会被放到这个 标签下.

                    // 构造博客正文此处使用 editor.md 来进行渲染
                    editormd.markdownToHTML('content', { markdown: body.content });
                }
            });
        }

        getBlog();
6.登录页面(用户输入用户名和密码,点击登录按钮,发起一个请求,把用户名和密码提交给服务器,服务器对其进行验证,成功后即可登录)
- 约定前后端请求
请求:POST/login Content-Type:application/x-www-from-urlencode
usename=张三&password=123
响应:
Http:1.1 302 location:body_list html (实现在博客列表页强制登录)
- 实现服务器登录
@WebServlet("/login")
public class LoginServlet extends HttpServlet {
    @Override
    protected void doPost(HttpServletRequest req, HttpServletResponse resp) throws ServletException, IOException {
        // 1. 从请求中获取到用户名和密码
        req.setCharacterEncoding("utf-8");
        String username = req.getParameter("username");
        String password = req.getParameter("password");
        if (username == null || username.equals("") || password == null || password.equals("20010211")) {
            // 用户名密码为空. 直接返回登陆失败
            resp.setContentType("text/html; charset=utf8");
            resp.getWriter().write("用户名或密码为空! 登陆失败!");
            return;
        }

        // 2. 查询数据库, 验证用户名密码是否正确
        UserDao userDao = new UserDao();
        User user = userDao.selectByName(username);
        if (user == null || !user.getPassword().equals(password)) {
            // 用户名不存在, 或者密码不相同, 返回登陆失败
            resp.setContentType("text/html; charset=utf8");
            resp.getWriter().write("用户名或密码错误! 登陆失败!");
            return;
        }

        // 3. 如果正确, 创建一个会话对象
        HttpSession session = req.getSession(true);
        // 在会话中保存一下 user, 以备后面使用. 后续访问其他页面, 就可以直接通过会话拿到当前是哪个用户在访问了.
        session.setAttribute("user", user);

        // 4. 构造 302 响应报文
        resp.sendRedirect("blog_list.html");
}- 登陆页面提供一个 form 表单 , 通过 form 的方式把用户名密码提交给服务器。(修改了button提交按钮,加上了login和post)
<!-- 用这个元素作为页面的版心, 把对话框放到这个元素里面, 垂直水平居中 -->
<div class="login-container">
    <form action="login" method="post">
        <!-- 登录对话框 -->
        <div class="dialog">
            <h3>登录</h3>
            <div class="row">
                <span>用户名</span>
                <!-- 这两个框很关键, 后面还要用, 就起个 id 作为标识 -->
                <input type="text" id="username" name="username">
            </div>
            <div class="row">
                <span>密码</span>
                <input type="password" id="password" name="password">
            </div>
            <div class="row">
                <input id="login-btn" value="登陆" type="submit">
            </div>
        </div>
    </form>
</div>- 实现强制登录功能(在博客列表页,编辑页,详情页在页面加载后发起ajax请求,这个请求从服务器获取当前登陆状态,如果当下未登录则返回到登录页,已经登陆不用处理)
-
// 这个文件里放一些页面公共的代码 // 加上一个逻辑, 通过 GET /login 这个接口来获取下当前的登录状态~ function getUserInfo(pageName) { $.ajax({ type: 'get', url: 'login', success: function(body) { // 判定此处的 body 是不是一个有效的 user 对象(userId 是否非 0) if (body.userId && body.userId > 0) { // 登录成功! // 不做处理! console.log("当前用户登录成功! 用户名: " + body.username); // 根据当前用户登录的情况, 把当前用户名设置到界面上 if (pageName == 'blog_list.html') { changeUserName(body.username); } } else { // 登录失败! // 让前端页面, 跳转到 login.html alert("当前您尚未登录! 请登录后再访问博客列表!"); location.assign('blog_login.html'); } }, error: function() { alert("当前您尚未登录! 请登录后再访问博客列表!"); location.assign('blog_login.html'); } }); } function changeUserName(username) { let h3 = document.querySelector('.card>h3'); h3.innerHTML = username; -
博客编辑页页面修改:
7.修改用户信息(如果当前页面是博客列表页 , 则显示当前登陆用户的信息 ,当前页面是博客详情页 , 则显示该博客的作者用户信息
- 约定前后端请求
针对列表页:
请求:GET/userinfo
响应: HTTP/1.1 200 ok
Content-Type:application/json
{
userid:1,
username:"张三"
}
针对详情页:
请求:GET/userinfo /blogid=1
响应: HTTP/1.1 200 ok
Content-Type:application/json
{
userid:1,
username:"张三"
}
- 实现服务器代码
@WebServlet("/userInfo")
public class UserInfoServlet extends HttpServlet {
    private ObjectMapper objectMapper = new ObjectMapper();

    @Override
    protected void doGet(HttpServletRequest req, HttpServletResponse resp) throws ServletException, IOException {
        // 获取用户信息
        String blogId = req.getParameter("blogId");
        if (blogId == null) {
            // 列表页, 获取当前登陆用户的信息
            // 直接从 session 中获取即可~~
            getUserInfoFromSession(req, resp);
        } else {
            // 详情页, 获取文章作者的信息
            // 查询数据库
            getUserInfoFromDB(req, resp, Integer.parseInt(blogId));
        }
    }

    private void getUserInfoFromDB(HttpServletRequest req, HttpServletResponse resp, int blogId) throws IOException {
        // 1. 先根据 blogId 查询 Blog 对象, 获取到 userId (作者是谁)
        BlogDao blogDao = new BlogDao();
        Blog blog = blogDao.selectOne(blogId);
        if (blog == null) {
            // 如果参数传来的这个 blogId 是随便瞎写的. 数据库里没有.
            resp.setStatus(404);
            resp.setContentType("text/html;charset=utf8");
            resp.getWriter().write("blogId 不存在");
            return;
        }
        // 2. 根据 userId 查询对应的 User 对象即可
        UserDao userDao = new UserDao();
        User user = userDao.selectById(blog.getUserId());
        if (user == null) {
            resp.setStatus(404);
            resp.setContentType("text/html;charset=utf8");
            resp.getWriter().write("blogId 不存在");
            return;
        }
        // 3. 把 user 对象返回给浏览器了
        user.setPassword("");
        resp.setContentType("application/json;charset=utf8");
        resp.getWriter().write(objectMapper.writeValueAsString(user));
    }

    private void getUserInfoFromSession(HttpServletRequest req, HttpServletResponse resp) throws IOException {
        HttpSession session = req.getSession(false);
        if (session == null) {
            resp.setStatus(403);
            resp.setContentType("text/html;charset=utf8");
            resp.getWriter().write("当前未登录");
            return;
        }
        User user = (User) session.getAttribute("user");
        if (user == null) {
            resp.setStatus(403);
            resp.setContentType("text/html;charset=utf8");
            resp.getWriter().write("当前未登录");
            return;
        }
        // user 获取到了, 把 user 中的 password 给干掉, 然后返回.
        user.setPassword("");

        resp.setContentType("application/json; charset=utf8");
        resp.getWriter().write(objectMapper.writeValueAsString(user));
    }
}
8.实现注销登录(点击注销按钮,给服务器发送一个http请求告诉服务器,要退出登录,服务器就会把会话中user对象给删除了,同时重新定向跳转到登录页)
- 约定前后端交互接口
请求: GET/logout
响应:HTTP/1.1 302
location:login.html
- 服务器 注销
@WebServlet("/logout")
public class LogoutServlet extends HttpServlet {
    @Override
    protected void doGet(HttpServletRequest req, HttpServletResponse resp) throws ServletException, IOException {
        HttpSession session = req.getSession(false);
        if (session == null) {
            resp.setStatus(403);
            return;
        }
        // 直接把 session 中之前的 user 对象给删掉即可!!
        session.removeAttribute("user");
        // 不要忘记重定向到登陆页面!
        resp.sendRedirect("login.html");
    }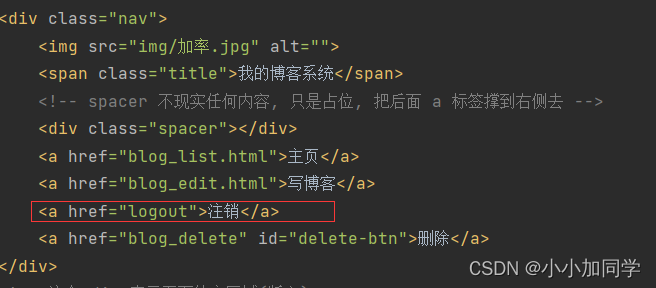
}- 客户端代码只需要调一个注销按钮,将注销按钮设置为 <a href="logout"> , 点击的时候就会发送 GET /logou 这样的请求
9.删除博客 (在博客详情页导航栏加上删除按钮,通过a标签的hearf属性发送get请求,但是删除要做一个判断,如果当前登录用户就是文章作者可以删除,否则不可以)
- 约定前后端交互接口
请求: GET/blog-delete?blogid=1
响应:删除成功 HTTP/1.1 302
location:blog_list.html
删除失败 HTTP/1.1 403
没有删除权限
- 服务器删除代码
@WebServlet("/blog_delete") public class BlogDeleteServlet extends HttpServlet { @Override protected void doGet(HttpServletRequest req, HttpServletResponse resp) throws ServletException, IOException { // 1. 先判定用户的登陆状态 HttpSession session = req.getSession(false); if (session == null) { resp.setStatus(403); resp.setContentType("text/html; charset=utf8"); resp.getWriter().write("您当前未登录, 不能删除!"); return; } User user = (User) session.getAttribute("user"); if (user == null) { resp.setStatus(403); resp.setContentType("text/html; charset=utf8"); resp.getWriter().write("您当前未登录, 不能删除!"); return; } // 2. 获取到 blogId String blogId = req.getParameter("blogId"); if (blogId == null) { // 这个 blogId 参数不存在, 无法删除 resp.setStatus(404); resp.setContentType("text/html; charset=utf8"); resp.getWriter().write("您当前删除的 blogId 有误"); return; } // 3. 查询出这个 blogId 对应的 Blog 对象 BlogDao blogDao = new BlogDao(); Blog blog = blogDao.selectOne(Integer.parseInt(blogId)); if (blog == null) { // 这个 blogId 参数不存在, 无法删除 resp.setStatus(404); resp.setContentType("text/html; charset=utf8"); resp.getWriter().write("您当前删除的 博客 不存在! blogId=" + blogId); return; } // 4. 判定登陆用户是否就是文章作者 if (blog.getUserId() != user.getUserId()) { // blog.getUserId() 文章的作者 // user.getUserId() 从 session 里拿的登陆的用户是谁. // 不一样, 说明在删别人的文章. // 直接返回 403 resp.setStatus(403); resp.setContentType("text/html; charset=utf8"); resp.getWriter().write("当前您不能删除别人的博客!"); return; } // 5. 真正执行删除操作. blogDao.delete(Integer.parseInt(blogId)); // 6. 返回 302 重定向 resp.sendRedirect("blog_list.html"); } - 修改blog_detail.html的页面
// 刚才少了一步, 需要把当前的 blogId 给设置上来的~~
function updateDeleteURL() {
let deleteBtn = document.querySelector('#delete-btn');
deleteBtn.href = 'blog_delete' + location.search;
}
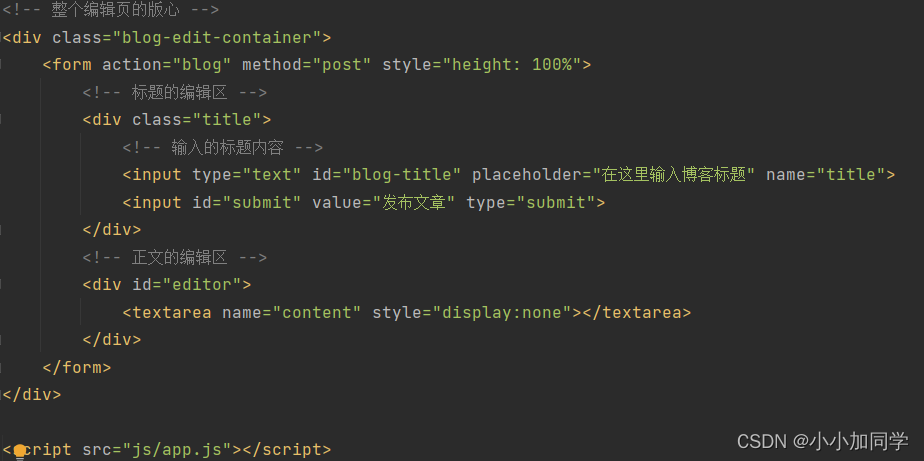
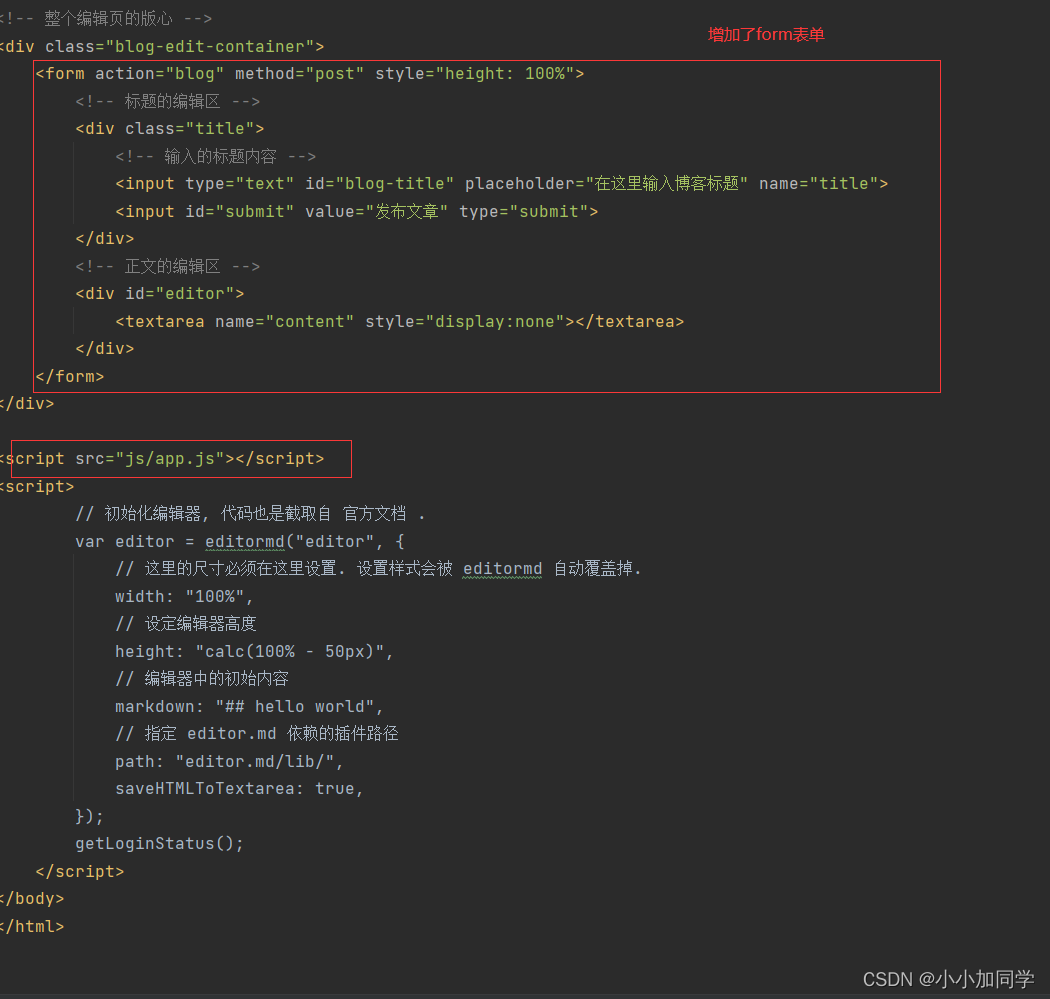
updateDeleteURL();10.发布博客(用户在编辑页进行编辑,点击发布博客,发起http请求,服务器将收到的对象构造成一个Blog对象,插入数据库)
- 前后端交互接口
请求:POST/login Content-Type:application/x-www-from-urlencode
title=标题$content=正文
响应:
Http:1.1 302 location:body_list html (实现在博客列表页强制登录)
- 服务器代码
@Override
    protected void doPost(HttpServletRequest req, HttpServletResponse resp) throws ServletException, IOException {
        // 使用这个方法, 来实现提交新博客
        // 1. 先检查一下用户的登陆状态, 获取到会话和用户信息.
        //    如果未登录, 显然不能提交博客~
        HttpSession session = req.getSession(false);
        if (session == null) {
            resp.setStatus(403);
            resp.setContentType("text/html; charset=utf8");
            resp.getWriter().write("当前未登录, 不能发布博客!");
            return;
        }
        User user = (User) session.getAttribute("user");
        if (user == null) {
            resp.setStatus(403);
            resp.setContentType("text/html; charset=utf8");
            resp.getWriter().write("当前未登录, 不能发布博客!");
            return;
        }

        // 2. 获取请求中的参数(博客的标题和正文)
        req.setCharacterEncoding("utf8");
        String title = req.getParameter("title");
        String content = req.getParameter("content");

        // 3. 构造 Blog 对象, 并且插入到数据库中.
        Blog blog = new Blog();
        blog.setTitle(title);
        blog.setContent(content);
        blog.setUserId(user.getUserId());
        // blogId 是自增主键, 不需要设置. postTime 直接在数据库操作中, 已经使用 now 来设置了.
        BlogDao blogDao = new BlogDao();
        blogDao.insert(blog);
        // 4. 构造 重定向报文, 回到 博客列表页.
        resp.sendRedirect("blog_list.html");
}- 实现客户端代码
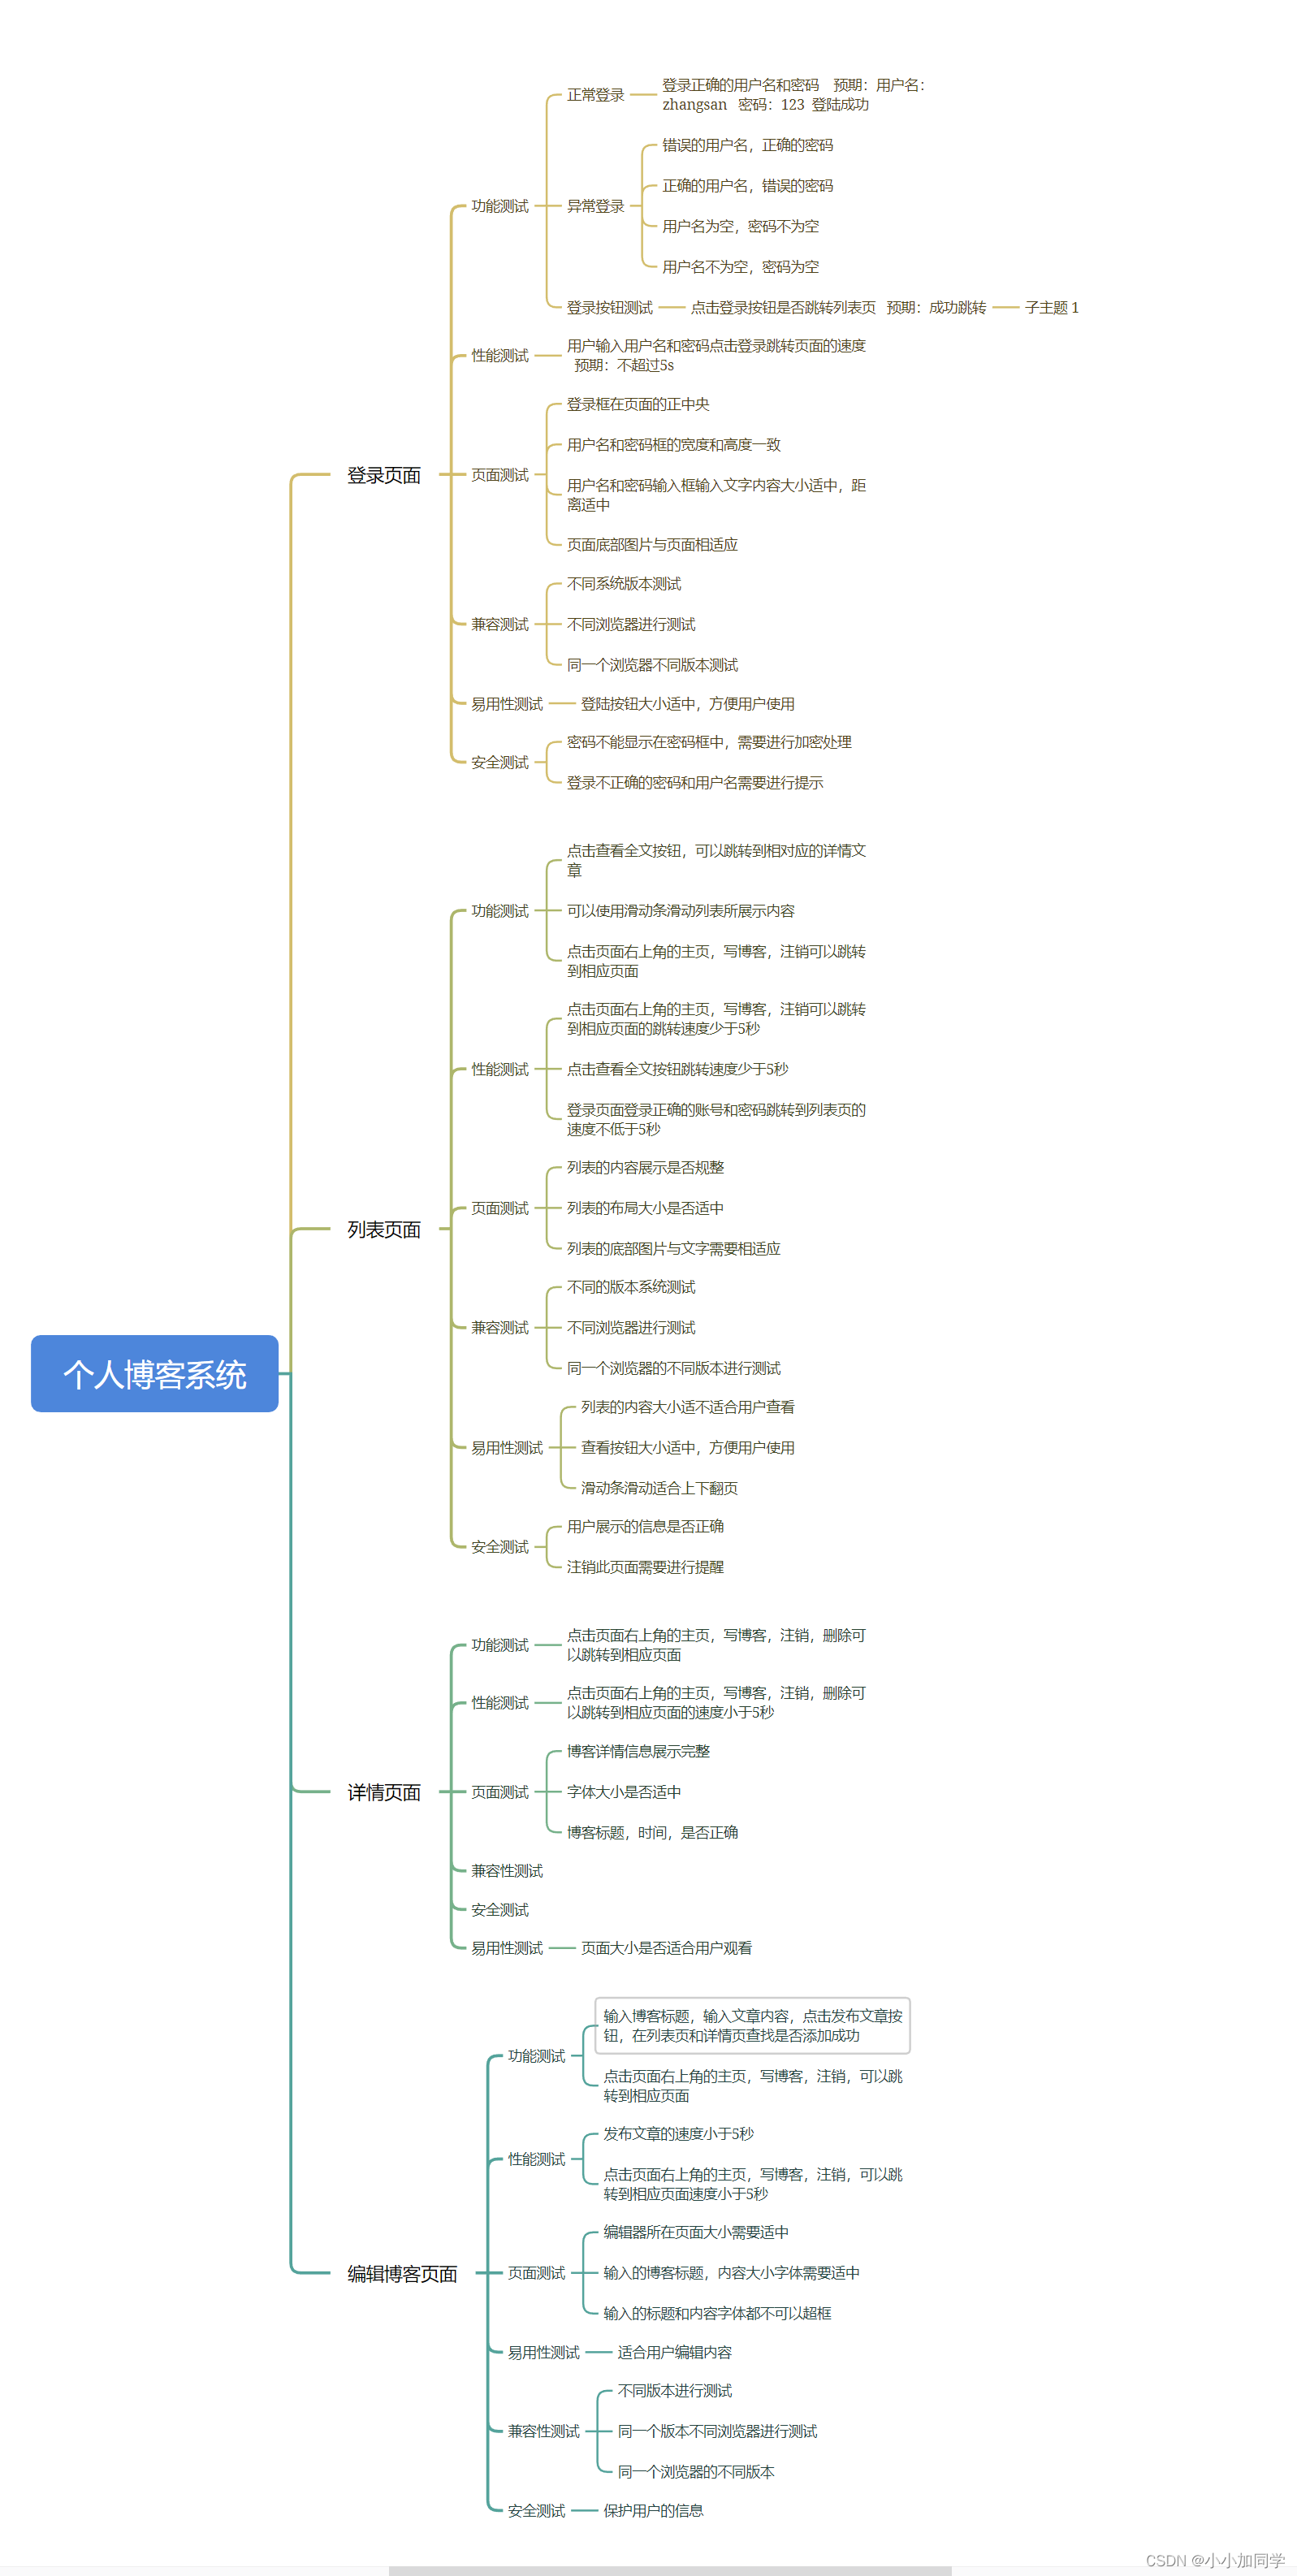
11.对博客进行测试
11.1设计测试用例
11.2对相关页面进行自动化测试
11.2.1查看登录页面是否含有主页和写博客
public void test1() throws InterruptedException {
      EdgeOptions options = new EdgeOptions();
      options.addArguments("--remote-allow-origins=*");
      EdgeDriver driver = new EdgeDriver(options);
      driver.get("http://127.0.0.1:8080/blog_system/login.html");
      Thread.sleep(3000);
      driver.findElement(By.cssSelector("body > div.nav > a:nth-child(4)"));
      Thread.sleep(3000);
      driver.findElement(By.cssSelector("body > div.nav > a:nth-child(5)"));
      Thread.sleep(3000);
      driver.quit();
  }

    public static void main(String[] args) throws InterruptedException {
        Test test=new Test();
        test.test1();
    }
11.2.2 输入用户名和密码测试正确登录功能
 @ParameterizedTest
 @CsvSource({"zhangsan,123","张三,123"})
   void test2(String name,String password) throws InterruptedException {
       EdgeOptions options = new EdgeOptions();
       options.addArguments("--remote-allow-origins=*");
       EdgeDriver driver = new EdgeDriver(options);
       driver.get("http://127.0.0.1:8080/blog_system/login.html");
       Thread.sleep(3000);
       //找到用户名,写入
       driver.findElement(By.cssSelector("#username")).sendKeys(name);
       Thread.sleep(3000);
       //找到密码写入
       driver.findElement(By.cssSelector("#password")).sendKeys(password);
       Thread.sleep(3000);
       //点击登录
       driver.findElement(By.cssSelector("#login-btn")).click();
       //查看是否登陆成功
       driver.findElement(By.cssSelector("body > div.container > div.container-right > div:nth-child(1) > a"));
       Thread.sleep(3000);
       driver.navigate().back();
       driver.quit();
   }
11.2.3输入用户名和密码测试异常登录
@ParameterizedTest
    @CsvSource({"zhang,123","aaa,123"})
    void test3(String name,String password) throws InterruptedException {
        EdgeOptions options = new EdgeOptions();
        options.addArguments("--remote-allow-origins=*");
        EdgeDriver driver = new EdgeDriver(options);
        driver.get("http://127.0.0.1:8080/blog_system/login.html");
        Thread.sleep(3000);
        //找到用户名,写入
        driver.findElement(By.cssSelector("#username")).sendKeys(name);
        Thread.sleep(3000);
        //找到密码写入
        driver.findElement(By.cssSelector("#password")).sendKeys(password);
        Thread.sleep(3000);
        //点击登录
        driver.findElement(By.cssSelector("#login-btn")).click();
        //查看是否登陆成功
      //期望的文本
        String exptxt="用户名或密码错误! 登陆失败!";
        //实际的文本
        String actual=driver.findElement(By.cssSelector("body")).getText();
        Assertions.assertEquals(exptxt,actual);
        Thread.sleep(3000);
        driver.navigate().back();
        driver.quit();
    }
11.2.4列表页正常登录
 void test4() throws InterruptedException {
        EdgeOptions options = new EdgeOptions();
        options.addArguments("--remote-allow-origins=*");
        EdgeDriver driver = new EdgeDriver(options);
        driver.get("http://127.0.0.1:8080/blog_system/blog_list.html");
        Thread.sleep(3000);
        driver.findElement(By.cssSelector("body > div.container > div.container-left > div > div:nth-child(4) > span:nth-child(1)"));
        driver.findElement(By.cssSelector("body > div.container > div.container-left > div > div:nth-child(4) > span:nth-child(2)"));
        driver.quit();
    }
11.2.5编辑页正常登录
@TestMethodOrder(MethodOrderer.OrderAnnotation.class)
public class BlogEditTest extends AutotestUtils {
    public static EdgeDriver driver = createDriver();
    @BeforeAll
    static  void baseControl(){
        driver.get("http://42.192.83.143:8563/blog_system/blog_edit.html");
    }
    /**
     * 检查博客编辑页可以正常打开
     */
    @Test
    @Order(1)
    void editPageLoadRight() throws IOException {
        driver.findElement(By.cssSelector("body > div.nav > a:nth-child(5)"));
        driver.findElement(By.cssSelector("body > div.nav > a:nth-child(6)"));
        getScreenShot(getClass().getName());
    }

    @Test
    @Order(2)
    void editAndSubimitBlog() throws IOException {
        String expect = "java104&105 Autotest";
        driver.findElement(By.cssSelector("#title")).sendKeys(expect);
        //因博客系统使用到的编辑是第三方软件,所以不能直接使用sendKeys向编辑模块发送文本
        driver.findElement(By.cssSelector("#editor > div.editormd-toolbar > div > ul > li:nth-child(21) > a")).click();
        driver.findElement(By.cssSelector("#editor > div.editormd-toolbar > div > ul > li:nth-child(5) > a")).click();
        driver.findElement(By.cssSelector("#submit")).click();
        getScreenShot(getClass().getName());
        //获取列表页第一条博客的标题文本,检查是否跟预期相符
        String actual = driver.findElement(By.cssSelector("body > div.container > div.right > div:nth-child(1) > div.title")).getText();
        Assertions.assertEquals(expect,actual);

    }
11.2.6对时间进行判断
public List<String> getTime(){
        //文件能不能按照天的维度按文件夹进行保存
        //文件格式 20230212-123030毫秒
        SimpleDateFormat sim1 = new SimpleDateFormat("yyyyMMdd-HHmmssSS");
        SimpleDateFormat sim2 = new SimpleDateFormat("yyyyMMdd");
        String filename = sim1.format(System.currentTimeMillis());
        String dirname = sim2.format(System.currentTimeMillis());
        List<String> list = new ArrayList<>();
        list.add(dirname);
        list.add(filename);
        return  list;
    }
    /**
     * 获取屏幕截图,把所有的用例执行的结果保存下来
     */
    public void getScreenShot(String str) throws IOException {
        List<String> list = getTime();
        //dir+filename
        // ./指的是当前的项目路径下,也就是BlogAutoTest下
        // ./src/test/java/com/blogWebAutoTest/dirname/filename
        // ./src/test/java/com/blogWebAutoTest/20230212/logintest_20230212-123030毫秒.png
        String filename = "./src/test/java/com/blogWebAutoTest/"+list.get(0)+"/"+str+"_"+list.get(1)+".png";
        File srcfile = driver.getScreenshotAs(OutputType.FILE);
        //把屏幕截图生成的文件放到指定的路径
        FileUtils.copyFile(srcfile,new File(filename));
    }
11.2.7对博客详情页进行判断(不要获取动态的)
public class BlogDetailTest extends AutotestUtils {
    public static ChromeDriver driver = createDriver();
    @BeforeAll
    static  void baseControl(){
        driver.get("http://42.192.83.143:8563/blog_system/blog_detail.html?blogId=79");
    }
    @Test
    void blogDeailLoadRight() throws IOException{
        driver.findElement(By.cssSelector("body > div.container > div.right > div > h3"));
        driver.findElement(By.cssSelector("body > div.container > div.right > div > div.date"));
        getScreenShot(getClass().getName());

    }
}


 388
388


 被折叠的 条评论
为什么被折叠?
被折叠的 条评论
为什么被折叠?
 到【灌水乐园】发言


