


目录
Web开发技术迭代速度日新月异,对于技术的更新往往是基于底层一步步封装简化,因此掌握一些基础的传统的开发技术还是有必要的。传统的JavaWeb开发通常使用Java Servlet、JavaServer Pages(JSP)、JavaBeans等技术来开发Web应用程序。
需求与设计
基础需求:
要求用户从前台界面输入基本信息,并且做基础的校验,验证无误后将数据插入数据库,再从数据库中查询所有的数据,最后再呈现到前台页面。
项目结构:

项目逻辑:
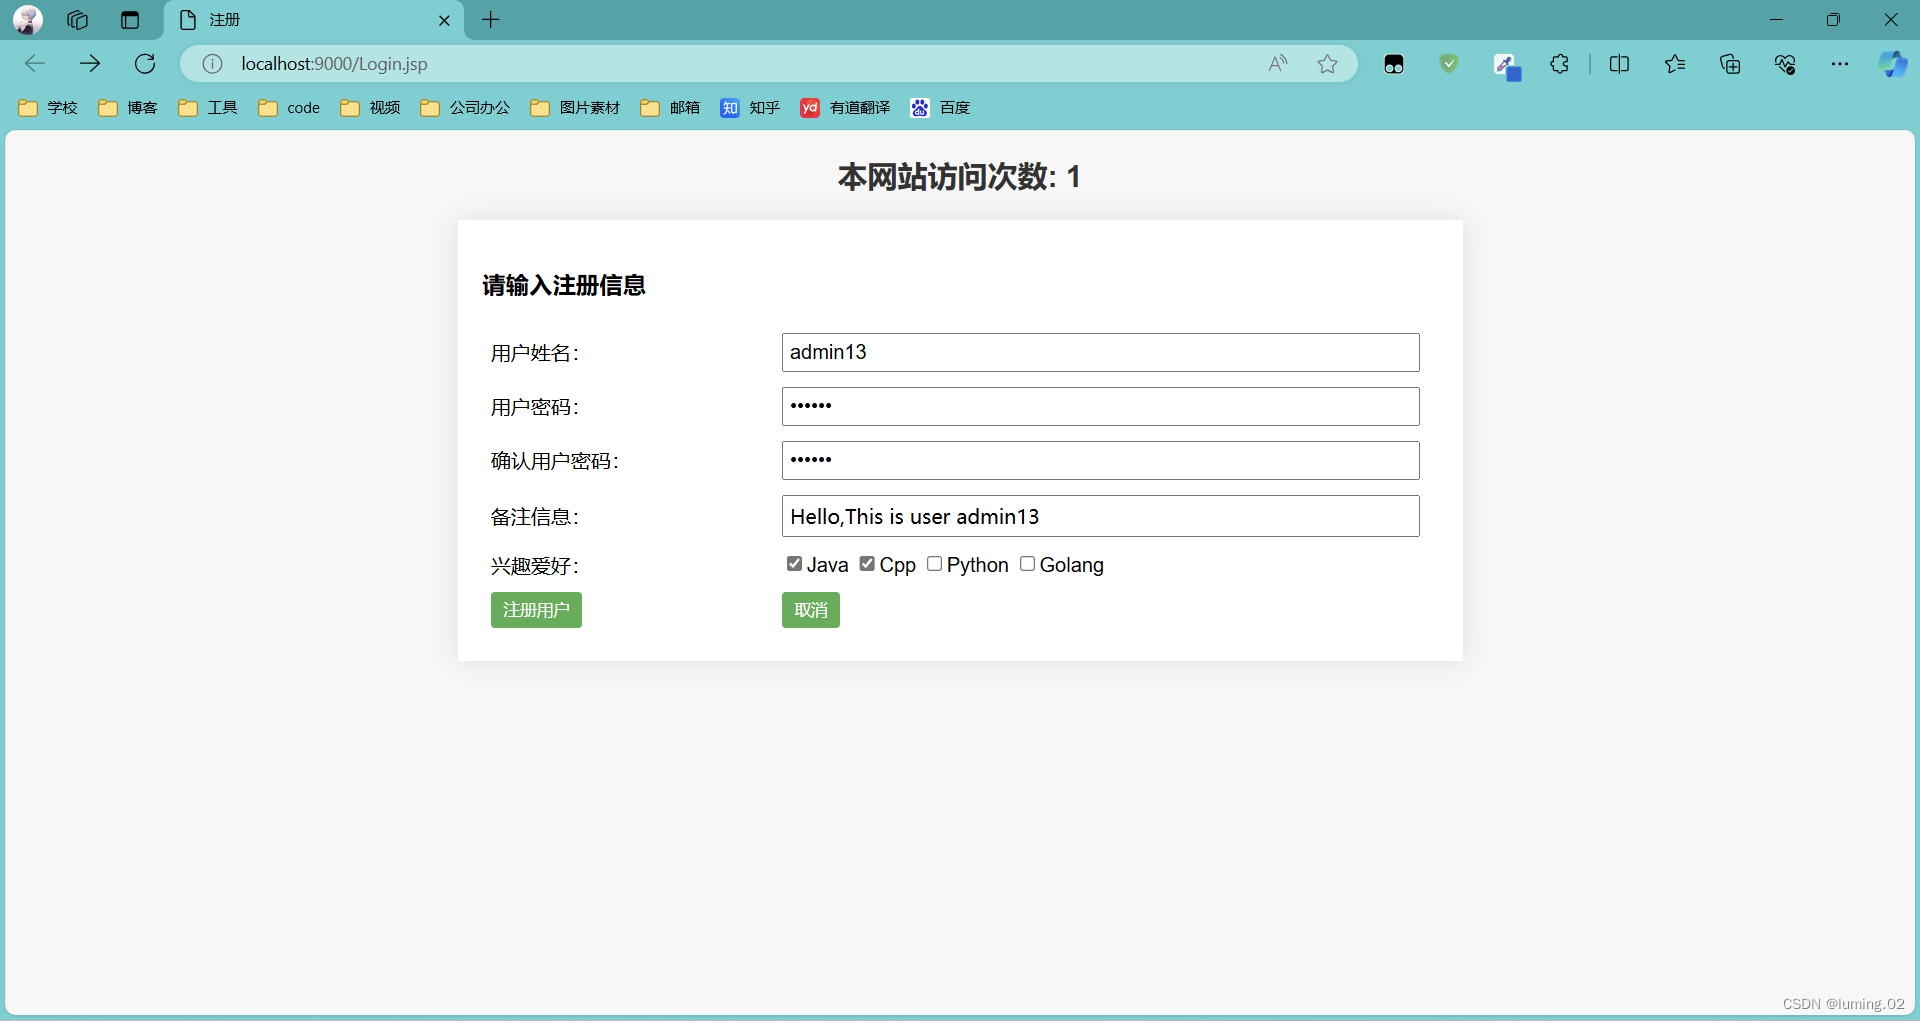
- 用户登录注册页面Login.jsp,登陆时密码不一致则会提示
- 用户登录成功后会将数据提交至InsertServelt,并且插入到数据库中
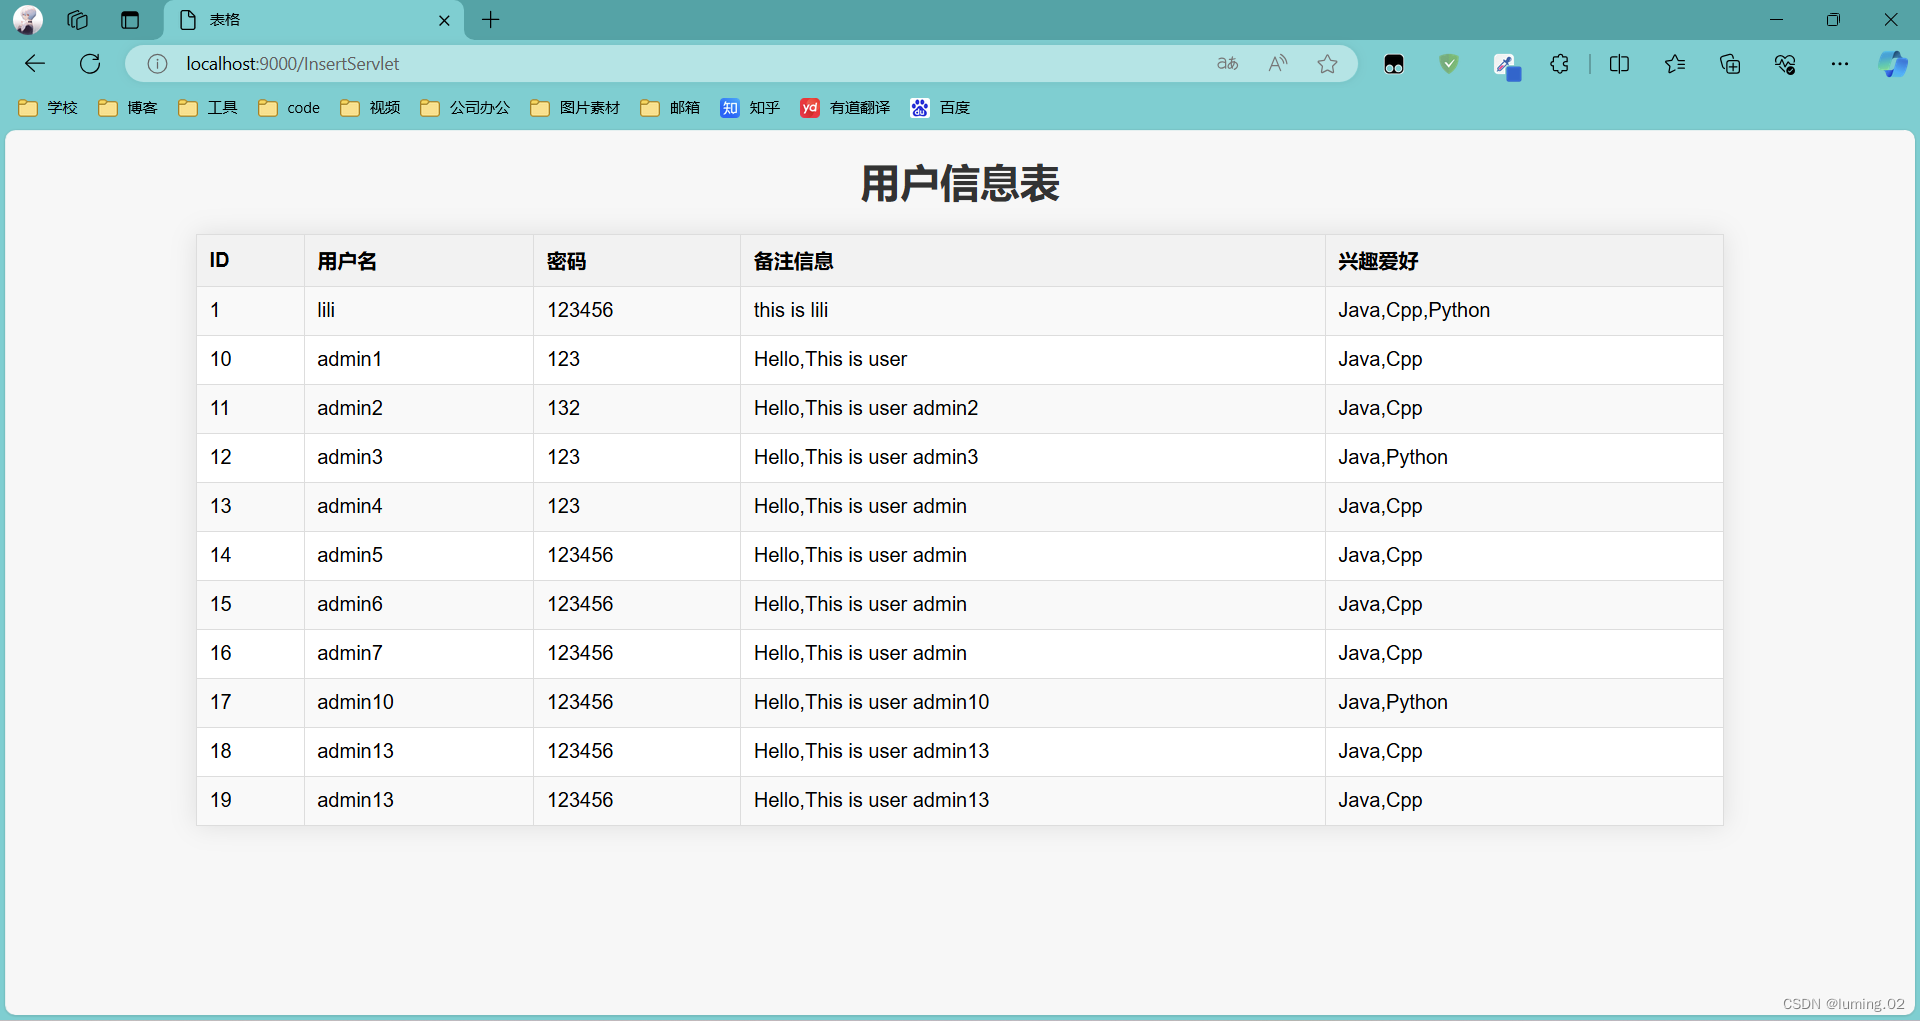
- 插入完成后,跳转至SelectServelt,查询该数据库中全部字段信息,并且将结构封装返回给前台页面Table.jsp
- 前台页面拿到数据后进行遍历渲染
运行图示:
在数据库查询数据后再返回给前端JSP,通过表格的方式呈现数据
代码实现
Login.jsp
包含了基础的注册功能和密码校验功能,通过简单的CSS样式美化了页面。
<%@ page import="java.util.Enumeration" %>
<%--
  登录注册页面,登陆时密码不一致则会提示
  用户登录成功后会将数据提交至InsertServelt,并且插入到数据库中
  插入完成后,跳转至SelectServelt,查询该数据库中全部字段信息,最终返回到Table.jsp中
--%>
<%@ page language="java" contentType="text/html; charset=UTF-8" pageEncoding="UTF-8" %>
<!DOCTYPE html>
<html>
<head>
  <meta charset="UTF-8">
  <title>注册</title>
  <style>
    body {
      font-family: Arial, sans-serif;
      margin: 0;
      padding: 0;
      background-color: #f7f7f7;
    }

    h2 {
      text-align: center;
      margin-top: 20px;
      color: #333;
    }

    .container {
      width: 50%;
      margin: 20px auto;
      background-color: #fff;
      padding: 20px;
      box-shadow: 0 0 20px rgba(0, 0, 0, 0.1);
    }

    form {
      margin-top: 20px;
    }

    table {
      width: 100%;
    }

    td {
      padding: 5px;
    }

    .txtBox {
      padding: 5px;
      width: 100%;
      font-size: 16px;
    }

    input[type="submit"], input[type="reset"] {
      padding: 5px 10px;
      background-color: #4CAF50;
      color: white;
      border: none;
      border-radius: 3px;
      cursor: pointer;
    }

    input[type="submit"]:hover, input[type="reset"]:hover {
      background-color: #45a049;
    }
  </style>
  <script>
    function validateForm() {
      var password = document.getElementById('password').value;
      var confirmPassword = document.getElementById('repassword').value;

      if (password !== confirmPassword) {
        document.getElementById('repasswordError').innerText = '密码不一致';
        return false;
      } else {
        document.getElementById('repasswordError').innerText = '';
        return true;
      }
    }
  </script>
</head>
<body>
<%
  // 检查 application 中是否已经存在计数器属性
  Integer count = (Integer) application.getAttribute("visitCount");
  if (count == null) {
    count = 0;
  }
  // 增加访问次数
  count++;
  application.setAttribute("visitCount", count);
%>
<h2>本网站访问次数: <%= count - 1%></h2>
<div class="container">
  <h3>请输入注册信息</h3>
  <form name="form1" method="post" action="InsertServlet" onsubmit="return validateForm()">
    <table>
      <tr>
        <td>用户姓名:</td>
        <td><input type="text" name="username" value="" class="txtBox"/></td>
      </tr>
      <tr>
        <td>用户密码:</td>
        <td><input type="password" id="password" name="password" value="" class="txtBox"/></td>
      </tr>
      <tr>
        <td>确认用户密码:</td>
        <td><input type="password" id="repassword" name="repassword" value="" class="txtBox"/></td>
        <td><span id="repasswordError" style="color: red;"></span></td>
      </tr>
      <tr>
        <td>备注信息:</td>
        <td><input type="text" name="information" value="Hello,This is user" class="txtBox"/></td>
      </tr>
      <tr>
        <td>兴趣爱好:</td>
        <td>
          <input type="checkbox" name="hobby" value="Java"/>Java
          <input type="checkbox" name="hobby" value="Cpp"/>Cpp
          <input type="checkbox" name="hobby" value="Python"/>Python
          <input type="checkbox" name="hobby" value="Golang"/>Golang
        </td>
      </tr>
      <!-- 以下是提交、取消按钮 -->
      <tr>
        <td><input type="submit" value="注册用户"/></td>
        <td><input type="reset" value="取消"/></td>
      </tr>
    </table>
  </form>
</div>
</body>
</html>
InsertServlet
主要通过JDBC实现用户信息的插入。
import com.mysql.cj.jdbc.Driver;

import javax.servlet.ServletException;
import javax.servlet.annotation.WebServlet;
import javax.servlet.http.HttpServlet;
import javax.servlet.http.HttpServletRequest;
import javax.servlet.http.HttpServletResponse;
import java.io.IOException;
import java.sql.Connection;
import java.sql.DriverManager;
import java.sql.SQLException;
import java.sql.Statement;

/**
 * @Author Luming
 * @Date 2024/5/15 13:56
 * @Description:
 */
@WebServlet("/InsertServlet")
public class InsertServlet extends HttpServlet {

    protected void doPost(HttpServletRequest request, HttpServletResponse response) throws IOException, ServletException {

        String url = "jdbc:mysql://127.0.0.1:3306/WebTest";
        String user = "root";//数据库名
        String passwd = "123456";//登录数据库密码

        String username = request.getParameter("username");
        String password = request.getParameter("password");
        String information = request.getParameter("information");
        String[] hobbies = request.getParameterValues("hobby");
        String hobby = String.join(",", hobbies); // 使用逗号作为分隔符

        try {
            // 加载JDBC驱动程序
            Class.forName("com.mysql.jdbc.Driver");
            //1、注册驱动
            Driver driver = new com.mysql.jdbc.Driver();
            DriverManager.registerDriver(driver);
            //2.获取连接
            Connection connection = DriverManager.getConnection(url, user, passwd);
            //3、获取数据库操作对象
            Statement statement = connection.createStatement();
            //4.sql语句
            String sql = "insert into user_info (username, password, information, hobby) " +
                    "VALUES ('" + username + "', '" + password + "', '" + information + "', '" + hobby + "')";
            //5.执行sql语句后的结果
            int count = statement.executeUpdate(sql);

        } catch (SQLException | ClassNotFoundException e) {
            throw new RuntimeException(e);
        }

        request.getRequestDispatcher("SelectServlet").forward(request,response);
    }
}
SelectServlet
主要通过JDBC实现了数据的查询,再将结构遍历封装,转发给前台页面
import Pojo.User;
import com.mysql.cj.jdbc.Driver;

import javax.servlet.ServletException;
import javax.servlet.annotation.WebServlet;
import javax.servlet.http.HttpServlet;
import javax.servlet.http.HttpServletRequest;
import javax.servlet.http.HttpServletResponse;
import java.io.IOException;
import java.sql.*;
import java.util.ArrayList;
import java.util.List;

/**
 * @Author Luming
 * @Date 2024/5/15 20:01
 * @Description:
 */
@WebServlet("/SelectServlet")
public class SelectServlet extends HttpServlet {
    protected void doPost(HttpServletRequest request, HttpServletResponse response) throws IOException, ServletException {

        String url = "jdbc:mysql://127.0.0.1:3306/WebTest";
        String user = "root";//数据库名
        String passwd = "123456";//登录数据库密码

        try {
            // 加载JDBC驱动程序
            Class.forName("com.mysql.jdbc.Driver");
            //1、注册驱动
            Driver driver = new com.mysql.jdbc.Driver();
            DriverManager.registerDriver(driver);
            //2.获取连接
            Connection connection = DriverManager.getConnection(url, user, passwd);
            //3、获取数据库操作对象
            Statement statement = connection.createStatement();
            //4.sql语句
            String sql = "select * from user_info";
            //5.执行sql语句后的结果
            ResultSet resultSet = statement.executeQuery(sql);
            //6.封装
            List<User> userList = new ArrayList<>();
            while (resultSet.next()) {
                User userTemp = new User();
                userTemp.setId(resultSet.getInt("id"));
                userTemp.setUsername(resultSet.getString("username"));
                userTemp.setPassword(resultSet.getString("password"));
                userTemp.setInformation(resultSet.getString("information"));
                userTemp.setHobby(resultSet.getString("hobby"));
                userList.add(userTemp);
            }
            // 将 userList 存储到 request 中,方便在 JSP 中使用
            request.setAttribute("userList", userList);
        } catch (SQLException e) {
            throw new RuntimeException(e);
        } catch (ClassNotFoundException e) {
            throw new RuntimeException(e);
        }
        request.getRequestDispatcher("Table.jsp").forward(request,response);
    }
}
Table.jsp
遍历展示数据库信息
<%@ page import="Pojo.User" %>
<%@ page import="java.util.List" %>
<%@ page contentType="text/html;charset=UTF-8" language="java" %>
<!DOCTYPE html>
<html lang="en">
<head>
    <meta charset="UTF-8">
    <meta http-equiv="X-UA-Compatible" content="IE=edge">
    <meta name="viewport" content="width=device-width, initial-scale=1.0">
    <title>表格</title>
    <style>
        body {
            font-family: Arial, sans-serif;
            background-color: #f7f7f7;
            margin: 0;
            padding: 0;
        }

        h1 {
            text-align: center;
            margin-top: 20px;
            color: #333;
        }

        table {
            width: 80%;
            margin: 20px auto;
            border-collapse: collapse;
            background-color: #fff;
            box-shadow: 0 0 20px rgba(0, 0, 0, 0.1);
        }

        th, td {
            border: 1px solid #ddd;
            padding: 10px;
            text-align: left;
        }

        th {
            background-color: #f2f2f2;
            font-weight: bold;
        }

        tr:nth-child(even) {
            background-color: #f9f9f9;
        }

        tr:hover {
            background-color: #f1f1f1;
        }

        .button-container {
            text-align: center;
            margin-top: 20px;
        }

        .button {
            padding: 10px 20px;
            background-color: #4CAF50;
            color: white;
            border: none;
            border-radius: 5px;
            cursor: pointer;
            margin-right: 10px;
        }

        .button:hover {
            background-color: #45a049;
        }
    </style>
</head>
<body>
<h1>用户信息表</h1>
<table>
    <tr>
        <th>ID</th>
        <th>用户名</th>
        <th>密码</th>
        <th>备注信息</th>
        <th>兴趣爱好</th>
    </tr>
    <%
        List<User> userList = (List<User>) request.getAttribute("userList");
        for (User user : userList) {
            out.println("<tr>");
            out.println("<td>" + user.getId() + "</td>");
            out.println("<td>" + user.getUsername() + "</td>");
            out.println("<td>" + user.getPassword() + "</td>");
            out.println("<td>" + user.getInformation() + "</td>");
            out.println("<td>" + user.getHobby() + "</td>");
            out.println("</tr>");
        }
    %>
</table>
</body>
</html>
user
用户实体类,用来封装查询后的数据,这里使用了lombok注解,如果不使用lombok的注解的话,需要自己手动去设置每个字段的set和get方法,以及无参构造方法和全参构造方法。
package Pojo;

import lombok.AllArgsConstructor;
import lombok.Data;
import lombok.NoArgsConstructor;

/**
 * @Author Luming
 * @Date 2024/5/15 20:17
 * @Description:
 */
@Data
@AllArgsConstructor
@NoArgsConstructor
public class User {
    private int id;
    private String username;
    private String password;
    private String information;
    private String hobby;
}
mysql表结构
CREATE TABLE `user_info` (
  `id` int NOT NULL AUTO_INCREMENT,
  `username` varchar(255) NOT NULL,
  `password` varchar(255) NOT NULL,
  `information` varchar(255) DEFAULT NULL,
  `hobby` varchar(255) DEFAULT NULL,
  PRIMARY KEY (`id`)
) ENGINE=InnoDB AUTO_INCREMENT=20 DEFAULT CHARSET=utf8mb4 COLLATE=utf8mb4_0900_ai_ci;![]() 本次的分享就到此为止了,希望我的分享能给您带来帮助,创作不易也欢迎大家三连支持,你们的点赞就是博主更新最大的动力!
本次的分享就到此为止了,希望我的分享能给您带来帮助,创作不易也欢迎大家三连支持,你们的点赞就是博主更新最大的动力!![]() 如有不同意见,欢迎评论区积极讨论交流,让我们一起学习进步!
如有不同意见,欢迎评论区积极讨论交流,让我们一起学习进步!![]() 有相关问题也可以私信博主,评论区和私信都会认真查看的,我们下次再见
有相关问题也可以私信博主,评论区和私信都会认真查看的,我们下次再见![]()


 794
794

 被折叠的 条评论
为什么被折叠?
被折叠的 条评论
为什么被折叠?
 到【灌水乐园】发言


