


MyBatis的学习
1.中文文档
https://mybatis.org/mybatis-3/zh/index.html
MyBatis 是一款优秀的持久层框架,它支持自定义 SQL、存储过程以及高级映射。MyBatis 免除了几乎所有的 JDBC 代码以及设置参数和获取结果集的工作。MyBatis 可以通过简单的 XML 或注解来配置和映射原始类型、接口和 Java POJO(Plain Old Java Objects,普通老式 Java 对象)为数据库中的记录。
 MyBatis 本是apache的一个开源项目iBatis, 2010年这个项目由apache software foundation 迁移到了google code,并且改名为MyBatis 。
 2013年11月迁移到Github。
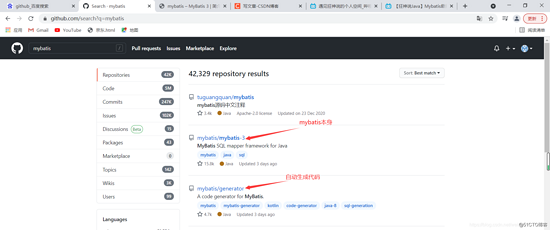
如何获取mybatis:
1.maven仓库
<!-- https://mvnrepository.com/artifact/org.mybatis/mybatis -->
<dependency>
    <groupId>org.mybatis</groupId>
    <artifactId>mybatis</artifactId>
    <version>3.5.7</version>
</dependency>
2.github
https://github.com/mybatis/mybatis-3
2.持久层
Dao层,Service层,Controller层
3.学习过程
3.1 导入依赖
<dependencies>
        <dependency>
            <groupId>org.mybatis</groupId>
            <artifactId>mybatis</artifactId>
            <version>3.5.7</version>
        </dependency>
        <dependency>
            <groupId>junit</groupId>
            <artifactId>junit</artifactId>
            <version>4.12</version>
        </dependency>
        <dependency>
            <groupId>mysql</groupId>
            <artifactId>mysql-connector-java</artifactId>
            <version>5.1.47</version>
        </dependency>

    </dependencies>
3.2 创建模块
写一个核心配置文件
<?xml version="1.0" encoding="UTF-8" ?>
<!DOCTYPE configuration
        PUBLIC "-//mybatis.org//DTD Config 3.0//EN"
        "http://mybatis.org/dtd/mybatis-3-config.dtd">
<configuration>
    <environments default="development">
        <environment id="development">
            <transactionManager type="JDBC"/>
            <dataSource type="POOLED">
                <property name="driver" value="com.mysql.jdbc.Driver"/>
                <property name="url" value="jdbc:mysql://localhost:3306/mybatis?useSSl=true&useUnicode=true&characterEncoding=utf-8"/>
                <property name="username" value="root"/>
                <property name="password" value="123456"/>
            </dataSource>
        </environment>
    </environments>
    <mappers>
        <mapper resource="org/mybatis/example/BlogMapper.xml"/>
    </mappers>
</configuration>
写一个工具类
package utils;

import org.apache.ibatis.io.Resources;
import org.apache.ibatis.session.SqlSession;
import org.apache.ibatis.session.SqlSessionFactory;
import org.apache.ibatis.session.SqlSessionFactoryBuilder;

import java.io.IOException;
import java.io.InputStream;

public class MyBatisUtil {
    private  static  SqlSessionFactory sqlSessionFactory;


    static
    {
        try {
                   //使用mybatis第一步获取sqlSession对象
            String resource = "mybatis-config.xml";
            InputStream inputStream = Resources.getResourceAsStream(resource);
           sqlSessionFactory = new SqlSessionFactoryBuilder().build(inputStream);
        } catch (IOException e) {
            e.printStackTrace();
        }
    }

    public static SqlSession getSqlSession(){
        SqlSession sqlSession=sqlSessionFactory.openSession();
        return sqlSession;
    }

}
实体类
package pojo;

public class User {
    private int id;
    private String name;
    private  String pwd;

    public User() {
    }

    public User(int id, String name, String pwd) {
        this.id = id;
        this.name = name;
        this.pwd = pwd;
    }

    public int getId() {
        return id;
    }

    public void setId(int id) {
        this.id = id;
    }

    public String getName() {
        return name;
    }

    public void setName(String name) {
        this.name = name;
    }

    public String getPwd() {
        return pwd;
    }

    public void setPwd(String pwd) {
        this.pwd = pwd;
    }


    @Override
    public String toString() {
        return "User{" +
                "id=" + id +
                ", name='" + name + '\'' +
                ", pwd='" + pwd + '\'' +
                '}';
    }
}
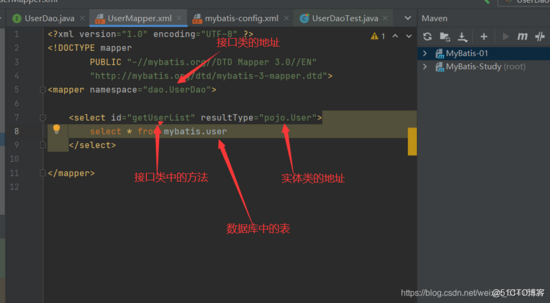
接口类
package dao;

import pojo.User;

import java.util.List;

//编写一个接口类
public interface UserDao {
    List<User> getUserList();
}
mybatis中直接通过xml文件连接数据库和实现接口类
4.CRUD增删改查
需要注意的事:
namespace的包名要跟Dao和Mapper的接口的包名一致。
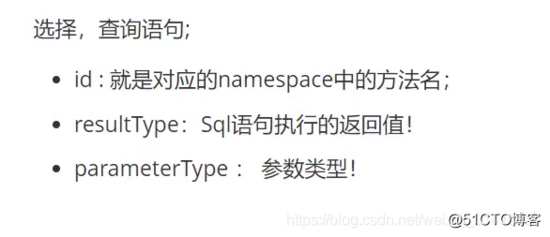
4.1 select
4.2 insert
4.3 update
4.4 delete
******增删改需要提交事务
4.5 万能Map
如果一个实体类或者数据库的参数过多,我们应当考虑使用map

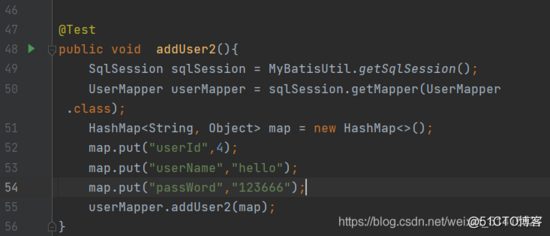
Map传递参数,可以直接在sql中取出参数即可。
5 日志的实现
5.1默认的日志使用

5.2 LOG4J的使用
1.导入依赖
<!-- https://mvnrepository.com/artifact/log4j/log4j -->
<dependency>
    <groupId>log4j</groupId>
    <artifactId>log4j</artifactId>
    <version>1.2.17</version>
</dependency>
2.写一个log4j.properties
#将等级为DEBUG的日志信息输出到console和file这两个目的地,console和file的定义在下面的代码
log4j.rootLogger=DEBUG,console,file

#控制台输出的相关设置
log4j.appender.console = org.apache.log4j.ConsoleAppender
log4j.appender.console.Target = System.out
log4j.appender.console.Threshold=DEBUG
log4j.appender.console.layout = org.apache.log4j.PatternLayout
log4j.appender.console.layout.ConversionPattern=[%c]-%m%n

#文件输出的相关设置
log4j.appender.file = org.apache.log4j.RollingFileAppender
log4j.appender.file.File=./log/whx.log
log4j.appender.file.MaxFileSize=10mb
log4j.appender.file.Threshold=DEBUG
log4j.appender.file.layout=org.apache.log4j.PatternLayout
log4j.appender.file.layout.ConversionPattern=[%p][%d{yy-MM-dd}][%c]%m%n

#日志输出级别
log4j.logger.org.mybatis=DEBUG
log4j.logger.java.sql=DEBUG
log4j.logger.java.sql.Statement=DEBUG
log4j.logger.java.sql.ResultSet=DEBUG
log4j.logger.java.sql.PreparedStatement=DEBUG
3.表示使用成功
4.简单使用
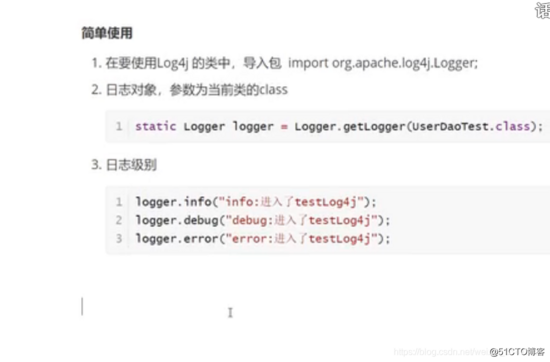
LOG4J的相关方法和配置的网址:
https://baike.baidu.com/item/log4j/480673?fr=aladdin#2
6 使用注解开发
1.注解在接口上实现
@select("select * from user")
List<User>getUsers();
2.需要在配置文件绑定接口
<mappers>
<mapper class="dao.UserMapper/>"
</mappers>
7.使用注解完成增删改查
不需要写xml文件直接在测试文件书写即可
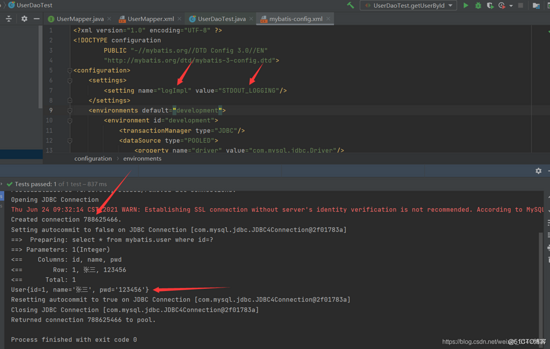
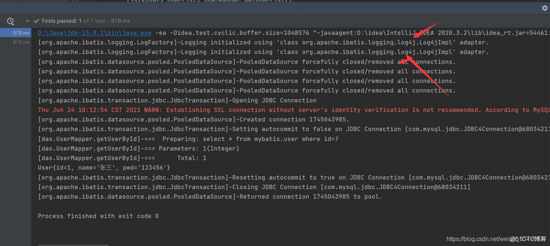
1.根据ID查询用户
@Select("select * from mybatis.user where id=#{id}")
    User getUserById(@Param("id") int id);
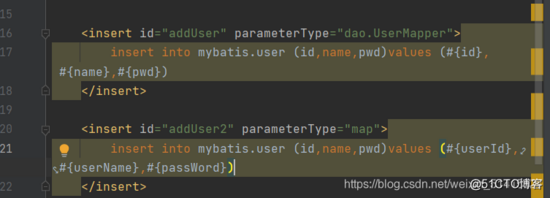
2.增加用户
@Insert("insert into mybatis.user (id,name,pwd)values(#{id},#{name},#{pwd})")
 int addUser(User user);
与xml文件进行对比
<select id="getUserById" resultType="pojo.User" parameterType="int">
        select * from mybatis.user where id=#{id}
    </select>


    <insert id="addUser" parameterType="dao.UserMapper">
        insert into mybatis.user (id,name,pwd)values (#{id},#{name},#{pwd})
    </insert>
方便快捷很多,但是只限于参数少的时候。
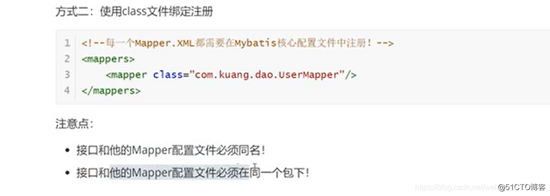
使用注解得在配置文件中完成注册。

若含有多个Mapper的时候我们可以采用resource字段
<mapper resource="dao/*Mapper.xml"></mapper>
@param注解:
1.基本类型的参数或者String必须加上
2.引用类型不需要加上
3.如果只有一个基本类型的话可以忽略,但是建议都加上
4.我们在SQL中引用的就是我们在@Param中设定的属性名
8.Lombok的学习
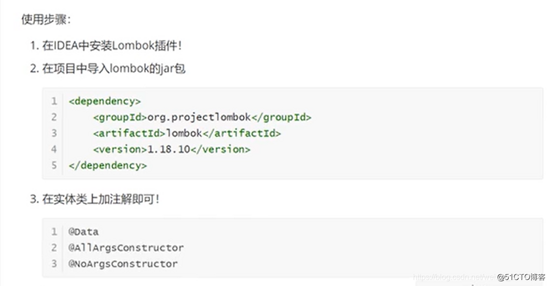
简化实体类的书写。
Maven中需要导入的依赖:https://mvnrepository.com/artifact/org.projectlombok/lombok/1.18.20
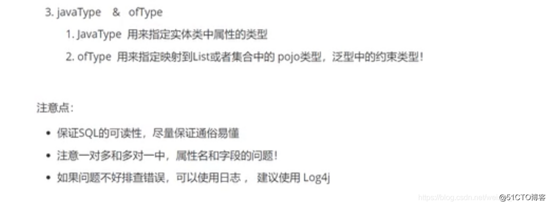
9.多对一处理
9.1按照结果嵌套处理

9.2 按照select内嵌查询
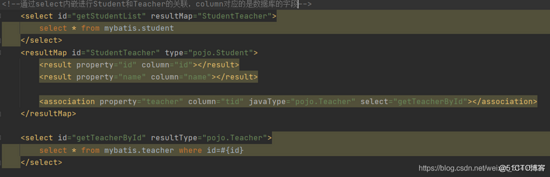
<select id="getStudentList" resultMap="StudentTeacher">
        select * from mybatis.student
    </select>
    <resultMap id="StudentTeacher" type="pojo.Student">
        <result property="id" column="id"></result>
        <result property="name" column="name"></result>

        <association property="teacher" column="tid" javaType="pojo.Teacher" select="getTeacherById"></association>
    </resultMap>

    <select id="getTeacherById" resultType="pojo.Teacher">
        select * from mybatis.teacher where id=#{id}
    </select>
10.一对多处理
此处举例为一个老师对应多个学生
1.实体类
package pojo;
import lombok.Data;
@Data
public class Student {
    private int id;
    private String name;
    private int tid;
}
package pojo;
import lombok.Data;
import java.util.List;
@Data
public class Teacher {
    private int id;
    private String name;

//    一个老师对应多个学生
    private List<Student> students;
}
接口类
package dao;

import org.apache.ibatis.annotations.Param;
import org.apache.ibatis.annotations.Select;
import pojo.Teacher;

import java.util.List;

public interface TeacherMapper {
//查询老师信息
//  List<Teacher> getTeacher();


//  获取指定老师下的所有学生
     Teacher getTeacherById(@Param("tid") int id);
}
10.1 按select嵌套查询
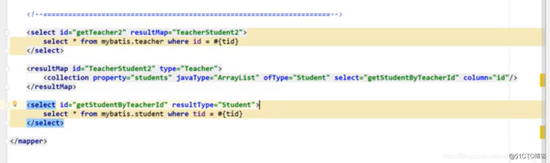
10.2 按结果嵌套查询
<?xml version="1.0" encoding="UTF-8" ?>
<!DOCTYPE mapper
        PUBLIC "-//mybatis.org//DTD Config 3.0//EN"
        "http://mybatis.org/dtd/mybatis-3-mapper.dtd">

<mapper namespace="dao.TeacherMapper">

    <select id="getTeacherById" resultMap="TeacherStudent">
        select s.id sid,s.name sname,t.name tname,t.id tid from student s,teacher t where s.tid=t.id and t.id=#{tid}
    </select>
    <resultMap id="TeacherStudent" type="pojo.Teacher">
        <result property="id" column="tid"></result>
        <result property="name" column="tname"></result>
        <collection property="students" ofType="pojo.Student">
            <result property="id" column="sid"></result>
            <result property="name" column="sname"></result>
            <result property="tid" column="tid"></result>
        </collection>
    </resultMap>
小结:
关联 association (多对一)
集合 collection(一对多)
11.动态SQL
创建一个基础工程:
1.导包
2.编写配置文件
3.编写一个实体类
4.编写实体类对应的Mapper以及Mapper.xml文件
解决驼峰命名,例如数据库字段为create_time而实体类中写的是createTime这种形式,在settings中设置为true.

配置文件
<?xml version="1.0" encoding="UTF-8" ?>
<!DOCTYPE configuration
        PUBLIC "-//mybatis.org//DTD Config 3.0//EN"
        "http://mybatis.org/dtd/mybatis-3-config.dtd">
<configuration>
    <settings>
        <setting name="mapUnderscoreToCamelCase" value="true"/>
    </settings>
    <environments default="development">
        <environment id="development">
            <transactionManager type="JDBC"/>
            <dataSource type="POOLED">
                <property name="driver" value="com.mysql.jdbc.Driver"/>
                <property name="url" value="jdbc:mysql://localhost:3306/mybatis?useSSl=true&useUnicode=true&characterEncoding=utf-8"/>
                <property name="username" value="root"/>
                <property name="password" value="123456"/>
            </dataSource>
        </environment>
    </environments>

    <mappers>
        <mapper class="dao.BlogMapper"></mapper>
    </mappers>
</configuration>
BlogMapper文件
package dao;

import pojo.Blog;

public interface BlogMapper {

    int  addBlog(Blog blog);
}
BlogMapper.xml文件
<?xml version="1.0" encoding="UTF-8" ?>
<!DOCTYPE mapper
        PUBLIC "-//mybatis.org//DTD Config 3.0//EN"
        "http://mybatis.org/dtd/mybatis-3-mapper.dtd">
<mapper namespace="dao.BlogMapper">

    <insert id="addBlog" parameterType="dao.BlogMapper">
        insert into mybatis.blog (id,title,author,create_time,views)values (#{id},#{title},#{author},#{createTime},#{views})
    </insert>

</mapper>
测试文件
import dao.BlogMapper;
import org.apache.ibatis.session.SqlSession;
import org.junit.Test;
import pojo.Blog;
import utils.IDutils;
import utils.MyBatisUtil;

import java.util.Date;

public class MyTest {
    @Test
    public void addBlog(){
        SqlSession sqlSession = MyBatisUtil.getSqlSession();
        BlogMapper mapper = sqlSession.getMapper(BlogMapper.class);
        Blog blog=new Blog();
        blog.setId(IDutils.getId());
        blog.setTitle("一日归属吉大,一生念念不忘");
        blog.setAuthor("吉林大学王小懒");
        blog.setCreateTime(new Date());
        blog.setViews(9999);
        mapper.addBlog(blog);

        blog.setId(IDutils.getId());
        blog.setTitle("java学习很简单");
        mapper.addBlog(blog);

        blog.setId(IDutils.getId());
        blog.setTitle("python学习很简单");
        mapper.addBlog(blog);

        sqlSession.commit();
        sqlSession.close();
    }
}
11.1 动态SQL之IF语句
<select id="queryBlogIf" parameterType="map" resultType="pojo.Blog">
        select * from mybatis.blog where 1=1
        <if test="title!=null">
            and title=#{title}
        </if>
        <if test="author!=null">
            and author=#{author}
        </if>
    </select>
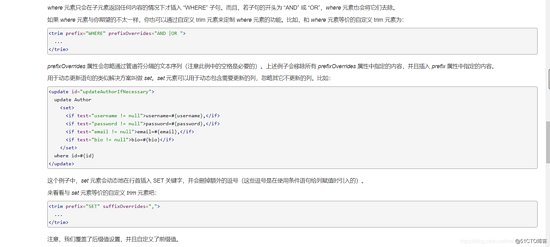
如果没有where 1=1则程序会报错,此种错误的解决方式是加一个where标签。如下:
<select id="queryBlogIf" parameterType="map" resultType="pojo.Blog">
        select * from mybatis.blog
        <where>
        <if test="title!=null">
         and   title=#{title}
        </if>
        <if test="author!=null">
          author=#{author}
        </if>
        </where>
    </select>
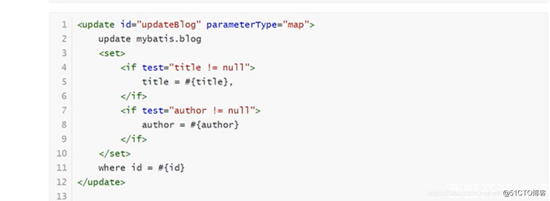
11.2trim(where和set)
<select id="queryBlogIf" parameterType="map" resultType="pojo.Blog">
        select * from mybatis.blog
        <where>
        <if test="title!=null">
         and   title=#{title}
        </if>
        <if test="author!=null">
          author=#{author}
        </if>
        </where>
    </select>
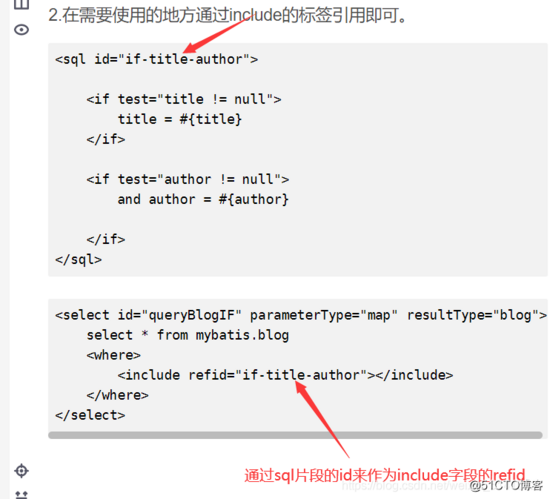
11.3 SQL片段
1.使用SQL片段提取公共部分。
2.在需要使用的地方通过include的标签引用即可。
<sql id="if-title-author">

    <if test="title != null">
        title = #{title}
    </if>

    <if test="author != null">
        and author = #{author}

    </if>
</sql>
<select id="queryBlogIF" parameterType="map" resultType="blog">
    select * from mybatis.blog
    <where>
        <include refid="if-title-author"></include>
    </where>
</select>
开启别名的Settings的设置:


 374
374


 被折叠的 条评论
为什么被折叠?
被折叠的 条评论
为什么被折叠?
 到【灌水乐园】发言


