


因之前需要使用Linux来代替网络设备,实现vlan 功能。网上搜寻了不少资料,发现部分资料只有临时添加vlan 的方法。重启系统后所添加的vlan就会失效,无法应用到实际环境中。本文对Linux临时添加vlan和永久添加vlan的方法进行了整理。特别是永久添加vlan的方法。用于Linux vlan划分,并实现与网络设备进行对接。
一、网络TOP图及环境说明
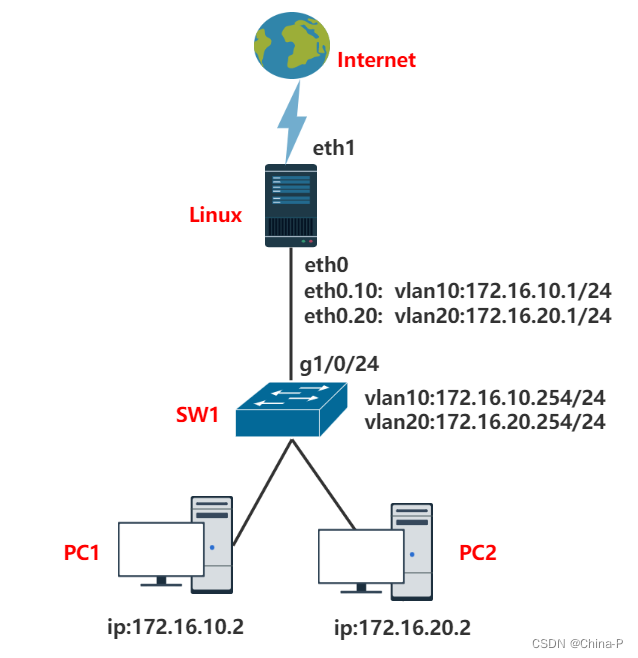
1.1 Linux 有两块网卡eth0 , eth1。网卡eth1连接上级设备,网卡eth0与交换机对接。
1.2 交换机上面有两个vlan。分别为:vlan10 vlan20
1.3 Linux 网卡eth0 连接 交换机的g1/0/24接口
1.4 通过在Linux eth0网卡上配置vlan,与交换机对接,实现PC1 PC2通讯。
二、安装epel源 及vconfig 工具
[root@localhost ~]# yum install epel* -y             #安装epel源
[root@localhost ~]# yum install vconfig -y           #安装vconfig工具
三、临时和永久加载8021q模块
3.1 临时加载8021q 模块,重启系统后失效 -- 仅测试
[root@localhost ~]# modprobe -a 8021q   #加载8021q
[root@localhost ~]# lsmod |grep -i 8021q  #查看内核是否载入了802.1q模组
3.2 永久加载8021q 模块 (实际应用)
3.2.1 添加8021q 模块,(临时和永久添加vlan 都必须确保8021q模块正常加载,前提条件)
tee /etc/sysconfig/modules/8021q.modules <<-'EOF'

/sbin/modinfo -F filename 8021q > /dev/null 2>&1
if [ $? -eq 0 ]; then
    /sbin/modprobe 8021q
fi

EOF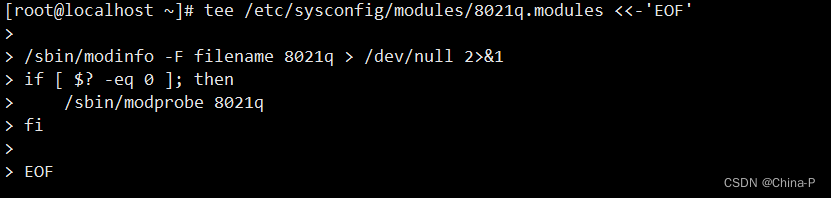
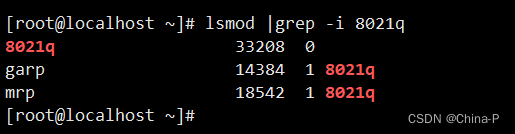
3.2.2 设置8021q.modules 为可执行文件,重启查看802.1q 模块已自动加载
[root@localhost ~]# chmod +x /etc/sysconfig/modules/8021q.modules    #设置为可执行文件
[root@localhost ~]# shutdown -r now          #重启系统
[root@localhost ~]# lsmod |grep -i 8021q     #查看内核是否载入了802.1q模组
四、临时添加vlan (重启后失效,仅测试)
4.1 使用vconfig 临时添加和删除vlan
[root@localhost ~]# vconfig add eth0 10   #添加vlan10
[root@localhost ~]# vconfig add eth0 20   #添加vlan20
[root@localhost ~]# cat /proc/net/vlan/config   #查看vlan信息

[root@localhost ~]# vconfig rem eth0.10   #删除vlan10
[root@localhost ~]# vconfig rem eth0.20   #删除vlan20
4.2 使用ip link 临时添加vlan
[root@localhost ~]# ip link add link eth0 name eth0.10  type vlan id 10  #添加vlan10
[root@localhost ~]# ip link add link eth0 name eth0.20  type vlan id 20  #添加vlan20

[root@localhost ~]# ip link set eth0.10 up    #设置网卡为up状态
[root@localhost ~]# ip link set eth0.20 up    #设置网卡为up状态
4.3 临时配置vlan ip
ifconfig 配置方式
[root@localhost ~]# yum install net-tools.x86_64 -y  #安装网络工具包
[root@localhost ~]# ifconfig eth0.10 172.16.10.1 netmask 255.255.255.0 up
[root@localhost ~]# ifconfig eth0.20 172.16.20.1 netmask 255.255.255.0 up
ip address 配置方式
[root@localhost ~]# ip address add 172.16.10.1/24 dev eth0.10
[root@localhost ~]# ip address add 172.16.20.1/24 dev eth0.20
4.4 重启网络服务
[root@localhost ~]# service network restart        #centos 6.x 7.x 8.x
[root@localhost ~]# systemctl restart network      #centos 7.x 8.x
五、配置永久vlan (实际运用)
5.1 添加vlan10 , 写入网络信息到配置文件
vi /etc/sysconfig/network-scripts/ifcfg-eth0.10 #eth0为物理网卡名称,请对应修改
TYPE=Vlan           #TYPE类型为Vlan , 默认为:Ethernet
BOOTPROTO=static
DEVICE=eth0.10
ONBOOT=yes
IPADDR=172.16.10.1
PREFIX=24
VLAN=yes           #设置支持vlan
VLAN_ID=10         #设置vlan号
REORDER_HDR=yes
GVRP=no
MVRP=no
5.2 添加vlan20 , 写入网络信息到配置文件
vi /etc/sysconfig/network-scripts/ifcfg-eth0.20 #eth0为物理网卡名称,请对应修改
TYPE=Vlan           #TYPE类型为Vlan , 默认为:Ethernet
BOOTPROTO=static
DEVICE=eth0.20
ONBOOT=yes
IPADDR=172.16.20.1
PREFIX=24
VLAN=yes           #设置支持vlan
VLAN_ID=20         #设置vlan号
REORDER_HDR=yes
GVRP=no
MVRP=no
5.3 重启网络服务
[root@localhost ~]# service network restart        #centos 6.x 7.x 8.x
[root@localhost ~]# systemctl restart network      #centos 7.x 8.x
5.4 查看vlan及网络信息
[root@localhost ~]# ip add                      #查看网络信息方式1
[root@localhost ~]# ifconfig                    #查看网络信息方式2
[root@localhost ~]# cat /proc/net/vlan/config   #查看vlan信息
5.5 交换机、PC设置 (略)


 3054
3054

 被折叠的 条评论
为什么被折叠?
被折叠的 条评论
为什么被折叠?
 到【灌水乐园】发言


