


前言
一句话总结:并发的用户执行了第一类测试任务、第二类测试任务,设置所有类的测试前置、测试后置,设置每一类测试任务的测试前置,测试后置。
1、概念
1.1、一个完整的脚本示例
from locust import task, HttpUser, constant_pacing
from locust import between, constant, tag
from locust import events
from locust.runners import MasterRunner
import csv
import time
import json
from json import JSONDecodeError
from loguru import logger
@events.test_start.add_listener
def on_test_start(environment, **kwargs):
if not isinstance(environment.runner, MasterRunner):
print("Beginning test setup")
else:
print("Started test from Master node")
@events.test_stop.add_listener
def on_test_stop(environment, **kwargs):
if not isinstance(environment.runner, MasterRunner):
print("Cleaning up test data")
else:
print("Stopped test from Master node")
# 请求完成后,触发监听器:定义了输出响应的相关内容,这个可以放到locufile文件里面
@events.request.add_listener
def my_request_handler(request_type, name, response_time, response_length, response,
context, exception, start_time, url, **kwargs):
if exception:
print(f"Request to {name} failed with exception {exception}")
else:
print(f"request_type : {request_type}")
print(f"response_time : {response_time}")
print(f"response_length : {response_length}")
print(f"context : {context}")
print(f"start_time : {start_time}")
print(f"url : {url}")
print(f"Successfully made a request to: {name}")
print(f"The response : {response.text}")
class User1(HttpUser):
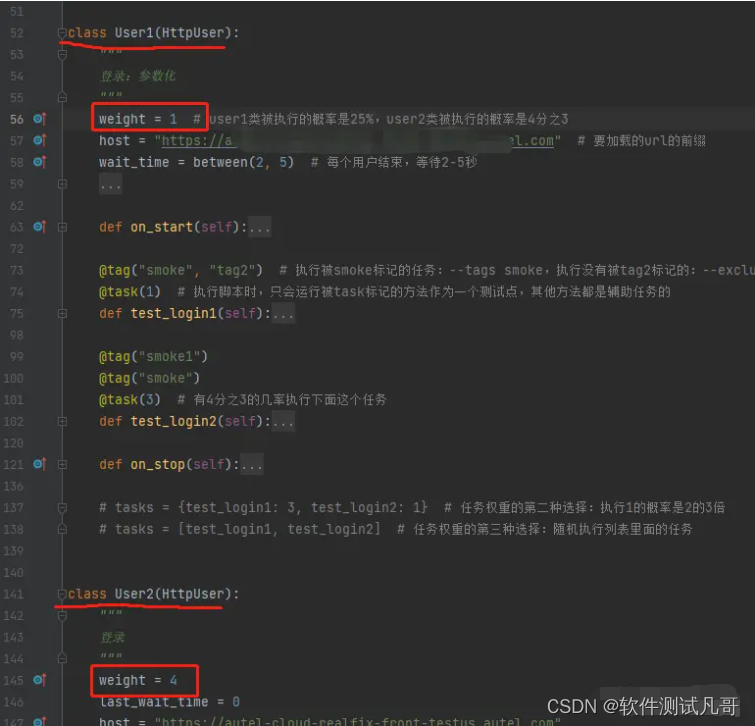
weight = 1 # user1类被执行的概率是25%,user2类被执行的概率是4分之3
host = "https://xxx.com" # 要加载的url的前缀
wait_time = between(2, 5) # 每个用户结束,等待2-5秒
# wait_time = constant(3) # 每个用户操作完成后,等待3秒
# wait_time = constant_pacing(10) # 强制只等待10秒,优先级大于@task标记方法自定义的的sleep(20)
# wait_time = constant_throughput(0.1) # pacing的反例,这个还是等待10秒,1/值(0.1) = 10
def on_start(self):
"""
每个user启动前调用on_start方法
这是获取用户特定测试数据的好地方。每个用户执行一次
如果不希望记录请求,可以将self.client.<method>替换为request请求
"""
headers = {"Content-Type": "application/json"}
self.client.headers = headers # 这里设置的headers将给分发给每个任务的headers,避免重复去写。
time.sleep(1)
@tag("smoke", "tag2") # 执行被smoke标记的任务:--tags smoke,执行没有被tag2标记的:--exclude-tags tag2/--exclude-tags tag2 smoke
@task(1) # 执行脚本时,只会运行被task标记的方法作为一个测试点,其他方法都是辅助任务的
def test_login1(self):
# 读取csv中的用户名、密码
file = open("../data/user/userdata_1000.csv", "r")
table = csv.reader(file)
for i in table:
# 参数化登录的入参
data = json.dumps({"account": "18741341234"})
headers = {"Content-Type": "application/json"}
r = self.client.post("/api/login", data=data, headers=headers)
# self.client继承了request.session,所以不用传cookie,传登录,直接请求即可
with r as response: # 断言响应的内容
try:
if response.status_code != 200:
logger.info("Did not get expected value in greeting")
except JSONDecodeError:
response.failure("Response could not be decoded as JSON") # 如果是json格式问题,抛出自己定义的异常
except KeyError:
response.failure("Response did not contain expected key 'greeting'") # 执行失败,抛出异常
@tag("smoke1")
@tag("smoke")
@task(3) # 有4分之3的几率执行下面这个任务
def test_login2(self):
data = json.dumps({"account": "18741341234"})
headers = {"Content-Type": "application/json"}
response = self.client.post("/api/login", data=data, headers=headers)
# locust自带标准断言
with response as res:
try:
if res.status_code != 200:
res.failure("脚本返回的code不是200")
except JSONDecodeError:
res.failure("Response could not be decoded as JSON")
time.sleep(1)
# self.environment.runner.quit() # to stop the runner from a task method
def on_stop(self):
"""
每个user运行结束后调用on_start方法
清理测试数据等:
(1)调用接口清理测试数据、(2)数据库清理测试数据
"""
data = json.dumps({"account": "18741341234"})
headers = {"Content-Type": "application/json"}
self.client.post("/api/login", data=data, headers=headers)
time.sleep(1)
# tasks = {test_login1: 3, test_login2: 1} # 任务权重的第二种选择:执行1的概率是2的3倍
# tasks = [test_login1, test_login2] # 任务权重的第三种选择:随机执行列表里面的任务
class User2(HttpUser):
"""
登录
"""
weight = 4
last_wait_time = 0
host = "https://xxx.com"
wait_time = constant(1)
def on_start(self):
data = json.dumps({"account": "18741341234"})
headers = {"Content-Type": "application/json"}
self.user_specific_testdata = self.client.post("/api/login", data=data, headers=headers)
time.sleep(1)
self.tfjiao = "jiaotengfei" # 在on start方法中定义了self.tfjiao属性,所以下面可直接调用
@tag("tag2")
@task
def test_login3(self):
print(self.tfjiao)
self.last_wait_time += 1 #
data = json.dumps({"account": "18741341234"})
headers = {"Content-Type": "application/json"}
response = self.client.post("/api/login", data=data, headers=headers)
assert response.status_code == 200
@tag("smoke")
@task
def test_login4(self):
self.last_wait_time += 1 #
data = json.dumps({"account": "18741341234"})
headers = {"Content-Type": "application/json"}
r = self.client.post("/api/login", data=data, headers=headers)
def on_stop(self):
data = json.dumps({"account": "18741341234"})
headers = {"Content-Type": "application/json"}
self.client.post("/api/login", data=data, headers=headers)
time.sleep(1)1.2、基础内容
from locust import task, HttpUser, constant_pacing from locust import between, constant, tag from locust import events from locust.runners import MasterRunner
- 在这里locust 文件只是一个普通的 Python 模块,它可以从其他文件或包中导入代码。
- 在这里,我们为将要模拟的用户定义了一个类。它继承自 HttpUser,为每个用户提供一个client属性,HttpUser继承了HttpSession,client属性可用于发出 HTTP 请求。当测试开始时,locust 会为模拟的每个用户创建一个这个类的实例,每个用户都将开始在他们自己的gevent 线程中运行。HttpSession继承了request.session,HttpSession 增加的主要是将请求结果上报到 Locust(成功/失败、响应时间、响应长度、名称),它具有request库的所有功能,包括抛出的异常内容。
- wait_time = between(1, 5) :父类定义了一个wait_time,让模拟用户在每个任务执行后等待 1 到 5 秒
- @task 装饰器locustd的核心。对于每个正在运行的用户,Locust 创建一个 greenlet(微线程),它将调用这些方法。我们通过用 装饰两个方法来声明两个任务@task,其中一个被赋予了更高的执行概率。locust只会监控被@task标记的方法的测试数据,因此可以定义自己的内部辅助方法。
2、HttpUser类
一个继承了HttpUser的类代表一个用户(脚本执行,web界面可以让你自由设置用户的数目)。它继承自User 类,有以下通用属性:
2.1、等待时间:wait_time
- wait_time = between(2, 5) # 每个用户执行结束,等待2-5秒
- wait_time = constant(3) # 每个用户执行结束,固定等待3秒
- wait_time = constant_pacing(10) # 每个用户执行结束,强制等待10秒,优先级大于@task标记方法自定义的的 time.sleep(20)
- wait_time = constant_throughput(0.1) # pacing的反例,这个还是等待10秒,1/值(0.1) = 10
2.2、权重:weight
weight = 2 用来设置用户类的权重,权重也就是每个用户类被执行的概率,也就是上面的user1和user2两类用户被执行的概率,2个类默认被执行的概率是一样的,如下设置,user2被执行的概率是user1的4倍。
2.3、host
host 要加载的主机的 URL 前缀(即“ google.com ”)。可以理解为base url,后面发送的请求只要想写变化的部分,url固定的内容都被提到了 host 属性里面。
2.4、on_start \ on_stop
User1类在执行被@task标记的方法前会调用 on_start 方法,on_stop 是执行完@task 后调用。 用于自定义测试数据的准备、清理等。
2.5、环境属性
environment对用户正在运行的用户的引用。使用它与环境或其runner包含的环境进行交互。例如,从任务方法中停止跑步者: self.environment.runner.quit() ,如果在独立的 locust 实例上运行,这将停止整个运行。如果在工作节点上运行,它将停止该特定节点。
2.6、验证响应
如果 HTTP 响应代码正常(<400),则认为请求成功,但对响应进行一些额外验证通常很有用。 可以使用catch_response参数、with语句和对response.failure()的调用将请求标记为失败
with self.client.get("/", catch_response=True) as response:
    if response.text != "Success":
        response.failure("Got wrong response")
    elif response.elapsed.total_seconds() > 0.5:
        response.failure("Request took too long")
我常用的3种断言:
            # 第一种
            assert response.status_code == 200

            # 第二种:locust自带标准断言
            with response as res:
                try:
                    if res.status_code != 200:
                        res.failure("脚本返回的code不是200")
                except JSONDecodeError:
                    res.failure("Response could not be decoded as JSON")
            # 第三种:
            # res = response.json()['code']
            # if res == 200:
            #     result = f"{title} - 用例执行成功"
            #     file2.write(result + "\n")
            #     logger.info("成功搜索title: " + title)
            # else:
            #     result = f"{title} - 用例执行失败"
            #     file2.write(result + "\n")
3、任务
当10并发开始时,将为并发的每个用户创建一个User1类(继承HttpUser)的实例,并且他们将开始在自己的gevent中运行。当这些用户运行时,他们选择要执行的任务,执行完成后,等待一会,继续选择一个新任务,如此持续。这些任务是普通的 Python 可调用程序,如果我们对网站进行负载测试,它们可以执行,如“加载起始页”、“搜索某些产品”、“出价”等操作。
3.1、给用户添加任务:@task
给用户添加任务就是添加装饰器 @task , 它接受权重的设置,如下test_login2方法的执行概率是test_login1的三倍,

3.2、给用户添加任务:tasks
给用户添加任务的第二个方法是设置tasks属性。以下是2种设置方法:
- 使用字典来设置权重: tasks = {test_login1: 3, test_login2: 1} # 执行1的概率是2的3倍
- 源码调用 random.choice() 从列表中随机选择任务: tasks = [test_login1, test_login2]
在内部,上面的 dict 实际上将扩展为一个列表(并且tasks属性被更新),类似于: [my_task, my_task, my_task, another_task]
from locust import User, constant

def my_task(user):
    pass

class MyUser(User):
    tasks = [my_task]
    wait_time = constant(1)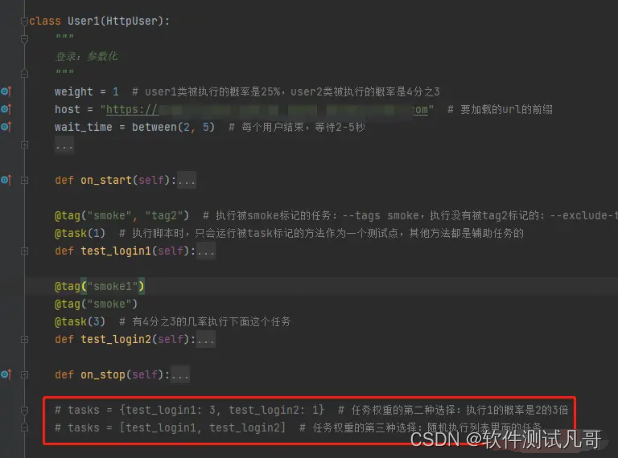
3.3、标记任务:@tag
通过使用@tag装饰器标记任务,可以使用--tags和--exclude-tags参数对在测试期间执行的任务进行自由选择,比如冒烟用例。示例:
from locust import User, constant, task, tag

class MyUser(User):
    wait_time = constant(1)

    @tag('tag1')
    @task
    def task1(self):
        pass

    @tag('tag1', 'tag2')
    @task
    def task2(self):
        pass

    @tag('tag3')
    @task
    def task3(self):
        pass

    @task
    def task4(self):
        pass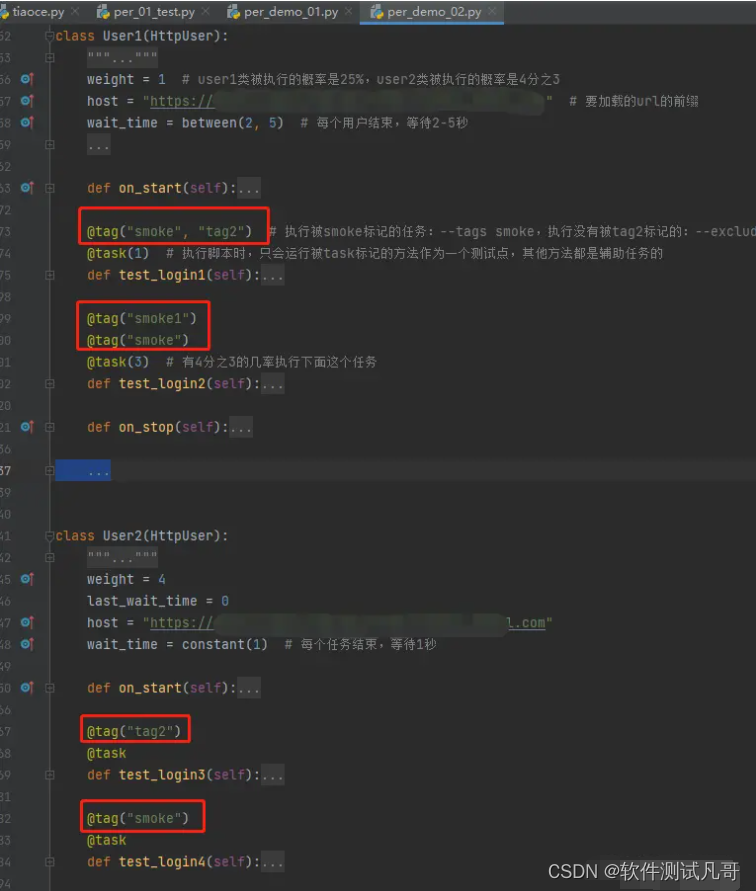
执行示例:locust -f per_01_test.py --tags smoke tag2
4、事件 @event
如果你想运行一些设置代码作为测试的一部分,通常把它放在 locustfile.py 里面就足够了,但有时需要在运行中的特定时间做一些事情。为了这个需求,Locust 提供了事件钩子。
4.1、test_start \ test_stop
如果您需要在负载测试开始或停止时运行一些代码,您应该使用 test_start和test_stop 事件。您可以在 locustfile 的模块级别为这些事件设置侦听器:
from locust import events

@events.test_start.add_listener
def on_test_start(environment, **kwargs):
    print("A new test is starting")

@events.test_stop.add_listener
def on_test_stop(environment, **kwargs):
    print("A new test is ending")
4.2、init
该init事件在每个 Locust 进程开始时触发。在分布式模式中特别有用,其中每个工作进程(而不是每个用户)都需要进行一些初始化。:
from locust import events
from locust.runners import MasterRunner

@events.init.add_listener
def on_locust_init(environment, **kwargs):
    if isinstance(environment.runner, MasterRunner):
        print("I'm on master node")
    else:
        print("I'm on a worker or standalone node")
4.3、其他
其他参考产品文档
5、项目框架
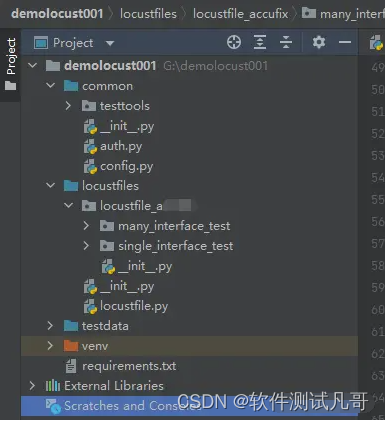
三部分:common、locustfiles、testdata,locustfiles里面分项目、项目里面分单接口测试脚本、业务流程测试脚本
-事必有法,然后有成- 最后祝大家早日达到测试的天花板!
以下是我收集到的比较好的学习教程资源,虽然不是什么很值钱的东西,如果你刚好需要,可以留言【777】直接拿走就好了


 1270
1270


 被折叠的 条评论
为什么被折叠?
被折叠的 条评论
为什么被折叠?
 到【灌水乐园】发言


