


1 press_keycode
1.1 键盘操作
press_keycode是Appium的键盘相关函数;
可以实现键盘的相关操作,比如返回、按键、音量调节等等;函数使用方法为:
driver.press_keycode(KeyCode)1.2 关于KeyCode
以上press_keycode方法中传入参数KeyCode,而KeyCode是对应的键值码;
其可以传入对应的键值名,也可以传入具体键值名的值(对应数字)。
1.3 press_keycode源码
press_keycode源码如下:
def press_keycode(self, keycode: int, metastate: Optional[int] = None, flags: Optional[int] = None) -> 'WebDriver':"""Sends a keycode to the device.Android only. Possible keycodes can be foundin http://developer.android.com/reference/android/view/KeyEvent.html.Args:keycode: the keycode to be sent to the devicemetastate: meta information about the keycode being sentflags: the set of key event flagsReturns:Union['WebDriver', 'Keyboard']: Self instance"""ext_name = 'mobile: pressKey'args = {'keycode': keycode}if metastate is not None:args['metastate'] = metastateif flags is not None:args['flags'] = flagstry:self.assert_extension_exists(ext_name).execute_script(ext_name, args)except UnknownMethodException:# TODO: Remove the fallbackself.mark_extension_absence(ext_name).execute(Command.PRESS_KEYCODE, args)return cast('WebDriver', self)
从源码中可以看出,想要找到对应的键值名可以直接去官网查看。
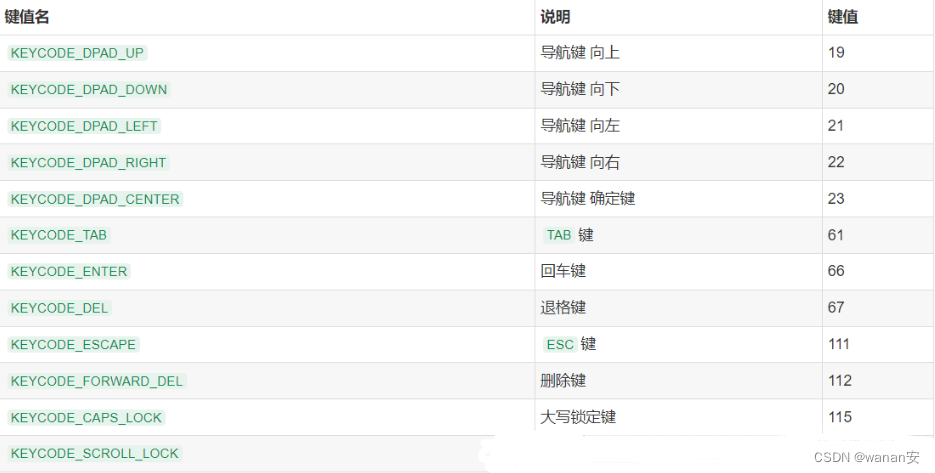
1.4 电话键相关
以下为部分(非全部,仅参考)电话键相关键值名:

1.5控制键相关
以下为部分(非全部,仅参考)控制键相关键值名:
1.6 基本按键相关
以下为部分(非全部,仅参考)基本按键相关键值名:
其中按键0-9键值为7-16,比如:

其中字母A-Z的键值为29-54,比如:

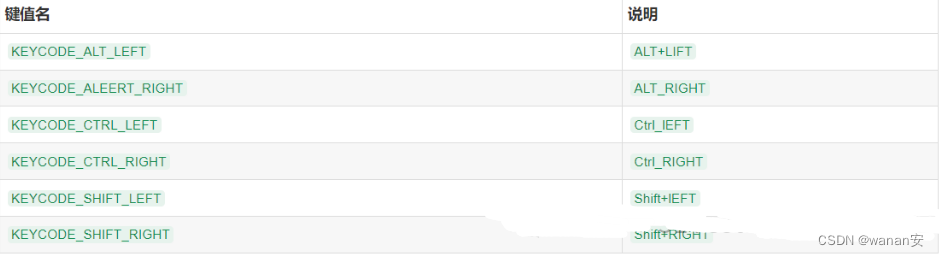
1.7 组合键相关
以下为部分(非全部,仅参考)组合键相关键值名:
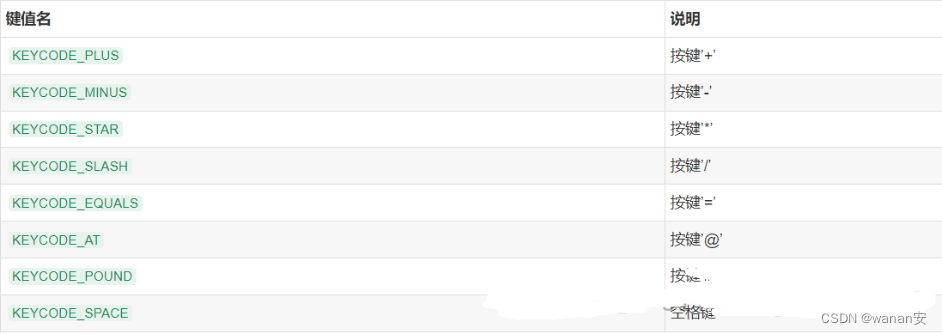
1.8 符号键相关
以下为部分(非全部,仅参考)符号键相关键值名:
1.9 使用举例
使用方法为:
driver.press_keycode(4) # 返回键driver.press_keycode(84) # 搜索键
或者可以使用keyevent方法:
driver.keyevent(66) # 回车键driver.keyevent(67) # 退格键
2 swip方
2.1 swip说明
swip()方法是从一个坐标位置滑动到另一个坐标位置;
也就是说两点之间的滑动。
2.2 swip使用方法
可以查看swip源码来看下如何使用:
def swipe(self, start_x: int, start_y: int, end_x: int, end_y: int, duration: int = 0) -> 'WebDriver':"""Swipe from one point to another point, for an optional duration.Args:start_x: x-coordinate at which to startstart_y: y-coordinate at which to startend_x: x-coordinate at which to stopend_y: y-coordinate at which to stopduration: defines the swipe speed as time taken to swipe from point a to point b, in ms.Usage:driver.swipe(100, 100, 100, 400)Returns:Union['WebDriver', 'ActionHelpers']: Self instance"""touch_input = PointerInput(interaction.POINTER_TOUCH, "touch")actions = ActionChains(self)actions.w3c_actions = ActionBuilder(self, mouse=touch_input)actions.w3c_actions.pointer_action.move_to_location(start_x, start_y)actions.w3c_actions.pointer_action.pointer_down()if duration > 0:actions.w3c_actions = ActionBuilder(self, mouse=touch_input, duration=duration)actions.w3c_actions.pointer_action.move_to_location(end_x, end_y)actions.w3c_actions.pointer_action.release()actions.perform()return cast('WebDriver', self)
从以上看需要至少四个参数swipe(self, start_x: int, start_y: int, end_x: int, end_y: int);
2.3 使用示例
比如坐标从(100,200)滑动到(300,400):
driver.swipe(100, 200, 300, 400)再比如从(400,500)滑动到(600,700)持续3秒:
3 scroll方法
scroll()方法是从一个元素滑动到另一个元素,直到页面自动停止;
使用方法为:
def scroll(self, origin_el: WebElement, destination_el: WebElement, duration: Optional[int] = None) -> 'WebDriver':"""Scrolls from one element to anotherArgs:origin_el: the element from which to begin scrolling (center of element)destination_el: the element to scroll to (center of element)duration: defines speed of scroll action when moving from originalEl to destinationEl.Default is 600 ms for W3C spec.Usage:driver.scroll(el1, el2)
比如从用户名滑动到密码输入框:
user_name = driver.find_element(AppiumBy.XPATH, "//*[@text='用户名']")user_passwd = driver.find_element(AppiumBy.XPATH, "//*[@text='密码']")driver.scroll(user_name, user_passwd)
4 drag_and_drop方法
drag_and_drop()方法从一个元素滑动到另一个元素,第二个元素代替第一个元素原本屏幕上的位置;
使用方法为:
def drag_and_drop(self, origin_el: WebElement, destination_el: WebElement) -> 'WebDriver':"""Drag the origin element to the destination elementArgs:origin_el: the element to dragdestination_el: the element to drag toReturns:Union['WebDriver', 'ActionHelpers']: Self instance"""
比如:
user_name = driver.find_element(AppiumBy.XPATH, "//*[@text='用户名']")user_passwd = driver.find_element(AppiumBy.XPATH, "//*[@text='密码']")driver.drag_and_drop(user_name, user_passwd)
5 TouchAction方法
TouchAction可实现手势的操作,比如滑动、拖动、长按等操作;
使用方法是先需要导入TouchAction:
from appium.webdriver.common.touch_action import TouchAction5.1 tap方法
tap()方法模拟手指对某个元素或坐标按下并快速抬起;
使用方法为:
def tap(self,element: Optional['WebElement'] = None,x: Optional[int] = None,y: Optional[int] = None,count: int = 1,) -> 'TouchAction':"""Perform a tap action on the elementArgs:element: the element to tapx : x coordinate to tap, relative to the top left corner of the element.y : y coordinate. If y is used, x must also be set, and vice versa
比如:
TouchAction(driver).tap(user_name).perform()5.2 press方法
press()方法是手指一直按下;
使用方法:
def press(self,el: Optional['WebElement'] = None,x: Optional[int] = None,y: Optional[int] = None,pressure: Optional[float] = None,) -> 'TouchAction':"""Begin a chain with a press down action at a particular element or pointArgs:el: the element to pressx: x coordiate to press. If y is used, x must also be sety: y coordiate to press. If x is used, y must also be set
比如:
TouchAction(driver).press(x=100, y=200).perform()5.3 release方法
release()方法是模拟手指抬起;
使用方法:
def release(self) -> 'TouchAction':"""End the action by lifting the pointer off the screenReturns:`TouchAction`: Self instance"""self._add_action('release', {})return self
比如:
TouchAction(driver).press(x=100, y=200).release().perform()5.4 wait方法
wait()方法是模拟手指等待;
使用方法为:
def wait(self, ms: int = 0) -> 'TouchAction':"""Pause for `ms` milliseconds.Args:ms: The time to pauseReturns:`TouchAction`: Self instance"""
比如按下等待3秒后抬起:
TouchAction(driver).press(x=100, y=200).wait(3000).release().perform()5.5 move_to方法
move_to()方法是模拟手指移动;
使用方法:
def move_to(self, el: Optional['WebElement'] = None, x: Optional[int] = None, y: Optional[int] = None) -> 'TouchAction':"""Move the pointer from the previous point to the element or point specifiedArgs:el: the element to be moved tox: x coordiate to be moved to. If y is used, x must also be sety: y coordiate to be moved to. If x is used, y must also be setReturns:`TouchAction`: Self instance"""
比如:
TouchAction(driver).press(x=400, y=500).move_to(500, 600).perform()现在我也找了很多测试的朋友,做了一个分享技术的交流群,共享了很多我们收集的技术文档和视频教程。
如果你不想再体验自学时找不到资源,没人解答问题,坚持几天便放弃的感受
可以加入我们一起交流。而且还有很多在自动化,性能,安全,测试开发等等方面有一定建树的技术大牛
分享他们的经验,还会分享很多直播讲座和技术沙龙
可以免费学习!划重点!开源的!!!
qq群号:485187702【暗号:csdn11】最后感谢每一个认真阅读我文章的人,看着粉丝一路的上涨和关注,礼尚往来总是要有的,虽然不是什么很值钱的东西,如果你用得到的话可以直接拿走! 希望能帮助到你!【100%无套路免费领取】


 616
616

 被折叠的 条评论
为什么被折叠?
被折叠的 条评论
为什么被折叠?
 到【灌水乐园】发言


