


DHCP原理与配置
DHCP的原理
DHCP的概念
DHCP 动态主机配置协议。
服务器配置好了地址池 192.168.233.10 192.168.233.20
客户端从地址池当中随机获取一个ip地址,IP地址会发生变化,使用服务端提供的IP地址,时间限制,重启之后也会更换。
DHCP的优点
1、降低了配置和部署的时间
2、降低了发生配置错误的可能性
3、ip地址可以进行集中化管理
4、提高了ip地址的利用率
在工作中,局域网,DHCP,动态写死的IP地址。
服务端和客户端
服务端 提供某种特定的服务
客户端 使用这种的特定的服务
c/s client servers 客户端 服务端 应用程序之间,通过端口进行通信,实现c/s
b/s browser server 浏览器 服务端
DHCP的分配方式

自动分配:自动分配,然后永久使用
动态分配:自动分配,时间限制,重启之后,IP地址会被回收,给下一个客户机继续使用。
手动分配:管理员通过DHCP给客户机手动分配一个ip地址。(很少)
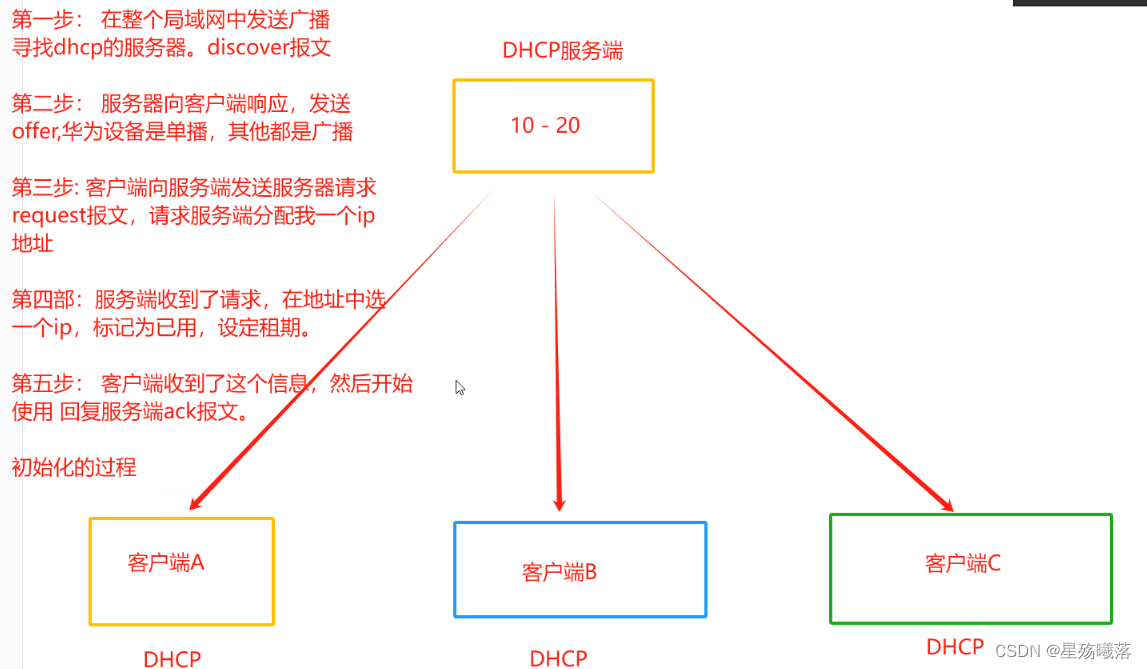
初始化过程:
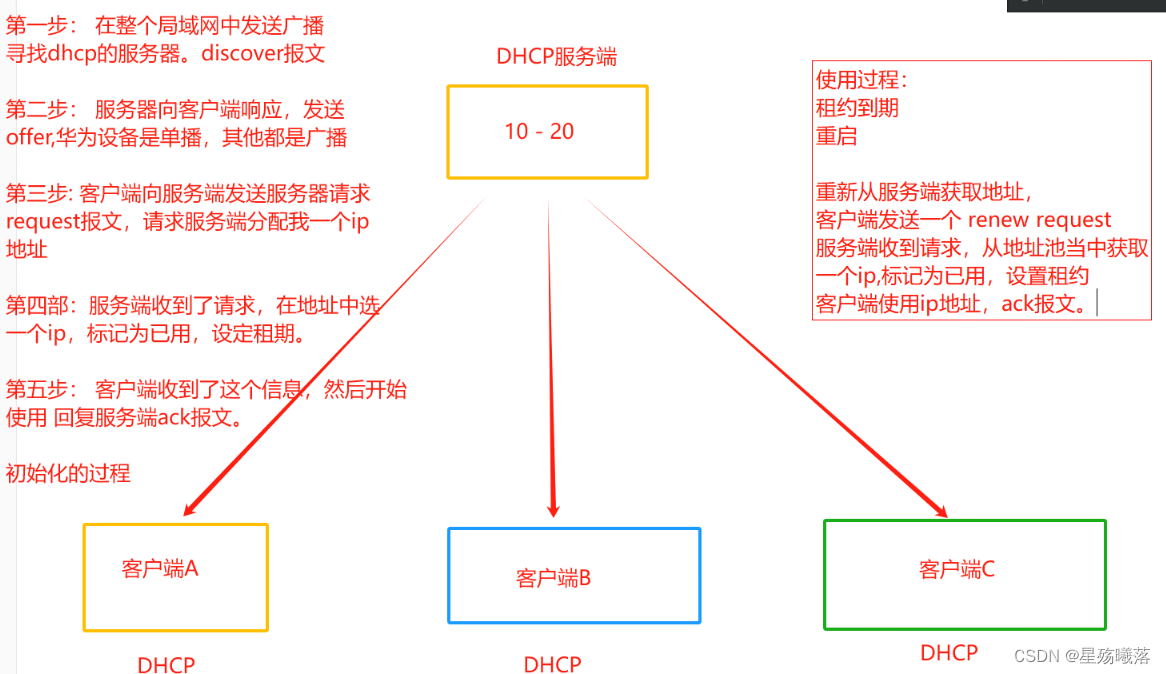
使用过程:()
特殊情况:
如果地址池当中可分配ip用尽怎么办?
只能等。这种情况很少出现。
地址池可以手动配置。可以加,可以减。
实验1:
test2 服务端 dhcp服务 192.168.60.20 192.168.60.100-192.168.60.110
test3 客户端 修改获取ip地址的方式。

DHCP服务端的端口是 67
客户端的端口是 68
操作:
1、关闭两个主机的防火墙
systemctl stop firewalld
setenforce 0
2、在test2里装DHCP
yum -y instart dhcp
3、进入doc目录下修改配置文件
[root@test1 ~]# cd /usr/share/doc
[root@test1 doc]# ls
[root@test1 doc]# cd dhcp-4.2.5/
4、将dhcpd.conf.example复制到dhcpd.conf中
[root@test1 dhcp]# cp /usr/share/doc/dhcp-4.2.5/dhcpd.conf.example /etc/dhcp/dhcpd.conf
5、将dhcpd.conf文件备个份
[root@test1 dhcp]# cp dhcpd.conf dhcpd.conf.bak.20240604
6、更改dhcpd.conf配置we
7 option domain-name "example.org";
8 #DHCP的默认域名
9 option domain-name-servers ns1.example.org, ns2.example.org;
10 #dhcp的DNS的服务地址
11 default-lease-time 600;
12 #最小租约 秒
13 max-lease-time 7200;
14 #最大租约 秒
15 # Use this to enble / disable dynamic dns updates globally.
16 #ddns-update-style none;
17 #禁用DNS的动态更新
33 # This is a very basic subnet declaration.
34 #声明网段和地址池的配置
35 subnet 192.168.60.0 netmask 255.255.255.0 {
36 range 192.168.60.100 192.168.60.110 ;
37 option routers 192.168.60.2;
38 }
7、重启服务
[root@test2 dhcp]# systemctl restart dhcpd
8、在另一个里更改网卡配置
vim /etc/sysconfig/network-scripts/ifcfg-ens33
9、重启网卡
systemctl restat network
ftp:file transfer protocol 文件传输协议。在网络上用于双向进行传输。也是一个应用程序
c/s架构
不同的操作系统有不同ftp的软件,使用的协议都是一样的。
FTP基于tcp协议,有两个端口
20 建立数据连接,传输数据
21 连接控制,传输ftp的控制命令
ftp服务端和客户端,建立连接之后,双向进行的文件传输。
ftp建立数据连接的模式:
主动模式:服务器主动向端口发起数据连接
被动模式:服务器等待客户端发起连接。
(常用)被动模式:被动模式更容易穿越防护墙,默认就是被动模式
匿名用户默认的根目录:
/var/ftp/pub/
上传是put 本地文件 上传到服务器
下载 get 把服务器的文件下载到本地。
匿名用户权限太高,存在安全隐患。
禁止匿名用户登录
只要是系统用户登录,都禁锢在家目录
黑名单和白名单:
黑名单:在名单上的不允许登录 允许所有,拒绝个别
白名单:只有在名单上的才允许登录 拒绝所有,允许个别
实验2:
操作:
1、安装vsftpd
[root@localhost ~]# yum -y install vsftpd
2、进入vsftpd目录下备份vsftpd.conf配置文件
[root@localhost ~]# cd /etc/vsftpd/
[root@localhost vsftpd]# ls
ftpusers  user_list  vsftpd.conf  vsftpd_conf_migrate.sh
[root@localhost vsftpd]# cp vsftpd.conf vsftpd.conf.bask.20240604
3、修改vsftpd.conf配置文件
 12 anonymous_enable=YES
 13 #允许匿名用户登录
 14 #
 15 # Uncomment this to allow local users to log in.
 16 # When SELinux is enforcing check for SE bool ftp_home_dir
 17 local_enable=YES
 18 #允许系统用户进行访问
 19 #
 20 # Uncomment this to enable any form of FTP write command.
 21 write_enable=YES 22 #可以在服务器上进行上传操作
 32 anon_upload_enable=YES
 33 #允许匿名用户上传文件
 34 #
 35 # Uncomment this if you want the anonymous FTP user to be a    ble to create
 36 # new directories.
 37 anon_mkdir_write_enable=YES
 38 #允许匿名用户创建,上传目录
 39 anon_other_write_enable=YES
 40 #允许匿名用户,删除,重命名,覆盖等等操作,手动添加
4、重启vsftpd.conf配置文件
[root@localhost vsftpd]# systemctl restart vsftpd
5、进入pub目录下写一个文件
[root@localhost /]# cd /var/ftp/pub/
[root@localhost vsftpd]# chmod 777 /var/ftp/pub/
[root@localhost pub]# ls
[root@localhost pub]# echo "hello,world" > test.txt
[root@localhost pub]# ls
test.txt
6、进入本机win+r的cmd模拟匿名用户的下载和上传操作
C:\Users\86158>ftp 192.168.60.20
连接到 192.168.60.20。
220 (vsFTPd 3.0.2)
200 Always in UTF8 mode.
用户(192.168.60.20:(none)): ftp
331 Please specify the password.
密码:
230 Login successful.
ftp> ls
200 PORT command successful. Consider using PASV.
150 Here comes the directory listing.
pub
226 Directory send OK.
ftp: 收到 8 字节,用时 0.00秒 8000.00千字节/秒。
ftp> cd pub
250 Directory successfully changed.
ftp> ls
200 PORT command successful. Consider using PASV.
150 Here comes the directory listing.
test.txt
226 Directory send OK.
ftp: 收到 13 字节,用时 0.00秒 13000.00千字节/秒。
ftp> get test.txt
200 PORT command successful. Consider using PASV.
150 Opening BINARY mode data connection for test.txt (12 bytes).
226 Transfer complete.
ftp: 收到 12 字节,用时 0.00秒 12000.00千字节/秒。
ftp> put test1.txt
200 PORT command successful. Consider using PASV.
150 Ok to send data.
226 Transfer complete.
ftp: 发送 24 字节,用时 0.00秒 24000.00千字节/秒。
7、创建普通用户
[root@localhost pub]# useradd xy102
[root@localhost pub]# passwd xy102
更改用户 xy102 的密码 。
新的 密码:
无效的密码: 密码少于 8 个字符
重新输入新的 密码:
passwd:所有的身份验证令牌已经成功更新。
8、更改vsftpd.conf配置文件 使所有用户禁锢在家目录
[root@localhost pub]# vim /etc/vsftpd/vsftpd.conf
 12 anonymous_enable=NO
 13 #禁止匿名用户登录
 108 chroot_local_user=YES
 109 #系统用户只能在自己的家目录
 110 allow_writeable_chroot=YES
[root@localhost pub]# systemctl restart vsftpd          #重启配置文件
9、更改vsftpd.conf配置文件下的黑白名单配置:
133 listen_ipv6=YES
134
135 pam_service_name=vsftpd
136 userlist_enable=YES
137 userlist_deny=NO
138 #这个是默认开启的


 1131
1131

 被折叠的 条评论
为什么被折叠?
被折叠的 条评论
为什么被折叠?
 到【灌水乐园】发言


