


1.I/O流
全称就是Input/Output Stream 即输入/输出流
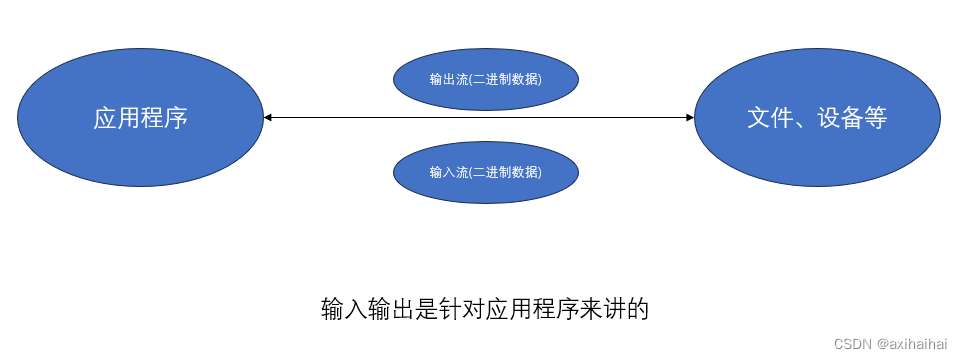
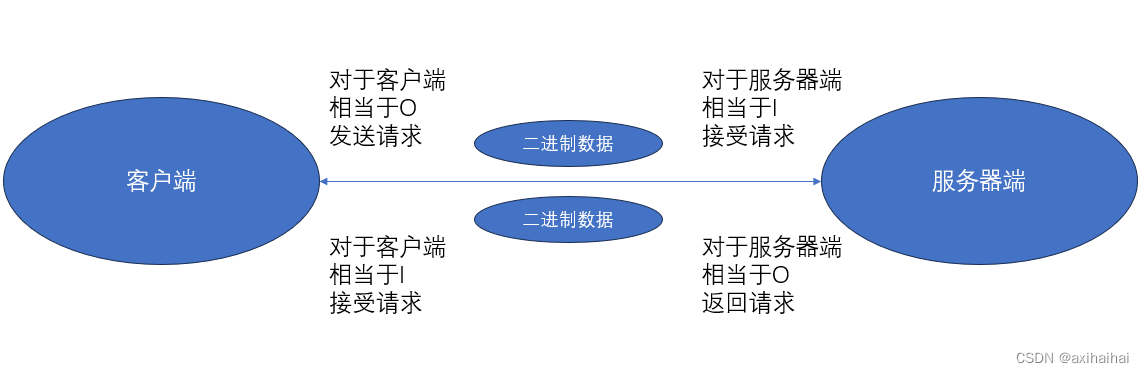
我可以举一个客户端和服务器端之间发送和返回请求的例子
2.常用类型
I/O流的常用类型都在java.io包中了
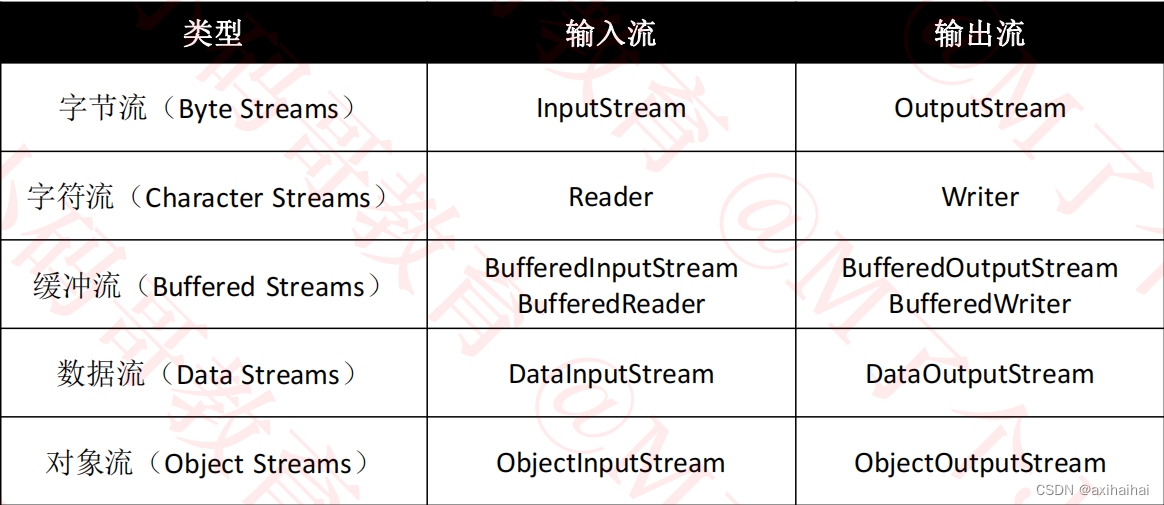
我可以简单用文字分析一下其中的一些类型:
比如输入流中的字节流 你可以理解为一个字节一个字节的输入/读取
再比如输出流的字符流 你可以理解为一个字符一个字符的输出
3.File
I/O流的操作对象经常是文件 所以我们需要来了解一下文件如何创建以及使用
一个File对象就表示一个文件或者一个文件夹
public class Main {
    public static void main(String[] args) {
    	// file1中的文件路径的双反斜杠的原因在于能够避免转义字符的出现
        File file1 = new File("D:\\1.txt");
        File file2 = new File("D:/1.txt");
    }
}
名字分隔符:我们可以通过File.separator获取对应系统中的推荐分隔符
在UNIX、Linux、Mac系统中:推荐使用正斜杠(/)
在Windows系统中:推荐使用反斜杠()
但是实在是不知道用什么了 可以直接使用File.separator来进行拼接即可
路径分隔符:我们可以通过File.pathSeparator获取对应系统中的推荐分隔符
在UNIX、Linux、Mac系统中:推荐使用冒号(😃
在Windows中:推荐使用分号(😉
应用场景就是要将多个路径整合成一个字符串进行打印 其中多个路径之间用路径分隔符区分开来
在Windows、Mac系统中
文件名、目录名(文件夹名)是不区分大小写的
在UNIX、Linux系统中
文件名和目录名是区分大小写的
1.常用方法

System.out.println()的参数如果是文件类的话 那么打印的结果就是文件类的参数路径
public class Main {
    public static void main(String[] args) {
        // 根据指定路径获取一个文件类
        File file = new File("D:/test/1.txt");
        // getName 获取指定文件或者目录的名称
        System.out.println(file.getName());// 1.txt
        // getParent 获取父路径对应的字符串
        System.out.println(file.getParent());// D:/test
        // getParentFile 获取父文件或者父目录
        System.out.println(file.getParentFile());// D:/test
        // getPath 获取当前路径对应的字符串
        System.out.println(file.getPath());// D:/test/1.txt
        // getAbsolutePath 获取当前绝对路径对应的字符串
        System.out.println(file.getAbsolutePath());// D:/test/1.txt
        // getAbsoluteFile 获取绝对路径形式的文件
        System.out.println(file.getAbsoluteFile());// D:/test/1.txt
    }
}
但是其实我们可以看到getPath和getAbsolutePath没有什么区别 打印结果都一样 你可以看一下接下去的代码
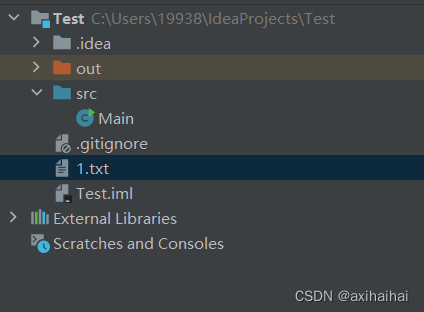
在Java中 相对路径的文件是储存在当前项目路径下的 而且你不能够直接通过getParent或者getParentFile获取父路径 而是只能先获取一下当前路径的绝对路径形式在调用getParent或者getParentFile才能完成父路径的获取操作
public class Main{
    public static void main(String[] args) {
        File file = new File("1.txt");
        System.out.println(file.getPath());// 获取相对路径 1.txt
        System.out.println(file.getAbsolutePath());// 获取绝对路径 C:\Users\19938\IdeaProjects\Test\1.txt
        System.out.println(file.getParent());// null
        System.out.println(file.getParentFile());// null
        System.out.println(file.getAbsoluteFile().getParent());// C:\Users\19938\IdeaProjects\Test
        System.out.println(file.getAbsoluteFile().getParentFile());// C:\Users\19938\IdeaProjects\Test
    }
}
再者 目录(文件夹)本身是没有大小的 他的大小来源于他其下的所有文件和目录的大小之和 所以你通过File.length方法去获取目录的大小结果为0
public class Main{
    public static void main(String[] args) throws IOException {
        File file = new File("D:/2");
        System.out.println(file.length());
    }
}


public class Main{
public static void main(String[] args) {
// 创建一个文件类
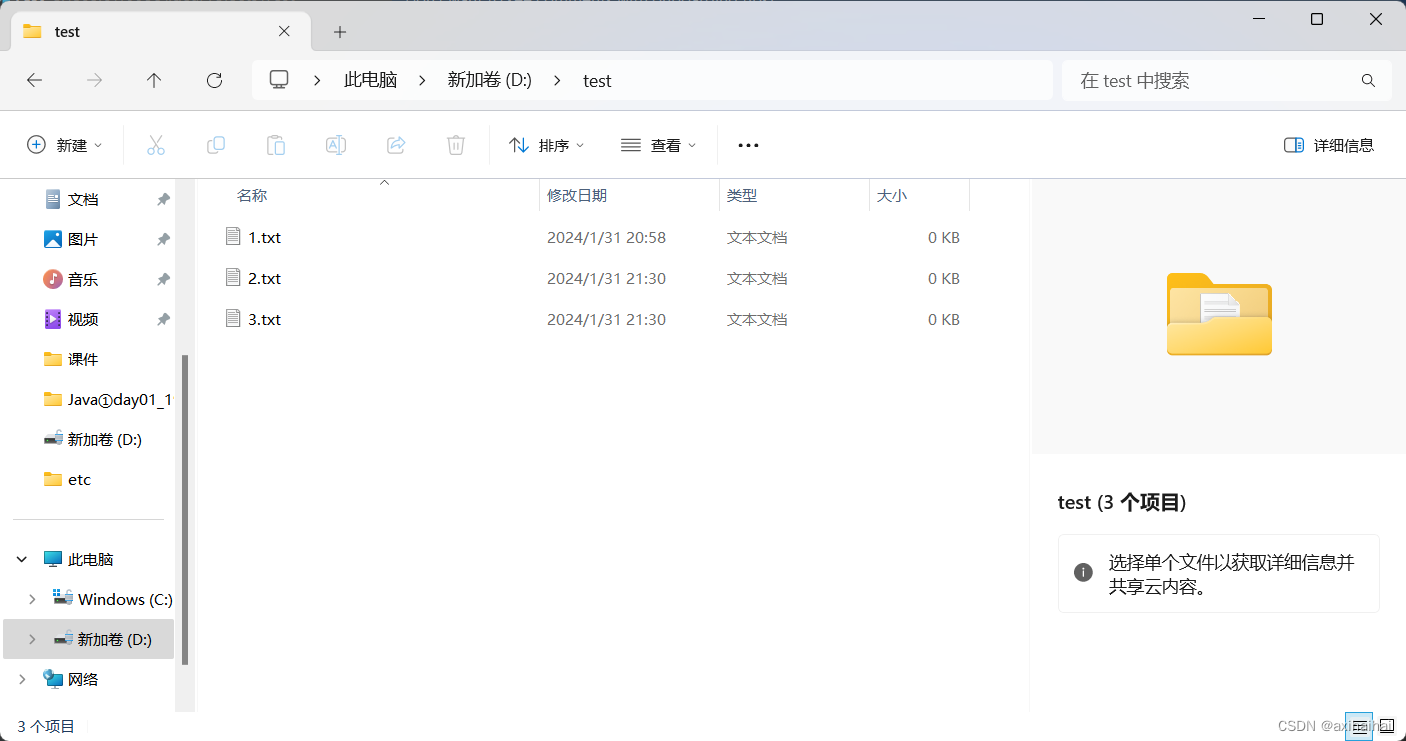
File file = new File("D:/test");
// 获取当前目录下的所有文件和目录的名称所组成的字符串数组
String[] files = file.list();
System.out.println(Arrays.toString(files));// [1.txt, 2.txt, 3.txt]
// 而且不仅仅可以获取所有的文件和目录的名称 还可以有条件的获取文件和目录的名称 他的原理是当accept的返回值为true的时候才会将文件或者目录收集到字符串数组中去
String[] files2 = file.list(new FilenameFilter() {
@Override
public boolean accept(File dir, String name) {
return name.startsWith("1");
}
});
System.out.println(Arrays.toString(files2));// [1.txt]
}
}
public class Main{
    public static void main(String[] args) {
        // 创建一个文件类
        File file = new File("D:/test");
        // 获取一下当前路径下的所有文件和目录所组成的文件类数组
        File[] files = file.listFiles();
        System.out.println(Arrays.toString(files));// [D:/test/1.txt, D:/test/2.txt, D:/test/3.txt]
        // 我们也可以有条件的获取当前路径下的文件和目录所组成的文件类数组
        File[] files2 = file.listFiles(new FilenameFilter() {
            @Override
            public boolean accept(File dir, String name) {
                return name.startsWith("1");
            }
        });
        System.out.println(Arrays.toString(files2));// [D:/test/1.txt]
    }
}

public class Main{
    public static void main(String[] args) throws IOException {
        // 新建一个文件 我的D盘下没有1.txt这个文件
        File file = new File("D:/1.txt");
        // 新建以后D盘下出现了该文件
        file.createNewFile();
    }
}
public class Main{
    public static void main(String[] args) throws IOException {
        // 新建一个目录 原本D盘下没有1这个目录
        File file = new File("D:/1");
        // 新建以后 D盘下就存在这个目录了
        file.mkdir();
    }
}
public class Main{
    public static void main(String[] args) throws IOException {
        // 新建一个多级目录 原本D盘下没有2/3这个目录
        File file = new File("D:/2/3");
        // 新建以后 D盘下就存在这个目录了
        file.mkdirs();
    }
}
public class Main{
    public static void main(String[] args) throws IOException {
        // renameTo可以实现剪切功能
        File file = new File("D:/1.txt");
        file.renameTo(new File("D:/2/3/2.txt"));
    }
}
2.自定义功能
1.搜索功能
为了程序的健壮性 你需要做的判断很多 比如对指定文件或者目录判空、指定文件或者目录存不存在的问题进行判断
判断做好以后 需要获取到所有直接储存在指定目录下的文件和目录组成的文件类数组 接着遍历这个数组 执行接口中定义好的操作 然后不仅仅需要遍历直接储存的文件或者目录 还需要遍历间接储存的文件或者目录 所以在遍历操作的最后 还需要判断一下当前遍历的是文件还是目录 如果是目录的话 需要进行递归遍历 打印那些间接储存在指定目录下的文件或者目录
public class Files {
    // 定义一个搜索方法 用于对指定目录中直接储存或者间接储存的文件或者目录进行遍历打印
    public static void search(File dir, Consumer<File> consumer){
        // 首先对参数进行判空操作
        if(dir == null || consumer == null)return;
        // 接着如果指定文件不存在或者不是文件的话 那么也不执行任何操作
        if(!dir.exists() || dir.isFile())return;
        // 获取指定目录下的所有文件和目录组成的集合
        File[] subfiles = dir.listFiles();
        // 接着就是遍历指定目录下的所有文件和目录
        for(File subfile: subfiles){
            // 调用consumer的accept方法中的文件操作方式 用于操作文件
            consumer.accept(subfile);
            // 但是上述的操作只能够满足遍历直接储存在指定目录下的文件和目录 并不能遍历到间接储存在指定目录下的文件和目录 所以我们还需要进行递归操作
            // 如果当前遍历到的是文件的话 那么就接下去进行遍历 否则就递归遍历当前目录下的文件和目录
            if(subfile.isFile())continue;
            search(subfile, consumer);
        }
    }

    public static void main(String[] args) {
        // 测试一下搜索功能
        File dir = new File("D:/2");
        search(dir, System.out::println);
    }
}
2.剪切功能
我实现的剪切功能中 如果目标路径已经存在的话 那么我就不执行剪切功能 因为我不执行覆盖文件的操作
而且如果目标路径不存在的话 即其中多级目录不存在的话 那么这时候需要多一个创建父路径的方法 即mkparents
public class Files {
    // 定义一个搜索方法 用于对指定目录中直接储存或者间接储存的文件或者目录进行遍历打印
    public static void search(File dir, Consumer<File> consumer){
        // 首先对参数进行判空操作
        if(dir == null || consumer == null)return;
        // 接着如果指定文件不存在或者不是文件的话 那么也不执行任何操作
        if(!dir.exists() || dir.isFile())return;
        // 获取指定目录下的所有文件和目录组成的集合
        File[] subfiles = dir.listFiles();
        // 接着就是遍历指定目录下的所有文件和目录
        for(File subfile: subfiles){
            // 调用consumer的accept方法中的文件操作方式 用于操作文件
            consumer.accept(subfile);
            // 但是上述的操作只能够满足遍历直接储存在指定目录下的文件和目录 并不能遍历到间接储存在指定目录下的文件和目录 所以我们还需要进行递归操作
            // 如果当前遍历到的是文件的话 那么就接下去进行遍历 否则就递归遍历当前目录下的文件和目录
            if(subfile.isFile())continue;
            search(subfile, consumer);
        }
    }
    public static void move(File src, File dest){
        // 对参数进行判空操作
        if(src == null || dest == null)return;
        // 如果源文件不存在或者目标文件已经存在的话 那么什么操作也不执行
        if(!src.exists() || dest.exists())return;
        mkparents(dest);
        src.renameTo(dest);
    }
    public static void mkparents(File dest){
        // 获取一下参数的父文件
        File parent = dest.getParentFile();
        if(parent.exists())return;
        parent.mkdirs();
    }
    public static void main(String[] args) {
        // 测试一下剪切功能
        File file = new File("D:/2/test2.txt");
        File file2 = new File("D:/2/Main/a/b/test.txt");
        move(file, file2);
    }
}
但是mkparents方法存在两个值得改进的地方:
1.mkdirs方法中已经包含了对父文件存在的判断 我们不需要另行判断
public static void mkparents(File dest){
    // 获取一下参数的父文件
    File parent = dest.getParentFile();
    parent.mkdirs();
}
但是这样mkparenrs岂不是就可以只有一个语句了 即dest.getParentFile().mkdirs();
那就没有封装的必要性了 以后直接调用就行了
这种想法是不对的 因为我的move方法中存在对于getParentFile的调用 虽然我的move不支持目录的移动 但是如果有的人硬是用它来进行目录的移动 也不是不行 只是不会奏效而已 但是这样就会引发一个问题 那就是如果调用getParentFile的时候去获取父文件时 结果可能为空(如果目标目录为盘符的话) 那么之后调用mkdirs方法时就会出现空指针异常 所以我们需要对获取到的父文件进行判空操作
2.
public static void mkparents(File dest){
    // 获取一下参数的父文件
    File parent = dest.getParentFile();
    if(parent == null)return;
    parent.mkdirs();
}
3.删除功能
如果遇到的是文件的话 直接调用文件类的delete方法进行删除即可
如果遇到的是目录的话 那么文件类的delete方法只能够删除空目录 而不能删除有内容的目录 所以我们首先得先将目录清空 然后在进行删除
但是如果目录中含有非空目录的话 那么这时候就需要我们进行递归删除了
public class Files {
    // 定义一个搜索方法 用于对指定目录中直接储存或者间接储存的文件或者目录进行遍历打印
    public static void search(File dir, Consumer<File> consumer){
        // 首先对参数进行判空操作
        if(dir == null || consumer == null)return;
        // 接着如果指定文件不存在或者不是文件的话 那么也不执行任何操作
        if(!dir.exists() || dir.isFile())return;
        // 获取指定目录下的所有文件和目录组成的集合
        File[] subfiles = dir.listFiles();
        // 接着就是遍历指定目录下的所有文件和目录
        for(File subfile: subfiles){
            // 调用consumer的accept方法中的文件操作方式 用于操作文件
            consumer.accept(subfile);
            // 但是上述的操作只能够满足遍历直接储存在指定目录下的文件和目录 并不能遍历到间接储存在指定目录下的文件和目录 所以我们还需要进行递归操作
            // 如果当前遍历到的是文件的话 那么就接下去进行遍历 否则就递归遍历当前目录下的文件和目录
            if(subfile.isFile())continue;
            search(subfile, consumer);
        }
    }
    public static void move(File src, File dest){
        // 对参数进行判空操作
        if(src == null || dest == null)return;
        // 如果源文件不存在或者目标文件已经存在的话 那么什么操作也不执行
        if(!src.exists() || dest.exists())return;
        mkparents(dest);
        src.renameTo(dest);
    }
    public static void mkparents(File dest){
        // 获取一下参数的父文件
        File parent = dest.getParentFile();
        if(parent.exists())return;
        parent.mkdirs();
    }
    // 实现一下删除功能
    public static void delete(File file){
        if(file == null || !file.exists())return;
        // 如果是目录的话 那么先清空 在删除
        clean(file);
        file.delete();
    }

    public static void clean(File file) {
        if(file == null || !file.exists() || file.isFile())return;
        // 接着就是获取指定目录下的文件和目录所组成的文件类数组
        File[] subfile = file.listFiles();
        for(File sf: subfile){
            delete(sf);
        }
    }

    public static void main(String[] args) {
        // 测试一下删除功能
        File file = new File("D:/2/3");
        delete(file);
    }
}
4.字符编码
1.字符集
在计算机中
一个中文汉字是一个字符
一个英文字母是一个字符
一个阿拉伯数字是一个字符
一个标点符号是一个字符
……
字符集:由字符组成的集合
常见的字符集有:
ASCII:128个字符(包括了英文字母大小写、阿拉包数字)
ISO-8859-1:支持欧洲的部分语言 在有些环境下也叫做Latin-1
GB2312:支持中文(包括6763个汉字)
BIG5:支持繁体中文(包括13053个汉字)
GBK:对GB2312、BIG5的扩充(包括21003个汉字),支持中日韩
GB18030:是对GBK的扩充(包括了27484个汉字)
Unicode:包括了世界上所有的字符
除了ASCII字符集以外的其他字符集中都包括了ASCII字符集中的所有字符
2.字符编码
每个字符集都有自己对应的字符编码 他决定了每一个字符如何转成二进制数据储存在计算机中
ASCII:单字节编码(即每一个字符用一个字节来表示) 编码范围为0x00-0x7F(0-127)
ISO-8859-1:单字节编码 编码范围为0x00-0xFF(0-255) 其中0x00-0x7F和ASCII一致 0x80-0x9F是控制字符 0xA0-0xFF是文字符号(比如希腊文字)
GB2312、BIG5、GBK:采用双字节表示一个汉字(汉字用两个字节表示)
GB18030:采用单字节、双字节、四字节表示一个字符(至于什么字符采用多少个字节进行表示 这个不用知道)
(前面这几种字符集的编码方式都只有一种 比如GB18030的编码方式为GB18030编码)
Unicode:有Unicode、UTF-8、UTF-16、UTF-32等编码 最常用的是UTF-8编码
UTF-8采用单字节、双字节、三字节、四字节表示一个字符(至于什么字符采用多少个字节进行表示 这个不用知道)
public class Main {
    public static void main(String[] args) throws UnsupportedEncodingException {
        // 定义一个字符串
        String str = "MJ码哥";
        // 使用ASCII编码方式进行编码
        System.out.println(Arrays.toString(str.getBytes("ASCII")));// [77, 74, 63, 63]
        // 使用ISO-8859-1编码方式进行编码
        System.out.println(Arrays.toString(str.getBytes("ISO_8859-1")));// [77, 74, 63, 63]
        // 使用GB2312编码方式进行编码
        System.out.println(Arrays.toString(str.getBytes("GB2312")));// [77, 74, -62, -21, -72, -25]
        // 使用BIG5编码方式进行编码 如果用他来表示简体中文 可能会不符合预期 所以尽量不要用其来表示中文 尽量用GB2312、GBK、GB18030表示简体中文
        System.out.println(Arrays.toString(str.getBytes("BIG5")));// [77, 74, 63, -83, -12]
        // 使用GBK编码方式进行编码
        System.out.println(Arrays.toString(str.getBytes("GBK")));// [77, 74, -62, -21, -72, -25]
        // 使用GB18030编码方式进行编码
        System.out.println(Arrays.toString(str.getBytes("GB18030")));// [77, 74, -62, -21, -72, -25]
        // 使用UTF-8编码方式进行编码
        System.out.println(Arrays.toString(str.getBytes("UTF-8")));// [77, 74, -25, -96, -127, -27, -109, -91]
    }
}
而且如果这个字符集中没有收录这个字符的话 有想要表示这个字符的话 那么字节就会表示成63
getBytes也可以不传递参数 那么这时候就是使用默认的编码方式对指定字符进行编码 默认的编码方式取决于所在文件的编码方式(一般是UTF-8)
public class Main {
    public static void main(String[] args) throws UnsupportedEncodingException {
        // 定义一个字符串
        String str = "MJ码哥";
        // 使用默认的编码方式进行编码
        System.out.println(Arrays.toString(str.getBytes()));// [77, 74, -25, -96, -127, -27, -109, -91]
    }
}
你也可以通过Character.defaultCharset获取JVM的默认字符编码 一般就是所在文件的编码方式
public class Main {
    public static void main(String[] args) throws UnsupportedEncodingException {
        System.out.println(Charset.defaultCharset());// UTF-8
    }
}
Charset类的全名是java.nio.charset.Charset
3.乱码
一般将字符串转为二进制的过程称为编码(Encode)
一般将二进制转为字符串的过程称为解码(Decode)
编码、解码时使用的字符编码要一致 否则就会乱码
public class Main {
    public static void main(String[] args) throws UnsupportedEncodingException {
        String str = "MJ码哥";
        System.out.println(Arrays.toString(str.getBytes()));// 默认使用UTF-8的编码方式
        byte[] bytes = {77, 74, -25, -96, -127, -27, -109, -91};// MJ码哥
        String str2 = new String(bytes, "GBK");
        System.out.println(str2);// MJ鐮佸摜
    }
}
编码时使用的是UTF-8编码方式 但是解码时使用的是GBK编码方式
常见的使用场景是:
客户端和服务器端之间的请求的发送和返回
比如客户端发送请求给服务器端 那么发送的字符串就要编码成二进制进行传输 然后交给服务器端的时候 需要解码成字符串 以供服务器端操作
5.字节流
其特点就是一次只能够读写一个字节
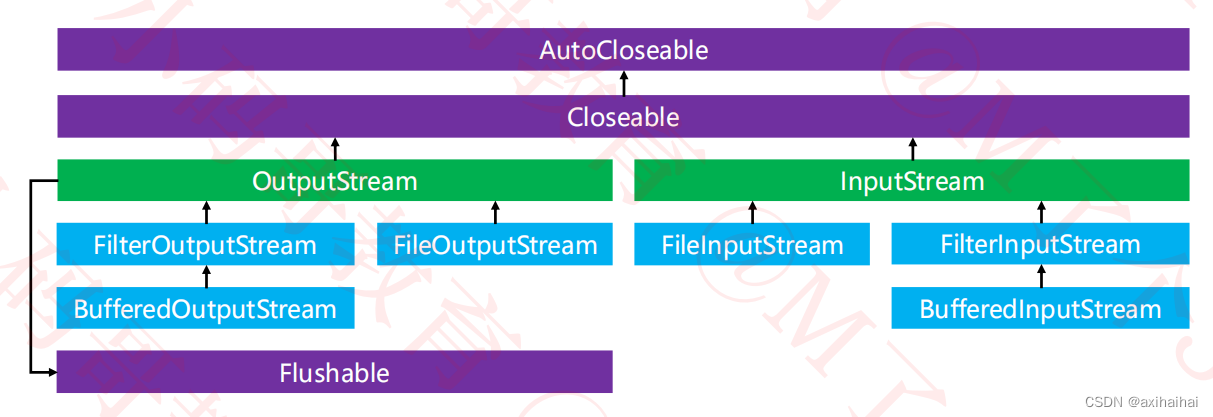
最终都继承自InputStream、OutputStream
常用的字节流有FileInputStream、FileOutputStream
字节流的大致结构为
1.FileOutputStream
如果指定的文件不存在的话 那么他会主动帮你创建出来
其实ascii码值就是ascii码表中每一个字符储存在计算机中的字节(二进制)对应的十进制形式
public class Main{
    public static void main(String[] args) throws IOException {
        // 定义一个文件输出流 并且为其指定文件
        OutputStream os = new FileOutputStream("D:/1.txt");
        // 写入整形数据 具体是字符储存在计算机中的字节对应的十进制形式
        os.write(77);// M
        os.write(78);// N
        // 写入字节数组
        os.write(new byte[]{77, 78});// M N
        // 关闭文件输出流
        os.close();
    }
}
但是如果我想要进行追加操作的话 而不是覆盖操作的话 那么我们可以在创建文件输出流的时候将第二个参数设置为true即可 因为默认是false
public class Main{
    public static void main(String[] args) throws IOException {
        // 定义一个文件输出流 并且为其指定文件
        OutputStream os = new FileOutputStream("D:/1.txt", true);
        // 写入整形数据 具体是字符储存在计算机中的字节对应的十进制形式
        os.write(77);// M
        os.write(78);// N
        // 写入字节数组
        os.write(new byte[]{77, 78});// M N
        // 关闭文件输出流
        os.close();
    }
}
当然你在进行写入操作的时候 他允许你传递一个字节数组 你除了直接传递一个字节数组以外 还可以通过字符串.getBytes方法获取一个字节数组
public class Main{
    public static void main(String[] args) throws IOException {
        // 定义一个文件输出流
        OutputStream os = new FileOutputStream("D:/1.txt");
        // 往指定文件中写入一个字节数组的数据
        os.write("MJ码哥".getBytes());// 如果getBytes没有指定编码方式的话 默认采用的是jvm的默认编码方式 也就是所在文件的编码方式 即UTF-8
        // 顺便打印一下这个字符串对应的字节数组是长什么样子的 一边验证一下我们对于UTF-8编码方式的熟悉程度
        System.out.println(Arrays.toString("MJ码哥".getBytes()));// 验证了我们的猜想 即在utf-8编码方式中 中文字符是以三个字节的形式进行储存的 即[77, 74, -25, -96, -127, -27, -109, -91]
        // 关闭新建的文件输出流
        os.close();
    }
}
我们如果使用的是Windows系统的话 那么我们打开文件一般都是通过记事本打开的 我们刚才所写入的字符串是通过二进制的形式进行储存的(编码) 然后通过记事本打开的时候 会进行解码操作(即将二进制转换为字符串) 但是一定要注意编码所使用的编码方式和解码所使用的编码方式要一致 不然的话 就会出现乱码
如果编码方式指定的是GBK的话 那么记事本打开以后的结果是怎样的呢 会出现乱码吗 答案是不会的
public class Main{
    public static void main(String[] args) throws IOException {
        // 定义一个文件输出流
        OutputStream os = new FileOutputStream("D:/1.txt");
        // 往指定文件中写入一个字节数组的数据
        os.write("MJ码哥".getBytes("GBK"));// 如果getBytes没有指定编码方式的话 默认采用的是jvm的默认编码方式 也就是所在文件的编码方式 即UTF-8
        // 顺便打印一下这个字符串对应的字节数组是长什么样子的 一边验证一下我们对于UTF-8编码方式的熟悉程度
        System.out.println(Arrays.toString("MJ码哥".getBytes()));// 验证了我们的猜想 即在utf-8编码方式中 中文字符是以三个字节的形式进行储存的 即[77, 74, -25, -96, -127, -27, -109, -91]
        // 关闭新建的文件输出流
        os.close();
    }
}
由于本地区域是中国 所以记事本的默认编码方式一般都是GBK 但是有的打开方式可能会出现乱码的原因是因为他可能不支持GBK编码方式
2.FileInputStream
如果指定的文件不存在的话 那么他会自动帮你创建出来
你可以一个字节一个字节的读取
public class Main{
    public static void main(String[] args) throws IOException {
        // 定义一个文件输出流
        OutputStream os = new FileOutputStream("D:/1.txt");
        os.write("MJ码哥".getBytes("GBK"));
        System.out.println(Arrays.toString("MJ码哥".getBytes("GBK")));// [77, 74, -62, -21, -72, -25]
        // 定义一个文件输入流
        InputStream is = new FileInputStream("D:/1.txt");
        int byte1 = is.read();// 读取第一个字节
        int byte2 = is.read();// 读取第二个字节
        int byte3 = is.read();// 读取第三个字节
        System.out.println(byte1);// 77
        System.out.println(byte2);// 74
        System.out.println(byte3);// 194
        // 关闭文件输出和输入流
        os.close();
        is.close();
    }
}
你其实可以看到 打印出来的第三个字节和通过数组打印得到的第三个字节是不一样的 这是因为InputStream.read()方法获取到的是一个无符号的int类型 而byte类型是有符号的整型 所以两个结果不一致很正常
当然也可以通过字节数组储存读取的内容
public class Main{
    public static void main(String[] args) throws IOException {
        // 定义一个文件输入流
        InputStream is = new FileInputStream("D:/1.txt");
        byte[] b = new byte[100];// 我打算从指定文件中最多读取100个字节出来
        int len = is.read(b);// 他会将读取出来的字节储存到刚才的数组中 返回值是读取的字节数的有效长度
        System.out.println(Arrays.toString(b));// [77, 74, -62, -21, -72, -25, 0, 0, 0, 0, 0, 0, 0, 0, 0, 0, 0, 0, 0, 0, 0, 0, 0, 0, 0, 0, 0, 0, 0, 0, 0, 0, 0, 0, 0, 0, 0, 0, 0, 0, 0, 0, 0, 0, 0, 0, 0, 0, 0, 0, 0, 0, 0, 0, 0, 0, 0, 0, 0, 0, 0, 0, 0, 0, 0, 0, 0, 0, 0, 0, 0, 0, 0, 0, 0, 0, 0, 0, 0, 0, 0, 0, 0, 0, 0, 0, 0, 0, 0, 0, 0, 0, 0, 0, 0, 0, 0, 0, 0, 0]
        System.out.println(len);// 6 因为我的MJ码哥是通过GBK方式储存的 所以一个汉字占用两个字节而已
        // 关闭文件输入流
        is.close();
    }
}
当然我不仅仅可以通过数组对读取到的字符进行打印 我还可以通过字符串进行打印
只不过需要注意的是 由于我们创建的数组中 有效储存的长度只有6个 所以我们只需要表示前6个即可 再者 由于刚才的编码方式是GBK 所以现在有二进制转换为字符串的解码也需要采取的是GBK
这边的read()方法的返回值是实际读取的字节数
public class Main{
    public static void main(String[] args) throws IOException {
        // 定义一个文件输入流
        InputStream is = new FileInputStream("D:/1.txt");
        byte[] b = new byte[100];// 我打算从指定文件中最多读取100个字节出来
        int len = is.read(b);// 他会将读取出来的字节储存到刚才的数组中 返回值是读取的字节数的有效长度
        String str = new String(b, 0, len, "GBK");
        System.out.println(str + "_");// 下划线的目的在于检测有没有打印后94个字节的内容 显然是没有的 因为打印结果是MJ码哥_ 其中码哥和_是在一起的
        // 关闭文件输入流
        is.close();
    }
}
3.自定义功能
1.写入功能
我们现在想要实现一个需求 即将内存中的数据写入到文件中去
值得注意的是
如果指定文件不存在的话 那么文件输出流会自动帮你创建
但是如果是指定多级目录不存在的话 那么文件输出流会报FileNotFoundException异常 这时候你就需要先创建多级父目录 在创建文件输出流
我们在关闭文件输入流的时候 需要保证文件输入流对象非空才能够调用close方法(因为执行到关闭输入流的时候有可能输入流为空 当我们执行try语句中的创建文件输入流时抛出异常 那么此时文件输入流为空)
public class Files {
    // 定义一个搜索方法 用于对指定目录中直接储存或者间接储存的文件或者目录进行遍历打印
    public static void search(File dir, Consumer<File> consumer){
        // 首先对参数进行判空操作
        if(dir == null || consumer == null)return;
        // 接着如果指定文件不存在或者不是文件的话 那么也不执行任何操作
        if(!dir.exists() || dir.isFile())return;
        // 获取指定目录下的所有文件和目录组成的集合
        File[] subfiles = dir.listFiles();
        // 接着就是遍历指定目录下的所有文件和目录
        for(File subfile: subfiles){
            // 调用consumer的accept方法中的文件操作方式 用于操作文件
            consumer.accept(subfile);
            // 但是上述的操作只能够满足遍历直接储存在指定目录下的文件和目录 并不能遍历到间接储存在指定目录下的文件和目录 所以我们还需要进行递归操作
            // 如果当前遍历到的是文件的话 那么就接下去进行遍历 否则就递归遍历当前目录下的文件和目录
            if(subfile.isFile())continue;
            search(subfile, consumer);
        }
    }
    public static void move(File src, File dest){
        // 对参数进行判空操作
        if(src == null || dest == null)return;
        // 如果源文件不存在或者目标文件已经存在的话 那么什么操作也不执行
        if(!src.exists() || dest.exists())return;
        mkparents(dest);
        src.renameTo(dest);
    }
    public static void mkparents(File dest){
        // 获取一下参数的父文件
        File parent = dest.getParentFile();
        if(parent.exists())return;
        parent.mkdirs();
    }
    // 实现一下删除功能
    public static void delete(File file){
        if(file == null || !file.exists())return;
        // 如果是目录的话 那么先清空 在删除
        clean(file);
        file.delete();
    }

    public static void clean(File file) {
        if(file == null || !file.exists() || file.isFile())return;
        // 接着就是获取指定目录下的文件和目录所组成的文件类数组
        File[] subfile = file.listFiles();
        for(File sf: subfile){
            delete(sf);
        }
    }
    // 将字节数组写入到指定文件中去
    public static void write(byte[] bytes, File file){
        // 对参数判空
        if(bytes == null || file == null)return;
        // 接着如果指定文件存在或者为目录的话 我也不执行任何操作
        if(file.exists() || file.isDirectory())return;
        // 如果是指定文件不存在的话 那么文件输出流会自动帮你创建 但是如果是指定的多级目录不存在的话 那么他是会报异常的 所以我们需要在创建文件输出流之前先创建好多级目录才行
        mkparents(file);
        // 接着根据指定文件创建一个文件输出流 而且无论try和catch语句执行的怎么样 最后都需要关闭文件输出流
        // 文件输出流必须要提到外面来 否则无法在多个不同的语句体中进行调用
        OutputStream os = null;
        try {
            os = new FileOutputStream(file);
            os.write(bytes);
        } catch (FileNotFoundException e) {
            e.printStackTrace();
        } catch (IOException e) {
            e.printStackTrace();
        } finally{
            try {
            	if(os != null){
                	os.close();
                }
            } catch (IOException e) {
                e.printStackTrace();
            }
        }
    }

    // 当然你也可以定义写入方法的重载方法 即支持写入字符串
    public static void write(String string, File file){
        // 我可以直接调用写入字节数组的方法
        write(string.getBytes(), file);
    }
    public static void main(String[] args) {
        // 测试一下写入功能
        write(new byte[]{77, 78}, new File("D:/a/b/3.txt"));// ok
        write("MN", new File("D:/a/a/3.txt"));// ok
    }
}
2.读取功能
现在有这么一个需求:
从文件中读取数据到内存 并且打印这个字节数组 自定义这个功能
值得注意的是:
如果是同一次程序运行当中 多次的write是不会相互覆盖的
但是如果是不同次的程序运行中的不同write才是真正的进行覆盖操作的
public class Files {
    // 定义一个搜索方法 用于对指定目录中直接储存或者间接储存的文件或者目录进行遍历打印
    public static void search(File dir, Consumer<File> consumer){
        // 首先对参数进行判空操作
        if(dir == null || consumer == null)return;
        // 接着如果指定文件不存在或者不是文件的话 那么也不执行任何操作
        if(!dir.exists() || dir.isFile())return;
        // 获取指定目录下的所有文件和目录组成的集合
        File[] subfiles = dir.listFiles();
        // 接着就是遍历指定目录下的所有文件和目录
        for(File subfile: subfiles){
            // 调用consumer的accept方法中的文件操作方式 用于操作文件
            consumer.accept(subfile);
            // 但是上述的操作只能够满足遍历直接储存在指定目录下的文件和目录 并不能遍历到间接储存在指定目录下的文件和目录 所以我们还需要进行递归操作
            // 如果当前遍历到的是文件的话 那么就接下去进行遍历 否则就递归遍历当前目录下的文件和目录
            if(subfile.isFile())continue;
            search(subfile, consumer);
        }
    }
    public static void move(File src, File dest){
        // 对参数进行判空操作
        if(src == null || dest == null)return;
        // 如果源文件不存在或者目标文件已经存在的话 那么什么操作也不执行
        if(!src.exists() || dest.exists())return;
        mkparents(dest);
        src.renameTo(dest);
    }
    public static void mkparents(File dest){
        // 获取一下参数的父文件
        File parent = dest.getParentFile();
        if(parent == null)return;
        parent.mkdirs();
    }
    // 实现一下删除功能
    public static void delete(File file){
        if(file == null || !file.exists())return;
        // 如果是目录的话 那么先清空 在删除
        clean(file);
        file.delete();
    }

    public static void clean(File file) {
        if(file == null || !file.exists() || file.isFile())return;
        // 接着就是获取指定目录下的文件和目录所组成的文件类数组
        File[] subfile = file.listFiles();
        for(File sf: subfile){
            delete(sf);
        }
    }
    // 将字节数组写入到指定文件中去
    public static void write(byte[] bytes, File file){
        // 对参数判空
        if(bytes == null || file == null)return;
        // 接着如果指定文件存在或者为目录的话 我也不执行任何操作
        if(file.exists() || file.isDirectory())return;
        // 如果是指定文件不存在的话 那么文件输出流会自动帮你创建 但是如果是指定的多级目录不存在的话 那么他是会报异常的 所以我们需要在创建文件输出流之前先创建好多级目录才行
        mkparents(file);
        // 接着根据指定文件创建一个文件输出流 而且无论try和catch语句执行的怎么样 最后都需要关闭文件输出流
        // 文件输出流必须要提到外面来 否则无法在多个不同的语句体中进行调用
        OutputStream os = null;
        try {
            os = new FileOutputStream(file);
            os.write(bytes);
        } catch (FileNotFoundException e) {
            e.printStackTrace();
        } catch (IOException e) {
            e.printStackTrace();
        } finally{
            try {
            	if(os != null){
                	os.close();
                }
            } catch (IOException e) {
                e.printStackTrace();
            }
        }
    }

    // 当然你也可以定义写入方法的重载方法 即支持写入字符串
    public static void write(String string, File file){
        // 我可以直接调用写入字节数组的方法
        write(string.getBytes(), file);
    }

    // 从文件读取数据到内存中
    public static byte[] read(File file){
        // 对参数进行判空
        if(file == null)return null;
        // 对文件的存在性进行判断或者判断此文件是否为文件
        if(!file.exists() || file.isDirectory())return null;
        // 定义一个文件输入流 用于读取数据
        InputStream is = null;
        try {
            is = new FileInputStream(file);
            byte[] bytes = new byte[(int)file.length()];
            // 用一个刚好容量的数组储存指定文件中的数据
            is.read(bytes);
            // 返回存放读取数据的数组
            return bytes;
        } catch (FileNotFoundException e) {
            e.printStackTrace();
            return null;
        } catch (IOException e) {
            e.printStackTrace();
            return null;
        } finally {
            try {
                is.close();
            } catch (IOException e) {
                e.printStackTrace();
            }
        }


    }
    public static void main(String[] args) {
        System.out.println(Arrays.toString(read(new File("D:/a/b/3.txt"))));
    }
}
但是如果我们想要打印的是这个字节数组对应的字符串的话 那么就需要考虑解码时的编码方式是否和编码时的编码方式一致了
由于我们当初指定文件的编码时的编码方式为utf-8 所以现在可以不用指定解码时的编码方式 使用默认的编码方式 即utf-8 和编码时的一致
public class Files {
    // 定义一个搜索方法 用于对指定目录中直接储存或者间接储存的文件或者目录进行遍历打印
    public static void search(File dir, Consumer<File> consumer){
        // 首先对参数进行判空操作
        if(dir == null || consumer == null)return;
        // 接着如果指定文件不存在或者不是文件的话 那么也不执行任何操作
        if(!dir.exists() || dir.isFile())return;
        // 获取指定目录下的所有文件和目录组成的集合
        File[] subfiles = dir.listFiles();
        // 接着就是遍历指定目录下的所有文件和目录
        for(File subfile: subfiles){
            // 调用consumer的accept方法中的文件操作方式 用于操作文件
            consumer.accept(subfile);
            // 但是上述的操作只能够满足遍历直接储存在指定目录下的文件和目录 并不能遍历到间接储存在指定目录下的文件和目录 所以我们还需要进行递归操作
            // 如果当前遍历到的是文件的话 那么就接下去进行遍历 否则就递归遍历当前目录下的文件和目录
            if(subfile.isFile())continue;
            search(subfile, consumer);
        }
    }
    public static void move(File src, File dest){
        // 对参数进行判空操作
        if(src == null || dest == null)return;
        // 如果源文件不存在或者目标文件已经存在的话 那么什么操作也不执行
        if(!src.exists() || dest.exists())return;
        mkparents(dest);
        src.renameTo(dest);
    }
    public static void mkparents(File dest){
        // 获取一下参数的父文件
        File parent = dest.getParentFile();
        if(parent == null)return;
        parent.mkdirs();
    }
    // 实现一下删除功能
    public static void delete(File file){
        if(file == null || !file.exists())return;
        // 如果是目录的话 那么先清空 在删除
        clean(file);
        file.delete();
    }

    public static void clean(File file) {
        if(file == null || !file.exists() || file.isFile())return;
        // 接着就是获取指定目录下的文件和目录所组成的文件类数组
        File[] subfile = file.listFiles();
        for(File sf: subfile){
            delete(sf);
        }
    }
    // 将字节数组写入到指定文件中去
    public static void write(byte[] bytes, File file){
        // 对参数判空
        if(bytes == null || file == null)return;
        // 接着如果指定文件存在(不进行覆盖操作)或者为目录的话 我也不执行任何操作
        if(file.exists() || file.isDirectory())return;
        // 如果是指定文件不存在的话 那么文件输出流会自动帮你创建 但是如果是指定的多级目录不存在的话 那么他是会报异常的 所以我们需要在创建文件输出流之前先创建好多级目录才行
        mkparents(file);
        // 接着根据指定文件创建一个文件输出流 而且无论try和catch语句执行的怎么样 最后都需要关闭文件输出流
        // 文件输出流必须要提到外面来 否则无法在多个不同的语句体中进行调用
        OutputStream os = null;
        try {
            os = new FileOutputStream(file);
            os.write(bytes);
        } catch (FileNotFoundException e) {
            e.printStackTrace();
        } catch (IOException e) {
            e.printStackTrace();
        } finally{
            try {
            	if(os != null){
                	os.close();
                }
            } catch (IOException e) {
                e.printStackTrace();
            }
        }
    }

    // 当然你也可以定义写入方法的重载方法 即支持写入字符串
    public static void write(String string, File file){
        // 我可以直接调用写入字节数组的方法
        write(string.getBytes(), file);
    }

    // 从文件读取数据到内存中
    public static byte[] read(File file){
        // 对参数进行判空
        if(file == null)return null;
        // 对文件的存在性进行判断或者判断此文件是否为文件
        if(!file.exists() || file.isDirectory())return null;
        // 定义一个文件输入流 用于读取数据
        InputStream is = null;
        try {
            is = new FileInputStream(file);
            byte[] bytes = new byte[(int)file.length()];
            // 用一个刚好容量的数组储存指定文件中的数据
            is.read(bytes);
            // 返回存放读取数据的数组
            return bytes;
        } catch (FileNotFoundException e) {
            e.printStackTrace();
            return null;
        } catch (IOException e) {
            e.printStackTrace();
            return null;
        } finally {
            try {
                is.close();
            } catch (IOException e) {
                e.printStackTrace();
            }
        }


    }
    public static void main(String[] args) throws UnsupportedEncodingException {
    	// 不用指定编码方式也行
        String str = new String(read(new File("D:/a/b/3.txt")), "UTF-8");
        System.out.println(str);
    }
}
3.复制功能
对于复制功能来说 其中有几点需要注意的
我们如果有多个字节流需要进行关闭的话 那么字节流关闭的时候肯定会涉及到try-catch处理异常操作 我们一般的做法不是将多个字节流的try-catch写在一起 而是分开进行编写
针对文件输入流的read方法来说 他的返回值为当前读取的字节数 如果一旦读取到文件内容的末尾时 那么返回值将会是-1
我们在进行读取写入的操作时 如果指定文件的内容比一次性读取的内容的字节数少的话 那么在写入的时候就需要写入有效的字节数 如果指定文件的内容比一次性读取的内容的字节数多的话 那么我们就需要依靠循环进行指定文件内容的不断获取 直到读取到文件的结尾 总之两种情况合起来讲就是统一写成循环读取的形式
public class Files {
    // 定义一个搜索方法 用于对指定目录中直接储存或者间接储存的文件或者目录进行遍历打印
    public static void search(File dir, Consumer<File> consumer){
        // 首先对参数进行判空操作
        if(dir == null || consumer == null)return;
        // 接着如果指定文件不存在或者不是文件的话 那么也不执行任何操作
        if(!dir.exists() || dir.isFile())return;
        // 获取指定目录下的所有文件和目录组成的集合
        File[] subfiles = dir.listFiles();
        // 接着就是遍历指定目录下的所有文件和目录
        for(File subfile: subfiles){
            // 调用consumer的accept方法中的文件操作方式 用于操作文件
            consumer.accept(subfile);
            // 但是上述的操作只能够满足遍历直接储存在指定目录下的文件和目录 并不能遍历到间接储存在指定目录下的文件和目录 所以我们还需要进行递归操作
            // 如果当前遍历到的是文件的话 那么就接下去进行遍历 否则就递归遍历当前目录下的文件和目录
            if(subfile.isFile())continue;
            search(subfile, consumer);
        }
    }
    public static void move(File src, File dest){
        // 对参数进行判空操作
        if(src == null || dest == null)return;
        // 如果源文件不存在或者目标文件已经存在的话 那么什么操作也不执行
        if(!src.exists() || dest.exists())return;
        mkparents(dest);
        src.renameTo(dest);
    }
    public static void mkparents(File dest){
        // 获取一下参数的父文件
        File parent = dest.getParentFile();
        if(parent == null)return;
        parent.mkdirs();
    }
    // 实现一下删除功能
    public static void delete(File file){
        if(file == null || !file.exists())return;
        // 如果是目录的话 那么先清空 在删除
        clean(file);
        file.delete();
    }

    public static void clean(File file) {
        if(file == null || !file.exists() || file.isFile())return;
        // 接着就是获取指定目录下的文件和目录所组成的文件类数组
        File[] subfile = file.listFiles();
        for(File sf: subfile){
            delete(sf);
        }
    }
    // 将字节数组写入到指定文件中去
    public static void write(byte[] bytes, File file){
        // 对参数判空
        if(bytes == null || file == null)return;
        // 接着如果指定文件存在或者为目录的话 我也不执行任何操作
        if(file.exists() || file.isDirectory())return;
        // 如果是指定文件不存在的话 那么文件输出流会自动帮你创建 但是如果是指定的多级目录不存在的话 那么他是会报异常的 所以我们需要在创建文件输出流之前先创建好多级目录才行
        mkparents(file);
        // 接着根据指定文件创建一个文件输出流 而且无论try和catch语句执行的怎么样 最后都需要关闭文件输出流
        // 文件输出流必须要提到外面来 否则无法在多个不同的语句体中进行调用
        OutputStream os = null;
        try {
            os = new FileOutputStream(file);
            os.write(bytes);
        } catch (FileNotFoundException e) {
            e.printStackTrace();
        } catch (IOException e) {
            e.printStackTrace();
        } finally{
            try {
                os.close();
            } catch (IOException e) {
                e.printStackTrace();
            }
        }
    }

    // 当然你也可以定义写入方法的重载方法 即支持写入字符串
    public static void write(String string, File file){
        // 我可以直接调用写入字节数组的方法
        write(string.getBytes(), file);
    }

    // 从文件读取数据到内存中
    public static byte[] read(File file){
        // 对参数进行判空
        if(file == null)return null;
        // 对文件的存在性进行判断或者判断此文件是否为文件
        if(!file.exists() || file.isDirectory())return null;
        // 定义一个文件输入流 用于读取数据
        InputStream is = null;
        try {
            is = new FileInputStream(file);
            byte[] bytes = new byte[(int)file.length()];
            // 用一个刚好容量的数组储存指定文件中的数据
            is.read(bytes);
            // 返回存放读取数据的数组
            return bytes;
        } catch (FileNotFoundException e) {
            e.printStackTrace();
            return null;
        } catch (IOException e) {
            e.printStackTrace();
            return null;
        } finally {
            try {
                is.close();
            } catch (IOException e) {
                e.printStackTrace();
            }
        }
    }
    public static void copy(File src, File dest){
        // 对参数进行判空
        if(src == null || dest == null)return;
        // 如果原文件不存在或者目标文件存在的话 那么不执行任何操作
        if(!src.exists() || dest.exists())return;
        // 需要保证原路径和目标路径都是文件才行
        if(src.isDirectory() || dest.isDirectory())return;
        // 而且如果目标路径的父路径不存在的话 那么就需要我们先创建出来 然后在进行复制操作
        mkparents(dest);
        // 分别定义文件输入流和文件输出流 由于需要在不同的代码块中执行 所以需要抽取到代码块外部进行声明
        InputStream is = null;
        OutputStream os = null;
        try {
            is = new FileInputStream(src);
            os = new FileOutputStream(dest);
            // 从文件输入流中的指定文件中读取数据 并且使用字节数组储存 假设我一次最多读取8192个字节 因为我数组的长度限制了我一次读取的最多字节数
            byte[] bytes = new byte[8192];
            // 由于读取的文件中的字节数可能超出一次读取的最多字节数 所以我们需要进行循环读取 直到最后读取到的有效字节数为-1时 表示已经读取到了末尾
            int len = 0;
            while((len = is.read(bytes)) != -1){
                // 除了需要考虑到指定文件的内容比一次读取的内容多的情况 还需要考虑到指定文件的内容比一次性读取的内容少的情况 所以写入方法需要调用的是写入有效长度
                os.write(bytes, 0, len);
            }
        } catch (FileNotFoundException e) {
            e.printStackTrace();
        } catch (IOException e) {
            e.printStackTrace();
        } finally {
            try {
                if(is != null) {
                    is.close();
                }
            } catch (IOException e) {
                e.printStackTrace();
            }
            try {
                if(os != null) {
                    os.close();
                }
            } catch (IOException e) {
                e.printStackTrace();
            }
        }
    }
    public static void main(String[] args) throws UnsupportedEncodingException {
        File file1 = new File("D:/a/a/3.txt");
        File file2 = new File("D:/a/a/b/new3.txt");
        copy(file1, file2);
        // 读取一下复制以后的文件中的内容
        byte[] bytes = read(file2);
        // 解码为字符串再行打印
        String str = new String(bytes);
        System.out.println(str);
    }
}
6.try-with-resources
我们可以看到刚才所写的复制方法显得很复杂 其中的try-catch-finally{关闭资源}的语句是复杂的关键所在 所以引入了平替的写法try-with-resources(可自动进行资源的关闭操作)
try-with-resources语句是Java7开始的语法 其中可以不包含catch和finally语句
try(资源1;资源2;……){

}catch(Exception e){

}finally{

}
可以在try后面的小括号中声明一个或者多个资源
凡是实现了java.lang.AutoCloseable(自动关闭)接口的实例 都可以称之为资源
不管try中的语句是正常还是意外结束(抛异常) 总之结束以后都会自动按顺序调用每一个资源中的close方法(close方法的调用顺序和资源的声明顺序相反)
之前实现的写入、读取以及复制操作都涉及到通过finally储存了资源的手动关闭操作 这样会使得代码变得十分繁杂 所以我们可以通过try-with-resources的方式进行优化操作
public class Files {
    public static void mkparents(File dest){
        // 获取一下参数的父文件
        File parent = dest.getParentFile();
        if(parent == null)return;
        parent.mkdirs();
    }
    // 写入功能
    public static void write2(byte[] bytes, File file){
        // 对参数进行判空操作
        if(bytes == null || file == null)return;
        // 对参数文件不采取覆盖的操作 并且参数文件非目录
        if(file.exists() || file.isDirectory())return;
        // 如果指定文件的父路径不存在的话 那么先要创建出来 然后才能够进行通过文件输出流进行输出操作
        mkparents(file);
        // 定义一个文件输出流 并且指定输出之后的目标文件
        try (OutputStream os = new FileOutputStream(file)){
            os.write(bytes);
        } catch (FileNotFoundException e) {
            e.printStackTrace();
        } catch (IOException e) {
            e.printStackTrace();
        }
    }
    // 读取功能
    public static byte[] read2(File file){
        // 对参数进行判空
        if(file == null)return null;
        // 保证参数文件的存在性 以及参数是一个文件
        if(!file.exists() || file.isDirectory())return null;
        try(InputStream is = new FileInputStream(file)){
            // 设置一次性读取的内容和指定文件的内容所占用的字节数一致
            byte[] bytes = new byte[(int)file.length()];
            is.read(bytes);
            return bytes;
        } catch (FileNotFoundException e) {
            e.printStackTrace();
            return null;
        } catch (IOException e) {
            e.printStackTrace();
            return null;
        }
    }
    // 复制功能
    public static void copy2(File file1, File file2){
        // 对参数进行判空操作
        if(file1 == null || file2 == null)return;
        // 接着保证参数的存在性
        if(!file1.exists() || file2.exists())return;
        // 接着保证文件的非目录性
        if(file1.isDirectory() || file2.isDirectory())return;
        // 保证目标文件的父路径存在
        mkparents(file2);
        try(InputStream is = new FileInputStream(file1); OutputStream os = new FileOutputStream(file2)) {
            // 设置一次性读取的字节数为8192个字节
            byte[] bytes = new byte[8192];
            int len = 0;
            while((len = is.read(bytes)) != -1){
                // 有可能我读取到的字节数小于数组的长度 所以我们需要将有效字节数写入到指定文件中去才对
                os.write(bytes, 0, len);
            }
        } catch (FileNotFoundException e) {
            e.printStackTrace();
        } catch (IOException e) {
            e.printStackTrace();
        }
    }
    public static void main(String[] args) throws UnsupportedEncodingException {
        // 分别测试一下通过try-with-resources优化以后的三个功能
        File file1 = new File("D:/a/b/4.txt");
        write2(new byte[]{73, 75}, file1);// IK
        byte[] bytes = read2(file1);
        String str = new String(bytes);
        System.out.println(str);// IK
        File file2 = new File("D:/a/a/new4.txt");
        copy2(file1, file2);
        byte[] bytes2 = read2(new File("D:/a/a/new4.txt"));
        String str2 = new String(bytes2);
        System.out.println(str2);// IK
    }
}
7.字符流
其特点就是:一次读写一个字符 而且最终都继承自Reader、Writer
常用的字符流有:FileReader、FileWriter
这两个类只适用于.txt、.java这种文件 因为如果读写的是非文本文件(前面所讲的编码方式都是针对字符的 即编码方式讨论的是不同类型的字符应该以多少字节的形式储存在计算机中 但是诸如.mp3文件的编码方式是针对非字符的 即编码方式讨论的不是 两者的编码方式是不同的)的话 那么可能会出现多字节或者少字节的情况
比如:[12, -20, 30, 56, 78, 46, 78, 90, -20]是以UTF-8编码方式储存在计算机中的字节(假设12以单字节的形式储存 -20, 30, 56是以三个字节的形式储存 78, 46是以两个字节的形式储存 78, 90是以两个字节的形式储存 -20也要以三个字节的形式储存 但是实际上只有一个字节 所以有可能会在凑两个字节过来组成三个字节储存在计算机中) 这是写入操作时可能会面临的问题 当然读取操作也同样会面临多字节或者少字节的问题

1.FileWriter
支持写入字符、字符串以及字符数组
public class Main{
    public static void main(String[] args) throws IOException {
        FileWriter fw = new FileWriter(new File("D:/a/a/new4.txt"));
        fw.write('a');// a
        fw.write("码哥");// 码哥
        fw.write("呵呵".toCharArray());// 呵呵
        fw.close();
    }
}
2.FileReader
支持读取的返回值为Unicode的字符的码值(int类型)
public class Main{
    public static void main(String[] args) throws IOException {
        FileReader fr = new FileReader(new File("D:/a/a/new4.txt"));
        // 读取第一个字符
        char ch1 = (char)fr.read();
        // 读取第二个字符
        char ch2 = (char)fr.read();
        System.out.println(ch1);// a
        System.out.println(ch2);// 码
        fr.close();
    }
}
也支持将读取的内容储存在字符数组中 并且返回值为有效读取的字符数
public class Main{
    public static void main(String[] args) throws IOException {
        FileReader fr = new FileReader(new File("D:/a/a/new4.txt"));
        char[] chs = new char[1024];
        int len = fr.read(chs);// 实际读取的字符数
        String str = new String(chs, 0, len);
        System.out.println(str);// a码哥呵呵
        fr.close();
    }
}
3.将文本文件的内容逐个字符进行打印
这个需求通过字符流的方式实现比较妥当 而通过字节流则很难实现(原因在于字节流一次读写的是一个字节 但是你要逐个字符进行打印的话 那么需要你自行完成从字节转换为字符的操作 这个是一个大工程 因为不同的语言字符占用的字节数不一样)
public class Main{
    public static void main(String[] args){
        try(Reader reader = new FileReader("D:/1.txt")){
            int ch;
            while((ch = reader.read()) != -1) {
                System.out.print((char)ch);
                Thread.sleep(1000);
            }
        } catch (FileNotFoundException e) {
            e.printStackTrace();
        } catch (IOException e) {
            e.printStackTrace();
        } catch (InterruptedException e) {
            e.printStackTrace();
        }
    }
}
8.缓冲流
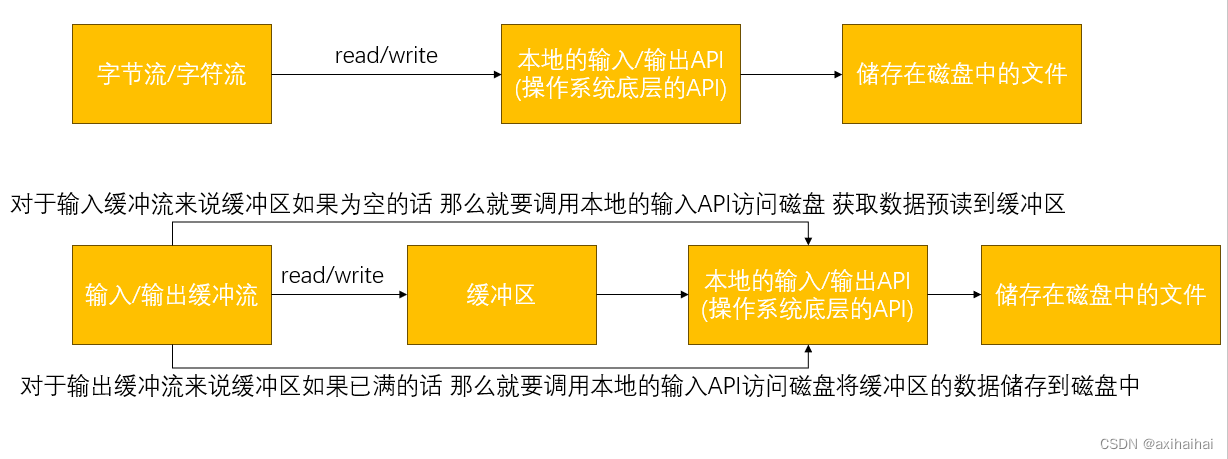
之前学过的字节流、字符流都是无缓冲的I/O流 每一个读写操作均会调用操作系统的底层API进行直接处理
每个读写操作会触发磁盘访问 产生大量的读写操作 可能会使程序的效率大大降低
为了减少读写操作带来的开销(因为总体路径变短了) Java实现了缓冲的I/O流
缓冲输入流:从缓冲区读取数据 并且只有当缓冲区为空时 才会调用本地的输入API 将磁盘的内容预读到缓冲区中
缓冲输出流:往缓冲区写入数据 并且只有当缓冲区已满时 才会调用本地的输出API 将缓冲区的内容写入磁盘中
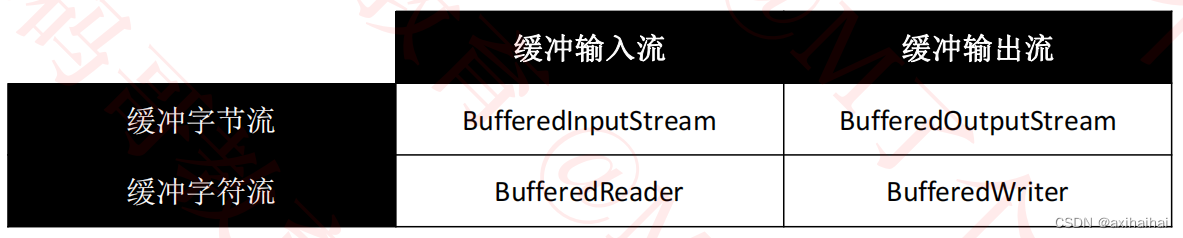
字节流和字符流都有缓冲流 并且输入流和输出流也都有缓冲流 那么这些流就可以配合出四种组合
四个缓冲流的缓冲区的默认大小时8192字节(8KB) 可以通过构造方法手动为缓冲流设置缓冲区大小
1.使用
对于缓冲流的使用 一般就是将无缓冲流包装成缓冲流 也就是将无缓冲流传递给缓冲流的构造方法
而且其中关闭流的时候 只需要关闭缓冲流 因为其内部已经包含了关闭其内部的无缓冲流的操作
public class Main{
    public static void main(String[] args){
        try (Writer write = new FileWriter("D:/1.txt");
             BufferedWriter bw = new BufferedWriter(write)){
            bw.write("a");
            bw.newLine();// 相当于输入一个换行符
            bw.write("b");
        } catch (FileNotFoundException e) {
            e.printStackTrace();
        } catch (IOException e) {
            e.printStackTrace();
        }
    }
}
2.close、flush
只要执行缓冲流的close方法 那么他就会自行在内部帮你完成缓冲流内部包装的无缓冲流的close操作
调用flush方法 会强制调用本地的输出API 将缓冲区的内容真正写入到磁盘中去
缓冲输出流的close方法内部会调用一次flush方法 将缓冲区的内容写入到磁盘中去
public class Main{
    public static void main(String[] args){
        try {
            BufferedWriter bw = new BufferedWriter(new FileWriter("D:/1.txt"));
            bw.write('a');
        } catch (IOException e) {
            e.printStackTrace();
        }
    }
}
打开文件以后 没有任何字符 这是因为字符都被储存在了缓冲区中 而硬盘中的文件是显示不了任何内容的
public class Main{
    public static void main(String[] args){
        try {
            BufferedWriter bw = new BufferedWriter(new FileWriter("D:/1.txt"));
            bw.write('a');
            bw.flush();
        } catch (IOException e) {
            e.printStackTrace();
        }
    }
}
上述代码可以成功写入
public class Main{
    public static void main(String[] args){
        BufferedWriter bw = null;
        try {
            bw = new BufferedWriter(new FileWriter("D:/1.txt"));
            bw.write('a');
        } catch (IOException e) {
            e.printStackTrace();
        } finally {
            try {
                if(bw != null)
                    bw.close();
            } catch (IOException e) {
                e.printStackTrace();
            }
        }
    }
}
亦是成功写入
public class Main{
    public static void main(String[] args){
        try (BufferedWriter bw = new BufferedWriter(new FileWriter("D:/1.txt"))){
            bw.write('a');
        } catch (IOException e) {
            e.printStackTrace();
        }
    }
}
这个try-with-resources自动进行了关闭操作 所以也间接执行了flush操作 所以也成功写入
3.利用缓冲流优化写入、读取、复制、逐个字符打印
就是将原来的不带缓冲的流包装成带缓冲的流
public class Files {
    public static void mkparents(File dest){
        // 获取一下参数的父文件
        File parent = dest.getParentFile();
        if(parent == null)return;
        parent.mkdirs();
    }
    public static void write2(byte[] bytes, File file){
        // 对参数进行判空操作
        if(bytes == null || file == null)return;
        // 对参数文件不采取覆盖的操作 并且参数文件非目录
        if(file.exists() || file.isDirectory())return;
        // 如果指定文件的父路径不存在的话 那么先要创建出来 然后才能够进行通过文件输出流进行输出操作
        mkparents(file);
        // 定义一个文件输出流 并且指定输出之后的目标文件
        try (OutputStream os = new FileOutputStream(file)){
            os.write(bytes);
        } catch (FileNotFoundException e) {
            e.printStackTrace();
        } catch (IOException e) {
            e.printStackTrace();
        }
    }
    public static void write3(byte[] bytes, File file){
        // 对参数判空
        if(bytes == null || file == null)return;
        // file存在或者file是一个目录的话 也不执行任何操作
        if(file.exists() || file.isDirectory())return;
        // 如果指定文件的父路径不存在的话 那么要先去创建父路径 才能够将指定内容写入到指定文件中去
        mkparents(file);
        // 接着定义一个带缓冲的字节输出流
        try(BufferedOutputStream bos = new BufferedOutputStream(new FileOutputStream(file))){
            bos.write(bytes);
        } catch (FileNotFoundException e) {
            e.printStackTrace();
        } catch (IOException e) {
            e.printStackTrace();
        }
    }

    public static byte[] read2(File file){
        // 对参数进行判空
        if(file == null)return null;
        // 保证参数文件的存在性 以及参数是一个文件
        if(!file.exists() || file.isDirectory())return null;
        try(InputStream is = new FileInputStream(file)){
            // 设置一次性读取的内容和指定文件的内容所占用的字节数一致
            byte[] bytes = new byte[(int)file.length()];
            is.read(bytes);
            return bytes;
        } catch (FileNotFoundException e) {
            e.printStackTrace();
            return null;
        } catch (IOException e) {
            e.printStackTrace();
            return null;
        }
    }
    // 实现一下带缓冲的读取功能
    public static byte[] read3(File file){
        // 对参数进行判空
        if(file == null)return null;
        // 文件不存在或者参数不是文件的话 就不执行任何操作
        if(!file.exists() || file.isDirectory())return null;
        try(BufferedInputStream bis = new BufferedInputStream(new FileInputStream(file))) {
            byte[] bytes = new byte[(int)file.length()];// 用一个刚刚好的空间来储存文件中读取的内容
            bis.read(bytes);
            return bytes;
        } catch (FileNotFoundException e) {
            e.printStackTrace();
            return null;
        } catch (IOException e) {
            e.printStackTrace();
            return null;
        }
    }
    public static void copy2(File file1, File file2){
        // 对参数进行判空操作
        if(file1 == null || file2 == null)return;
        // 接着保证参数的存在性
        if(!file1.exists() || file2.exists())return;
        // 接着保证文件的非目录性
        if(file1.isDirectory() || file2.isDirectory())return;
        // 保证目标文件的父路径存在
        mkparents(file2);
        try(InputStream is = new FileInputStream(file1); OutputStream os = new FileOutputStream(file2)) {
            // 设置一次性读取的字节数为8192个字节
            byte[] bytes = new byte[8192];
            int len = 0;
            while((len = is.read(bytes)) != -1){
                // 有可能我读取到的字节数小于数组的长度 所以我们需要将有效字节数写入到指定文件中去才对
                os.write(bytes, 0, len);
            }
        } catch (FileNotFoundException e) {
            e.printStackTrace();
        } catch (IOException e) {
            e.printStackTrace();
        }
    }
    // 定义一个带缓冲的复制功能 并且读取一个字节立马写入一个字节
    public static void copy3(File src, File dest){
        // 对参数进行判空操作
        if(src == null || dest == null)return;
        // 对参数包含的文件进行判空
        if(!src.exists() || dest.exists())return;
        // 对参数的目录性质进行判断
        if(src.isDirectory() || dest.isDirectory())return;
        // 也得保证目标路径的父路径存在才行
        mkparents(dest);
        // 复制功能需要两个东西 一个是输入流 一个是输出流 而且这个方法的需求是定义带缓冲的流 所以一个是带缓冲的输入流 一个是带缓冲的输出流
        try(BufferedInputStream bis = new BufferedInputStream(new FileInputStream(src)); BufferedOutputStream bos = new BufferedOutputStream(new FileOutputStream(dest))){
            byte len = 0;
            while((len = (byte)bis.read()) != EOF){
                bos.write(len);
            }
        } catch (FileNotFoundException e) {
            e.printStackTrace();
        } catch (IOException e) {
            e.printStackTrace();
        }
    }
    // 定义一个带缓冲的复制功能 并且读取一群字节立马写入一群字节
    public static void copy4(File src, File dest){
        // 对参数进行判空操作
        if(src == null || dest == null)return;
        // 对参数包含的文件进行判空操作
        if(!src.exists() || dest.exists())return;
        // 对参数包含的文件的非目录性进行判断
        if(src.isDirectory() || dest.isDirectory())return;
        // 接着还需要对目标路径的父路径进行判断 判断是否为空 如果为空的话 那么在定义流的时候 将不会自动为你创建出来 他只会自动创建出指定文件
        mkparents(dest);
        try(BufferedInputStream bis = new BufferedInputStream(new FileInputStream(src)); BufferedOutputStream bos = new BufferedOutputStream(new FileOutputStream(dest))) {
            // 定义一个数组 用于接收读取到的字节 容量为8kb
            byte[] bytes = new byte[8192];
            int len = 0;
            while((len = bis.read(bytes)) != EOF){
                bos.write(bytes, 0, len);// 读取的是有效的字节数
            }
        } catch (FileNotFoundException e) {
            e.printStackTrace();
        } catch (IOException e) {
            e.printStackTrace();
        }
    }
    public static void main(String[] args) throws UnsupportedEncodingException {
        // 测试一下带缓冲的写入功能
        // write3(new byte[]{77, 78}, new File("D:/2.txt"));// MN
        // 测试一下带缓冲的读取功能
        // byte[] bytes = read3(new File("D:/2.txt"));
        // System.out.println(new String(bytes));
        // 测试一下带缓冲的复制功能
        // copy3(new File("D:/a/a/海豚.jpg"), new File("D:/a/b/new海豚.jpg"));
        // 测试一下带缓冲的复制功能 并且是读取一群字节就写入一群字节
        copy4(new File("D:/a/a/海豚.jpg"), new File("D:/a/b/new海豚.jpg"));
    }
}
4.利用缓冲流逐行打印字符
利用的是带缓冲的字符输入流中的readLine方法
public class Main{
    public static void main(String[] args){
        // 要实现的需求是 逐行打印字符
        try(BufferedReader br = new BufferedReader(new FileReader(new File("D:/a/a/new4.txt")))){
            String str = null;
            while((str = br.readLine()) != null){
                System.out.println(str);
                Thread.sleep(2000);
            }
        } catch (FileNotFoundException e) {
            e.printStackTrace();
        } catch (IOException e) {
            e.printStackTrace();
        }
    }
}
这和逐个字符打印的需求很不一样 这个需求中不会打印换行符 但是这个字符打印这个需求是会打印换行符的
5.转化文本文件编码
本质上就是用不同的编码方式表示同一个字符串 底层的字节储存方式不一致的特性
并且什么方法可以接收编码方式
接下来的案例中 我们提供了将字节输入流转换为字符输入流的方式InputStreamReader 也提供了将字节输出流转换为字符输出流的方式OutputStreamWriter
这第一种方式就是利用InputStreamReader传递解码的编码方式 然后利用OutputStreamWriter传递编码的编码方式
public class Main{
    public static void main(String[] args){
        // 我们的需求是将以gbk编码方式储存在计算机中的文件改用以utf-8编码方式储存在计算机中
        // 采用第一种方式 就是将缓冲字节输入流转换成缓冲字符输入流 这样在解码的过程中可以指定编码方式
        try(BufferedReader br = new BufferedReader(new InputStreamReader(new FileInputStream("D:/a/a/GBK.txt"), "GBK"));
        BufferedWriter bw = new BufferedWriter(new OutputStreamWriter(new FileOutputStream("D:/a/a/UTF-8.txt"), "UTF-8"))){
            String str = null;
            // 采用逐行读取的方式
            while((str = br.readLine()) != null){
                bw.write(str);
                bw.newLine();
            }
        } catch (FileNotFoundException e) {
            e.printStackTrace();
        } catch (IOException e) {
            e.printStackTrace();
        }
    }
}
这第二种方式就是也是利用InputStreamReader设置解码时的编码方式 然后利用FileOutputStream的getBytes方法设置编码是的编码方式
public class Main{
    public static void main(String[] args){
        // 我们的需求是将以gbk编码方式储存在计算机中的文件改用以utf-8编码方式储存在计算机中
        // 采用第一种方式 就是将缓冲字节输入流转换成缓冲字符输入流 这样在解码的过程中可以指定编码方式
        try(BufferedReader br = new BufferedReader(new InputStreamReader(new FileInputStream("D:/a/a/GBK.txt"), "GBK"));
        BufferedOutputStream bos = new BufferedOutputStream(new FileOutputStream("D:/a/a/UTF-8.txt"))){
            // 还是每次读取一行字符串以后就写入到指定文件中去
            String str = null;
            while((str = br.readLine()) != null){
                bos.write(str.getBytes("UTF-8"));
                bos.write("\n".getBytes("UTF-8"));
            }
        } catch (FileNotFoundException e) {
            e.printStackTrace();
        } catch (IOException e) {
            e.printStackTrace();
        }
    }
}
你除了每读取一行就写入一行的字符串外 你还可以每读取一个字符就写入一个字符
所以第三种方式就是第一种方式的变种
public class Main{
    public static void main(String[] args){
        // 我们的需求是将以gbk编码方式储存在计算机中的文件改用以utf-8编码方式储存在计算机中
        // 采用第一种方式 就是将缓冲字节输入流转换成缓冲字符输入流 这样在解码的过程中可以指定编码方式
        try(BufferedReader br = new BufferedReader(new InputStreamReader(new FileInputStream("D:/a/a/GBK.txt"), "GBK"));
            BufferedWriter bw = new BufferedWriter(new OutputStreamWriter(new FileOutputStream("D:/a/a/UTF-8.txt"), "UTF-8"))){
            int ch;
            while((ch = br.read()) != -1){
                bw.write(ch);
            }
        } catch (FileNotFoundException e) {
            e.printStackTrace();
        } catch (IOException e) {
            e.printStackTrace();
        }
    }
}
除此之外 第四种方式就是读取使用的是字符输入流 写入的时候使用的是字符输出流 但是每次读取的是字符数组 一读取到就立马写入 是对第一种方式的变种
public class Main{
    public static void main(String[] args){
        // 我们的需求是将以gbk编码方式储存在计算机中的文件改用以utf-8编码方式储存在计算机中
        // 采用第一种方式 就是将缓冲字节输入流转换成缓冲字符输入流 这样在解码的过程中可以指定编码方式
        try(BufferedReader br = new BufferedReader(new InputStreamReader(new FileInputStream("D:/a/a/GBK.txt"), "GBK"));
            BufferedWriter bw = new BufferedWriter(new OutputStreamWriter(new FileOutputStream("D:/a/a/UTF-8.txt"), "UTF-8"))){
            char[] chs = new char[1024];
            int len = 0;
            while((len = br.read(chs)) != -1){
                bw.write(chs, 0, len);
            }
        } catch (FileNotFoundException e) {
            e.printStackTrace();
        } catch (IOException e) {
            e.printStackTrace();
        }
    }
}
前两种方式不完美 因为他会将最后一行之后的换行符也进行写入 实际上最后一行后面是没有换行符的
后两种方式是完美的 因为有什么就输入什么 gbk.txt和utf-8.txt的字符数对等
我想说的是这个需求可以通过很多种方式实现 可以任意搭配 只要能满足需求即可
9.窥探缓冲流的底层细节
通过断点调试进行窥探
1.字节输出流
public class Main{
    public static void main(String[] args) throws IOException {
        OutputStream os = new FileOutputStream(new File("D:/a/a/1.txt"));
        os.write(97);// a
        os.write(98);// b
        os.close();
    }
}
对于上述这段代码来说 通过断点调试以后可以得出结论 字节输出流的每次写入操作确实都是调用操作系统底层的api触发对磁盘的访问 每次都是直接将要输入的字节输入到磁盘中去
2.字符输出流
public class Main{
    public static void main(String[] args) throws IOException {
        Writer writer = new FileWriter(new File("D:/a/a/1.txt"));
        writer.write('a');// a
        writer.write('b');// b
        writer.close();
    }
}
从断点调试的每一步操作中 我们可以得知 他在执行完write操作以后并没有直接访问磁盘 将字符输出到磁盘中 而是等到关闭字符输出流以后才会将前面写入的所有字符统统写入到磁盘中 可以见的 字符输出流是一个带缓冲的流
从另一方面(jdk源码)也可以窥得这一结论
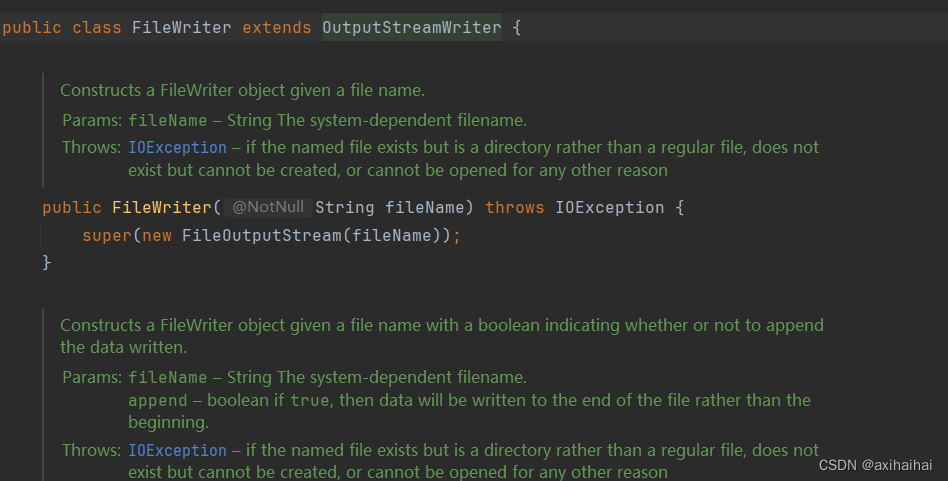
上图中 FileWriter中并没有对write方法的定义 也就是FileWriter调用的不是自己的write方法
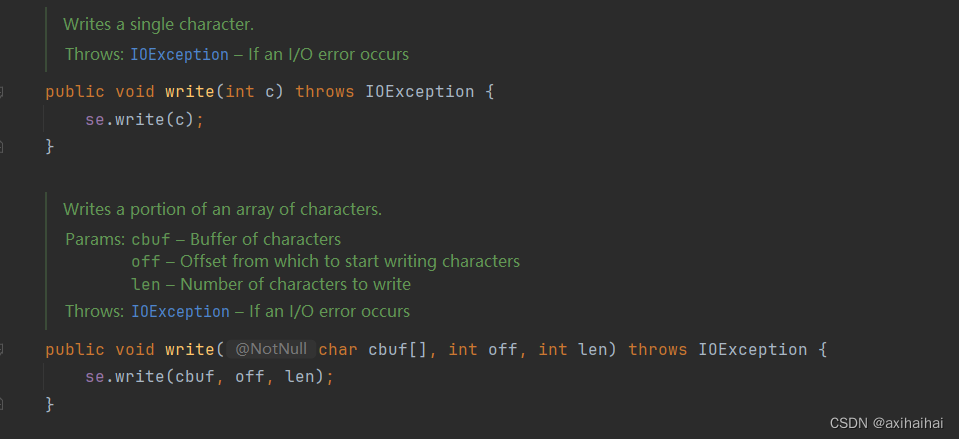
于是乎 我们寻找他的父类 从中发现了write方法的踪迹 于是我们可以下结论 FileWriter调用的是父类中的write方法 但是他是通过se这个对象进行调用的
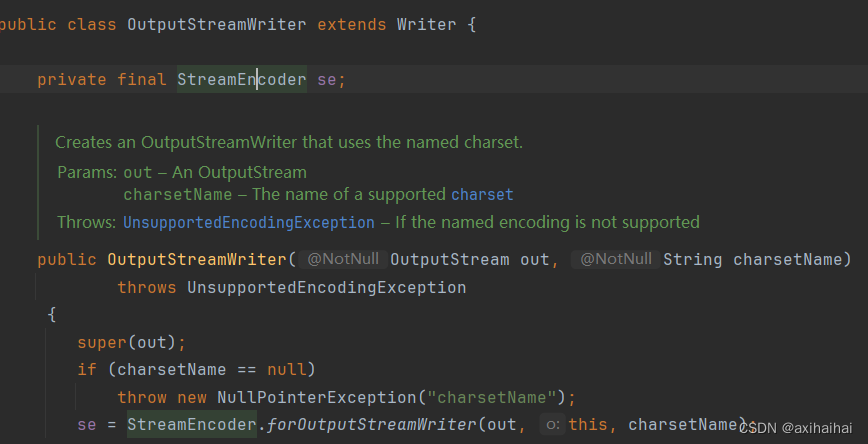
仔细观察 发现在同一个类中 se是作为成员变量被定义在了同一个类中的
他属于StreamEncoder类型
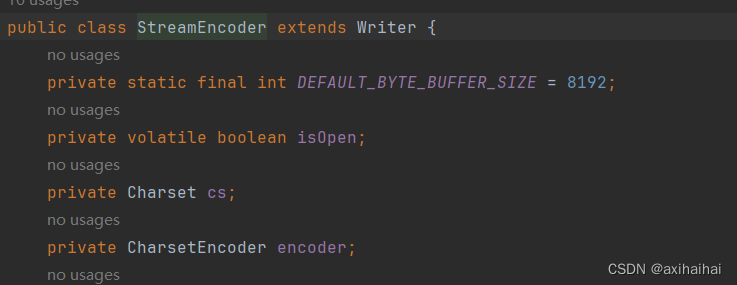
窥探内部可以发现 这个类型具有一个属性 唤作DEFAULT_BYTE_BUFFER_SIZE属性 也就是缓冲区的默认大小 所以其实调用字符输出流的write方法的本质就是在调用一个缓冲流的write方法 也可以这么说 字符输出流自带了缓冲
3.字节输入流
虽然他不能够通过断点调试观察到是否自带缓冲 因为他不想输出流那样可以通过记事本或者其他打开方式一步步窥见断点调试的结果 但是我们可以利用jdk源码来查看他是否调用的是缓冲流的read方法
从jdk源码中可以直到 他没有自带缓冲 也就是每调用一次read方法都需要触发对磁盘的访问
4.字符输入流
同样的是 不能通过断点调试观察到他的缓冲细节 但是可以根据jdk源码知道
从jdk源码中 我们可以观察到字符输入流调用read方法同样是要访问缓冲区的
10.标准输入、标准输出
标准输入流:就是控制台的输入、键盘的输入 是一个字节输入流 Sytem.in(InputStream类型)
标准输出流:就是控制台的输出、屏幕的输出 是一个字节输出流 System.out(PrintStream类型)
我们可以利用标准输入流读取我们键盘的输入
实现一个需求:
读取键盘的输入 并作出适当的反馈 模拟一个傻瓜式的ai
其中readLine可以起到阻塞程序的作用 当我们没有任何输入的时候 readLine将会阻塞程序
public class Main{
    public static void main(String[] args) throws IOException {
        // 首先定义一个带缓冲的字符输入流
        BufferedReader br = new BufferedReader(new InputStreamReader(System.in));
        // 接着就是定义一个字符串 用于接收读取我们键入的每一行字符串
        String line = null;
        while((line = br.readLine()) != null){
            line = line.replace("你", "朕");
            line = line.replace("吗", "");
            line = line.replace("么", "");
            line = line.replace("?", "!");
            System.out.println("\t" + line);
        }
        br.close();
    }
}
11.Scanner
java.util.Scanner就是一个可以使用正则表达式解析基本类型和字符串的简单文本扫描器
他的默认正则表达式是空白字符(空格、终止符、制表符) 他利用正则表达式将输入分割成若干个token(你可以理解为部分 就是将输入按照指定的格式分割成若干个部分)
他可以解析的输入类型有InputStream、Readable(就是FileReader最终实现的接口)、File、String
另外Scanner实现了closeable接口 所以他是一个资源 资源使用完毕以后需要进行关闭
public class Main{
    public static void main(String[] args) throws IOException {
        Scanner scanner = new Scanner("jack rose linda");
        while(scanner.hasNext()){
            System.out.println(scanner.next());
            // jack
            // rose
            // linda
        }
        scanner.close();
    }
}
public class Main{
    public static void main(String[] args) throws IOException {
        Scanner scanner = new Scanner(new File("D:/a/a/1.txt"));
        while(scanner.hasNext()){
            System.out.println(scanner.next());
        }
        scanner.close();
    }
}
1.next
我们可以通过next设置所读取的格式 如果读取到的不符合next的格式 那么就会返回空值
public class Main{
    public static void main(String[] args) throws IOException {
        Scanner scanner = new Scanner("jack 666 888 ak47");
        while(scanner.hasNext()){
            System.out.println(scanner.next());// jack
            System.out.println(scanner.nextInt());// 666
            System.out.println(scanner.nextDouble());// 888
            System.out.println(scanner.next("[a-z]{2}\\d{2}"));// ak47
        }
        scanner.close();
    }
}
2.useDelimiter
我们可以利用这个方法自定义分隔符 通过这个分隔符可以将指定输入分割成若干个token
public class Main{
    public static void main(String[] args) throws IOException {
        Scanner scanner = new Scanner("aa 1 bb 22 cc33dd");
        scanner.useDelimiter("\\s*\\d+\\s*");// 自定义分隔符
        while(scanner.hasNext()){
            System.out.println(scanner.next());
        }
        scanner.close();
    }
}
3.标准输入流
前面我们知道Scanner的构造方法可以接收一个字节输入流 那么就可以接收一个标准输入流了
其中如果没有键入数据的话 那么程序将会阻塞在scanner.nextInt处
public class Main{
    public static void main(String[] args) throws IOException {
        Scanner scanner = new Scanner(System.in);
        System.out.println("请输入第一个整数:");
        int n1 = scanner.nextInt();
        System.out.println("请输入第二个整数:");
        int n2 = scanner.nextInt();
        System.out.println("n1 + n2 = " + (n1 + n2));
        scanner.close();
    }
}
4.改进傻瓜式ai
可以简化代码量
public class Main{
    public static void main(String[] args) throws IOException {
        Scanner scanner = new Scanner(System.in);
        while(scanner.hasNextLine()){
            String str = scanner.nextLine();
            str = str.replace("你", "朕");
            str = str.replace("吗", "");
            str = str.replace("么", "");
            str = str.replace("?", "!");
            System.out.println("\t" + str);
        }
        scanner.close();
    }
}
12.格式化输出
有两个类可以实现格式化输出 分别时PrintStream、PrintWriter
他们用三个常用方法 分别是print、printf、format(该方法用于格式化输出 格式化输出就是体现在该方法上)
print、write的区别在于(不管是PrintWrite还是PrintStream):
write(97)写入的是字符’a’
print(97)写入的就是字符串"97"
前者本质上写入的是一个字节 即97这个字节
后者本质上写入的是两个字节 即9和7这两个字节
1.PrintStream
System.out和System.err都是PrintSteam类型的实例
public class Main {
    public static void main(String[] args) throws UnsupportedEncodingException {
        System.out.println(123);
        System.err.println(456);
    }
}
上面一个案例通过PrintStream调用了println方法进行打印 两者的打印顺序可能是不按照代码的顺序进行的
他属于标准输出流 所谓标准输出流就是往控制台进行输出、输出到屏幕上
而且PrintStream属于字节输出流 但是他内部利用了字符流对象模拟了许多字符流的功能
2.PrintWriter
PrintStream和PrintWriter的区别在于:前者强调标准化输出 就是输出到控制台或者屏幕 即强调使用System.out或者System.err创建PrintWriter对象 而不是通过构造方法创建处对象以后输出到文件中去
后者则更推荐使用在需要创建格式化输出流的场景中(也就是构造方法创建格式化输出流)
他是字符流 我们可以利用他的format方法进行格式化输出
public class Main {
    public static void main(String[] args) throws UnsupportedEncodingException, FileNotFoundException {
        PrintWriter pw = new PrintWriter(new File("D:/1.txt"));
        pw.format("my name is %s, my age is %d", "jack", 15);
        pw.close();
    }
}
可以通过构造方法设置autoflush为true 那么println、printf、format方法内部就会自动调用flush方法
public class Main {
    public static void main(String[] args) throws UnsupportedEncodingException, FileNotFoundException {
        PrintWriter pw = new PrintWriter(new FileOutputStream("D:/1.txt"), true);
        pw.println("my name is jack");
        pw.printf("my name is rose\n");
        pw.format("my name is %s", "linda");
        pw.close();
    }
}
13.数据流
有两个数据流:DataInputStream、DataOutputStream 支持基本类型和字符串的I/O操作
public class Main{
    public static void main(String[] args) throws IOException {
        // 利用数据输出流将不同类型的数据依次储存到文件中去
        DataOutputStream dos = new DataOutputStream(new FileOutputStream("D:/1.txt"));
        dos.writeInt(20);
        dos.writeInt(3000);
        dos.writeDouble(1.75);
        dos.writeUTF("jack");
        // 0000 0014 0000 0bb8 3ffc 0000 0000 0000
        // 0004 6a61 636b
        DataInputStream dis = new DataInputStream(new FileInputStream("D:/1.txt"));
        System.out.println(dis.readInt());// 20
        System.out.println(dis.readInt());// 3000
        System.out.println(dis.readDouble());// 1.75
        System.out.println(dis.readUTF());// jack
        dos.close();
        dis.close();
    }
}
从以上代码中我们可以看出 通过数据流输出的数据展示是以一定格式的十六进制展示在文件中的
而如果我们通过PrintWriter.print方法输出到指定文件中的话 那么他将会以字符串的形式展示
public class Main{
    public static void main(String[] args) throws IOException {
        PrintWriter pw = new PrintWriter(new FileWriter("D:/2.txt"));
        pw.print(20);
        pw.print(3000);
        pw.print(1.75);
        pw.print("jack");
        // 2030001.75jack
    }
}
针对以上两个案例 都可以达到输出到文件的需求 但是如果要做到更好的归档和接档的工作的话 那么显然只有数据流才可以胜任
何为更好的进行归档和接档 就是可以接档时获取的不同类型的数据和归档时储存的不同类型数据是一一对应的
所以如果你有这方面的需求的话 推荐使用数据流
14.对象流
有两个对象流:ObjectInputStream、ObjectOutputStream 支持引用类型的I/O操作
现在有一个需求是:
想要将一个对象进行归档和接档的操作 我们先用数据流实现 由于是数据流支持的是基本类型和字符串的I/O操作 所以我们需要将一个对象拆分成多个属性 然后分别进行归档和接档操作
但是如果我们用对象流去实现的话 那么不用进行拆分 只需要对一个对象进行归档和接档的操作足矣
public class Main{
    public static void main(String[] args) throws IOException {
        Person person = new Person("jack", 20, 99);
        DataOutputStream dos = new DataOutputStream(new FileOutputStream("D:/1.txt"));
        dos.writeInt(person.getAge());
        dos.writeInt(person.getLevel());
        dos.writeUTF(person.getName());
        DataInputStream dis = new DataInputStream(new FileInputStream("D:/1.txt"));
        System.out.println(dis.readInt());
        System.out.println(dis.readInt());
        System.out.println(dis.readUTF());
        dos.close();
        dis.close();
    }
}
public class Main{
    public static void main(String[] args) throws IOException, ClassNotFoundException {
        Person person = new Person("jack", 20, 99);
        ObjectOutputStream oos = new ObjectOutputStream(new FileOutputStream("D:/1.txt"));
        oos.writeObject(person);
        /*
        通过sublime text展示的结果如下所示:
        aced 0005 7372 0006 5065 7273 6f6e 5e2f
        2e70 e065 d296 0200 0349 0003 6167 6549
        0005 6c65 7665 6c4c 0004 6e61 6d65 7400
        124c 6a61 7661 2f6c 616e 672f 5374 7269
        6e67 3b78 7000 0000 1400 0000 6374 0004
        6a61 636b
         */
        ObjectInputStream ois = new ObjectInputStream(new FileInputStream("D:/1.txt"));
        System.out.println(ois.readObject());// Person{name='jack', age=20, level=99}
        oos.close();
        ois.close();
    }
}
对比以上两个案例 我们可以清楚的知道 使用对象流对对象进行I/O操作的话 可以极大的简化代码量
而且从中也发现了一个问题:
只有实现了java.io.Serializable接口的类才能使用对象流进行I/O操作 否则就会抛出java.io.NotSerializableException异常
还有另外一个问题就是:
public class Main{
    public static void main(String[] args) throws IOException, ClassNotFoundException {
        Person person = new Person("jack", 20, 99);
        ObjectOutputStream oos = new ObjectOutputStream(new FileOutputStream("D:/1.txt"));
        oos.writeObject(person);
        /*
        通过sublime text展示的结果如下所示:
        aced 0005 7372 0006 5065 7273 6f6e 5e2f
        2e70 e065 d296 0200 0349 0003 6167 6549
        0005 6c65 7665 6c4c 0004 6e61 6d65 7400
        124c 6a61 7661 2f6c 616e 672f 5374 7269
        6e67 3b78 7000 0000 1400 0000 6374 0004
        6a61 636b
         */
        ObjectInputStream ois = new ObjectInputStream(new FileInputStream("D:/1.txt"));
        System.out.println(((Person)ois.readObject()).getAge());
        System.out.println(((Person)ois.readObject()).getLevel());
        System.out.println(((Person)ois.readObject()).getName());
        oos.close();
        ois.close();
    }
}
在代码中 你尝试获取多个对象 而你刚才只储存了一个对象 所以抛出了EOFException异常
如果你想要获取刚才储存的对象的属性的话 那么你可以先变量保存 然后分别打印属性
public class Main{
    public static void main(String[] args) throws IOException, ClassNotFoundException {
        Person person = new Person("jack", 20, 99);
        ObjectOutputStream oos = new ObjectOutputStream(new FileOutputStream("D:/1.txt"));
        oos.writeObject(person);
        /*
        通过sublime text展示的结果如下所示:
        aced 0005 7372 0006 5065 7273 6f6e 5e2f
        2e70 e065 d296 0200 0349 0003 6167 6549
        0005 6c65 7665 6c4c 0004 6e61 6d65 7400
        124c 6a61 7661 2f6c 616e 672f 5374 7269
        6e67 3b78 7000 0000 1400 0000 6374 0004
        6a61 636b
         */
        ObjectInputStream ois = new ObjectInputStream(new FileInputStream("D:/1.txt"));
        person = (Person)ois.readObject();
        System.out.println(person.getAge());// 20
        System.out.println(person.getLevel());// 99
        System.out.println(person.getName());// jack
        oos.close();
        ois.close();
    }
}
Serializable是一个标记接口 不要求实现任何方法 仅仅只是为了标记实现类可以被对象流进行I/O操作
1.对象的序列化和反序列化
所谓序列化 其实就是将对象转换为可储存或者传输的数据(一般就是二进制数据) 利用ObjectOutputStream可以实现对象的序列化
所谓反序列化 就是将序列化后的数据恢复成对象 利用ObjectInputStream可以实现对象的反序列化
值得注意的是 如果一个可序列化的类中包含了非可序列化的类 那么这个可序列化的类仍然可以进行序列化操作 只不过如果你想要对这个非可序列化的对象赋值的话 结果就会抛出了NotSerializableException
2.序列化
将可序列化的对象转换为二进制数据
public class Main{
    public static void main(String[] args) throws IOException, ClassNotFoundException {
        ObjectOutputStream oos = new ObjectOutputStream(new FileOutputStream("D:/3.txt"));
        Person person = new Person("jack", 11, 90);
        person.setCar(new Car("Bently"));
        oos.writeObject(person);
        Car car = new Car("BMW");
        oos.writeObject(car);
        oos.close();
    }
}
3.反序列化
将二进制数据转换为对象
public class Main{
    public static void main(String[] args) throws IOException, ClassNotFoundException {
        ObjectInputStream ois = new ObjectInputStream(new FileInputStream("D:/3.txt"));
        Person person2 = (Person)ois.readObject();
        Car car2 = (Car)ois.readObject();
        System.out.println(person2);
        System.out.println(car2);
        ois.close();
    }
}
4.transient
被transient修饰的实例变量不会被序列化(不会参与到对象的序列化过程中)
public class Main{
    public static void main(String[] args) throws IOException, ClassNotFoundException {
        ObjectOutputStream oos = new ObjectOutputStream(new FileOutputStream("D:/1.txt"));
        Person person = new Person("jack", 20, 99);
        person.setCar(new Car("Toyota"));
        oos.writeObject(person);
        ObjectInputStream ois = new ObjectInputStream(new FileInputStream("D:/1.txt"));
        person = (Person)ois.readObject();
        System.out.println(person.getAge());// 20
        System.out.println(person.getLevel());// 99
        System.out.println(person.getName());// jack
        System.out.println(person.getCar());// null
        oos.close();
        ois.close();
    }
}
5.serialVersionUID
每一个可序列化的类都有一个serialVersionUID 相当于类的版本号
默认情况下会根据类的详细信息计算吹serialVersionUID的值 根据编译器(jdk7、jdk8等)实现的不同这个值可能千差万别
一旦类的信息发生了改变 serialVersionUID的值就会发生改变
如果序列化和反序列化时的serialVersionUID不一致的话
会认定序列化和反序列化的类不兼容 会抛出java.io.InvalidClassException异常
public class Person implements Serializable {
    private String name;
    private int age;
    public Person(String name, int age){
        this.name = name;
        this.age = age;
    }
    public int getAge(){
        return age;
    }
    public String toString(){
        return "Person [name = " + name + ", age = " + age + "]";
    }
}
public class Main {
    public static void main(String[] args) throws IOException {
        ObjectOutputStream oos = new ObjectOutputStream(new FileOutputStream("D:/1.txt"));
        oos.writeObject(new Person("jack", 11));
        oos.close();
    }
}
以上是Person结构改变前的详细信息
public class Person implements Serializable {
    private String name;
    // private int age;
    public Person(String name, int age){
        this.name = name;
        // this.age = age;
    }
    // public int getAge(){
        // return age;
    // }
    public String toString(){
        return "Person [name = " + name + ", age = " + 0 + "]";
    }
}
public class Main {
    public static void main(String[] args) throws IOException, ClassNotFoundException {
        ObjectInputStream ois = new ObjectInputStream(new FileInputStream("D:/1.txt"));
        Person p = (Person)ois.readObject();
        System.out.println(p);
    }
}
从控制台显而易见可以看出来 改变了类的结构 序列化时的版本号和反序列化时的版本号对不上 导致抛出InvalidClassException异常
为了避免改变类结构导致的类版本不兼容 我们推荐自定义serialVersionUID 而不要使用他默认的值
必须是通过static final long修饰的(因为我们要保证结构变化时版本号不变)
建议声明为private(因为暴露给外面没必要)
如果没有定义serialVersionUID的话 那么编译器就会发出"serial"警告
public class Person implements Serializable {
    private static final long serialVersionUID = 1L;
    private String name;
    private int age;
    public Person(String name, int age){
        this.name = name;
        this.age = age;
    }
    public int getAge(){
        return age;
    }
    public String toString(){
        return "Person [name = " + name + ", age = " + age + "]";
    }
}
public class Main {
    public static void main(String[] args) throws IOException, ClassNotFoundException {
        ObjectOutputStream oos = new ObjectOutputStream(new FileOutputStream("D:/1.txt"));
        oos.writeObject(new Person("jack", 11));
        oos.close();
    }
}
这是改变结构前的情况 可以正常输出到指定文件中 此时UID为自定义的1
public class Person implements Serializable {
    private static final long serialVersionUID = 1L;
    private String name;
    // private int age;
    public Person(String name, int age){
        this.name = name;
        // this.age = age;
    }
    // public int getAge(){
        // return age;
    // }
    public String toString(){
        return "Person [name = " + name + ", age = " + 0 + "]";
    }
}
public class Main {
    public static void main(String[] args) throws IOException, ClassNotFoundException {
        ObjectInputStream ois = new ObjectInputStream(new FileInputStream("D:/1.txt"));
        Person p = (Person)ois.readObject();
        System.out.println(p);// Person [name = jack, age = 0]
    }
}
这是改变结构后的情况 此时的版本号也是1
由于改变前和改变后的版本号一致 所以不会抛出异常 而且反序列化之后可以正常打印


 被折叠的 条评论
为什么被折叠?
被折叠的 条评论
为什么被折叠?
 到【灌水乐园】发言


