


目录
新建项目和项目环境配置
一、新建项目
我习惯在D盘下创建一个Vue3项目文件夹,用CMD打开该文件夹,输入
## 1.创建命令
npm create vue@latest

## 2.具体配置
## 配置项目名称
√ Project name: vue3_test ##项目名称
## 是否添加TypeScript支持
√ Add TypeScript?  Yes
## 是否添加JSX支持
√ Add JSX Support?  Yes
## 是否添加路由环境
√ Add Vue Router for Single Page Application development?  Yes
## 是否添加pinia环境
√ Add Pinia for state management?  Yes
## 是否添加单元测试
√ Add Vitest for Unit Testing?  Yes
## 是否添加端到端测试方案
√ Add an End-to-End Testing Solution? » Yes
## 是否添加ESLint语法检查
√ Add ESLint for code quality?  Yes
## 是否添加Prettiert代码格式化
√ Add Prettier for code formatting?  Yes

cd vue3_test
npm install ##跟着npm提示走就行
npm run dev ##测试下项目是否创建完成
项目创建成功之后,用VS Code打开,方便后续代码书写和管理
二、整理项目代码
把代码删成这样
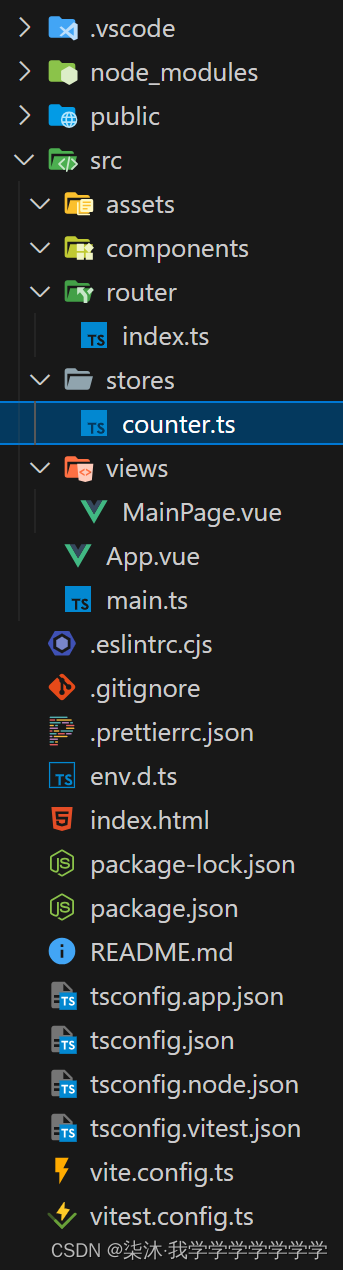
其中:
##./src/router/index.ts
import { createRouter, createWebHistory } from 'vue-router'
import mainpage from '../views/MainPage.vue'

const router = createRouter({
  history: createWebHistory(import.meta.env.BASE_URL),
  routes: [
    {
      path: '/',
      name: 'mainpage',
      component: mainpage
    }
  ]
})

export default router
##./src/stores/counter.ts
import { ref, computed } from 'vue'
import { defineStore } from 'pinia'

export const useCounterStore = defineStore('counter', () => {
  const count = ref(0)
  const doubleCount = computed(() => count.value * 2)
  function increment() {
    count.value++
  }

  return { count, doubleCount, increment }
})
##./src/views/MainPage.vue
##这个地方是写主页的
<template>
  <div class="mainpage-layout"></div>
</template>

<script lang="ts" setup></script>

<style scoped></style>
##App.vue
<script setup lang="ts"></script>

<template>
  <div id="app">
    <router-view></router-view>
  </div>
</template>

<style scoped></style>
##main.ts
##这里存放一些配置
import './assets/main.css'

import { createApp } from 'vue'
import { createPinia } from 'pinia'

import App from './App.vue'
import router from './router'
import ElementPlus from 'element-plus'
import 'element-plus/dist/index.css'

createApp(App).use(router).use(createPinia()).use(ElementPlus).mount('#app')
##index.html
<!doctype html>
<html lang="en">
  <head>
    <meta charset="UTF-8" />
    <link rel="icon" href="/favicon.ico" />
    <meta name="viewport" content="width=device-width, initial-scale=1.0" />
    <title>Vite App</title>
  </head>
  <body>
    <div id="app"></div>
    <script type="module" src="/src/main.ts"></script>
  </body>
</html>
##vite.config.ts
import { fileURLToPath, URL } from 'node:url'

import { defineConfig } from 'vite'
import vue from '@vitejs/plugin-vue'

// https://vitejs.dev/config/
export default defineConfig({
  plugins: [vue()],
  resolve: {
    alias: {
      '@': fileURLToPath(new URL('./src', import.meta.url))
    }
  }
})
三、Element Plus 的引入和配置
- 在终端中输入代码:
npm install element-plus --save
- 安装
unplugin-vue-components和unplugin-auto-import这两款插件
npm install -D unplugin-vue-components unplugin-auto-import- 然后把vite.config.js文件配置成上面的代码规范就行了
四、简单介绍一下各配置的功能
- Element Plus:能够在 Vue 项目中愉快地使用 Element UI 提供的按钮、表单、对话框等各种漂亮的组件
- Pinia: 来管理应用程序中的数据、状态、全局状态等,从而使得应用程序的状态管理变得更加高效和便捷。
- Vue Router :是 Vue.js 中非常重要的一个插件,它帮助我们管理页面之间的跳转和导航。
初版项目日志:
【vue3.0 引入Element Plus步骤与使用】![]() https://blog.csdn.net/Ge_Daye/article/details/132511352柒沐的项目开发日志
https://blog.csdn.net/Ge_Daye/article/details/132511352柒沐的项目开发日志![]() https://blog.csdn.net/m0_71506747/article/details/136785810
https://blog.csdn.net/m0_71506747/article/details/136785810


 277
277


 被折叠的 条评论
为什么被折叠?
被折叠的 条评论
为什么被折叠?
 到【灌水乐园】发言


