


一、本地服务器准备(选tomcat)
(一)服务器下载与运行
- 首先从官网下载tomcat10的文件(Apache Tomcat® - Apache Tomcat 10 Software Downloads)
- 然后将文件解压,找到文件夹bin目录下的startup.sh执行该文件。
- mac电脑执行方法如下:
- 先开启用户对该文件下所有sh的权限,否则startup.sh执行时就找不到一个同级文件夹中./catalina.sh
- 执行指令 sudo chmod 755 *.sh
- 执行指令:sh ./startup.sh
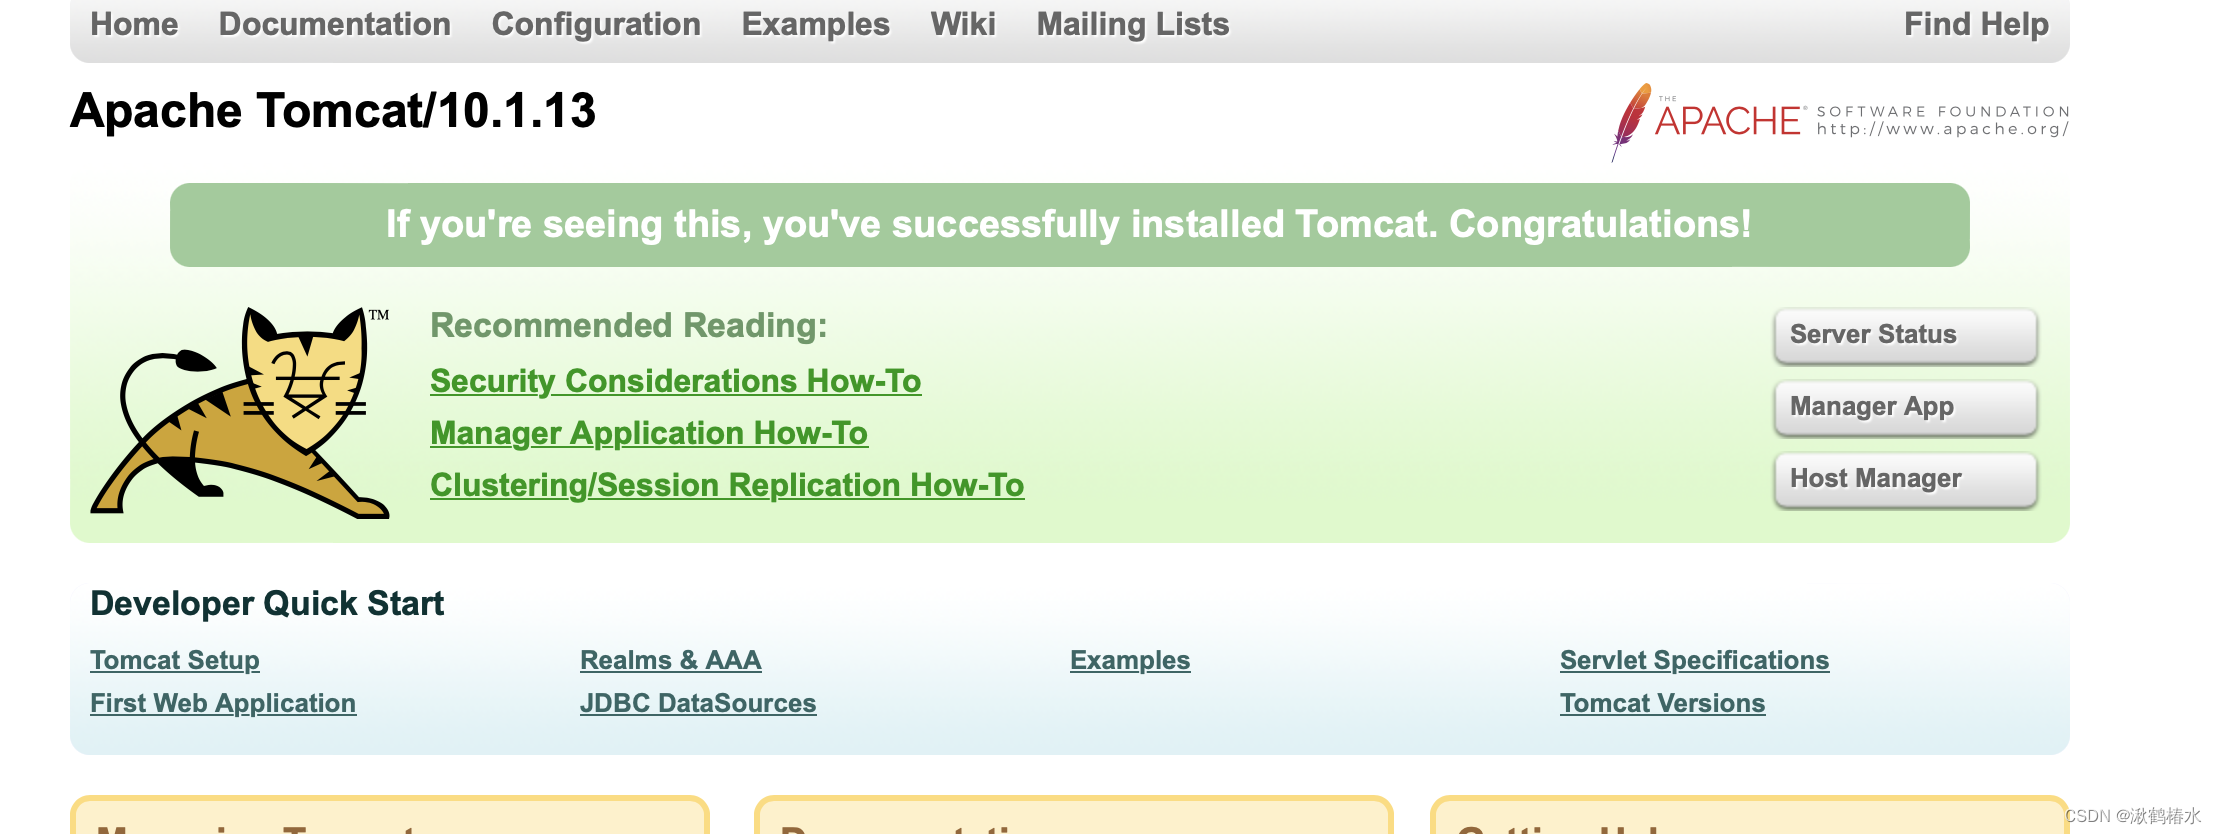
- 看到输出后,tomcat启动成功“tomact started”
- 然后我就可以通过http://localhost:8080访问首页了!
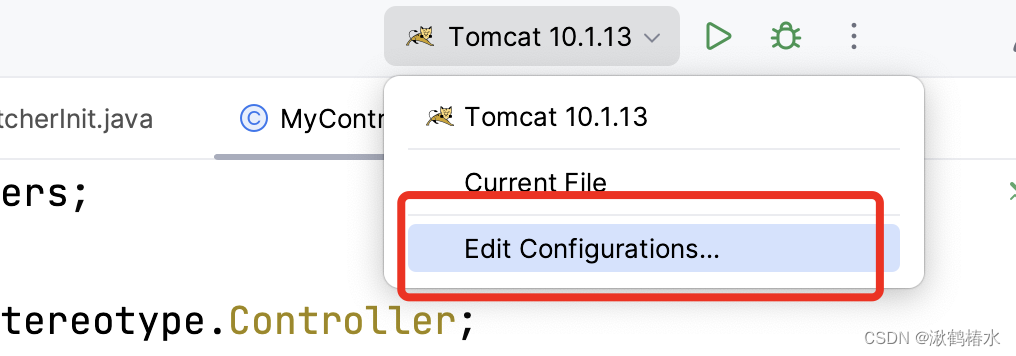
(二)服务器配置到idea
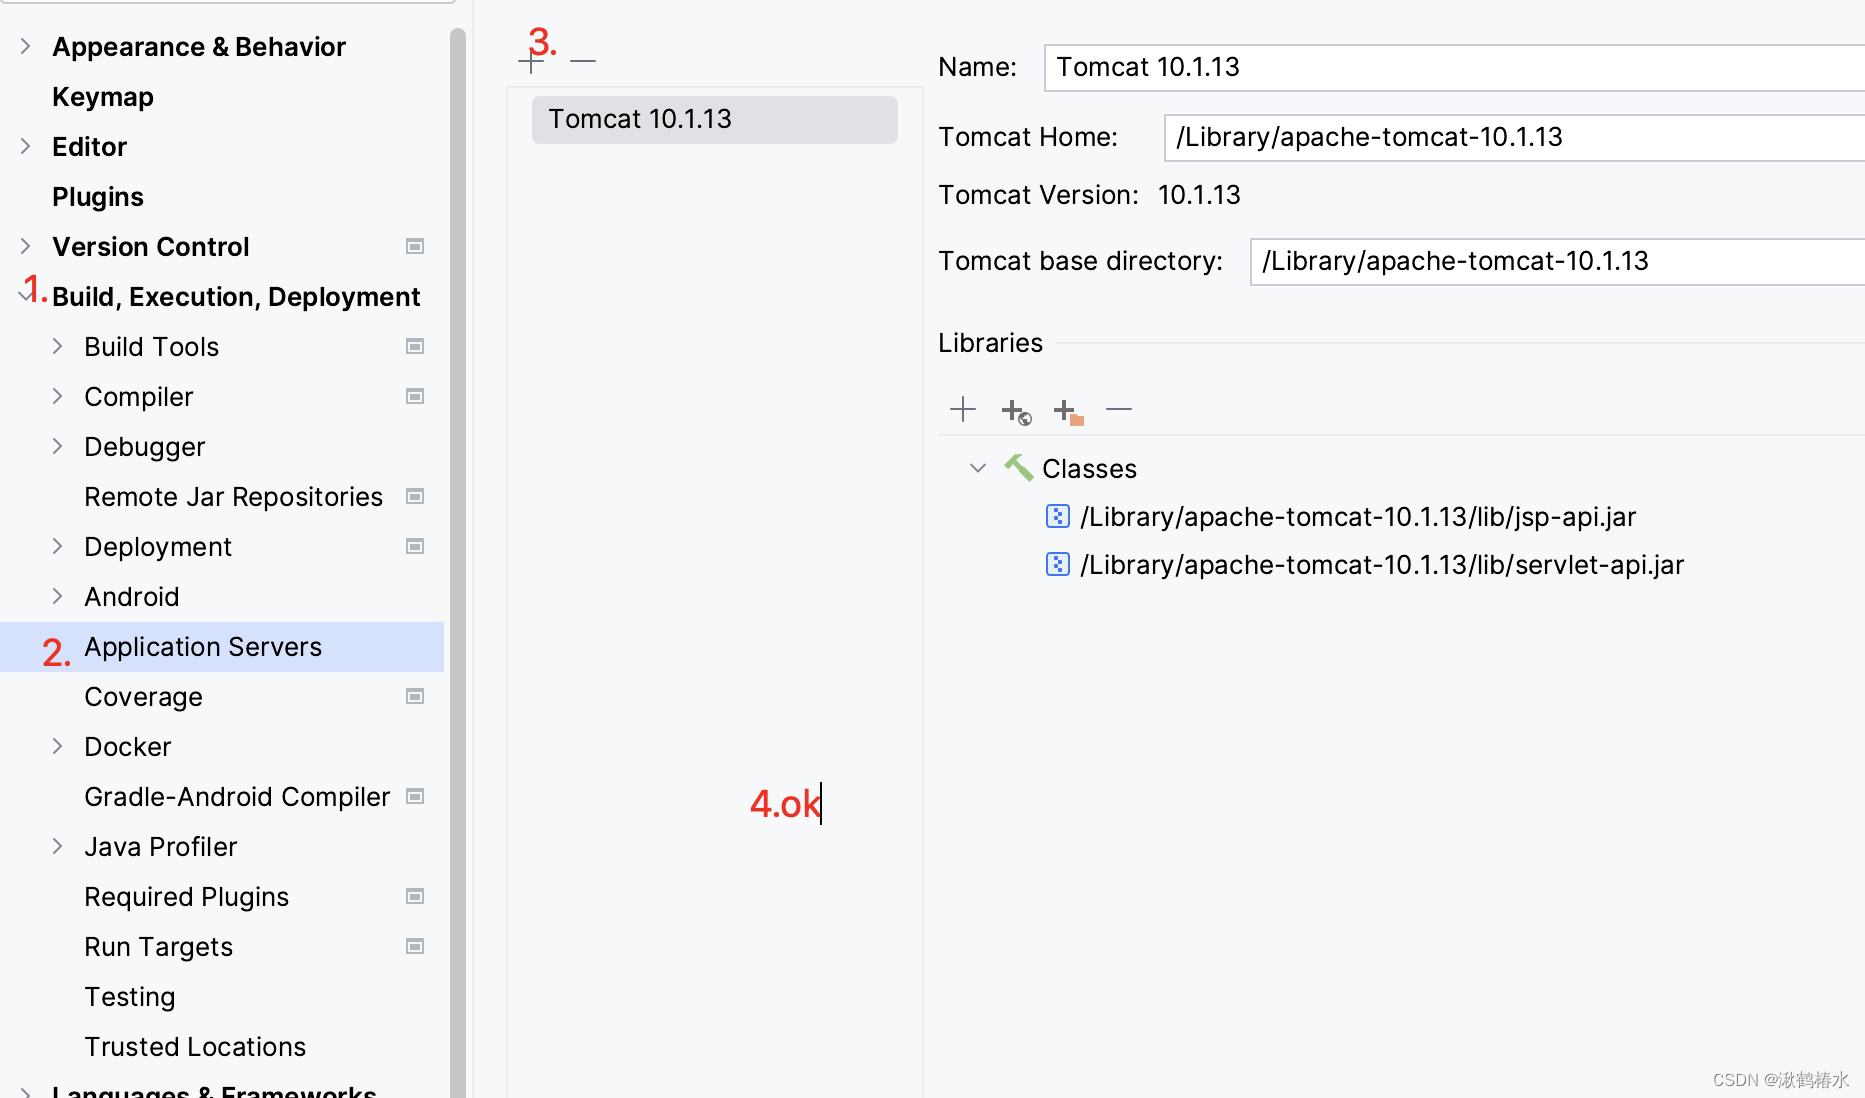
然后点击
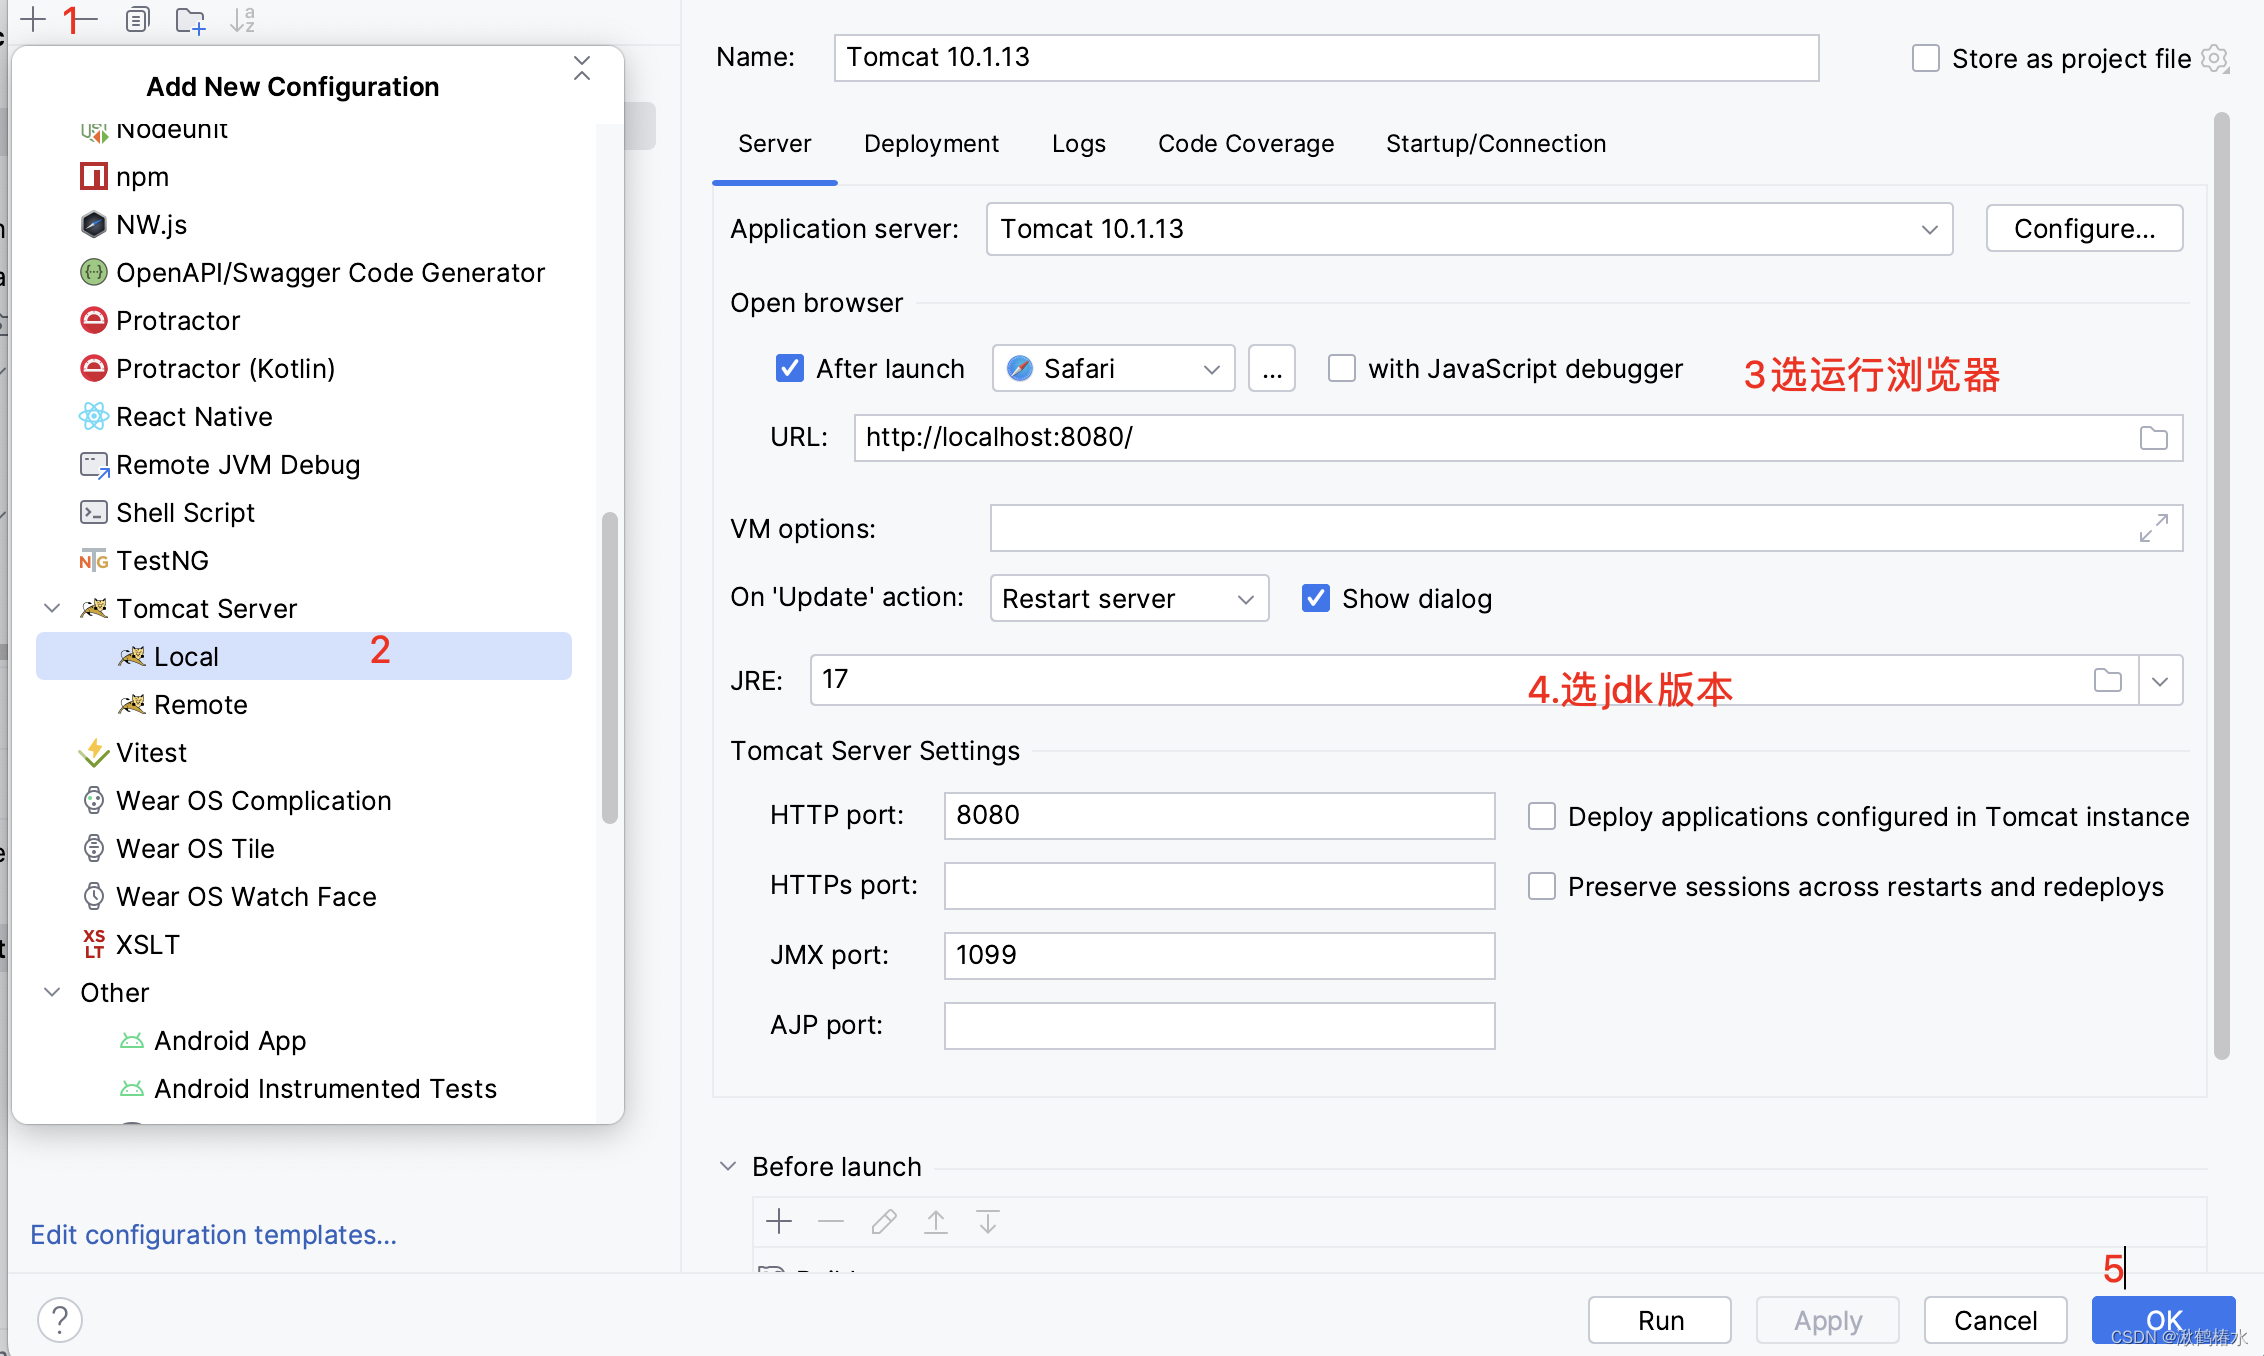
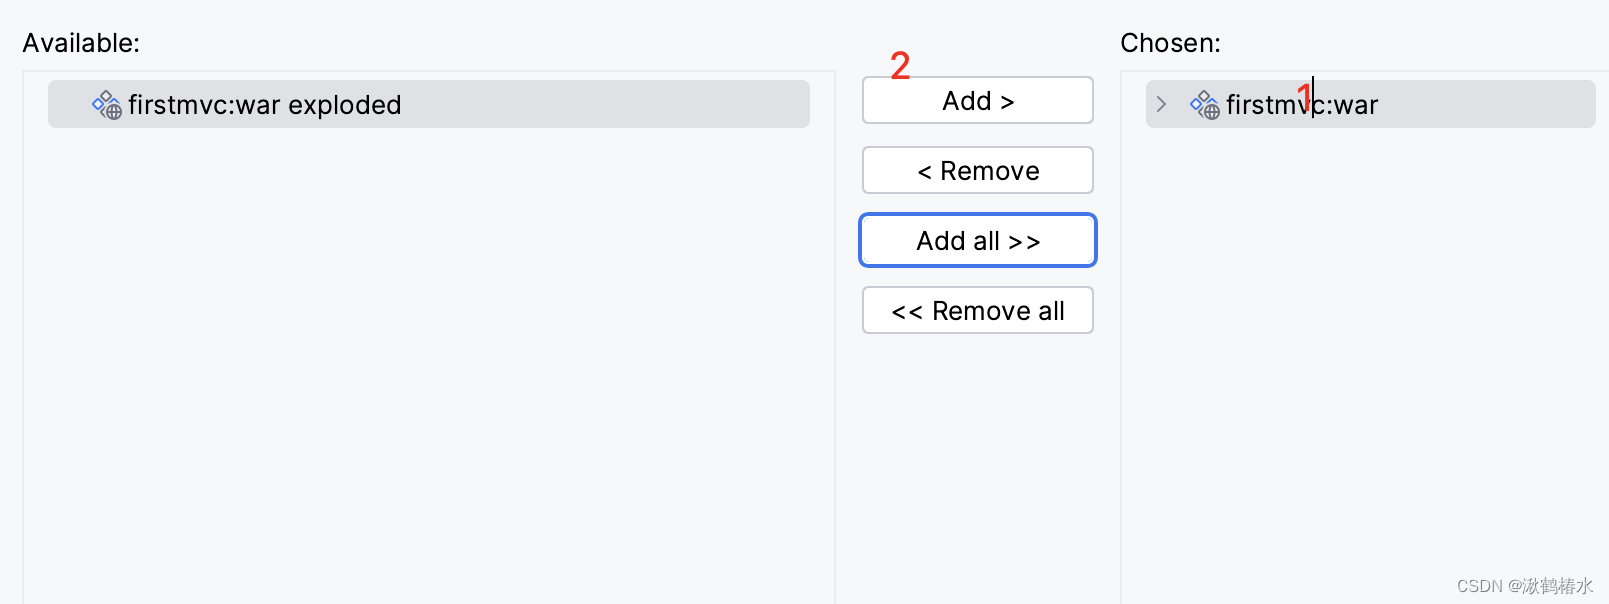
(三)部署项目

二、springmvc原理介绍
(一)底层处理逻辑图:
- springmvc是一个专门简化表述层数据接收和数据返回的框架
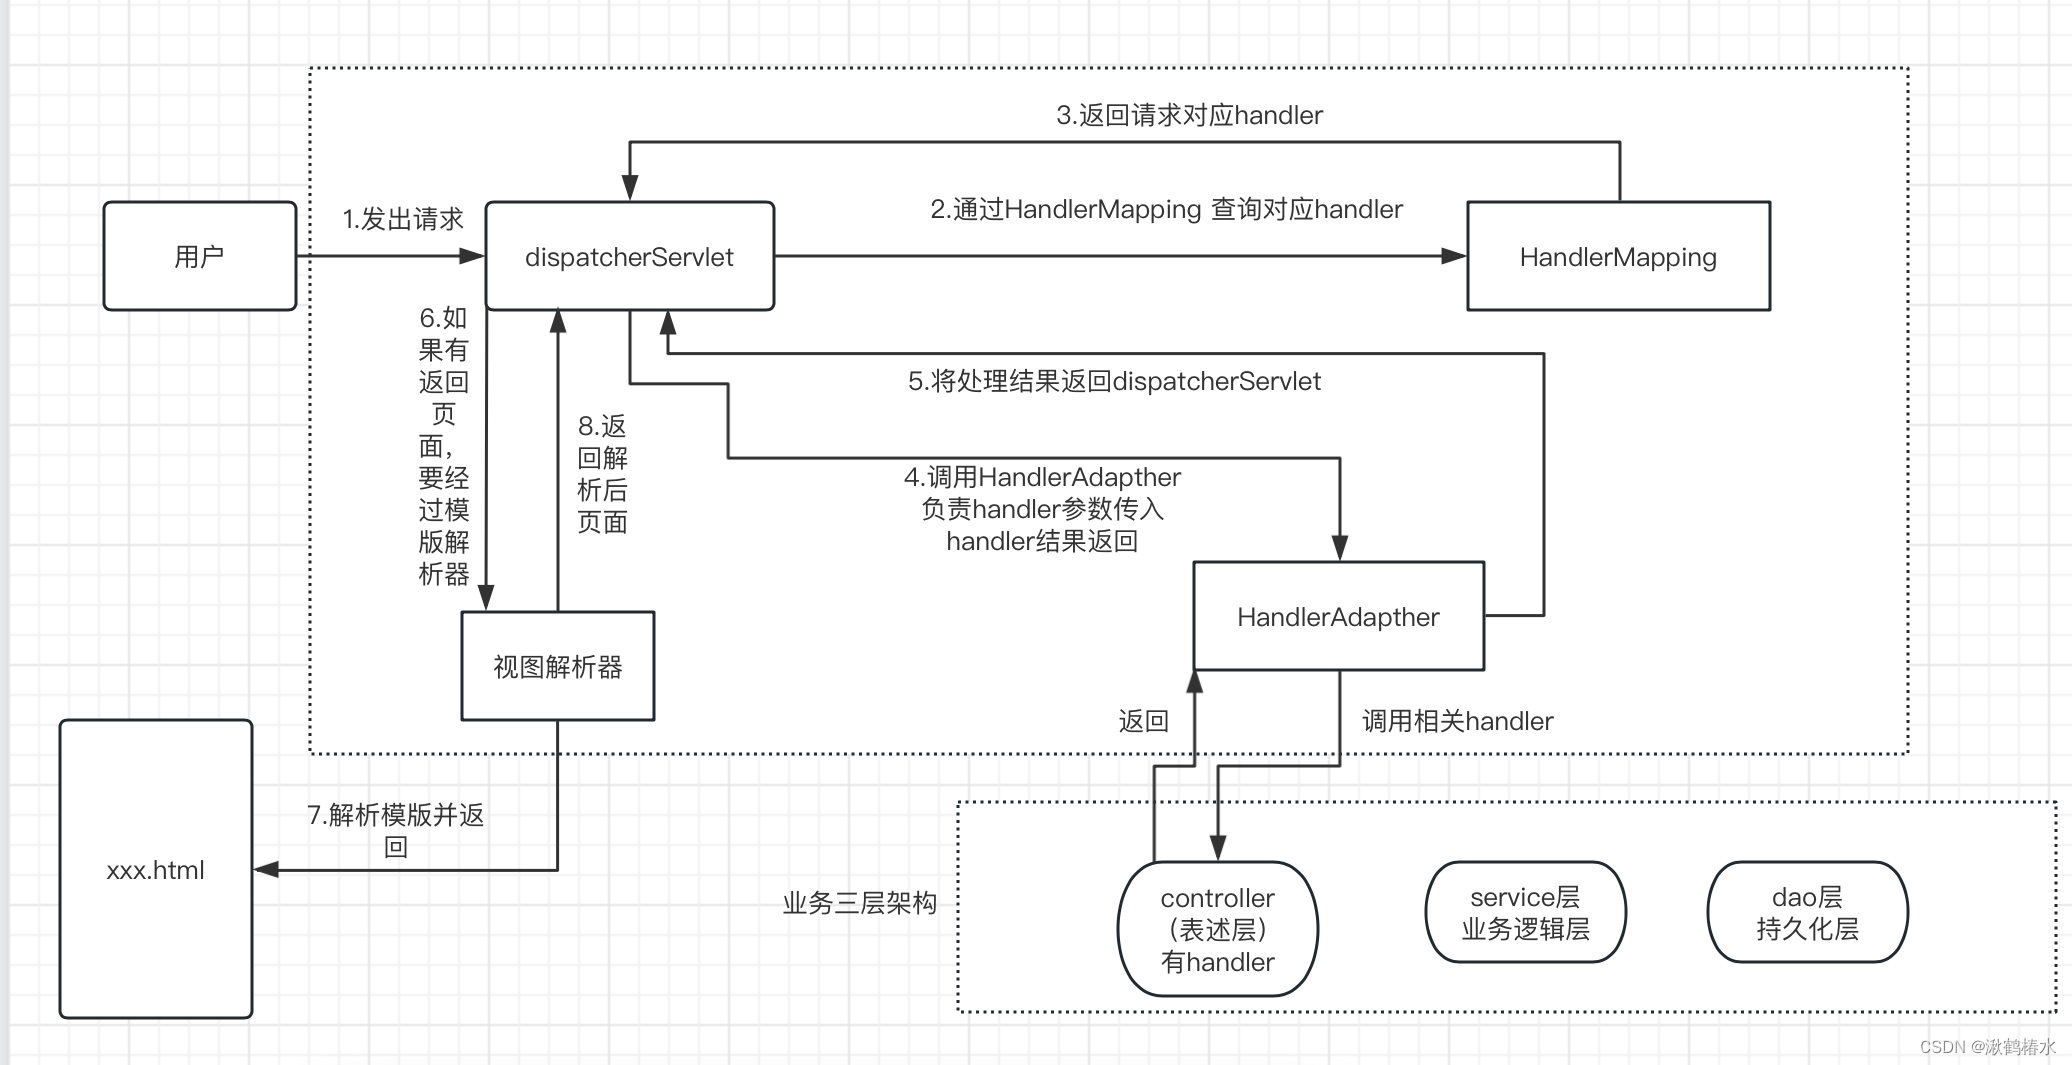
注:handler指的是方法
(二)环境搭建思路
- HandlerMapping HandlerAdapter 以及视图解析器(选引)的引入ioc容器
- 同时controller层的handler也需要引入ioc容器
- ioc容器的配置使用配置类实现
- dispatcherServlet需要被指定为servlet,且要指定拦截路径
(三)开整!
A、首先引入相关依赖
<dependencies>
    <dependency>
      <!--引入ioc容器-->
      <groupId>org.springframework</groupId>
      <artifactId>spring-context</artifactId>
    </dependency>
    <dependency>
      <!--引入web工程必备地servlet,这地址是迁移后的地址
      dispatcherServlet也是对原生servlet的封装-->
      <groupId>jakarta.platform</groupId>
      <artifactId>jakarta.jakartaee-web-api</artifactId>
    </dependency>
    <dependency>
      <!--引入webmvc的依赖,里面包括四大组件的实例-->
      <groupId>org.springframework</groupId>
      <artifactId>spring-webmvc</artifactId>
    </dependency>
    <dependency>
      <!--引入的java数据转换成json串的依赖,没有该依赖,spring无法转换json串-->
      <groupId>com.fasterxml.jackson.core</groupId>
      <artifactId>jackson-databind</artifactId>
      <version>2.15.1</version>
    </dependency>
  </dependencies>
B、ioc容器的配置类(在配置类中注入Mapping和adapter)
@Configuration//标注为配置类
@ComponentScan("com.chenpei.controllers")//开启包扫描,将controller层加入ioc容器,方便mvc调里面的handler
public class IocXmlMe {
    //将HandlerAdapter加入容器
    @Bean
    public RequestMappingHandlerAdapter handlerAdapter(){
        return new RequestMappingHandlerAdapter();
    }
    //将HandlerMapping注入容器
    @Bean
    public RequestMappingHandlerMapping handlerMapping(){
        return new RequestMappingHandlerMapping();
    }

}
C、在代替web.xml的类中声明dispatcherServlet的拦截路径,及要加载的ioc容器配置类(这个类会帮我们加载ioc容器和配置servlet)
//实现指定类,代替web.xml文件中对servlet的指定和默认路径的配置,同时可以帮助我们加载ioc容器
public class MyDispatcherInit extends AbstractAnnotationConfigDispatcherServletInitializer {
    @Override
    protected Class<?>[] getRootConfigClasses() {
        return new Class[0];
    }
   //指定要加载的ioc容器
    @Override
    protected Class<?>[] getServletConfigClasses() {
        return new Class[]{IocXmlMe.class};
    }
//指定mvc中dispatcher的拦截路径
    @Override
    protected String[] getServletMappings() {
        return new String[]{"/"};
    }
}
D、创建controller并在其中声明handler和mapping要绑定的地址:
@Controller//注入容器
public class MyController {
    @RequestMapping("mytest")//让mapping对象找到相关路径并报告dispatcherServlet
    @ResponseBody()//让方法返回值为json串,不交给视图解析器
    public String giveTextTo(){
        return "i am superman!";
    }
}
E、最后测试路径localhost:8080/mytest:

三、spring是如何用类来代替web.xml文件的?
(一)AbstractAnnotationConfigDispatcherServletInitializer抽象类的继承结构(带替配置文件的类要继承该类):
- 第一层自定义web.xml的替代类,继承AbstractAnnotationConfigDispatcherServletInitializer
- 第二层类:AbstractAnnotationConfigDispatcherServletInitializer,其继承了第三层
- 第三层类:AbstractDispatcherServletInitializer,其继承了第四层
- 第四层类:AbstractContextLoaderIntializer,其实现了最终层接口
- 第五层接口:WebApplicationInitializer
(二)从最终层说起(service和dao层的ioc容器如何被创建)
A、最终层只用一个方法:
void onStartup(ServletContext servletContext) throws ServletException;该方法会在web项目启动时就被调用,所以可以利用此方法进行ioc容器的初始化,以及dispatcherServlet的创建及拦截路径的指定等web.xml所做的工作。
B、第四层中实现了onStartup的结构
public void onStartup(ServletContext servletContext) throws ServletException {
        this.registerContextLoaderListener(servletContext);
    }
他在中间调用了自身的另一个方法registerContextLoaderListener(将servlet Context)参数传入
protected void registerContextLoaderListener(ServletContext servletContext) {
        WebApplicationContext rootAppContext = this.createRootApplicationContext();
//上面是需要关注的一步,这里创建了一个webApplicationContext,即ioc容器,调用了createRootApplicationContext方法创建的
        if (rootAppContext != null) {
            ContextLoaderListener listener = new ContextLoaderListener(rootAppContext);
            listener.setContextInitializers(this.getRootApplicationContextInitializers());
            servletContext.addListener(listener);
        } else {
            this.logger.debug("No ContextLoaderListener registered, as createRootApplicationContext() did not return an application context");
        }

    }
createRootApplicationContext方法在其自身被声明成了抽象方法:
protected abstract WebApplicationContext createRootApplicationContext();所以我们需要找到其实现(在第二层中同名方法)
protected WebApplicationContext createRootApplicationContext() {
        Class<?>[] configClasses = this.getRootConfigClasses();
//上面通过调用getRootConfigClasses方法找到到了第一层我们自己实现的方法,返回的是我们自己的ioc容器配置类的class对象。
        if (!ObjectUtils.isEmpty(configClasses)) {
//这里判断配置类是否存在,如果存在就创建一个容器AnnotationConfigWebApplication。
            AnnotationConfigWebApplicationContext context = new AnnotationConfigWebApplicationContext();
            context.register(configClasses);
            return context;
        } else {
            return null;
        }
}下面显示第一层我们自己传入的类的方法:
@Override
    protected Class<?>[] getRootConfigClasses() {
        return new Class[0];
}//这里内容为空,是因为这个是用来配置放service层和dao层ioc容器的配置类,上面例子暂时还没用到,故现在返回的是null。(三)从第四层说起(dispatcherServlet的创建和指定拦截路径的实现)
A、第四层中onStartup方法主要作用见上:
public void onStartup(ServletContext servletContext) throws ServletException {
        this.registerContextLoaderListener(servletContext);
    }
上面方法所经历的就是创建service层和dao层ioc容器的过程:故仅作引子,我们进入第三层中的onstartup方法
B、第三层中的onStartup方法:
public void onStartup(ServletContext servletContext) throws ServletException {
        super.onStartup(servletContext);//调用第五层的方法
        this.registerDispatcherServlet(servletContext);
          //顾名思义这里是初始化dispatcherServlet的方法
}C、上面的registerDispatcherServlet方法在其自身,如下:
protected void registerDispatcherServlet(ServletContext servletContext) {
        String servletName = this.getServletName();
        Assert.state(StringUtils.hasLength(servletName), "getServletName() must not return null or empty");
        WebApplicationContext servletAppContext = this.createServletApplicationContext();
        Assert.state(servletAppContext != null, "createServletApplicationContext() must not return null");
        FrameworkServlet dispatcherServlet = this.createDispatcherServlet(servletAppContext);
//如上是关键步骤一:创建dispatcherServlet对象,调用的createDispatcherServlet方法中又有玄机
        Assert.state(dispatcherServlet != null, "createDispatcherServlet(WebApplicationContext) must not return null");
        dispatcherServlet.setContextInitializers(this.getServletApplicationContextInitializers());
        ServletRegistration.Dynamic registration = servletContext.addServlet(servletName, dispatcherServlet);
        if (registration == null) {
            throw new IllegalStateException("Failed to register servlet with name '" + servletName + "'. Check if there is another servlet registered under the same name.");
        } else {
//一些关于dispatcherServlet相关配置的操作
            registration.setLoadOnStartup(1);
//关键步骤二,从我们自己实现的getServletMappings中拿到返回值(要拦截的路径)
            registration.addMapping(this.getServletMappings());
            registration.setAsyncSupported(this.isAsyncSupported());
            Filter[] filters = this.getServletFilters();
            if (!ObjectUtils.isEmpty(filters)) {
                Filter[] var7 = filters;
                int var8 = filters.length;

                for(int var9 = 0; var9 < var8; ++var9) {
                    Filter filter = var7[var9];
                    this.registerServletFilter(servletContext, filter);
                }
            }

            this.customizeRegistration(registration);
        }
}(四)从第三层说起(Controller层和web相关组件放置的ioc容器的创建)
A、让我们回到第三层的onStartup方法:
public void onStartup(ServletContext servletContext) throws ServletException {
        super.onStartup(servletContext);
        this.registerDispatcherServlet(servletContext);
    }
关于其中registerDispatcherServlet方法的主要功能,创建dispatcherServlet和指定其拦截路径上面已经分析过
B、但该方法中同样创建了ioc容器(注释位置)
protected void registerDispatcherServlet(ServletContext servletContext) {
        String servletName = this.getServletName();
        Assert.state(StringUtils.hasLength(servletName), "getServletName() must not return null or empty");
        WebApplicationContext servletAppContext = this.createServletApplicationContext();
//这里调用createServletApplicationContext方法创建了ioc容器
        Assert.state(servletAppContext != null, "createServletApplicationContext() must not return null");
        FrameworkServlet dispatcherServlet = this.createDispatcherServlet(servletAppContext);
        Assert.state(dispatcherServlet != null, "createDispatcherServlet(WebApplicationContext) must not return null");
        dispatcherServlet.setContextInitializers(this.getServletApplicationContextInitializers());
        ServletRegistration.Dynamic registration = servletContext.addServlet(servletName, dispatcherServlet);
        if (registration == null) {
            throw new IllegalStateException("Failed to register servlet with name '" + servletName + "'. Check if there is another servlet registered under the same name.");
        } else {
            registration.setLoadOnStartup(1);
            registration.addMapping(this.getServletMappings());
            registration.setAsyncSupported(this.isAsyncSupported());
            Filter[] filters = this.getServletFilters();
            if (!ObjectUtils.isEmpty(filters)) {
                Filter[] var7 = filters;
                int var8 = filters.length;

                for(int var9 = 0; var9 < var8; ++var9) {
                    Filter filter = var7[var9];
                    this.registerServletFilter(servletContext, filter);
                }
            }

            this.customizeRegistration(registration);
        }
    }
里面的createServletApplicationContext再其自身声明为抽象方法
protected abstract WebApplicationContext createServletApplicationContext();其实现在第二层中的同名方法:
 protected WebApplicationContext createServletApplicationContext() {
        AnnotationConfigWebApplicationContext context = new AnnotationConfigWebApplicationContext();
//new出ioc容器
        Class<?>[] configClasses = this.getServletConfigClasses();
//注意:这里通过反射拿到了我们再第一层声明的ioc容器(该容器配置是专供controoler和mvc使用的)配置类的Class
        if (!ObjectUtils.isEmpty(configClasses)) {
            context.register(configClasses);
        }

        return context;
    }
(五)从第一层纵观其他层:(总结)
至此,我们完整分析了,第一层中,三个方法的实现分别在什么时刻调用
public class MyDispatcherInit extends AbstractAnnotationConfigDispatcherServletInitializer {
    @Override
    protected Class<?>[] getRootConfigClasses() {
        return new Class[0];
    }//调用时刻见(二)从最终层说起
   //指定要加载的ioc容器
    @Override
    protected Class<?>[] getServletConfigClasses() {
        return new Class[]{IocXmlMe.class};
    }//调用时刻见(四)从第三层说起
//指定mvc中dispatcher的拦截路径
    @Override
    protected String[] getServletMappings() {
        return new String[]{"/"};
    }//调用时刻见(三)从第四层说起
}
四、springmvc接收数据
(一)注解@RequestMapping设置请求路径和请求方式
A、@RequestMapping一共有两个属性值:value专门设置对应方法或类的指定路径,method用来设置请求的方式:post,get,put,delete四种请求(后两种是spring特有的)
- 当不指定method时,则直接写字符串就是value值:
@RequestMapping("mytest")- 路径设置有精确和模糊之分:
精确比如:mytest/a/b
模糊路径匹配:mytest/* 省略号mytest后一级路径,可匹配路径如:mytest/a
mytest/** 省略mytest后多级路径,可匹配路径只需要开头是mytest即可。
- @RequestMapping既可以标注在方法上,也可以标在controller类上;
- 标在类上的路径会和标在方法上的路径拼接构成方法的真正映射路径。
- 路径指定时路径前第一个/可以省略。
B、四个固定请求方式映射的注解
- @GetMapping相当于method指定了Get方式
- @PostMapping
- @PutMapping
- @DeleteMapping
- 这四个方法只能在方法上用
(二)参数的接收
A、传参的两种类型:param和json的区别
- 所用编码格式:param用的是ascii编码;json用的是utf-8,兼容性更好
- 顺序要求:param键值对之间用&连接,没有顺序要求,json内部有复杂结构,数据是有序的。
- 层级复杂性:param仅仅是单层数据结构,而json是多层的,可以标识对象{},数组[]等多样化结构。
- 可读性来讲,当传入数据层级比较复杂时,json的可读性会更好。
- 综上,json是传参首选。
B、param方式传参的接收:
- 情况一:当前端所传数据key值跟handler中参数名一致时,只需要在handler参数中声明好即可:
handler内容:
@RequestMapping("mytest")
    @ResponseBody//让方法返回值为json串,不交给视图解析器
    public String giveTextTo(String name, int age){
        //接收到参数后输入到终端:
        System.out.println("name " + name + "age " + age);
        return "i am superman";
    }
传参形式:
localhost:8080/mytest?name=姬小满&age=34注:这种默认名对传参的方式,不要求handler中声明的参数都实际接收到,可以为空。
- 情况二:当传入参数的key值和handler中参数名不一致时,可以使用@RequestParam注解指定要接收的数据key名字,同时要求必传(默认值,可修改),不传会报400错误。
handler参数方:
@GetMapping("gettest")
    @ResponseBody//给第一个参数设置了非必需,同时设置了默认值,第二个参数为只填写指定key值,默认必须传入
    public String getTest(@RequestParam(value = "name",defaultValue="超人强",required=false)String myName,@RequestParam("age") int myAge){
        //接收到参数后输出到终端
        System.out.println("myAge " + myAge + "myName " + myName);
        return "me";
    }
发送方:
http://localhost:8080/gettest?name=姬小满&age=34- 情况三:当发送方发送多个统一key值的数据,可以在handler端直接用集合接收,集合名字跟key值一样,或通过@RequestParam指定(用集合接收同key参数,该注解必备,否则报错)
接收端:
  @RequestMapping("testList")
    @ResponseBody
    public String testListGet(@RequestParam String names){
        //输出接收到的数据
        System.out.println("names " + names);
        return "ok";
    }
发送端:
http://localhost:8080/testList?names=姬小满&names=超人强&names=风雅送- 情况四:用参数接收数据:
创建一个实体类Person,中间有name,age属性,同时有getter和setter,重写了toString方法
handler内容:
@RequestMapping("objectTest")
    @ResponseBody
    public String objectTest(Person person){
        System.out.println(person);
        return "ok";
    }
发送方:
http://localhost:8080/objectTest?name=姬小满&age=18要求:对象中属性名一定要跟key值相对应,默认值通过在类中声明来定。
C、路径方式传参与接收
- 路径传参的接收:
- 在@RequestMapping的路径信息中声明好参数传入位置,同时为参数设置key值
- 在接收的参数前使用注解@PathVariable注解,表明使用路径传参方式
- @PathVariable注解也有value和required属性来指定要接收参数的key值和是否必须传入。
- 例子:
传参方(注意路径传参方式的变化):
http://localhost:8080/myPathTest/宵宫/18接收参数方:
    @RequestMapping("myPathTest/{name}/{age}")
    @ResponseBody//让方法返回值为json串,不交给视图解析器,此方法也可放在类上全部生效
    public String myPathTest(@PathVariable String name, @PathVariable("age") int myAge){
        //接收到参数后输入到终端:
        System.out.println("name " + name + "age " + myAge);
        return "ok";
    }
D、json形式参数的接收
- 前置处理:
- 因为json本就是前端的数据格式,java原生api没有处理json数据的能力,所以我们要引入依赖,增加json数据转化成java数据格式的能力。
 <dependency>
      <groupId>com.fasterxml.jackson.core</groupId>
      <artifactId>jackson-databind</artifactId>
      <version>2.15.1</version>
    </dependency>
2.将转化器给到HandlerAdapter(专门处理传参的Spring组件),只需要在ioc配置类上加上注解@EnableWebMvc即可
@EnableWebMvc
@Configuration//标注为配置类
@ComponentScan("com.chenpei.controllers")//开启包扫描,将controller层加入ioc容器,方便mvc调里面的handler
public class IocXmlMe {/*...*/}- 参数接收方例子:
 //发送json请求必须使用post方式
    @RequestMapping(value ="objectTest", method=RequestMethod.POST)
    @ResponseBody
    //添加RequestBody表明接收的是请求体数据(json)
    public String objectTest(@RequestBody Person person){
        System.out.println(person);
        return "ok";
    }
E、接收Cookie值(请求头中的特殊内容)
要用到的注解@CookieValue标注到参数上
- 要在本地加上cookie键值对,可以直接在浏览器加,这里通过服务器给浏览器发送,发送cookie值的方式如下:
 //向本地浏览器添加cookie
    @GetMapping("saveCookie")
    @ResponseBody
    public String saveCookie(HttpServletResponse response){
        Cookie myCookie = new Cookie("myCookie","239809Love");
        //调用原生response对象返回cookie值
        response.addCookie(myCookie);
        return "cookie save ok";
    }
当访问路径saveCookie就会发送cookie值到前端。
- Cookie值的接收:
 @RequestMapping("/getCookie")
    @ResponseBody
    public String objectTest(@CookieValue("myCookie") String myCookie){
        System.out.println("cookie值是:" + myCookie);
        return "ok";
    }
F、接收其他类型的请求头数据:
- 在参数前加上@RequestHeader("要得到的请求头的key")
- 没有感情全是技巧
G、在Handler中使用web原生常用对象
- HttpServletRequest、HttpServletResponse可以直接声明在参数中,即可使用。
- ServletContext获取两种方式:
- 通过HttpServletRequest对象获取:
httpServletRequest.getSession().getServletContext()2. 直接在Controller类中声明ServletContext属性,使用全局自动注入:
在web进行初始化时会自动将ServletContext注入到容器
     @Autowired
ServletContext myServletContext;- 上面两种方式都可以进行请求与请求之间的数据共享:
- HttpServletRequest对象直接使用(范围:一次请求)
httpServletRequest.setAttribute("键值","数据值");- ContextServlet面向整个工程:
myServletContext.setAttribute("键值","数据值");H、spring提供的用于存放数据和视图名的对象:model和modelandview
ModelAndView model = new ModelAndView();
        //设置视图的名字:
        model.setViewName("index");
        //设置要传递的数据
        model.addObject("键值","内容值");
//该对象可以作为返回对象返回,能够被视图解析器识别,返回客户端指定视图
  Model model = new ConcurrentModel();
        model.addAttribute("键值","值");


 884
884


 被折叠的 条评论
为什么被折叠?
被折叠的 条评论
为什么被折叠?
 到【灌水乐园】发言


