


本文打算对spring的事务做详细分析,带大家一起探讨一下spring事务的设计原理和底层实现,希望这篇文章能够让你有所收获。
一、开启事务功能
1、spring开启事务
有些朋友的公司可能还没有使用springboot,这里我介绍一下spring的事务开启。当然,我主要介绍的是基于注解的方式配置spring事务,由于基于xml的方式相对来说有些繁琐,并且比较古老,我在这里就不做赘述了。
基于注解的方法使用起来非常简单,使@EnableTransactionManagement 注解就可以开启事务功能。
@Target(ElementType.TYPE)@Retention(RetentionPolicy.RUNTIME)@Documented@Import(TransactionManagementConfigurationSelector.class)public @interface EnableTransactionManagement {/*** true:cglib代理 false:jdk动态代理*/boolean proxyTargetClass() default false;/*** PROXY:代理的通知模式 ASPECTJ:ASPECTJ的通知模式*/AdviceMode mode() default AdviceMode.PROXY;/*** 如果存在多个切换时可以指定执行顺序*/int order() default Ordered.LOWEST_PRECEDENCE;} 接下来重点看一下TransactionManagementConfigurationSelector类 public class TransactionManagementConfigurationSelector extends AdviceModeImportSelector<EnableTransactionManagement> { @Overrideprotected String[] selectImports(AdviceMode adviceMode) {switch (adviceMode) {case PROXY:return new String[] {AutoProxyRegistrar.class.getName(),ProxyTransactionManagementConfiguration.class.getName()};case ASPECTJ:return new String[] {TransactionManagementConfigUtils.TRANSACTION_ASPECT_CONFIGURATION_CLASS_NAME};default:return null;}}}
该方法逻辑比较简单,就是判断通知模式是 PROXY,还是ASPECTJ。我们重点介绍的是 PROXY模式,如果对ASPECTJ模式感兴趣的朋友,可以深入研究一下。
PROXY模式主要是要加载两个类:AutoProxyRegistrar和ProxyTransactionManagementConfiguration
先看一下AutoProxyRegistrar类
public class AutoProxyRegistrar implements ImportBeanDefinitionRegistrar {@Overridepublic void registerBeanDefinitions(AnnotationMetadata importingClassMetadata, BeanDefinitionRegistry registry) {boolean candidateFound = false;//获取@EnableTransactionManagement上的所有注解属性类型Set<String> annoTypes = importingClassMetadata.getAnnotationTypes();for (String annoType : annoTypes) {//获取用户配置的注解属性AnnotationAttributes candidate = AnnotationConfigUtils.attributesFor(importingClassMetadata, annoType);if (candidate == null) {continue;}//获取通知模式Object mode = candidate.get("mode");//获取代理类型Object proxyTargetClass = candidate.get("proxyTargetClass");if (mode != null && proxyTargetClass != null && AdviceMode.class == mode.getClass() &&Boolean.class == proxyTargetClass.getClass()) {candidateFound = true;//如果是PROXY代理模式if (mode == AdviceMode.PROXY) {//注册aop入口类AopConfigUtils.registerAutoProxyCreatorIfNecessary(registry);if ((Boolean) proxyTargetClass) {AopConfigUtils.forceAutoProxyCreatorToUseClassProxying(registry);return;}}}}if (!candidateFound && logger.isWarnEnabled()) {String name = getClass().getSimpleName();}}}
看一下 registerAutoProxyCreatorIfNecessary方法
@Nullablepublic static BeanDefinition registerAutoProxyCreatorIfNecessary(BeanDefinitionRegistry registry) {return registerAutoProxyCreatorIfNecessary(registry, null);}@Nullablepublic static BeanDefinition registerAutoProxyCreatorIfNecessary(BeanDefinitionRegistry registry, @Nullable Object source) {return registerOrEscalateApcAsRequired(InfrastructureAdvisorAutoProxyCreator.class, registry, source);}
特别提醒一下,这里需要注册的类是:InfrastructureAdvisorAutoProxyCreator
@Nullableprivate static BeanDefinition registerOrEscalateApcAsRequired(Class<?> cls, BeanDefinitionRegistry registry, @Nullable Object source) {Assert.notNull(registry, "BeanDefinitionRegistry must not be null");//判断是否已经注册过aop的入口类了,如果已经注册过了则需要判断类的优先级if (registry.containsBeanDefinition(AUTO_PROXY_CREATOR_BEAN_NAME)) {//获取已经注册的aop入口类BeanDefinitionBeanDefinition apcDefinition = registry.getBeanDefinition(AUTO_PROXY_CREATOR_BEAN_NAME);//如果当前的入口类和已注册的入口类不一样if (!cls.getName().equals(apcDefinition.getBeanClassName())) {//获取已注册的入口类优先级int currentPriority = findPriorityForClass(apcDefinition.getBeanClassName());//获取当前入口类优先级int requiredPriority = findPriorityForClass(cls);//如果已注册的入口类优先级小于当前入口类优先级if (currentPriority < requiredPriority) {//用当前入口类替换已注册的入口类apcDefinition.setBeanClassName(cls.getName());}}return null;}//实例化beanDefinitionRootBeanDefinition beanDefinition = new RootBeanDefinition(cls);beanDefinition.setSource(source);beanDefinition.getPropertyValues().add("order", Ordered.HIGHEST_PRECEDENCE);//设置role为ROLE_INFRASTRUCTUREbeanDefinition.setRole(BeanDefinition.ROLE_INFRASTRUCTURE);//将beanDefinition注册到spring容器registry.registerBeanDefinition(AUTO_PROXY_CREATOR_BEAN_NAME, beanDefinition);return beanDefinition;}
这个方法也比较简单,就是注册aop入口类。先判断如果spring容器中已有aop入口类,则跟当前的aop入口类比较优先级,如果当前aop入口类的优先级大于已有的,则注册当前类(即InfrastructureAdvisorAutoProxyCreator
)作为新的aop入口类。
❝这里引出一个问题:
使用@EnableAspectJAutoProxy注解开启AOP时,有自己的入口类:
AnnotationAwareAspectJAutoProxyCreator,这个入口类和@EnableTransactionManagement注解引入的入口类:❞
InfrastructureAdvisorAutoProxyCreator哪个的优先级更高?
接下来看一下这个aop入口类:InfrastructureAdvisorAutoProxyCreator
public class InfrastructureAdvisorAutoProxyCreator extends AbstractAdvisorAutoProxyCreator {@Nullableprivate ConfigurableListableBeanFactory beanFactory;@Overrideprotected void initBeanFactory(ConfigurableListableBeanFactory beanFactory) {super.initBeanFactory(beanFactory);this.beanFactory = beanFactory;}@Overrideprotected boolean isEligibleAdvisorBean(String beanName) {return (this.beanFactory != null && this.beanFactory.containsBeanDefinition(beanName) &&this.beanFactory.getBeanDefinition(beanName).getRole() == BeanDefinition.ROLE_INFRASTRUCTURE);}}isEligibleAdvisorBean方法在aop中是用来判断 切面是否合格的,这里判断了beanDefinition的role属性是否为BeanDefinition.ROLE_INFRASTRUCTURE,还记得上面我们介绍的registerOrEscalateApcAsRequired方法中
//设置role为ROLE_INFRASTRUCTUREbeanDefinition.setRole(BeanDefinition.ROLE_INFRASTRUCTURE);有这一行代码,设置beanDefinition的role就是BeanDefinition.ROLE_INFRASTRUCTURE,所以会触发AOP的功能。
由于AOP的功能不是本文介绍的重点,有些细节在这里就不做过多赘述了。
接下来,看一下需要注册的另外一个类:ProxyTransactionManagementConfiguration
@Configurationpublic class ProxyTransactionManagementConfiguration extends AbstractTransactionManagementConfiguration {@Bean(name = TransactionManagementConfigUtils.TRANSACTION_ADVISOR_BEAN_NAME)@Role(BeanDefinition.ROLE_INFRASTRUCTURE)public BeanFactoryTransactionAttributeSourceAdvisor transactionAdvisor() {BeanFactoryTransactionAttributeSourceAdvisor advisor = new BeanFactoryTransactionAttributeSourceAdvisor();advisor.setTransactionAttributeSource(transactionAttributeSource());advisor.setAdvice(transactionInterceptor());if (this.enableTx != null) {advisor.setOrder(this.enableTx.<Integer>getNumber("order"));}return advisor;}@Bean@Role(BeanDefinition.ROLE_INFRASTRUCTURE)public TransactionAttributeSource transactionAttributeSource() {return new AnnotationTransactionAttributeSource();}@Bean@Role(BeanDefinition.ROLE_INFRASTRUCTURE)public TransactionInterceptor transactionInterceptor() {TransactionInterceptor interceptor = new TransactionInterceptor();interceptor.setTransactionAttributeSource(transactionAttributeSource());if (this.txManager != null) {interceptor.setTransactionManager(this.txManager);}return interceptor;}}从上面可以看出来,ProxyTransactionManagementConfiguration是一个配置类,它主要定义了:BeanFactoryTransactionAttributeSourceAdvisor、TransactionAttributeSource 和 TransactionInterceptor 三个bean。其中BeanFactoryTransactionAttributeSourceAdvisor包含了TransactionAttributeSource 和 TransactionInterceptor 。
如果大家熟悉spring的aop的话,肯定知道一般切面advisor由pointcut 和 advice 组成。
而TransactionInterceptor实现了Advice接口。
Advice有了,那么pointcut从哪里来呢?
我们看一下BeanFactoryTransactionAttributeSourceAdvisor类本身。
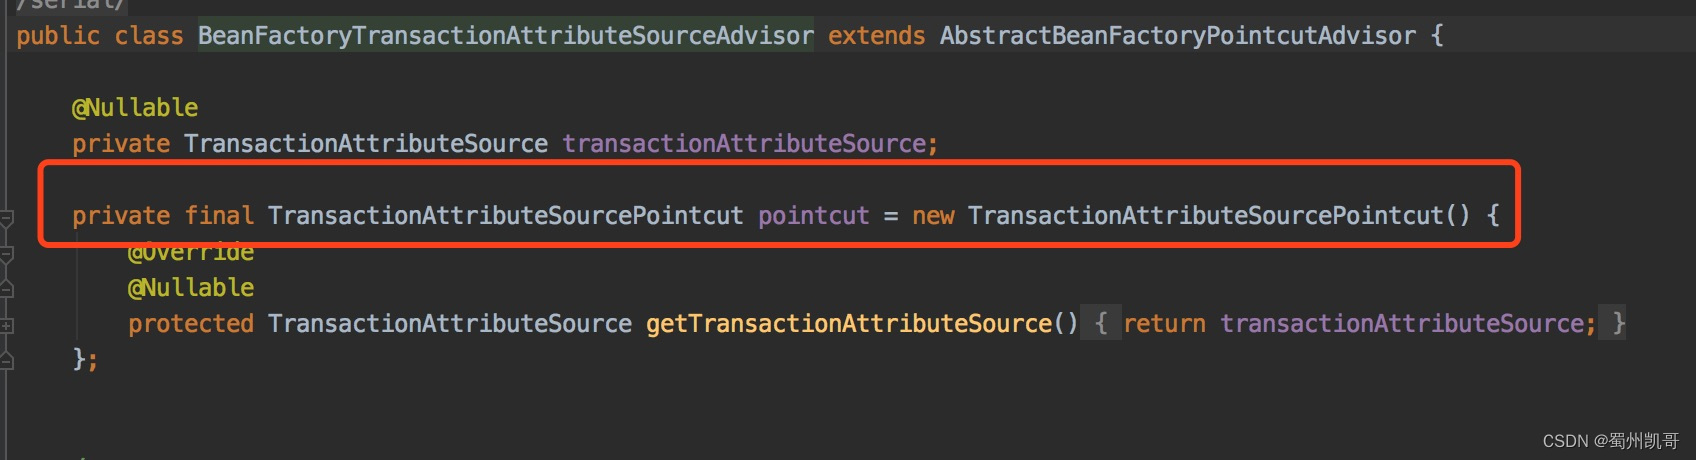
可以看到这个类里面就定义了TransactionAttributeSourcePointcut对象。
有了这些功能,事务切面可以正常运行了。
回头再看看定义advisor bean实例的时候,使用了@Role(BeanDefinition.ROLE_INFRASTRUCTURE)注解,这样可以确保在使用AOP功能时能够正确的匹配到事务的advisor
AnnotationTransactionAttributeSource类有什么用?
它里面包含了事务注解解析器,说简单点它是用于解析事务注解属性的。

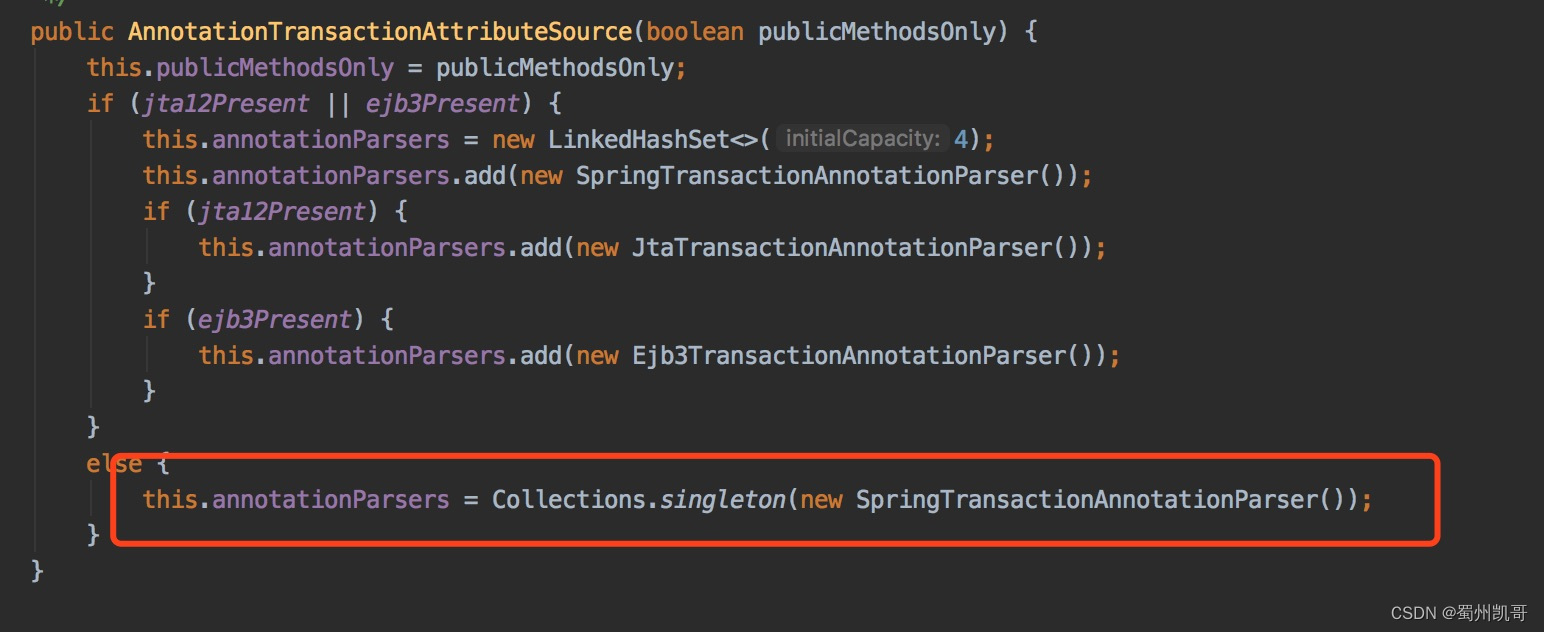
构造方法中会默认初始化 SpringTransactionAnnotationParser类,
public class SpringTransactionAnnotationParser implements TransactionAnnotationParser, Serializable {@Override@Nullablepublic TransactionAttribute parseTransactionAnnotation(AnnotatedElement element) {AnnotationAttributes attributes = AnnotatedElementUtils.findMergedAnnotationAttributes(element, Transactional.class, false, false);if (attributes != null) {return parseTransactionAnnotation(attributes);}else {return null;}}public TransactionAttribute parseTransactionAnnotation(Transactional ann) {return parseTransactionAnnotation(AnnotationUtils.getAnnotationAttributes(ann, false, false));}protected TransactionAttribute parseTransactionAnnotation(AnnotationAttributes attributes) {RuleBasedTransactionAttribute rbta = new RuleBasedTransactionAttribute();Propagation propagation = attributes.getEnum("propagation");rbta.setPropagationBehavior(propagation.value());Isolation isolation = attributes.getEnum("isolation");rbta.setIsolationLevel(isolation.value());rbta.setTimeout(attributes.getNumber("timeout").intValue());rbta.setReadOnly(attributes.getBoolean("readOnly"));rbta.setQualifier(attributes.getString("value"));List<RollbackRuleAttribute> rollbackRules = new ArrayList<>();for (Class<?> rbRule : attributes.getClassArray("rollbackFor")) {rollbackRules.add(new RollbackRuleAttribute(rbRule));}for (String rbRule : attributes.getStringArray("rollbackForClassName")) {rollbackRules.add(new RollbackRuleAttribute(rbRule));}for (Class<?> rbRule : attributes.getClassArray("noRollbackFor")) {rollbackRules.add(new NoRollbackRuleAttribute(rbRule));}for (String rbRule : attributes.getStringArray("noRollbackForClassName")) {rollbackRules.add(new NoRollbackRuleAttribute(rbRule));}rbta.setRollbackRules(rollbackRules);return rbta;}@Overridepublic boolean equals(Object other) {return (this == other || other instanceof SpringTransactionAnnotationParser);}@Overridepublic int hashCode() {return SpringTransactionAnnotationParser.class.hashCode();}}我们可以看到它会解析@Transactional注解上的属性,并且封装到RuleBasedTransactionAttribute对象中。 TransactionInterceptor类有什么用?
它是真正执行事务功能的地方,后面我会用重点介绍。
spring基于注解事务开启的功能,先介绍到这里,下面我们一起看看springboot是如何开启事务的。
2、springboot自动开启事务
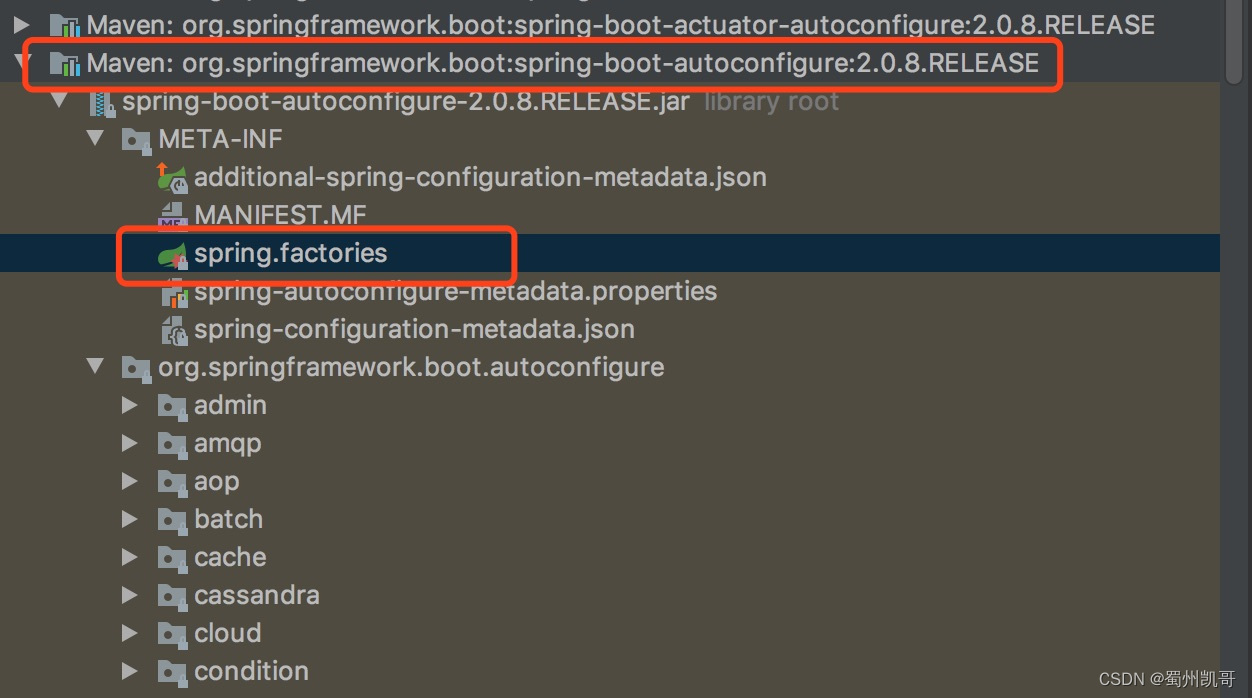
如上图,找到spring-boot-autoconfigure jar包META-INF目录下的spring.factories文件。
打开该文件
# Auto Configureorg.springframework.boot.autoconfigure.EnableAutoConfiguration=\org.springframework.boot.autoconfigure.admin.SpringApplicationAdminJmxAutoConfiguration,\org.springframework.boot.autoconfigure.aop.AopAutoConfiguration,\org.springframework.boot.autoconfigure.amqp.RabbitAutoConfiguration,\org.springframework.boot.autoconfigure.batch.BatchAutoConfiguration,\org.springframework.boot.autoconfigure.cache.CacheAutoConfiguration,\org.springframework.boot.autoconfigure.cassandra.CassandraAutoConfiguration,\......org.springframework.boot.autoconfigure.transaction.TransactionAutoConfiguration,\......
可以看到这个文件中key为
org.springframework.boot.autoconfigure.EnableAutoConfiguration=\的配置下面有一行
org.springframework.boot.autoconfigure.transaction.TransactionAutoConfiguration,\该类就是事务自动配置的核心代码,让我们一起看看这个类。
@Configuration@ConditionalOnClass(PlatformTransactionManager.class)@AutoConfigureAfter({ JtaAutoConfiguration.class, HibernateJpaAutoConfiguration.class,DataSourceTransactionManagerAutoConfiguration.class,Neo4jDataAutoConfiguration.class })@EnableConfigurationProperties(TransactionProperties.class)public class TransactionAutoConfiguration {//定义用户自定义的事务管理器@Bean@ConditionalOnMissingBeanpublic TransactionManagerCustomizers platformTransactionManagerCustomizers(ObjectProvider<List<PlatformTransactionManagerCustomizer<?>>> customizers) {return new TransactionManagerCustomizers(customizers.getIfAvailable());}@Configuration@ConditionalOnSingleCandidate(PlatformTransactionManager.class)public static class TransactionTemplateConfiguration {private final PlatformTransactionManager transactionManager;public TransactionTemplateConfiguration(PlatformTransactionManager transactionManager) {this.transactionManager = transactionManager;}//定义TransactionTemplate,用它做编程式事务开发@Bean@ConditionalOnMissingBeanpublic TransactionTemplate transactionTemplate() {return new TransactionTemplate(this.transactionManager);}}@Configuration@ConditionalOnBean(PlatformTransactionManager.class)@ConditionalOnMissingBean(AbstractTransactionManagementConfiguration.class)public static class EnableTransactionManagementConfiguration {//proxy-target-class=false表示配置了jdk动态代理//则使用注解EnableTransactionManagement的时候proxyTargetClass = false@Configuration@EnableTransactionManagement(proxyTargetClass = false)@ConditionalOnProperty(prefix = "spring.aop", name = "proxy-target-class", havingValue = "false", matchIfMissing = false)public static class JdkDynamicAutoProxyConfiguration {}//proxy-target-class=true表示配置了cglib生成代理//则使用注解EnableTransactionManagement的时候proxyTargetClass = true@Configuration@EnableTransactionManagement(proxyTargetClass = true)@ConditionalOnProperty(prefix = "spring.aop", name = "proxy-target-class", havingValue = "true", matchIfMissing = true)public static class CglibAutoProxyConfiguration {}}}
so easy
springboot开启事务功能的底层其实就是使用了@EnableTransactionManagement注解,又回到之前的逻辑。
这里就可以解释,为什么我们在springboot程序里面没有使用过@EnableTransactionManagement注解开启事务,它却自动拥有事务的功能。因为它在事务的自动配置中已经使用了@EnableTransactionManagement注解开启事务。
至此,spring如何开启事务已经介绍完了。
接下来,我们的重点是TransactionInterceptor,因为在它里面实现了事务的逻辑。
二、核心拦截器
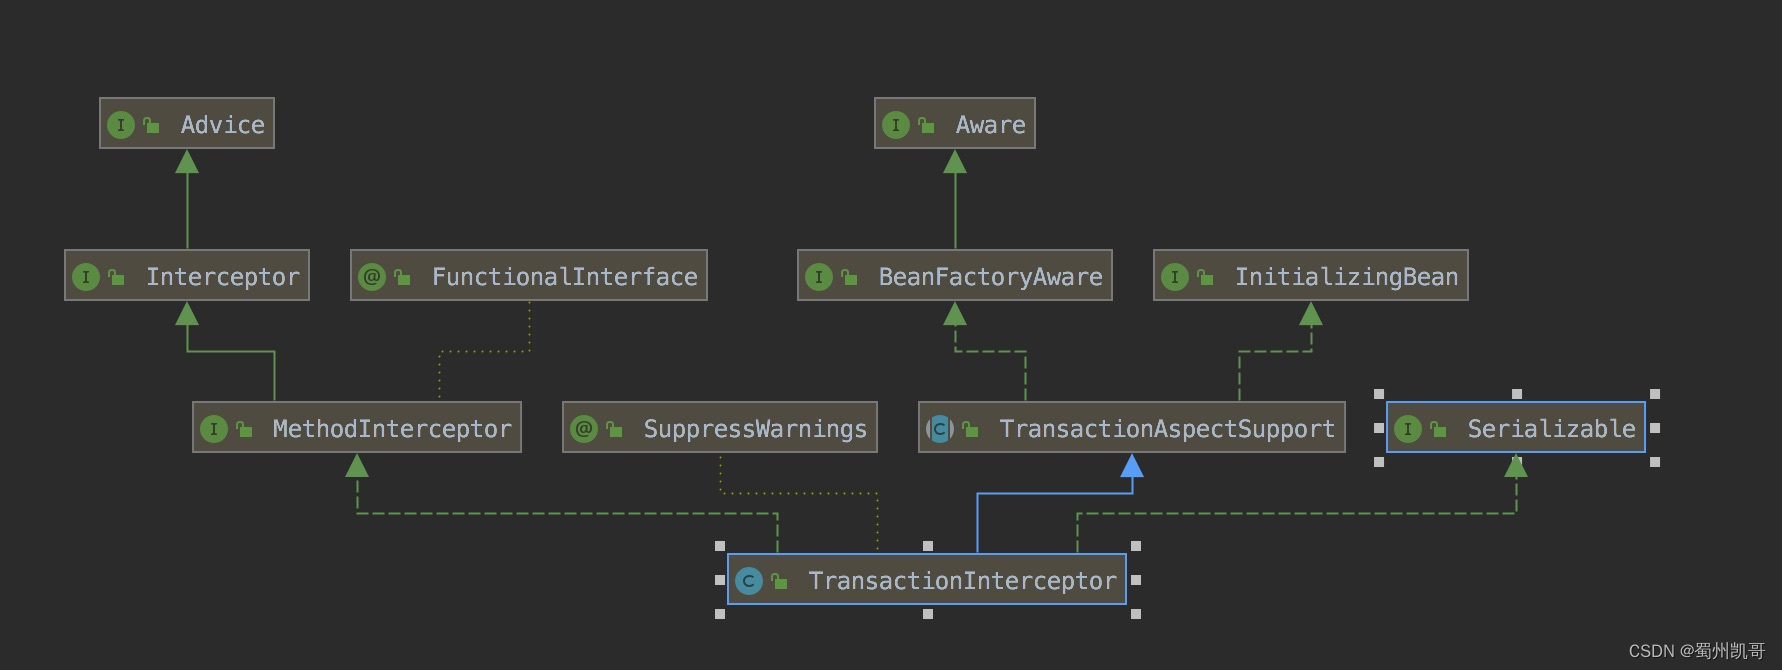
废话不不多说,直接上TransactionInterceptor的代码。
public class TransactionInterceptor extends TransactionAspectSupport implements MethodInterceptor, Serializable {public TransactionInterceptor() {}public TransactionInterceptor(PlatformTransactionManager ptm, Properties attributes) {setTransactionManager(ptm);setTransactionAttributes(attributes);}public TransactionInterceptor(PlatformTransactionManager ptm, TransactionAttributeSource tas) {setTransactionManager(ptm);setTransactionAttributeSource(tas);}@Override@Nullablepublic Object invoke(MethodInvocation invocation) throws Throwable {Class<?> targetClass = (invocation.getThis() != null ? AopUtils.getTargetClass(invocation.getThis()) : null);return invokeWithinTransaction(invocation.getMethod(), targetClass, invocation::proceed);}}
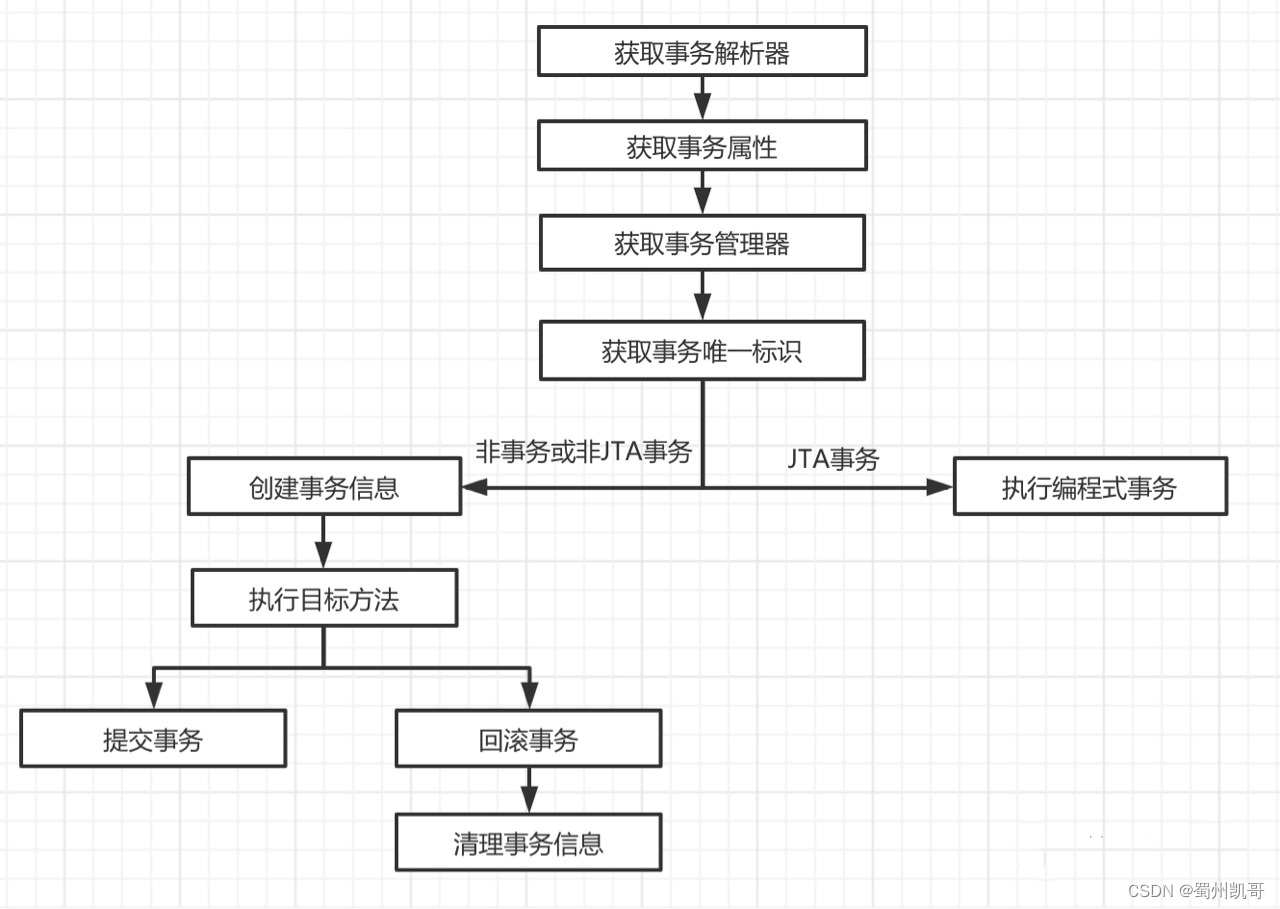
代码其实比较简单,关键代码是invokeWithinTransaction方法。
protected Object invokeWithinTransaction(Method method, @Nullable Class<?> targetClass,final InvocationCallback invocation) throws Throwable {//获取事务属性解析器TransactionAttributeSource tas = getTransactionAttributeSource();//获取事务属性final TransactionAttribute txAttr = (tas != null ? tas.getTransactionAttribute(method, targetClass) : null);//获取事务管理器final PlatformTransactionManager tm = determineTransactionManager(txAttr);//获取事务唯一标识final String joinpointIdentification = methodIdentification(method, targetClass, txAttr);//如果是非事务执行 或者 非JTA事务if (txAttr == null || !(tm instanceof CallbackPreferringPlatformTransactionManager)) {//创建事务信息TransactionInfo txInfo = createTransactionIfNecessary(tm, txAttr, joinpointIdentification);Object retVal = null;try {//执行目标方法retVal = invocation.proceedWithInvocation();}catch (Throwable ex) {//回滚事务completeTransactionAfterThrowing(txInfo, ex);throw ex;}finally {//清理事务信息cleanupTransactionInfo(txInfo);}//提交事务commitTransactionAfterReturning(txInfo);return retVal;}//如果是JTA事务else {final ThrowableHolder throwableHolder = new ThrowableHolder();try {Object result = ((CallbackPreferringPlatformTransactionManager) tm).execute(txAttr, status -> {TransactionInfo txInfo = prepareTransactionInfo(tm, txAttr, joinpointIdentification, status);try {return invocation.proceedWithInvocation();}catch (Throwable ex) {if (txAttr.rollbackOn(ex)) {// A RuntimeException: will lead to a rollback.if (ex instanceof RuntimeException) {throw (RuntimeException) ex;}else {throw new ThrowableHolderException(ex);}}else {// A normal return value: will lead to a commit.throwableHolder.throwable = ex;return null;}}finally {cleanupTransactionInfo(txInfo);}});// Check result state: It might indicate a Throwable to rethrow.if (throwableHolder.throwable != null) {throw throwableHolder.throwable;}return result;}catch (ThrowableHolderException ex) {throw ex.getCause();}catch (TransactionSystemException ex2) {if (throwableHolder.throwable != null) {logger.error("Application exception overridden by commit exception", throwableHolder.throwable);ex2.initApplicationException(throwableHolder.throwable);}throw ex2;}catch (Throwable ex2) {if (throwableHolder.throwable != null) {logger.error("Application exception overridden by commit exception", throwableHolder.throwable);}throw ex2;}}}
因为是核心代码,我们用流程图梳理一下流程
我们再看看getTransactionAttribute方法,这个方法在AbstractFallbackTransactionAttributeSource类里面。
@Override@Nullablepublic TransactionAttribute getTransactionAttribute(Method method, @Nullable Class<?> targetClass) {if (method.getDeclaringClass() == Object.class) {return null;}//获取缓存的keyObject cacheKey = getCacheKey(method, targetClass);//根据key从缓存中获取TransactionAttribute对象,缓存值TransactionAttribute cached = this.attributeCache.get(cacheKey);//如果缓存值不为空,则直接返回缓存值if (cached != null) {//如果缓存值为自己定义的空值,则返回nullif (cached == NULL_TRANSACTION_ATTRIBUTE) {return null;}else {return cached;}}//如果缓存值为空else {//计算TransactionAttributeTransactionAttribute txAttr = computeTransactionAttribute(method, targetClass);//如果TransactionAttribute为空则缓存一个空值if (txAttr == null) {this.attributeCache.put(cacheKey, NULL_TRANSACTION_ATTRIBUTE);}//如果TransactionAttribute不为空,则作为缓存值添加到缓存中else {String methodIdentification = ClassUtils.getQualifiedMethodName(method, targetClass);if (txAttr instanceof DefaultTransactionAttribute) {((DefaultTransactionAttribute) txAttr).setDescriptor(methodIdentification);}if (logger.isDebugEnabled()) {logger.debug("Adding transactional method '" + methodIdentification + "' with attribute: " + txAttr);}//添加到缓存this.attributeCache.put(cacheKey, txAttr);}return txAttr;}}
看一下computeTransactionAttribute方法
@Nullableprotected TransactionAttribute computeTransactionAttribute(Method method, @Nullable Class<?> targetClass) {//如果目标方法不是public,则直接返回空,表示非事务执行if (allowPublicMethodsOnly() && !Modifier.isPublic(method.getModifiers())) {return null;}Method specificMethod = AopUtils.getMostSpecificMethod(method, targetClass);//第一步从目标方法上找事务属性。如果方法和类上都配置了事务,则以方法上的为准TransactionAttribute txAttr = findTransactionAttribute(specificMethod);//如果存在则直接返回if (txAttr != null) {return txAttr;}//第二步从目标类上找事务属性txAttr = findTransactionAttribute(specificMethod.getDeclaringClass());//如果存在则直接返回if (txAttr != null && ClassUtils.isUserLevelMethod(method)) {return txAttr;}if (specificMethod != method) {txAttr = findTransactionAttribute(method);if (txAttr != null) {return txAttr;}txAttr = findTransactionAttribute(method.getDeclaringClass());if (txAttr != null && ClassUtils.isUserLevelMethod(method)) {return txAttr;, }}return null;}
❝if (allowPublicMethodsOnly()&& !Modifier.isPublic(method.getModifiers())) {
return null;
}
这个判断条件就是非public方法为什么不支持事务的原因
说白了,上面的方法就是一系列的查找TransactionAttribute(事务属性)的过程。
我们重点看看findTransactionAttribute方法
@Override@Nullableprotected TransactionAttribute findTransactionAttribute(Method method) {return determineTransactionAttribute(method);}
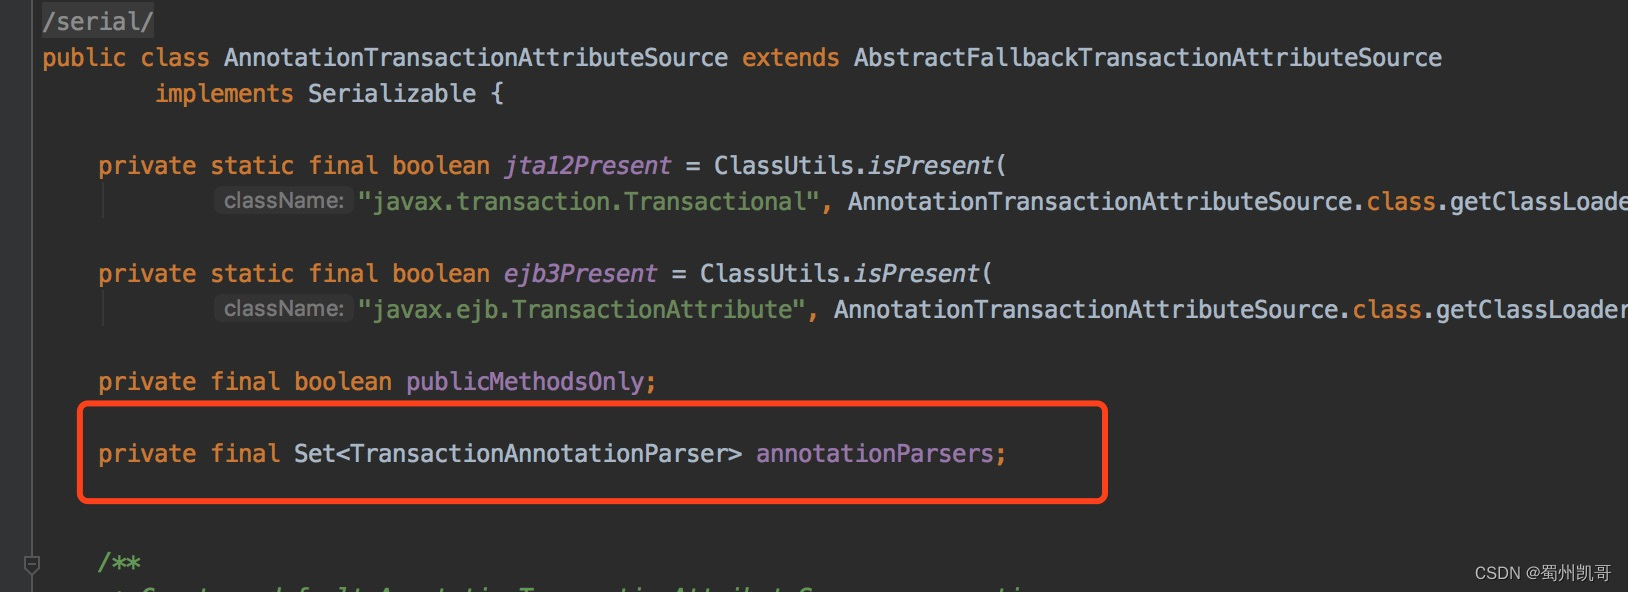
@Nullableprotected TransactionAttribute determineTransactionAttribute(AnnotatedElement element) {for (TransactionAnnotationParser annotationParser : this.annotationParsers) {TransactionAttribute attr = annotationParser.parseTransactionAnnotation(element);if (attr != null) {return attr;}}return null;}
private final Set<TransactionAnnotationParser> annotationParsers;其中annotationParsers就是我们之前说过AnnotationTransactionAttributeSource类的构造方法中对应的事务属性解析器。
我们一探究竟,一起看一下parseTransactionAnnotation方法,是如何解析的
@Override@Nullablepublic TransactionAttribute parseTransactionAnnotation(AnnotatedElement element) {AnnotationAttributes attributes = AnnotatedElementUtils.findMergedAnnotationAttributes(element, Transactional.class, false, false);if (attributes != null) {return parseTransactionAnnotation(attributes);}else {return null;}}
可以看到这个方法会去解析@Transactional注解上的属性,如果注解属性不为空,则会调用parseTransactionAnnotation方法。
protected TransactionAttribute parseTransactionAnnotation(AnnotationAttributes attributes) {RuleBasedTransactionAttribute rbta = new RuleBasedTransactionAttribute();Propagation propagation = attributes.getEnum("propagation");rbta.setPropagationBehavior(propagation.value());Isolation isolation = attributes.getEnum("isolation");rbta.setIsolationLevel(isolation.value());rbta.setTimeout(attributes.getNumber("timeout").intValue());rbta.setReadOnly(attributes.getBoolean("readOnly"));rbta.setQualifier(attributes.getString("value"));List<RollbackRuleAttribute> rollbackRules = new ArrayList<>();for (Class<?> rbRule : attributes.getClassArray("rollbackFor")) {rollbackRules.add(new RollbackRuleAttribute(rbRule));}for (String rbRule : attributes.getStringArray("rollbackForClassName")) {rollbackRules.add(new RollbackRuleAttribute(rbRule));}for (Class<?> rbRule : attributes.getClassArray("noRollbackFor")) {rollbackRules.add(new NoRollbackRuleAttribute(rbRule));}for (String rbRule : attributes.getStringArray("noRollbackForClassName")) {rollbackRules.add(new NoRollbackRuleAttribute(rbRule));}rbta.setRollbackRules(rollbackRules);return rbta;}
哈哈哈,这些不就是我们熟悉的事务属性吗?
这个方法从注解属性上获取到具体的属性值,封装到RuleBasedTransactionAttribute类中返回。
接下来看一下createTransactionIfNecessary方法。
protected TransactionInfo createTransactionIfNecessary(@Nullable PlatformTransactionManager tm,@Nullable TransactionAttribute txAttr, final String joinpointIdentification) {//如果事务属性不为空,并且没有名称,则生成一个名称if (txAttr != null && txAttr.getName() == null) {txAttr = new DelegatingTransactionAttribute(txAttr) {@Overridepublic String getName() {return joinpointIdentification;}};}TransactionStatus status = null;if (txAttr != null) {if (tm != null) {//获取事务状态status = tm.getTransaction(txAttr);}else {if (logger.isDebugEnabled()) {logger.debug("Skipping transactional joinpoint [" + joinpointIdentification +"] because no transaction manager has been configured");}}}//封装事务信息对象,并且将事务信息对象绑定到当前线程return prepareTransactionInfo(tm, txAttr, joinpointIdentification, status);}
三、获取事务
这里先看一下getTransaction方法
@Overridepublic final TransactionStatus getTransaction(@Nullable TransactionDefinition definition) throws TransactionException {//获取事务对象Object transaction = doGetTransaction();boolean debugEnabled = logger.isDebugEnabled();//如果事务属性definition为空,则创建一个默认的事务属性definitionif (definition == null) {definition = new DefaultTransactionDefinition();}//如果存在事务if (isExistingTransaction(transaction)) {//处理已有事务return handleExistingTransaction(definition, transaction, debugEnabled);}//如果事务不存在,并且超时时间小于默认值-1,则报异常if (definition.getTimeout() < TransactionDefinition.TIMEOUT_DEFAULT) {throw new InvalidTimeoutException("Invalid transaction timeout", definition.getTimeout());}//如果事务不存在,并且传播属性为 PROPAGATION_MANDATORY,则报异常if (definition.getPropagationBehavior() == TransactionDefinition.PROPAGATION_MANDATORY) {throw new IllegalTransactionStateException("No existing transaction found for transaction marked with propagation 'mandatory'");}//如果事务不存在,并且事务传播属性为空:PROPAGATION_REQUIRED、PROPAGATION_REQUIRES_NEW、PROPAGATION_NESTEDelse if (definition.getPropagationBehavior() == TransactionDefinition.PROPAGATION_REQUIRED ||definition.getPropagationBehavior() == TransactionDefinition.PROPAGATION_REQUIRES_NEW ||definition.getPropagationBehavior() == TransactionDefinition.PROPAGATION_NESTED) {//空挂起SuspendedResourcesHolder suspendedResources = suspend(null);if (debugEnabled) {logger.debug("Creating new transaction with name [" + definition.getName() + "]: " + definition);}try {boolean newSynchronization = (getTransactionSynchronization() != SYNCHRONIZATION_NEVER);//创建事务状态对象,注意这里的newTransaction=trueDefaultTransactionStatus status = newTransactionStatus(definition, transaction, true, newSynchronization, debugEnabled, suspendedResources);//获取数据库连接,关闭数据自动提交,如果是只读事务,则设置为只读//同时获取数据库隔离基本和超时时间,最后将数据库连接绑定到当前线程doBegin(transaction, definition);//将事务名称、激活状态、只读状态、隔离级别等绑定到当前线程prepareSynchronization(status, definition);return status;}catch (RuntimeException | Error ex) {resume(null, suspendedResources);throw ex;}}else {// 如果事务不存在,并且事务传播属性是:PROPAGATION_NEVER、PROPAGATION_SUPPORTS、PROPAGATION_NOT_SUPPORTED// 如果定义了隔离级别但是事务又不存在,则打印一个警告if (definition.getIsolationLevel() != TransactionDefinition.ISOLATION_DEFAULT && logger.isWarnEnabled()) {logger.warn("Custom isolation level specified but no actual transaction initiated; " +"isolation level will effectively be ignored: " + definition);}boolean newSynchronization = (getTransactionSynchronization() == SYNCHRONIZATION_ALWAYS);//返回非事务的事务状态return prepareTransactionStatus(definition, null, true, newSynchronization, debugEnabled, null);}}
再看看事务存在时调用的方法handleExistingTransaction
private TransactionStatus handleExistingTransaction(TransactionDefinition definition, Object transaction, boolean debugEnabled)throws TransactionException {//如果事务存在,并且事务传播属性是PROPAGATION_NEVER,则报异常if (definition.getPropagationBehavior() == TransactionDefinition.PROPAGATION_NEVER) {throw new IllegalTransactionStateException("Existing transaction found for transaction marked with propagation 'never'");}//如果事务存在,并且事务传播属性是PROPAGATION_NOT_SUPPORTEDif (definition.getPropagationBehavior() == TransactionDefinition.PROPAGATION_NOT_SUPPORTED) {if (debugEnabled) {logger.debug("Suspending current transaction");}//挂起当前事务Object suspendedResources = suspend(transaction);boolean newSynchronization = (getTransactionSynchronization() == SYNCHRONIZATION_ALWAYS);//返回非事务的事务状态return prepareTransactionStatus(definition, null, false, newSynchronization, debugEnabled, suspendedResources);}//如果事务存在,并且事务传播属性是PROPAGATION_REQUIRES_NEWif (definition.getPropagationBehavior() == TransactionDefinition.PROPAGATION_REQUIRES_NEW) {if (debugEnabled) {logger.debug("Suspending current transaction, creating new transaction with name [" +definition.getName() + "]");}//挂起当前事务SuspendedResourcesHolder suspendedResources = suspend(transaction);try {boolean newSynchronization = (getTransactionSynchronization() != SYNCHRONIZATION_NEVER);//创建新事务状态DefaultTransactionStatus status = newTransactionStatus(definition, transaction, true, newSynchronization, debugEnabled, suspendedResources);//获取数据库连接,关闭数据自动提交,如果是只读事务,则设置为只读//同时获取数据库隔离基本和超时时间,最后将数据库连接绑定到当前线程doBegin(transaction, definition);//将事务名称、激活状态、只读状态、隔离级别等绑定到当前线程prepareSynchronization(status, definition);//返回新的事务状态return status;}catch (RuntimeException | Error beginEx) {resumeAfterBeginException(transaction, suspendedResources, beginEx);throw beginEx;}}//如果事务存在,并且事务传播属性是PROPAGATION_NESTEDif (definition.getPropagationBehavior() == TransactionDefinition.PROPAGATION_NESTED) {//如果不允许嵌套事务,则报异常if (!isNestedTransactionAllowed()) {throw new NestedTransactionNotSupportedException("Transaction manager does not allow nested transactions by default - " +"specify 'nestedTransactionAllowed' property with value 'true'");}if (debugEnabled) {logger.debug("Creating nested transaction with name [" + definition.getName() + "]");}//如果允许使用回滚点if (useSavepointForNestedTransaction()) {//创建事务状态对象将newTransaction设置为falseDefaultTransactionStatus status =prepareTransactionStatus(definition, transaction, false, false, debugEnabled, null);//创建回滚点status.createAndHoldSavepoint();return status;}else {//如果不允许使用回滚点boolean newSynchronization = (getTransactionSynchronization() != SYNCHRONIZATION_NEVER);//创建新的事务状态DefaultTransactionStatus status = newTransactionStatus(definition, transaction, true, newSynchronization, debugEnabled, null);//获取数据库连接,关闭数据自动提交,如果是只读事务,则设置为只读//同时获取数据库隔离基本和超时时间,最后将数据库连接绑定到当前线程doBegin(transaction, definition);//将事务名称、激活状态、只读状态、隔离级别等绑定到当前线程prepareSynchronization(status, definition);return status;}}// Assumably PROPAGATION_SUPPORTS or PROPAGATION_REQUIRED.if (debugEnabled) {logger.debug("Participating in existing transaction");}//对事务的属性做一下校验if (isValidateExistingTransaction()) {if (definition.getIsolationLevel() != TransactionDefinition.ISOLATION_DEFAULT) {Integer currentIsolationLevel = TransactionSynchronizationManager.getCurrentTransactionIsolationLevel();if (currentIsolationLevel == null || currentIsolationLevel != definition.getIsolationLevel()) {Constants isoConstants = DefaultTransactionDefinition.constants;throw new IllegalTransactionStateException("Participating transaction with definition [" +definition + "] specifies isolation level which is incompatible with existing transaction: " +(currentIsolationLevel != null ?isoConstants.toCode(currentIsolationLevel, DefaultTransactionDefinition.PREFIX_ISOLATION) :"(unknown)"));}}if (!definition.isReadOnly()) {if (TransactionSynchronizationManager.isCurrentTransactionReadOnly()) {throw new IllegalTransactionStateException("Participating transaction with definition [" +definition + "] is not marked as read-only but existing transaction is");}}}//如果事务存在,并且传播属性是:PROPAGATION_REQUIRED、PROPAGATION_MANDATORY、PROPAGATION_SUPPORTSboolean newSynchronization = (getTransactionSynchronization() != SYNCHRONIZATION_NEVER);//将newTransaction设置为falsereturn prepareTransactionStatus(definition, transaction, false, newSynchronization, debugEnabled, null);}
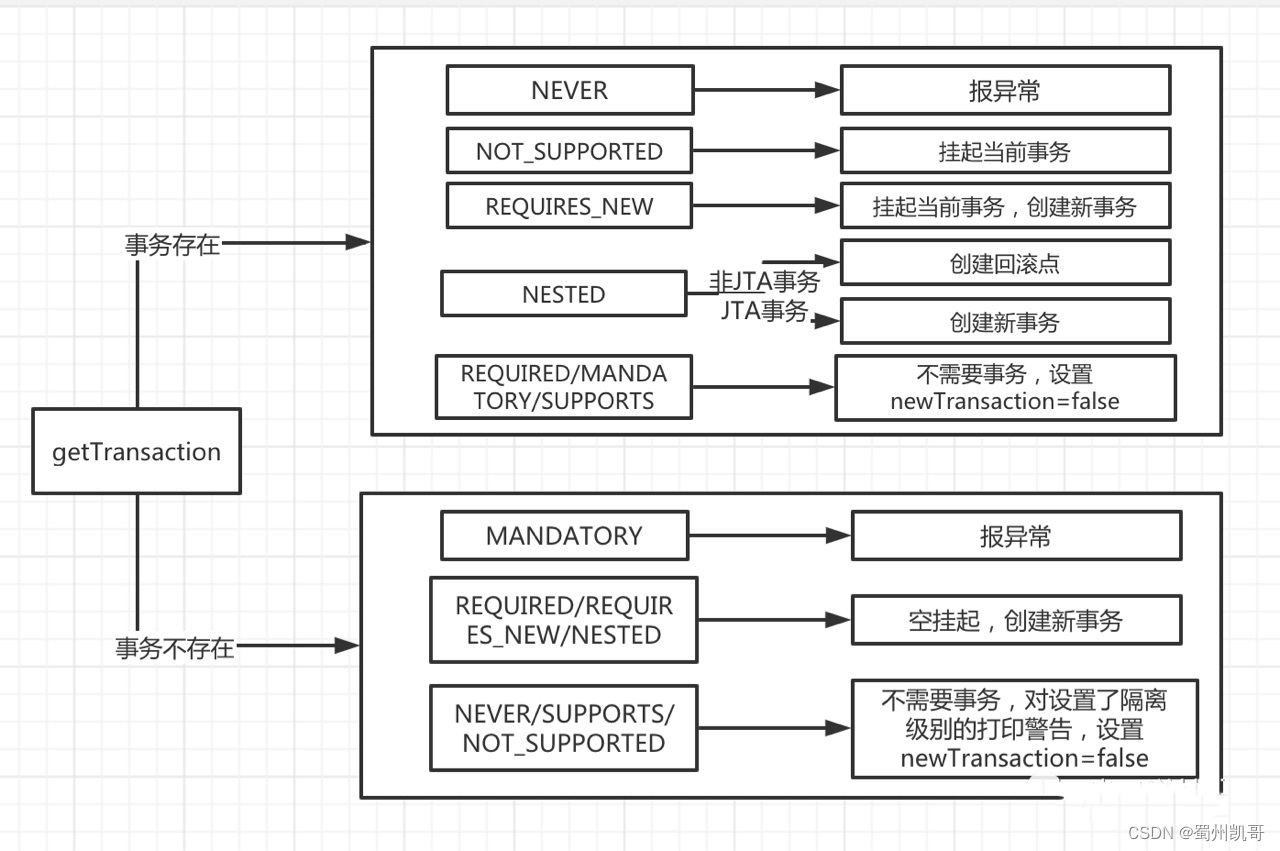
这两段代码虽然我写了很多注释,有些朋友看起来可能还是一脸懵逼。让我们一起先看看事务7钟传播属性的怎么回事。
-
Propagation.REQUIRED(required):支持当前事务,如果当前有事务, 那么加入事务, 如果当前没有事务则新建一个(默认情况)
-
Propagation.NOT_SUPPORTED(not_supported) :以非事务方式执行操作,如果当前存在事务就把当前事务挂起,执行完后恢复事务(忽略当前事务);
-
Propagation.SUPPORTS (supports) :如果当前有事务则加入,如果没有则不用事务。
-
Propagation.MANDATORY (mandatory) :支持当前事务,如果当前没有事务,则抛出异常。(当前必须有事务)
-
PROPAGATION_NEVER (never) :以非事务方式执行,如果当前存在事务,则抛出异常。(当前必须不能有事务)
-
Propagation.REQUIRES_NEW (requires_new) :支持当前事务,如果当前有事务,则挂起当前事务,然后新创建一个事务,如果当前没有事务,则自己创建一个事务。
-
Propagation.NESTED (nested 嵌套事务) :如果当前存在事务,则嵌套在当前事务中。如果当前没有事务,则新建一个事务自己执行(和required一样)。嵌套的事务使用保存点作为回滚点,当内部事务回滚时不会影响外部事物的提交;但是外部回滚会把内部事务一起回滚回去。(这个和新建一个事务的区别)
然后用一张图给大家再描述一下事务的这7种传播属性是如何调用的。
再回头看看doGetTransaction方法,它是一个钩子方法,主要看DataSourceTransactionManager的实现
@Overrideprotected Object doGetTransaction() {//创建一个事务实体对象DataSourceTransactionObject txObject = new DataSourceTransactionObject();//设置是否允许设置回滚点txObject.setSavepointAllowed(isNestedTransactionAllowed());//获取数据库连接的holderConnectionHolder conHolder =(ConnectionHolder) TransactionSynchronizationManager.getResource(obtainDataSource());//赋值txObject.setConnectionHolder(conHolder, false);return txObject;}
重点看看TransactionSynchronizationManager.getResource方法
@Nullablepublic static Object getResource(Object key) {//获取key,其实就是dataSourceObject actualKey = TransactionSynchronizationUtils.unwrapResourceIfNecessary(key);//根据key获取值,其实就是connectionHolderObject value = doGetResource(actualKey);if (value != null && logger.isTraceEnabled()) {logger.trace("Retrieved value [" + value + "] for key [" + actualKey + "] bound to thread [" +Thread.currentThread().getName() + "]");}return value;}
进入doGetResource方法
//threadLocal保存connectionHolder//map中的key是dataSource,value是connectionHolderprivate static final ThreadLocal<Map<Object, Object>> resources =new NamedThreadLocal<>("Transactional resources");@Nullableprivate static Object doGetResource(Object actualKey) {//从当前线程中获取数据连接mapMap<Object, Object> map = resources.get();if (map == null) {return null;}//根据dataSource获取connectionHolderObject value = map.get(actualKey);if (value instanceof ResourceHolder && ((ResourceHolder) value).isVoid()) {map.remove(actualKey);if (map.isEmpty()) {resources.remove();}value = null;}//返回connectionHolderreturn value;}
这里就是嵌套事务和外层事务为什么可以共用同一个数据库连接的原因,因为数据库连接放在threadLocal中了,嵌套事务和外层事务共用同一个线程,就可以通过threadLocal获取同一个连接。
❝这里又引出一个问题:
内嵌事务 和 外层事务共用同一个数据库连接,它们共用同一个事务对象吗?
再看看一下doBegin方法
@Overrideprotected void doBegin(Object transaction, TransactionDefinition definition) {DataSourceTransactionObject txObject = (DataSourceTransactionObject) transaction;Connection con = null;try {//如果没有数据库连接或连接不是同步事务状态if (!txObject.hasConnectionHolder() ||txObject.getConnectionHolder().isSynchronizedWithTransaction()) {//从dataSource中获取一个数据库连接Connection newCon = obtainDataSource().getConnection();if (logger.isDebugEnabled()) {logger.debug("Acquired Connection [" + newCon + "] for JDBC transaction");}//将数据库连接封装到ConnectionHolder对象中//并且设置到事务对象中txObject.setConnectionHolder(new ConnectionHolder(newCon), true);}//设置事务同步状态为truetxObject.getConnectionHolder().setSynchronizedWithTransaction(true);//从ConnectionHolder中获取数据库连接con = txObject.getConnectionHolder().getConnection();//获取数据库隔离级别Integer previousIsolationLevel = DataSourceUtils.prepareConnectionForTransaction(con, definition);//将数据库隔离级别设置到当前事务对象中txObject.setPreviousIsolationLevel(previousIsolationLevel);//如果当前数据库连接是自动提交if (con.getAutoCommit()) {txObject.setMustRestoreAutoCommit(true);if (logger.isDebugEnabled()) {logger.debug("Switching JDBC Connection [" + con + "] to manual commit");}//关闭自动提交con.setAutoCommit(false);}//如果事务属性配置了只读事务,则将事务设置成只读prepareTransactionalConnection(con, definition);//设置数据库连接holder事务状态为激活状态txObject.getConnectionHolder().setTransactionActive(true);//获取事务属性中配置的超时时间int timeout = determineTimeout(definition);//如果配置的超时时间不等于-1if (timeout != TransactionDefinition.TIMEOUT_DEFAULT) {//则给数据库连接holder设置新的超时时间txObject.getConnectionHolder().setTimeoutInSeconds(timeout);}//如果是新事务if (txObject.isNewConnectionHolder()) {//将数据库连接绑定到当前线程TransactionSynchronizationManager.bindResource(obtainDataSource(), txObject.getConnectionHolder());}}catch (Throwable ex) {//如果是新连接if (txObject.isNewConnectionHolder()) {//释放数据库连接DataSourceUtils.releaseConnection(con, obtainDataSource());//将事务对象中的ConnectionHolder设置为空txObject.setConnectionHolder(null, false);}throw new CannotCreateTransactionException("Could not open JDBC Connection for transaction", ex);}}
我们只看一下bindResource方法,其他的方法比较简单,我就不一一介绍了。
public static void bindResource(Object key, Object value) throws IllegalStateException {//获取key,即dataSourceObject actualKey = TransactionSynchronizationUtils.unwrapResourceIfNecessary(key);Assert.notNull(value, "Value must not be null");//从threadLocal中获取数据库连接Map<Object, Object> map = resources.get();//如果map为空,则创建一个map,设置到threadLocal中if (map == null) {map = new HashMap<>();resources.set(map);}//将新的数据库连接放到map中,返回旧连接对象Object oldValue = map.put(actualKey, value);if (oldValue instanceof ResourceHolder && ((ResourceHolder) oldValue).isVoid()) {oldValue = null;}if (oldValue != null) {throw new IllegalStateException("Already value [" + oldValue + "] for key [" +actualKey + "] bound to thread [" + Thread.currentThread().getName() + "]");}if (logger.isTraceEnabled()) {logger.trace("Bound value [" + value + "] for key [" + actualKey + "] to thread [" +Thread.currentThread().getName() + "]");}}
❝这里又引出一个问题:
threadLocal中为什么要放一个map对象,key是dataSource,而value是connectionHolder?
再看看挂起方法suspend
protected final SuspendedResourcesHolder suspend(@Nullable Object transaction) throws TransactionException {//如果事务事务激活状态if (TransactionSynchronizationManager.isSynchronizationActive()) {//挂起事务同步资源,解绑线程绑定的连接,连接池回收连接List<TransactionSynchronization> suspendedSynchronizations = doSuspendSynchronization();try {Object suspendedResources = null;if (transaction != null) {//挂起事务suspendedResources = doSuspend(transaction);}String name = TransactionSynchronizationManager.getCurrentTransactionName();//解绑线程中的事务名称TransactionSynchronizationManager.setCurrentTransactionName(null);boolean readOnly = TransactionSynchronizationManager.isCurrentTransactionReadOnly();//解绑线程中的只读状态TransactionSynchronizationManager.setCurrentTransactionReadOnly(false);Integer isolationLevel = TransactionSynchronizationManager.getCurrentTransactionIsolationLevel();//解绑线程中的只隔离级别TransactionSynchronizationManager.setCurrentTransactionIsolationLevel(null);boolean wasActive = TransactionSynchronizationManager.isActualTransactionActive();//解绑线程中的激活状态TransactionSynchronizationManager.setActualTransactionActive(false);//封装挂起资源对象return new SuspendedResourcesHolder(suspendedResources, suspendedSynchronizations, name, readOnly, isolationLevel, wasActive);}catch (RuntimeException | Error ex) {// doSuspend failed - original transaction is still active...doResumeSynchronization(suspendedSynchronizations);throw ex;}}else if (transaction != null) {// Transaction active but no synchronization active.Object suspendedResources = doSuspend(transaction);return new SuspendedResourcesHolder(suspendedResources);}else {// Neither transaction nor synchronization active.return null;}}
其实还有很多方法想介绍,但是由于篇幅的原因,在这里就不一一列出了。
四、提交事务
提交事务的代码要从commitTransactionAfterReturning开始说起。
protected void commitTransactionAfterReturning(@Nullable TransactionInfo txInfo) {//判断当前有事务信息,并且事务状态不为空,才允许提交事务if (txInfo != null && txInfo.getTransactionStatus() != null) {if (logger.isTraceEnabled()) {logger.trace("Completing transaction for [" + txInfo.getJoinpointIdentification() + "]");}//提交事务txInfo.getTransactionManager().commit(txInfo.getTransactionStatus());}}
@Overridepublic final void commit(TransactionStatus status) throws TransactionException {//如果事务状态是完成状态,则抛出异常,这种情况说明已经提交过了if (status.isCompleted()) {throw new IllegalTransactionStateException("Transaction is already completed - do not call commit or rollback more than once per transaction");}DefaultTransactionStatus defStatus = (DefaultTransactionStatus) status;//如果事务状态事务是本地回滚if (defStatus.isLocalRollbackOnly()) {if (defStatus.isDebug()) {logger.debug("Transactional code has requested rollback");}//回滚事务processRollback(defStatus, false);return;}//如果没有配置全局回滚,并且当前状态需要回滚if (!shouldCommitOnGlobalRollbackOnly() && defStatus.isGlobalRollbackOnly()) {if (defStatus.isDebug()) {logger.debug("Global transaction is marked as rollback-only but transactional code requested commit");}//回滚事务processRollback(defStatus, true);return;}//提交事务processCommit(defStatus);}
执行事务提交之前,先判断一下事务状态是否需要提交,如果有需要回滚的则回滚,最后提交事务交给processCommit方法。
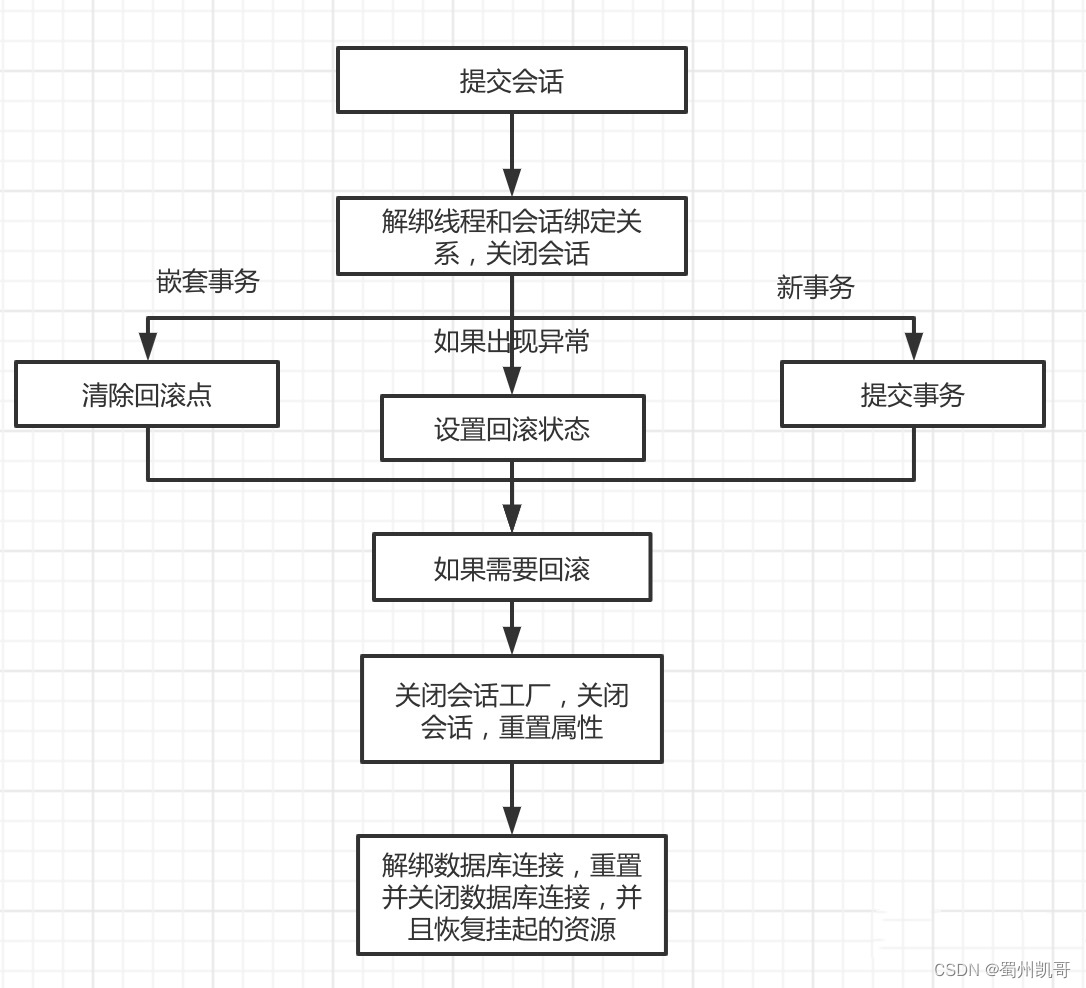
private void processCommit(DefaultTransactionStatus status) throws TransactionException {try {boolean beforeCompletionInvoked = false;try {boolean unexpectedRollback = false;//空实现prepareForCommit(status);//提交会话triggerBeforeCommit(status);//解绑线程和会话绑定关系,关闭会话triggerBeforeCompletion(status);beforeCompletionInvoked = true;//如果配置了回滚点,说明是嵌套事务if (status.hasSavepoint()) {if (status.isDebug()) {logger.debug("Releasing transaction savepoint");}unexpectedRollback = status.isGlobalRollbackOnly();//清除回滚点status.releaseHeldSavepoint();}//如果是新事务else if (status.isNewTransaction()) {if (status.isDebug()) {logger.debug("Initiating transaction commit");}unexpectedRollback = status.isGlobalRollbackOnly();//提交事务doCommit(status);}else if (isFailEarlyOnGlobalRollbackOnly()) {unexpectedRollback = status.isGlobalRollbackOnly();}if (unexpectedRollback) {throw new UnexpectedRollbackException("Transaction silently rolled back because it has been marked as rollback-only");}}catch (UnexpectedRollbackException ex) {//关闭会话工厂,关闭会话,重置属性triggerAfterCompletion(status, TransactionSynchronization.STATUS_ROLLED_BACK);throw ex;}catch (TransactionException ex) {// can only be caused by doCommitif (isRollbackOnCommitFailure()) {doRollbackOnCommitException(status, ex);}else {//关闭会话工厂,关闭会话,重置属性triggerAfterCompletion(status, TransactionSynchronization.STATUS_UNKNOWN);}throw ex;}catch (RuntimeException | Error ex) {if (!beforeCompletionInvoked) {triggerBeforeCompletion(status);}doRollbackOnCommitException(status, ex);throw ex;}try {//空实现triggerAfterCommit(status);}finally {//关闭会话工厂,关闭会话,重置属性triggerAfterCompletion(status, TransactionSynchronization.STATUS_COMMITTED);}}finally {//解绑数据库连接,重置并关闭数据库连接//恢复挂起的资源cleanupAfterCompletion(status);}}
我再用一张流程图梳理一下整个流程
doCommit方法代码很简单
@Overrideprotected void doCommit(DefaultTransactionStatus status) {DataSourceTransactionObject txObject = (DataSourceTransactionObject) status.getTransaction();Connection con = txObject.getConnectionHolder().getConnection();if (status.isDebug()) {logger.debug("Committing JDBC transaction on Connection [" + con + "]");}try {con.commit();}catch (SQLException ex) {throw new TransactionSystemException("Could not commit JDBC transaction", ex);}}
就是调用数据库连接的commit方法,清空回滚点也是调用数据库连接的releaseSavepoint方法,比较简单在这里就不深入介绍了。
五、回滚事务
回滚事务入口在completeTransactionAfterThrowing方法
protected void completeTransactionAfterThrowing(@Nullable TransactionInfo txInfo, Throwable ex) {//如果存在事务信息,并且事务状态不为空if (txInfo != null && txInfo.getTransactionStatus() != null) {if (logger.isTraceEnabled()) {logger.trace("Completing transaction for [" + txInfo.getJoinpointIdentification() +"] after exception: " + ex);}//如果属性属性不为空,并且需要回滚if (txInfo.transactionAttribute != null && txInfo.transactionAttribute.rollbackOn(ex)) {try {//回滚事务txInfo.getTransactionManager().rollback(txInfo.getTransactionStatus());}catch (TransactionSystemException ex2) {logger.error("Application exception overridden by rollback exception", ex);ex2.initApplicationException(ex);throw ex2;}catch (RuntimeException | Error ex2) {logger.error("Application exception overridden by rollback exception", ex);throw ex2;}}//如果不需要回滚事务else {try {//继续提交事务txInfo.getTransactionManager().commit(txInfo.getTransactionStatus());}catch (TransactionSystemException ex2) {logger.error("Application exception overridden by commit exception", ex);ex2.initApplicationException(ex);throw ex2;}catch (RuntimeException | Error ex2) {logger.error("Application exception overridden by commit exception", ex);throw ex2;}}}}
我们重点看一下是如何判断要回滚事务的,看一下txInfo.transactionAttribute.rollbackOn方法
@Overridepublic boolean rollbackOn(Throwable ex) {return (ex instanceof RuntimeException || ex instanceof Error);}
❝这里又引出一个问题:
默认情况下,事务是否需要回滚是根据异常类型判断的,如果异常类型为RuntimeException或者Error,则需要回滚。那么问题来了,如果异常类型是Exception需要回滚不?如果不需要回滚,怎样才能让异常类型是Exception的事务回滚?
重点看一下事务回滚方法rollback
@Overridepublic final void rollback(TransactionStatus status) throws TransactionException {if (status.isCompleted()) {throw new IllegalTransactionStateException("Transaction is already completed - do not call commit or rollback more than once per transaction");}DefaultTransactionStatus defStatus = (DefaultTransactionStatus) status;processRollback(defStatus, false);}
再进入processRollback方法
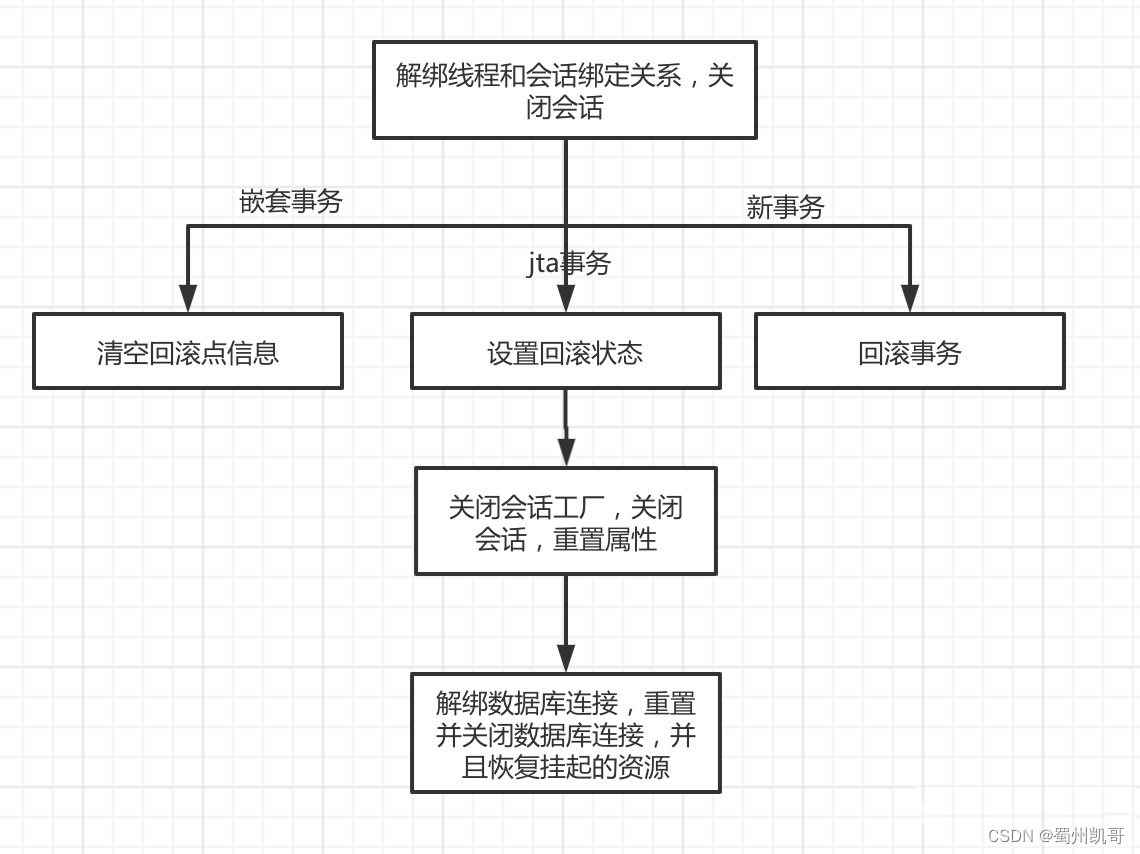
private void processRollback(DefaultTransactionStatus status, boolean unexpected) {try {boolean unexpectedRollback = unexpected;try {//解绑线程和会话绑定关系,关闭会话triggerBeforeCompletion(status);//如果设置了回滚点,说明是嵌套事务if (status.hasSavepoint()) {if (status.isDebug()) {logger.debug("Rolling back transaction to savepoint");}//回滚到回滚点,清空回滚点status.rollbackToHeldSavepoint();}//如果是新事务else if (status.isNewTransaction()) {if (status.isDebug()) {logger.debug("Initiating transaction rollback");}//回滚doRollback(status);}else {// jta事务if (status.hasTransaction()) {//如果是本地回滚或者全局回滚if (status.isLocalRollbackOnly() || isGlobalRollbackOnParticipationFailure()) {if (status.isDebug()) {logger.debug("Participating transaction failed - marking existing transaction as rollback-only");}// 设置回滚状态为需要回滚doSetRollbackOnly(status);}else {if (status.isDebug()) {logger.debug("Participating transaction failed - letting transaction originator decide on rollback");}}}else {logger.debug("Should roll back transaction but cannot - no transaction available");}// Unexpected rollback only matters here if we're asked to fail earlyif (!isFailEarlyOnGlobalRollbackOnly()) {unexpectedRollback = false;}}}catch (RuntimeException | Error ex) {//关闭会话工厂,关闭会话,重置属性triggerAfterCompletion(status, TransactionSynchronization.STATUS_UNKNOWN);throw ex;}//关闭会话工厂,关闭会话,重置属性triggerAfterCompletion(status, TransactionSynchronization.STATUS_ROLLED_BACK);// Raise UnexpectedRollbackException if we had a global rollback-only markerif (unexpectedRollback) {throw new UnexpectedRollbackException("Transaction rolled back because it has been marked as rollback-only");}}finally {//解绑数据库连接,重置并关闭数据库连接//恢复挂起的资源cleanupAfterCompletion(status);}}
再用一张流程图梳理一下流程
事务还有很多有意思的代码,由于篇幅的原因暂时先介绍到这里。
文章中间,我提出了几个小问题朋友们有空可以思考一下,这些问题我会在以后文章中进行解读。欢迎朋友们关注,谢谢大家。


 4万+
4万+


 被折叠的 条评论
为什么被折叠?
被折叠的 条评论
为什么被折叠?
 到【灌水乐园】发言


