


目录
27.3.动画控制 (使用Character Pack: Free Sample资源包)
1.组件
组件就是某一个物体的功能,不同的物体都是由空物体添加了不同的组件,例:正方体,灯光;
点击物体,选择添加组件

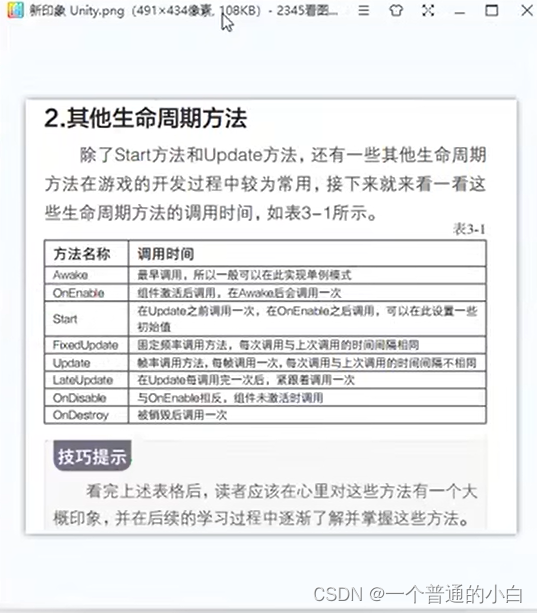
2.脚本的声明周期
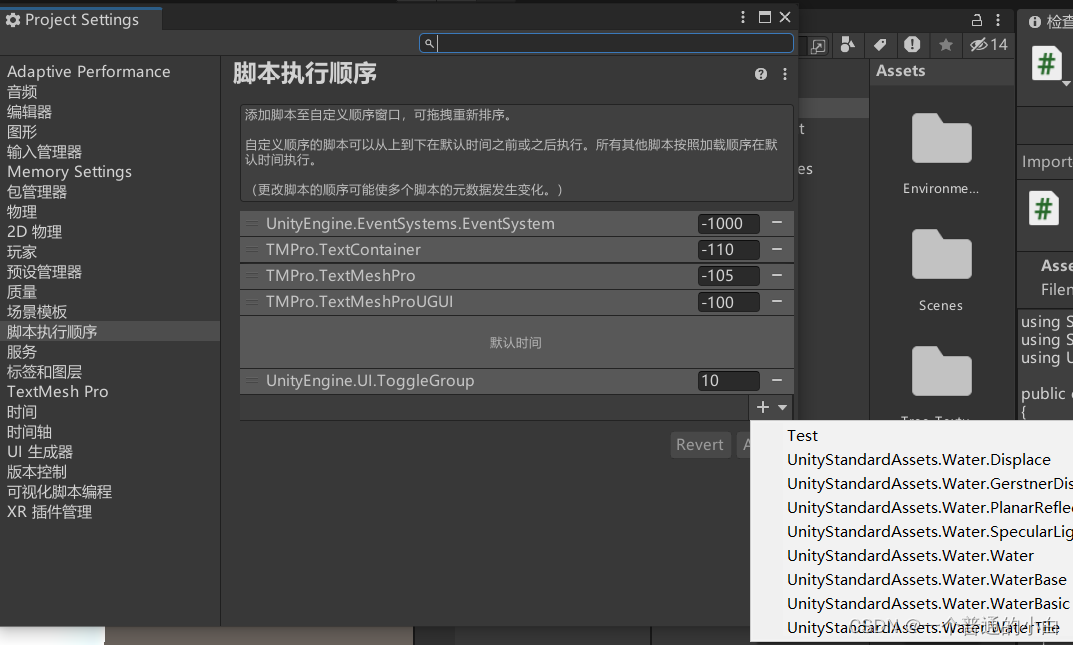
2.1脚本的执行顺序
- 对象会依次执行所有脚本的Awake,OnEnable,Start....;
- 脚本的执行顺序按添加的顺序先入后出;
打开脚本执行顺序:编辑--项目管理--脚本执行顺序
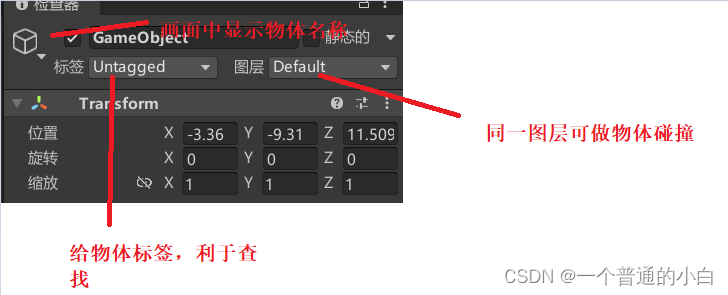
3.图层分组
4.标量和向量
- 标量:只有大小的量,例:1、100 、390;
- 向量:有大小且有方向的量,例:前方100m;
- 向量的模:向量的大小;
- 单位向量:大小为1的向量;
- 单位化,归一化:把向量转化为单位向量的过程;
4.1.向量的运算
A(x1,y1),B(x2,y2);
- 加法:A+B = (x1+x2,y1+y2)
- 减法:A-B = (x1-x2,y1-y2)
- 点乘:A*B = x1x2 + y1y2 = n = |A||B|*cos&;
- 点乘的意义:求出两者之间的夹角:n = cos&;
5.预设体
5.1.设置子物体:点击物体右击创建对象
5.2.预设体:将物体拖拽至Assets,形成预制体
- 改变预设体的参数,由预设体生成的对象的参数也会一同改变;
- 改变预设体生成的对象的参数,可以通过改变位置的脚本的设置“应用到预制体”;

5.3.变体:和预制体相同的参数会随之改变,独有的不改变
- 将由预制体的生成的对象,修改参数拖拽到Aseets,选择预制体变体即可;

6.欧拉角和四元数
    void Start()
    {
        //表示欧拉角
        Vector3 rotate = new Vector3(0, 30, 0);
        //四元数默认值为0的;
        Quaternion quaternion = Quaternion.identity;
        //欧拉角转四元数
        quaternion = Quaternion.Euler(rotate);
        //四元数转欧拉角
        rotate = quaternion.eulerAngles;
        //看向某一个位置
        quaternion = quaternion.LookRotation(new Vecter3(0,0,0));
    }
7.动态修改物体属性
        //获取脚本所挂载的游戏物体,
        GameObject go = this.gameObject;
        Debug.Log(go.name);
        //直接使用gameObject也可以
        Debug.Log(gameObject.name);
        Debug.Log(gameObject.tag);
        Debug.Log(gameObject.layer);

        Debug.Log(cube.name);
        //当前真正的激活状态
        Debug.Log(cube.activeInHierarchy);
        //当前自身的激活状态
        Debug.Log(cube.activeSelf);

        //获取transform,这个组件可以直接获取
        Debug.Log(transform.position);
        Transform trans = this.transform;
        //获取其他组件 ,使用GetComponent;
        BoxCollider bc = GetComponent<BoxCollider>();
        //获取子对象的组件
        BoxCollider bcc = GetComponentInChildren<BoxCollider>();
        //获取父对象的组件
        BoxCollider bcp = GetComponentInParent<BoxCollider>();

        //添加组件
        gameObject.AddComponent<AudioSource>();

        //通过名字来获取游戏对象
        GameObject tmp = GameObject.Find("Tmp");
        //通过标签来获取游戏对象
        //GameObject tmp = GameObject.FindWithTag("ENEMY");
        Debug.Log(tmp.name);
        //设置激活状态
        tmp.SetActive(false);

        //实例化预制体,并作为子物体存在
        Instantiate(prefab,transform);
        //实例化预制体
        //Instantiate(prefab, Vector3.zero,Quaternion.identity);
7.1.声明对象(游戏对象/预制体)并关联
- 在vs中声明对象,然后在unity中将对应物体拖拽至C#脚本对应位置

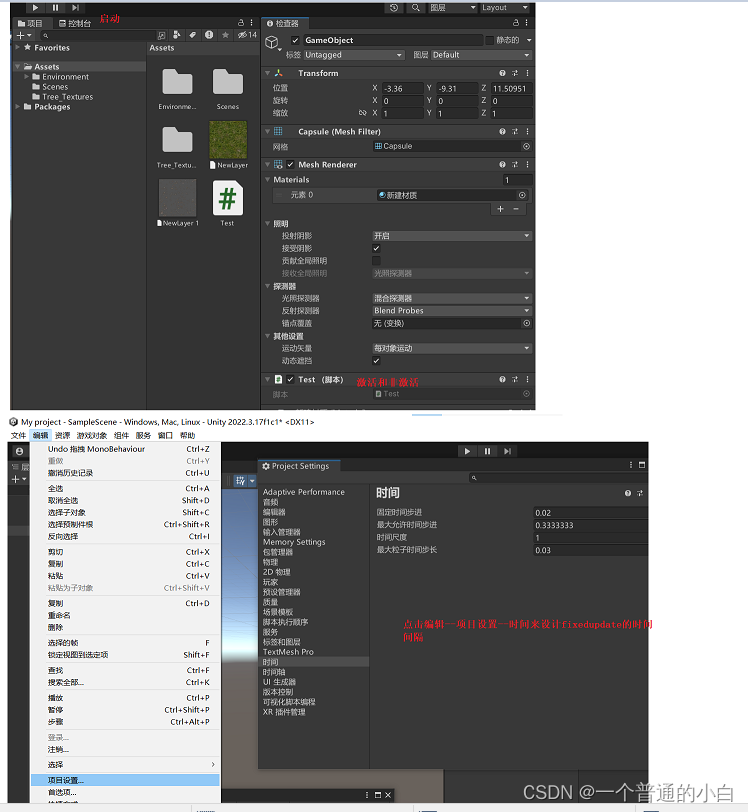
8.获取时间
    float timer = 0;
    void Start()
    {
        //当前脚本执行的时间
        Debug.Log(Time.time);
        //时间缩放值
        Debug.Log(Time.timeScale);
        //固定时间间隔
        Debug.Log(Time.fixedDeltaTime);
    }

    void Update()
    {
        timer += Time.deltaTime;
        //上一帧到这一帧所花的时间
        //Debug.Log(Time.deltaTime);
        if(timer > 5.0)
        {
            Debug.Log("shijiancahoguo5miao");
        }
    }
9.Application类
        //游戏数据文件(只读),加密
        Debug.Log(Application.dataPath);
        //持续化文件(写入保存数据),加密
        Debug.Log(Application.persistentDataPath);
        //配置文件,非加密
        Debug.Log(Application.streamingAssetsPath);
        //临时文件
        Debug.Log(Application.temporaryCachePath);
        //是否后台运行
        Debug.Log(Application.runInBackground);
        //访问网址
        //Application.OpenURL("https://www.bilibili.com/video/BV1gQ4y1e7SS?p=26&vd_source=dd33a133562c58424bf7e4dd3013ae0e");
        退出
        //Application.Quit();
10.场景
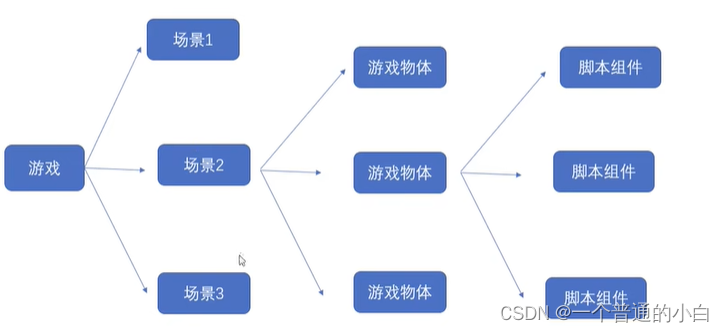
- 游戏由多个场景构成,场景由多个游戏对象构成,游戏对象由多个组件构成;
10.1.创建和添加废弃用场景
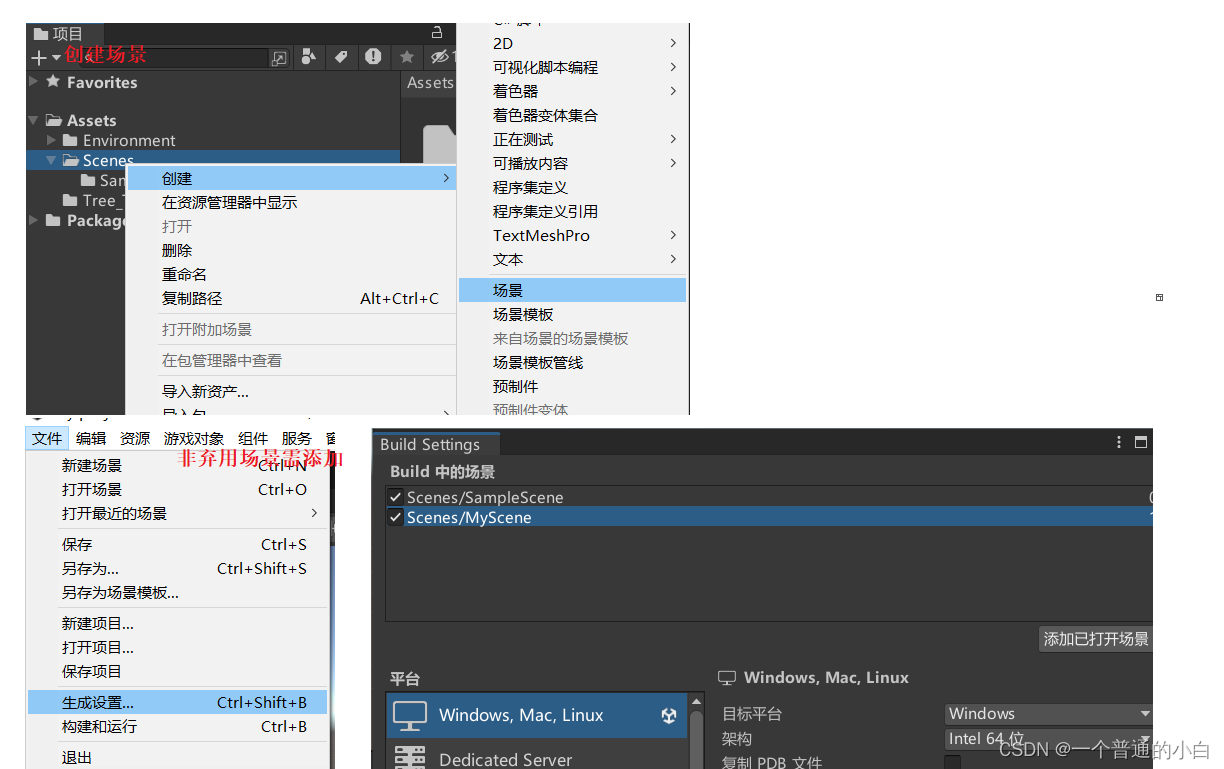
10.2.同步加载
- 加载其他场景默认是LoadSceneMode.Single;
        //有两个类:场景类和场景管理类

        //场景类
        //获取当前场景
        Scene scene = SceneManager.GetActiveScene();
        //场景名字
        Debug.Log(scene.name);
        //场景的路径
        Debug.Log(scene.path);
        //场景的索引
        Debug.Log(scene.buildIndex);
        //获取当前场景的所有游戏物体,打印数量
        GameObject[] goa = scene.GetRootGameObjects();
        Debug.Log(goa.Length);

        //场景管理类
        //创建一个新场景
        Scene newScene = SceneManager.CreateScene("NewScene");
        //当前的场景数量
        Debug.Log(SceneManager.sceneCount);
        //卸载场景
        SceneManager.UnloadSceneAsync("NewScene");
        //加载其他场景,切换
        SceneManager.LoadScene("MyScene",LoadSceneMode.Single);
        //加载其他场景,添加
        SceneManager.LoadScene("MyScene",LoadSceneMode.Additive);
10.3.异步加载
    public AsyncOperation operation;
    void Start()
    {
        StartCoroutine(LoadScene());
    }
    //协程方法调用异步加载场景
    IEnumerator LoadScene()
    {
        operation = SceneManager.LoadSceneAsync(1);
        //加载结束不自动跳转
        operation.allowSceneActivation = false;
        yield return operation;
    }
    float timer = 0;
    void Update()
    {
        //当前加载进度 0-0.9
        Debug.Log(operation.progress);
        timer += Time.deltaTime;
        if(timer > 5)
        {
            Debug.Log("超过5秒,跳转场景");
            operation.allowSceneActivation = true;;
        }
    }
11.transform类
- transform类通常有两个作用:1.控制位置旋转缩放,2.控制父子关系
    void Start()
    {
        常用的参数
        获取世界位置
        //Debug.Log(transform.position);
        获取本地位置
        //Debug.Log(transform.localPosition);
        获取四元数旋转
        //Debug.Log(transform.rotation);
        //Debug.Log(transform.localRotation);
        获取欧拉角
        //Debug.Log(transform.eulerAngles);
        //Debug.Log(transform.localEulerAngles);
        transform获取缩放
        //Debug.Log(transform.localScale);
        transform获取向量:前方、上方、右方
        //Debug.Log(transform.forward);
        //Debug.Log(transform.up);
        //Debug.Log(transform.right);

        //控制父子关系
        //获取父对象
        //GameObject parent = transform.parent.gameObject;
        //获取子对象,子对象有多个
        Debug.Log(transform.childCount);
        Transform child = transform.Find("Child");
        //按索引获取子物体
        transform.GetChild(0);
        //解除父子关系
        transform.DetachChildren();
        //判断是否是另一个物体的子物体
        Debug.Log(child.IsChildOf(transform));
        //设置为一个物体的子物体
        child.SetParent(transform);
        Debug.Log(child.IsChildOf(transform));
    }
    void Update()
    {
        //看向原点(0,0,0)
        //transform.LookAt(Vector3.zero);
        //旋转
        //transform.Rotate(Vector3.right, 3);
        //绕某一个物体旋转:点,轴,度数
        //transform.RotateAround(Vector3.zero, Vector3.right, 2);
        //移动
        //transform.Translate(Vector3.forward * 0.1f);
    }
12.获取键鼠操作
    void Update()
    {
        //0-左键,1-右键,2-滚轮
        //按下右键
        if (Input.GetMouseButtonDown(1))
        {
            Debug.Log("按下了右键");
        }
        //持续按下右键
        if (Input.GetMouseButton(1))
        {
            Debug.Log("持续按下右键");
        }
        //抬起右键
        if (Input.GetMouseButtonUp(1))
        {
            Debug.Log("抬起右键");
        }
        //按下了A键
        if (Input.GetKeyDown(KeyCode.A))
        {
            Debug.Log("按下了A键");
        }
        //持续按下了A键
        if (Input.GetKey(KeyCode.A))
        {
            Debug.Log("持续按下了A键");

        }
        //抬起了A键
        if (Input.GetKeyUp(KeyCode.A))
        {
            Debug.Log("抬起了A键");

        }
    }
13.轴线

获取虚拟轴和虚拟按键
    void Update()
    {
        //获取虚拟轴
        float horizontal = Input.GetAxis("Horizontal");
        float vertical = Input.GetAxis("Vertical");
        Debug.Log(horizontal+"    "+vertical);
        //获取虚拟按键
        if(Input.GetButtonDown("Jump"))
        {
            Debug.Log("空格");
        }
    }
14.触摸
    void Start()
    {
        //开启多点触摸
        Input.multiTouchEnabled = true;
    }

    void Update()
    {
        //判断单点触摸
        if(Input.touchCount == 1)
        {
            //获取触摸
            Touch touch = Input.touches[0];
            //触摸位置
            Debug.Log(touch.position);
            //触摸阶段
            switch(touch.phase)
            {
                case TouchPhase.Began://开始
                    break;
                case TouchPhase.Moved://移动
                    break;
                case TouchPhase.Stationary://静止
                    break;
                case TouchPhase.Ended://结束
                    break;
                case TouchPhase.Canceled://取消
                    break;
            }
        }

        //多点触摸
        if(Input.touchCount == 2)
        {
            Touch touch1 = Input.touches[0];
            Touch touch2 = Input.touches[1];
        }
    }
15.灯光
15.1.光的类型(区域下面单独讲)
- 聚光类似一个手电筒
- 定向光从某一个方向照射,只有改变旋转才能改变照射的方向
- 点光类似一个灯泡

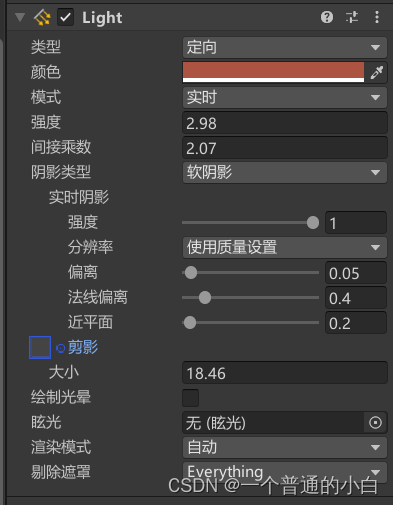
15.2.灯光的参数选项
- 实时灯光:实时计算阴影等,耗性能,烘焙灯光:把灯光贴图保存,删除灯光依然有灯光贴图
- 软阴影:真实性好,耗性能
15.3.区域灯光和烘焙
1.选择烘焙物体,设置为Contribute GI

2.窗口-渲染-照明-生成灯光

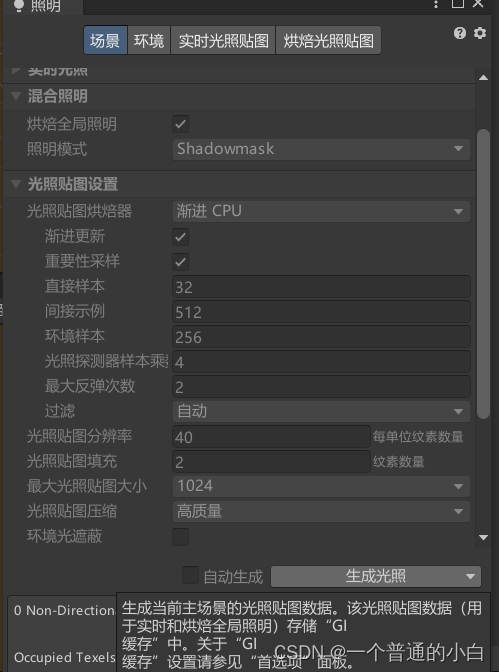
3.会生成一个灯光贴图

16.相机
17.设置音乐音效
//声明音乐片段
public AudioClip music;
public AudioClip se;
//声音组件
private AudioSource player;
void Start()
{
player = GetComponent<AudioSource>();
//设定播放片段
player.clip = music;
//设置循环
player.loop = true;
//音量
player.volume = 0.5f;
//播放
player.Play();
}
void Update()
{
//点击空格停止音乐
if(Input.GetKeyDown(KeyCode.Space))
{
if(player.isPlaying)
{
//暂停
//player.Pause();
//停止播放
player.Stop();
}
else
{
//继续播放
//player.UnPause();
//从头开始播放
player.Play();
}
}
//播放一次音效
if(Input.GetMouseButtonDown(0))
{
player.PlayOneShot(se);
}
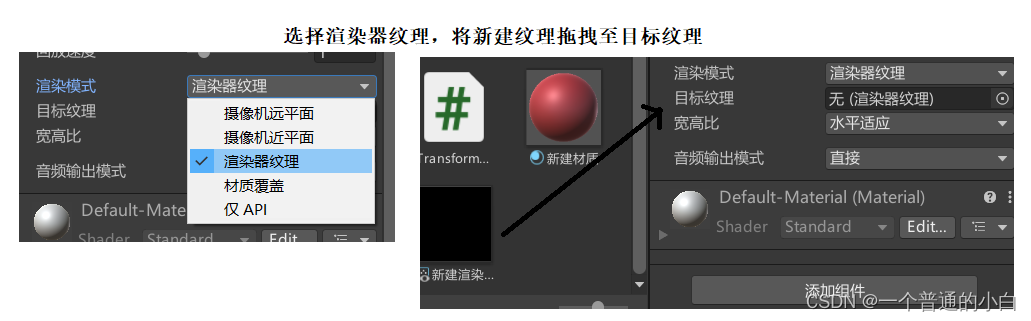
}18.设置视频播放
先创建渲染器纹理


19.使用角色控制器
void Update()
{
player = GetComponent<CharacterController>();
//水平轴
float horizontal = Input.GetAxis("Horizontal");
//垂直轴
float vertical = Input.GetAxis("Vertical");
//画一条方向的射线
Vector3 dir = new Vector3(horizontal, 0, vertical);
Debug.DrawRay(transform.position, dir, Color.black);
//受重力影响
player.SimpleMove(dir);
//不受重力影响
//player.Move(dir);
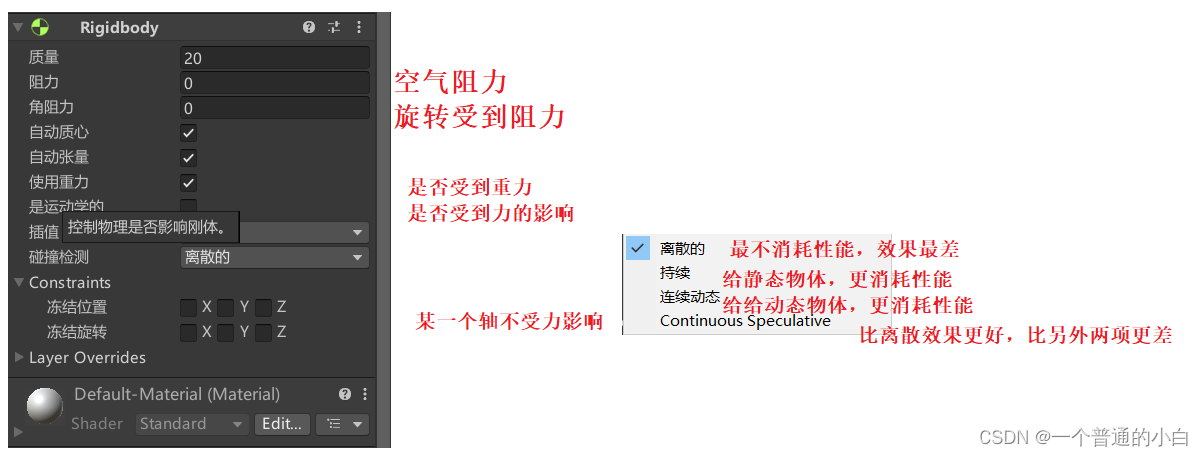
}20.RigidBody刚体;受力影响
21.碰撞
- 碰撞检测脚本写在碰撞的两物体任意一个;
- 两个碰撞物体至少有一个有刚体组件,至少一个物体会受力的影响;
当火焰与地面碰撞后,发生爆炸;需要给物体添加碰撞检测组件Collider
检测碰撞
    //声明预制体
    public GameObject Prefab;
    void Start()
    {

    }
    void Update()
    {
    }
    //监听发生碰撞
    //参数为被碰撞物体的碰撞信息:被碰撞游戏对象等等
    private void OnCollisionEnter(Collision collision)
    {
        //发生碰撞,创建爆炸物体
        Instantiate(Prefab,transform.position,Quaternion.identity);
        //销毁火焰
        Destroy(gameObject);
    }
    //持续碰撞
    private void OnCollisionStay(Collision collision)
    {
    }
    //碰撞结束
    private void OnCollisionExit(Collision collision)
    {
    }
销毁爆炸:将脚本挂载到爆炸预制体上,自动销毁
    //2s后销毁
    void Start()
    {
    }
    float timer = 0;
    void Update()
    {
        timer += Time.deltaTime;
        if(timer > 2)
            Destroy(gameObject);
    }
22.触发
- 触发和碰撞的区别:触发两个物体碰撞后会穿过物体
- 也需要将其中一个物体设为刚体
22.1.设置触发:在碰撞器组件设置是触发器

发生触发,墙消失
移动物体且添加刚体
    void Update()
    {
        //获取水平垂直轴
        float horizontal = Input.GetAxis("Horizontal");
        float vertical = Input.GetAxis("Vertical");
        //向量
        Vector3 Dir = new Vector3(horizontal,  0, vertical);
        //朝向量移动,乘以deltaTime从帧转为妙
        transform.Translate(Dir * 2 * Time.deltaTime);
    }
设置是触发器
//参数为进入触发物体的碰撞器
private void OnTriggerEnter(Collider other)
{
GameObject wall = GameObject.Find("Wall");
//存在那么删除或者设置为非激活
if(wall != null)
{
wall.SetActive(false);
}
}
private void OnTriggerStay(Collider other)
{
}
private void OnTriggerExit(Collider other)
{
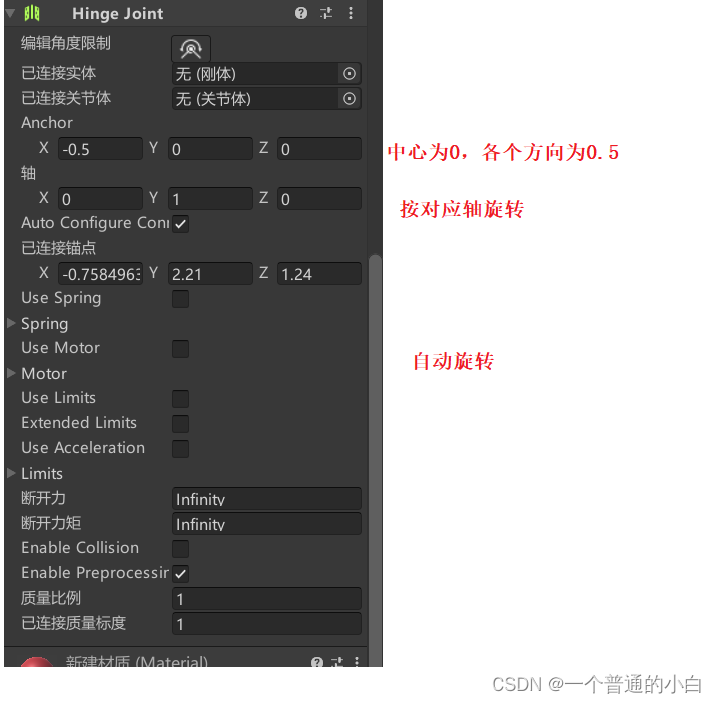
}23.关节
23.1.铰链关节(HingeJoint)
- 在Physics中找
23.2.弹簧关节(Springjoint)
- 被连接的物体需要设置为刚体

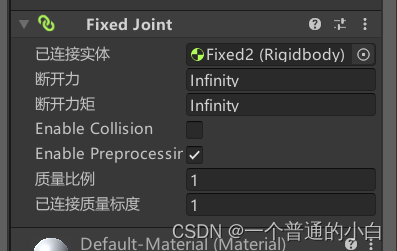
23.3.固定关节(FixedJoint)
- 被连接的物体需要设置为刚体
24.物理材质(摩擦力和弹力)
- 动摩擦力<=静摩擦力
创建一个物理材质

物理材质添加到碰撞器的材质里面

25.射线检测:获取点击位置
- 点击位置由相机的镜片面发生出;下图灰色的长方形

    void Update()
    {
        //鼠标点击
        if(Input.GetMouseButtonDown(0))
        {
            //鼠标点击发出射线,main为主相机,current为当前相机
            Ray ray = Camera.main.ScreenPointToRay(Input.mousePosition);
            //声明一个碰撞检测类
            RaycastHit hit;
            //输出参数获取碰撞检测类
            bool res = Physics.Raycast(ray, out hit);
            if(res)
            {
                Debug.Log(hit.point);
                //移动到点击位置
                transform.position = hit.point;
            }
        }
26.粒子效果
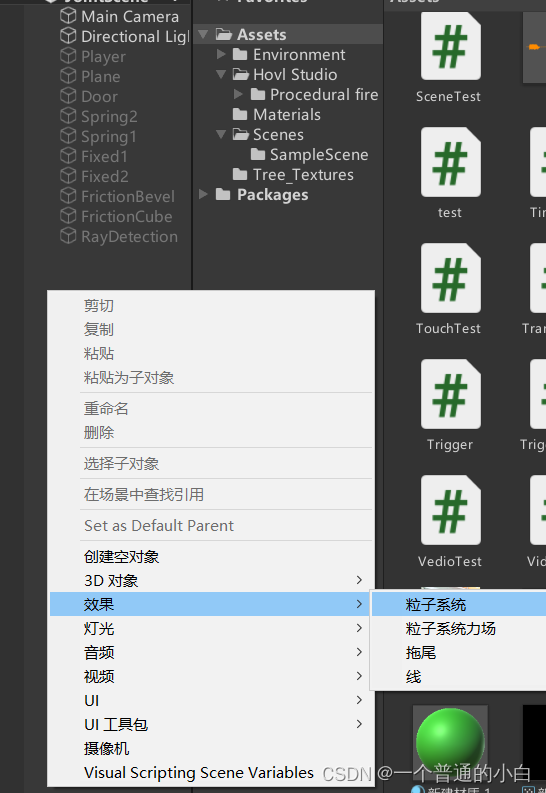
26.画线和拖尾
26.1.画线:添加Line Renderer组件

void Start()
{
//获取LineRenderer组件
LineRenderer lr = GetComponent<LineRenderer>();
//设置点的个数
lr.positionCount = 3;
lr.SetPosition(0, Vector3.zero);
lr.SetPosition(1, Vector3.one);
lr.SetPosition(2, Vector3.up);
//Vector3[] vector3s = { Vector3.zero, Vector3.one, Vector3.up };
//lr.SetPositions(vector3s);
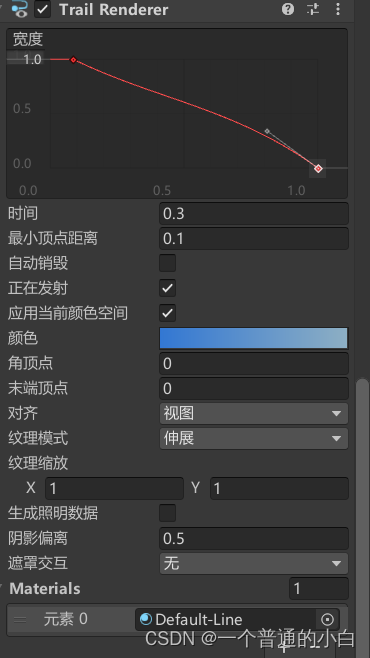
}26.2.拖尾
- 组件在Effect中TrailRenderer
27.动画
27.1.老版动画(Animation)
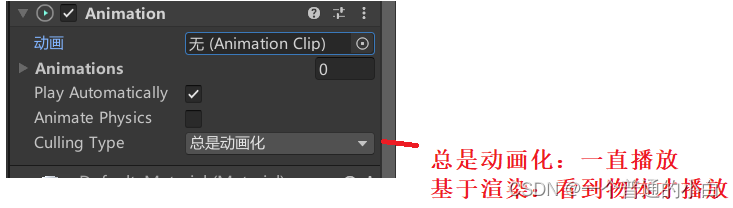
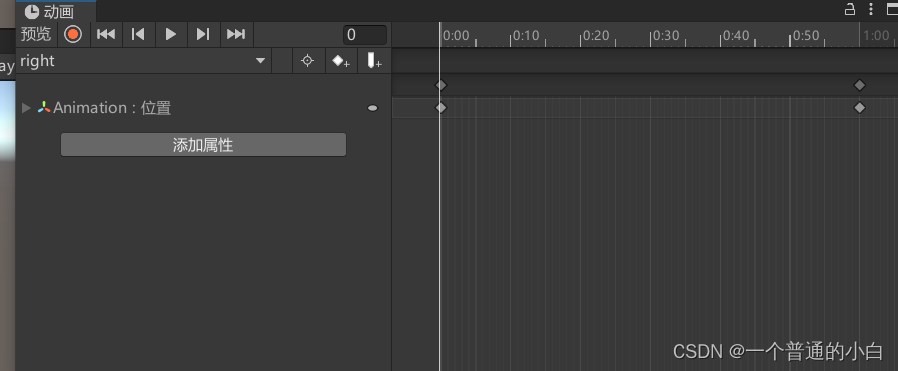
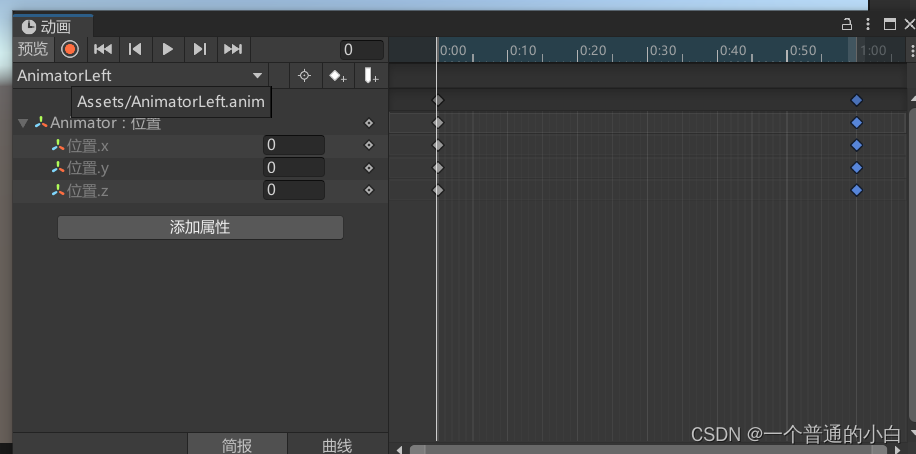
27.1.1.制作简易动画

可以使用关键帧的方法录制或者使用录制模式

27.2.新版动画(Animator)
将创建的动画控制器拖拽至Animator组件的控制器

点开动画控制器的界面,如下

如老版动画一样创建动画

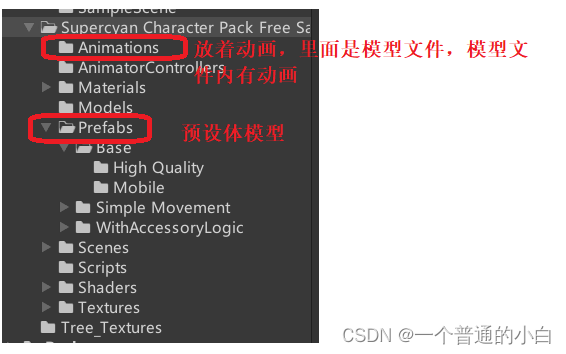
27.3.动画控制 (使用Character Pack: Free Sample资源包)
27.3.1.资源包的构成
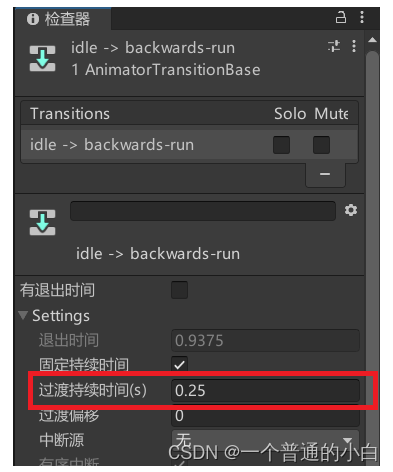
27.3.2设置过渡条件

    void Update()
    {
        //点击鼠标左键角色触发wave动作
        if(Input.GetMouseButtonDown(0))
        {
            Animator animator = GetComponent<Animator>();
            animator.SetTrigger("wave");
        }
    }
27.4.控制角色移动
下面属性控制:动画切换速度,越小切换越快切换看起来更生硬
void Update()
{
//获取垂直水平轴
float horizontal = Input.GetAxis("Horizontal");
float vertical = Input.GetAxis("Vertical");
Vector3 Dir = new Vector3(horizontal, 0, vertical);
//如果点击了方向键WSAD,那么Dir不可能为0
if(Dir != Vector3.zero)
{
//旋转方向等同于看向这个方向
transform.rotation = Quaternion.LookRotation(Dir);
//切换到Run动画
GetComponent<Animator>().SetBool("IsRun", true);
//以旋转方向,直接向前移动
transform.Translate(Vector3.forward * 2 * Time.deltaTime);
}
else
{
//切换到idle动画
GetComponent<Animator>().SetBool("IsRun", false);
}
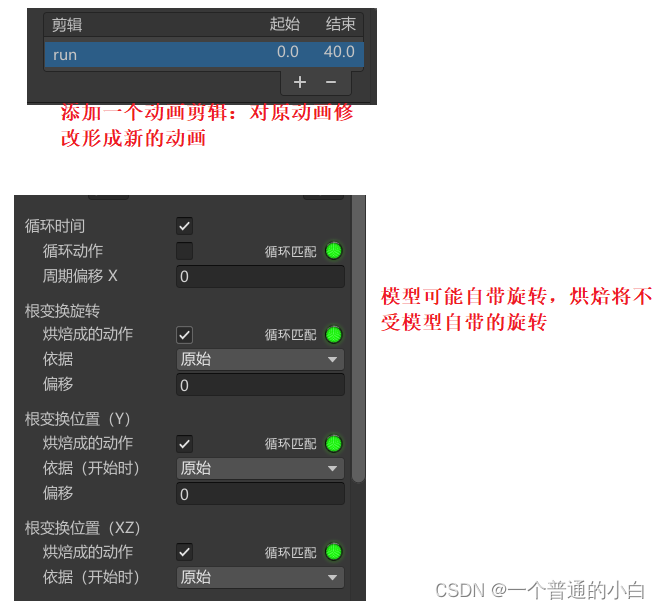
}27.5.动画功能设置
介绍:无:无动画;旧版:使用Animation组件的动画;泛型:使用Animator的非人动画;人形:使用Animator的人形动画;

27.5.1曲线
- 使用场景:比如随着动画时间,将生成火焰,火焰的大小可以由曲线数值来设置
- 曲线和参数的名字相同,旧可以使用Animatior组件的GetFloat获取数值
Debug.Log(GetComponent<Animator>().GetFloat("Curve"));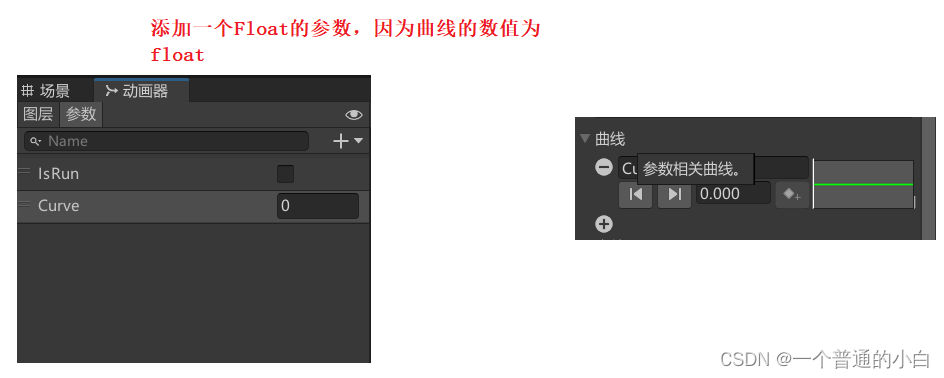
27.5.2.事件
- 使用场景:当动画到某一帧时,例如左脚着地将发出脚步声;
- 关联:添加事件后,挂载在物体上的任意脚本写出对应函数即可;
    void LeftFoot()
    {
        Debug.Log("左脚着地");
    }
    void RightFoot()
    {
        Debug.Log("右脚着地");
    }
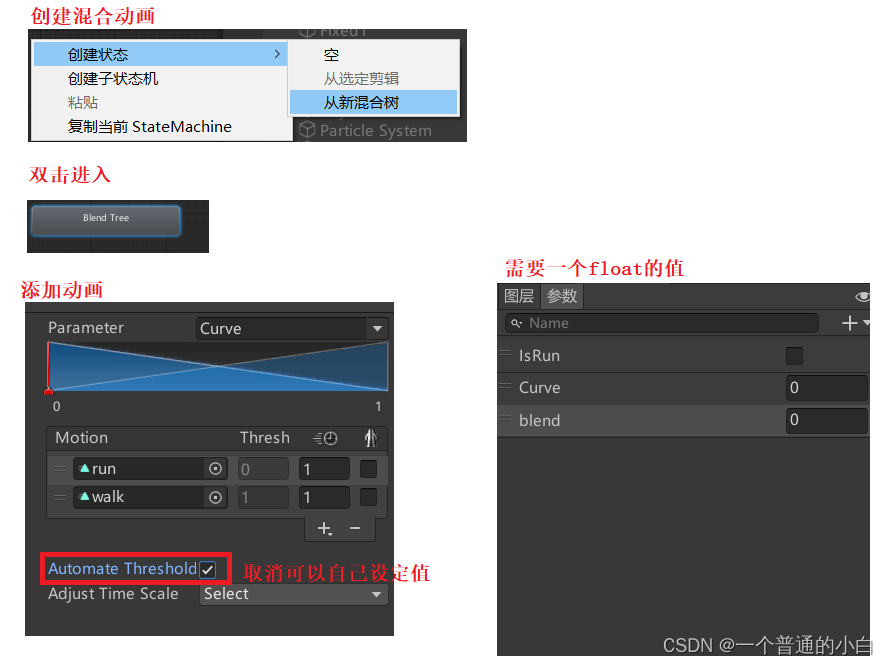
27.6.混合动画
- 根据float类型的参数,决定播放两个动画的明显程度;
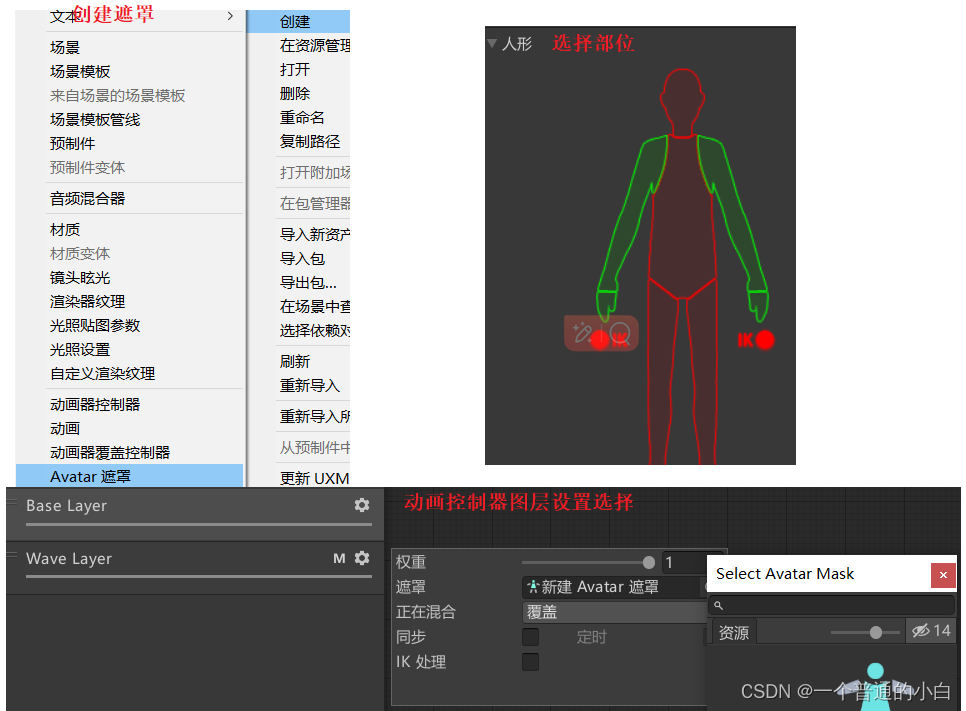
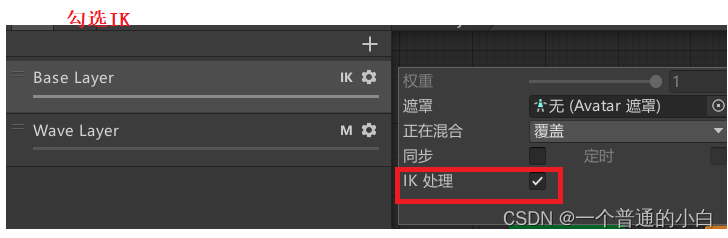
27.7.遮罩
27.7.1.遮罩
- 只覆盖所选中的身体部位
- 图层的权值决定覆盖程度,列表下面为新(Wave Layer),新覆盖旧
27.7.2.动画分类
- 创建一个子状态机,同一类动画放在一起;
- 创建一个新图层,同一类动画放在一起;
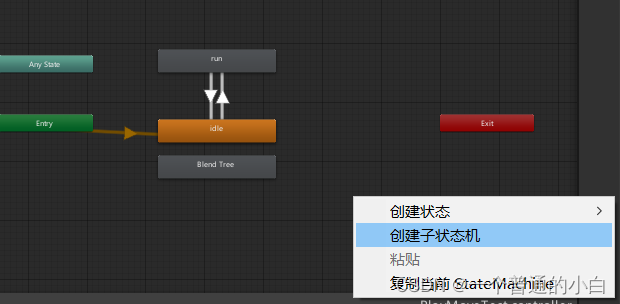
27.7.3.3个状态
- 所有状态:连接动画,此动画将可以被所有动画过渡
- 入口状态:会从这个状态开始
- 退出状态:返回入口状态

27.8.IK
- 身体的部位看向或指向某一个位置
    private void OnAnimatorIK(int layerIndex)
    {
        Animator animator = GetComponent<Animator>();
        //设置头部IK
        animator.SetLookAtWeight(1);//设置权重
        animator.SetLookAtPosition(target.transform.position);//设置位置

        //设置其他部位都使用以下函数
        //设置位置和位置权值
        animator.SetIKPositionWeight(AvatarIKGoal.LeftHand, 1);
        animator.SetIKPosition(AvatarIKGoal.LeftHand, target.transform.position);
        //设置旋转和旋转权值
        animator.SetIKRotationWeight(AvatarIKGoal.LeftHand, 1);
        animator.SetIKRotation(AvatarIKGoal.LeftHand, target.transform.rotation);

    }
28.AI导航
28.1.设置导航

28.2.移动起来
- 添加导航代理组件

using UnityEngine.AI;
public class NavAgent : MonoBehaviour
{
private NavMeshAgent agent;
void Start()
{
//获取组件
agent = GetComponent<NavMeshAgent>();
}
void Update()
{
if(Input.GetMouseButtonDown(0))
{
Ray ray = Camera.main.ScreenPointToRay(Input.mousePosition);
RaycastHit hit;
if(Physics.Raycast(ray, out hit))
{
//设置为导航目标点
agent.SetDestination(hit.point);
}
}
}
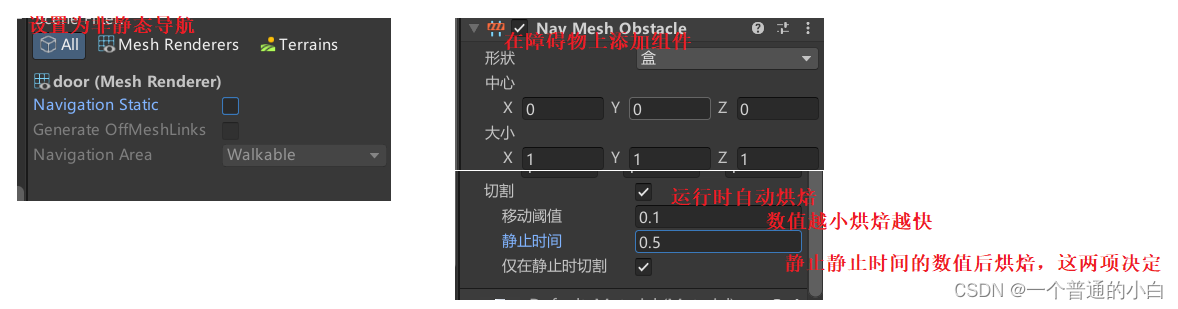
}28.3.动态障碍物(动态烘焙)
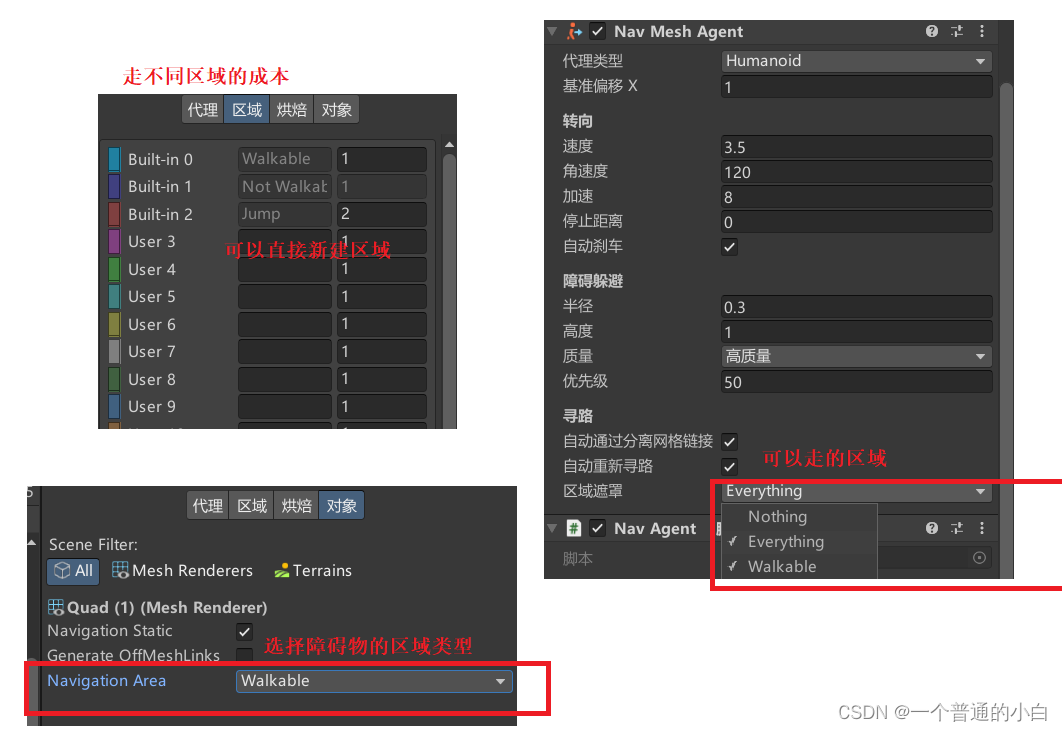
28.4.设置跳跃高度和距离

28.5.传送阵

28.6.成本
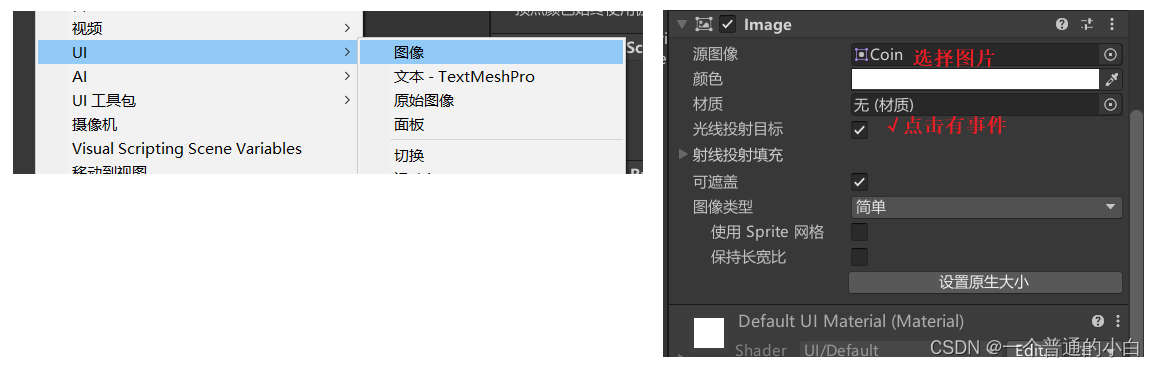
29. UI
创建UI画布,同是会自动创建事件系统

UI画布设置

添加图像
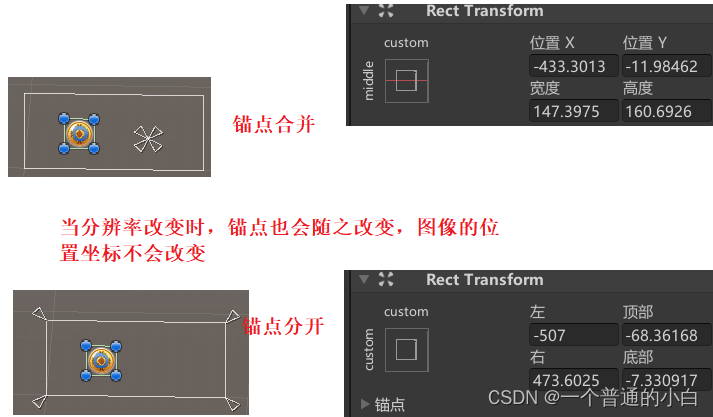
锚点
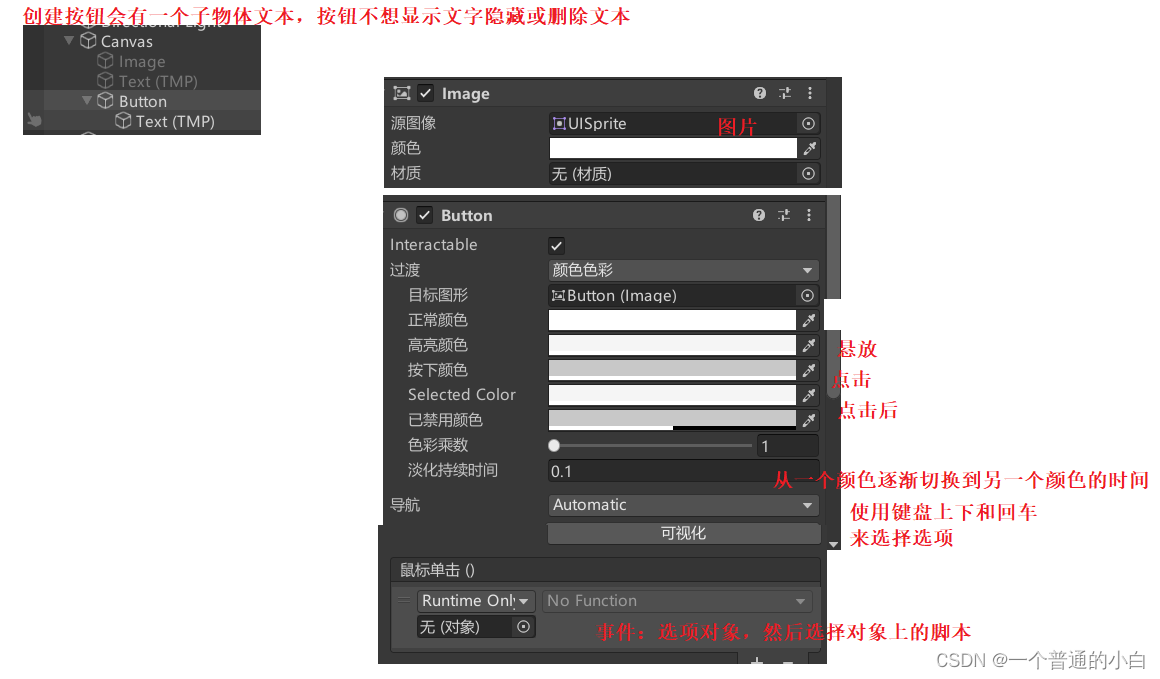
29.1.文本 和按钮
- 旧版都要使用Using UnityEngine.UI,新版都需要使用Using TMPro;

按钮
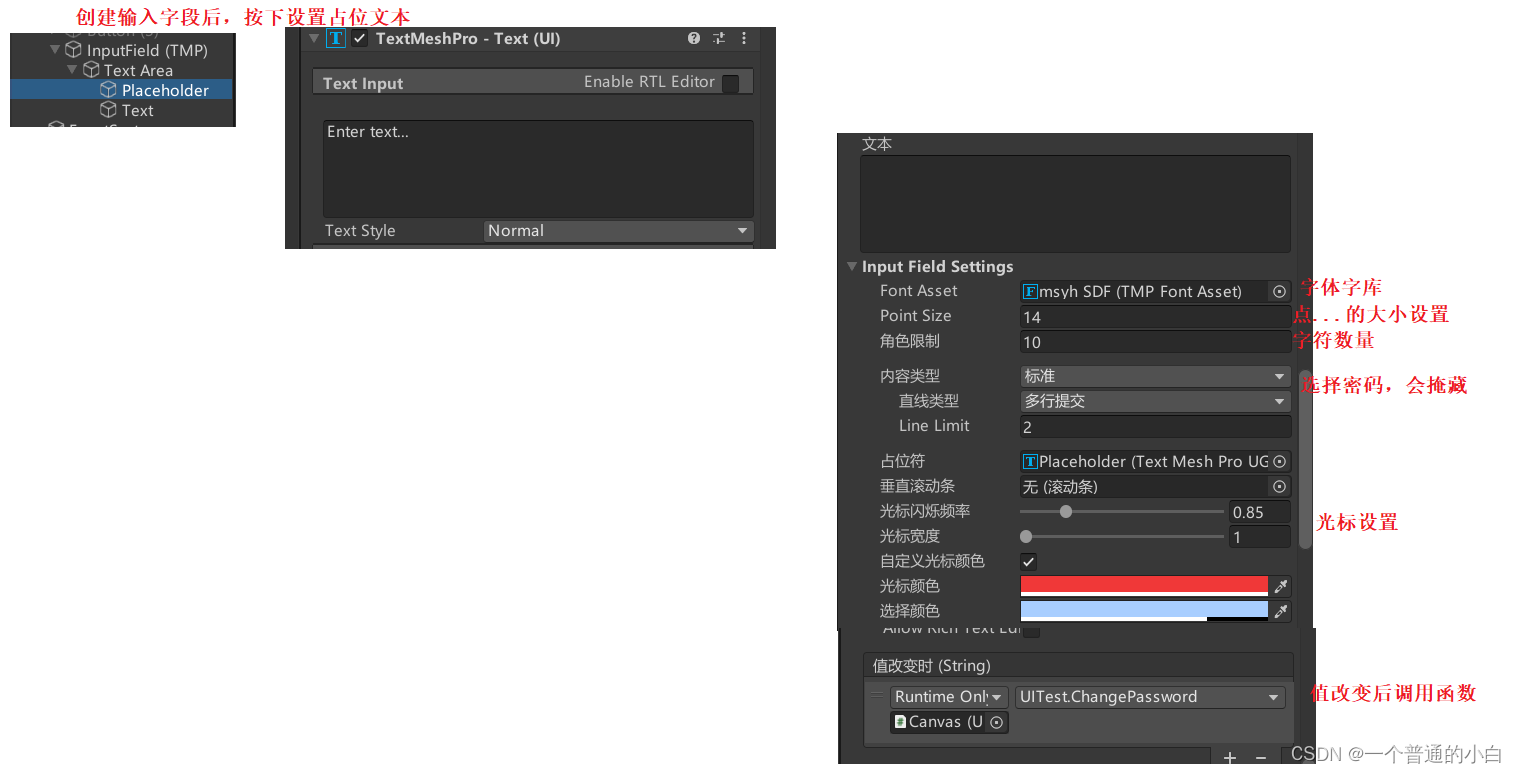
29.2.输入框
 29.3. 选项(切换)组件

29.4.下拉列表
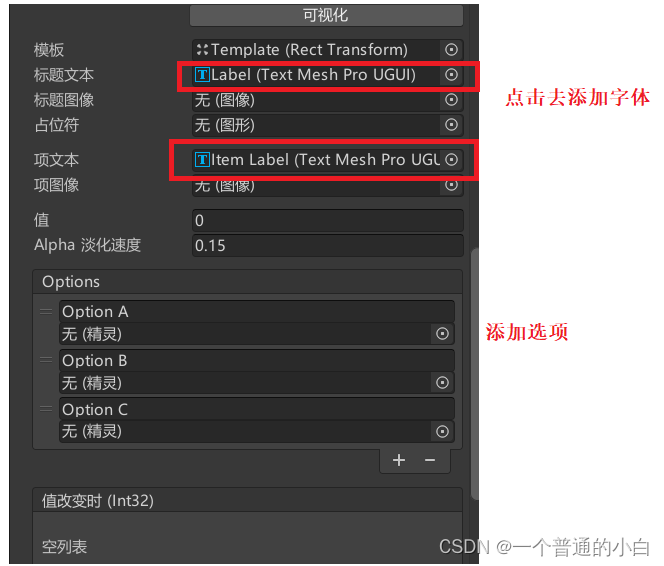
使用脚本添加
void Start()
{
TMP_Dropdown dropdown = GetComponent<TMP_Dropdown>();
//获取选择表
List<TMP_Dropdown.OptionData> options = dropdown.options;
//修改选项;
options.Add(new TMP_Dropdown.OptionData("乌兰巴托"));
//dropdown.options = options;
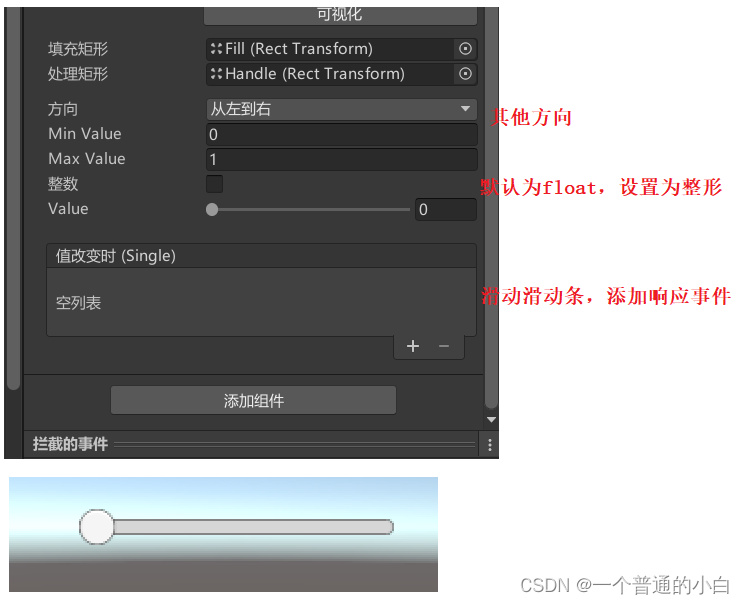
}29.5.滑动条
29.6.滚动条

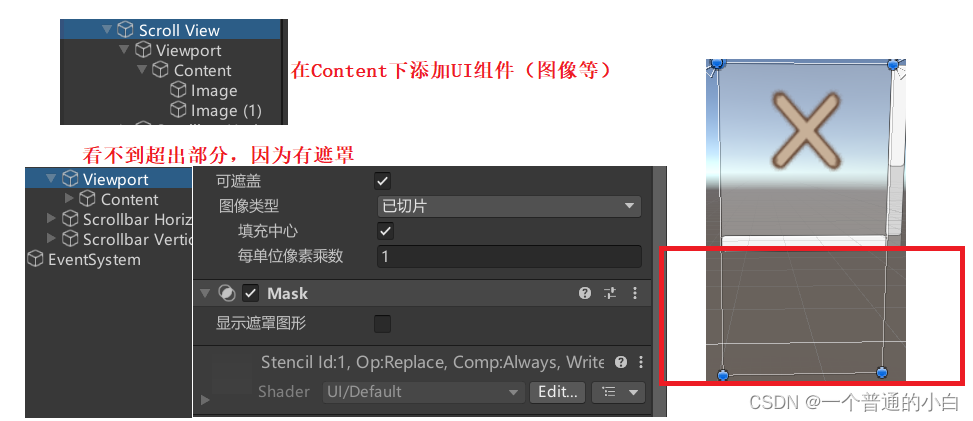
29.7.滚动视图
29.8.画板

29.9.适配UI的一些组价
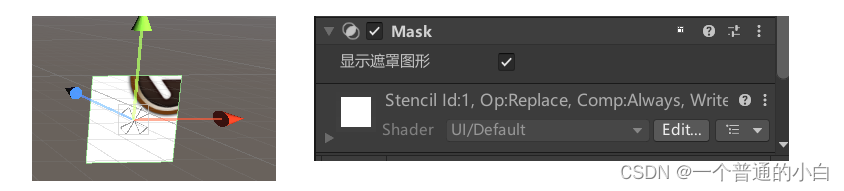
1.mask:添加Mask组件,子物体超出部分被遮盖
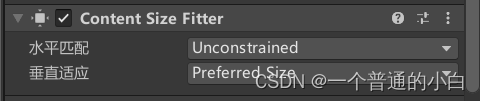
2.content size fiitter:自动控制文本垂直/水平
- 垂直适应:选择Preferred size(选择大小)
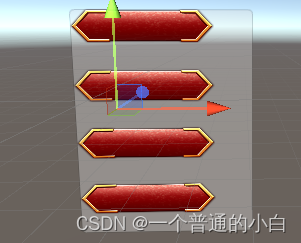
3.vertical/horizontal/grid layout group:控制画板上的物体(垂直、水平、网格)间隔
- 挂载在画板上
- 挂载在滚动视图的content上


 733
733


 被折叠的 条评论
为什么被折叠?
被折叠的 条评论
为什么被折叠?
 到【灌水乐园】发言


