


目录
Java中的常用类及包装类
Math类
在Java中,如果想使用一些数学方法,则可以使用Math类中的方法,Java的Math类具有构造方法私有及方法静态的特点,所以使用Math类不可以创建对象,调用对应方法只需要使用类名即可调用
在Java中,Math在java.lang包下,所以可以不引包
Math类常用方法
- 求绝对值:
static int abs(int a) - 向上取整:
static double ceil(double a) - 向下取整:
static double floor(double a) - 四舍五入:
static long round(double a) - 求两个数之间的最小值:
static int max(int a, int b) - 求两个数之间的最大值:
static int min(int a, int b)
使用实例如下:
public class Test {
    public static void main(String[] args) {
        // 1. 求绝对值:static int abs(int a)
        System.out.println(Math.abs(-2));
        // 2. 向上取整:static double ceil(double a)
        System.out.println(Math.ceil(2.1));
        // 3. 向下取整:static double floor(double a)
        System.out.println(Math.floor(-2.1));
        // 4. 四舍五入:static long round(double a)
        System.out.println(Math.round(2.1));
        // 5. 求两个数之间的最小值:static int max(int a, int b)
        System.out.println(Math.max(2, 3));
        // 6. 求两个数之间的最大值:static int min(int a, int b)
        System.out.println(Math.min(2, 3));
    }
}

输出结果:
2
3.0
-3.0
2
3
2
需要注意,在Java中没有求三个数之间的最小值和最大值的方法,但是可以通过嵌套实现:
public class Test {
    public static void main(String[] args) {
        // 嵌套求三个数的最大值和最小值
        System.out.println(Math.max(2, Math.max(3,4)));
        System.out.println(Math.min(2, Math.min(3,4)));
    }
}

输出结果:
4
2BigInteger类
在Java中,如果遇到了一个数值的长度超过了long类型的最大长度,则此时再进行计算会出现溢出问题,为了解决这个问题,可以使用BigInterger类进行特别大的整数运算,常用的计算方法有加减乘除
创建BigInteger类对象
使用字符串形式的数值创建BigInteger对象:BigInteger(String val)
例如:
public class Test {
    public static void main(String[] args) {
        BigInteger integer = new BigInteger("12324878783457982374898");
        System.out.println("integer = " + integer);
    }
}

输出结果:
integer = 12324878783457982374898
常用方法
- 加法:
BigInteger add(BigInteger val),调用对象数值+参数数值 - 减法:
BigInteger subtract(BigInteger val),调用对象数值-参数数值 - 乘法:
BigInteger multiply(BigInteger val),调用对象数值 * 参数数值 - 除法:
BigInteger divide(BigInteger val),调用对象数值 / 参数数值
使用实例如下:
public class Test {
    public static void main(String[] args) {
        BigInteger i = new BigInteger("1232487878345798237489845478675456786312313787997678");
        BigInteger i1 = new BigInteger("123248787834579823748984547867545678678");
        // 1. 加法:BigInteger add(BigInteger val),调用对象数值+参数数值
        System.out.println(i.add(i1));
        // 2. 减法:BigInteger subtract(BigInteger val),调用对象数值-参数数值
        System.out.println(i.subtract(i1));
        // 3. 乘法:BigInteger multiply(BigInteger val),调用对象数值 * 参数数值
        System.out.println(i.multiply(i1));
        // 4. 除法:BigInteger divide(BigInteger val),调用对象数值 / 参数数值
        System.out.println(i.divide(i1));
    }
}BigInteger上限:42亿的21亿次方,内存根本扛不住,所以我们可以认为BigInteger无上限
BigDecimal类
在使用float类型和double类型计算时,有时会出现误差,例如下面的代码:
public class Test {
    public static void main(String[] args) {
        float a = 3.55f;
        float b = 2.12f;
        System.out.println(a - b);
    }
}

输出结果:
1.4300001当数据非常重要时,这种计算会导致资源损失,为了解决这个问题,可以使用BigDecimal类进行相应的计算
创建BigDecimal类对象
使用String类型的数值创建对象:BigDecimal(String val)
需要注意,实际上BigDecimal类还支持使用double类型的数值进行构造,但是根据官方文档描述,该构造方式存在不可预测性,可能转换出的结果并不完全等于输入的double数值,所以需要考虑使用对应的方法
常用方法
- 将
double类型转换为BigDecimal类对象:static BigDecimal valueOf(double val) - 加法:
BigDecimal add(BigDecimal val),调用对象数值+参数数值 - 减法:
BigDecimal subtract(BigDecimal val),调用对象数值-参数数值 - 乘法:
BigDecimal multiply(BigDecimal val),调用对象数值 * 参数数值 - 除法:
BigDecimal divide(BigDecimal val),调用对象数值 / 参数数值,注意,本方法在除不尽时会抛出ArithmeticException,此时需要使用第6种除法考虑小数点后的保留部分 - 保留除法:
divide(BigDecimal divisor, int scale, RoundingMode roundingMode),调用对象数值 / 参数数值,第一个参数为除数,第二个参数为保留小数个数,第三个参数为保留模式,一般有DOWN(直接截断多余部分)、UP(保留的最后一位小数+1,其余部分截断)和HALF_UP(四舍五入)
对于第6种方法来说,有一个对应的过时方法:BigDecimal divide(BigDecimal divisor, int scale, int roundingMode),与推荐的方法不同的是,推荐的方法第三个参数是一个枚举类型,而过时的方法使用int类型,对于过时的方法会存在一个注解@Deprecated
过时的方法也可以使用,只是不推荐使用,在IDEA中,使用过时的方法会看到方法上存在删除线
基本使用实例:
public class Test {
    public static void main(String[] args) {
        BigDecimal b1 = new BigDecimal("3.55");
        BigDecimal b2 = new BigDecimal("2.12");
        // 1. 将double类型转换为BigDecimal类对象:static BigDecimal valueOf(double val)
        System.out.println(BigDecimal.valueOf(0.1));
        // 2. 加法:BigDecimal add(BigDecimal val)
        System.out.println(b1.add(b2));
        // 3. 减法:BigDecimal subtract(BigDecimal val)
        System.out.println(b1.subtract(b2));
        // 4. 乘法:BigDecimal multiply(BigDecimal val)
        System.out.println(b1.multiply(b2));
        // 5. 除法:BigDecimal divide(BigDecimal val)
        // System.out.println(b1.divide(b2)); 除不尽时会抛出异常
        // 6. 保留除法:divide(BigDecimal divisor, int scale, RoundingMode roundingMode)
        System.out.println(b1.divide(b2, 2, RoundingMode.DOWN));// 直接截断
        System.out.println(b1.divide(b2, 2, RoundingMode.HALF_UP));// 四舍五入
        System.out.println(b1.divide(b2, 2, RoundingMode.UP)); // 保留部分最后一位小数加1
    }
}

输出结果:
0.1
5.67
1.43
7.5260
1.67
1.67
1.68Date日期类
在Java中,存在日期类Date,该类可以表示指定的时间,精确到毫秒(1000毫秒=1秒)
创建Date类对象
Date类在util包下,需要进行引包
一共有两个常用构造方法创建Date类对象:
- 无参构造:
Date(),返回当前系统时间和日期 - 使用毫秒构造:
Date(long time),该方法会从在时间原点的基础上进行加法计算,但是会根据系统所在的时区进行相应调整
时间原点:1970年1月1日 0时0分0秒(UNIX系统起始时间),叫做格林威治时间。
中国北京所在时区相对原点为1970年1月1日 8时0分0秒(差8个小时)
基本使用实例:
public class Test {
    public static void main(String[] args) {
        System.out.println(new Date());
        System.out.println(new Date(1000)); // 根据时区在时间原点上加1秒
    }
}

输出结果:
Tue Sep 10 15:40:00 CST 2024
Thu Jan 01 08:00:01 CST 1970
常用方法
- 设置时间:
void setTime(long time),参数是毫秒,根据时区在时间原点上加1秒 - 获取时间:
long getTime(),返回的是毫秒值
基本使用实例:
public class Test {
    public static void main(String[] args) {
//        System.out.println(new Date());
//        System.out.println(new Date(1000)); // 根据时区在时间原点上加1秒
        Date date = new Date();
        date.setTime(2000);
        System.out.println(date.getTime());
    }
}

输出结果:
2000Calendar类
与Date类基本一致,Calendar类主要用于获取当前系统的年、月和日
获取Calendar类实例
Calendar类在util包下,使用前需要引包
因为Calendar类为抽象类,所以不可以直接创建Calendar类对象,但是提供了一个获取实例的静态方法:static Calendar getInstance()
使用如下:
public class Test {
    public static void main(String[] args) {
        Calendar calendar = Calendar.getInstance();
        System.out.println(calendar);
    }
}

输出结果:
java.util.GregorianCalendar[...,YEAR=2024,MONTH=8,...,DAY_OF_MONTH=10,...,DAY_OF_WEEK=3,...,HOUR_OF_DAY=16,MINUTE=12,SECOND=41,MILLISECOND=968, ...]
上面的输出结果中:
YEAR:表示当前年份
MONTH:表示当前月份,需要注意,Calendar类中的月是从0开始计算的,所以0月实际上是现实生活的1月,以此类推Calendar类中的11月表示实际生活中的12月
DAY_OF_MONTH:表示当前的日,例如当前是9月10日,DAY_OF_MONTH表示的就是「10日」中的「10」
DAYE_OF_WEEK:表示星期几,需要注意,默认情况下Java中的一周第一天为星期日,所以实际上星期日为1,星期一为2,以此类推星期六为7,所以星期二为3
HOUR_OF_DAY:表示当前时间的小时
MINUTE:表示当前时间的分钟
SECOND:表示当前时间的秒数
MILLISECOND:表示当前时间的毫秒数
实际输出还存在其他内容,但是当前情况下不考虑
常用方法
- 返回指定字段的值:
int get(int field),参数可以为前面实例出现的任一字段 - 将指定字段设置为指定的数值:
void set(int field, int value),需要注意,如果field为月份时,value如果超过11,则结果为value % 12的值 - 将指定字段减少或增加指定值:
void add(int field, int amount),当第二个参数为正数时,增加对应字段的值,否则减少对应字段的值 - 将
Calendar实例转换为Date对象:Date getTime() - 设置具体的年月日:
void set(int year, int month, int date)
上面的field表示的字段都是Calendar类中的静态字段,例如年是Calendar.YEAR
基本使用实例:
public class Test {
    public static void main(String[] args) {
        // 1. 返回指定字段的值:int get(int field),参数可以为前面实例出现的任一字段
        System.out.println(Calendar.getInstance().get(Calendar.YEAR));
        // 2. 将指定字段设置为指定的数值:void set(int field, int value)
        Calendar calendar = Calendar.getInstance();

        calendar.set(Calendar.YEAR, 2020);
        System.out.println(calendar.get(Calendar.YEAR));
        // 3. 将指定字段减少或增加指定值:void add(int field, int amount)
        calendar.add(Calendar.YEAR, 1);
        System.out.println(calendar.get(Calendar.YEAR));
        calendar.add(Calendar.MONTH, -1);
        System.out.println(calendar.get(Calendar.MONTH));
        // 4. 将Calendar实例转换为Date对象:Date getTime()
        Date date = calendar.getTime();
        System.out.println(date);
        // 5. 设置具体的年月日:void set(int year, int month, int date)
        calendar.set(2020, 1, 1);
        System.out.println(calendar.get(Calendar.YEAR) + " " + calendar.get(Calendar.MONTH) + " " + calendar.get(Calendar.DAY_OF_MONTH));
    }
}

输出结果:
2024
2020
2021
7
Tue Aug 10 16:56:40 CST 2021
2020 1 1SimpleDateFormat类
使用SimpleDateFormat类可以改变Date类的日期时间输出显示格式
创建SimpleDateFormat类对象
使用内容为指定日期时间格式的字符串进行构造:SimpleDateFormat(String pattern)
指定日期时间格式的对应部分代号如下:
| 时间字母表示 | 说明 |
|
| 年 |
|
| 月 |
|
| 日 |
|
| 时 |
|
| 分 |
|
| 秒 |
注意,代号不可以随便修改,也不可以随便更改大小写,但是可以修改个数
例如"yyyy-MM-dd HH:mm:ss"表示「年-月-日 时:分:秒」
常用方法
- 将
Date类对象按照SimpleDateFormat类对象中的格式转换为字符串:String format(Date date) - 将满足
SimpleDateFormat类对象中的格式的日期时间字符串转换为Date类对象:Date parse(String source),注意本方法存在转换失败异常ParseException
基本使用如下:
public class Test {
    public static void main(String[] args) {
        SimpleDateFormat dateFormat = new SimpleDateFormat("yyyy-MM-dd HH:mm:ss");
        // 1. 将Date类对象按照SimpleDateFormat类对象中的格式转换为字符串:String format(Date date)
        String date = dateFormat.format(new Date());
        System.out.println(date);
        // 2. 将满足SimpleDateFormat类对象中的格式的日期时间字符串转换为Date类对象:Date parse(String source)
        try {
            Date date1 = dateFormat.parse(date);
            System.out.println(date1);
            Date date2 = dateFormat.parse("2020/01/01 12:12:12"); // 不符合初始格式,转换格式
            System.out.println(date2);
        } catch (ParseException e) {
            System.out.println("日期格式错误");
        }
    }
}

输出结果:
2024-09-10 18:54:08
Tue Sep 10 18:54:08 CST 2024
日期格式错误
JDK8新日期类
在JDK8中新增了两个日期类、两个日期差值计算类和一个日期格式化类,分别是LocalDate类和LocalDateTime类、Period类和Duration类与DateTimeFormatter类
这些类均在
time包下,使用前需要进行引包
LocalDate类与LocalDateTime类
LocalDate类和LocalDateTime类都属于不可变的日期对象,LocalDate更侧重于年月日,而LocalDateTime更侧重于年月日时分秒
与Calendar类不同的是,LocalDate类和LocalDateTime类获取到的月份与现实中的月份一一对应
因为LocalDate类和LocalDateTime类都属于不可变的日期类对象,所以对于修改已经创建的两种日期类对象中内容的方法实际上都是在修改一个副本,并且对应方法会返回一个同类的新对象,新对象中是原日期内容修改后的内容
获取对应类的对象
对于LocalDate类来说,共有两种方式获取对象:
- 通过当前时间创建对象:
static LocalDate now() - 通过设置指定的年月日创建对象:
static LocalDate of(int year, int month, int dayOfMonth)
基本使用如下:
public class Test {
    public static void main(String[] args) {
        // 1. 通过当前时间创建对象:static LocalDate now()
        System.out.println(LocalDate.now());
        // 2. 通过设置指定的年月日创建对象:static LocalDate of(int year, int month, int dayOfMonth)
        System.out.println(LocalDate.of(2020, 12, 1));
    }
}

输出结果:
2024-09-10
2020-12-01对于LocalDateTime类来说,与LocalDate类基本一致,存在两个方法获取对象:
- 通过当前时间创建对象:
static LocalDateTime now() - 通过设置指定的年月日,时分秒创建对象:
static LocalDateTime of(int year, Month month, int dayOfMonth, int hour, int minute, int second)
基本使用如下:
public class Test {
    public static void main(String[] args) {
        // 1. 通过当前时间创建对象
        System.out.println(LocalDateTime.now());
        // 2. 通过设置指定的年月日,时分秒创建对象
        System.out.println(LocalDateTime.of(2020, 1, 1, 12, 12, 12));
    }
}

输出结果:
2024-09-10T19:12:34.425
2020-01-01T12:12:12获取日期字段方法(get方法)
下面的方法在LocalDate类和LocalDateTime类中均存在,并且使用方式相同
- 获取年份:
int getYear() - 获取月份:
int getMonthValue() - 获取月份的第几天:
int getDayOfMonth()
基本使用代码如下:
以
LocalDate类为例
public class Test {
    public static void main(String[] args) {
        LocalDate ld = LocalDate.now();
        System.out.println(ld.getYear());
        System.out.println(ld.getMonth());
        System.out.println(ld.getDayOfMonth());
    }
}

输出结果:
2024
SEPTEMBER
10设置日期字段方法(with方法)
下面的方法在LocalDate类和LocalDateTime类中均存在,并且使用方式相同
- 设置年份:
int withYear(int year) - 设置月份:
int withMonthValue(int month) - 设置月份的第几天:
int withDayOfMonth(int day)
基本使用代码如下:
以
LocalDate类为例
public class Test {
    public static void main(String[] args) {
        LocalDate ld = LocalDate.now();
        LocalDate ld2 = ld.withYear(2020).withMonth(5).withDayOfMonth(5);
        System.out.println(ld2);
    }
}

输出结果:
2020-05-05LocalDate类和LocalDateTime类均重写了toString()方法
日期字段偏移
- 日期数值增加:
plus系列,例如LocalDate plusYears(long yearsToAdd)和LocalDateTime plusYears(long years) - 日期数值减少:
minus系列,例如LocalDate minusYears(long yearsToSubtract)和LocalDateTime minusYears(long years)
上面的函数参数都是long类型,为了避免出现隐式类型转换,在传递参数时尽量在数值尾部加上L
基本使用如下:
以
LocalDate为例
public class Test {
    public static void main(String[] args) {
        LocalDate ld = LocalDate.now();
        System.out.println(ld);
        LocalDate ld1 = ld.plusYears(20).plusMonths(2).minusDays(2);
        System.out.println(ld1);
    }
}

输出结果:
2024-09-10
2044-11-08Period和Duration类
Period类和Duration类都是计算不同日期之间的差值
Period类中计算差值的方法:static Period between(LocalDate d1,LocalDate d2)
Duration类中计算差值的方法:static Duration between(Temporal startInclusive, Temporal endExclusive)
需要注意,对于Duration类来说,Temporal是LocalDate和LocalDateTime类实现的接口,所以Duration类计算差值的方法可以传递LocalDate类和LocalDateTime类对象,但是因为Duration类计算精确时间偏差,所以需要传递能操作精确时间的LocalDateTime类对象
在计算日期差值时,两个方法的计算结果有些不同:Period类的计算结果是返回相差xx年xx月xx日,而Duration类的计算返回相差天数
计算差值后,需要使用对应的方法获取到对应的差值:
对于Period类来说:
- 获取年差值:
int getYears() - 获取月差值:
int getMonths() - 获取日差值:
int getDays()
对于Duration类来说:
- 获取天差值:
long toDays() - 获取小时差值:
long toHours() - 获取分钟差值:
long toMinutes() - 获取毫秒差值:
long toMillis()
基本使用代码如下:
public class Test {
    public static void main(String[] args) {
        LocalDate ld = LocalDate.of(2021, 2, 3);
        LocalDate ld1 = LocalDate.of(2022, 5, 1);

        System.out.println(Period.between(ld, ld1).getYears());
        System.out.println(Period.between(ld, ld1).getMonths());
        System.out.println(Period.between(ld, ld1).getDays());
        System.out.println();

        LocalDateTime ld2 = LocalDateTime.of(2021, 2, 3, 12, 0, 0);
        LocalDateTime ld3 = LocalDateTime.of(2022, 1, 5, 12, 10, 0);
        System.out.println(Duration.between(ld2, ld3).toDays());
        System.out.println(Duration.between(ld2, ld3).toHours());
        System.out.println(Duration.between(ld2, ld3).toMinutes());
        System.out.println(Duration.between(ld2, ld3).toMillis());
    }
}

输出结果:
1
2
28

336
8064
483850
29031000000DateTimeFormatter类
基本思路与
SimpleDateFormat类类似
获取对象
根据String字符串中的格式设置日期时间格式static DateTimeFormatter ofPattern(String pattern)
常用方法
- 根据指定格式,将日期时间返回为一个
String对象:String format(TemporalAccessor temporal) - 将满足格式的日期时间
String字符串转换为TemporalAccessor对象:TemporalAccessor parse(CharSequence text) - 将
TemporalAccessor对象转换成LocalDate类或者LocalDateTime对象:static LocalDateTime from(TemporalAccessor temporal),这个方法属于LocalDateTime类
方法中的TemporalAccessor是Temporal接口继承的接口,而Temporal类是LocalDate类和LocalDateTime类实现的接口,所以可以直接使用LocalDate类和LocalDateTime类对象
方法中的CharSequence是String类实现的接口,可以传递String类对象
注意,第三种方法不可以使用向下转型代替,因为TemporalAccessor接口不止被一个类实现
基本使用如下:
public class Test {
    public static void main(String[] args) {
        DateTimeFormatter dtf = DateTimeFormatter.ofPattern("yyyy-MM-dd HH:mm:ss");
        System.out.println(dtf.format(LocalDateTime.now()));

        TemporalAccessor ta = dtf.parse("2020-01-01 12:12:12");
        System.out.println(LocalDateTime.from(ta));
    }
}

输出结果:
2024-09-10 20:09:47
2020-01-01T12:12:12
System类
System类是系统相关类,是一个工具类,所以满足构造私有化和方法静态的特点
常用方法
- 返回以毫秒为单位的当前时间,可以测代码运行效率:
static long currentTimeMillis() - 终止当前正在运行的 Java 虚拟机:
static void exit(int status),当status为0表示正常终止,非零状态码表示异常终止 - 数组拷贝:
static void arraycopy(Object src, int srcPos, Object dest, int destPos, int length),其中第一个参数代表源数组,第二个参数代表拷贝起始位置(包括),第三个参数代表目标数组,第四个参数代表目标数组起始位置(包括),第四个参数表示拷贝个数(包括起始位置的数据)
基本使用代码(只使用arraycopy方法):
public class Test {
    public static void main(String[] args) {
        //一维数组拷贝
        int arr[] = {1, 2, 3, 4, 5};
        int arr1[] = new int[5];
        System.arraycopy(arr, 0, arr1, 0, arr.length);
        for ( int i = 0; i < arr1.length; i++ ) {
            System.out.printf("%d ",arr1[i]);
        }
        System.out.println();

        // 使用System.arraycopy()方法不改变一维数组源数组数据
        arr1[2] = 2;// 修改复制后的数组的第三个元素

        // 打印修改前的数组
        for ( int i = 0; i < arr.length; i++ ) {
            System.out.printf("%d ", arr[i]);
        }
        System.out.println();
        // 打印修改后的数组
        for (int i = 0; i < arr1.length; i++) {
            System.out.printf("%d ", arr1[i]);

        }
        System.out.println();
    }
}

输出结果:
1 2 3 4 5
1 2 3 4 5
1 2 2 4 5 二维数组使用arraycopy的浅拷贝问题与解决方案
需要注意,使用arraycopy方法拷贝二维数组时需要进行深拷贝,直接使用arraycopy方法拷贝会导致拷贝后的二维数组中的一维数组仍是原来的一维数组,例如下面的代码:
public class Test {
    public static void main(String[] args) {
        // 二维数组拷贝
        int dArr[][] = {{1, 2}, {0, 1, 2, 3, 4}, {2, 3, 4}};
        int dArr1[][] = new int[3][];
        dArr1[0] = new int[2];
        dArr1[1] = new int[5];
        dArr1[2] = new int[3];
        // 直接拷贝源二维数组,打印拷贝数组
        System.arraycopy(dArr, 0, dArr1, 0, dArr.length);
        for ( int i = 0; i < dArr1.length; i++ ) {
            for ( int j = 0; j < dArr1[i].length; j++ ) {
                System.out.printf("%d ", dArr1[i][j]);
            }
            System.out.printf("\n");
        }
        dArr1[1][2] = 4; // 修改了拷贝后的数组中第二个一维数组的第三个元素的值
        System.out.println();

        // 打印源数组的数值
        for ( int i = 0; i < dArr.length; i++ ) {
            for ( int j = 0; j < dArr[i].length; j++ ) {
                System.out.printf("%d ", dArr[i][j]);
            }
            System.out.printf("\n");
        }
    }
}


输出结果:
1 2
0 1 2 3 4
2 3 4

1 2
0 1 4 3 4
2 3 4
出现上面的原因示意图如下:
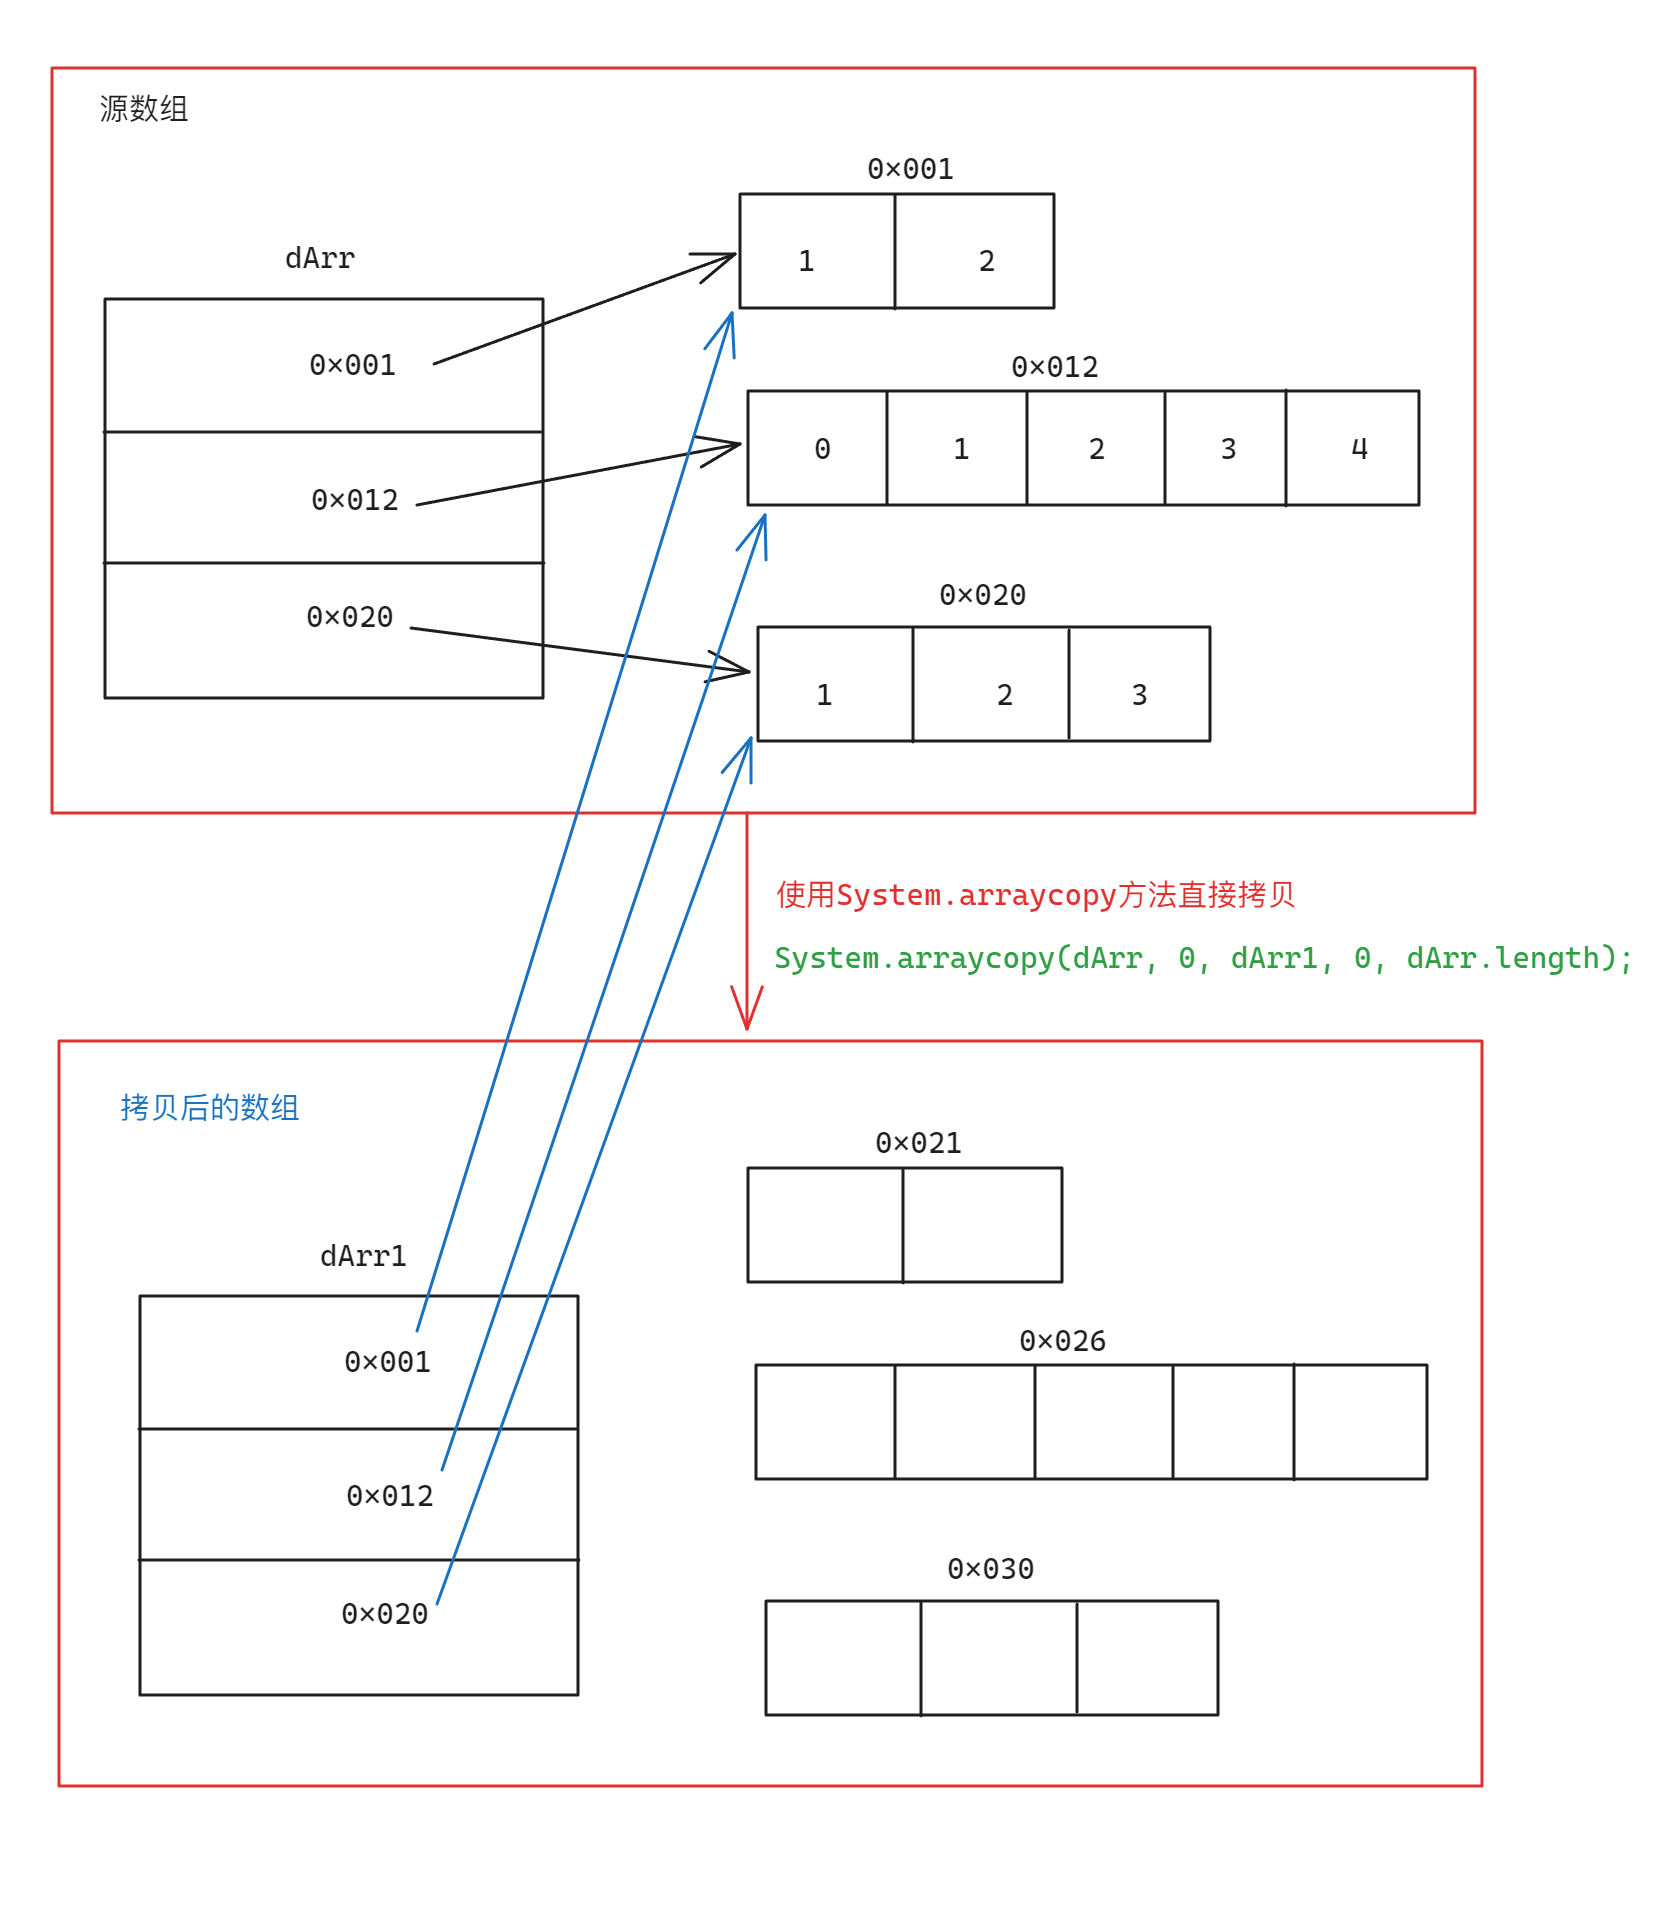
所以实际上拷贝的方式应该是拷贝每一行每一列的数据到新二维数组每一个一维数组中:
public class Test {
    public static void main(String[] args) {
        //二维数组拷贝
        int dArr[][] = {{1, 2}, {0, 1, 2, 3, 4}, {2, 3, 4}};
        int dArr1[][] = new int[3][];
        dArr1[0] = new int[2];
        dArr1[1] = new int[5];
        dArr1[2] = new int[3];

        //解决方案
        //拷贝到目标数组
        for ( int i = 0; i < dArr.length; i++ ) {
            // 每一行都进行拷贝
            System.arraycopy(dArr[i], 0, dArr1[i], 0, dArr[i].length);
        }

        // 打印拷贝后的数组
        for ( int i = 0; i < dArr1.length; i++ ) {
            for ( int j = 0; j < dArr1[i].length; j++ ) {
                System.out.printf("%d ", dArr1[i][j]);
            }
            System.out.printf("\n");
        }
        dArr1[1][2] = 5; // 修改拷贝后的数组
        System.out.println();

        // 打印拷贝后的数组
        for ( int i = 0; i < dArr1.length; i++ ) {
            for ( int j = 0; j < dArr1[i].length; j++ ) {
                System.out.printf("%d ", dArr1[i][j]);
            }
            System.out.printf("\n");
        }
        System.out.println();
        // 打印源数组
        for ( int i = 0; i < dArr.length; i++ ) {
            for ( int j = 0; j < dArr[i].length; j++ ) {
                System.out.printf("%d ", dArr[i][j]);
            }
            System.out.printf("\n");
        }
    }
}

输出结果:
1 2
0 1 2 3 4
2 3 4

1 2
0 1 5 3 4
2 3 4

1 2
0 1 2 3 4
2 3 4 Arrays数组工具类
Arrays类是数组相关类,是一个工具类,所以满足构造私有化和方法静态的特点
常用方法
- 格式化打印数组:
static String toString(int[] a),格式:[元素1, 元素2, ...] - 数组排序:
static void sort(int[] a),默认升序 - 二分查找:
static int binarySearch(int[] a, int key),必须保证数组升序 - 数组扩容:
static int[] copyOf(int[] original, int newLength)
基本使用如下:
public class Test {
    public static void main(String[] args) {
        int[] arr = {5,3,4,6,5,4,7};
        System.out.println(Arrays.toString(arr));

        Arrays.sort(arr);
        System.out.println(Arrays.toString(arr));

        int[] arr1 = {1,2,3,4,5,6,7};
        int index = Arrays.binarySearch(arr1, 3);
        System.out.println("index = " + index);

        int[] arr2 = {1,2,3,4,5};
        int[] newArr = Arrays.copyOf(arr2, 10);
        System.out.println(Arrays.toString(newArr));

        // 替换源数组
        arr2 = newArr;
        System.out.println(Arrays.toString(arr2));

    }
}

输出结果:
[5, 3, 4, 6, 5, 4, 7]
[3, 4, 4, 5, 5, 6, 7]
index = 2
[1, 2, 3, 4, 5, 0, 0, 0, 0, 0]
[1, 2, 3, 4, 5, 0, 0, 0, 0, 0]
包装类
包装类介绍
包装类是所有基本数据类型对应的类,将基本数据类型转成包装类,从而让基本数据类型可以使用成员等类的特点,需要注意的是,基本数据类型的包装类不可以使用+、-、*、/进行运算
| 基本类型 | 包装类 |
|
|
|
|
|
|
|
|
|
|
|
|
|
|
|
|
|
|
|
|
|
|
|
|
因为包装类具有的属性和方法基本一致,下面以
Integer包装类为例介绍
Integer包装类
Integer是int的包装类,现在推荐使用的构造方法如下:
Integer 对象名 = 整型值过时的两种构造方法如下:
- 使用
int类型的value进行构造:Integer(int value) - 使用
String类型的数值进行构造:Integer(String s)
使用方式如下:
public class Test {
    public static void main(String[] args) {
        // 推荐的方式
        Integer i = 1;

        // 过时的方式
        Integer i1 = new Integer(1);
        Integer i2 = new Integer("1");
    }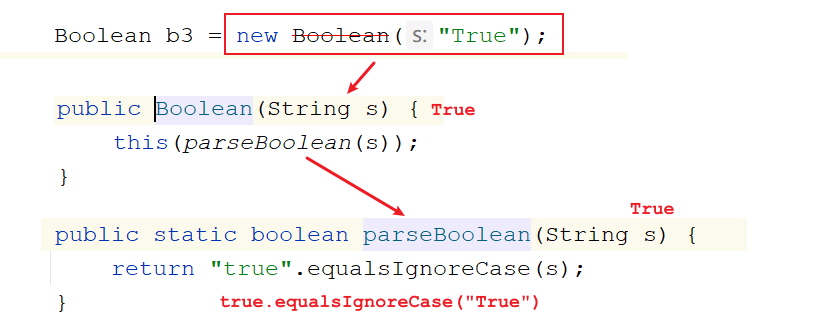
}需要注意一个比较特殊的类型Boolean构造包装类对象:
public class Test {
    public static void main(String[] args) {
        // 不论大小写都可以正常转化
        Boolean b = new Boolean("true");
        Boolean b1 = new Boolean("True");

        System.out.println(b);
        System.out.println(b1);
    }
}

输出结果:
true
true
之所以不需要考虑大小写是因为底层源码使用了忽略大小写的方式:
装箱与拆箱
装箱:将基本数据类型包装为包装类对象
拆箱:将包装类对象转换为基本数据类型
装箱使用到的方法如下:
- 使用包装类对应的基本数据类型构造:
static Integer valueOf(int i) - 使用数值字符串构造:
static Integer valueOf(String s)
拆箱使用到的方法:int intValue()
拆箱方法名巧记:转成什么类型,方法开头就是什么类型
基本使用代码如下:
public class Test {
    public static void main(String[] args) {
        // 拆箱和装箱
        Integer i = Integer.valueOf(1);
        Integer i1 = Integer.valueOf("1");

        int i2 = i1.intValue();
        System.out.println(i.intValue()+1);
    }
}
自动拆箱与装箱
在现在的JDK中,拆箱和装箱基本都是自动完成的,但是底层调用的还是装箱和拆箱的方法
public class Test {
    public static void main(String[] args) {
        Integer i = 10;// 自动装箱
        Integer sum = i+10;// 自动拆箱装箱
        System.out.println("sum = " + sum);
    }
}

输出结果:
20
源码如下:

包装面试题
思考下面的代码运行结果:
public class Test01 {
    public static void main(String[] args) {
        Integer i1 = 100;
        Integer i2 = 100;
        System.out.println(i1==i2);

        Integer i3 = 128;
        Integer i4 = 128;
        System.out.println(i3==i4);
    }
}

输出结果:
true
false
源码如下:
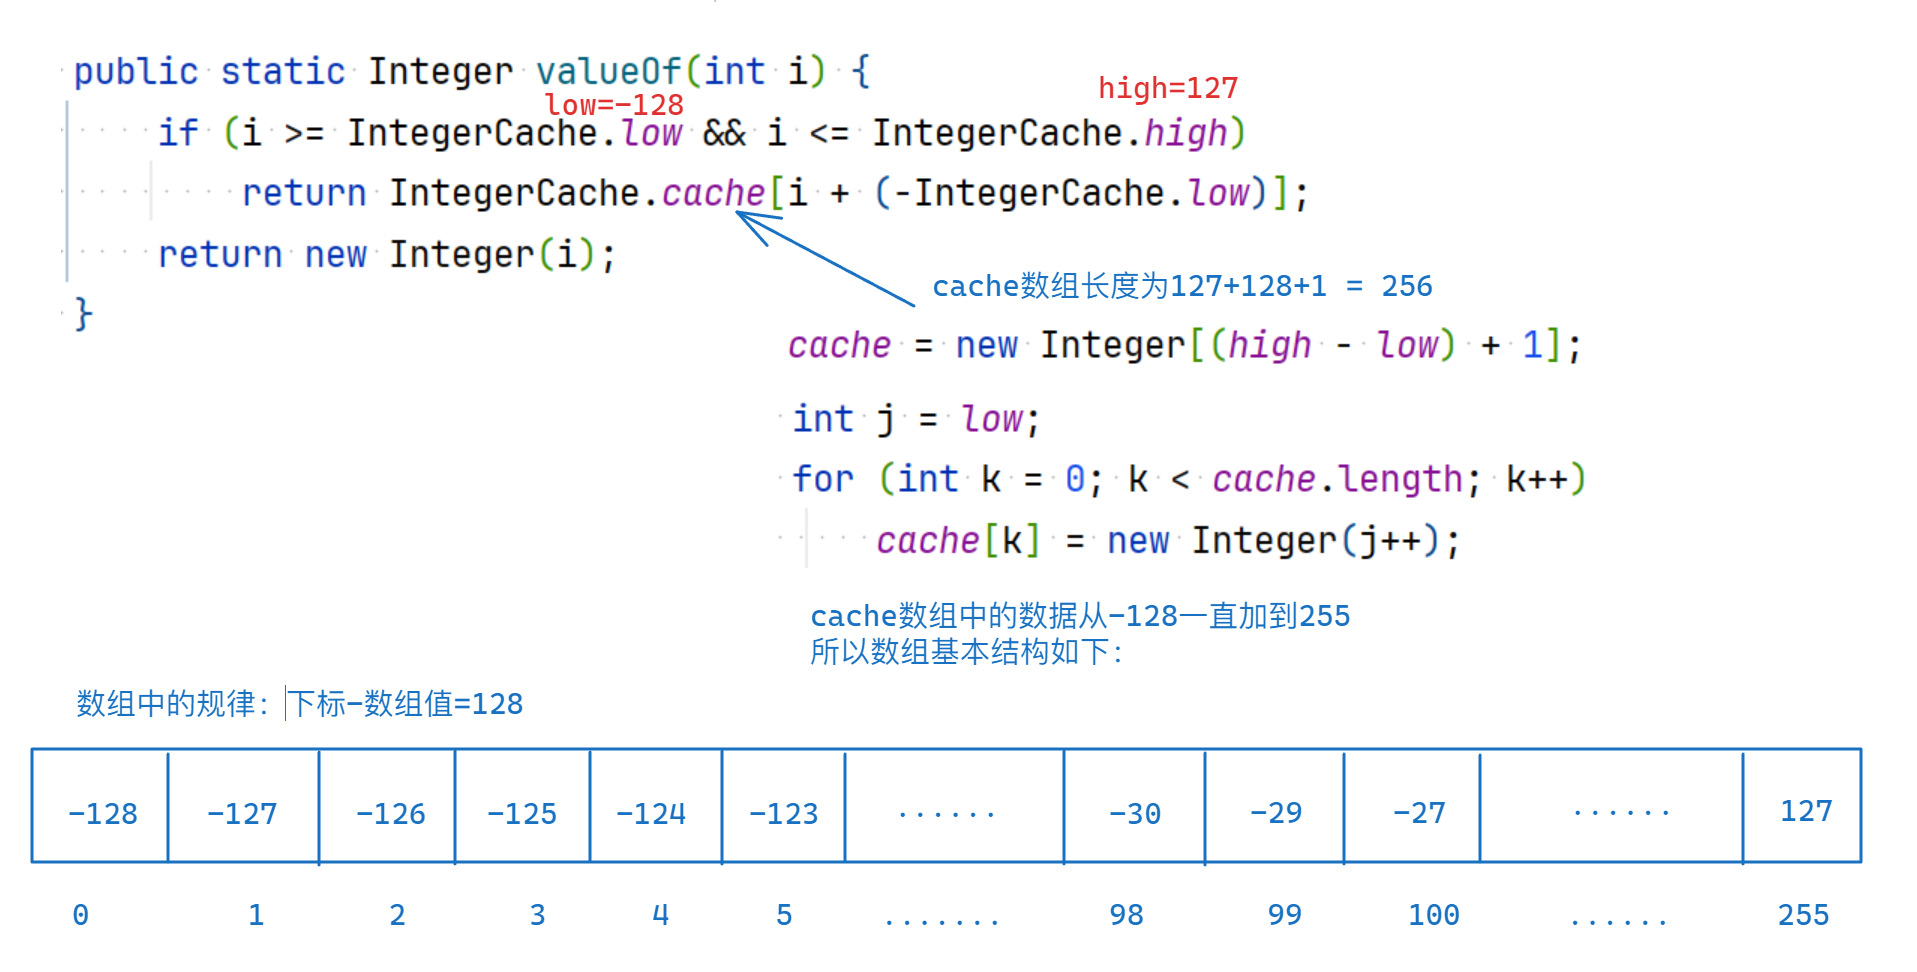
如果转换的基本数据类型值在-128到127之间,根据源码会直接返回数组中的数值,而对于100来说,因为在-128到127之间,所以返回数组中对应的-27,因为是数组中同一下标对应的数值,所以valueof函数返回的Integer对象也是同样的对象,所以i1和i2的地址相同
但是对于在-128到127之外的部分,因为涉及到了new,所以不同的调用,返回的对象都不会相同,所以使用128装箱会导致i3和i4地址并不相等
需要注意,并不是所有的包装类都有缓冲数组,具体见下表:
| 包装类 | 缓存对象 |
|
| -128~127 |
|
| -128~127 |
|
| -128~127 |
|
| -128~127 |
|
| 无 |
|
| 无 |
|
| 0~127 |
|
|
|
基本数据类型与String类型的转换
基本数据类型转换String
一共两种方式:
- 使用「基本数据类型+"字符串"」拼接
- 使用
String类中的valueOf:static String valueOf(int i)
private static void method01() {
    int i = 10;
    // 字符串拼接
    String s1 = i+"";
    System.out.println(s1+1);

    // valueOf方法
    String s = String.valueOf(10);
    System.out.println(s+1);
}String转基本数据类型(parse方法)
| 位置 | 方法 | 说明 |
|
|
| 将 |
|
|
| 将 |
|
|
| 将 |
|
|
| 将 |
|
|
| 将 |
|
|
| 将 |
|
|
| 将 |
以String转Integer为例
private static void method02() {
    int number = Integer.parseInt("1111");
    System.out.println(number+1);
}

输出结果:
1112标准Javabean升级
前面的Javabean中的基本数据类型可以用对应的包装类代替,例如:
public class User {
    //private int uid;// 之前的写法用户id
    private Integer uid;// 用户id
    private String username;// 用户名
    private String password;// 密码

    public User() {
    }

    public User(Integer uid, String username, String password) {
     this.uid = uid;
     this.username = username;
     this.password = password;
    }

    public Integer getUid() {
     return uid;
    }

    public void setUid(Integer uid) {
     this.uid = uid;
    }

    public String getUsername() {
     return username;
    }

    public void setUsername(String username) {
     this.username = username;
    }

    public String getPassword() {
     return password;
    }

    public void setPassword(String password) {
     this.password = password;
    }
}
转换原因:
如果uid为Integer型,则因为引用数据类型为null,所以Integer默认值是null。将来Javabean中的数据都是和数据库表联系起来的,可以将Javabean中的数据添加到表中,如果表中的uid为主键自增的,此时添加语句时uid中的数据就不用单独维护赋值了,添加语句的SQL语句就可以这样写:insert into user(uid,username,password) values (NULL,'金莲','36666');,后面只需要将Javabean中封装的数据获取出来放到SQL语句中,如果uid为主键自增,而且Javabean中的uid为包装类型,默认值为null,这样就不用单独维护uid的值了,也不用先给Javabean中的uid赋值,然后在保存到数据库中了,咱们就可以直接使用uid的默认值,将默认值放到SQL语句的uid列中,其次将Javabean中的属性变成包装类,还可以使用包装类中的方法去操作此属性值


 1099
1099

 被折叠的 条评论
为什么被折叠?
被折叠的 条评论
为什么被折叠?
 到【灌水乐园】发言


