


一、前言:MVC
Model-View-Controller (MVC) 是源自 SmallTalk 的一个设计模式,在构建用户界面时经常用到。作为一种经典到不能再经典的架构模式,MVC 大行其道有其必然的道理。通过把职责、 性质相近的成分归结在一起,不相近的进行隔离,MVC 将系统分解为模型、视图、控制器 三部分,每一部分都相对独立,职责单一,在实现过程中可以专注于自身的核心逻辑。MVC 是对系统复杂性的一种合理的梳理与切分,它的思想实质就是“关注点分离”。
- 模型(Model)代表数据,通过精心设计的接口向外部提供服务,而内部实现,拜托,谁也别想管我,哪怕我自甘堕落成为一团浆糊。
- 视图(View)是呈现给用户看的可视化界面,文字列表、图文混合,想怎么着就怎么着。
- 控制器(Controller )就是个中间人,它从模型拉数据给视图,数据变化时通知视图更新,用户想针对数据干点什么,比如删除、更改、排序等,它也通知模型来响应这种变化。
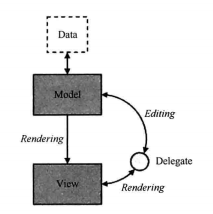
Qt 中的 Model-View 编程框架,对 Controller 部分做了改动,引入了 Delegate 的概念, 合起来就是 Model-View-Delegate。模型还是负责提供数据,视图则负责提供一个舞台、基本的布局管理和 Item 创建等工作,剩下的就由 Delegate 负责实现。
下图来自于 Qt 帮助,可以说明 Qt 中的 Model-View-Delegate 框架。
在 Qt Quick 中,Model-View 编程变得更加简单,不简单也对不起 Quick 这个词儿不是。 ListView、TableView、GridView、PathView 等预定义的视图大多数时候可以满足你的需要, Model 则有现成的 ListModel、XmlListModel 可用,而 Delegate 的实现则受益于 Qt Quick 的设计理念,组合一些基础的 Item 就行,可以构建出很好的可视效果。
二、ListView的简单使用
ListView 用来显示一个条目列表,条目对应的数据来自于Model,而每个条目的外观则由 Delegate 决定。我们可以将 Delegate 看成如何展示 Item 的一个模板。Android 手机上常见 的联系人界面,其实就是使用 ListView 实现的,而且 Android 的 ListView 和 Qt Quick 的 ListView 使用同样的模式:Model、View、Item Template (Delegate)。
我们先以 Qt Quick 内建 Model 为例,把使用 ListView 的方方面面都介绍一下,然后再看如何使用在 C++ 中实现自定义的 Model。
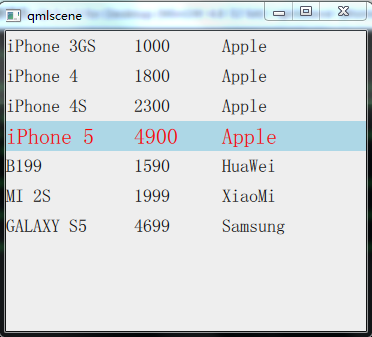
我构建了一个简单的手机列表,展示手机的型号、价格、制造商。使用上下键可以切换不同的手机,选中的手机有一个浅蓝色的高亮背景,同时字体放大,文字颜色变为红色。代码 phone_list_simple.qml:
import QtQuick 2.2
import QtQuick.Controls 1.2
import QtQuick.Layouts 1.1

Rectangle {
    width: 360
    height: 300
    color: "#EEEEEE"

    // 1.定义delegate,内嵌三个Text对象来展示Model定义的ListElement的三个role
    Component {
        id: phoneDelegate
        Item {
            id: wrapper
            width: parent.width
            height: 30

            // 实现了鼠标点选高亮的效果
            MouseArea {
                anchors.fill: parent;
                onClicked: wrapper.ListView.view.currentIndex = index
            }

            // 内嵌三个Text对象,水平布局
            RowLayout {
                anchors.left: parent.left
                anchors.verticalCenter: parent.verticalCenter
                spacing: 8

                Text {
                    id: col1;
                    text: name;
                    // 是否是当前条目
                    color: wrapper.ListView.isCurrentItem ? "red" : "black"
                    font.pixelSize: wrapper.ListView.isCurrentItem ? 22 : 18
                    Layout.preferredWidth: 120
                }

                Text {
                    text: cost;
                    color: wrapper.ListView.isCurrentItem ? "red" : "black"
                    font.pixelSize: wrapper.ListView.isCurrentItem ? 22 : 18
                    Layout.preferredWidth: 80
                }

                Text {
                    text: manufacturer;
                    color: wrapper.ListView.isCurrentItem ? "red" : "black"
                    font.pixelSize: wrapper.ListView.isCurrentItem ? 22 : 18
                    Layout.fillWidth: true
                }
            }
        }
    } // phoneDelegate-END

    // 2.定义ListView
    ListView {
        id: listView
        anchors.fill: parent

        // 使用先前设置的delegate
        delegate: phoneDelegate

        // 3.ListModel专门定义列表数据的,它内部维护一个 ListElement 的列表。
        model: ListModel {
            id: phoneModel

            // 一个 ListElement 对象就代表一条数据
            ListElement{
                name: "iPhone 3GS"
                cost: "1000"
                manufacturer: "Apple"
            }
            ListElement{
                name: "iPhone 4"
                cost: "1800"
                manufacturer: "Apple"
            }
            ListElement{
                name: "iPhone 4S"
                cost: "2300"
                manufacturer: "Apple"
            }
            ListElement{
                name: "iPhone 5"
                cost: "4900"
                manufacturer: "Apple"
            }
            ListElement{
                name: "B199"
                cost: "1590"
                manufacturer: "HuaWei"
            }
            ListElement{
                name: "MI 2S"
                cost: "1999"
                manufacturer: "XiaoMi"
            }
            ListElement{
                name: "GALAXY S5"
                cost: "4699"
                manufacturer: "Samsung"
            }
        }

        // 背景高亮
        focus: true
        highlight: Rectangle{
            color: "lightblue"
        }
    }
}
执行 “qmlscene phone_list_simple.qml” 命令,可以看到如下图所示的效果。
为了示例简单,我直接在声明 ListView 对象时为 model 属性初始化了一个 ListModel。ListModel 是专门定义列表数据的,它内部维护一个 ListElement 的列表。一个 ListElement 对象就代表一条数据。
-
使用 ListElement 定义的数据条目可能是简单的,比如只有一个人名;也可能是复杂的,比如还有这个人的出生年月、性别;共同构成一个 ListElement 的一个或多个数据信息被称为 role,它包含一个名字(role-name)和一个值(role-value)。
-
role 的定义就像 QML 对象属性定义那样简单,语法是这样的:<role-name>: <role-value>,其中 role-name 必须以小写字母开头,role-value 必须是简单的常量,如字符串、布尔值、数字或枚举值。
-
在 ListElement 中定义的 role,可以在 Delegate 中通过 role-name 来访问。示例定义的 ListElement 包含三个 role:name、cost、manufacturer,而 Delegate 则使用 Row 管理三个 Text 对象来展现这三个 role, Text 对象的 text 属性被绑定到 role-name 上。
ListView 的 delegate 属性类型是 Component,我在 phone_list_simple.qml 中定义了 id 为 phoneDelegate 的 Component。phoneDelegate 的顶层是 RowLayout,RowLayout内嵌三个 Text 对象来展示 Model 定义的 ListElement 的三个 role。
- ListView 给 delegate 暴露了一个 index 属性,代表当前 delegate 实例对应的 Item 的索引位置,必要时可以使用它来访问数据。
- 示例中实现了鼠标点选高亮的效果:给 delegate 添加了一个 MouseArea 元素,在 onClicked 信号处理器中设置 ListView 的 currentlndex 属性。
ListView 定义了 delayRemove、isCurrentltem、nextSection、previousSection、section、view 等附加属性,以及 add、remove 两个附加信号,可以在 delegate 中直接访问。不过要注意的是,只有 delegate 的顶层 Item 才可以直接使用这些附加属性和信号,非顶层 Item 则需通过顶层Item的id来访问这些附加属性。
-
示例中的 delegate 组件,顶层 Item 是一个 Item 对象, 用于展示 name、cost、manufacturer 的 Text 对象通过
wrapper.ListView.isCurrentltem判断本 delegate 实例呈现的数据是否是当前条目,如果是,则改变文字大小和颜色。注意,我们是通过类名直接访问附加属性的。 -
示例中当前选中条目有一个浅蓝色的背景,它由 ListView 的 highlight 属性指定的 Component 提供,它的 Z 序小于 delegate 实例化出来的 Item 对象。示例通过给 highlight 初始 化一个 Rectangle 定义了高亮背景,如果你想实现复杂的高亮效果,也可以专门定义一个 Component。
-
与高亮效果相关的,还有很多属性,比如 highlightFollowsCurrentltem 属性指定高亮背景是否跟随当前条目,默认值为 true,你用鼠标点选某个 Item 时,高亮背景会经过一个平滑的动画后移动到新的 Item 下面。你可以设置它为 false 来禁用这种动画。
三、header
通过为 ListView 的 header 属性设置一个 Component,,用方向键浏览 Item 或者用鼠标在 ListView 内拖动时,表头随着拖动可能会变得不可见。
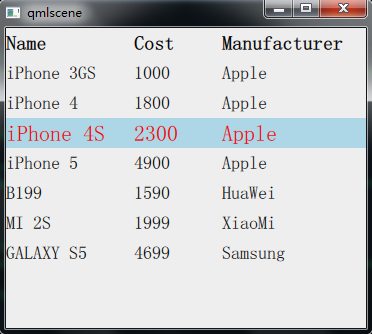
表头在某些应用场景下可以让数据的可读性更好。比如前面的手机信息示例,如果添加了表头,别人一看就知道每一列的数据含义。phone_list_header.qml 是修改后的文件,内容如下:
import QtQuick 2.2
import QtQuick.Controls 1.2
import QtQuick.Layouts 1.1

Rectangle {
    width: 360
    height: 300
    color: "#EEEEEE"

    // 1.定义header
    Component {
        id: headerView
        Item {
            width: parent.width
            height: 30
            RowLayout {
                anchors.left: parent.left
                anchors.verticalCenter: parent.verticalCenter
                spacing: 8

                Text {
                    text: "Name"
                    font.bold: true
                    font.pixelSize: 20
                    Layout.preferredWidth: 120
                }
                // 省略。。。
            }
        }
    }

    // 2.定义delegate
    Component {
        id: phoneDelegate
        Item {
            id: wrapper
            width: parent.width
            height: 30

            MouseArea {
                anchors.fill: parent
                onClicked: {
                    wrapper.ListView.view.currentIndex = index
                    console.log("index=", index)
                    }
            }

            RowLayout {
                anchors.left: parent.left
                anchors.verticalCenter: parent.verticalCenter
                spacing: 8

                Text {
                    id: col1;
                    text: name;
                    color: wrapper.ListView.isCurrentItem ? "red" : "black"
                    font.pixelSize: wrapper.ListView.isCurrentItem ? 22 : 18
                    Layout.preferredWidth: 120
                }
                // 省略。。。
            }
        }
    }

    // 3.定义model
    Component {
        id: phoneModel
        ListModel {
            ListElement{
                name: "iPhone 3GS"
                cost: "1000"
                manufacturer: "Apple"
            }
            // 省略。。。
        }
    }

    // 4.定义ListView
    ListView {
        id: listView
        anchors.fill: parent

        delegate: phoneDelegate
        model: phoneModel.createObject(listView)
        header: headerView
        focus: true
        highlight: Rectangle{
            color: "lightblue"
        }
    }
}
效果如下图所示。
headerView 是我定义的表头组件,与 delegate 组件定义类似,使用三个 Text 对象分别来描述每一列数据的含义,设定字体大小,让字体变粗,还设定了每一列的宽度。ListView 的 headerltem 属性保存了本 ListView 使用的、由 header 组件创建出来的 Item。
四、footer
footer 属性允许我们指定 ListView 的页脚,footerltem 保存了 footer 组件创建出来的 Item 对象,这个 Item会被添加到 ListView 的末尾,在所有可见的 Item 之后。
用 footer 可以干什么呢?随你吧。我这里的示例只是简单地在footer内放置了一个 Text对象,显示当前选中的Item的数据。有点儿像状态栏。
Rectangle {
    width: 360
    height: 300
    color: "#EEEEEE"

    // 省略header。。。

    // 2. 定义footer
    Component {
        id: footerView
        Text {
            width: parent.width
            font.italic: true
            color: "blue"
            height: 30
            verticalAlignment: Text.AlignVCenter
        }
    }

    // 省略delegate和model。。。

    // 5.定义ListView
    ListView {
        id: listView
        anchors.fill: parent

        delegate: phoneDelegate
        model: phoneModel.createObject(listView)
        header: headerView
        footer: footerView
        focus: true;
        highlight: Rectangle{
            color: "lightblue"
        }

        onCurrentIndexChanged:{
            if( listView.currentIndex >=0 ){
                var data = listView.model.get(listView.currentIndex);
                listView.footerItem.text = data.name + " , " + data.cost + " , " + data.manufacturer
            }
        }
    }
}
效果如下图所示。
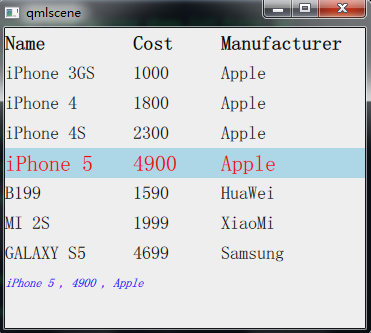
为了使 footer 能够跟随当前 Item 发生变化,我为 listView 定义了 onCurrentlndexChanged 信号处理器,因为 currentlndexChanged 信号不带参数,所以只能再次访问 currentlndex 属性来获取当前 Item 的索引,然后通过 ListModel 的 get() 方法获取到对应的数据对象,最后呢, 我把 name、cost、manufacturer 三个 role 拼接在一块赋值给 footerltem。于是乎,当你点选一 个 Item 或者使用上下键浏览 Item 时,footer 就变化了。
五、ListView-增删改查
使用 ListView 是为了向用户展示某些数据,期望用户根据这些数据做出一些反馈,比如买某个东西。而我们会经常需要访问、修改一个 ListView 展现的数据。现在我们就来看看怎么做。
1、访问数据
ListModel 的 count 属性表示 Model 中有多少条数据,int 类型。dynamicRoles 属性为布尔值,为 true 时表示 Model 中的 role 对应的值的类型可以动态改变,默认值是 false。要设置 dynamicRoles,必须在添加数据之前。不过要注意的是,一旦你使能了 dynamicRoles,ListModel 的性能会大大下降,通常它带来的性能损失是使用静态类型的 4〜6 倍。
ListModel 的get()方法接受一个 int 类型的参数,用来获取指定索引位置的数据,返回一 个 QML 对象。然后,我们就可以像访问属性那样访问数据的 role 了,正如我们在前面使用的那样:
var data = listView.model.get(listView.currentIndex}
listView.footerltem.text = data.name + " , " + data.cost + " , " + data.manufacturer
2、删除数据
如果你想删除一条或多条数据,可以使用 ListModel 的remove(int index, int count)方法,它有两个整型参数,第一个参数指明要删除的数据的索引位置,第二个参数表示要删除的数据条数,默认值为 1。
如果你想清空一个 Model,可以直接调用 clear() 方法。
现在我们将 phone_list_footer.qml 另存为 phone_list_change.qml,将 phoneDelegate 内的 MouseArea 对象修改为下面的样子:
MouseArea {
	anchors.fill: parent
    onClicked: {
		wrapper.ListView.view.currentlndex = index
	}

	onDoubleClicked: {
		wrapper.ListView.view.model.remove(index)
	}
}
然后执行 “qmlscene phone_list_change.qml” 命令,用鼠标左键双击某个 Item,该 Item 就会从 ListView 中删除。
让我们再修改一下 footer 组件,添加一个清除按钮,用来清除所有的数据。footer 组件的新代码如下:
Component {
    id: footerView
    Item{
        id: footerRootItem
        width: parent.width
        height: 30
        property alias text: txt.text
        signal clean()

        Text {
            anchors.left: parent.left
            anchors.top: parent.top
            anchors.bottom: parent.bottom
            id: txt
            font.italic: true
            color: "blue"
            verticalAlignment: Text.AlignVCenter
        }

        Button {
            id: clearAll
            anchors.right: parent.right
            anchors.verticalCenter: parent.verticalCenter
            text: "Clear"
            onClicked: footerRootItem.clean()
        }
    }
}
给 ListView 添加 Component.onCompleted 附加信号处理器:
Component.onCompleted: {
    listView.footerItem.clean.connect(listView.model.clear)
}
现在可以运行 phone_list_change.qml 了,看到界面右下角的 “Clear” 按钮了吧,点击它,列表所有数据就没啦。
3、修改数据
要想修改 Model 的数据,可以使用 ListModel 的setProperty(int index,string property, variant value)方法。该方法有三个参数,第一个是数据的索引,第二个是数据内 role 的名字,第三个是mle的值。比如要修改 “MI 2S" 的价格,可以这样:
listView.model.setProperty(5, "cost", 16999)
如果想替换某一条数据,可以使用set(int index, jsobject dict)方法。我们经常用对象的字面量表示法构造一个对象传递给 set() 方法。比如想把 “iPhone 3GS” 替换为 “Z5S mini”,可以这样:
listView.model.set(0, {"name" : "25S mini ", "cost" : 1999, "manufacturer" : "ZhongXing"})
4、添加数据
要向 Model 的尾部添加数据,可以使用append()方法。append() 的参数是 jsobject,在 ECMAScript 中可以使用对象的字面量表示法来构造这个 jsobject,即花括号加 key-value 对的 集合,类似于这样:{"name" : "zhangsan", "age" : 28},key-value 对之间使用逗号分隔。这种方式与 QML 对象声明的方式略有不同。给个简单的例子:
function addOne(){
    model.append(
        {
            "name": "MX3",
            "cost": "1799",
            "manufacturer": "MeiZu"
        }
    );
}
如果想在指定位置添加数据,可以使用insert()方法,它的第一个参数是整型的,代表插 入的索引位置,第二个参数是 jsobject。
再来修改下phone_list_change.qml,新增添加数据的代码,全新的内容如下:
import QtQuick 2.2
import QtQuick.Controls 1.2
import QtQuick.Layouts 1.1

Rectangle {
    width: 360
    height: 300
    color: "#EEEEEE"

    Component {
        id: headerView
        Item {
            width: parent.width
            height: 30
            RowLayout {
                anchors.left: parent.left
                anchors.verticalCenter: parent.verticalCenter
                spacing: 8
                Text {
                    text: "Name"
                    font.bold: true
                    font.pixelSize: 20
                    Layout.preferredWidth: 120
                }
                // 省略。。。
            }
        }
    }

    Component {
        id: footerView
        Item{
            id: footerRootItem
            width: parent.width
            height: 30
            property alias text: txt.text

            // 1.自定义信号
            signal clean()
            signal add()

            Text {
                anchors.left: parent.left
                anchors.top: parent.top
                anchors.bottom: parent.bottom
                id: txt
                font.italic: true
                color: "blue"
                verticalAlignment: Text.AlignVCenter
            }

            Button {
                id: clearAll
                anchors.right: parent.right
                anchors.verticalCenter: parent.verticalCenter
                text: "Clear"
                onClicked: footerRootItem.clean()
            }

            Button {
                id: addOne
                anchors.right: clearAll.left
                anchors.rightMargin: 4
                anchors.verticalCenter: parent.verticalCenter
                text: "Add"
                onClicked: footerRootItem.add()
            }
        }
    }

    Component {
        id: phoneDelegate
        Item {
            id: wrapper
            width: parent.width
            height: 30

            MouseArea {
                anchors.fill: parent

                onClicked: {
                    wrapper.ListView.view.currentIndex = index
                    mouse.accepted = true
                }

                onDoubleClicked: {
                    wrapper.ListView.view.model.remove(index)
                    mouse.accepted = true
                }
            }

            RowLayout {
                anchors.left: parent.left
                anchors.verticalCenter: parent.verticalCenter
                spacing: 8

                Text {
                    id: col1
                    text: name
                    color: wrapper.ListView.isCurrentItem ? "red" : "black"
                    font.pixelSize: wrapper.ListView.isCurrentItem ? 22 : 18
                    Layout.preferredWidth: 120
                }
                // 省略。。。
            }
        }
    }

    Component {
        id: phoneModel;
        ListModel {
            ListElement{
                name: "iPhone 3GS"
                cost: "1000"
                manufacturer: "Apple"
            }
            // 省略。。。
        }
    }

    ListView {
        id: listView
        anchors.fill: parent

        delegate: phoneDelegate
        model: phoneModel.createObject(listView)
        header: headerView
        footer: footerView
        focus: true
        highlight: Rectangle{
            color: "lightblue"
        }

        onCurrentIndexChanged: {
            if( listView.currentIndex >=0 ){
                var data = listView.model.get(listView.currentIndex)
                listView.footerItem.text = data.name + " , " + data.cost + " , " + data.manufacturer
            }else{
                listView.footerItem.text = ""
            }
        }

        // 2.槽函数:添加数据
        function addOne() {
            model.append(
                        {
                            "name": "MX3",
                            "cost": "1799",
                            "manufacturer": "MeiZu"
                        }
            )
        }

        // 3.连接信号槽
        Component.onCompleted: {
            listView.footerItem.clean.connect(listView.model.clear)
            listView.footerItem.add.connect(listView.addOne)
        }
    }
}
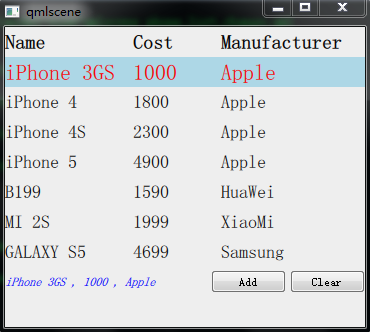
执行 “qmlscenephone_list_change.qml" 命令后的初始效果如下图所示。
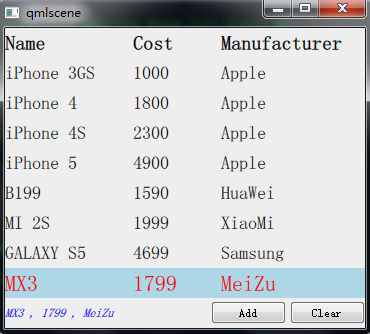
点击 "Add" 按钮后的效果如下图所示。
到现在为止,这个例子涵盖了 ListView 的基本应用,包括怎样初始化一个 ListView、访问数据、删除数据、动态添加数据、处理高亮等内容。你可以点击 “Clear” 按钮、点击某个 Item 或者双击某个 Item 看看效果。
六、ListView-动画+上移下移
ListView 提供了 add、remove、move、populate、displaced 几种场景的过渡动画效果,你 可以通过设置相应的属性来改变特定场景对应的过渡动画。这些场景对应的属性,类型都是 Transition,—个场景也可能有多个属性,比如新增 Item 会触发 add 过渡动画,同时也可能引 起其他 Item 的位置变化,进而触发 addDisplaced 或 displaced 过渡动画。
1、效果
2、初始化 动画
ListView 第一次初始化使用 populate 动画:
// 在ListView第一次实例化或者因Model变化而需要创建Item时应用
populate: Transition {
    NumberAnimation {
        property: "opacity"
        from: 0
        to: 1.0
        duration: 1000
    }
}
这将产生一个渐显效果。
3、add 动画
add 属性指定向 ListView 新增一个 Item 时针对该 Item 应用的过渡动画。其设置了一个 ParallelAnimation,内含一个变换透明度的动画和一个变换 y 位置的动画。
// add过渡动画(新增Item触发)
add: Transition {
    ParallelAnimation{
        NumberAnimation {
            property: "opacity"
            from: 0
            to: 1.0
            duration: 1000
        }
        NumberAnimation {
            properties: "x,y"
            from: 0
            duration: 1000
        }
    }
}
最终的效果是,新增 Item 从 ListView 上方渐现、缓缓下落到特定位置。 需要注意的是,尽量不要在 add 动画中改变 Item 的高度,因为这样会引起它下面的其他 Item 被重新布局进而错放位置,也会带来性能上的损耗。
4、displaced 动画
我点击 “Insert” 按钮时,新增 Item 下方的那些被迫移位的 Item,没有明显的动画效果。 这是因为 displaced 属性默认为 null,ListView 没有提供默认的移位动画。
displaced 属性用于指定通用的、由于 Model 变化导致 Item 被迫移位时的动画效果,而相应 的 addDisplaced、moveDisplaced、removeDisplaced 则用于指定由特定的 add、move、remove 操作引起的移位动画。如果你同时指定了 displaced 和 xxxDisplaced,那 xxxDisplaced生效;如果你只指定 displaced,那只要有移位发生,displaced 动画就会被应用。
// 用于指定通用的、由于Model变化导致Item被迫移位时的动画效果
displaced: Transition {
    SpringAnimation {
        property: "y"
        spring: 3
        damping: 0.1
        epsilon: 0.25
    }
}
再运行看看,点击 “Insert” 按钮,会发现位于新增 Item 下方的那些 Item 会向下移动,来回弹几次才平静下来。
5、remove 动画
remove 属性指定将一个 Item 从 ListView 中移除时应用的过渡动画。当动画开始执行时, Item 已经被移除,此时任何对该 Item 的引用都是非法的。移除一个 Item 可能会导致其他 Item 移位,此时会触发 removeDisplaced 或 displaced 过渡动画。给 ListView 指定 remove 动画如下:
// remove过渡动画(移除Item触发)
remove: Transition {
    SequentialAnimation{
        NumberAnimation {
            properties: "y"
            to: 0
            duration: 600
        }
        NumberAnimation {
            property: "opacity"
            to: 0
            duration: 400
        }
    }
}
再运行看看,双击一个 Item,它会先移动到 ListView 顶部,然后再慢慢变得看不见。
6、move 动画
move 属性指定移动一个 Item 时要应用的过渡动画。
// move过渡动画(移动Item触发)
move: Transition {
    NumberAnimation {
        property: "y"
        duration: 700
        easing.type: Easing.InQuart
    }
}
7、上移 + 下移
我们以之前的示例为基础,构造一个专门演示动画效果的示例,phone_list_animation. qml。我给 footer 添加了 Up 和 Down 按钮,还增加了 moveUp 和 moveDown 信号,连接到 ListView 新增的 moveUp() 和 moveDown() 方法上。新的 footer 组件定义如下:
// 定义footer
Component {
    id: footerView

    Item{
        id: footerRootItem
        width: parent.width
        height: 30

        // 自定义信号
        signal add()
        signal insert()
        signal moveUp()
        signal moveDown()

        // 新增按钮
        Button {
            id: addOne
            anchors.right: parent.right
            anchors.rightMargin: 4
            anchors.verticalCenter: parent.verticalCenter
            text: "Add"
            onClicked: footerRootItem.add()
        }

        // 插入按钮
        Button {
            id: insertOne
            anchors.right: addOne.left
            anchors.rightMargin: 4
            anchors.verticalCenter: parent.verticalCenter
            text: "Insert"
            onClicked: footerRootItem.insert()
        }

        // 下移按钮
        Button {
            id: moveDown;
            anchors.right: insertOne.left
            anchors.rightMargin: 4
            anchors.verticalCenter: parent.verticalCenter
            text: "Down"
            onClicked: footerRootItem.moveDown()
        }

        // 上移按钮
        Button {
            id: moveUp;
            anchors.right: moveDown.left
            anchors.rightMargin: 4
            anchors.verticalCenter: parent.verticalCenter
            text: "Up"
            onClicked: footerRootItem.moveUp()
        }
    }
}
ListView 新增 moveUp() 和 moveDown() 方法,计算当前 Item 的索引,调用 model 的 move() 方法让当前 Item 下移一个位置。给 move 属性设置了一个 Transition 对象。新的 ListView 声明如下:
    // 定义ListView
    ListView {
        id: listView
        anchors.fill: parent
        interactive: false

        delegate: phoneDelegate
        model: phoneModel.createObject(listView)
        header: headerView
        footer: footerView
        focus: true
        highlight: Rectangle{
            color: "lightblue"
        }

        // 在ListView第一次实例化或者因Model变化而需要创建Item时应用
        populate: Transition {
            NumberAnimation {
                property: "opacity"
                from: 0
                to: 1.0
                duration: 1000
            }
        }

        // add过渡动画(新增Item触发)
        add: Transition {
            ParallelAnimation{
                NumberAnimation {
                    property: "opacity"
                    from: 0
                    to: 1.0
                    duration: 1000
                }
                NumberAnimation {
                    properties: "x,y"
                    from: 0
                    duration: 1000
                }
            }
        }

        // 用于指定通用的、由于Model变化导致Item被迫移位时的动画效果
        displaced: Transition {
            SpringAnimation {
                property: "y"
                spring: 3
                damping: 0.1
                epsilon: 0.25
            }
        }

        // remove过渡动画(移除Item触发)
        remove: Transition {
            SequentialAnimation{
                NumberAnimation {
                    properties: "y"
                    to: 0
                    duration: 600
                }
                NumberAnimation {
                    property: "opacity"
                    to: 0
                    duration: 400
                }
            }
        }

        // move过渡动画(移动Item触发)
        move: Transition {
            NumberAnimation {
                property: "y"
                duration: 700
                easing.type: Easing.InQuart
            }
        }

        // 新增函数
        function addOne() {
            model.append(
                        {
                            "name": "MX3",
                            "cost": "1799",
                            "manufacturer": "MeiZu"
                        }
            )
        }

        // 插入函数
        function insertOne() {
            model.insert( Math.round(Math.random() * model.count),
                        {
                            "name": "HTC One E8",
                            "cost": "2999",
                            "manufacturer": "HTC"
                        }
            )
        }

        // 上移函数
        function moveUp() {
            if(currentIndex - 1 >= 0){
                model.move(currentIndex, currentIndex - 1, 1)
            }
        }

        // 下移函数
        function moveDown() {
            if(currentIndex + 1 < model.count){
                model.move(currentIndex, currentIndex + 1, 1)
            }
        }

        // 连接信号槽
        Component.onCompleted: {
            listView.footerItem.add.connect(listView.addOne)
            listView.footerItem.insert.connect(listView.insertOne)
            listView.footerItem.moveUp.connect(listView.moveUp)
            listView.footerItem.moveDown.connect(listView.moveDown)
        }
    }
}
现在可以执行 “qmlscenephone_list_animation.qml” 看看效果了。


 被折叠的 条评论
为什么被折叠?
被折叠的 条评论
为什么被折叠?
 到【灌水乐园】发言


