


本次分享一下如何搭建Spring AI框架,构建属于自己的AI,以及由于项目后端由我实现,所以我总结一下项目的后端部分。
Spring AI
Spring AI 是一个由 Spring 团队开发的开源框架,可以使用来构建属于自己的智能机器人,接下来我将分享如何去构建Spring AI。
pom.xml的配置
Spring AI配置不难只需要在原有Spring boot的依赖上如下代码就可以。我使用的是java17和spring-ai的0.8.0版本(!这个很重要不然会出现依赖冲突)
 <properties>
        <java.version>17</java.version>
        <spring-ai.version>0.8.0</spring-ai.version>
</properties>

<dependencies>
 <dependency>
      <groupId>org.springframework.ai</groupId>
      <artifactId>spring-ai-openai-spring-boot-starter</artifactId>
      <version>${spring-ai.version}</version>
  </dependency>
 </dependencies>

    <repositories>
        <repository>
            <id>spring-milestones</id>
            <url>https://repo.spring.io/milestone</url>
        </repository>
        <repository>
            <id>spring-ai-releases</id>
            <url>https://repo.spring.ai/releases</url>
        </repository>
     </repositories>
配置Api-key和Base-url
由于我是maven配置的项目,所以在application.properties配置自己的api-key和base-url以及模型,一定要配置模型不然很可能请求访问不到。
spring.ai.openai.api-key=your api key
spring.ai.openai.base-url=https://api.deepseek.com
spring.ai.openai.chat.options.model=deepseek-chat
使用Controller来实现AI调用
我们将 AI 调用逻辑封装到一个控制器类中,同时要注意AI的输出一定要是流式的,不然会等很久才能得到反馈体验很不好。
流式输出
spring ai里面自带的有实现流式输出的对象,可以直接调用StreamingChatClient来实现。
package com.example.demo.Controller;
import org.springframework.ai.chat.StreamingChatClient;
import org.springframework.ai.chat.prompt.Prompt;
import org.springframework.ai.chat.Generation;
import org.springframework.ai.chat.messages.AssistantMessage;
import org.springframework.http.MediaType;
import org.springframework.web.bind.annotation.CrossOrigin;
import org.springframework.web.bind.annotation.GetMapping;
import org.springframework.web.bind.annotation.RequestMapping;
import org.springframework.web.bind.annotation.RequestParam;
import org.springframework.web.bind.annotation.RestController;
import reactor.core.publisher.Flux;

@GetMapping(value = "/stream", produces = MediaType.TEXT_EVENT_STREAM_VALUE)
  public Flux<String> stream(@RequestParam(value = "input", defaultValue = "Hello") String message) {
        Prompt prompt = new Prompt(message);
        return streamingChatClient.stream(prompt)
                .map(chatResponse -> {
                    if (chatResponse != null && chatResponse.getResults() != null && !chatResponse.getResults().isEmpty()) {
                         Generation generation = chatResponse.getResults().get(0);
                         if (generation != null && generation.getOutput() != null) {
                             AssistantMessage assistantMessage = generation.getOutput();
                             if (assistantMessage != null && assistantMessage.getContent() != null) {
                                  return assistantMessage.getContent(); // **使用 getContent()**
                             }
                         }
                    }
                    return "";
                });
    }
可以直接调用StreamingChatClient 的 stream 方法,将 Prompt 对象传递给聊天模型。 该方法返回一个 Flux<ChatResponse>,表示一个响应流。我们只需在前端解析这个响应流就可以实现流式输出了。
前端调用
我们在前端写一个简单的弹窗来测试一下输出的效果,首先要在前端编写函数来处理后端发来的Flux流
const processStreamingResponse = async (url, onMessageChunk, onError, onComplete) => {
    try {
        const response = await fetch(url);

        const reader = response.body.getReader();
        const decoder = new TextDecoder();
        let buffer = '';
        const dataPrefix = 'data:';

        while (true) {
            const { value, done } = await reader.read();

            if (done) {
                break;
            }

            buffer += decoder.decode(value, { stream: true });

            let newlineIndex;
            while ((newlineIndex = buffer.indexOf('\n')) !== -1) {
                const line = buffer.substring(0, newlineIndex);
                buffer = buffer.substring(newlineIndex + 1);

                const dataIndex = line.indexOf(dataPrefix);

                if (dataIndex !== -1) {
                    const contentStartIndex = dataIndex + dataPrefix.length;
                    let payloadStartIndex = contentStartIndex;
                    if (payloadStartIndex < line.length && line[payloadStartIndex] === ' ') {
                        payloadStartIndex++;
                    }

                    const dataContent = line.substring(payloadStartIndex);
                    onMessageChunk(dataContent);
                }
            }
        }

        const dataIndex = buffer.indexOf(dataPrefix);
        if (dataIndex !== -1) {
            const contentStartIndex = dataIndex + dataPrefix.length;
            let payloadStartIndex = contentStartIndex;
            if (payloadStartIndex < buffer.length && buffer[payloadStartIndex] === ' ') {
                payloadStartIndex++;
            }
            const dataContent = buffer.substring(payloadStartIndex);
            onMessageChunk(dataContent);
        }

        const finalDecoded = decoder.decode(undefined, { stream: false });
        const dataIndexFinal = finalDecoded.indexOf(dataPrefix);
        if (dataIndexFinal !== -1) {
            const contentStartIndex = dataIndexFinal + dataPrefix.length;
            let payloadStartIndex = contentStartIndex;
            if (payloadStartIndex < finalDecoded.length && finalDecoded[payloadStartIndex] === ' ') {
                payloadStartIndex++;
            }
            const dataContent = finalDecoded.substring(payloadStartIndex);
            onMessageChunk(dataContent);
        }

        if (onComplete) {
            onComplete();
        }
    } catch (error) {
        onError(error);
    }
};
由于有效token前面会有"data"这个前缀,所以我们这个函数用于识别 SSE 格式中的数据行,通过逐步读取和解码流数据,提取有效内容,并通过回调函数通知调用者。这种实现方式适用于与后端的实时交互场景,例如聊天应用或实时数据更新。
效果展示
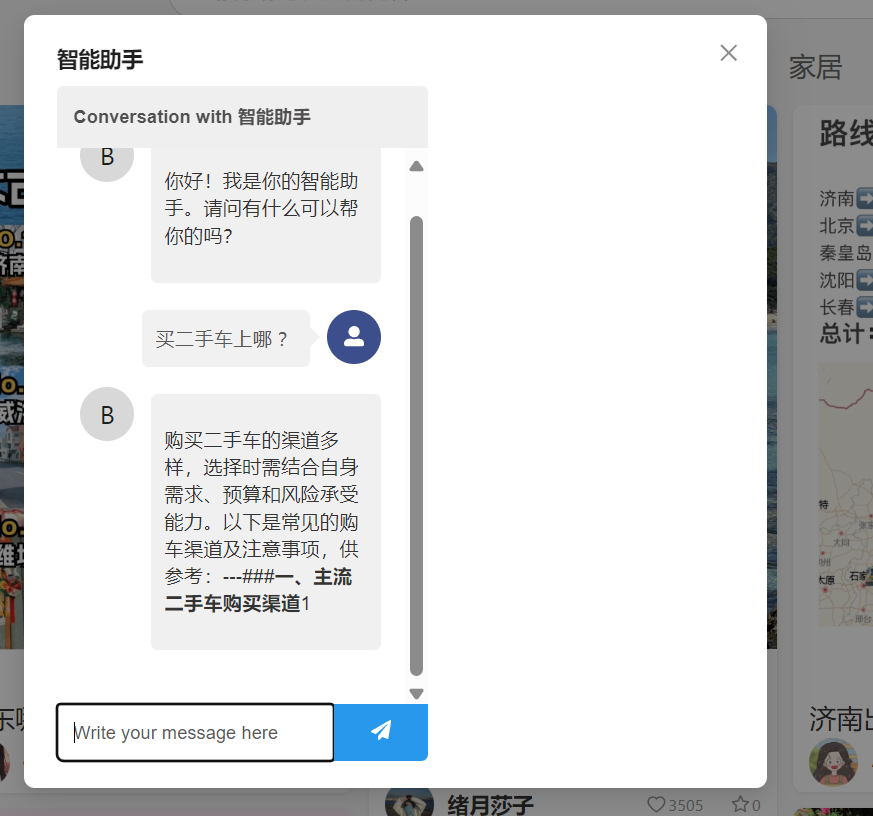
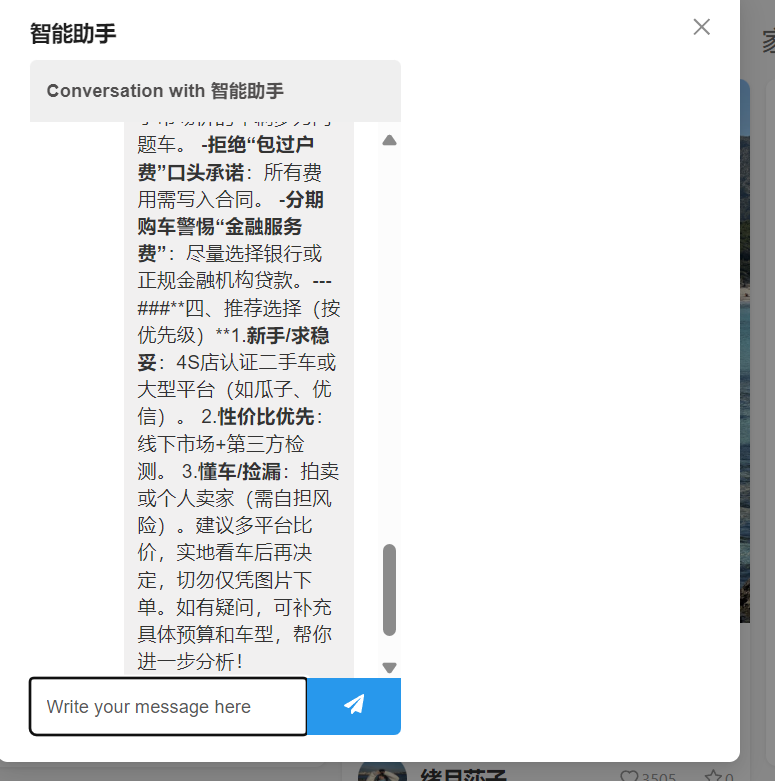
可以看出这样流式的输出就不会等很久,如果是同步的输出那么就会等非常非常久,体验很不好。后续如何解决输出文本很好的转化为markdown格式是待完成的任务。
小红书风格的笔记页面实现
直接展示效果,仿照小红书的首页布局。点击聊天就能和我们上部分写的AI进行对话。

这是单个笔记的页面

前端部分我就不进行讲解,我主要讲解数据的爬取和导入。
爬虫的实现(只用于学习)
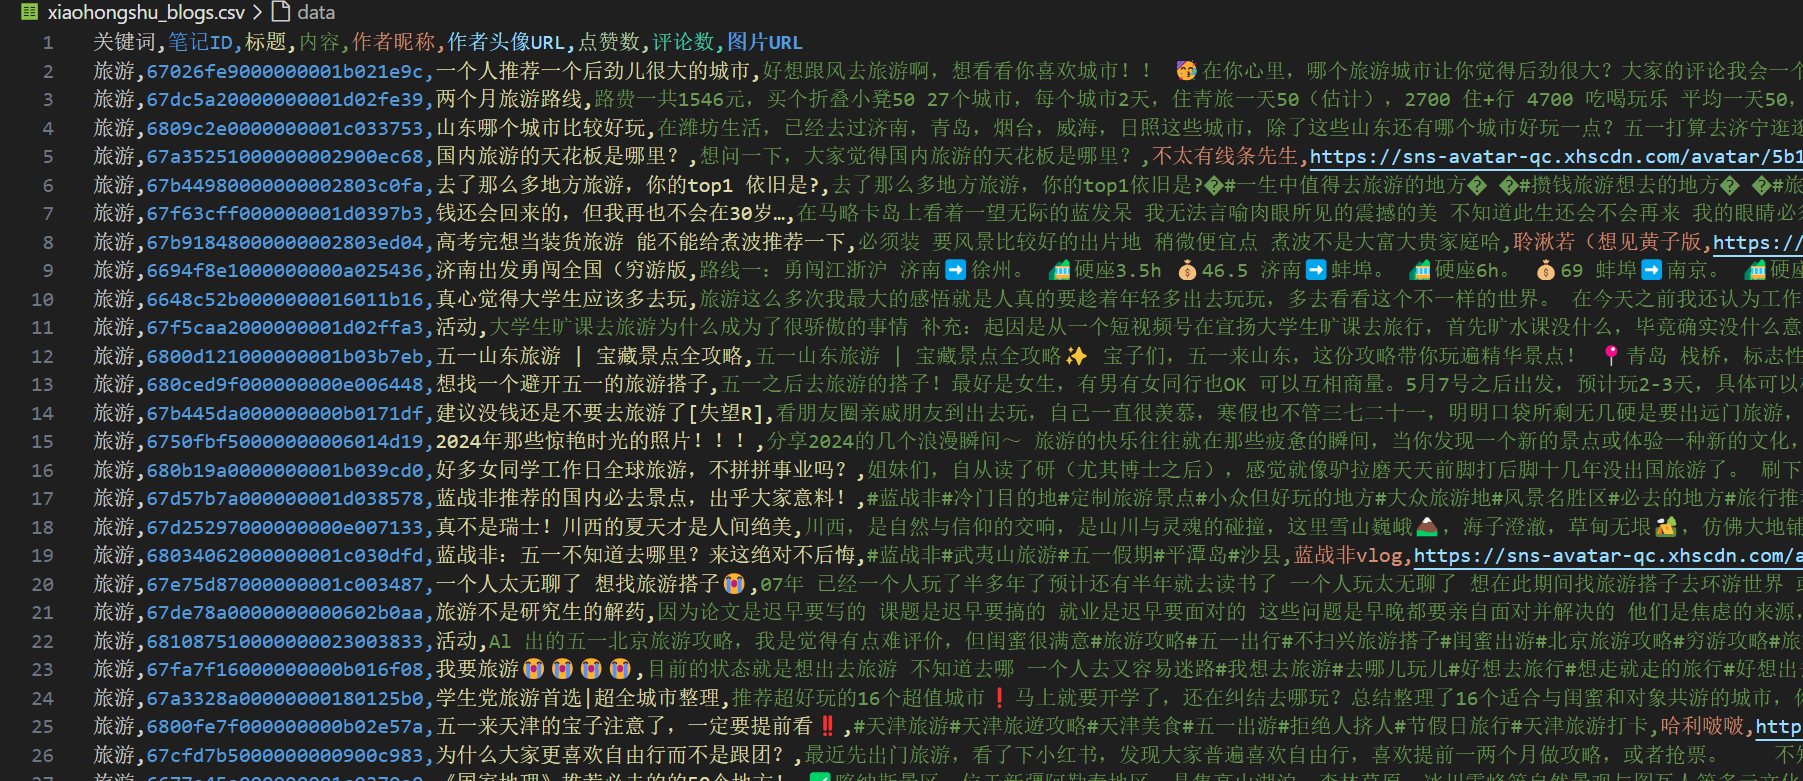
我大概爬取了100个旅游帖子的资源用于我们博客页面的初始化,爬取为csv的格式用于后续写道数据库中(当然也可以直接写到数据库中)
爬虫的部分代码
DrissionPage 是一个基于 Python 的自动化测试工具,它结合了 Selenium 和 Pyppeteer 的功能,提供了更灵活的网页操作接口。
如果没有安装库先在终端输入
pip install DrissionPage这里我们先设计关键词,爬取的轮数,输出的文件,谷歌浏览器的exe文件的地址以及csv的每个列的内容。
import time
import random
import csv
from DrissionPage import ChromiumPage, ChromiumOptions
KEYWORD = "旅游"
SCROLL_TIMES = 20
OUTPUT_CSV_FILE = "xiaohongshu_blogs.csv"
browser_exe_path = r"C:\Program Files\Google\Chrome\Application\chrome.exe"
chromium_options = ChromiumOptions()
chromium_options.set_browser_path(browser_exe_path)
csv_headers = ["关键词", "笔记ID", "标题", "内容", "作者昵称", "作者头像URL", "点赞数", "评论数", "图片URL"]
函数收集我们需要爬取的链接,用不断下滑的方式刷新帖子来爬取链接。
def search_and_collect_links(page, keyword, scroll_times):
    print(f"正在搜索关键词: {keyword}")
    search_url =url##替换实际的url
    page.get(search_url)
    try:
        page.wait.ele_displayed('.feeds-container', timeout=20)
    except Exception as e:
        return []

    note_links = set()
    processed_urls = set()
    xpath_selector_for_links = "element"##替换实际的元素的Xpath
    for i in range(scroll_times):
        print(f"正在滚动搜索结果页 ({i+1}/{scroll_times})...")
        link_eles = page.eles(f'xpath:{xpath_selector_for_links}')

        if not link_eles:
             print("未找到笔记链接元素,可能已滚到底部或选择器错误。")
             if i == 0:
                  break
             print("尝试再次滚动加载更多...")
             page.scroll.to_bottom()
             time.sleep(random.uniform(3, 5))
             new_link_eles = page.eles(f'xpath:{xpath_selector_for_links}')
             if not new_link_eles or len(new_link_eles) <= len(link_eles):
                 print("二次查找未找到新链接元素,可能已滚到底部。")
                 break
             else:
                 link_eles = new_link_eles
                 print("二次查找找到新链接元素。")
        current_scroll_new_links = 0
        for link_ele in link_eles:
            try:
                link = link_ele.link
                if link and link.startswith('http') and link not in processed_urls:
                     note_links.add(link)
                     processed_urls.add(link)
                     current_scroll_new_links += 1
            except Exception as e:
                 continue
剩下的根据我们需要的元素去爬取对应的元素(在开发者模式找)即可。爬取的时间会很慢(避免封号和防爬),模拟人正常浏览的速度即可,不会对服务器造成压力。
,数据导入到mongodb中
由于我的数据是放在mongodb中,所以我需要将csv导入到我的mongdb中。
import csv
from pymongo import MongoClient
import os
import sys
CSV_FILE_PATH = "xiaohongshu_blogs.csv"
MONGO_URI = "your url"
MONGO_DATABASE = "your base"
MONGO_COLLECTION = "your collection"
def import_csv_to_mongodb(csv_file, mongo_uri, mongo_db, mongo_collection_name):
    if not os.path.exists(csv_file):
        print(f"错误:未找到 CSV 文件 '{csv_file}'。请检查文件路径是否正确。")
        return
    client = None
    try:
        client = MongoClient(mongo_uri)
        client.admin.command('ping')

        db = client[mongo_db]
        collection = db[mongo_collection_name]

        with open(csv_file, mode='r', newline='', encoding='utf-8') as infile:
            reader = csv.DictReader(infile)

            imported_count = 0
            skipped_count = 0

            for row in reader:
                mongo_document = {}

                mongo_document["title"] = row.get('标题', '')
                mongo_document["content"] = row.get('内容', '')

                image_urls_string = row.get('图片URL', '')
                mongo_document["images"] = [url.strip() for url in image_urls_string.split(';') if url.strip()]

                author_name = row.get('作者昵称', '')
                author_avatar = row.get('作者头像URL', '')
                if author_name or author_avatar:
                    mongo_document["author"] = {
                        "name": author_name,
                        "avatar": author_avatar
                    }

                try:
                    mongo_document["likes"] = int(row.get('点赞数', '0'))
                except (ValueError, TypeError):
                    mongo_document["likes"] = 0

                try:
                    mongo_document["comment_count"] = int(row.get('评论数', '0'))
                except (ValueError, TypeError):
                    mongo_document["comment_count"] = 0
                mongo_document["note_id"] = row.get('笔记ID', '')

                if mongo_document.get("title") or mongo_document.get("content") or mongo_document.get("images"):
                    try:
                        collection.insert_one(mongo_document)
                        imported_count += 1
                    except Exception as insert_e:
                        skipped_count += 1
                else:
                    skipped_count += 1

        print(f"数据导入完成。成功导入 {imported_count} 条记录,跳过 {skipped_count} 条记录。")

    except Exception as e:
        print(f"导入过程中发生错误: {e}")
    finally:
        if client:
            client.close()

def delete_blogs_by_author(mongo_uri, mongo_db, mongo_collection_name, author_name):
    client = None
    try:
        client = MongoClient(mongo_uri)
        client.admin.command('ping')

        db = client[mongo_db]
        collection = db[mongo_collection_name]

        delete_filter = { "author.name": author_name }
        result = collection.delete_many(delete_filter)

        print(f"删除操作完成。成功删除了 {result.deleted_count} 条记录,作者名字为 '{author_name}'。")

    except Exception as e:
        print(f"删除过程中发生错误: {e}")
        sys.exit(1)
    finally:
        if client:
            client.close()

if __name__ == '__main__':
    AUTHOR_NAME_TO_DELETE = "蓝战非vlog"
    delete_blogs_by_author(MONGO_URI, MONGO_DATABASE, MONGO_COLLECTION, AUTHOR_NAME_TO_DELETE)
通过运行上述脚本程序我们就能够将笔记存到信息中展示出来,展示的后端逻辑在第二次报告中提给出。
总结
任务已经过去了一半,后续着重于界面的美化和功能的拓展,争取打造出实用美观的网站。


 1934
1934

 被折叠的 条评论
为什么被折叠?
被折叠的 条评论
为什么被折叠?
 到【灌水乐园】发言


