文章目录
JavaBean
有一定规范的Java实体类,类内提供了一些公共方法以便外界对该对象的内部属性进行操作
所有属性都是private,所有的属性都可以通过get/set方法进行访问,同时还需要有一个无参构造(默认就有)
public class User{
	private String name;
	private int age;
	public String getName(){
		return name;
	}
	public String getAge(){
		return age;
	}
	public void setName(String name){
		this.name = name;
	}
	public void setAge(int age){
		this.age = age;
	}
}
IoC理论基础
高内聚,低耦合是现代软件的开发的设计模式
之前编写的图书管理系统具有高耦合性,虽然体系逻辑清晰,流程也快,但是当要对一个功能进行修改时,很容易需要大量的时间进行修改;因此如果需要改善这种情况,只能对各个模块进行解耦,降低依赖性,也就是说,所有的实现类对象全部交给程序来管理,对象之间的关系也由程序来动态决定
IOC是Inversion of Control的缩写,翻译为:“控制反转”,把复杂系统分解成相互合作的对象,这些对象类通过封装以后,内部实现对外部是透明的,从而降低了解决问题的复杂度,而且可以灵活地被重用和扩展

可以将对象交给IoC容器进行管理,这时我们就只需要关心接口定义之类
使用IoC容器
使用Spring的首要目的是为了使得软件项目进行解耦,而不是简化代码
Spring并不是一个独立的框架,实际上有很多模块

Spring是一个非入侵式的框架,就像一个工具库一样,因此,我们只需要直接导入其依赖就可以使用
使用Spring
先导入依赖
<dependency>
    <groupId>org.springframework</groupId>
    <artifactId>spring-context</artifactId>
    <version>5.3.19</version>
</dependency>
在resources目录中创建Spring配置文件
<?xml version="1.0" encoding="UTF-8"?>
<beans xmlns="http://www.springframework.org/schema/beans"
       xmlns:xsi="http://www.w3.org/2001/XMLSchema-instance"
       xsi:schemaLocation="http://www.springframework.org/schema/beans
        https://www.springframework.org/schema/beans/spring-beans.xsd">

</beans>
在主方法中编写
public static void main(String[] args) {
    ClassPathXmlApplicationContext context = new ClassPathXmlApplicationContext("text");
}
注册JavaBean
写一个类之后,在配置文件中添加bean
<bean name="Student" class="org.example.entity.Student"/>
之后在主方法中使用IoC容器生成
    public static void main(String[] args) {
        ClassPathXmlApplicationContext context = new ClassPathXmlApplicationContext("spring.xml");
        Student student = context.getBean(Student.class); //直接输入name也行
        System.out.println(student);
    }
输出:说明是可行的

这里得到的Student对象是由Spring通过反射机制进行创建
生命周期与继承
生命周期
<bean name="student" class="com.test.bean.Student"/>
name属性:也可以是id属性,全局唯一,不可出现重复的名称,我们发现,之前其实就是通过Bean的名称来向IoC容器索要对应的对象,也可以通过其他方式获取。
我们现在在主方法中连续获取两个对象:
public class Main {
    public static void main(String[] args) {
        ClassPathXmlApplicationContext context = new ClassPathXmlApplicationContext("spring.xml");
        Student student = context.getBean(Student.class);
        Student student1 = (Student) context.getBean("Student");
        System.out.println(student);
        System.out.println(student1);
    }
}
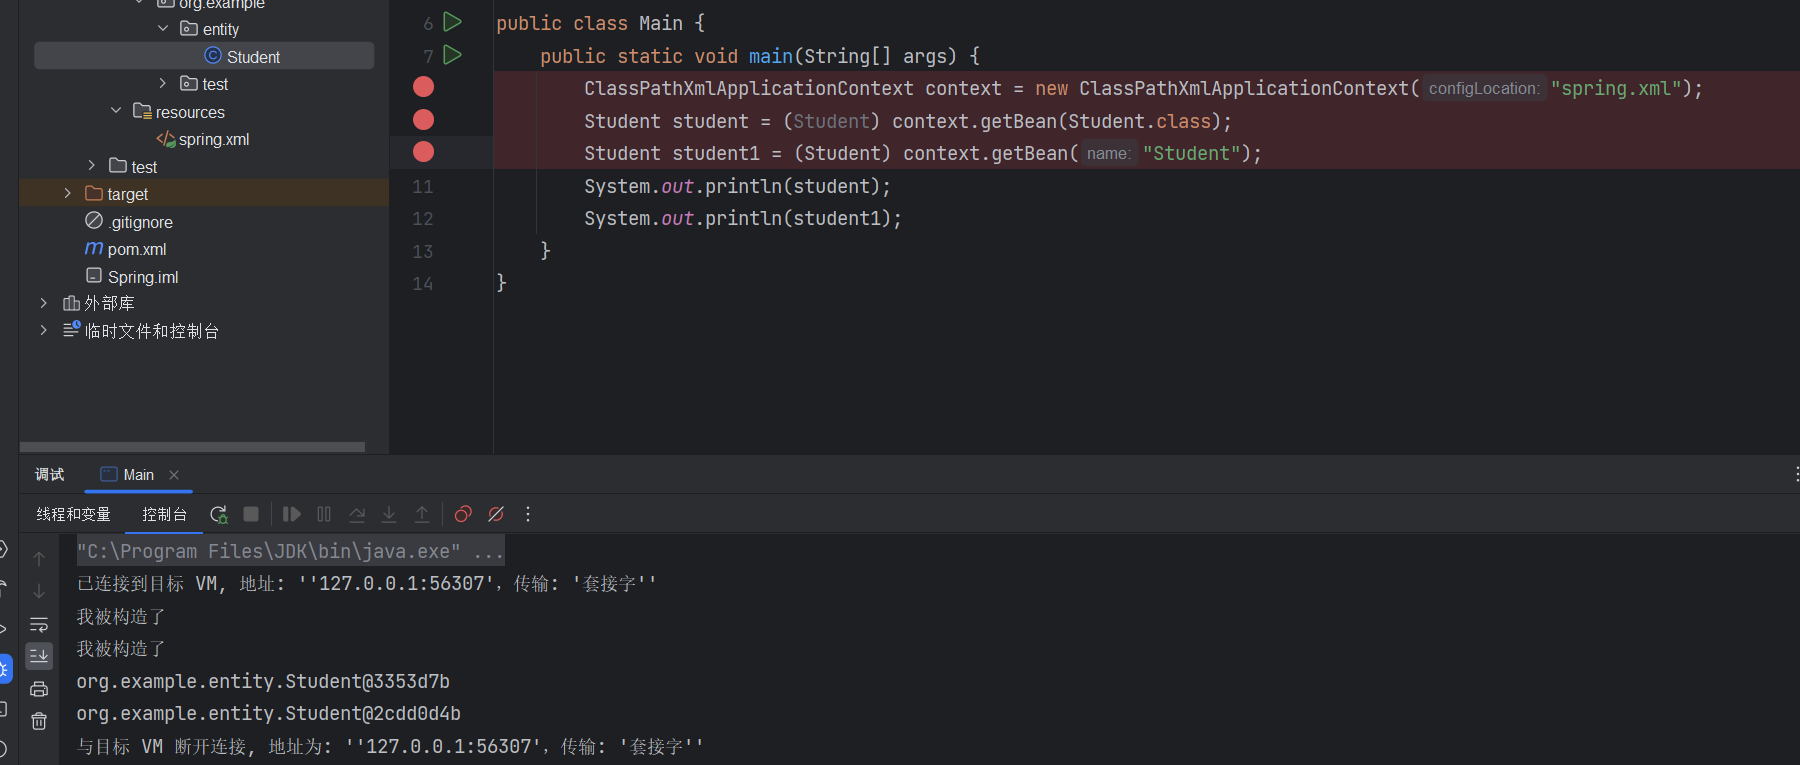
我们发现两次获取到的实际上是同一个对象

也就是说,默认情况下,通过IoC容器进行管理的JavaBean是单例模式的,
那么如何进行修改:只需要修改其作用域即可,添加scope属性:
<bean name="student" class="com.test.bean.Student" scope="prototype"/>
通过将其设定为prototype(原型模式)来使得其每次都会创建一个新的对象

观察一下这两种模式下Bean的生命周期,我们给构造方法添加一个输出:
public class Student {
    String name;
    int age;

    public Student(){
        System.out.println("我被构造了!");
    }
}
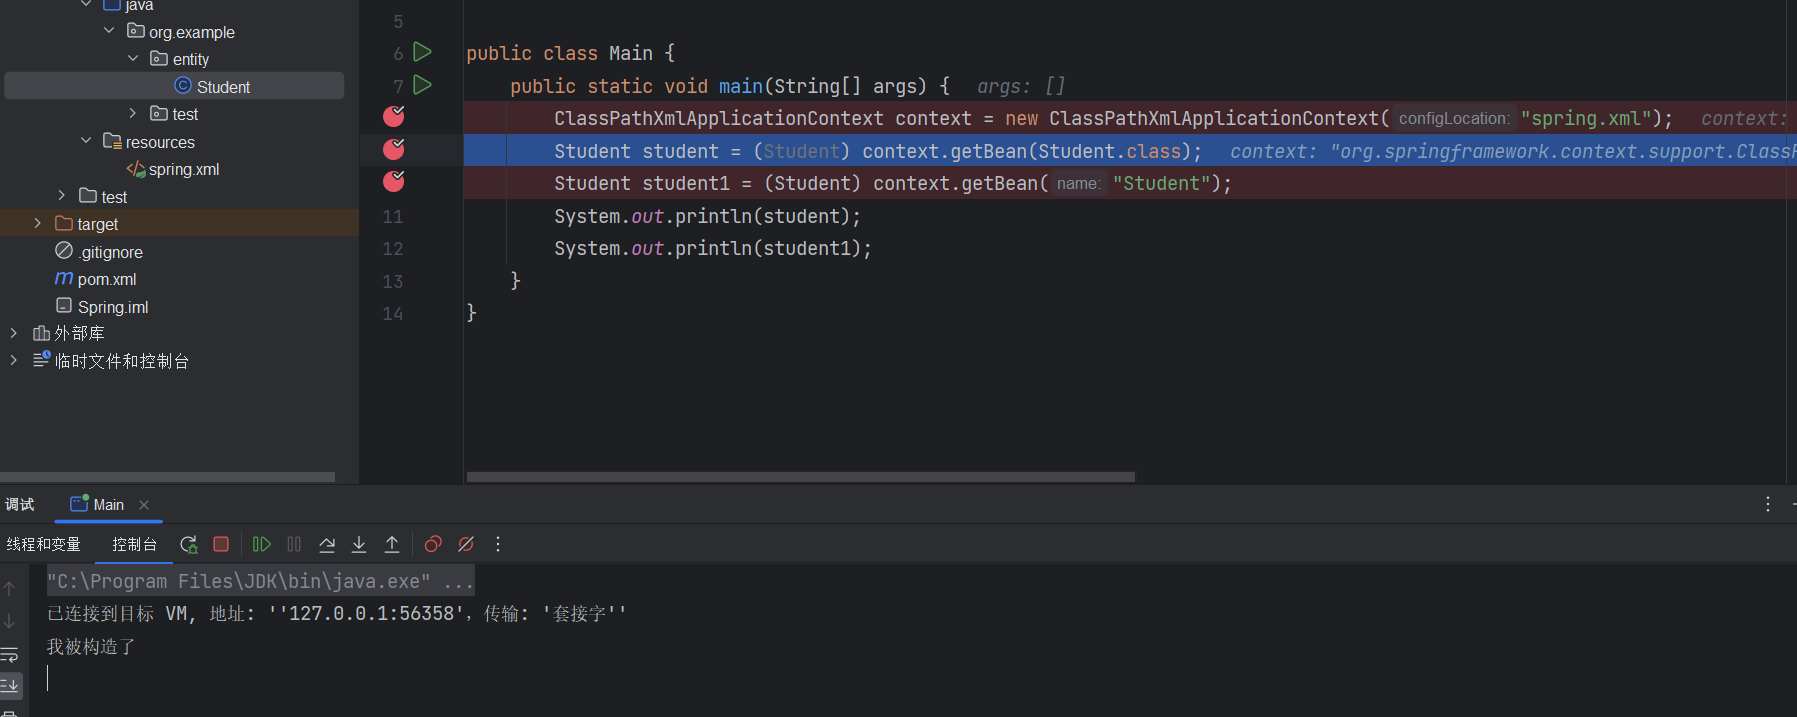
接着在mian方法中打上断点来查看对象分别是在什么时候被构造的
原型模式 prototype
每new一个对象,就构造一次

单例模式 singleton
在一开始的时候就进行构造

我们发现,当Bean的作用域为单例模式,那么它会在一开始就被创建,而处于原型模式下,只有在获取时才会被创建,也就是说,单例模式下,Bean会被IoC容器存储,只要容器没有被销毁,那么此对象将一直存在,而原型模式才是相当于直接new了一个对象,并不会被保存。
我们还可以通过配置文件,告诉创建一个对象需要执行此初始化方法,以及销毁一个对象的销毁方法:
public class Student {
    String name;
    int age;

    public Student() {
        System.out.println("我被构造了");
    }
    public void init() {
        System.out.println("我是初始化");
    }

    public void destroy() {
        System.out.println("我是销毁方法");
    }
}
public static void main(String[] args) {
    ClassPathXmlApplicationContext context = new ClassPathXmlApplicationContext("test.xml");
    Student student = (Student) context.getBean("student");
    System.out.println(student);
    context.close();  //手动销毁容器
}
最后在XML文件中编写配置:
<bean name="student" class="com.test.bean.Student" init-method="init" destroy-method="destroy"/>
看输出

我们还可以手动指定Bean的加载顺序,若某个Bean需要保证一定在另一个Bean加载之前加载,那么就可以使用depend-on属性
添加一个类
public class teacher {
    String name;
    int age;
    public teacher() {
        System.out.println("老师被构造了");
    }
    public void init() {
        System.out.println("老师初始化");
    }

    public void destroy() {
        System.out.println("我是老师的销毁方法");
    }
}
再添加配置文件:此处注意depend-on后跟的是name

最后输出

继承
Bean之间也存在继承关系,是属性的继承
XML文件
虽然是继承但是也可以进行增删改,而不是完全继承
<bean name="Art" class="...">
	<property name="name" value="Alice"/>
</bean>
<bean name="Sports" class="...Sports" parent="Art">
	<property name="id" value="1"/>
</bean>
也可以将一个bean作为抽象的bean,此时就不能直接去获取,有点类似Java当中的抽象类
<bean name="Art" class="..." abstract="true">
依赖注入 Dependency Injection
将bean装配在一起的行为是基于依赖注入的模式实现的,此时,组件不会再去创建它所依赖的组件并管理它们的生命周期,使用依赖注入的应用依赖于单独的实体(容器)来创建和维护所有的组件,并将其注入到需要的bean中,通常通过构造器参数和属性访问(property accessor)方法来实现
基本类型注入
实现向Bean的成员属性进行赋值,使用set方法+property标签来实现
public class Student {
    String name;
    int age;

    public void setName(String name) {
        this.name = name;
    }

    public void say(){
        System.out.println("I'm "+name);
    }
}
在xml文件中设置
        <bean name="Student" class="org.example.entity.Student">
                <property name="name" value="Alice"/>
        </bean>
最后设置主方法
public static void main(String[] args) {
    ClassPathXmlApplicationContext context = new ClassPathXmlApplicationContext("test.xml");
    Student student = (Student) context.getBean("student");
    student.say();
}
输出:发现属性被成功注入到对象当中

非基本类型注入
如果成员类型是一个非基本类型的对象,应该这样注入
@ToString
public class teacher {
    String name;
    int age;
    public teacher() {
        System.out.println("老师被构造了");
    }

    public void setName(String name) {
        this.name = name;
    }
}
Student类
@ToString
public class Student {
    String name;
    int age;
    teacher t;

    public Student() {
        System.out.println("我被构造了");
    }

    public void setName(String name) {
        this.name = name;
    }

    public void setT(teacher t) {
        this.t = t;
    }
    public void say() {
        System.out.println("I'm " + name);
    }
}
我们只需要将对应的类型也注册为bean即可,然后直接使用ref属性来进行引用:

看输出

集合注入
需要在property内部进行编写:
<bean name="student" class="com.test.bean.Student">
    <property name="list">
        <list>
            <value type="double">100.0</value>
            <value type="double">95.0</value>
            <value type="double">92.5</value>
        </list>
    </property>
</bean>
就可以直接以一个数组的方式将属性注入,注意如果是List类型的话,可以使用array数组。如果是一个Map类型,也可以使用entry来注入:
public class Student {
    String name;
    int age;
    Map<String, Double> map;

    public void setMap(Map<String, Double> map) {
        this.map = map;
    }

    public void say(){
        System.out.println("我的成绩:"+ map);
    }
}
<bean name="student" class="com.test.bean.Student">
    <property name="map">
        <map>
            <entry key="语文" value="100.0"/>
            <entry key="数学" value="80.0"/>
            <entry key="英语" value="92.5"/>
        </map>
    </property>
</bean>
自动装配注入
使用自动装配来实现属性值的注入:
<bean name="card" class="com.test.bean.Card"/>
<bean name="student" class="com.test.bean.Student" autowire="byType"/>
自动装配会根据set方法中需要的类型,自动在容器中查找是否存在对应类型或是对应名称以及对应构造方法的Bean,比如我们上面指定的为byType,那么其中的card属性就会被自动注入类型为Card的Bean
我们已经了解了如何使用set方法来创建对象,那么能否不使用默认的无参构造方法,而是指定一个有参构造进行对象的创建呢?我们可以指定构造方法:
<bean name="student" class="com.test.bean.Student">
        <constructor-arg name="name" value="小明"/>
        <constructor-arg index="1" value="18"/>
    </bean>
public class Student {
    String name;
    int age;

    public Student(String name, int age){
        this.name = name;
        this.age = age;
    }

    public void say(){
        System.out.println("我是:"+name+"今年"+age+"岁了!");
    }
}
通过手动指定构造方法参数,就可以直接告诉容器使用哪一个构造方法来创建对象
面向切面AOP
AOP思想实际上就是:在运行时,动态地将代码切入到类的指定方法、指定位置上的编程思想就是面向切面的编程。也就是说,我们可以使用AOP来帮助我们在方法执行前或执行之后,做一些额外的操作,实际上,就是代理!
通过AOP我们可以在保证原有业务不变的情况下,添加额外的动作,比如我们的某些方法执行完成之后,需要打印日志,那么这个时候,我们就可以使用AOP来帮助我们完成,它可以批量地为这些方法添加动作。可以说,它相当于将我们原有的方法,在不改变源代码的基础上进行了增强处理。

相当于我们的整个业务流程,被直接斩断,并在断掉的位置添加了一个额外的操作,再连接起来,也就是在一个切点位置插入内容。它的原理实际上就是通过动态代理机制实现的,我们在JavaWeb阶段已经给大家讲解过动态代理了。不过Spring底层并不是使用的JDK提供的动态代理,而是使用的第三方库实现,它能够以父类的形式代理,而不是接口
使用SpringAOP
Spring是支持AOP编程的框架之一(实际上它整合了AspectJ框架的一部分),要使用AOP我们需要先导入一个依赖:
<dependency>
    <groupId>org.springframework</groupId>
    <artifactId>spring-aspects</artifactId>
    <version>5.3.13</version>
</dependency>
那么,如何使用AOP呢?首先我们要明确,要实现AOP操作,我们需要知道这些内容:
- 需要切入的类,类的哪个方法需要被切入
- 切入之后需要执行什么动作
- 是在方法执行前切入还是在方法执行后切入
- 如何告诉Spring需要进行切入
那么我们依次来看,首先需要解决的问题是,找到需要切入的类:
public class Student {
    String name;
    int age;

		//分别在test方法执行前后切入
    public int test(String str) {
        System.out.println("我是一个测试方法:"+str);
        return str.length();
    }
}
现在我们希望在test方法执行前后添加我们的额外执行的内容,接着,我们来看看如何为方法执行前和执行后添加切入动作。比如现在我们想在方法返回之后,再执行我们的动作,首先定义我们要执行的操作:
public class AopTest {

    //执行之后的方法
    public void after(){
        System.out.println("我是执行之后");
    }

    //执行之前的方法
    public void before(){
        System.out.println("我是执行之前");
    }
}
那么,现在如何告诉Spring我们需要在方法执行之前和之后插入其他逻辑呢?首先我们将要进行AOP操作的类注册为Bean:
<bean name="student" class="com.test.bean.Student"/>
<bean name="aopTest" class="com.test.aop.AopTest"/>
一个是Student类,还有一个就是包含我们要切入方法的AopTest类,注册为Bean后,他们就交给Spring进行管理,这样Spring才能帮助我们完成AOP操作。
接着,我们需要告诉Spring,我们需要添加切入点,首先将顶部修改为,引入aop相关标签:
<?xml version="1.0" encoding="UTF-8"?>
<beans xmlns="http://www.springframework.org/schema/beans"
       xmlns:xsi="http://www.w3.org/2001/XMLSchema-instance"
       xmlns:aop="http://www.springframework.org/schema/aop"
       xsi:schemaLocation="http://www.springframework.org/schema/beans http://www.springframework.org/schema/beans/spring-beans.xsd
       http://www.springframework.org/schema/aop http://www.springframework.org/schema/aop/spring-aop.xsd">
通过使用aop:config来添加一个新的AOP配置:
<aop:config>

</aop:config>
首先第一行,我们需要告诉Spring,我们要切入的是哪一个类的哪个或是哪些方法:
<aop:pointcut id="test" expression="execution(* com.test.bean.Student.say())"/>
其中,expression属性的execution填写格式如下:
修饰符 包名.类名.方法名称(方法参数)
- 修饰符:public、protected、private、包括返回值类型、static等等(使用*代表任意修饰符)
- 包名:如com.test(*代表全部,比如com.*代表com包下的全部包)
- 类名:使用*也可以代表包下的所有类
- 方法名称:可以使用*代表全部方法
- 方法参数:填写对应的参数即可,比如(String, String),也可以使用
*来代表任意一个参数,使用..代表所有参数
也可以使用其他属性来进行匹配,比如@annotation可以用于表示标记了哪些注解的方法被切入
接着,为此方法添加一个执行前动作和一个执行后动作:
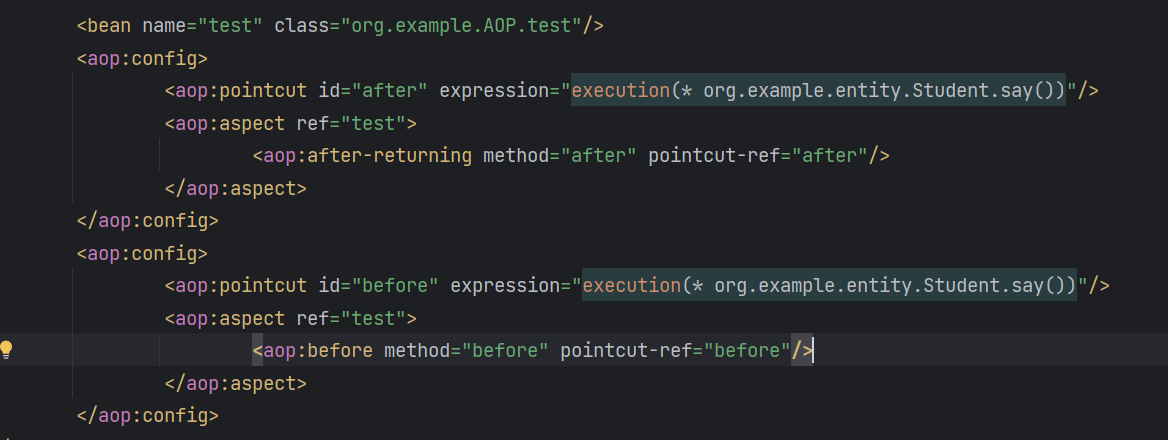
<aop:aspect ref="aopTest">
    <aop:before method="before" pointcut-ref="test"/>
    <aop:after-returning method="after" pointcut-ref="test"/>
</aop:aspect>
最后总设置

现在来实验一下吧:
public class Main {
    public static void main(String[] args) {
        ClassPathXmlApplicationContext context = new ClassPathXmlApplicationContext("spring.xml");
        Student student = context.getBean(Student.class);
        student.say();
        context.close();
    }
}
输出

我们发现,方法执行前后,分别调用了对应的方法。但是仅仅这样还是不能满足一些需求,在某些情况下,我们可以需求方法执行的一些参数,比如方法执行之后返回了什么,或是方法开始之前传入了什么参数等等。
这个时候,可以为切入的方法添加一个参数,通过此参数就可以快速获取切点位置的一些信息:
//执行之前的方法
public void before(JoinPoint point){
    System.out.println("我是执行之前");
    System.out.println(point.getTarget());  //获取执行方法的对象
    System.out.println(Arrays.toString(point.getArgs()));  //获取传入方法的实参
}
通过添加JoinPoint作为形参,Spring会自动给我们一个实现类对象,这样我们就能获取方法的一些信息了。
环绕方法
环绕方法相当于完全代理了此方法,它完全将此方法包含在中间,需要手动调用才可以执行此方法,并且可以直接获取更多的参数:
public Object around(ProceedingJoinPoint joinPoint) throws Throwable {
    System.out.println("方法开始之前");
    Object value = joinPoint.proceed(); //如果没有此语句,则指定方法不会被调用
    System.out.println("方法执行完成,结果为:"+value);
    return value;
}
注意,如果代理方法存在返回值,那么环绕方法也需要有一个返回值,通过proceed方法来执行代理的方法,也可以修改参数之后调用proceed(Object[]),使用我们给定的参数再去执行:
public Object around(ProceedingJoinPoint joinPoint) throws Throwable {
    System.out.println("方法开始之前");
    String arg = joinPoint.getArgs()[0] + "lailou";
    Object value = joinPoint.proceed(new Object[]{arg});
    System.out.println("方法执行完成,结果为:"+value);
    return value;
}
使用接口实现AOP
如何使用Advice实现AOP
它与之前学习的动态代理更接近一些,比如在方法开始执行之前或是执行之后会去调用实现的接口,首先需要将一个类实现Advice接口,只有实现此接口,才可以被通知,比如这里使用MethodBeforeAdvice表示是一个在方法执行之前的动作:
public class AopTest implements MethodBeforeAdvice {
    @Override
    public void before(Method method, Object[] args, Object target) throws Throwable {
        System.out.println("通过Advice实现AOP");
    }
}
我们发现,方法中包括了很多的参数,其中args代表的是方法执行前得到的实参列表,还有target表示执行此方法的实例对象。运行之后,效果和之前是一样的,但是在这里我们就可以快速获取到更多信息。
<aop:config>
    <aop:pointcut id="stu" expression="execution(* com.test.bean.Student.say(String))"/>
    <aop:advisor advice-ref="before" pointcut-ref="stu"/>
</aop:config>
除了此接口以外,还有其他的接口,比如AfterReturningAdvice就需要实现一个方法执行之后的操作:
public class AopTest implements MethodBeforeAdvice, AfterReturningAdvice {
    @Override
    public void before(Method method, Object[] args, Object target) throws Throwable {
        System.out.println("我是方法执行之前!");
    }

    @Override
    public void afterReturning(Object returnValue, Method method, Object[] args, Object target) throws Throwable {
        System.out.println("我是方法执行之后!");
    }
}
AOP 领域中的特性术语:
- 通知(Advice): AOP 框架中的增强处理,通知描述了切面何时执行以及如何执行增强处理,也就是我们上面编写的方法实现。
- 连接点(join point): 连接点表示应用执行过程中能够插入切面的一个点,这个点可以是方法的调用、异常的抛出,实际上就是我们在方法执行前或是执行后需要做的内容。
- 切点(PointCut): 可以插入增强处理的连接点,可以是方法执行之前也可以方法执行之后,还可以是抛出异常之类的。
- 切面(Aspect): 切面是通知和切点的结合,我们之前在xml中定义的就是切面,包括很多信息。
- 引入(Introduction):引入允许我们向现有的类添加新的方法或者属性。
- 织入(Weaving): 将增强处理添加到目标对象中,并创建一个被增强的对象,我们之前都是在将我们的增强处理添加到目标对象,也就是织入(这名字挺有文艺范的)
使用注解开发
好处:更强的类型安全性和更好的重构能力
注解实现配置文件
那么,现在既然不使用XML文件了,那通过注解的方式就只能以实体类的形式进行配置了,给作为配置的类上添加@Configuration注解,先创建一个新的类MainConfiguration:
@Configuration 注解会告知Spring这是一个配置类,会为Spring上下文提供bean
@Configuration
public class MainConfiguration {
    //没有配置任何Bean
}
可以看作:
<?xml version="1.0" encoding="UTF-8"?>
<beans xmlns="http://www.springframework.org/schema/beans"
       xmlns:xsi="http://www.w3.org/2001/XMLSchema-instance"
       xsi:schemaLocation="http://www.springframework.org/schema/beans
        https://www.springframework.org/schema/beans/spring-beans.xsd">
		<!-- 没有配置任何Bean -->
</beans>
Bean配置
之前我们是直接在配置文件中编写Bean的一些信息,现在在配置类中,我们只需要编写一个方法,并返回我们要创建的Bean的对象即可,并在其上方添加@Bean注解:
@Bean注解表明这些方法所返回的对象会以Bean的形式添加到 Spring的应用上下文,默认情况下,bean所对应的bean ID与定义它们的方法名称是相同的
@Bean //如果想设置别名,则使用 @Bean("card")
public Card card(){
    return new Card();
}
这样,等价于:
<?xml version="1.0" encoding="UTF-8"?>
<beans xmlns="http://www.springframework.org/schema/beans"
       xmlns:xsi="http://www.w3.org/2001/XMLSchema-instance"
       xsi:schemaLocation="http://www.springframework.org/schema/beans
        https://www.springframework.org/schema/beans/spring-beans.xsd">
		<bean class="com.test.bean.Card"></bean>
</beans>
指定作用域
还可以继续添加@Scope注解来指定作用域,例如:
@Bean
@Scope("prototype")
public Card card(){
    return new Card();
}
采用这种方式,可以更加方便地控制一个Bean对象的创建过程,相当于这个对象时由我们创建好了再交给Spring进行后续处理,我们可以在对象创建时做很多额外的操作,包括一些属性值的配置等
加载配置类
既然现在我们已经创建好了配置类,接着我们就可以在主方法中加载此配置类,并创建一个基于配置类的容器:
public class Main {
    public static void main(String[] args) {
      	//使用AnnotationConfigApplicationContext来实现注解配置
        AnnotationConfigApplicationContext context = new AnnotationConfigApplicationContext(MainConfiguration.class);
        //这里需要告诉Spring哪个类作为配置类
        Card card = context.getBean(Card.class);  //容器用法和之前一样
        System.out.println(card);
    }
}
在配置的过程中,我们可以点击IDEA底部的Spring标签,打开后可以对当前向容器中注册的Bean进行集中查看,并且会标注Bean之间的依赖关系
Bean的默认名称实际上就是首字母小写的方法名称,可以手动指定:
@Bean("test")
@Scope("prototype")
public Card card(){
    return new Card();
}
还可以直接在类上添加@Component注解来将一个类进行注册**(现在最常用的方式)**,不过要实现这样的方式,我们需要添加一个自动扫描
在配置类上添加一个@ComponentScan注解,也可以使用@ComponentScans来批量添加。这里演示将bean包下的所有类进行扫描:
@ComponentScan("com.test.bean") //表示扫描bean目录中的所有
@Configuration
public class MainConfiguration {

}
现在删除类中的Bean定义,我们在Student类的上面添加@Component注解,来表示此类型需要作为Bean交给容器进行管理:
@Component
@Scope("prototype")
public class Student {
    String name;
    int age;
    Card card;
}
同样的,在类上也可以直接添加@Scope来限定作用域。
效果和刚刚实际上是相同的,我们可以来测试一下:
public class Main {
    public static void main(String[] args) {
        AnnotationConfigApplicationContext context = new AnnotationConfigApplicationContext(MainConfiguration.class);
        System.out.println(context.getBean(Student.class));
    }
}
我们可以看到IDEA的Spring板块中也显示了我们刚刚通过直接在类上添加@Component声明的Bean。
与@Component同样效果的还有@Controller、@Service和@Repository
现在我们就有两种方式注册一个Bean了,那么如何实现像之前一样的自动注入呢,比如我们将Card也注册为Bean,我们希望Spring自动将其注入到Student的属性中:
@Component
public class Student {
    String name;
    int sid;
    Card card;
}
因此,我们可以将此类型,也通过这种方式注册为一个Bean:
@Component
@Scope("prototype")
public class Card {
}
在需要注入的位置,添加一个@Resource注解来实现自动装配:
@Component
public class Student {
    String name;
    int sid;

    @Resource
    Card card;
}
这样的好处是,完全不需要创建任何的set方法,只需要添加这样的一个注解就可以了,Spring会跟之前配置文件的自动注入一样,在整个容器中进行查找,并将对应的Bean实例对象注入到此属性中,当然,如果还是需要通过set方法来注入,可以将注解添加到方法上:
@Component
public class Student {
    String name;
    int sid;
    Card card;

    @Resource
    public void setCard(Card card) {
        System.out.println("通过方法");
        this.card = card;
    }
}
除了使用@Resource以外,我们还可以使用@Autowired(IDEA不推荐将其使用在字段上,会出现黄标,但是可以放在方法或是构造方法上),它们的效果是一样的,但是它们存在区别,虽然它们都是自动装配:
- @Resource默认ByName如果找不到则ByType,可以添加到set方法、字段上。
- @Autowired默认是byType,可以添加在构造方法、set方法、字段、方法参数上。
并且@Autowired可以配合@Qualifier使用,来指定一个名称的Bean进行注入:
@Autowired
@Qualifier("sxc")
public void setCard(Card card) {
    System.out.println("通过方法");
    this.card = card;
}
如果Bean是在配置文件中进行定义的,我们还可以在方法的参数中使用@Autowired来进行自动注入:
@ComponentScan("com.test.bean")
@Configuration
public class MainConfiguration {

    @Bean
    public Student student(@Autowired Card card){
        Student student = new Student();
        student.setCard(card);
        return student;
    }
}
我们还可以通过@PostConstruct注解来添加构造后执行的方法,它等价于之前讲解的init-method:
@PostConstruct
public void init(){
    System.out.println("我是初始化方法!1");
}
注意它们的顺序:Constructor(构造方法) -> @Autowired(依赖注入) -> @PostConstruct
同样的,如果需要销毁方法,也可以使用@PreDestroy注解,这里就不做演示了。
这样,两种通过注解进行Bean声明的方式就讲解完毕了,那么什么时候该用什么方式去声明呢?
- 如果要注册为Bean的类是由其他框架提供,我们无法修改其源代码,那么我们就使用第一种方式进行配置。
- 如果要注册为Bean的类是我们自己编写的,我们就可以直接在类上添加注解,并在配置中添加扫描。
注解实现AOP操作
首先在主类添加@EnableAspectJAutoProxy注解,开启AOP注解支持:
@EnableAspectJAutoProxy
@ComponentScan("com.test.bean")
@Configuration
public class MainConfiguration {
}
接着在定义AOP增强操作的类上添加@Aspect注解和@Component将其注册为Bean,如同之前在配置文件中也要将其注册为Bean:
@Component
@Aspect
public class AopTest {

}
接着,在里面编写方法,并将此方法添加到一个切点中,比如我们希望在Student的test方法执行之前执行我们的方法:
public int test(String str){
    System.out.println("我被调用了:"+str);
    return str.length();
}
只需要添加@Before注解即可:
@Before("execution(* com.test.bean.Student.test(..))")
public void before(){
    System.out.println("我是之前执行的内容!");
}
同样的,为其添加JoinPoint参数来获取切入点信息:
@Before("execution(* com.test.bean.Student.test(..))")
public void before(JoinPoint point){
    System.out.println("参数列表:"+ Arrays.toString(point.getArgs()));
    System.out.println("我是之前执行的内容!");
}
使用@AfterReturning注解来指定方法返回后的操作:
@AfterReturning(value = "execution(* com.test.bean.Student.test(..))", returning = "returnVal")
public void after(Object returnVal){
    System.out.println("方法已返回,结果为:"+returnVal);
}
指定returning属性,并将其作为方法某个参数的实参。同样的,环绕也可以直接通过注解声明:
@Around("execution(* com.test.bean.Student.test(..))")
public Object around(ProceedingJoinPoint point) throws Throwable {
    System.out.println("方法执行之前!");
    Object val = point.proceed();
    System.out.println("方法执行之后!");
    return val;
}
其他注解配置
配置文件可能不止一个,我们有可能会根据模块划分,定义多个配置文件,这个时候,可能会出现很多个配置类,如果我们需要@Import注解来快速将某个类加入到容器中,比如我们现在创建一个新的配置文件,并将数据库Bean也搬过去:
public class Test2Configuration {
    @Bean
    public Connection getConnection() throws SQLException {
        System.out.println("创建新的连接!");
        return DriverManager.getConnection("jdbc:mysql://localhost:3306/study",
                "root",
                "root");
    }
}
@EnableAspectJAutoProxy
@Configuration
@ComponentScan("com.test")
@Import(Test2Configuration.class) //可以强制注册为一个Bean
public class TestConfiguration {

    @Resource
    Connection connection;

    @PostConstruct
    public void init(){
        System.out.println(connection);
    }
}
注意另一个配置类并没有添加任何注解,实际上,相当于导入的类被强制注册为了一个Bean,到现在,我们一共了解了三种注册为Bean的方式,利用这种特性,我们还可以将其他的类型也强制注册为Bean:
@EnableAspectJAutoProxy
@Configuration
@ComponentScan("com.test")
@Import({Test2Configuration.class, Date.class})
public class TestConfiguration {

    @Resource
    Connection connection;
    @Resource
    Date date;

    @PostConstruct
    public void init(){
        System.out.println(date+" -> "+connection);
    }
}
日期直接作为一个Bean放入到IoC容器中,并且时间永远都是被new的那个时间,也就是同一个对象(因为默认是单例模式)
通过@Import方式最主要为了实现的目标并不是创建Bean,而是为了方便一些框架的Registrar进行Bean定义


 200
200


 被折叠的 条评论
为什么被折叠?


