


💕喜欢的朋友可以关注一下,下次更新不迷路!💕(●'◡'●)
目录
七、Spring Boot集成 Swagger2 展现在线接口文档
一、为什么使用SpringBoot
简化依赖配置
原来 Spring 有多个 xml 和 properties配置,在 Spring Boot 中只需要个 application.yml即可。
在 Spring Boot 中,我们只需要在 pom 文件中添加如下一个 starter-web 依赖即可。
<dependency>
	<groupId>org.springframework.boot</groupId>
	<artifactId>spring-boot-starter-web</artifactId>
</dependency>
Spring Boot 这个 starter-web 已经包含了多个依赖,包括之前在 Spring 工程中需要导入的依赖,我们看一下其中的一部分,如下:
<!-- .....省略其他依赖 -->
<dependency>
    <groupId>org.springframework</groupId>
    <artifactId>spring-web</artifactId>
    <version>5.0.7.RELEASE</version>
    <scope>compile</scope>
</dependency>
<dependency>
    <groupId>org.springframework</groupId>
    <artifactId>spring-webmvc</artifactId>
    <version>5.0.7.RELEASE</version>
    <scope>compile</scope>
</dependency>
简化配置类和Bean
@Configuration表示该类是个配置类,@Bean表示该方法返回一个 Bean。这样就把TestService作为 Bean 让 Spring 去管理了,在其他地方,我们如果需要使用该 Bean,和原来一样,直接使用@Resource注解注入进来即可使用,非常方便。
import org.springframework.context.annotation.Bean;
import org.springframework.context.annotation.Configuration;

@Configuration
public class JavaConfig {
    @Bean
    public TestService getTestService() {
        return new TestService();
    }
}
@Resource
private TestService testService;简化部署
在使用 Spring 时,项目部署时需要我们在服务器上部署 tomcat,然后把项目打成 war 包扔到 tomcat里。
在使用 Spring Boot 后,我们不需要在服务器上去部署 tomcat,因为 Spring Boot 内嵌了 tomcat,我们只需要将项目打成 jar 包,使用 java -jar xxx.jar一键式启动项目。
另外,也降低对运行环境的基本要求,环境变量中有JDK即可。
简化监控
我们可以引入 spring-boot-start-actuator 依赖,直接使用 REST 方式来获取进程的运行期性能参数,从而达到监控的目的,比较方便。但是 Spring Boot 只是个微框架,没有提供相应的服务发现与注册的配套功能,没有外围监控集成方案,没有外围安全管理方案,所以在微服务架构中,还需要 Spring Cloud 来配合一起使用。
二、Spring Boot开发环境搭建和项目启动
新建项目

配置maven
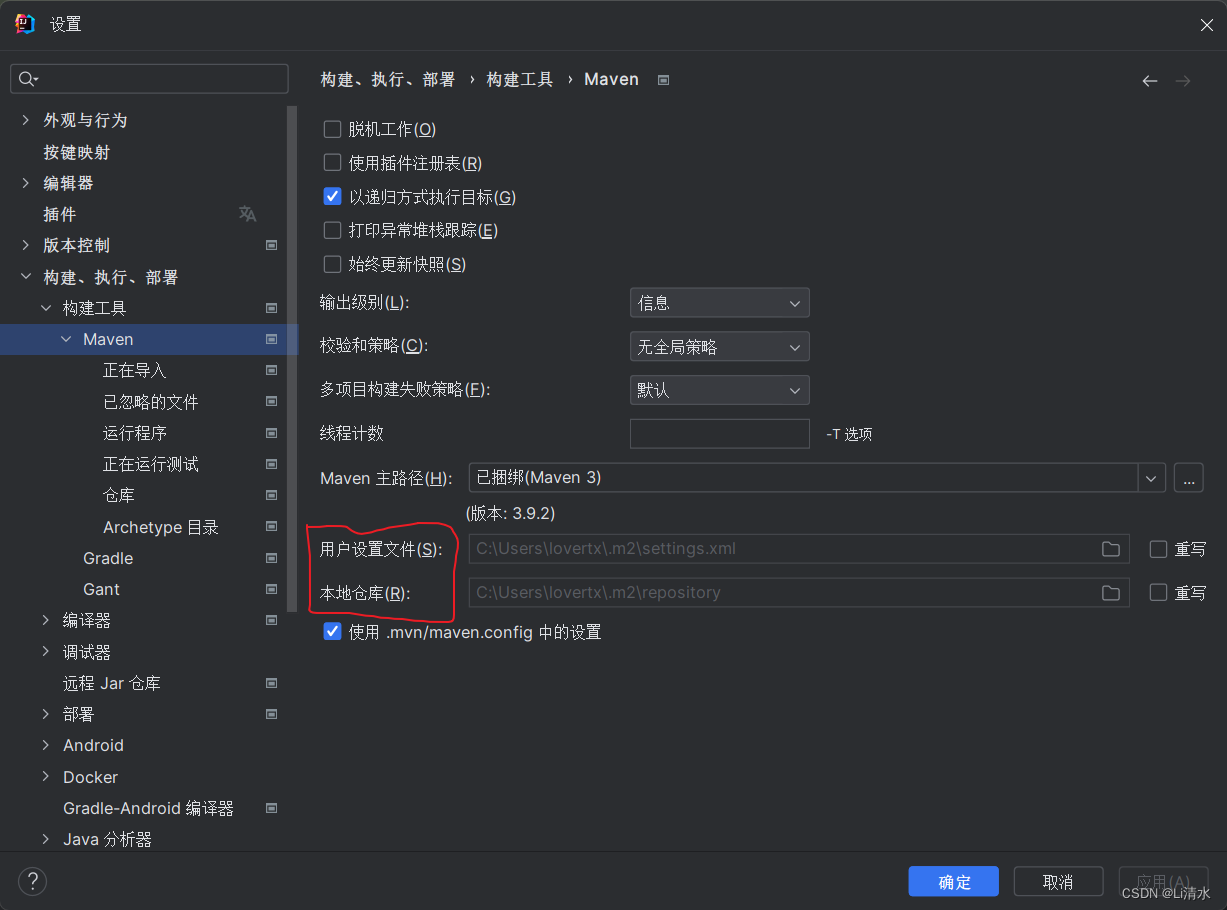
在 Maven home directory 中选择本地 Maven 的安装路径;在 User settings file 中选择本地 Maven 的配置文件所在路径。在配置文件中,我们配置一下国内阿里的镜像,这样在下载 maven 依赖时,速度很快。
<mirror>
	<id>nexus-aliyun</id>
	<mirrorOf>*</mirrorOf>
	<name>Nexus aliyun</name>
	<url>http://maven.aliyun.com/nexus/content/groups/public</url>
</mirror>
三、Spring Boot返回Json数据及数据封装
• 在项目开发中,接口与接口之间,前后端之间数据的传输都使用 Json 格式,
• 在 Spring Boot 中,在Controller 中使用@RestController注解即可返回 Json 格式的数据,
• @RestController 注解包含了原来的 @Controller 和 @ResponseBody 注解,
• @ResponseBody 注解是将返回的数据结构转换为 Json 格式。
• Spring Boot 中默认使用的 json 解析框架是 jackson。
Spring Boot 默认对Json的处理
在实际项目中,常用的数据结构无非有类对象、List对象、Map对象,我们看一下默认的 jackson 框架对这三个常用的数据结构转成 json 后的格式如何。
1、创建 User 实体类
public class User {
    private Long id;
    private String username;
    private String password;
	/* 省略get、set和带参构造方法 */
}
2、创建Controller类
创建一个 Controller,分别返回 User对象、List 和 Map。
package com.itcodai.course01.controller;

import com.itcodai.course01.domain.User;
import org.springframework.web.bind.annotation.RequestMapping;
import org.springframework.web.bind.annotation.RestController;

import java.util.ArrayList;
import java.util.HashMap;
import java.util.List;
import java.util.Map;

@RestController
@RequestMapping("/json")
public class JsonController {
    @RequestMapping("/user")
    public User getUser() {
        User user = new User(1L, "itcodai", "123456");
        return user;
    }

    @RequestMapping("/list")
    public List<User> getUserList() {
        List<User> userList = new ArrayList<>();
        userList.add(new User(1L, "itcodai", "123456"));
        userList.add(new User(2L, "itcodai2", "123456"));
        return userList;
    }

    @RequestMapping("/map")
    public Map<String, Object> getMap() {
        Map<String, Object> map = new HashMap<>(3);
        User user = new User(1L, "itcodai", "123456");
        map.put("user", user);
        map.put("name", "itcodai");
        map.put("age", 18);
        return map;
    }
}
3、测试不同数据类型返回的json
在浏览器中输入:localhost:8080/json/user 返回 json 如下:
{
    "id": 1,
    "name": "itcodai",
    "password": "123456"
} 在浏览器中输入:localhost:8080/json/list 返回 json 如下:
[
    {
        "id": 1,
        "name": "itcodai",
        "password": "123456"
    },
    {
        "id": 2,
        "name": "itcodai2",
        "password": "123456"
    }
] 在浏览器中输入:localhost:8080/json/map 返回 json 如下:
{
    "name": "itcodai",
    "user": {
        "id": 1,
        "name": "itcodai",
        "password": "123456"
    },
    "age": 18
}
4、jackson 中对null的处理
在实际项目中,我们难免会遇到一些 null 值出现,我们转 json 时,是不希望有这些 null 出现的,比如我们期望所有的 null 在转 json 时都变成 “” 这种空字符串,那怎么做呢?在 Spring Boot 中,我们做一下配置即可。
新建一个 jackson 的配置类:
package com.itcodai.course01.config;

import com.fasterxml.jackson.core.JsonGenerator;
import com.fasterxml.jackson.databind.JsonSerializer;
import com.fasterxml.jackson.databind.ObjectMapper;
import com.fasterxml.jackson.databind.SerializerProvider;
import org.springframework.boot.autoconfigure.condition.ConditionalOnMissingBean;
import org.springframework.context.annotation.Bean;
import org.springframework.context.annotation.Configuration;
import org.springframework.context.annotation.Primary;
import org.springframework.http.converter.json.Jackson2ObjectMapperBuilder;

import java.io.IOException;

@Configuration
public class JacksonConfig {
    @Bean
    @Primary
    @ConditionalOnMissingBean(ObjectMapper.class)
    public ObjectMapper jacksonObjectMapper(Jackson2ObjectMapperBuilder builder) {
        ObjectMapper objectMapper = builder.createXmlMapper(false).build();
        objectMapper.getSerializerProvider().setNullValueSerializer(new JsonSerializer<Object>(){

            @Override
            public void serialize(Object o, JsonGenerator jsonGenerator, SerializerProvider serializerProvider) throws IOException {
                jsonGenerator.writeString("");
            }
        });
        // 通过该方法对mapper对象进行设置,所有序列化的对象都将按改规则进行系列化
        // Include.Include.ALWAYS 默认
        // Include.NON_DEFAULT 属性为默认值不序列化
        // Include.NON_EMPTY 属性为 空("") 或者为 NULL 都不序列化,则返回的json是没有这个字段的。这样对移动端会更省流量
        return objectMapper;
    }
}
然后我们修改一下上面返回 map 的接口,将几个值改成 null 测试一下:
@RequestMapping("/map")
    public Map<String, Object> getMap() {
        Map<String, Object> map = new HashMap<>(3);
        User user = new User(1L, "itcodai", null);
        map.put("user", user);
        map.put("name", null);
        map.put("age", 18);
        return map;
} 再次输入:localhost:8080/json/map,可以看到 jackson 已经将所有 null 字段转成了空字符串了。
{
    "name": "",
    "user": {
        "id": 1,
        "name": "itcodai",
        "password": ""
    },
    "age": 18
}
使用阿里巴巴FastJson的设置
1、jackson 和 fastJson 的对比
| 选项 | fastJson | jackson |
|---|---|---|
| 上手难易程度 | 容易 | 中等 |
| 高级特性支持 | 中等 | 丰富 |
| 官方文档、Example支持 | 中文 | 英文 |
| 处理json速度 | 略快 | 快 |
2、fastJson依赖导入
<dependency>
	<groupId>com.alibaba</groupId>
	<artifactId>fastjson</artifactId>
	<version>1.2.35</version>
</dependency>
3、 使用 fastJson 处理 null
使用 fastJson 时,需要继承 WebMvcConfigurationSupport 类,然后覆盖 configureMessageConverters 方法,在方法中,我们可以选择对要实现 null 转换的场景,配置好即可。
package com.itcodai.course01.config;

import com.alibaba.fastjson.serializer.SerializerFeature;
import com.alibaba.fastjson.support.config.FastJsonConfig;
import com.alibaba.fastjson.support.spring.FastJsonHttpMessageConverter;
import org.springframework.context.annotation.Configuration;
import org.springframework.http.MediaType;
import org.springframework.http.converter.HttpMessageConverter;
import org.springframework.web.servlet.config.annotation.WebMvcConfigurationSupport;

import java.nio.charset.Charset;
import java.util.ArrayList;
import java.util.List;

@Configuration
public class fastJsonConfig extends WebMvcConfigurationSupport {
    /**
     * 使用fastjson作为json解析器
     * 可以使得返回“”空字符串而不是null
     */
    @Override
    public void configureMessageConverters(List<HttpMessageConverter<?>> converters) {
        FastJsonHttpMessageConverter converter = new FastJsonHttpMessageConverter();
        FastJsonConfig config = new FastJsonConfig();
        config.setSerializerFeatures(
                // 保留map空的字段
                SerializerFeature.WriteMapNullValue,
                // 将String类型的null转成""
                SerializerFeature.WriteNullStringAsEmpty,
                // 将Number类型的null转成0
                SerializerFeature.WriteNullNumberAsZero,
                // 将List类型的null转成[]
                SerializerFeature.WriteNullListAsEmpty,
                // 将Boolean类型的null转成false
                SerializerFeature.WriteNullBooleanAsFalse,
                // 避免循环引用
                SerializerFeature.DisableCircularReferenceDetect);

        converter.setFastJsonConfig(config);
        converter.setDefaultCharset(Charset.forName("UTF-8"));
        List<MediaType> mediaTypeList = new ArrayList<>();
        // 解决中文乱码问题,相当于在Controller上的@RequestMapping中加了个属性produces = "application/json"
        mediaTypeList.add(MediaType.APPLICATION_JSON);
        converter.setSupportedMediaTypes(mediaTypeList);
        converters.add(converter);
    }
}
4、封装统一返回的数据结构
在实际项目中,除了要封装数据之外,我们往往需要在返回的 json 中添加一些其他信息,比如返回一些状态码 code ,返回一些 msg 给调用者,这样调用者可以根据 code 或者 msg 做一些逻辑判断。所以在实际项目中,我们需要封装一个统一的 json 返回结构存储返回信息。
定义统一的 json 结构
由于封装的 json 数据的类型不确定,所以在定义统一的 json 结构时,我们需要用到泛型。统一的 json 结构中属性包括数据、状态码、提示信息即可,构造方法可以根据实际业务需求做相应的添加即可,一般来说,应该有默认的返回结构,也应该有用户指定的返回结构。
package com.itcodai.course01.result;

public class JsonResult<T> {
    private T data;
    private String code;
    private String msg;
    /**
     * 若没有数据返回,默认状态码为0,提示信息为:操作成功!
     */
    public JsonResult() {
        this.code = "0";
        this.msg = "操作成功!";
    }
    /**
     * 若没有数据返回,可以人为指定状态码和提示信息
     * @param code
     * @param msg
     */
    public JsonResult(String code, String msg) {
        this.code = code;
        this.msg = msg;
    }
    /**
     * 有数据返回时,状态码为0,默认提示信息为:操作成功!
     * @param data
     */
    public JsonResult(T data) {
        this.data = data;
        this.code = "0";
        this.msg = "操作成功!";
    }
    /**
     * 有数据返回,状态码为0,人为指定提示信息
     * @param data
     * @param msg
     */
    public JsonResult(T data, String msg) {
        this.data = data;
        this.code = "0";
        this.msg = msg;
    }
    public T getData() {
        return data;
    }
    public void setData(T data) {
        this.data = data;
    }
    public String getCode() {
        return code;
    }
    public void setCode(String code) {
        this.code = code;
    }
    public String getMsg() {
        return msg;
    }
    public void setMsg(String msg) {
        this.msg = msg;
    }
}
修改 Controller 中的返回值类型及测试
在具体的场景将泛型替换成具体的数据类型即可,在实际项目中,还可以继续封装,比如状态码和提示信息可以定义一个枚举类型,以后我们只需要维护这个枚举类型中的数据即可。
package com.itcodai.course01.controller;

import com.itcodai.course01.domain.User;
import com.itcodai.course01.result.JsonResult;
import org.springframework.web.bind.annotation.RequestMapping;
import org.springframework.web.bind.annotation.RestController;

import java.util.ArrayList;
import java.util.HashMap;
import java.util.List;
import java.util.Map;

@RestController
@RequestMapping("/jsonresult")
public class JsonResultController {
    @RequestMapping("/user")
    public JsonResult<User> getUser() {
        User user = new User(1L, "admin", "123456");
        return new JsonResult<>(user);
    }
    @RequestMapping("/list")
    public JsonResult<List> getUserList() {
        List<User> userList = new ArrayList<>();
        User user1 = new User(1L, "admin", "123456");
        User user2 = new User(2L, "admin2", "123456");
        userList.add(user1);
        userList.add(user2);
        return new JsonResult<>(userList, "获取用户列表成功");
    }
    @RequestMapping("/map")
    public JsonResult<Map> getMap() {
        Map<String, Object> map = new HashMap<>(3);
        map.put("user", new User(1L, "admin", "123456"));
        map.put("userList", new ArrayList<User>() {{
            add(new User(1L, "admin", "123456"));
            add(new User(2L, "admin2", "123456"));
        }});
        return new JsonResult<>(map, "获取Map成功");
    }
}
四、Spring Boot使用slf4j进行日志记录
在项目中使用了 slf4j 记录日志,并且绑定了 log4j(即导入相应的依赖),则日志会以 log4j 的风格输出;后期需要改为以 logback 的风格输出日志,只需要将 log4j 替换成 logback 即可,不用修改项目中的代码。
创建slf4j日志框架
依赖
<dependency>
	<groupId>org.slf4j</groupId>
	<artifactId>slf4j-api</artifactId>
	<version>1.7.25</version>
</dependency>
import org.slf4j.Logger;
import org.slf4j.LoggerFactory;
public class Test {
private static final Logger logger = LoggerFactory.getLogger(Test.class);
// ……
}application.yml 中对日志的配置
Spring Boot内部已经集成了 slf4j
可以使用
application.properties文件配置或application.yml
application.yml 文件中对日志的配置:
logging:
  config: logback.xml
  level:
    com.itcodai.course03.dao: trace
logging.config 是用来指定项目启动的时候,读取哪个配置文件,这里指定的是日志配置文件是根路径下的 logback.xml 文件,关于日志的相关配置信息,都放在 logback.xml 文件中了。logging.level 是用来指定具体的 mapper 中日志的输出级别,上面的配置表示 com.itcodai.course03.dao 包下的所有 mapper 日志输出级别为 trace,会将操作数据库的 sql 打印出来,开发时设置成 trace 方便定位问题,在生产环境上,将这个日志级别再设置成 error 级别即可
常用的日志级别按照从高到低依次为:ERROR、WARN、INFO、DEBUG。
logback.xml 配置文件解析
在上面 application.yml 文件中,我们指定了日志配置文件 logback.xml,logback.xml 文件中主要用来做日志的相关配置。在 logback.xml 中,我们可以定义日志输出的格式、路径、控制台输出格式、文件大小、保存时长等等。
1、 定义日志输出格式和存储路径
<configuration>
	<property name="LOG_PATTERN" value="%date{HH:mm:ss.SSS} [%thread] %-5level %logger{36} - %msg%n" />
	<property name="FILE_PATH" value="D:/logs/course03/demo.%d{yyyy-MM-dd}.%i.log" />
</configuration>
首先定义一个格式,命名为 “LOG_PATTERN”,该格式中 %date 表示日期,%thread 表示线程名,%-5level 表示级别从左显示5个字符宽度,%logger{36} 表示 logger 名字最长36个字符,%msg 表示日志消息,%n 是换行符。
然后再定义一下名为 “FILE_PATH” 文件路径,日志都会存储在该路径下。%i 表示第 i 个文件,当日志文件达到指定大小时,会将日志生成到新的文件里,这里的 i 就是文件索引,日志文件允许的大小可以设置
2、定义控制台输出
<configuration>
	<appender name="CONSOLE" class="ch.qos.logback.core.ConsoleAppender">
		<encoder>
            <!-- 按照上面配置的LOG_PATTERN来打印日志 -->
			<pattern>${LOG_PATTERN}</pattern>
		</encoder>
	</appender>
</configuration>
使用 节点设置个控制台输出(class="ch.qos.logback.core.ConsoleAppender")的配置,定义为 “CONSOLE”。使用上面定义好的输出格式(LOG_PATTERN)来输出,使用 ${} 引用进来即可。
3、定义日志文件的相关参数
<configuration>
	<appender name="FILE" class="ch.qos.logback.core.rolling.RollingFileAppender">
		<rollingPolicy class="ch.qos.logback.core.rolling.TimeBasedRollingPolicy">
			<!-- 按照上面配置的FILE_PATH路径来保存日志 -->
			<fileNamePattern>${FILE_PATH}</fileNamePattern>
			<!-- 日志保存15天 -->
			<maxHistory>15</maxHistory>
			<timeBasedFileNamingAndTriggeringPolicy class="ch.qos.logback.core.rolling.SizeAndTimeBasedFNATP">
				<!-- 单个日志文件的最大,超过则新建日志文件存储 -->
				<maxFileSize>10MB</maxFileSize>
			</timeBasedFileNamingAndTriggeringPolicy>
		</rollingPolicy>

		<encoder>
			<!-- 按照上面配置的LOG_PATTERN来打印日志 -->
			<pattern>${LOG_PATTERN}</pattern>
		</encoder>
	</appender>
</configuration>
使用 定义一个名为 “FILE” 的文件配置,主要是配置日志文件保存的时间、单个日志文件存储的大小、以及文件保存的路径和日志的输出格式。
4、定义日志输出级别
<configuration>
	<logger name="com.itcodai.course03" level="INFO" />
	<root level="INFO">
		<appender-ref ref="CONSOLE" />
		<appender-ref ref="FILE" />
	</root>
</configuration>
定义一下项目中默认的日志输出级别,这里定义级别为 INFO,然后针对 INFO 级别的日志,使用 引用上面定义好的控制台日志输出和日志文件的参数。这样 logback.xml 文件中的配置就设置完了。
使用Logger在项目中打印日志
在代码中,我们一般使用 Logger 对象来打印出一些 log 信息,可以指定打印出的日志级别,也支持占位符,很方便。
package com.itcodai.course01.controller;

import org.slf4j.Logger;
import org.slf4j.LoggerFactory;
import org.springframework.web.bind.annotation.RequestMapping;
import org.springframework.web.bind.annotation.RestController;

@RestController
@RequestMapping("/test")
public class TestController {
    private final static Logger logger = LoggerFactory.getLogger(TestController.class);

    @RequestMapping("/log")
    public String testLog() {
        logger.debug("=====测试日志debug级别打印====");
        logger.info("======测试日志info级别打印=====");
        logger.error("=====测试日志error级别打印====");
        logger.warn("======测试日志warn级别打印=====");

        // 可以使用占位符打印出一些参数信息
        String str1 = "blog.itcodai.com";
        String str2 = "blog.csdn.net/eson_15";
        logger.info("======测试:{}", str1, str2);

        return "success";
    }
}
五、Spring Boot中的项目属性配置
在项目中,很多时候需要用到一些配置的信息,这些信息可能在测试环境和生产环境下会有不同的配置,后面根据实际业务情况有可能还会做修改,针对这种情况,我们不能将这些配置在代码中写死,最好就是写到配置文件中。比如可以把这些信息写到
application.yml文件中。
1、少量配置信息的情形
在微服务架构中,最常见的就是某个服务需要调用其他服务来获取其提供的相关信息,那么在该服务的配置文件中需要配置被调用的服务地址,比如在当前服务里,我们需要调用订单微服务获取订单相关的信息,假设 订单服务的端口号是 8002,那我们可以做如下配置:
server:
  port: 8001

# 配置微服务的地址
url:
  # 订单微服务的地址
  orderUrl: http://localhost:8002
用变量代替配置信息,这样可以做到批量修改和获取配置
@Value注解上通过${key}即可获取配置文件中和 key 对应的 value 值。然后在业务代码中如何获取到这个配置的订单服务地址呢?我们可以使用
@Value注解来解决。在对应的类中加上一个属性,在属性上使用@Value注解即可获取到配置文件中的配置信息,如下:
import org.slf4j.Logger;
import org.slf4j.LoggerFactory;
import org.springframework.beans.factory.annotation.Value;
import org.springframework.web.bind.annotation.RequestMapping;
import org.springframework.web.bind.annotation.RestController;

@RestController
@RequestMapping("/test")
public class ConfigController {

    private static final Logger LOGGER = LoggerFactory.getLogger(ConfigController.class);

    @Value("${url.orderUrl}")
    private String orderUrl;

    @RequestMapping("/config")
    public String testConfig() {
        LOGGER.info("=====获取的订单服务地址为:{}", orderUrl);
        return "success";
    }
}
2、多个配置信息的情形
随着业务复杂度的增加,一个项目中可能会有越来越多的微服务,某个模块可能需要调用多个微服务获取不同的信息,那么就需要在配置文件中配置多个微服务的地址。可是,在需要调用这些微服务的代码中,如果这样一个个去使用
@Value注解引入相应的微服务地址的话,太过于繁琐,也不科学。
所以,在实际项目中,业务繁琐,逻辑复杂的情况下,需要考虑封装一个或多个配置类。举个例子:假如在当前服务中,某个业务需要同时调用订单微服务、用户微服务和购物车微服务,分别获取订单、用户和购物车相关信息,然后对这些信息做一定的逻辑处理。那么在配置文件中,我们需要将这些微服务的地址都配置好:
# 配置多个微服务的地址
url:
  # 订单微服务的地址
  orderUrl: http://localhost:8002
  # 用户微服务的地址
  userUrl: http://localhost:8003
  # 购物车微服务的地址
  shoppingUrl: http://localhost:8004
也许实际业务中,远远不止这三个微服务,甚至十几个都有可能。对于这种情况,我们可以先定义一个
MicroServiceUrl类来专门保存微服务的 url,如下:
@Component
@ConfigurationProperties(prefix = "url")
public class MicroServiceUrl {

    private String orderUrl;
    private String userUrl;
    private String shoppingUrl;
    // 省去get和set方法
}
使用 @ConfigurationProperties 注解并且使用 prefix 来指定一个前缀,然后该类中的属性名就是配置中去掉前缀后的名字,一一对应即可。即:前缀名 + 属性名就是配置文件中定义的 key。同时,该类上面需要加上 @Component 注解,把该类作为组件放到Spring容器中,让 Spring 去管理,我们使用的时候直接注入即可。
需要注意的是,使用 @ConfigurationProperties 注解需要导入它的依赖
@RestController
@RequestMapping("/test")
public class TestController {

    private static final Logger LOGGER = LoggerFactory.getLogger(TestController.class);

    @Resource
    private MicroServiceUrl microServiceUrl;

    @RequestMapping("/config")
    public String testConfig() {
        LOGGER.info("=====获取的订单服务地址为:{}", microServiceUrl.getOrderUrl());
        LOGGER.info("=====获取的用户服务地址为:{}", microServiceUrl.getUserUrl());
        LOGGER.info("=====获取的购物车服务地址为:{}", microServiceUrl.getShoppingUrl());

        return "success";
    }
}
3、指定项目配置文件
在实际项目中,一般有两个环境:开发环境和生产环境。
开发环境中的配置和生产环境中的配置往往不同,比如:环境、端口、数据库、相关地址等等。
我们不可能在开发环境调试好之后,部署到生产环境后,又要将配置信息全部修改成生产环境上的配置。
最好的解决方法就是开发环境和生产环境都有一套对用的配置信息,然后当我们在开发时,指定读取开发环境的配置,当我们将项目部署到服务器上之后,再指定去读取生产环境的配置。
我们新建两个配置文件:
application-dev.yml和application-pro.yml,分别用来对开发环境和生产环境进行相关配置。这里为了方便,我们分别设置两个访问端口号,开发环境用 8001,生产环境用 8002.
# 开发环境配置文件
server:
  port: 8001

# 生产环境配置文件
server:
  port: 8002
然后在
application.yml文件中指定读取哪个配置文件即可。比如我们在开发环境下,指定读取applicationn-dev.yml文件,如下:
spring:
  profiles:
    active:
    - dev
这样就可以在开发的时候,指定读取 application-dev.yml 文件,访问的时候使用 8001 端口,部署到服务器后,只需要将 application.yml 中指定的文件改成 application-pro.yml 即可,然后使用 8002 端口访问,非常方便。
六、Spring Boot中的MVC支持
Spring Boot 的 MVC 支持主要来介绍实际项目中最常用的几个注解,包括
@RestController、@RequestMapping、@PathVariable、@RequestParam以及@RequestBody。
1、@RestController
@RestController注解包含了原来的@Controller和@ResponseBody注解。
@ResponseBody注解是将返回的数据结构转换为 Json 格式。
2、@RequestMapping
@RequestMapping 是一个用来处理请求地址映射的注解,它可以用于类上,也可以用于方法上。在类的级别上的注解会将一个特定请求或者请求模式映射到一个控制器之上,表示类中的所有响应请求的方法都是以该地址作为父路径;在方法的级别表示进一步指定到处理方法的映射关系。
该注解有6个属性,一般在项目中比较常用的有三个属性:value、method 和 produces。
value 属性:指定请求的实际地址,value 可以省略不写
method 属性:指定请求的类型,主要有 GET、PUT、POST、DELETE,默认为 GET
produces属性:指定返回内容类型,如 produces = “application/json; charset=UTF-8”
@RestController
@RequestMapping(value = "/test", produces = "application/json; charset=UTF-8")
public class TestController {

    @RequestMapping(value = "/get", method = RequestMethod.GET)
    public String testGet() {
        return "success";
    }
}
针对四种不同的请求方式,是有相应注解的,不用每次在 @RequestMapping 注解中加 method 属性来指定,上面的 GET 方式请求可以直接使用 @GetMapping("/get") 注解,效果一样。相应地,PUT 方式、POST 方式和 DELETE 方式对应的注解分别为 @PutMapping、@PostMapping 和 @DeleteMapping。
3、@PathVariable
@PathVariable注解主要是用来获取 url 参数,Spring Boot 支持 restfull 风格的 url,比如一个 GET 请求携带一个参数 id 过来,我们将 id 作为参数接收,可以使用@PathVariable注解。如下:
@GetMapping("/user/{id}")
public String testPathVariable(@PathVariable Integer id) {
	System.out.println("获取到的id为:" + id);
	return "success";
}
如果想要 url 中占位符中的 id 值直接赋值到参数 id 中,需要保证 url 中的参数和方法接收参数一致,否则就无法接收。如果不一致的话,其实也可以解决,需要用
@PathVariable中的 value 属性来指定对应关系。如下:
@RequestMapping("/user/{idd}")
public String testPathVariable(@PathVariable(value = "idd") Integer id) {
	System.out.println("获取到的id为:" + id);
	return "success";
}
@GetMapping("/user/{idd}/{name}")
public String testPathVariable(@PathVariable(value = "idd") Integer id, @PathVariable String name) {
System.out.println("获取到的id为:" + id);
System.out.println("获取到的name为:" + name);
return "success";
}4、@RequestParam
@RequestParam 注解顾名思义,也是获取请求参数的,上面我们介绍了 @PathValiable 注解也是获取请求参数的,那么 @RequestParam 和 @PathVariable 有什么不同呢?
主要区别在于: @PathValiable 是从 url 模板中获取参数值, 即这种风格的 url:http://localhost:8080/user/{id} ;
而 @RequestParam 是从 request 里面获取参数值,即这种风格的 url:http://localhost:8080/user?id=1 。我们使用该 url 带上参数 id 来测试一下如下代码:
@GetMapping("/user")
public String testRequestParam(@RequestParam Integer id) {
	System.out.println("获取到的id为:" + id);
	return "success";
}
@PostMapping("/form1")
public String testForm(@RequestParam String username, @RequestParam String password) {
System.out.println("获取到的username为:" + username);
System.out.println("获取到的password为:" + password);
return "success";
}如果表单数据很多,我们需要封装一个实体类来接收这些参数,实体中的属性名和表单中的参数名一致即可。
public class ParamUser {
	private String username;
	private String password;
	// set get
}
使用实体接收的话,我们不能在前面加 @RequestParam 注解了,直接使用即可。
@PostMapping("/form2")
    public String testForm(ParamUser user) {
        System.out.println("获取到的username为:" + user.getUsername());
        System.out.println("获取到的password为:" + user.getPassword());
        return "success";
    }
5、@RequestBody
@RequestBody 注解用于接收前端传来的实体,接收参数也是对应的实体,比如前端通过 json 提交传来两个参数 username 和 password,此时我们需要在后端封装一个实体来接收。在传递的参数比较多的情况下,使用 @RequestBody 接收会非常方便。例如:
public class User {
	private String username;
	private String password;
	// set get
}
@PostMapping("/user")
public String testRequestBody(@RequestBody User user) {
System.out.println("获取到的username为:" + user.getUsername());
System.out.println("获取到的password为:" + user.getPassword());
return "success";
}@RequestBody 注解用于 POST 请求上,接收 json 实体参数。它和上面我们介绍的表单提交有点类似,只不过参数的格式不同,一个是 json 实体,一个是表单提交。
七、Spring Boot集成 Swagger2 展现在线接口文档
那么问题来了,随着代码的不断更新,(前后端联调问题)开发人员在开发新的接口或者更新旧的接口后,由于开发任务的繁重,往往文档很难持续跟着更新,Swagger 就是用来解决该问题的一款重要的工具,对使用接口的人来说,开发人员不需要给他们提供文档,只要告诉他们一个 Swagger 地址,即可展示在线的 API 接口文档,除此之外,调用接口的人员还可以在线测试接口数据,同样地,开发人员在开发接口时,同样也可以利用 Swagger 在线接口文档测试接口数据。
1、引入Swagger2 的 maven 依赖
使用 Swagger2 工具,必须要导入 maven 依赖
<dependency>
	<groupId>io.springfox</groupId>
	<artifactId>springfox-swagger2</artifactId>
	<version>2.2.2</version>
</dependency>
<dependency>
	<groupId>io.springfox</groupId>
	<artifactId>springfox-swagger-ui</artifactId>
	<version>2.2.2</version>
</dependency>
2、编写配置类
Swagger2 的配置类上除了添加必要的 @Configuration 注解外,还需要添加 @EnableSwagger2 注解。
package com.itcodai.course01.config;

import org.springframework.context.annotation.Bean;
import org.springframework.context.annotation.Configuration;
import org.springframework.web.servlet.config.annotation.EnableWebMvc;
import org.springframework.web.servlet.config.annotation.ResourceHandlerRegistry;
import org.springframework.web.servlet.config.annotation.WebMvcConfigurer;
import springfox.documentation.builders.ApiInfoBuilder;
import springfox.documentation.builders.PathSelectors;
import springfox.documentation.builders.RequestHandlerSelectors;
import springfox.documentation.service.ApiInfo;
import springfox.documentation.service.Contact;
import springfox.documentation.spi.DocumentationType;
import springfox.documentation.spring.web.plugins.Docket;
import springfox.documentation.swagger2.annotations.EnableSwagger2;

@Configuration
@EnableSwagger2
@EnableWebMvc
public class SwaggerConfig implements WebMvcConfigurer {
    @Bean
    public Docket getDocket() {
        ApiInfoBuilder apiInfoBuilder = new ApiInfoBuilder();
        apiInfoBuilder.title("Swagger2 在线接口文档");
        apiInfoBuilder.description("Swagger2 在线接口文档");
        apiInfoBuilder.version("1.0.0");
        apiInfoBuilder.contact(new Contact("itcodai", "", ""))
                .build();
        ApiInfo apiInfo = apiInfoBuilder.build();

        Docket docket = new Docket(DocumentationType.SWAGGER_2);
        docket.apiInfo(apiInfo);
        docket.select()
                .apis(RequestHandlerSelectors.basePackage("com.itcodai.course01.controller"))
                .paths(PathSelectors.any())
                .build();
        return docket;
    }
    public void addResourceHandlers(ResourceHandlerRegistry registry) {
        registry.addResourceHandler("swagger-ui.html")
                .addResourceLocations("classpath:/META-INF/resources/");
        registry.addResourceHandler("/webjars/**")
                .addResourceLocations("classpath:/META-INF/resources/webjars/");
    }

}
3、Swagger2 的使用
主要来介绍 Swagger2 中的几个常用的注解,分别在实体类上、 Controller 类上以及 Controller 中的方法上,最后我们看一下 Swagger2 是如何在页面上呈现在线接口文档的,并且结合 Controller 中的方法在接口中测试一下数据。
实体类注解
@ApiModel 和 @ApiModelProperty 注解
@ApiModel注解用于实体类,表示对类进行说明,用于参数用实体类接收。@ApiModelProperty注解用于类中属性,表示对 model 属性的说明或者数据操作更改。
package com.itcodai.course01.domain;

import io.swagger.annotations.ApiModel;
import io.swagger.annotations.ApiModelProperty;

@ApiModel(value = "用户实体类")
public class ApiUser {
    @ApiModelProperty(value = "用户唯一标识", required = true)
    private String id;
    @ApiModelProperty(value = "用户名", required = true)
    private String name;
    @ApiModelProperty(value = "用户密码", required = true)
    private String password;

    //getter/setter方法
    public String getId() {
        return id;
    }
    public void setId(String id) {
        this.id = id;
    }
    public String getName() {
        return name;
    }
    public void setName(String name) {
        this.name = name;
    }
    public String getPassword() {
        return password;
    }
    public void setPassword(String password) {
        this.password = password;
    }
}
Controller类中相关注解
@Api注解用于类上,表示标识这个类是 swagger 的资源。@ApiOperation注解用于方法,表示一个 http 请求的操作。@ApiParam注解用于参数上,用来标明参数信息。
package com.itcodai.course01.controller;

import com.itcodai.course01.domain.User;
import com.itcodai.course01.result.JsonResult;
import io.swagger.annotations.Api;
import io.swagger.annotations.ApiOperation;
import io.swagger.annotations.ApiParam;
import org.springframework.web.bind.annotation.GetMapping;
import org.springframework.web.bind.annotation.PathVariable;
import org.springframework.web.bind.annotation.RequestMapping;
import org.springframework.web.bind.annotation.RestController;

@RestController
@RequestMapping("/swagger")
@Api(value = "Swagger2 在线接口文档")
public class SwaggerController {
    @GetMapping("/get/{id}")
    @ApiOperation(value = "根据用户唯一标识获取用户信息")
    public JsonResult<User> getUserInfo(@PathVariable @ApiParam(value = "用户唯一标识") Long id){
        // 模拟数据库中根据id获取User信息
        User user = new User(id, "测试", "123456");
        return new JsonResult(user);
    }
}
八、Spring Boot集成Thymeleaf模板引擎
1、有什么用?
1、模板引擎,它可以完全替代 JSP(
JSP作为网页开发老技术,负责开发动态网页功能,实现MVC的视图View功能)。2、它可以让美工在浏览器查看页面的静态效果,也可以让程序员在服务器查看带数据的动态页面效果。
2、依赖导入
<dependency>
    <groupId>org.springframework.boot</groupId>
    <artifactId>spring-boot-starter-thymeleaf</artifactId>
</dependency>
另外,在 html 页面上如果要使用 thymeleaf 模板,需要在页面标签中引入:
<html xmlns:th="http://www.thymeleaf.org">3、相关配置
因为 Thymeleaf 中已经有默认的配置了,我们不需要再对其做过多的配置,有一个需要注意一下,Thymeleaf 默认是开启页面缓存的,所以在开发的时候,需要关闭这个页面缓存,配置如下。
配置应该写在application.yml或application.properties
spring:
  thymeleaf:
    cache: false #关闭缓存
否则会有缓存,导致页面没法及时看到更新后的效果。 比如你修改了一个文件,已经 update 到 tomcat 了,但刷新页面还是之前的页面,就是因为缓存引起的。
4、使用
访问静态页面
一般我们做网站的时候,都会做一个 404 页面和 500 页面,为了出错时给用户一个友好的展示,而不至于一堆异常信息抛出来。
Spring Boot 中会自动识别模板目录(templates/)下的 404.html 和 500.html 文件。我们在 templates/ 目录下新建一个 error 文件夹,专门放置错误的 html 页面,然后分别打印些信息。以 404.html 为例:

<!DOCTYPE html>
<html lang="en">
<head>
    <meta charset="UTF-8">
    <title>Title</title>
</head>
<body>
    这是404页面
</body>
</html>
Controller
package com.itcodai.course01.controller;

import org.springframework.stereotype.Controller;
import org.springframework.web.bind.annotation.RequestMapping;

@Controller
@RequestMapping("/thymeleaf")
public class ThymeleafController {

    @RequestMapping("/test404")
    public String test404() {
        return "index";
    }

    @RequestMapping("/test500")
    public String test500() {
        int i = 1 / 0;
        return "index";
    }
}
当我们在浏览器中输入 localhost:8080/thymeleaf/test400 时,故意输入错误,找不到对应的方法,就会跳转到 404.html 显示。
当我们在浏览器中输入 localhost:8088/thymeleaf/test505 时,会抛出异常,然后会自动跳转到 500.html 显示。
【注】这里有个问题需要注意一下,在 Controller 层上都是使用的 @RestController 注解,自动会把返回的数据转成 json 格式。
但是在使用模板引擎时,Controller 层就不能用 @RestController 注解了,因为在使用 thymeleaf 模板时,返回的是视图文件名,比如上面的 Controller 中是返回到 index.html 页面
如果使用 @RestController 的话,会把 index 当作 String 解析了,直接返回到页面了,而不是去找 index.html 页面
处理对象
假如我们在做个人博客的时候,需要给前端传博主相关信息来展示,那么我们会封装成一个博主对象,比如:
package com.itcodai.course01.domain;

public class Blogger {
    private Long id;
    private String username;
    private String password;
    public Blogger(Long id, String username, String password) {
        this.id = id;
        this.username = username;
        this.password = password;
    }
    public Long getId() {
        return id;
    }
    public void setId(Long id) {
        this.id = id;
    }
    public String getUsername() {
        return username;
    }
    public void setUsername(String username) {
        this.username = username;
    }
    public String getPassword() {
        return password;
    }
    public void setPassword(String password) {
        this.password = password;
    }
}
然后在controller层中初始化一下:
package com.itcodai.course01.controller;

import com.itcodai.course01.domain.Blogger;
import org.springframework.ui.Model;
import org.springframework.web.bind.annotation.GetMapping;

public class ThymeleafgetBlogger {
    @GetMapping("/getBlogger")
    public String getBlogger(Model model) {
        Blogger blogger = new Blogger(1L, "admin", "123456");
        model.addAttribute("blogger", blogger);
        return "blogger";
    }
}
我们先初始化一个 Blogger 对象,然后将该对象放到 Model 中,然后返回到 blogger.html 页面去渲染。接下来我们再写一个 blogger.html 来渲染 blogger 信息:
<!DOCTYPE html>
<html xmlns:th="http://www.thymeleaf.org">
<html lang="en">
<head>
<meta charset="UTF-8">
<title>博主信息</title>
</head>
<body>
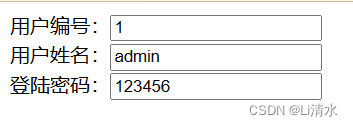
<form action="" th:object="${blogger}">
用户编号:<input name="id" th:value="${blogger.id}"/><br>
用户姓名:<input type="text" name="username" th:value="${blogger.getUsername()}" /><br>
登陆密码:<input type="text" name="password" th:value="*{password}" />
</form>
</body>
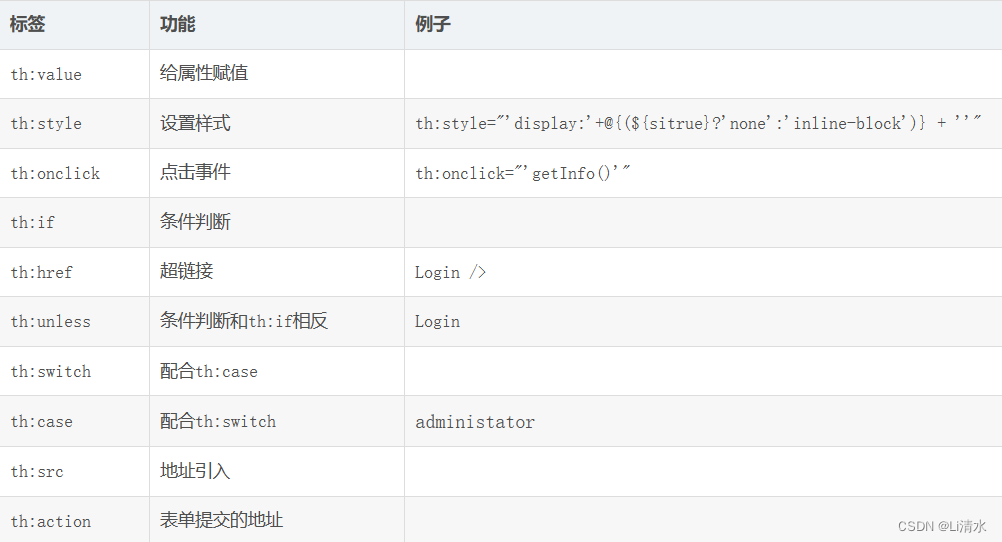
</html> 可以看出,在 thymeleaf 模板中,使用 th:object="${}" 来获取对象信息,然后在表单里面可以有三种方式来获取对象属性。如下:
使用
th:value="*{属性名}"
使用th:value="${对象.属性名}",对象指的是上面使用th:object获取的对象
使用th:value="${对象.get方法}",对象指的是上面使用th:object获取的对象
测试一下:localhost:8080/thymeleaf/getBlogger
Thymeleaf 中处理 List
处理 List 的话,和处理上面介绍的对象差不多,但是需要在 thymeleaf 中进行遍历。
@GetMapping("/getList")
    public String getList(Model model) {
        Blogger blogger1 = new Blogger(1L, "测试", "123456");
        Blogger blogger2 = new Blogger(2L, "测试课", "123456");
        List<Blogger> list = new ArrayList<>();
        list.add(blogger1);
        list.add(blogger2);
        model.addAttribute("list", list);
        return "list";
    }
接下来我们写一个 list.html 来获取该 list 信息,然后在 list.html 中遍历这个list。如下:
<!DOCTYPE html>
<html xmlns:th="http://www.thymeleaf.org">
<html lang="en">
<head>
    <meta charset="UTF-8">
    <title>博主信息</title>
</head>
<body>
<form action="" th:each="blogger : ${list}">
    用户编号:<input name="id" th:value="${blogger.id}"/><br>
    用户姓名:<input type="text" name="username" th:value="${blogger.getUsername()}" /><br>
    登陆密码:<input type="text" name="password" th:value="*{blogger.getPassword()}" />
</form>
</body>
</html>
可以看出,其实和处理单个对象信息差不多,Thymeleaf 使用 th:each 进行遍历,${} 取 model 中传过来的参数,然后自定义 list 中取出来的每个对象,这里定义为 blogger。表单里面可以直接使用 ${对象.属性名} 来获取 list 中对象的属性值,也可以使用 ${对象.get方法} 来获取,这点和上面处理对象信息是一样的,但是不能使用 *{属性名} 来获取对象中的属性,thymeleaf 模板获取不到。
其他常用 thymeleaf 操作
九、Spring Boot中的全局异常处理
1、有什么用?
在项目开发过程中,不管是对底层数据库的操作过程,还是业务层的处理过程,还是控制层的处理过程,都不可避免会遇到各种可预知的、不可预知的异常需要处理。如果对每个过程都单独作异常处理,那系统的代码耦合度会变得很高,此外,开发工作量也会加大而且不好统一,这也增加了代码的维护成本。
针对这种实际情况,我们需要将所有类型的异常处理从各处理过程解耦出来,这样既保证了相关处理过程的功能单一,也实现了异常信息的统一处理和维护。同时,我们也不希望直接把异常抛给用户,应该对异常进行处理,对错误信息进行封装,然后返回一个友好的信息给用户。
2、定义返回的统一 json 结构
前端或者其他服务请求本服务的接口时,该接口需要返回对应的 json 数据,一般该服务只需要返回请求着需要的参数即可,但是在实际项目中,我们需要封装更多的信息,比如状态码 code、相关信息 msg 等等,这一方面是在项目中可以有个统一的返回结构,整个项目组都适用,另一方面是方便结合全局异常处理信息,因为异常处理信息中一般我们需要把状态码和异常内容反馈给调用方。
package com.itcodai.course01.result;
/**
 * 全局异常处理
 */
public class GlobalJsonResult {
    protected String code;
    protected String message;
    public String getCode() {
        return code;
    }
    public void setCode(String code) {
        this.code = code;
    }
    public String getMessage() {
        return message;
    }
    public void setMessage(String message) {
        this.message = message;
    }
    public GlobalJsonResult() {
        this.code = "200";
        this.message = "success";
    }
    public GlobalJsonResult(String code, String message) {
        this.code = code;
        this.message = message;
    }
}
3、处理系统异常
新建一个 GlobalExceptionHandler 全局异常处理类,然后加上 @ControllerAdvice 注解即可拦截项目中抛出的异常,如下:
package com.itcodai.course01.handler;

import org.slf4j.Logger;
import org.slf4j.LoggerFactory;
import org.springframework.web.bind.annotation.ControllerAdvice;
import org.springframework.web.bind.annotation.ResponseBody;

@ControllerAdvice
@ResponseBody
public class GlobalExceptionHandler {
    private static final Logger logger = LoggerFactory.getLogger(GlobalExceptionHandler.class);
}
@ControllerAdvice 注解包含了 @Component 注解,说明在 Spring Boot 启动时,也会把该类作为组件交给 Spring 来管理。
@ResponseBody 注解是为了异常处理完之后给调用方输出一个 json 格式的封装数据。
在项目中如何使用呢?Spring Boot 中很简单,在方法上通过 @ExceptionHandler 注解来指定具体的异常,然后在方法中处理该异常信息,最后将结果通过统一的 json 结构体返回给调用者。
处理参数缺失异常
在前后端分离的架构中,前端请求后台的接口都是通过 rest 风格来调用,有时候,比如 POST 请求 需要携带一些参数,但是往往有时候参数会漏掉。另外,在微服务架构中,涉及到多个微服务之间的接口调用时,也可能出现这种情况,此时我们需要定义一个处理参数缺失异常的方法,来给前端或者调用方提示一个友好信息。
参数缺失的时候,会抛出 HttpMessageNotReadableException,我们可以拦截该异常,做一个友好处理,如下:
package com.itcodai.course01.handler;

import com.itcodai.course01.result.GlobalJsonResult;
import org.slf4j.Logger;
import org.slf4j.LoggerFactory;
import org.springframework.http.HttpStatus;
import org.springframework.web.bind.MissingServletRequestParameterException;
import org.springframework.web.bind.annotation.ControllerAdvice;
import org.springframework.web.bind.annotation.ExceptionHandler;
import org.springframework.web.bind.annotation.ResponseBody;
import org.springframework.web.bind.annotation.ResponseStatus;

@ControllerAdvice
@ResponseBody
public class GlobalExceptionHandler {
    private static final Logger logger = LoggerFactory.getLogger(GlobalExceptionHandler.class);

    @ExceptionHandler(MissingServletRequestParameterException.class)
    @ResponseStatus(value = HttpStatus.BAD_REQUEST)
    public GlobalJsonResult handleHttpMessageNotReadableException(
            MissingServletRequestParameterException ex){
        logger.error("缺少请求参数,{}", ex.getMessage());
        return new GlobalJsonResult("400", "缺少必要的请求参数");
    }
}
我们来写个简单的 Controller 测试一下该异常,通过 POST 请求方式接收两个参数:姓名和密码。
package com.itcodai.course01.controller;

import com.itcodai.course01.result.GlobalJsonResult;
import org.slf4j.Logger;
import org.slf4j.LoggerFactory;
import org.springframework.web.bind.annotation.PostMapping;
import org.springframework.web.bind.annotation.RequestMapping;
import org.springframework.web.bind.annotation.RequestParam;
import org.springframework.web.bind.annotation.RestController;

@RestController
@RequestMapping("/exception")
public class TestController {
    private static final Logger logger = LoggerFactory.getLogger(TestController.class);

    @PostMapping("/test")
    public GlobalJsonResult test(@RequestParam("name") String name,
                                            @RequestParam("pass") String pass) {
        logger.info("name:{}", name);
        logger.info("pass:{}", pass);
        return new GlobalJsonResult();
    }
}
然后使用 Postman 来调用一下该接口,调用的时候,只传姓名,不传密码,就会抛缺少参数异常,该异常被捕获之后,就会进入我们写好的逻辑,给调用方返回一个友好信息,如下:
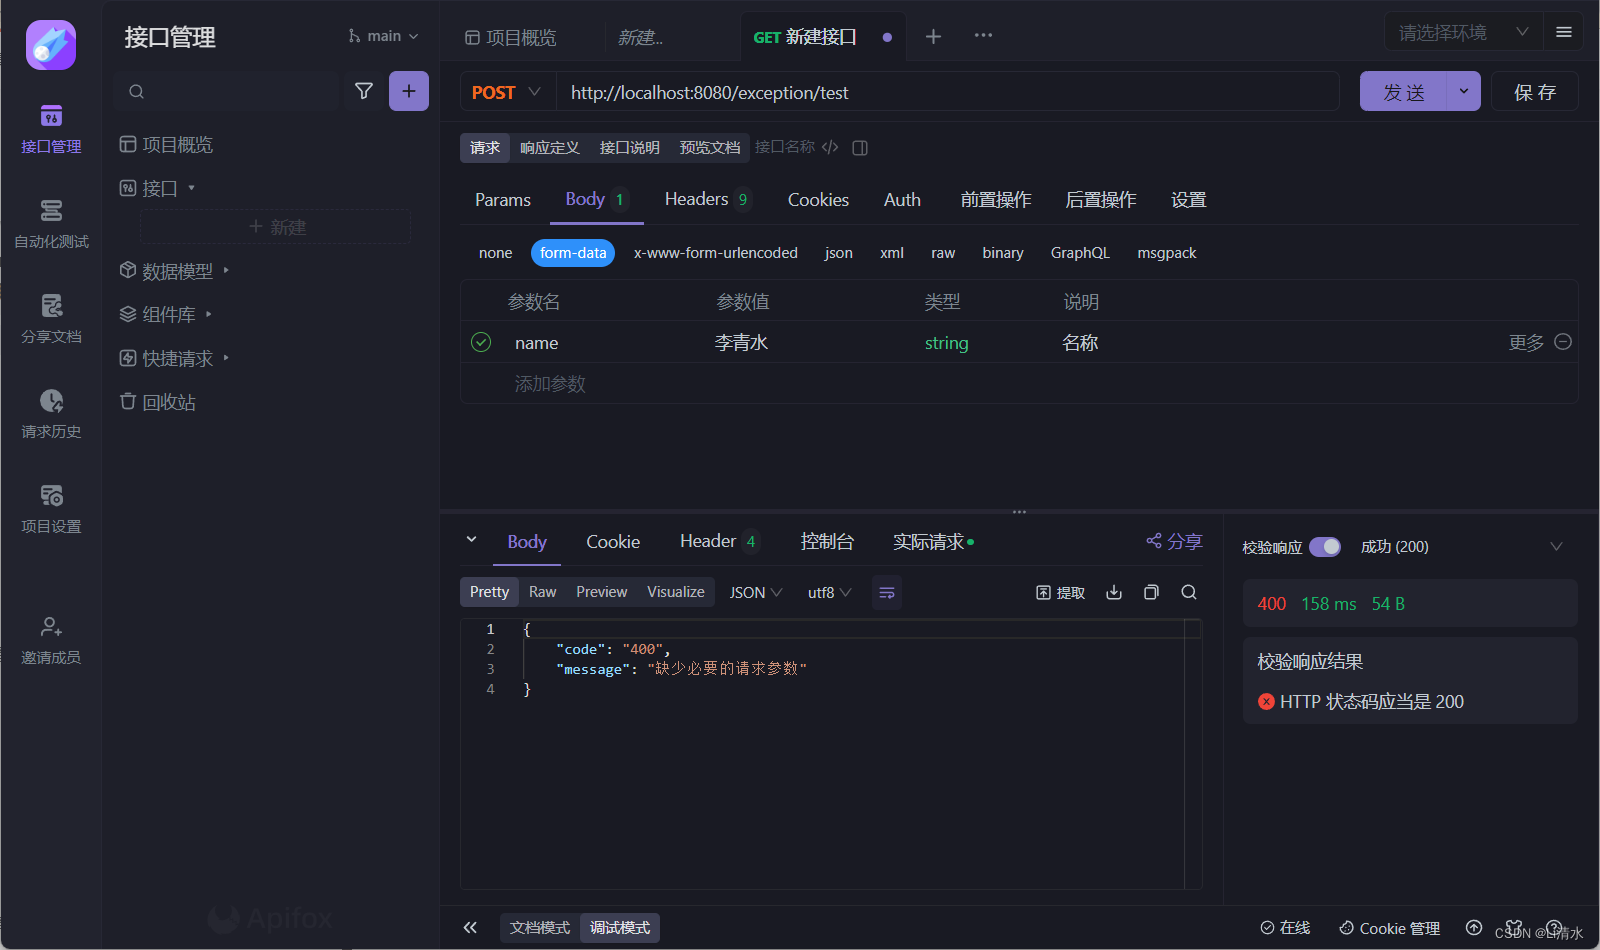
处理空指针异常
比如在微服务中,经常会调用其他服务获取数据,这个数据主要是 json 格式的,但是在解析 json 的过程中,可能会有空出现,所以我们在获取某个 jsonObject 时,再通过该 jsonObject 去获取相关信息时,应该要先做非空判断。
还有一个很常见的地方就是从数据库中查询的数据,不管是查询一条记录封装在某个对象中,还是查询多条记录封装在一个 List 中,我们接下来都要去处理数据,那么就有可能出现空指针异常,因为谁也不能保证从数据库中查出来的东西就一定不为空,所以在使用数据时一定要先做非空判断。
和处理参数确实异常类似:
 @ExceptionHandler(NullPointerException.class)
    @ResponseStatus(value = HttpStatus.INTERNAL_SERVER_ERROR)
    public GlobalJsonResult handleNullPointerException(NullPointerException ex){
        logger.error("空指针异常,{}", ex.getMessage());
        return new GlobalJsonResult("500", "空指针异常");
    }
处理预期之外的异常(一劳永逸)
当然了,异常很多,比如还有 RuntimeException,数据库还有一些查询或者操作异常等等。由于 Exception 异常是父类,所有异常都会继承该异常,所以我们可以直接拦截 Exception 异常,一劳永逸:
@ControllerAdvice
@ResponseBody
public class GlobalExceptionHandler {

    private static final Logger logger = LoggerFactory.getLogger(GlobalExceptionHandler.class);
    /**
     * 系统异常 预期以外异常
     * @param ex
     * @return
     */
    @ExceptionHandler(Exception.class)
    @ResponseStatus(value = HttpStatus.INTERNAL_SERVER_ERROR)
    public JsonResult handleUnexpectedServer(Exception ex) {
        logger.error("系统异常:", ex);
        return new JsonResult("500", "系统发生异常,请联系管理员");
    }
}
4、处理自定义异常
在实际项目中,除了拦截一些系统异常外,在某些业务上,我们需要自定义一些业务异常,比如在微服务中,服务之间的相互调用很平凡,很常见。要处理一个服务的调用时,那么可能会调用失败或者调用超时等等,此时我们需要自定义一个异常,当调用失败时抛出该异常,给 GlobalExceptionHandler 去捕获。
定义异常信息
由于在业务中,有很多异常,针对不同的业务,可能给出的提示信息不同,所以为了方便项目异常信息管理,我们一般会定义一个异常信息枚举类。比如:
package com.itcodai.course01.ExceptionMessage;

/**
 * 业务异常提示信息枚举类
 */
public enum BusinessMsgEnum {
    /** 参数异常 */
    PARMETER_EXCEPTION("102", "参数异常!"),
    /** 等待超时 */
    SERVICE_TIME_OUT("103", "服务调用超时!"),
    /** 参数过大 */
    PARMETER_BIG_EXCEPTION("102", "输入的图片数量不能超过50张!"),
    /** 500 : 一劳永逸的提示也可以在这定义 */
    UNEXPECTED_EXCEPTION("500", "系统发生异常,请联系管理员!");
    /**
     * 消息码
     */
    private String code;
    /**
     * 消息内容
     */
    private String msg;
    private BusinessMsgEnum(String code, String msg) {
        this.code = code;
        this.msg = msg;
    }
    public String getCode() {
        return code;
    }
    public String getMsg() {
        return msg;
    }
    public void setMsg(String msg) {
        this.msg = msg;
    }
    public void setCode(String code) {
        this.code = code;
    }
}
拦截自定义异常
然后我们可以定义一个业务异常,当出现业务异常时,我们就抛这个自定义的业务异常即可。比如我们定义一个 BusinessErrorException 异常,如下:
package com.itcodai.course01.handler;


import com.itcodai.course01.ExceptionMessage.BusinessMsgEnum;

/**
 * 自定义业务异常
 * @author shengwu ni
 */
public class BusinessErrorException extends RuntimeException {

    private static final long serialVersionUID = -7480022450501760611L;

    /**
     * 异常码
     */
    private String code;
    /**
     * 异常提示信息
     */
    private String message;

    public BusinessErrorException(BusinessMsgEnum businessMsgEnum) {
        this.code = businessMsgEnum.getCode();
        this.message = businessMsgEnum.getMsg();
    }
    // get set方法
}
在构造方法中,传入我们上面自定义的异常枚举类,所以在项目中,如果有新的异常信息需要添加,我们直接在枚举类中添加即可,很方便,做到统一维护,然后再拦截该异常时获取即可。
十、Spring Boot事务配置管理
1、有什么用?
我们在开发企业应用时,由于数据操作在顺序执行的过程中,线上可能有各种无法预知的问题,任何一步操作都有可能发生异常,异常则会导致后续的操作无法完成。此时由于业务逻辑并未正确的完成,所以在之前操作过数据库的动作并不可靠,需要在这种情况下进行数据的回滚。
事务的作用就是为了保证用户的每一个操作都是可靠的,事务中的每一步操作都必须成功执行,只要有发生异常就回退到事务开始未进行操作的状态。这很好理解,转账、购票等等,必须整个事件流程全部执行完才能人为该事件执行成功,不能转钱转到一半,系统死了,转账人钱没了,收款人钱还没到。
我们在实际应用开发时,基本上在 service 层处理业务逻辑的时候都要加上事务,当然了,有时候可能由于场景需要,也不用加事务(比如我们就要往一个表里插数据,相互没有影响,插多少是多少,不能因为某个数据挂了,把之前插的全部回滚)。
2、依赖配置
导入了 mysql 依赖后,Spring Boot 会自动注入 DataSourceTransactionManager,我们不需要任何其他的配置就可以用 @Transactional 注解进行事务的使用。
<dependency>
	<groupId>org.mybatis.spring.boot</groupId>
	<artifactId>mybatis-spring-boot-starter</artifactId>
	<version>1.3.2</version>
</dependency>
3、事务的测试
数据库连接
spring.datasource.url=jdbc:mysql://localhost:3306/ssm
   spring.datasource.username=lovertx
   spring.datasource.password=1234567
   spring.datasource.driver-class-name=com.mysql.cj.jdbc.Driver
建表
我们首先在数据库表中插入一条数据:
| id | user_name | password |
|---|---|---|
| 1 | 测试 | 123456 |
mapper
@Mapper
@Component
public interface UserMapper {
    @Insert("insert into user (user_name, password) values (#{username}, #{password})")
    Integer insertUser(User user);
}
service
package com.itcodai.course01.service;

import com.itcodai.course01.domain.User;

public interface UserService {
    void insertUser(User user);
}
package com.itcodai.course01.service;
import com.itcodai.course01.domain.User;
import com.itcodai.course01.mapper.UserMapper;
import org.springframework.stereotype.Service;
import org.springframework.transaction.annotation.Transactional;
import javax.annotation.Resource;
@Service
public class UserServiceImpl implements UserService{
@Resource
private UserMapper userMapper;
@Override
@Transactional
public void insertUser(User user) {
userMapper.insertUser(user);
//手动抛出异常,测试事务
//throw new RuntimeException();
}
}controller
package com.itcodai.course01.controller;

import com.itcodai.course01.domain.User;
import com.itcodai.course01.result.GlobalJsonResult;
import com.itcodai.course01.service.UserService;
import org.slf4j.Logger;
import org.slf4j.LoggerFactory;
import org.springframework.web.bind.annotation.*;

import javax.annotation.Resource;

@RestController
@RequestMapping("/exception")
public class TestController {
    private static final Logger logger = LoggerFactory.getLogger(TestController.class);

//    @PostMapping("/test")
//    public GlobalJsonResult test(@RequestParam("name") String name,
//                                            @RequestParam("pass") String pass) {
//        logger.info("name:{}", name);
//        logger.info("pass:{}", pass);
//        return new GlobalJsonResult();
//    }

    @Resource
    private UserService userService;
    @PostMapping("/adduser")
    public String addUser(@RequestBody User user) throws Exception {
        if(null != user){
            userService.insertUser(user);
            return "success";
        }else{
            return "error";
        }
    }

}
访问接口
http://localhost:8080/exception/adduser4、异常并没有被“捕获”到
并不是说我们把异常抛出来了,有异常了事务就会回滚,我们来看一个例子:
@Service
public class UserServiceImpl implements UserService {

    @Resource
    private UserMapper userMapper;

    @Override
    @Transactional
    public void isertUser2(User user) throws Exception {
        // 插入用户信息
        userMapper.insertUser(user);
        // 手动抛出异常
        throw new SQLException("数据库异常");
    }
}
手动抛出一个 SQLException 来模拟实际中操作数据库发生的异常,在这个方法中,既然抛出了异常,那么事务应该回滚,实际却不如此,读者可以使用我源码中 controller 的接口,通过 postman 测试一下,就会发现,仍然是可以插入一条用户数据的。
那么问题出在哪呢?因为 Spring Boot 默认的事务规则是遇到运行异常(RuntimeException)和程序错误(Error)才会回滚。比如上面我们的例子中抛出的 RuntimeException 就没有问题,但是抛出 SQLException 就无法回滚了。针对非运行时异常,如果要进行事务回滚的话,可以在 @Transactional 注解中使用 rollbackFor 属性来指定异常,比如 @Transactional(rollbackFor = Exception.class),这样就没有问题了,所以在实际项目中,一定要指定异常。
5、异常被 ”吃“ 掉
我们在处理异常时,有两种方式,要么抛出去,让上一层来捕获处理;要么把异常 try catch 掉,在异常出现的地方给处理掉。就因为有这中 try…catch,所以导致异常被 ”吃“ 掉,事务无法回滚。
@Service
public class UserServiceImpl implements UserService {

    @Resource
    private UserMapper userMapper;

    @Override
    @Transactional(rollbackFor = Exception.class)
    public void isertUser3(User user) {
        try {
            // 插入用户信息
            userMapper.insertUser(user);
            // 手动抛出异常
            throw new SQLException("数据库异常");
        } catch (Exception e) {
			// 异常处理逻辑
        }
    }
}
try…catch代码会吃掉异常
直接往上抛,给上一层来处理即可,千万不要在事务中把异常自己 ”吃“ 掉。
6、事务的范围
可以看到,因为要考虑并发问题,我在业务层代码的方法上加了个 synchronized 关键字。我举个实际的场景,比如一个数据库中,针对某个用户,只有一条记录,下一个插入动作过来,会先判断该数据库中有没有相同的用户,如果有就不插入,就更新,没有才插入,所以理论上,数据库中永远就一条同一用户信息,不会出现同一数据库中插入了两条相同用户的信息。
但是在压测时,就会出现上面的问题,数据库中确实有两条同一用户的信息,分析其原因,在于事务的范围和锁的范围问题。
从上面方法中可以看到,方法上是加了事务的,那么也就是说,在执行该方法开始时,事务启动,执行完了后,事务关闭。但是 synchronized 没有起作用,其实根本原因是因为事务的范围比锁的范围大。也就是说,在加锁的那部分代码执行完之后,锁释放掉了,但是事务还没结束,此时另一个线程进来了,事务没结束的话,第二个线程进来时,数据库的状态和第一个线程刚进来是一样的。即由于mysql Innodb引擎的默认隔离级别是可重复读(在同一个事务里,SELECT的结果是事务开始时时间点的状态),线程二事务开始的时候,线程一还没提交完成,导致读取的数据还没更新。第二个线程也做了插入动作,导致了脏数据。
这个问题可以避免,第一,把事务去掉即可(不推荐);第二,在调用该 service 的地方加锁,保证锁的范围比事务的范围大即可。


 4万+
4万+


 被折叠的 条评论
为什么被折叠?
被折叠的 条评论
为什么被折叠?
 到【灌水乐园】发言


