


目录
在application.properties里面配置数据库的连接信息
前言:
MyBatis是一种Java持久化框架,它可以简化数据库操作JDBC。下面是使用MyBatis进行数据库操作的一般步骤:
引入依赖:在项目的构建文件(如pom.xml)中添加MyBatis的依赖。
配置数据源:在配置文件中配置数据库连接信息,包括数据库类型、URL、用户名和密码等。
创建实体类:根据数据库表结构创建对应的实体类,并为每个字段添加相应的属性和方法。
创建Mapper接口:创建一个接口,用于定义数据库操作的方法。每个方法对应一条SQL语句。
编写Mapper XML文件:在XML文件中编写SQL语句,包括增删改查等操作。通过在XML文件中配置与Mapper接口方法的映射关系,实现方法与SQL语句的绑定。
创建SqlSessionFactory:通过配置文件创建SqlSessionFactory,SqlSessionFactory是MyBatis的核心对象,用于创建SqlSession。
创建SqlSession:通过SqlSessionFactory的openSession()方法创建SqlSession,SqlSession用于执行SQL语句。
调用Mapper方法:通过SqlSession的getMapper()方法获取Mapper接口的代理对象,然后调用Mapper接口的方法执行数据库操作。
提交事务和关闭资源:在完成数据库操作后,记得提交事务并关闭SqlSession。
以上是使用MyBatis进行数据库操作的一般步骤。根据具体的需求,可以对实体类、Mapper接口和Mapper XML文件进行扩展和配置。
准备工作:
首先创建一个数据库 名字为 user,里面的信息如下

步骤:
新建一个Spring Initializr的模块,注意Java的配置环境不要太高,21会失败,要用17

然后勾选上对应的框架和服务
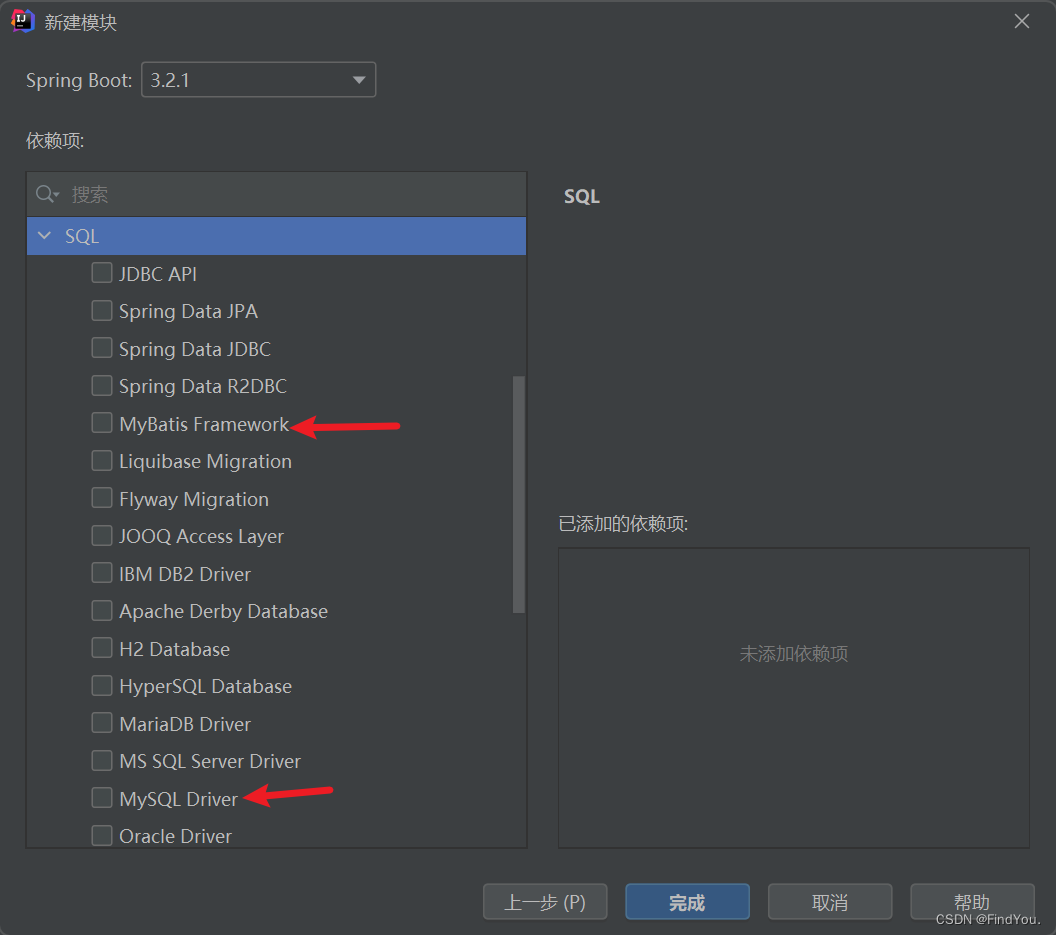
创建完成
在application.properties里面配置数据库的连接信息
因为你要操作数据库,因此你要去连接数据库.
3306/你要连接的数据库的名字
username = 账号
password = 密码
# 配置数据库的连接信息
#驱动名称
spring.datasource.driver-class-name=com.mysql.cj.jdbc.Driver
#数据库连接的url
spring.datasource.url=jdbc:mysql://localhost:3306/mybatis
# 连接数据库的用户名
spring.datasource.username=root
#连接数据库的用户密码
spring.datasource.password=123456
新建一个用户信息,和你要连接的数据库里面的字段保持一致
package com.example.springbootmybatisquickstart.poji;

public class User {

    private Integer id;
    private String name;
    private Short age;
    private Character gender;
    private String phone;

    public User(Integer id, String name, Short age, Character gender, String phone) {
        this.id = id;
        this.name = name;
        this.age = age;
        this.gender = gender;
        this.phone = phone;
    }

    public User() {

    }

    public Integer getId() {
        return id;
    }

    public void setId(Integer id) {
        this.id = id;
    }

    public String getName() {
        return name;
    }

    public void setName(String name) {
        this.name = name;
    }

    public Short getAge() {
        return age;
    }

    public void setAge(Short age) {
        this.age = age;
    }

    public Character getGender() {
        return gender;
    }

    public void setGender(Character gender) {
        this.gender = gender;
    }

    public String getPhone() {
        return phone;
    }

    public void setPhone(String phone) {
        this.phone = phone;
    }
    @Override
    public String toString() {
        return "User{" +
                "id=" + id +
                ", name='" + name + '\'' +
                ", age=" + age +
                ", gender=" + gender +
                ", phone='" + phone + '\'' +
                '}';
    }
}
然后去定义一个接口, @Select 表示的是 我要进行查找的操作,括号里面写的是sql语句
package com.example.springbootmybatisquickstart.mapper;

import com.example.springbootmybatisquickstart.poji.User;
import org.apache.ibatis.annotations.Mapper;
import org.apache.ibatis.annotations.Select;

import java.util.List;

@Mapper
public interface UserMapper {
    //查询全部用户的信息
    @Select("select * from user")
    List<User> list();
}
创建一个测试类,输出信息
package com.example.springbootmybatisquickstart;

import com.example.springbootmybatisquickstart.mapper.UserMapper;
import com.example.springbootmybatisquickstart.poji.User;
import org.junit.jupiter.api.Test;
import org.springframework.beans.factory.annotation.Autowired;
import org.springframework.boot.test.context.SpringBootTest;

import java.util.List;

@SpringBootTest
public class Usertest {
    @Autowired
    private UserMapper userMapper;

    @Test
    public void test() {
        List<User> userList = userMapper.list();
        userList.stream().forEach(user->{
            System.out.println(user);
        });
    }
}
JDBC:
1: 注册驱动
![]()
2:获取连接对象

3:获取执行SQL的对象Statement 执行SQL 返回结果

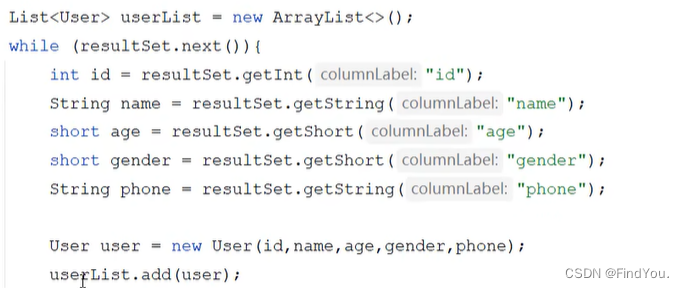
4:封装结果数据
5:释放资源

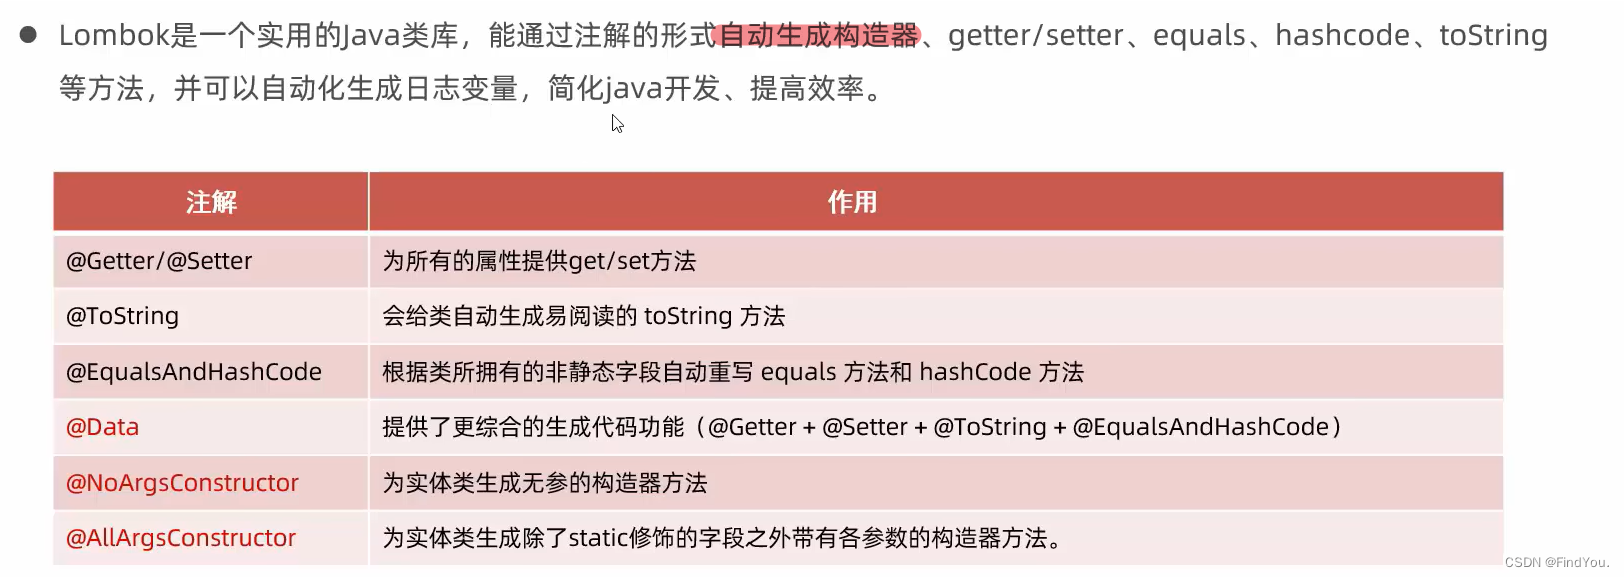
lombok:
在User里面的代码写的太多,大都是因为get和set 构造方法,这个时候我们可以引入lombok,通过注解去自动生成我们需要的东西
加入lombok依赖,记得点击刷新一下
   <!--lombok依赖-->
        <dependency>
            <groupId>org.projectlombok</groupId>
            <artifactId>lombok</artifactId>
        </dependency>
然后那么多的set和get等直接可以用一个注解@Data去替换了,注意@Data不包括 无参构造@NoArgsConstructor和有参构造@AllArgsConstructor
import lombok.AllArgsConstructor;
import lombok.Data;
import lombok.EqualsAndHashCode;
import lombok.NoArgsConstructor;

@Data // 自动引入get和set方法 以及toString以及HashCode等
@NoArgsConstructor // 无参构造
@AllArgsConstructor // 有参构造

public class User {

    private Integer id;
    private String name;
    private Short age;
    private Character gender;
    private String phone;
}
Mybatis基础操作:
删除操作:
删除id为2的
接口里面的代码是: #{id}表示的是占位符
package com.example.springbootmybatiscrud.mapper;

import org.apache.ibatis.annotations.Delete;
import org.apache.ibatis.annotations.Mapper;

@Mapper // 会自动创建对象
public interface EmpMapper {

    @Delete("delete from tb_emp where id = #{id};")
    public  void  delete(Integer id);
}
测试类里面的代码
package com.example.springbootmybatiscrud;

import com.example.springbootmybatiscrud.mapper.EmpMapper;
import com.example.springbootmybatiscrud.pojo.Emp;
import org.junit.jupiter.api.Test;
import org.springframework.beans.factory.annotation.Autowired;
import org.springframework.boot.test.context.SpringBootTest;

@SpringBootTest
class SpringbootMybatisCrudApplicationTests {
    @Autowired
    private EmpMapper empMapper;
    //调用方法
    @Test
   public  void testDelete() {
        empMapper.delete(2);
    }
}
配置日志:![]()
mybatis.configuration.log-impl=org.apache.ibatis.logging.stdout.StdOutImpl 预编译SQL的优势:
更加的安全
插入的操作:
    // 新增的操作
    @Insert("insert into tb_emp values(17, 'FindYou2.', '123456', 'Find', 1, '1.jpg', 2, '2003-11-15', 2, now(), now() );")
    public void insert();
调用的时候:
package com.example.springbootmybatiscrud;

import com.example.springbootmybatiscrud.mapper.EmpMapper;
import com.example.springbootmybatiscrud.pojo.Emp;
import org.junit.jupiter.api.Test;
import org.springframework.beans.factory.annotation.Autowired;
import org.springframework.boot.test.context.SpringBootTest;

import java.util.Scanner;

@SpringBootTest
class SpringbootMybatisCrudApplicationTests {
    @Autowired
    private EmpMapper empMapper;
    //调用方法
//    @Test
   public  void testDelete() {
        empMapper.delete(2);
    }

    @Test
    public void testInsert() {
       empMapper.insert();
    }
}
但是为了安全性,咱们还是要写为占位的,
代码改为:
    // 新增的操作
    @Insert("insert into tb_emp values" +
            "(#{id}, #{username}, #{password}, #{name}, #{gender}, #{image}, #{job}, #{entryDate}, #{deptId}, #{createTime}, #{updateTime} );")
    public void insert(Emp emp);
根据ID查询 :
  //查询操作
    @Select("select * from tb_emp where id = #{id};")
    public Emp getById(Integer id);
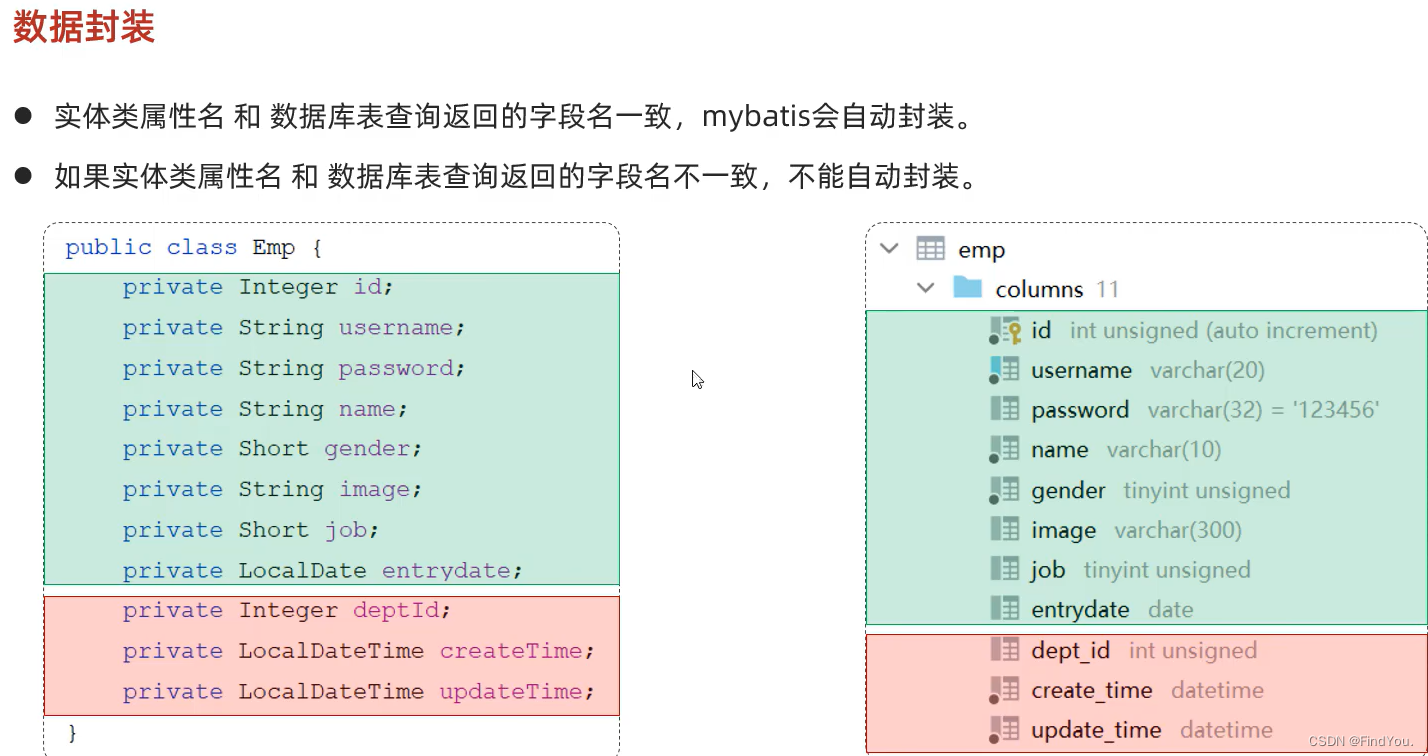
会发现deptId 和 createTime 以及updateTime为null 原因是因为数据的封装, 字段名不一样

解决的方法:
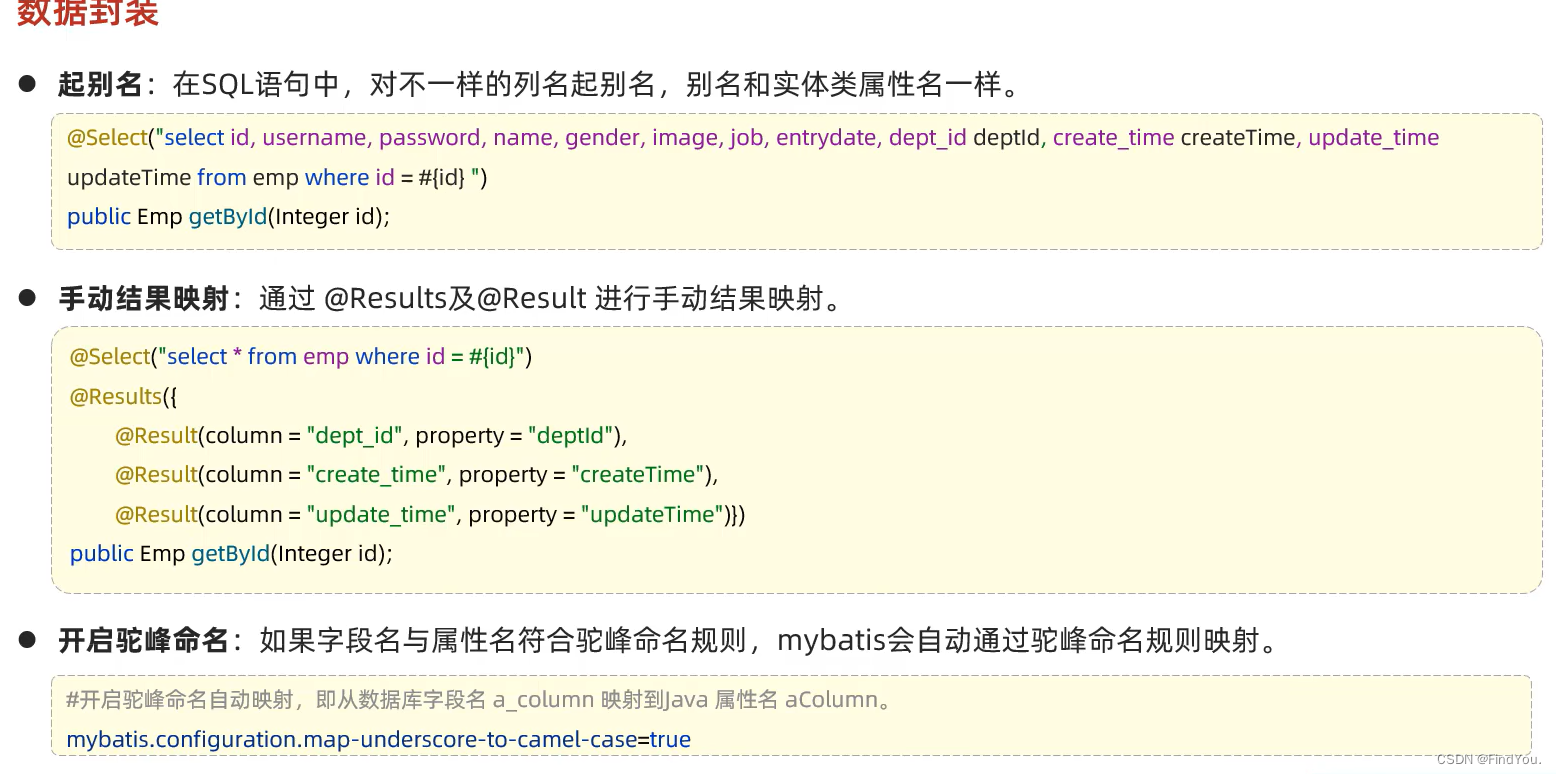
方案1:给字段起别名
    //查询操作
    @Select("select id, username, password, name, gender, image,\n" +
            "       job, entryDate, dept_id deptId  ,create_time createTime  , update_time updateTime      \n" +
            "       from tb_emp where id = #{id};")
    public Emp getById(Integer id);
运行的结果:就不在是null了 方案2:通过@Results和@Result注解 手动映射封装
在MyBatis中,@Result注解中的property属性表示将查询结果集中的列值映射到Java对象的属性上。
@Result注解用于指定结果集的列和Java对象属性之间的映射关系。例如,@Result(column = "dept_id", property = "deptId")将查询结果集中的"dept_id"列的值映射到Java对象的deptId属性上。
在写的时候 注意 property里面的数据 不要带多余的空格
//     通过@Results 和 @Result 注解手动映射封装
    @Results({
            @Result(column = "dept_id", property = "deptId"),
            @Result(column = "create_time", property = "createTime"),
            @Result(column = "update_time", property = "updateTime")
    })
    @Select("select * from tb_emp where id = #{id}")
public Emp getById(Integer id);运行的结果:![]()
方案3:开启mybatis的驼峰 命名自动映射开关 --- a cloumn -------> aColumn
前提是你需要严格遵守把字段里面的下划线转换为了驼峰命名

代码:
//    查询操作
    @Select("select id, username, password, name, gender, image,\n" +
            "       job, entryDate, dept_id deptId  ,create_time createTime  , update_time updateTime      \n" +
            "       from tb_emp where id = #{id};")
    public Emp getById(Integer id);
运行的结果:
小结:解决的方案
条件查询:
#{}语法是MyBatis提供的参数占位符语法,它用于将传入的参数值安全地插入到查询语句中,并避免SQL注入的风险。在#{}中不支持%通配符。因此我们需要用的是$
    //条件查询
    @Select("select * from tb_emp where name like '%${name}%'\n" +
            "                       and gender = #{gender} and entryDate between #{begin}\n" +
            "                       and #{end} order by update_time desc ;")
    public List<Emp> testSelect(String name, Short gender, LocalDate begin, LocalDate end);
为了解决#{}里面不可以跟%,我们可以用concat 字符串拼接函数,把like '%${name}%' 改为 like concat('%', #{name}, '%')
Mybatis动态SQL
<if></if> <where></where> <set></set>
在.xml里面
<?xml version="1.0" encoding="UTF-8" ?>
<!DOCTYPE mapper
        PUBLIC "-//mybatis.org//DTD Mapper 3.0//EN"
        "http://mybatis.org/dtd/mybatis-3-mapper.dtd">
<mapper namespace="com.example.springbootmybatiscrud.mapper.EmpMapper" >

    <select id="list" resultType="com.example.springbootmybatiscrud.pojo.Emp">
        select * from tb_emp where
                       <if test="name != null">
                           name like '%${name}%'
                       </if>
                       <if test="gender != null">
                           and gender = #{gender}
                       </if>
                       <if test="begin != null and end != null">
                           and entryDate between #{begin}and #{end}
                       </if>
                            order by update_time desc
    </select>
</mapper>
但是这样写的话,要是name为null但是gender不为null的时候,执行的sql语句 就是 where and gender 这样是会报错的 这个时候 就要用到<where>这个标签了,<where>会检测 如果里面什么都没有的话 这个where也会消失 而且也解决了and的问题
修改之后的代码是:
<?xml version="1.0" encoding="UTF-8" ?>
<!DOCTYPE mapper
        PUBLIC "-//mybatis.org//DTD Mapper 3.0//EN"
        "http://mybatis.org/dtd/mybatis-3-mapper.dtd">
<mapper namespace="com.example.springbootmybatiscrud.mapper.EmpMapper" >

    <select id="list" resultType="com.example.springbootmybatiscrud.pojo.Emp">
        select * from tb_emp
            <where>
                <if test="name != null">
                    name like '%${name}%'
                </if>
                <if test="gender != null">
                    and gender = #{gender}
                </if>
                <if test="begin != null and end != null">
                    and entryDate between #{begin}and #{end}
                </if>
                order by update_time desc
            </where>
    </select>
</mapper>现在还有一个问题,那就是逗号的问题,怎么去解决这个逗号问题呢?用<set></set>去解决逗号的问题,set标签会自动去除多余的逗号
foreach标签<foreach></foreach>
collection:便利的集合的名字
item:便利出来的元素
separator:分隔的符号
open:遍历开始拼接的SQL片段
close:遍历结束后拼接的SQL片段
   <delete id="deleteByIds">
        delete from tb_emp where id in
        <foreach collection="ids" item="id" separator="," open="(" close=")">
            #{id}
        </foreach>
    </delete>
<sql> <include>
解决的是代码的复用性 先把重复的给封装起来 然后再去调用
<sql id = "id名">
重复的代码
</sql>
调用的时候
<include refid = "和sel对应的id名"/>


 106
106


 被折叠的 条评论
为什么被折叠?
被折叠的 条评论
为什么被折叠?
 到【灌水乐园】发言


