


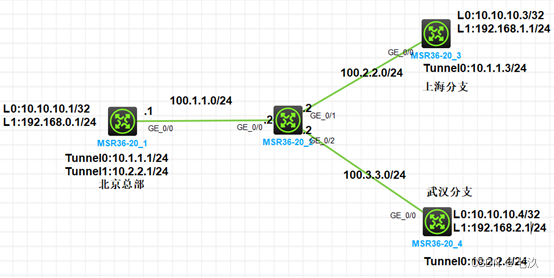
客户需求:
1.某企业北京总部、上海分支、武汉分支分别通过 R1,R3,R4 接入互联网,配置默认路由连通公网
2.按照图示配置 IP 地址,R1,R3,R4 分别配置 Loopback0 口匹配感兴趣流,Loopback1 口模拟业务网段
3.北京总部拥有固定公网地址,在 R2上配置 DHCP,对 R3 和 R4 动态分配 IP 地址,IP 地址网段如图
4.北京总部、上海分支、武汉分支配置GRE over IPsec VPN 连通内网,要求北京总部使用模板来简化配置
5.总部和分支之间配置 RIPv2 传递内网路由
实验步骤:
配置ip地址
[bj]inter g0/0
[bj-GigabitEthernet0/0]ip add 100.1.1.1 24
[bj]inter LoopBack 0
[bj-LoopBack0]ip add 10.10.10.1 32
[bj-LoopBack0]inter l 1
[bj-LoopBack1]ip add 192.168.0.1 24
[r2]inter g0/0
[r2-GigabitEthernet0/0]ip add 100.1.1.2 24
[r2-GigabitEthernet0/0]inter g0/1
[r2-GigabitEthernet0/1]ip add 100.2.2.2 24
[r2-GigabitEthernet0/1]inter g0/2
[r2-GigabitEthernet0/2]ip add 100.3.3.2 24[sh]inter LoopBack 0
[sh-LoopBack0]ip add 10.10.10.3 32
[sh]inter LoopBack 1
[sh-LoopBack1]ip add 192.168.1.1 24[wh]interface LoopBack 0
[wh-LoopBack0]ip add 10.10.10.4 32
[wh]interface LoopBack 0
[wh-LoopBack1]ip add 192.168.2.1 24在 R2 上配置 DHCP,对 R3 和 R4 动态分配 IP 地址R2上开启DHCP 功能,
[r2]dhcp enable
[r2]dhcp server ip-pool sh
[r2-dhcp-pool-sh]network 100.2.2.0 24
[r2-dhcp-pool-sh]gateway-list 100.2.2.2
[r2]dhcp server ip-pool wh
[r2-dhcp-pool-wh]network 100.3.3.0 24
[r2-dhcp-pool-wh]gateway-list 100.3.3.2
在sh wh的公网接口开启自动获取地址
[sh]inter g0/0
[sh-GigabitEthernet0/0]ip add dhcp-alloc
[wh]inter g0/0
[wh-GigabitEthernet0/0]ip add dhcp-alloc
查看sh wh的公网接口,已经自动获取到地址


配置默认路由,使公网互通
[bj]ip route-static 0.0.0.0 0 100.1.1.2[sh]ip route-static 0.0.0.0 0 100.2.2.2[wh]ip route-static0.0.0.0 0 100.3.3.2
在 R1 上创建 GRE Tunnel口,配置 IP 地址,并指定源地址和目的地址为两端 Loopback0 口地址 Tunnel0 口对应 sh,Tunnel1 口对应wh
[bj]inter Tunnel 0 mode gre
[bj-Tunnel0]ip add 10.1.1.1 24
[bj-Tunnel0]source LoopBack 0
[bj-Tunnel0]destination 10.10.10.3
[bj]inter Tunnel 1 mode gre
[bj-Tunnel0]ip add 10.2.2.1 24
[bj-Tunnel0]source LoopBack 0
[bj-Tunnel0]destination 10.10.10.4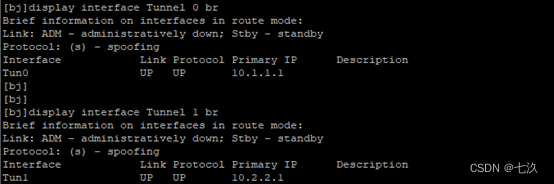
[sh]inter Tunnel 0 mode gre
[sh-Tunnel0]ip add 10.2.2.4 24
[sh-Tunnel0]source  LoopBack 0
[sh-Tunnel0]destination 10.10.10.1
[wh]inter Tunnel 0 mode gre
[wh-Tunnel0]ip add 10.2.2.4 24
[wh-Tunnel0]source  LoopBack 0
[wh-Tunnel0]destination 10.10.10.1
[bj]ike identity fqdn bj     //在 bj上配置 FQDN 名为 bj
[bj]ike proposal 1        //在 bj上创建 IKE 提议,使用默认配置即可
[bj-ike-proposal-1]qu
[bj]ike keychain fz     //在 bj 上创建预共享密钥,
[bj-ike-keychain-fz]pre-shared-key hostnamesh key simple 123456  //连接sh密钥123456
[bj-ike-keychain-fz]pre-shared-key hostnamewh key simple 654321 //连接wh密钥654321
#IKE Profile 中配置IKE 模式为野蛮模式,并使用 FQDN 名称来标识对端sh,引用IKE提议1,IKE密钥fz
[bj]ike profile sh
[bj-ike-profile-sh]exchange-mode aggressive
[bj-ike-profile-sh]match remote identityfqdn sh
[bj-ike-profile-sh]proposal 1
[bj-ike-profile-sh]keychain fz
#IKE Profile 中配置IKE 模式为野蛮模式,并使用 FQDN 名称来标识对端wh,引用IKE提议1,IKE密钥fz
[bj]ike profile wh
[bj-ike-profile-wh]exchange-mode aggressive
[bj-ike-profile-wh]match remote identityfqdn wh
[bj-ike-profile-wh]proposal 1
[bj-ike-profile-wh]keychain fz
#在 bj 上创建 IPsec 转换集,对两个分支可以使用同一个转换集
[bj]ipsec transform-set fz
[bj-ipsec-transform-set-fz]espauthentication-algorithm md5
[bj-ipsec-transform-set-fz]espencryption-algorithm 3des-cbc
在 bj上创建上海分支的 IPsec 策略模板,引用转换集fz,IKE模板sh
[bj]ipsec policy-template sh 1
[bj-ipsec-policy-template-sh-1]transform-setfz
[bj-ipsec-policy-template-sh-1]ike-profilesh
在 R1 上创建武汉分支的 IPsec策略模板,引用转换集fz,IKE模板wh
[bj]ipsec policy-template wh 1
[bj-ipsec-policy-template-wh-1]transform-setfz
[bj-ipsec-policy-template-wh-1]ike-profilewh
在 bj上创建 IPsec 策略,策略同名为fz,sh为1 wh为2,绑定两个模板
[bj]ipsec policy fz 1 isakmp template sh
[bj]ipsec policy fz 2 isakmp template wh
在 bj的公网接口上下发 IPsec 策略fz
[bj]inter g0/0
[bj-GigabitEthernet0/0]ipsec apply policyfz
[sh]ike identity fqdn sh //sh上创建FQDN为sh配置 IPsec 感兴趣流,目的和源为两端 Loopback0 口地址,
[sh]acl advanced  3000
[sh-acl-ipv4-adv-3000]ru
[sh-acl-ipv4-adv-3000]rule permit ip source10.10.10.3  0  destination 10.10.10.1  0
[sh]ike proposal 1 //创建IKE提议,默认配置
[sh-ike-proposal-1]qu[sh]ike keychain bj //创建IKE密钥串 名为bj
[sh-ike-keychain-bj]pre-shared-key address100.1.1.1 key simple 123456 //对端是公网地址密码为123456#IKE Profile(模板) 中配置 IKE 模式为野蛮模式,并使用 FQDN 名称来标识对端bj,引用IKE提议1,IKE密钥bj
[sh]ike profile bj
[sh-ike-profile-bj]exchange-mode aggressive
[sh-ike-profile-bj]match  remote identity fqdn bj
[sh-ike-profile-bj]keychain bj
[sh-ike-profile-bj]proposal 1
#在 sh 上创建 IPsec 转换集,加密和验证算法需要与 bj 上一致
[sh]ipsec transform-set bj
[sh-ipsec-transform-set-bj]espauthentication-algorithm md5
[sh-ipsec-transform-set-bj]esp encryption-algorithm3des-cbc
#在 sh上创建 IPsec 策略,名为bj ,自动协商,指定对端地址(公网地址)抓取感兴趣流,
转换集bj,以及IKE模板bj
[sh]ipsec policy bj 1 isakmp
[sh-ipsec-policy-isakmp-bj-1]security acl3000
[sh-ipsec-policy-isakmp-bj-1]remote-address100.1.1.1
[sh-ipsec-policy-isakmp-bj-1]transform-setbj
[sh-ipsec-policy-isakmp-bj-1]ike-profile bj
在 sh的公网接口上下发 IPsec 策略bj
[sh]inter g0/0
[sh-GigabitEthernet0/0]ipsec apply policybj
[wh]ike identity fqdn wh //配置 FQDN 名#配置 IPsec 感兴趣流,目的和源为两端 Loopback0 口地址
[wh]acl advanced 3000
[wh-acl-ipv4-adv-3000]rule permit ip source10.10.10.4 0 destination 10.10.10.1  0
#创建IKE提议1 默认配置
[wh]ike proposal 1
[wh-ike-proposal-1]qu
#创建共享密钥串,对端是公网地址,密码为654321
[wh]ike keychain bj
[wh-ike-keychain-bj]pre-shared-key address100.1.1.1 key simple  654321
# IKE Profile(模板) 中配置 IKE 模式为野蛮模式,并使用 FQDN 名称来标识对端bj,引用IKE提议1,IKE密钥bj
[wh]ike profile bj
[wh-ike-profile-bj]exchange-mode aggressive
[wh-ike-profile-bj]match remote identityfqdn bj
[wh-ike-profile-bj]keychain bj
[wh-ike-profile-bj]proposal 1
#创建转换集bj 加密和验证算法需要与 bj 上一致
[wh]ipsec transform-set bj
[wh-ipsec-transform-set-bj]espencryption-algorithm 3des-cbc
[wh-ipsec-transform-set-bj]espauthentication-algorithm md5
#在 wh上创建 IPsec 策略,名为bj ,自动协商,指定对端地址(公网地址)抓取感兴趣流,,转换集bj,以及IKE模板bj
[wh]ipsec policy bj 1 isakmp
[wh-ipsec-policy-isakmp-bj-1]security acl3000
[wh-ipsec-policy-isakmp-bj-1]remote-address100.1.1.1
[wh-ipsec-policy-isakmp-bj-1]transform-setbj
[wh-ipsec-policy-isakmp-bj-1]ike-profile bj
#在wh的公网接口上下发IPsec
[wh]inter g0/0
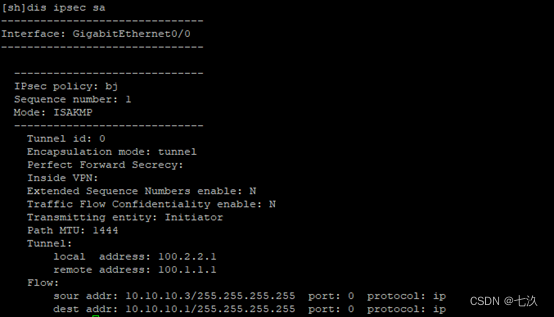
[wh-GigabitEthernet0/0]ipsec apply policybj查看IKE SA状态 可以看到已经建立IKE安全联盟


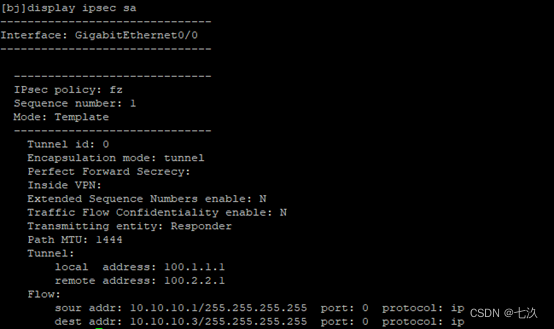
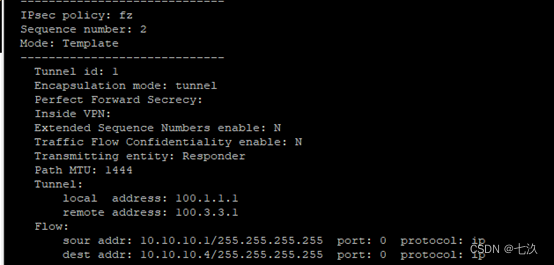
查看IPsec SA状态,可以看到bj上建立了两个IPsec安全联盟

#在 bj,sh,wh 上分别配置 RIPv2,宣告 Tunnel 口网段和各自业务网段
[bj]rip 1
[bj-rip-1]version 2
[bj-rip-1]undo summary
[bj-rip-1]network 10.0.0.0
[bj-rip-1]network 192.168.0.1
[sh]rip 1
[bj-rip-1]version 2
[sh-rip-1]undo summary
[sh-rip-1]network 10.0.0.0
[sh-rip-1]network 192.168.1.0[wh]rip 1
[wh-rip-1]version 2
[wh-rip-1]undo summary
[wh-rip-1]network 10.0.0.0
[wh-rip-1]network 192.168.2.0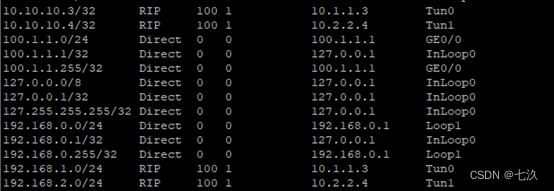
此时可以看到bj的路由表上通过rip学习到对端 Loopback0 口的路由,下一跳指向 Tunnel 口,基于路由最长掩码匹配规则,数据包发往 Tunnel 口进行 GRE 封装后,不会匹配默认路由扔向公网接口进行 IPsec 封装,而是会再次发往 Tunnel 口进行重复 GRE 封装,这样将造成 Tunnel 口频繁 UP/DOWN,所以需要配置静态路由,来使经过 GRE 封装之后的数据包能够正确扔向公网口进行 IPsec 封装
[bj]ip route-static 10.10.10.3 32 100.1.1.2
[bj]ip route-static 10.10.10.4 32 100.1.1.2
[sh]ip route-static 10.10.10.1 32 100.2.2.2[wh]ip route-static 10.10.10.1 32 100.3.3.2此时看到bj上只有rip学到的业务网段,带源触发VPN策略,可以相互访问

野蛮模式固定方无需配置感兴趣流,需要无固定公网地址的访问固定公网地址,才能触发感兴趣流
GRE over IPsec VPN需要注意:
Tunnel上配置的目的和源是环回口地址
不能把Tunnel口的目的和源宣告进路由协议
IKE和IPsec协商的对端地址是公网地址
IPsec策略下发在公网口


 4031
4031


 被折叠的 条评论
为什么被折叠?
被折叠的 条评论
为什么被折叠?
 到【灌水乐园】发言


