1.
运行环境:
| 主机 | 主机名 | 系统 | 服务 |
| 192.168.116.128 |
Server-Web
|
Linux
|
Web
|
| 192.168.116.129 |
Server-NFS-
DNS
|
Linux
|
NFS/DNS
|
2.
基础配置
配置主机名,静态
IP
地址
开启防火墙并配置
部分开启
SElinux
并配置
服务器之间使用同
ntp.aliyun.com
进行时间同步
服务器之间实现
SSH
免密登录
3.
业务需求
Server-NFS-DNS
主机配置
NFS
服务器,将博客网站资源
文件共享给
Server-web
主机,
Server-NFS-DNS
主机配
置
DNS
Server-web
主机配置
web
服务,通过域名
www.openla
b.com
可以访问到自建的博客网站
4.
准备工作
4.1.
恢复快照
4.2.
配置静态
IP


4.3.
修改主机名及
hosts
映射


4.4.
开启防火墙:


4.5.
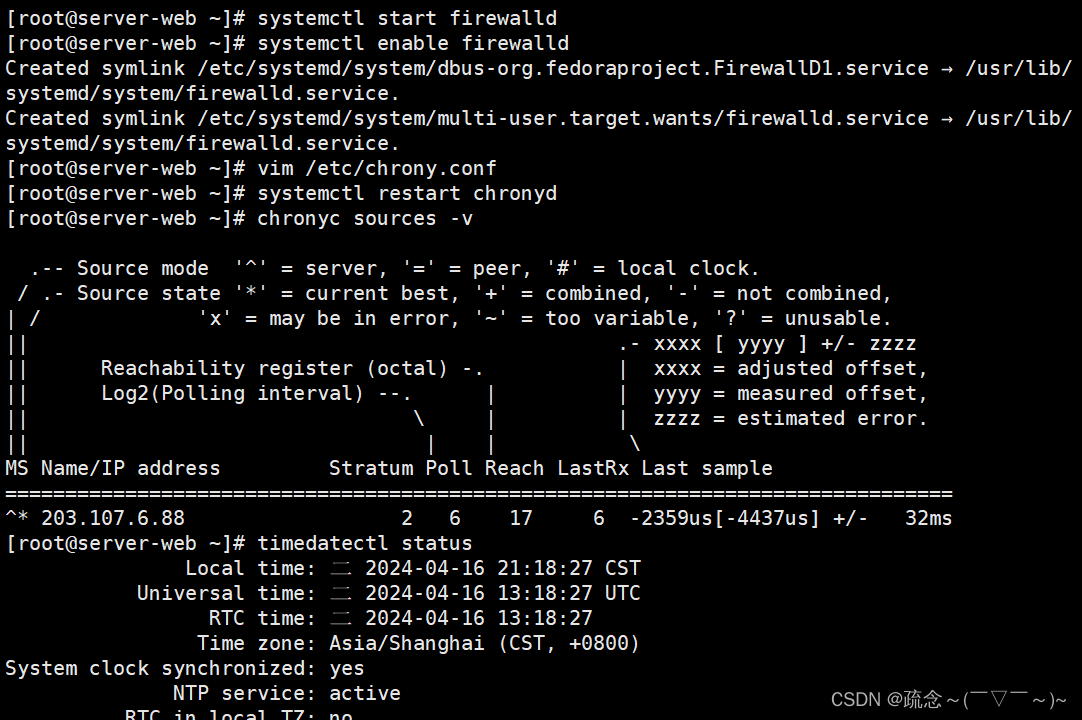
时间同步

 4.6.
配置免密
ssh
登录
#在192.168.116.128(Server-Web)中配置
[root@Server-Web~]#ssh-keygen-trsa   #生成公钥私钥,一路回车
[root@Server-Web~]#ssh-copy-id 192.168.116.129
[root@Server-Web~]#ssh192.168.116.129
[root@Server-Web~]#exit
#在192.168.48.131(Server-NFS-DNS)中配置
[root@Server-NFS-DNS~]#ssh-keygen-trsa
[root@Server-NFS-DNS~]#ssh-copy-id 192.168.116.128
[root@Server-NFS-DNS~]#ssh 192.168.116.128
[root@Server-NFS-DNS~]#exit
5.
环境搭建
5.1. Server-web
端安装
LNMP
环境软件
[root@server-web ~]# yum install nginx mariadb-server php* -y
5.2. Server-NFS-DNS
端上传博客软件
网址:
https://cn.wordpress.org/
,下载后为
zip
压缩
文件
将
wordpress
上传到
192.168.116.129
(
Server-NFS-
DNS
)端的
/
目录下
解压缩:
[root@server-NFS-DNS ~]# cd /
[root@server-NFS-DNS /]# unzip wordpress-6.1-zh_CN.zip
[root@server-NFS-DNS /]# cd wordpress
[root@server-NFS-DNS wordpress]# ls
5.3. Server-NFS-DNS
端设置
NFS
共享
目的:将
Server-NFS-DNS
端的
/wordpress
目录共享给
192.168.116.128
(
Server-Web
)
[root@Server-NFS-DNSwordpress]#yum install rpcbind -y
[root@Server-NFS-DNSwordpress]#yum install nfs-utils -y
[root@server-NFS-DNS wordpress]# cd ~
[root@server-NFS-DNS ~]# vim /etc/exports
[root@server-NFS-DNS ~]# chmod -Rf 777 /wordpress
[root@server-NFS-DNS ~]# firewall-cmd --permanent --zone public --add-service=mountd
success
[root@server-NFS-DNS ~]# firewall-cmd --permanent --zone public --add-servic=rpc-bind
success
[root@server-NFS-DNS ~]# firewall-cmd --permanent --zone public --add-servic=nfs
success
[root@server-NFS-DNS ~]# firewall-cmd --reload
success
[root@server-NFS-DNS ~]# systemctl start rpcbind
[root@server-NFS-DNS ~]# systemctl start nfs-server

5.4. Server-web
设置
5.4.1.
挂载远程共享目录
[root@server-web ~]# yum install rpcbind -y
[root@server-web ~]# yum install nfs-utils -y
[root@server-web ~]# showmount -e 192.168.116.129
Export list for 192.168.116.129:
/wordpress 192.168.116.128
[root@server-web ~]# mkdir /wp
[root@server-web ~]# mount -t nfs 192.168.116.129:/wordpress /wp
[root@server-web ~]# cd /wp
[root@server-web wp]# ls
5.4.2. nginx
设置
[root@server-web wp]# cd ~
[root@server-web ~]# firewall-cmd --permanent --zone public --add-service=http
success
[root@server-web ~]# firewall-cmd --reload
success
[root@server-web ~]# vim /etc/nginx/nginx.conf
5.4.3.
修改
wordpress
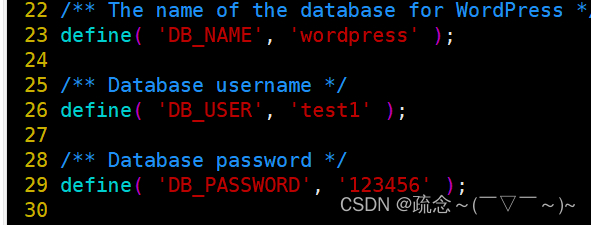
配置文件

[root@server-web ~]# cd /wp
[root@server-web wp]# cp wp-config-sample.php wp-config.php
[root@server-web wp]# vim wp-config.php
5.4.4.
启动数据库
[root@server-web wp]# cd ~
[root@server-web ~]# systemctl start mariadb
5.4.5.
在数据库中创建数据库和用户
[root@server-web ~]# mysql
Welcome to the MariaDB monitor.  Commands end with ; or \g.
Your MariaDB connection id is 3
Server version: 10.5.22-MariaDB MariaDB Server

Copyright (c) 2000, 2018, Oracle, MariaDB Corporation Ab and others.

Type 'help;' or '\h' for help. Type '\c' to clear the current input statement.

MariaDB [(none)]> create database wordpress;
Query OK, 1 row affected (0.000 sec)

MariaDB [(none)]> create user 'test1'@'localhost' identified by '123456';
Query OK, 0 rows affected (0.001 sec)

MariaDB [(none)]> grant all on wordpress.* to 'test1'@'localhost';
Query OK, 0 rows affected (0.001 sec)

MariaDB [(none)]> exit
Bye
5.4.6.
重启数据库和
http
[root@server-web ~]# systemctl restart mariadb
[root@server-web ~]# systemctl restart nginx
5.5.
测试
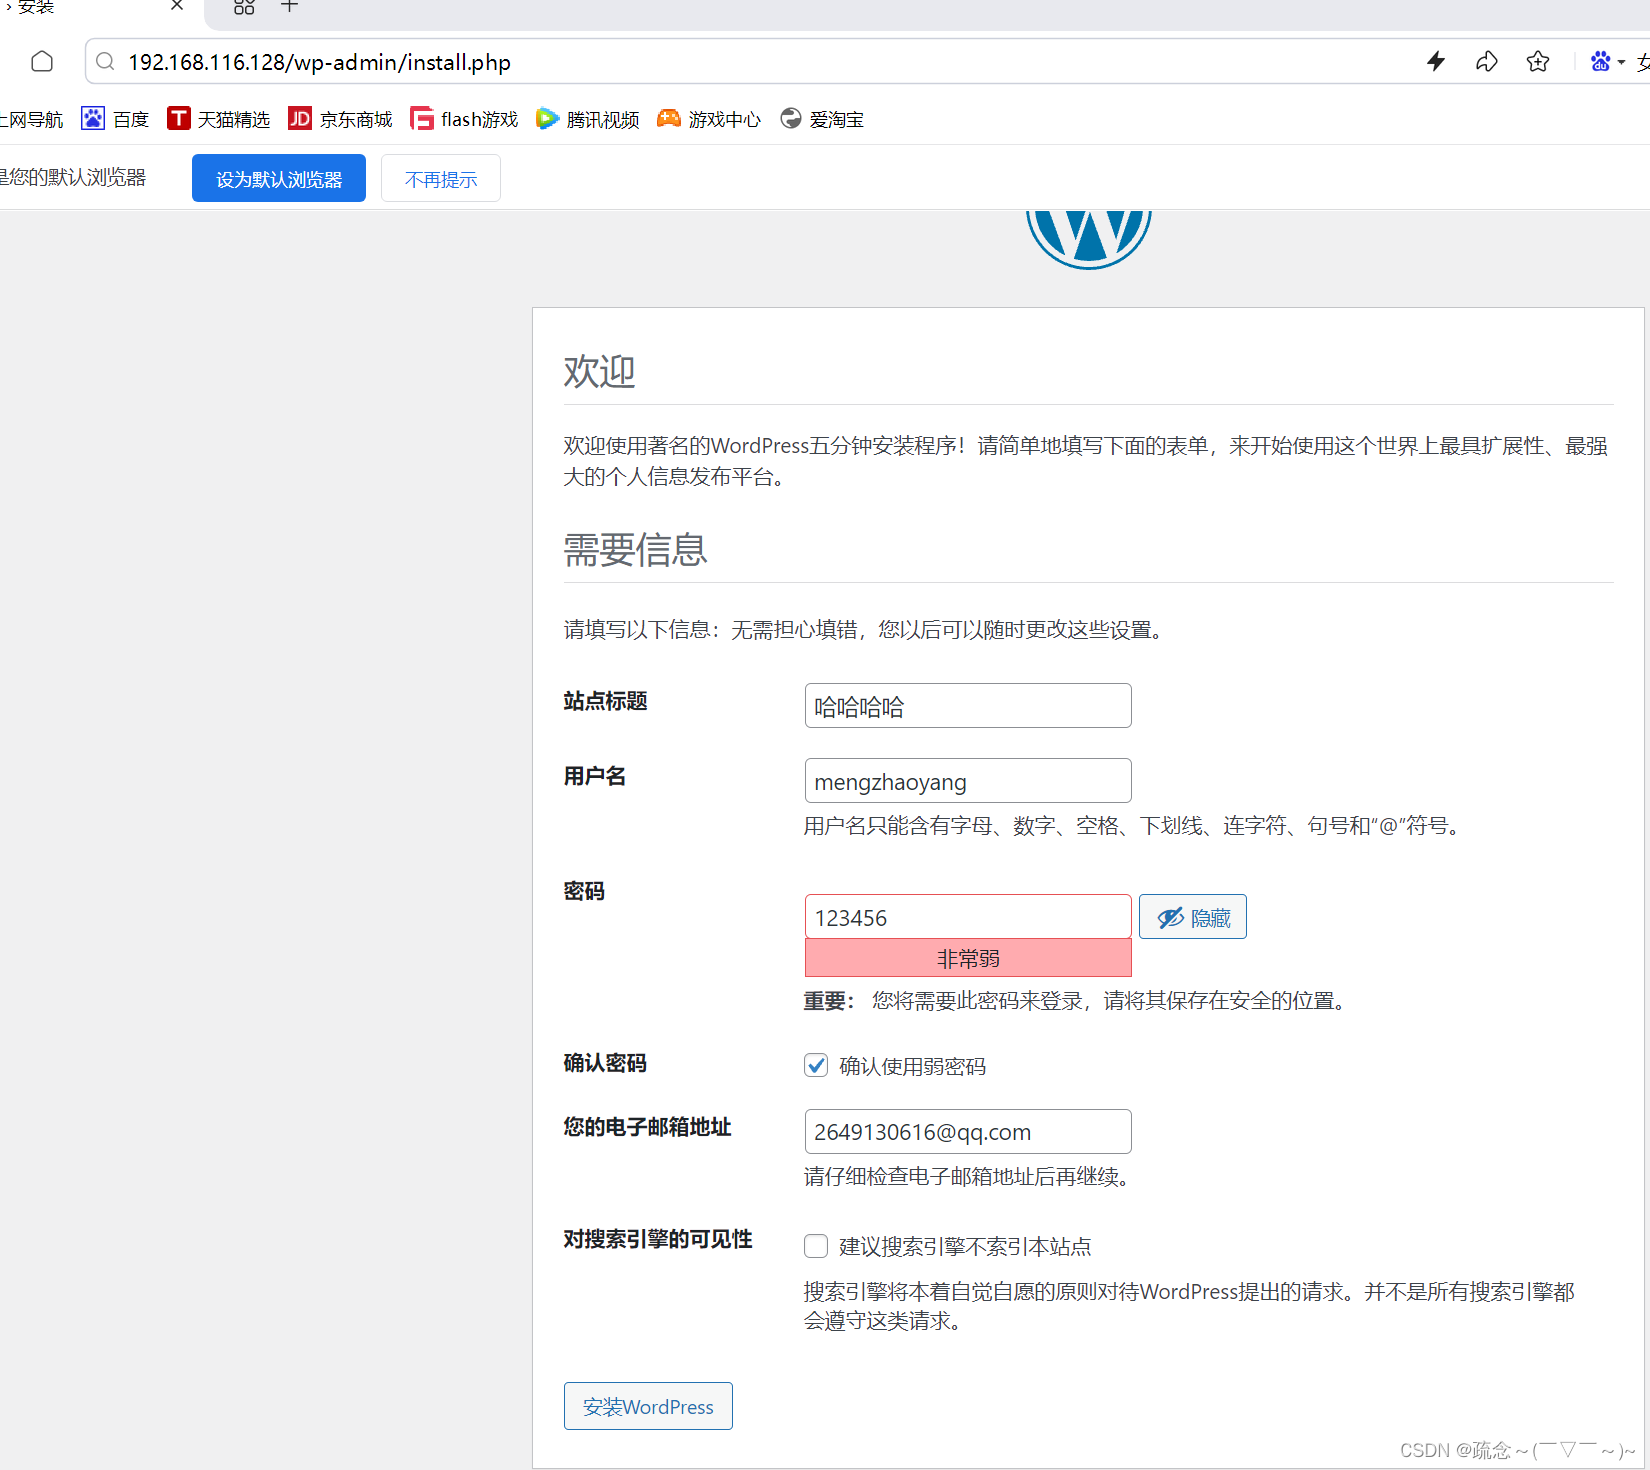
在
windows
端输入
192.168.116.128
继续完成
wordpress
配置
(
邮箱必须设置
)

5.6.
在
Server-NFS-DNS
端配置
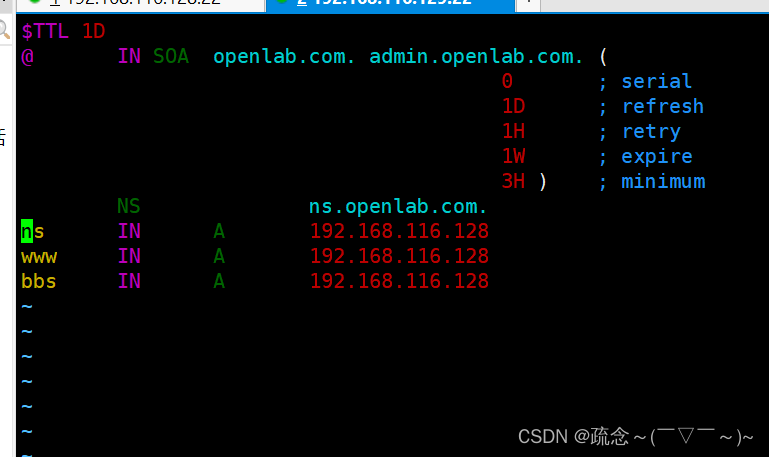
DNS
原则:
www.openlab.com
正向解析为
192.168.116.128
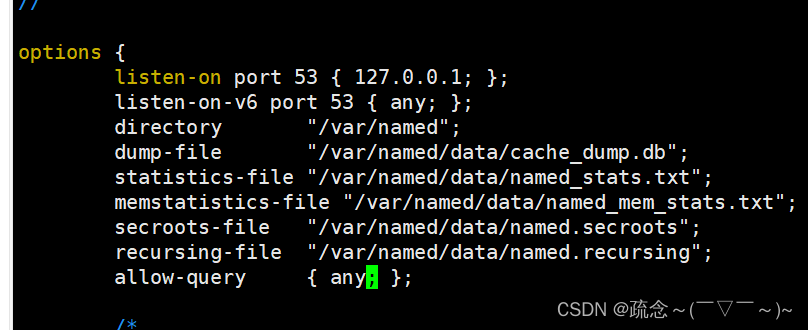
编辑主配置文件

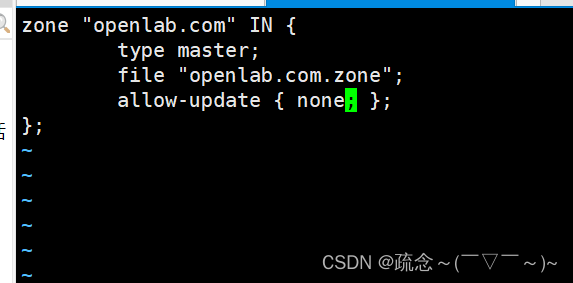
修改区域配置文件,清空添加:

新建区域数据文件并配置解析

测试


 被折叠的 条评论
为什么被折叠?


