


环境前置搭建Nacos:点击跳转
Spring Cloud Gateway Docs
新建gateway网关模块
pom.xml导入依赖
<!-- 网关 -->
<dependency>
    <groupId>org.springframework.cloud</groupId>
    <artifactId>spring-cloud-starter-gateway</artifactId>
</dependency>
<!-- nacos服务发现依赖 -->
<dependency>
    <groupId>com.alibaba.cloud</groupId>
    <artifactId>spring-cloud-starter-alibaba-nacos-discovery</artifactId>
</dependency>
编写启动类GatewayApplication.java(不是新模块就不用编写)
@SpringBootApplication
public class GatewayApplication {
    public static void main(String[] args) {
        SpringApplication.run(GatewayApplication.class, args);
    }
}
application.yml配置gateway
server:
  port: 10010 # 网关端口
spring:
  application:
    name: gateway # 服务名称
  cloud:
    nacos:
      server-addr: localhost:8848 # nacos地址
    gateway:
      routes: # 网关路由配置
        - id: user-service # 路由id,自定义,只要唯一即可
          # uri: http://127.0.0.1:8081 # 路由的目标地址 http就是固定地址
          uri: lb://userservice # 路由的目标地址 lb就是负载均衡,后面跟服务名称
          predicates: # 路由断言,也就是判断请求是否符合路由规则的条件
            - Path=/user/** # 这个是按照路径匹配,只要以/user/开头就符合要求
        - id: order-service
          uri: lb://orderservice
          predicates:
            - Path=/order/**
完成以上配置,直接启动即可,访问 http://localhost:10010
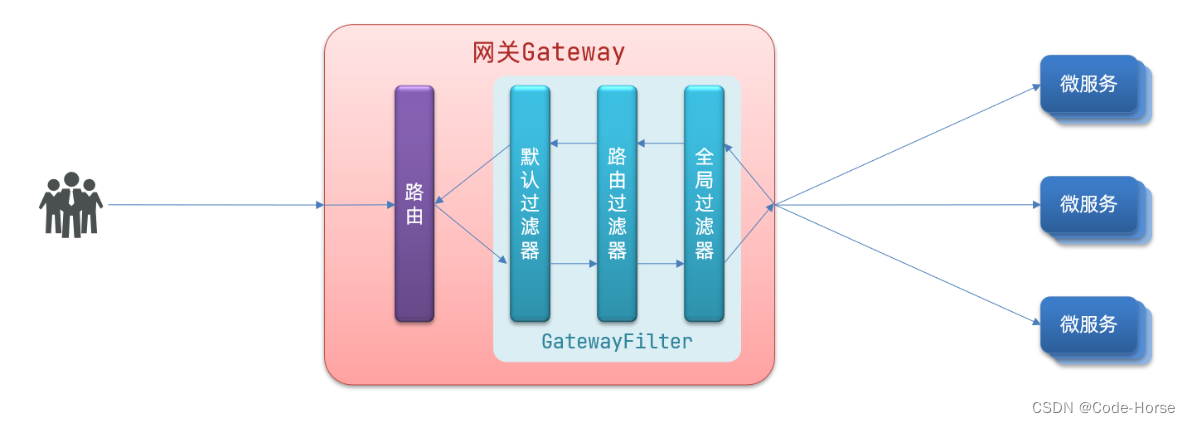
GatewayFilter Factories 过滤器工厂:GatewayFilter Factories文档
application.yml 中filters属性
spring:
  cloud:
    gateway:
      routes: # 网关路由配置
        - id: user-service # 路由id,自定义,只要唯一即可
          uri: lb://userservice # 路由的目标地址 lb就是负载均衡,后面跟服务名称
          predicates: # 路由断言,也就是判断请求是否符合路由规则的条件
            - Path=/user/** # 这个是按照路径匹配,只要以/user/开头就符合要求
          filters: # 过滤器给请求头添加信息
            - AddRequestHeader=info, header add new info # 格式:key, value  => ['info']="header add new info"
       - id: order-service
          uri: lb://orderservice
          predicates:
            - Path=/order/**
          filters:
            - AddRequestHeader=info, header add new info  # ['info']="header add new info"
      default-filters: # 默认过滤项
        - AddRequestHeader=DefaultInfo, all service add new info # ['DefaultInfo']="all service add new info."
全局过滤器:由于配置无法处理业务,可以使用代码实现过滤器
新建AuthorizeFilter.java实现GlobalFilter 接口重写 filter方法
@Order(-1)  // 过滤器执行链的顺序
@Component
public class AuthorizeFilter implements GlobalFilter {
    @Override
    public Mono<Void> filter(ServerWebExchange exchange, GatewayFilterChain chain) {
        // 获取请求参数
        MultiValueMap<String, String> params = exchange.getRequest().getQueryParams();
        // 获取authorization参数
        String auth = params.getFirst("authorization");
        // 校验
        if ("admin".equals(auth)) {
            // 放行
            return chain.filter(exchange);
        }
        // 设置状态码
        exchange.getResponse().setStatusCode(HttpStatus.FORBIDDEN);
        // 结束处理, 没有通过直接返回
        return exchange.getResponse().setComplete();
    }
}
执行顺序大致为:client → 路由 → 默认过滤器 → 局部(路由)过滤器 → 全局过滤器
解决跨域问题
跨域问题:浏览器禁止请求的发起者与服务端发生跨域ajax请求,请求被浏览器拦截的问题。
跨域问题并不是提供者和消费者的问题,而是浏览器禁止跨域导致的。
application.yml
spring:
  cloud:
    gateway:
      # ...
      globalcors: # 全局的跨域处理
        add-to-simple-url-handler-mapping: true  # 解决options请求被拦截问题
        corsConfigurations:
          '[/**]':
            allowedOrigins: # 允许哪些网站的跨域请求
              - "http://localhost:5500"
              - "http://127.0.0.1:5500"
            allowedMethods: # 允许的跨域ajax的请求方式
              - "GET"
              - "POST"
              - "DELETE"
              - "PUT"
              - "OPTIONS"
            allowedHeaders: "*" # 允许在请求中携带的头信息
            allowCredentials: true # 是否允许携带cookie
            maxAge: 360000 # 这次跨域检测的有效期,避免每次检查损耗效率
更多用法可以参考:Spring Cloud Gateway Docs


 2980
2980


 被折叠的 条评论
为什么被折叠?
被折叠的 条评论
为什么被折叠?
 到【灌水乐园】发言


