


我们之前介绍了使用XML配置复杂结果映射,上一篇中我们介绍了在Mybatis映射器中使用@Results定义结果映射,将查询出的数据库表中的每条数据映射成对象;本篇我们在映射器中使用@Results定义复杂结果映射,解决一对一关系中复杂的数据映射问题。
如果您对XML配置复杂结果映射、@Results注解不太了解,建议您先进行了解后再阅读本篇,可以参考:
Mybatis 复杂结果映射(ResultMap) - 一对一关系映射![]() https://blog.csdn.net/m1729339749/article/details/132548654Mybatis 映射器中使用普通结果映射(@Results)
https://blog.csdn.net/m1729339749/article/details/132548654Mybatis 映射器中使用普通结果映射(@Results)![]() https://blog.csdn.net/m1729339749/article/details/132865075
https://blog.csdn.net/m1729339749/article/details/132865075
一、数据准备
这里我们直接使用脚本初始化数据库中的数据
-- 如果数据库不存在则创建数据库
CREATE DATABASE IF NOT EXISTS demo DEFAULT CHARSET utf8;
-- 切换数据库
USE demo;
-- 创建班级表
CREATE TABLE IF NOT EXISTS T_CLASS(
  ID INT PRIMARY KEY,
  CLASS_NAME VARCHAR(32) NOT NULL
);
-- 创建学生表
CREATE TABLE IF NOT EXISTS T_STUDENT(
  ID INT PRIMARY KEY,
  USERNAME VARCHAR(32) NOT NULL,
  AGE INT NOT NULL,
  CLASS_ID INT NOT NULL
);
-- 插入班级数据
INSERT INTO T_CLASS(ID, CLASS_NAME)
VALUES(1, '班级1'),(2, '班级2');
-- 插入学生数据
INSERT INTO T_STUDENT(ID, USERNAME, AGE, CLASS_ID)
VALUES(1, '张三', 20, 1),(2, '李四', 22, 2),(3, '王五', 24, 1),(4, '赵六', 26, 2),(5, '田七', 21, 2);
创建了一个名称为demo的数据库;并在库里创建了名称为T_CLASS的班级表和名称为T_STUDENT的学生表,并向表中插入了数据
二、创建实体类
在cn.horse.demo下创建ClassInfo、StudentInfo类
ClassInfo类:
package cn.horse.demo;

public class ClassInfo {

    private String id;
    private String name;

    @Override
    public String toString() {
        StringBuilder result = new StringBuilder();
        result.append('{');
        result.append("id: " + this.id);
        result.append(", ");
        result.append("name: " + this.name);
        result.append('}');
        return result.toString();
    }
}
StudentInfo类:
package cn.horse.demo;

public class StudentInfo {
    private int id;
    private String name;
    private int age;
    private ClassInfo classInfo;

    @Override
    public String toString() {
        StringBuilder result = new StringBuilder();
        result.append('{');
        result.append("id: " + this.id);
        result.append(", ");
        result.append("name: " + this.name);
        result.append(", ");
        result.append("age: " + this.age);
        result.append(", ");
        result.append("classInfo: " + this.classInfo.toString());
        result.append('}');
        return result.toString();
    }
}
三、创建映射器
在cn.horse.demo下创建ClassInfoMapper、StudentInfoMapper接口
ClassInfoMapper接口:
package cn.horse.demo;

import org.apache.ibatis.annotations.Result;
import org.apache.ibatis.annotations.Results;
import org.apache.ibatis.annotations.Select;

public interface ClassInfoMapper {

    @Results(id = "classInfoMap", value = {
            @Result(column = "ID", property = "id"),
            @Result(column = "CLASS_NAME", property = "name")
    })
    @Select({"SELECT ID, CLASS_NAME FROM T_CLASS WHERE ID = #{id}"})
    ClassInfo findById(Integer id);
}
StudentInfoMapper类:
package cn.horse.demo;

import org.apache.ibatis.annotations.One;
import org.apache.ibatis.annotations.Result;
import org.apache.ibatis.annotations.Results;
import org.apache.ibatis.annotations.Select;

import java.util.List;

public interface StudentInfoMapper {

    @Results(id = "studentInfoMap", value = {
            @Result(column = "ID", property = "id"),
            @Result(column = "USERNAME", property = "name"),
            @Result(column = "AGE", property = "age"),
            @Result(one = @One(select = "cn.horse.demo.ClassInfoMapper.findById"),
                column = "CLASS_ID", property = "classInfo")
    })
    @Select({"SELECT ID, USERNAME, AGE, CLASS_ID FROM T_STUDENT"})
    List<StudentInfo> findAll();
}
@One:类似于association标签,用于解决一对一的关联关系的数据映射问题;通过使用select指定查询方法执行的结果作为映射的数据,查询方法传递的参数使用column属性指定(此属性值来源于数据库表查询字段,示例中我们使用了数据库查询结果中的CLASS_ID字段作为参数进行查询学生的班级数据)。
四、引入配置文件
在resources下新建mybatis-config.xml配置文件,并引入StudentInfoMapper、ClassInfoMapper映射器。
<?xml version="1.0" encoding="UTF-8" ?>
<!DOCTYPE configuration
PUBLIC "-//mybatis.org//DTD Config 3.0//EN"
"http://mybatis.org/dtd/mybatis-3-config.dtd">
<configuration>
<settings>
<setting name="logImpl" value="JDK_LOGGING"/>
</settings>
<environments default="development">
<environment id="development">
<transactionManager type="JDBC"/>
<dataSource type="POOLED">
<property name="driver" value="org.gjt.mm.mysql.Driver"/>
<property name="url" value="jdbc:mysql://localhost:3306/demo?useUnicode=true&useSSL=false&characterEncoding=utf8"/>
<property name="username" value="root"/>
<property name="password" value="horse"/>
</dataSource>
</environment>
</environments>
<mappers>
<mapper class="cn.horse.demo.StudentInfoMapper" />
<mapper class="cn.horse.demo.ClassInfoMapper" />
</mappers>
</configuration>
这里我们使用mapper引入映射器,这里分别引入了StudentInfoMapper映射器和ClassInfoMapper映射器。
五、启动程序
1、会话工具类
在cn.horse.demo包下新建SqlSessionUtils工具类
package cn.horse.demo;

import org.apache.ibatis.session.SqlSession;
import org.apache.ibatis.session.SqlSessionFactory;
import org.apache.ibatis.session.SqlSessionFactoryBuilder;

import java.io.InputStream;
import java.util.Objects;

public class SqlSessionUtils {

    private static final SqlSessionFactory sqlSessionFactory;
    static {
        // 读取mybatis配置文件
        InputStream inputStream = ClassLoader.getSystemClassLoader().getResourceAsStream("mybatis-config.xml");
        // 根据配置创建SqlSession工厂
        sqlSessionFactory = new SqlSessionFactoryBuilder()
                .build(inputStream);
    }

    /**
     * 开启会话
     * @return
     */
    public static SqlSession openSession() {
        return sqlSessionFactory.openSession();
    }

    /**
     * 关闭会话
     * @param sqlSession
     */
    public static void closeSession(SqlSession sqlSession) {
        if(Objects.nonNull(sqlSession)) {
            sqlSession.close();
        }
    }
}
2、JDK 日志系统配置
在resources的目录下新建logging.properties配置文件
handlers=java.util.logging.ConsoleHandler
.level=INFO

cn.horse.demo.ClassInfoMapper.level=FINER
cn.horse.demo.StudentInfoMapper.level=FINER
java.util.logging.ConsoleHandler.level=ALL
java.util.logging.ConsoleHandler.formatter=java.util.logging.SimpleFormatter
java.util.logging.SimpleFormatter.format=%1$tY-%1$tm-%1$td %1$tT.%1$tL %4$s %3$s - %5$s%6$s%n
在cn.horse.demo下创建JdkLogConfig类
JdkLogConfig类:
package cn.horse.demo;

import java.io.IOException;
import java.io.InputStream;
import java.util.logging.LogManager;

public class JdkLogConfig {

    public JdkLogConfig() {
        try {
            InputStream inputStream = ClassLoader.getSystemClassLoader().getResourceAsStream("logging.properties");
            LogManager.getLogManager().readConfiguration(inputStream);
        } catch (IOException e) {
            throw new RuntimeException(e);
        }
    }
}
3、启动程序
package cn.horse.demo;

import org.apache.ibatis.session.SqlSession;

import java.util.List;
import java.util.function.Consumer;

public class Main {
    public static void main(String[] args) {
        // 引入JDK日志配置
        System.setProperty("java.util.logging.config.class", "cn.horse.demo.JdkLogConfig");

        // 查询
        execute((StudentInfoMapper studentInfoMapper) -> {
            List<StudentInfo> studentInfoList = studentInfoMapper.findAll();
            for (StudentInfo studentInfo: studentInfoList) {
                System.out.println(studentInfo);
            }
        });
    }

    private static void execute(Consumer<StudentInfoMapper> function) {
        SqlSession sqlSession = null;
        try {
            sqlSession = SqlSessionUtils.openSession();
            function.accept(sqlSession.getMapper(StudentInfoMapper.class));
            sqlSession.commit();
        } finally {
            SqlSessionUtils.closeSession(sqlSession);
        }
    }
}
execute方法用于执行操作,方法中使用sqlSession.getMapper方法获取映射器对象,然后将映射器对象具体的执行操作委托给了Consumer对象。
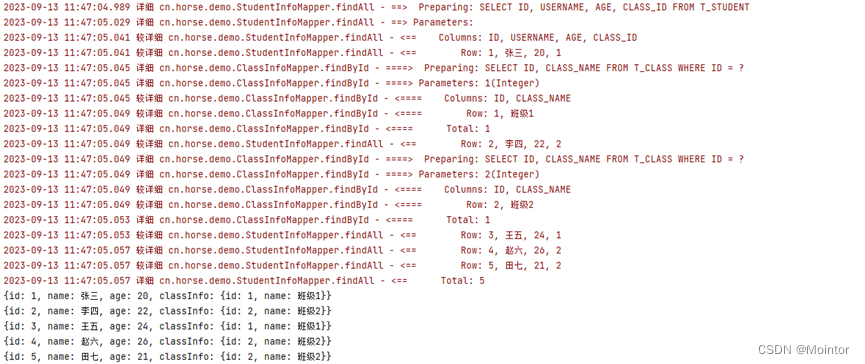
执行的结果如下:


 2万+
2万+


 被折叠的 条评论
为什么被折叠?
被折叠的 条评论
为什么被折叠?
 到【灌水乐园】发言


