


目录
1 基础概念
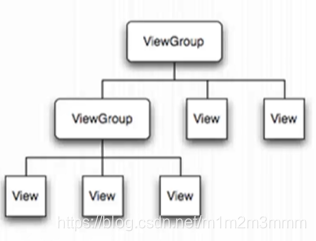
大格子套小格子,小格子套小小格子;
Activity
- Activity代表显示给用户的窗口或屏幕,使用一个View和Viewgroup的树状节点
- 要显示一个用户界面就需要给Activity分配一个view或者布局,setContentView
- Activity是窗口的实现逻辑,View是窗口实现的效果;Activity调用时,就会调用响应的xml文件,显示窗体
- 使用XML定义可使得表现层和控制层的分离,也可以通过所见即所得的方式搭建界面
View/Viewgroup
- View表示视图,即屏幕当中的一块矩形区域,用来提供组件绘制和事件处理,所有的View类都是基于widgets组件的基类,位于android.view包中;View的子类一般位于android.widget包中
- ViewGroup用来盛放View,抽象类
- LayoutParams类:layout_height, layout_width; 对应MATCH_PARENT(匹配父窗体)和WARP_CONTENT(包括内容)
- MarginLayoutParams类: 调整布局的内外边距
- 线性布局(LinearLayout)、框架布局(FrameLayout)、相对布局(RelativeLayout)、表格布局(TableLayout)和绝对布局(AbsoluteLayout)
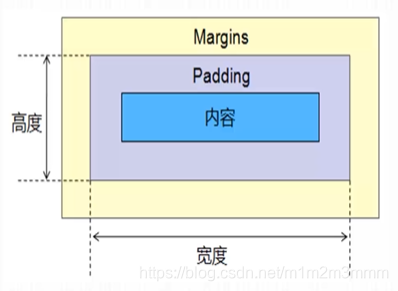
内外边距
- Padding:在View的顶部、底部、左侧和右侧的填充像素,也称为内边距。它设置的是内容与View边缘的距离。Padding将占据View的宽度和高度。设置指定的内边距后,视图内容将偏离View边缘指定的距离。
- Margins:组件的顶部、底部、左侧和右侧的空白区域,称为外边距。它设置的是组件与其父容器的距离。Margins不占据组件的宽度和高度。为组件设置外边距后,该组件将远离父容器指定的距离,如果还有相邻组件,那么也将远离其相邻组件指定距离。
界面设计应解决的问题
- 需要界面设计与程序逻辑完全分离,利于并行开发,在后期修改界面时,不用修改逻辑代码;[XML定义用户界面,Java定义逻辑,单独存放资源文件(低/中/高/超高)]
- 根据不同型号手机的屏幕解析度、尺寸和纵横比各不相同,自动调整界面上部分控件的位置和尺寸,避免因为屏幕信息的变化而出现显示错误;[界面描述方式灵活]
- 能够合理利用较小的屏幕显示空间,构造出符合人机交互规律的用户界面,避免出现;凌乱、拥挤的用户界面
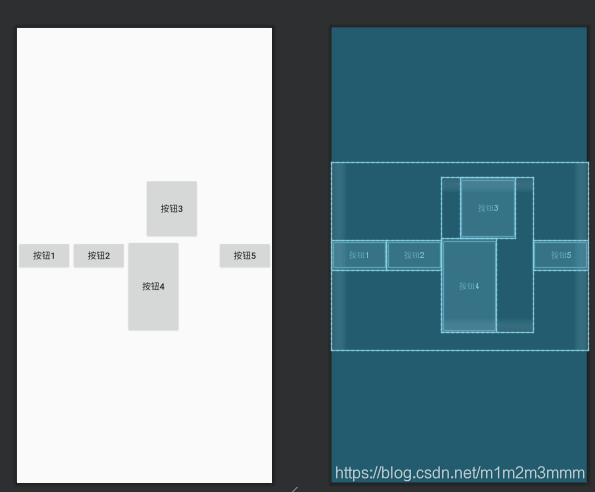
2 线型布局
支持嵌套线性布局
| 属性 | 描述 |
| layout_height | 布局的高度(warp_content/match_parent/**.dp) |
| layout_width | 布局的宽度(warp_content/match_parent/**.dp) |
| orientation | 垂直(vertical)和水平(horizontal) |
| gravity | 布局内的元素在布局中的重心位置 (布局内部元素) |
| layout_gravity | 布局的重心位置;(布局整体的位置) center|top,指定多个用 | 隔开 |
| layout_weight | 元素在整个布局空间内部的相对取值 |
实例代码
<?xml version="1.0" encoding="utf-8"?>
<LinearLayout xmlns:android="http://schemas.android.com/apk/res/android"
    android:layout_width="match_parent"
    android:layout_height="300dp"
    android:orientation="horizontal"
    android:gravity="center"
    android:layout_gravity="center|left">
    <Button
        android:layout_width="wrap_content"
        android:layout_height="wrap_content"
        android:text="按钮1"
        />
    <Button
        android:layout_width="wrap_content"
        android:layout_height="wrap_content"
        android:text="按钮2"
        />
    <LinearLayout
        android:layout_width="wrap_content"
        android:layout_height="250dp"
        android:layout_weight="1"
        android:orientation="vertical"
        >
        <Button
            android:layout_width="wrap_content"
            android:layout_height="wrap_content"
            android:text="按钮3"
            android:layout_weight="1"
            android:layout_gravity="center"
            />
        <Button
            android:layout_width="wrap_content"
            android:layout_height="wrap_content"
            android:text="按钮4"
            android:layout_weight="2"
            />

    </LinearLayout>

    <Button
        android:layout_width="wrap_content"
        android:layout_height="wrap_content"
        android:text="按钮5"
        />
</LinearLayout>
案例界面
3 FrameLayout
Android中的单位总结
- px(像素):屏幕上的点,pixels(像素)不同设备显示效果相同
- in(英寸):长度单位
- mm(毫米):长度单位
- pt(磅):1/72英寸
- dp(与密度无关的像素):一种基于屏幕密度的抽象单位。在每英寸160点的显示器上,1dp = 1px
- dip:与dp相同, device independent pixels(设备独立像素).不同设备有不同的显示效果,多用于Google示例中。
- sp(与刻度无关的像素):与dp类似,但是可以根据用户的字体大小首选项进行缩放.scaled pixels(放大像素).主要用于字体显示best for textsize。
- 尽量使用dp作为空间大小单位,sp作为和文字相关大小单位
后一个控件将覆盖前面的一个控件
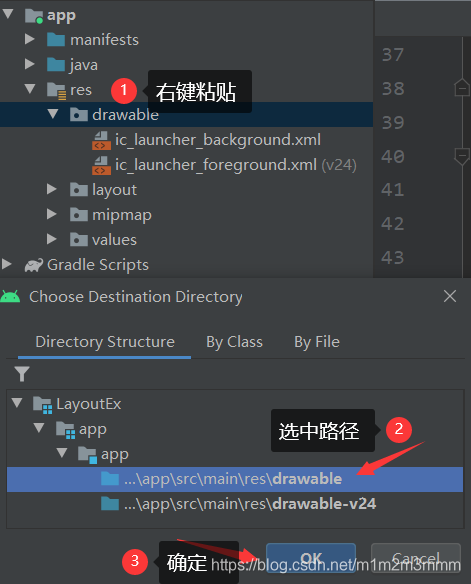
将图片粘贴到程序资源文件中的方法:首先复制文件,然后再res目录下,粘贴到drawable目录下
实例代码:
<FrameLayout android:layout_width="100dp"
        android:layout_height="200dp"
        >
        <TextView
            android:layout_height="wrap_content"
            android:layout_width="wrap_content"
            android:textColor="#5C4444"
            android:text="文本视图控件"
            android:layout_gravity="center"/>

        <ImageView
            android:layout_width="match_parent"
            android:layout_height="wrap_content"
            android:gravity="top"
            android:src="@drawable/hill" />

    </FrameLayout>
4 相对布局
相对于父容器
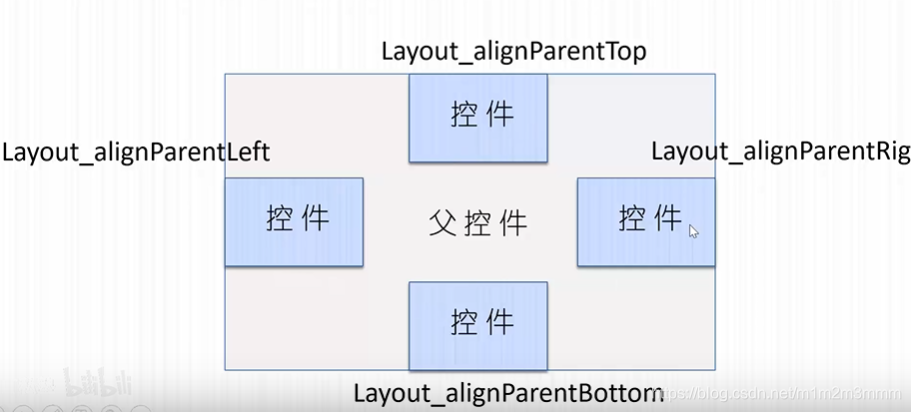
相对于子容器

已知控件控制未知控件的位置

小结:与父容器相关的布局都带Partent,与子容器相关的布局都带margin;其余与已知控件相对关系;描述一个相对布局,需要同时考虑上述三种布局方式。
<?xml version="1.0" encoding="utf-8"?>
<RelativeLayout android:layout_height="wrap_content"
    android:layout_width="wrap_content"
    xmlns:android="http://schemas.android.com/apk/res/android">

    <TextView
        android:id="@+id/txtView1"
        android:layout_width="match_parent"
        android:layout_height="40sp"
        android:text="欢迎光临"
        android:textSize="30sp"
        />

    <EditText
        android:id="@+id/editTxt1"
        android:layout_width="match_parent"
        android:layout_height="40sp"
        android:layout_marginTop="5dp"
        android:layout_below="@id/txtView1"
        />
    <Button
        android:id="@+id/btnOk"
        android:layout_width="wrap_content"
        android:layout_height="wrap_content"
        android:layout_below="@id/editTxt1"
        android:layout_alignParentRight="true"
        android:text="OK"
        />
    <Button
        android:layout_width="wrap_content"
        android:layout_height="wrap_content"
        android:layout_below="@id/editTxt1"
        android:layout_toLeftOf="@id/btnOk"
        android:layout_marginRight="10sp"
        android:text="CANCEL"
        />

</RelativeLayout>
5 表格布局
重要属性
| 属性 | 描述 |
| android:shrinkColumns="2,3,4" | 指定压缩的列 |
| android:stretchColumns="5" | 指定拉伸的列 |
| android:collapseColumns="1" | 指定隐藏的列 |
可以使用控件进行占位
<?xml version="1.0" encoding="utf-8"?>
<TableLayout
    android:layout_height="wrap_content"
    android:layout_width="wrap_content"
    android:shrinkColumns="1,2,3,4,5,6"
    xmlns:android="http://schemas.android.com/apk/res/android">
    <!--
        在上面的尖括号内不能写注释
        android:shrinkColumns="2,3,4"
        android:stretchColumns="5"
        android:collapseColumns="1"
        -->

    <TableRow>
        <TextView android:layout_width="wrap_content"
            android:layout_height="wrap_content"
            />
        <Button android:layout_height="wrap_content"
            android:layout_width="wrap_content"
            android:text="按钮R1"
            />
    </TableRow>
    <TableRow>
        <TextView android:layout_width="wrap_content"
            android:layout_height="wrap_content"
            />
        <Button android:layout_height="wrap_content"
            android:layout_width="wrap_content"
            android:text="按钮R2"
            />
        <Button android:layout_height="wrap_content"
            android:layout_width="wrap_content"
            android:text="按钮R22"
            />
        <Button android:layout_height="wrap_content"
            android:layout_width="wrap_content"
            android:text="按钮R23"
            />
        <Button android:layout_height="wrap_content"
            android:layout_width="wrap_content"
            android:text="按钮R24"
            />
        <Button android:layout_height="wrap_content"
            android:layout_width="wrap_content"
            android:text="按钮R25"
            />
        <Button android:layout_height="wrap_content"
            android:layout_width="wrap_content"
            android:text="按钮R26"
            />
    </TableRow>

    <TableRow>
        <Button android:layout_width="wrap_content"
            android:layout_height="wrap_content"
            android:text="按钮3"
            />
    </TableRow>
</TableLayout>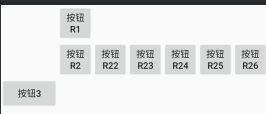
6 网格布局
使用无限细的格子,将界面划分成若干细的格子;通过指定控件的格子位置,进行布局
使用网格布局创建计算器界面
<GridLayout android:layout_height="wrap_content"
            android:layout_width="wrap_content"
            android:rowCount="6"
            android:columnCount="5"

            >
        <TextView android:layout_width="wrap_content"
            android:layout_height="wrap_content"
            android:text="0"
            android:layout_columnSpan="5"
            />
        <Button android:layout_height="wrap_content"
            android:layout_width="wrap_content"
            android:layout_columnSpan="5"
            android:text="清除"
            />
        <Button android:textSize="25sp" android:text="0" /><Button android:textSize="25sp" android:text="1"/>
            <Button android:textSize="25sp"
                android:text="2"/>
            <Button android:textSize="25sp"
                android:text="3"/>
            <Button android:textSize="25sp"
                android:text="+"/>
            <Button android:textSize="25sp"
                android:text="4"/>
            <Button android:textSize="25sp"
            android:text="5"/>
            <Button android:textSize="25sp"
            android:text="6"/>
            <Button android:textSize="25sp"
            android:text="7"/>
            <Button android:textSize="25sp"
            android:text="-"/>
            <Button android:textSize="25sp"
            android:text="8"/>
            <Button android:textSize="25sp"
            android:text="9"/>
            <Button android:textSize="25sp"
            android:text="*"/>
            <Button android:textSize="25sp"
            android:text="/"/>
            <Button android:textSize="25sp"
            android:text="="/>
        </GridLayout>
7 引入外部布局
引入外部布局时,外部布局一定要按内容适配(wrap_content)
创建外部布局文件:右键 --》 新建 --》 XML --》Layout xml File
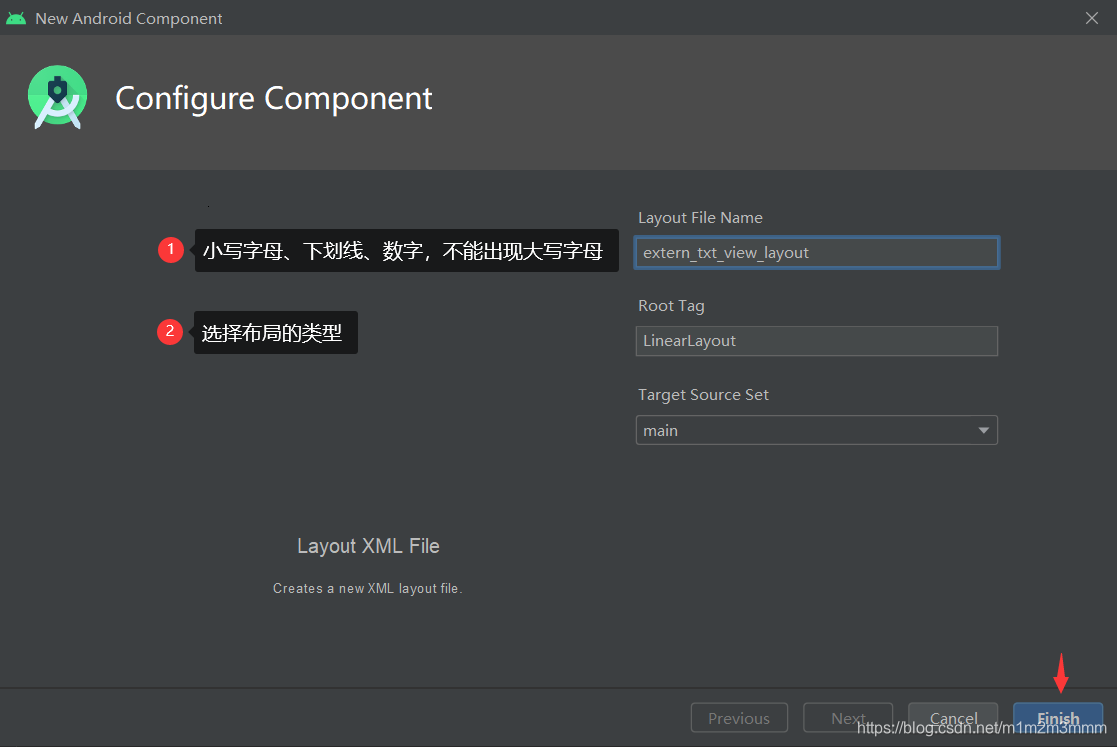
然后使用<include>指令把他引入到需要布局的位置
<include layout="@layout/extern_txt_view_layout"> </include>


 792
792


 被折叠的 条评论
为什么被折叠?
被折叠的 条评论
为什么被折叠?
 到【灌水乐园】发言


