


目录
5.1 ngx_http_rewrite_module 模块指令
5.2.3 rewrite 案例: break 与 last
6.1.1.3 实战案例: 指定 location 实现反向代理
6.3.2 FastCGI实战案例 : Nginx与php-fpm在同一服务器
2.1 Nginx 概述
2.1.1 Nginx 介绍
Nginx:engine X ,2002年开发,分为社区版和商业版(nginx plus )
2019年3月11日 F5 Networks 6.7亿美元的价格收购
Nginx是免费的、开源的、高性能的HTTP和反向代理服务器、邮件代理服务器、以及TCP/UDP代理服务器
解决C10K问题(10K Connections)
Nginx官网:http://nginx.org
nginx的其它的二次发行版:
·Tengine:由淘宝网发起的Web服务器项目。它在Nginx的基础上,针对大访问量网站的需求,添加了很多高级功能和特性。Tengine的性能和稳定性已经在大型的网站如淘宝网,天猫商城等得到了很好的检验。它的最终目标是打造一个高效、稳定、安全、易用的Web平台。从2011年12月开始,Tengine成为一个开源项目官网: http://tengine.taobao.org/
·OpenResty:基于 Nginx 与 Lua 语言的高性能 Web 平台, 章亦春团队开发,官网:http://openresty.org/cn/
2.1.2 Nginx 功能介绍
·静态的web资源服务器html,图片,js,css,txt等静态资源
·http/https协议的反向代理
·结合FastCGI/uWSGI/SCGI等协议反向代理动态资源请求
·tcp/udp协议的请求转发(反向代理)
·imap4/pop3协议的反向代理
2.1.3 基础特性
·模块化设计,较好的扩展性
·高可靠性
·支持热部署:不停机更新配置文件,升级版本,更换日志文件
·低内存消耗:10000个keep-alive连接模式下的非活动连接,仅需2.5M内存
·event-driven,aio,mmap,sendfile
2.1.4 Web 服务相关的功能
·虚拟主机(server)
·支持 keep-alive 和管道连接(利用一个连接做多次请求)
·访问日志(支持基于日志缓冲提高其性能)
·url rewirte
·路径别名
·基于IP及用户的访问控制
·支持速率限制及并发数限制
·重新配置和在线升级而无须中断客户的工作进程
2.2 Nginx 架构和进程
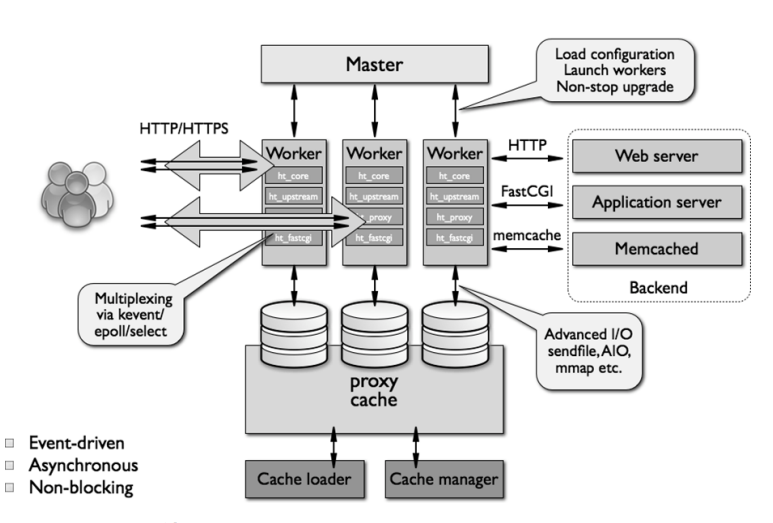
2.2.1 Nginx 进程结构
web请求处理机制
·多进程方式:服务器每接收到一个客户端请求就有服务器的主进程生成一个子进程响应客户端,直到用户关闭连接,这样的优势是处理速度快,子进程之间相互独立,但是如果访问过大会导致服务器资源耗尽而无法提供请求
·多线程方式:与多进程方式类似,但是每收到一个客户端请求会有服务进程派生出一个线程和此客户端进行交互,一个线程的开销远远小于一个进程,因此多线程方式在很大程度减轻了web服务器对系统资源的要求,但是多线程也有自己的缺点,即当多个线程位于同一个进程内工作的时候,可以相互访问同样的内存地址空间,所以他们相互影响,一旦主进程挂掉则所有子线程都不能工作了,IIS服务器使用了多线程的方式,需要间隔一段时间就重启一次才能稳定。
Nginx是多进程组织模型,而且是一个由Master主进程和Worker工作进程组成。
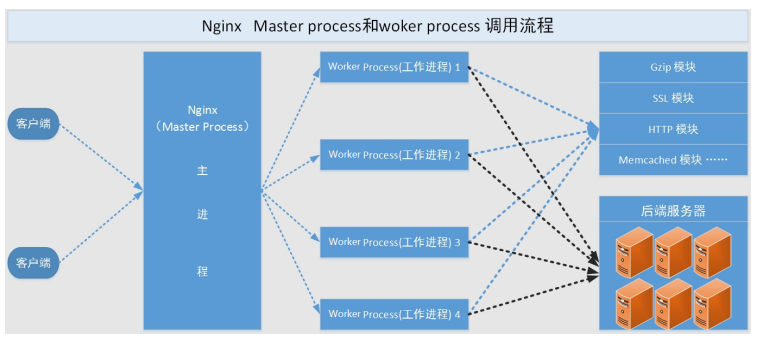
主进程(master process)的功能:(老板)
·对外接口:接收外部的操作(信号)
·对内转发:根据外部的操作的不同,通过信号管理 Worker
·监控:监控 worker 进程的运行状态,worker 进程异常终止后,自动重启 worker 进程
·读取Nginx 配置文件并验证其有效性和正确性
·建立、绑定和关闭socket连接
·按照配置生成、管理和结束工作进程
·接受外界指令,比如重启、升级及退出服务器等指令
·不中断服务,实现平滑升级,重启服务并应用新的配置
·开启日志文件,获取文件描述符
·不中断服务,实现平滑升级,升级失败进行回滚处理
·编译和处理perl脚本
工作进程(worker process)的功能: (员工)
·所有 Worker 进程都是平等的
·实际处理:网络请求,由 Worker 进程处理
·Worker进程数量:一般设置为核心数,充分利用CPU资源,同时避免进程数量过多,导致进程竞争CPU资源,
·增加上下文切换的损耗
·接受处理客户的请求
·将请求依次送入各个功能模块进行处理
·I/O调用,获取响应数据
·与后端服务器通信,接收后端服务器的处理结果
·缓存数据,访问缓存索引,查询和调用缓存数据
·发送请求结果,响应客户的请求
·接收主程序指令,比如重启、升级和退出等
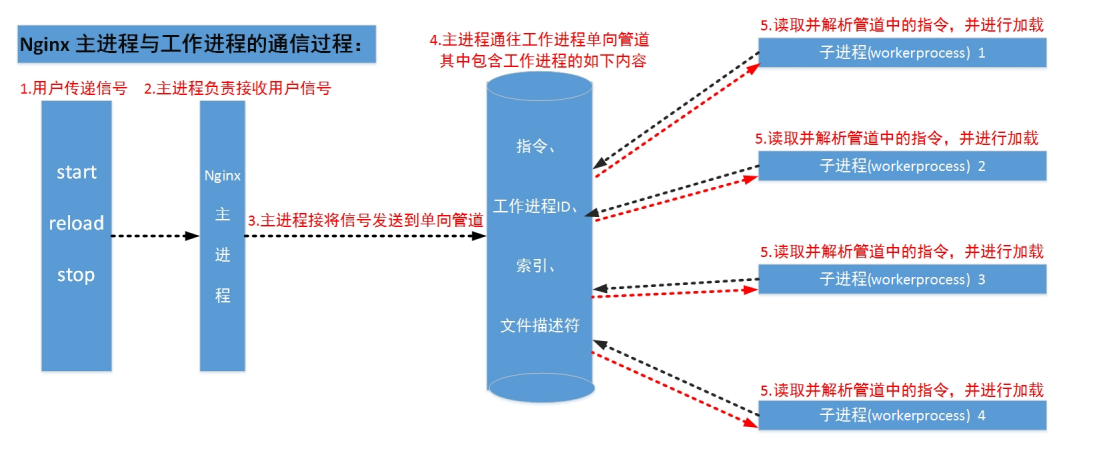
2.2.2 Nginx 进程间通信
工作进程是由主进程生成的,主进程使用fork()函数,在Nginx服务器启动过程中主进程根据配置文件决定启动工作进程的数量,然后建立一张全局的工作表用于存放当前未退出的所有的工作进程,主进程生成工作进程后会将新生成的工作进程加入到工作进程表中,并建立一个单向的管道并将其传递给工作进程,该管道与普通的管道不同,它是由主进程指向工作进程的单向通道,包含了主进程向工作进程发出的指令、工作进程ID、工作进程在工作进程表中的索引和必要的文件描述符等信息。
主进程与外界通过信号机制进行通信,当接收到需要处理的信号时,它通过管道向相关的工作进程发送正确的指令,每个工作进程都有能力捕获管道中的可读事件,当管道中有可读事件的时候,工作进程就会从管道中读取并解析指令,然后采取相应的执行动作,这样就完成了主进程与工作进程的交互。
worker进程之间的通信原理基本上和主进程与worker进程之间的通信是一样的,只要worker进程之间能够取得彼此的信息,建立管道即可通信,但是由于worker进程之间是完全隔离的,因此一个进程想要知道另外一个进程的状态信息,就只能通过主进程来实现。
为了实现worker进程之间的交互,master进程在生成worker进程之后,在worker进程表中进行遍历,将该新进程的PID以及针对该进程建立的管道句柄传递给worker进程中的其他进程,为worker进程之间的通信做准备,当worker进程1向worker进程2发送指令的时候,首先在master进程给它的其他worker进程工作信息中找到2的进程PID,然后将正确的指令写入指向进程2的管道,worker进程2捕获到管道中的事件后,解析指令并进行相关操作,这样就完成了worker进程之间的通信。
另worker进程可以通过共享内存来通讯的,比如upstream中的zone,或者limit_req、limit_conn中的zone等。操作系统提供了共享内存机制
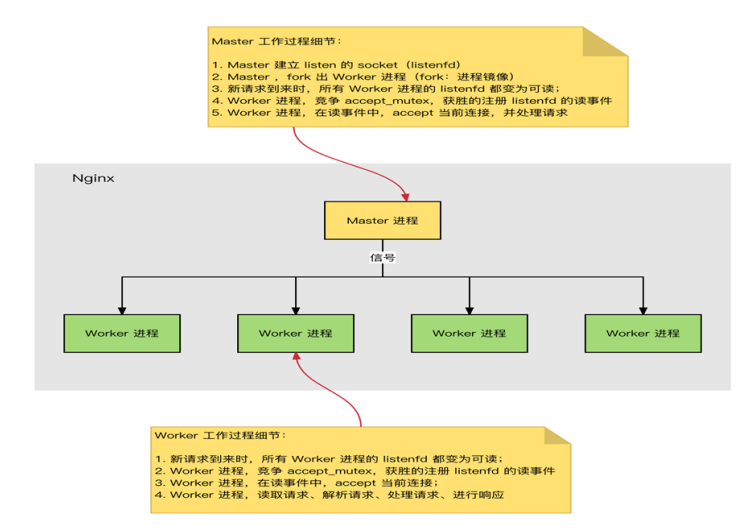
2.2.3 Nginx 启动和 HTTP 连接建立

·Nginx 启动时,Master 进程,加载配置文件
·Master 进程,初始化监听的 socket
·Master 进程,fork 出多个 Worker 进程
·Worker 进程,竞争新的连接,获胜方通过三次握手,建立 Socket 连接,并处理请求
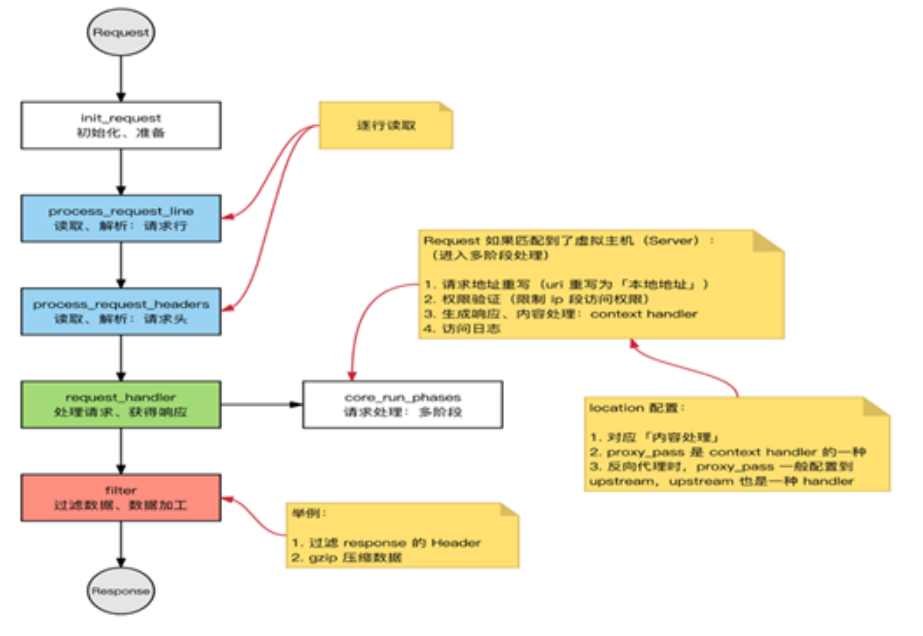
2.2.4 HTTP 处理过程
2.3 Nginx 模块介绍
nginx 有多种模块
·核心模块:是 Nginx 服务器正常运行必不可少的模块,提供错误日志记录 、配置文件解析 、事件驱动机制 、进程管理等核心功能
·标准HTTP模块:提供 HTTP 协议解析相关的功能,比如: 端口配置 、 网页编码设置 、 HTTP响应头设置 等等
·可选HTTP模块:主要用于扩展标准的 HTTP 功能,让 Nginx 能处理一些特殊的服务,比如: Flash
·多媒体传输 、解析 GeoIP 请求、 网络传输压缩 、 安全协议 SSL 支持等
·邮件服务模块:主要用于支持 Nginx 的 邮件服务 ,包括对 POP3 协议、 IMAP 协议和 SMTP协议的支持
·Stream服务模块: 实现反向代理功能,包括TCP协议代理
·第三方模块:是为了扩展 Nginx 服务器应用,完成开发者自定义功能,比如: Json 支持、 Lua 支持等
nginx高度模块化,但其模块早期不支持DSO机制;1.9.11 版本支持动态装载和卸载
模块分类:
核心模块:core module
标准模块:
HTTP 模块: ngx_http_*
HTTP Core modules      #默认功能
HTTP Optional modules  #需编译时指定
Mail 模块: ngx_mail_*
Stream 模块 ngx_stream_*
第三方模块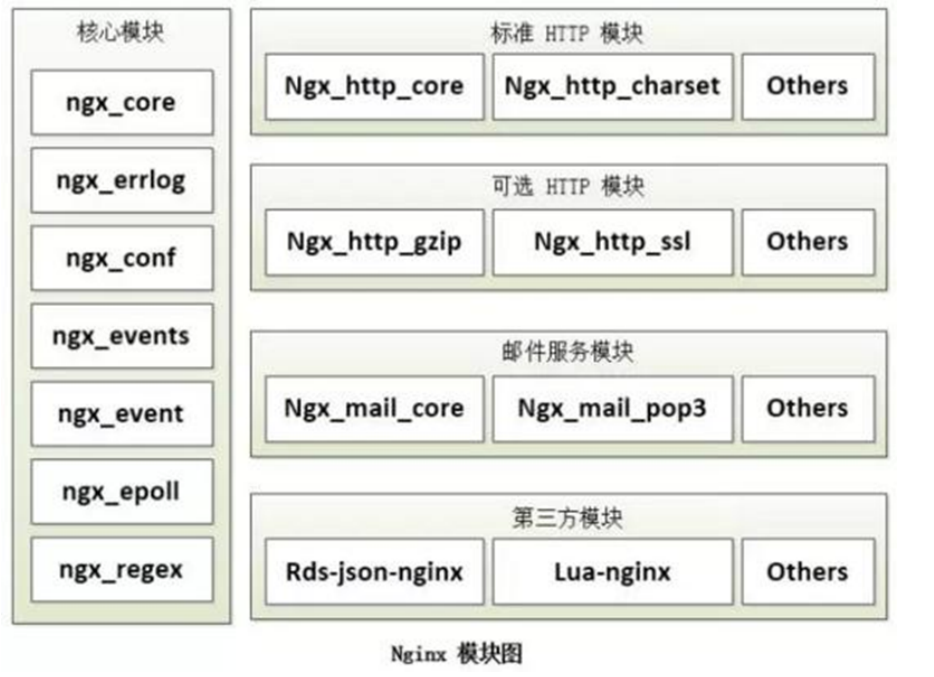
2.4 Nginx 安装
2.4.1 Nginx版本和安装方式
Nginx版本
·Mainline version 主要开发版本,一般为奇数版本号,比如1.19
·Stable version 当前最新稳定版,一般为偶数版本,如:1.20
·Legacy versions 旧的稳定版,一般为偶数版本,如:1.18
Nginx安装可以使用yum或源码安装,但是推荐使用源码编译安装
·yum的版本比较旧
·编译安装可以更方便自定义相关路径
·使用源码编译可以自定义相关功能,更方便业务的上的使用
2.4.2.Nginx 编译安装
编译器介绍
源码安装需要提前准备标准的编译器,GCC的全称是(GNU Compiler collection),其有GNU开发,并以GPL即LGPL许可,是自由的类UNIX即苹果电脑Mac OS X操作系统的标准编译器,因为GCC原本只能处理C语言,所以原名为GNU C语言编译器,后来得到快速发展,可以处理C++,Fortran,pascal,objective C,
java以及Ada等其他语言,此外还需要Automake工具,以完成自动创建Makefile的工作,Nginx的一些模块需要依赖第三方库,比如: pcre(支持rewrite),zlib(支持gzip模块)和openssl(支持ssl模块)等。
2.4.2.1 编译安装 Nginx
官方源码包下载地址:
编译安装示例:
[root@nginx-node1 ~]# dnf install gcc pcre-devel zlib-devel openssl-devel -y
[root@nginx-node1 ~]# useradd -s /sbin/nologin -M nginx
#解压
[root@nginx-node1 ~]# tar zxf nginx-1.24.0.tar.gz
[root@nginx-node1 ~]# cd nginx-1.24.0/
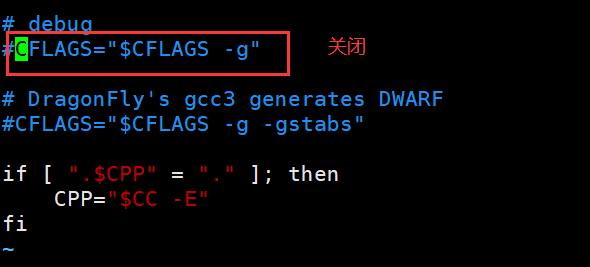
#关闭debug功能
[root@nginx-node1 nginx-1.24.0]# vim auto/cc/gcc
#CFLAGS="$CFLAGS -g"
[root@nginx-node1 nginx-1.24.0]# ./configure --prefix=/usr/local/nginx \
--user=nginx \ # 指定nginx运行用户
--group=nginx \ # 指定nginx运行组
--with-http_ssl_module \ # 支持https://
--with-http_v2_module \ # 支持http版本2
--with-http_realip_module \ # 支持ip透传
--with-http_stub_status_module \ # 支持状态页面
--with-http_gzip_static_module \ # 支持压缩
--with-pcre \ # 支持正则
--with-stream \ # 支持tcp反向代理
--with-stream_ssl_module \ # 支持tcp的ssl加密
--with-stream_realip_module # 支持tcp的透传ip
#如果要删除编译的文件,清除上次的make命令所产生的object文件(后缀为“.o”的文件)及可执行文件
[root@nginx-node1 nginx-1.24.0]# make clean
#完成之后有个Makefile文件
[root@nginx-node1 nginx-1.24.0]#ls
auto CHANGES.ru configure html Makefile objs src
CHANGES conf contrib LICENSE man README
#开始编译
#make install 会在安装后将objs文件拷贝到/usr/local/nginx中
[root@nginx-node1 nginx-1.24.0]# make && make install
[root@nginx-node1 nginx-1.24.0]# cd /usr/local/nginx/
[root@nginx-node1 nginx]# ls
conf html logs sbin
#启动nginx
[root@nginx-node1 nginx]# /usr/local/nginx/sbin/nginx
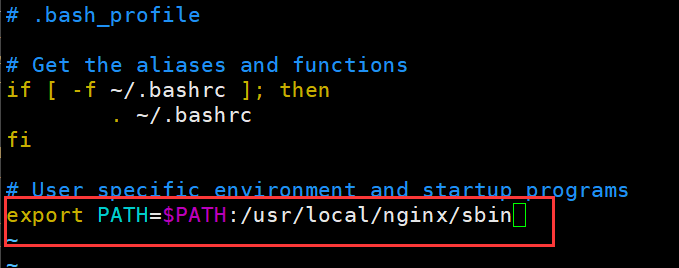
#把nginx软件的命令执行路径添加到环境变量中
[root@nginx-node1 nginx]# vim ~/.bash_profile
# User specific environment and startup programs
export PATH=$PATH:/usr/local/nginx/sbin
[root@nginx-node1 nginx]# source ~/.bash_profile
#查看版本
[root@nginx-node1 nginx]# nginx -V
nginx version: nginx/1.24.0
built by gcc 11.4.1 20231218 (Red Hat 11.4.1-3) (GCC)
built with OpenSSL 3.0.7 1 Nov 2022
TLS SNI support enabled
configure arguments: --prefix=/usr/local/nginx --user=nginx --group=nginx --with-http_ssl_module --with-http_v2_module --with-http_realip_module --with-http_stub_status_module --with-http_gzip_static_module --with-pcre --with-stream --with-stream_ssl_module --with-stream_realip_module

nginx完成安装以后,有四个主要的目录
[root@Nginx nginx-1.24.0]# ls /usr/local/nginx/
conf html logs sbin
conf:保存nginx所有的配置文件,其中nginx.conf是nginx服务器的最核心最主要的配置文件,其他的.conf则是用来配置nginx相关的功能的,例如fastcgi功能使用的是fastcgi.conf和fastcgi_params两个文件,配置文件一般都有一个样板配置文件,是以.default为后缀,使用时可将其复制并将default后缀去掉即可。
html目录中保存了nginx服务器的web文件,但是可以更改为其他目录保存web文件,另外还有一个50x的web文件是默认的错误页面提示页面。
logs:用来保存nginx服务器的访问日志错误日志等日志,logs目录可以放在其他路径,比如/var/logs/nginx里面。
sbin:保存nginx二进制启动脚本,可以接受不同的参数以实现不同的功能。
2.4.2.2 验证版本及编译参数
[root@Nginx ~]# vim ~/.bash_profile
export PATH=$PATH:/usr/local/nginx/sbin
[root@Nginx ~]# source ~/.bash_profile
[root@Nginx ~]# nginx -V
nginx version: nginx/1.24.0
built by gcc 11.4.1 20231218 (Red Hat 11.4.1-3) (GCC)
built with OpenSSL 3.0.7 1 Nov 2022
TLS SNI support enabled
configure arguments: --group=nginx --with-http_ssl_module --with-http_v2_module -
-with-http_realip_module --with-http_stub_status_module --withhttp_gzip_static_module --with-pcre --with-stream --with-stream_ssl_module --
with-stream_realip_module
2.4.2.3使用安装完成的二进制文件nginx
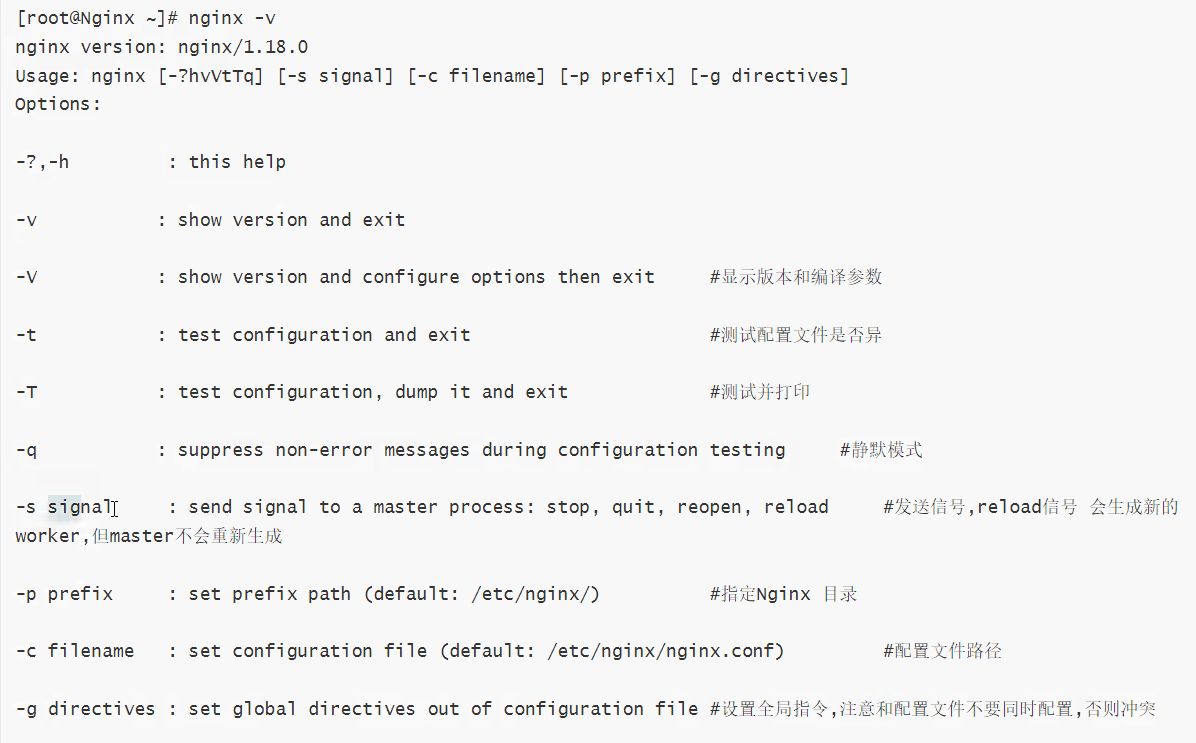
[root@nginx-node1 ~]# nginx -v
nginx version: nginx/1.24.0
Usage: nginx [-?hvVtTq] [-s signal] [-c filename] [-p prefix] [-g directives]
Options:
-?,-h : this help
-v : show version and exit
-V : show version and configure options then exit       #显示版本和编译参数
-t : test configuration and exit                        #测试配置文件是否异
-T : test configuration, dump it and exit               #测试并打印
-q : suppress non-error messages during configuration testing   #静默模式
-s signal : send signal to a master process: stop, quit, reopen, reload  #发送信号,reload信号 会生成新的worker,但master不会重新生成
-p prefix : set prefix path (default: /etc/nginx/) #指定Nginx 目录
-c filename : set configuration file (default: /etc/nginx/nginx.conf) #配置文件路径
-g directives : set global directives out of configuration file #设置全局指令,注意和配置文件不要同时配置,否则冲突
nginx命令应用示例:
[root@nginx-node1 ~]# vim /usr/local/nginx/conf/nginx.conf
nginx: [emerg] "worker_processes" directive is duplicate in /usr/local/nginx/conf/nginx.conf:3
root@Nginx ~]# nginx -g "worker_processes 6;"
[root@nginx-node1 ~]# ps aux | grep nginx
root 48148 0.0 0.1 9868 2052 ? Ss 14:00 0:00 nginx: master
process nginx -g worker_processes 6;
nobody 48149 0.0 0.2 14200 4868 ? S 14:00 0:00 nginx: worker
process
nobody 48150 0.0 0.2 14200 4868 ? S 14:00 0:00 nginx: worker
process
nobody 48151 0.0 0.2 14200 4868 ? S 14:00 0:00 nginx: worker
process
[root@nginx-node1 ~]# nginx -s quit
[root@nginx-node1 ~]# ps aux | grep nginx
root 48171 0.0 0.1 221664 2176 pts/0 S+ 14:04 0:00 grep --
color=auto nginx
#前台运行
[root@nginx-node1 ~]# nginx -g "daemon off;"
2.4.2.4 Nginx 启动文件
实现nginx的开机自启动
#写一个启动文件
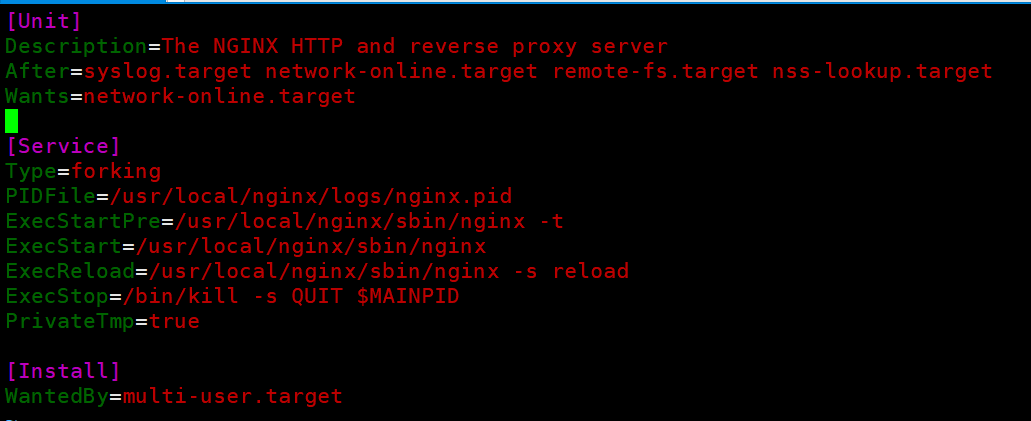
[root@nginx-node1 ~]# vim /lib/systemd/system/nginx.service
[Unit]
Description=The NGINX HTTP and reverse proxy server
After=syslog.target network-online.target remote-fs.target nss-lookup.target
Wants=network-online.target
[Service]
Type=forking
PIDFile=/usr/local/nginx/logs/nginx.pid
ExecStartPre=/usr/local/nginx/sbin/nginx -t
ExecStart=/usr/local/nginx/sbin/nginx
ExecReload=/usr/local/nginx/sbin/nginx -s reload
ExecStop=/bin/kill -s QUIT $MAINPID
PrivateTmp=true
[Install]
WantedBy=multi-user.target
[root@nginx-node1 ~]# systemctl daemon-reload
[root@nginx-node1 ~]# systemctl enable --now nginx
Created symlink /etc/systemd/system/multi-user.target.wants/nginx.service → /usr/lib/systemd/system/nginx.service.
2.6 平滑升级和回滚
有时候我们需要对Nginx版本进行升级以满足对其功能的需求,例如添加新模块,需要新功能,而此时Nginx又在跑着业务无法停掉,这时我们就可能选择平滑升级
2.6.1 平滑升级流程
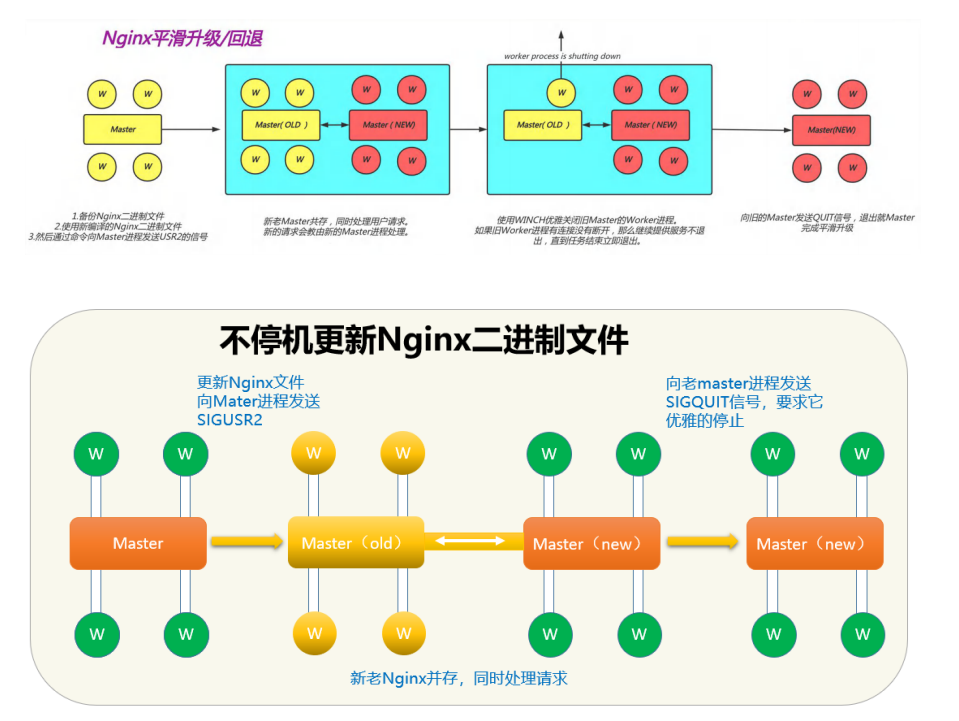
·将旧Nginx二进制文件换成新Nginx程序文件(注意先备份)
·向master进程发送USR2信号
·master进程修改pid文件名加上后缀.oldbin,成为nginx.pid.oldbin
·master进程用新Nginx文件启动新master进程成为旧master的子进程,系统中将有新旧两个Nginx主进程共同提供Web服务,当前新的请求仍然由旧Nginx的worker进程进行处理,将新生成的master进程的PID存放至新生成的pid文件nginx.pid
·向旧的Nginx服务进程发送WINCH信号,使旧的Nginx worker进程平滑停止
·向旧master进程发送QUIT信号,关闭老master,并删除Nginx.pid.oldbin文件
·如果发现升级有问题,可以回滚∶向老master发送HUP,向新master发送QUIT
2.6.2 平滑升级和回滚案例
平滑升级
需要两个包
echo-nginx-module-0.63.tar.gz ,tar zxf nginx-1.26.2.tar.gz
[root@nginx-node1 ~]# wget https://nginx.org/download/nginx-1.26.2.tar.gz
[root@nginx-node1 ~]# tar zxf echo-nginx-module-0.63.tar.gz
[root@nginx-node1 ~]# tar zxf nginx-1.26.2.tar.gz
[root@nginx-node1 ~]# cd nginx-1.26.2/
#开始编译新版本
[root@nginx-node1 nginx-1.26.2]#./configure --prefix=/usr/local/nginx --user=nginx --group=nginx --add-module=/root/echo-nginx-module-0.63 --with-http_ssl_module --with-http_v2_module --with-http_realip_module --with-http_stub_status_module --with-http_gzip_static_module --with-pcre --with-stream --with-stream_ssl_module --with-stream_realip_module
#只要make无需要make install
[root@nginx-node1 nginx-1.26.2]# make
#查看两个版本
[root@nginx-node1 nginx-1.26.2]# ll objs/nginx /usr/local/nginx/sbin/nginx
-rwxr-xr-x 1 root root 6170608 8月 15 19:39 objs/nginx
-rwxr-xr-x 1 root root 1234424 8月 15 19:03 /usr/local/nginx/sbin/nginx
#把之前的旧版的nginx命令备份
[root@nginx-node1 nginx-1.26.2]# cd /usr/local/nginx/sbin/
[root@nginx-node1 sbin]# ls
nginx
[root@nginx-node1 sbin]# cp nginx nginx.old
[root@nginx-node1 sbin]# ls
nginx nginx.old
#把新版本的nginx命令复制过去
[root@nginx-node1 sbin]# \cp -f /root/nginx-1.26.2/objs/nginx /usr/local/nginx/sbin
#检测一下有没有问题
[root@nginx-node1 sbin]# nginx -t
nginx: the configuration file /usr/local/nginx/conf/nginx.conf syntax is ok
nginx: configuration file /usr/local/nginx/conf/nginx.conf test is successful
#查看端口,并启动平滑升级可执行程序
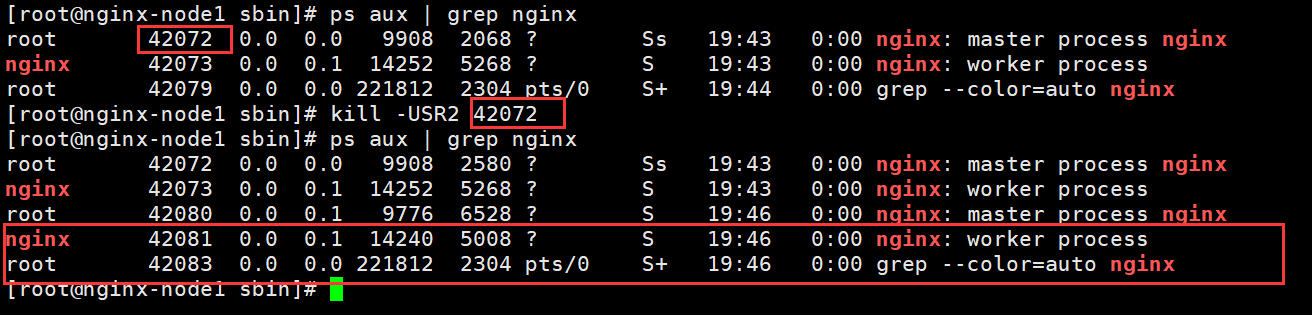
#USR2 平滑升级可执行程序,将存储有旧版本主进程PID的文件重命名为nginx.pid.oldbin,并启动新的nginx
#此时两个master的进程都在运行,只是旧的master不在监听,由新的master监听80
#此时Nginx开启一个新的master进程,这个master进程会生成新的worker进程,这就是升级后的Nginx进程,此时老的进程不会自动退出,但是当接收到新的请求不作处理而是交给新的进程处理。
[root@nginx-node1 sbin]# ps aux | grep nginx
root 42072 0.0 0.0 9908 2068 ? Ss 19:43 0:00 nginx: master process nginx
nginx 42073 0.0 0.1 14252 5268 ? S 19:43 0:00 nginx: worker process
root 42079 0.0 0.0 221812 2304 pts/0 S+ 19:44 0:00 grep --color=auto nginx
[root@nginx-node1 sbin]# kill -USR2 42072 #注意是写主程序的进程
[root@nginx-node1 sbin]# ps aux | grep nginx
root 42072 0.0 0.0 9908 2580 ? Ss 19:43 0:00 nginx: master process nginx
nginx 42073 0.0 0.1 14252 5268 ? S 19:43 0:00 nginx: worker process
root 42080 0.0 0.1 9776 6528 ? S 19:46 0:00 nginx: master process nginx
nginx 42081 0.0 0.1 14240 5008 ? S 19:46 0:00 nginx: worker process
root 42083 0.0 0.0 221812 2304 pts/0 S+ 19:46 0:00 grep --color=auto nginx
#发现仍然是旧的生效
[root@nginx-node1 sbin]# curl -I 172.25.254.100
HTTP/1.1 200 OK
Server: nginx/1.24.0 ##依旧是旧版本生生效
Date: Thu, 15 Aug 2024 11:49:22 GMT
Content-Type: text/html
Content-Length: 615
Last-Modified: Thu, 15 Aug 2024 11:03:45 GMT
Connection: keep-alive
ETag: "66bde091-267"
Accept-Ranges: bytes
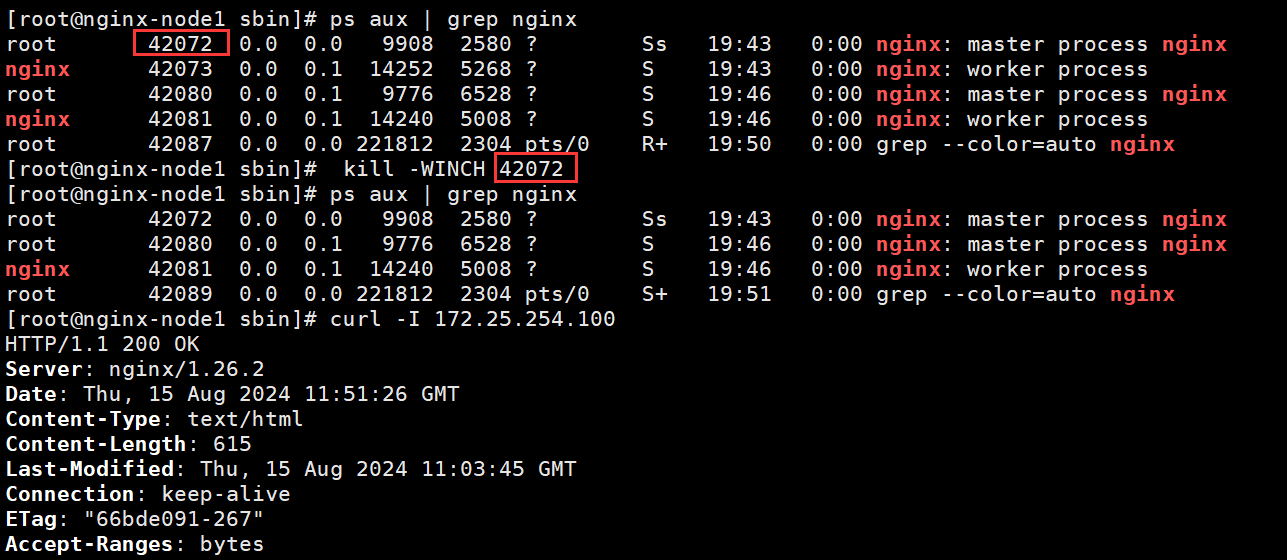
#回收旧的进程
[root@nginx-node1 sbin]# kill -WINCH 42072
[root@nginx-node1 sbin]# ps aux | grep nginx
root 42072 0.0 0.0 9908 2580 ? Ss 19:43 0:00 nginx: master process nginx
root 42080 0.0 0.1 9776 6528 ? S 19:46 0:00 nginx: master process nginx
nginx 42081 0.0 0.1 14240 5008 ? S 19:46 0:00 nginx: worker process
root 42089 0.0 0.0 221812 2304 pts/0 S+ 19:51 0:00 grep --color=auto nginx
[root@nginx-node1 sbin]# curl -I 172.25.254.100
HTTP/1.1 200 OK
Server: nginx/1.26.2
Date: Thu, 15 Aug 2024 11:51:26 GMT
Content-Type: text/html
Content-Length: 615
Last-Modified: Thu, 15 Aug 2024 11:03:45 GMT
Connection: keep-alive
ETag: "66bde091-267"
Accept-Ranges: bytes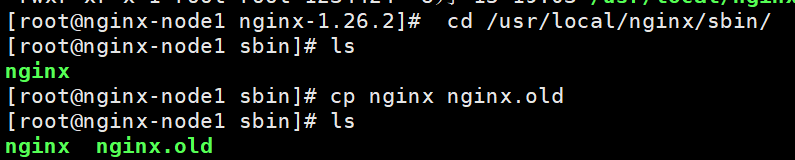

平滑升级程序
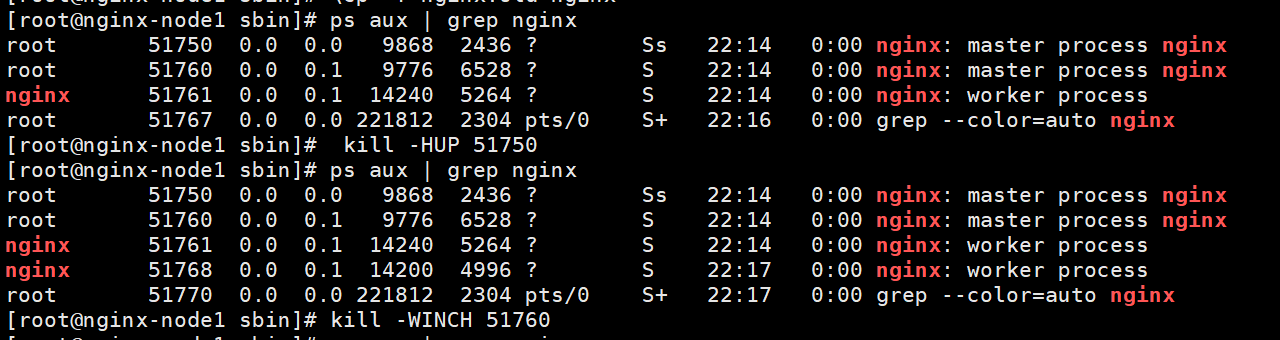
回滚
#如果升级的版本发现问题需要回滚,可以重新拉起旧版本的worker
[root@nginx-node1 sbin]# ls
nginx nginx.old
[root@nginx-node1 sbin]# cp nginx nginx.new
[root@nginx-node1 sbin]# ls
nginx nginx.new nginx.old
[root@nginx-node1 sbin]# \cp -f nginx.old nginx
[root@nginx-node1 sbin]# ls
nginx nginx.new nginx.old
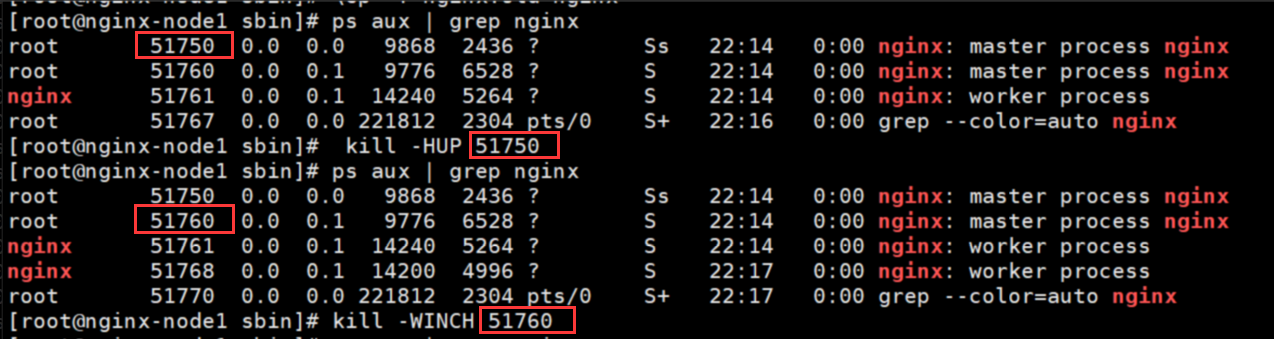
[root@nginx-node1 sbin]# ps aux | grep nginx
root 51750 0.0 0.0 9868 2436 ? Ss 22:14 0:00 nginx: master process nginx
root 51760 0.0 0.1 9776 6528 ? S 22:14 0:00 nginx: master process nginx
nginx 51761 0.0 0.1 14240 5264 ? S 22:14 0:00 nginx: worker process
root 51767 0.0 0.0 221812 2304 pts/0 S+ 22:16 0:00 grep --color=auto nginx
[root@nginx-node1 sbin]# kill -HUP 51750
[root@nginx-node1 sbin]# ps aux | grep nginx
root 51750 0.0 0.0 9868 2436 ? Ss 22:14 0:00 nginx: master process nginx
root 51760 0.0 0.1 9776 6528 ? S 22:14 0:00 nginx: master process nginx
nginx 51761 0.0 0.1 14240 5264 ? S 22:14 0:00 nginx: worker process
nginx 51768 0.0 0.1 14200 4996 ? S 22:17 0:00 nginx: worker process
root 51770 0.0 0.0 221812 2304 pts/0 S+ 22:17 0:00 grep --color=auto nginx
#回收旧的进程
[root@nginx-node1 sbin]# kill -WINCH 51760
[root@nginx-node1 sbin]# ps aux | grep nginx
root 51750 0.0 0.0 9868 2436 ? Ss 22:14 0:00 nginx: master process nginx
root 51760 0.0 0.1 9776 6528 ? S 22:14 0:00 nginx: master process nginx
nginx 51768 0.0 0.1 14200 4996 ? S 22:17 0:00 nginx: worker process
root 51773 0.0 0.0 221812 2304 pts/0 S+ 22:22 0:00 grep --color=auto nginx
[root@nginx-node1 sbin]# kill -9 51760
[root@nginx-node1 sbin]# ps aux | grep nginx
root 51750 0.0 0.0 9868 2436 ? Ss 22:14 0:00 nginx: master process nginx
nginx 51768 0.0 0.1 14200 5252 ? S 22:17 0:00 nginx: worker process
root 51780 0.0 0.0 221812 2304 pts/0 R+ 22:29 0:00 grep --color=auto nginx
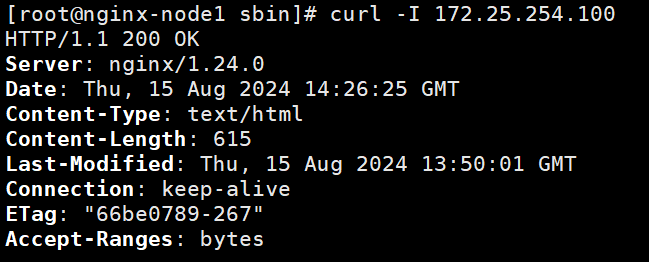
[root@nginx-node1 sbin]# curl -I 172.25.254.100
HTTP/1.1 200 OK
Server: nginx/1.24.0
Date: Thu, 15 Aug 2024 14:26:25 GMT
Content-Type: text/html
Content-Length: 615
Last-Modified: Thu, 15 Aug 2024 13:50:01 GMT
Connection: keep-alive
ETag: "66be0789-267"
Accept-Ranges: bytes

三 Nginx 核心配置详解
3.1 配置文件说明
nginx 官方帮助文档:http://nginx.org/en/docs/
Nginx的配置文件的组成部分:
·主配置文件:nginx.conf
·子配置文件: include conf.d/*.conf
·fastcgi, uwsgi,cgi 等协议相关的配置文件
·mime.types:支持的mime类型,MIME(Multipurpose Internet Mail Extensions)多用途互联网邮件扩展类型,MIME消息能包含文本、图像、音频、视频以及其他应用程序专用的数据,是设定某种扩展名的文件用一种应用程序来打开的方式类型,当该扩展名文件被访问的时候,浏览器会自动使用指定应用程序来打开。多用于指定一些客户端自定义的文件名,以及一些媒体文件打开方式。
nginx 配置文件格式说明
配置文件由指令与指令块构成
每条指令以;分号结尾,指令与值之间以空格符号分隔
可以将多条指令放在同一行,用分号分隔即可,但可读性差,不推荐
指令块以{ }大括号将多条指令组织在一起,且可以嵌套指令块
include语句允许组合多个配置文件以提升可维护性
使用#符号添加注释,提高可读性
使用$符号使用变量
部分指令的参数支持正则表达式
Nginx 主配置文件的配置指令方式:
directive value [value2 ...];
注意
(1) 指令必须以分号结尾
(2) 支持使用配置变量
内建变量:由Nginx模块引入,可直接引用
自定义变量:由用户使用set命令定义,格式: set variable_name value;
引用变量:$variable_name
主配置文件结构:四部分
main block:主配置段,即全局配置段,对http,mail都有效
#事件驱动相关的配置
event {
  ...
}

#http/https 协议相关配置段
http {
  ...
}

#默认配置文件不包括下面两个块
#mail 协议相关配置段
mail {
  ...
}

#stream 服务器相关配置段
stream {
  ...
}
默认的nginx.conf 配置文件格式说明
[root@nginx-node1 ~]# vim /usr/local/nginx/conf/nginx.conf
#全局配置端,对全局生效,主要设置nginx的启动用户/组,启动的工作进程数量,工作模式,Nginx的PID路径,日志路径等。
#user  nobody;
worker_processes  1;                              #启动工作进程数数量

#error_log  logs/error.log;
#error_log  logs/error.log  notice;
#error_log  logs/error.log  info;

#pid        logs/nginx.pid;


events {                                          #设置块,主要影响nginx服务器与用户的网络连接,比如是否允许同时接受多个网络连接,使用哪种事件驱动模型
                                                  #处理请求,每个工作进程可以同时支持的最大连接数,是否开启对多工作进程下的网络连接进行序列化等。
    worker_connections  1024;                     #设置单个nginx工作进程可以接受的最大并发,作为web服务器的时候最大并发数为worker_connections *worker_processes,
                                                  #作为反向代理的时候为(worker_connections * worker_processes)/2
}


http {                                             ##http块是Nginx服务器配置中的重要部分,缓存、代理和日志格式定义等绝大多数功能和第三方模块都可以在这设置,
                                                   #http块可以包含多个server块,而一个server块中又可以包含多个location块,
                                                   #server块可以配置文件引入、MIME-Type定义、日志自定义、是否启用sendfile、连接超时时间和单个链接的请求上限等。
    include       mime.types;
    default_type  application/octet-stream;

    #log_format  main  '$remote_addr - $remote_user [$time_local] "$request" '
    #                  '$status $body_bytes_sent "$http_referer" '
    #                  '"$http_user_agent" "$http_x_forwarded_for"';

    #access_log  logs/access.log  main;

    sendfile        on;                             #作为web服务器的时候打开sendfile加快静态文件传输,指定是否使用sendfile系统调用来传输文件
                                                    #sendfile系统调用在两个文件描述符之间直接传递数据(完全在内核中操作)从而避免了数据在内核缓冲区和用户缓冲区之间的拷贝,操作效率很高,被称之为零拷贝,
                                                    #硬盘 >> kernel buffer (快速拷贝到kernelsocketbuffer) >>协议栈。
    #tcp_nopush     on;

    #keepalive_timeout  0;
    keepalive_timeout  65;                          #长连接超时时间,单位是秒

    #gzip  on;

    server {                                        #设置一个虚拟机主机,可以包含自己的全局块,同时也可以包含多个location模块
                                                    ##比如本虚拟机监听的端口、本虚拟机的名称和IP配置,多个server可以使用一个端口比如都使用80端口提供web服务
        listen       80;                            #配置server监听的端口
        server_name  localhost;                     #本server的名称,当访问此名称的时候nginx会调用当前serevr内部的配置进程匹配。

        #charset koi8-r;

        #access_log  logs/host.access.log  main;

        location / {                               #location其实是server的一个指令,为nginx服务器提供比较多而且灵活的指令都是在location中体现的,
                                                   #主要是基于nginx接受到的请求字符串对用户请求的UIL进行匹配,并对特定的指令进行处理
                                                   #包括地址重定向、数据缓存和应答控制等功能都是在这部分实现,另外很多第三方模块的配置也是在location模块中配置。
            root   html;                           #相当于默认页面的目录名称,默认是安装目录的相对路径,可以使用绝对路径配置。
            index  index.html index.htm;           #默认的页面文件名称
        }

        #error_page  404              /404.html;       #错误页面的文件名称

        # redirect server error pages to the static page /50x.html
        #
        error_page   500 502 503 504  /50x.html;
        location = /50x.html {                          #location处理对应的不同错误码的页面定义到/50x.html,这个跟对应其server中定义的目录下。
            root   html;                                #定义默认页面所在的目录
        }

        # proxy the PHP scripts to Apache listening on 127.0.0.1:80
        #
        #location ~ \.php$ {
        #    proxy_pass   http://127.0.0.1;
        #}

        # pass the PHP scripts to FastCGI server listening on 127.0.0.1:9000
        #
        #location ~ \.php$ {
        #    root           html;
        #    fastcgi_pass   127.0.0.1:9000;
        #    fastcgi_index  index.php;
        #    fastcgi_param  SCRIPT_FILENAME  /scripts$fastcgi_script_name;
        #    include        fastcgi_params;
        #}

        # deny access to .htaccess files, if Apache's document root
        # concurs with nginx's one
        #
        #location ~ /\.ht {
        #    deny  all;
        #}
    }


    # another virtual host using mix of IP-, name-, and port-based configuration
    #
    #server {
    #    listen       8000;
    #    listen       somename:8080;
    #    server_name  somename  alias  another.alias;

    #    location / {
    #        root   html;
    #        index  index.html index.htm;
    #    }
    #}


    # HTTPS server
    #
    #server {
    #    listen       443 ssl;
    #    server_name  localhost;

    #    ssl_certificate      cert.pem;
    #    ssl_certificate_key  cert.key;

    #    ssl_session_cache    shared:SSL:1m;
    #    ssl_session_timeout  5m;

    #    ssl_ciphers  HIGH:!aNULL:!MD5;
    #    ssl_prefer_server_ciphers  on;

    #    location / {
    #        root   html;
    #        index  index.html index.htm;
    #    }
    #}

}

#和邮件相关的配置
#mail {
# ...
# } mail 协议相关配置段

#tcp代理配置,1.9版本以上支持
#stream {
# ...
# } stream 服务器相关配置段
#导入其他路径的配置文件
#include /apps/nginx/conf.d/*.conf
}
配置文件如下:
[root@nginx-node1 ~]# vim /usr/local/nginx/conf/nginx.conf

#user  nobody;
worker_processes  1;

#error_log  logs/error.log;
#error_log  logs/error.log  notice;
#error_log  logs/error.log  info;

#pid        logs/nginx.pid;


events {
    worker_connections  1024;
}


http {
    include       mime.types;
    default_type  application/octet-stream;

    #log_format  main  '$remote_addr - $remote_user [$time_local] "$request" '
    #                  '$status $body_bytes_sent "$http_referer" '
    #                  '"$http_user_agent" "$http_x_forwarded_for"';

    #access_log  logs/access.log  main;

    sendfile        on;
    #tcp_nopush     on;

    #keepalive_timeout  0;
    keepalive_timeout  65;

    #gzip  on;

    server {
        listen       80;
        server_name  localhost;

        #charset koi8-r;

        #access_log  logs/host.access.log  main;

        location / {
            root   html;
            index  index.html index.htm;
        }

        #error_page  404              /404.html;

        # redirect server error pages to the static page /50x.html
        #
        error_page   500 502 503 504  /50x.html;
        location = /50x.html {
            root   html;
        }

        # proxy the PHP scripts to Apache listening on 127.0.0.1:80
        #
        #location ~ \.php$ {
        #    proxy_pass   http://127.0.0.1;
        #}

        # pass the PHP scripts to FastCGI server listening on 127.0.0.1:9000
        #
        #location ~ \.php$ {
        #    root           html;
        #    fastcgi_pass   127.0.0.1:9000;
        #    fastcgi_index  index.php;
        #    fastcgi_param  SCRIPT_FILENAME  /scripts$fastcgi_script_name;
        #    include        fastcgi_params;
        #}

        # deny access to .htaccess files, if Apache's document root
        # concurs with nginx's one
        #
        #location ~ /\.ht {
        #    deny  all;
        #}
    }


    # another virtual host using mix of IP-, name-, and port-based configuration
    #
    #server {
    #    listen       8000;
    #    listen       somename:8080;
    #    server_name  somename  alias  another.alias;

    #    location / {
    #        root   html;
    #        index  index.html index.htm;
    #    }
    #}


    # HTTPS server
    #
    #server {
    #    listen       443 ssl;
    #    server_name  localhost;

    #    ssl_certificate      cert.pem;
    #    ssl_certificate_key  cert.key;

    #    ssl_session_cache    shared:SSL:1m;
    #    ssl_session_timeout  5m;

    #    ssl_ciphers  HIGH:!aNULL:!MD5;
    #    ssl_prefer_server_ciphers  on;

    #    location / {
    #        root   html;
    #        index  index.html index.htm;
    #    }
    #}

}
3.2 全局配置
Main 全局配置段常见的配置指令分类
·正常运行必备的配置
·优化性能相关的配置
·用于调试及定位问题相关的配置
·事件驱动相关的配置
全局配置说明:
修改工作进程数量,cpu的核心绑定
[root@nginx-node1 ~]# vim /usr/local/nginx/conf/nginx.conf
user nginx nginx; #启动Nginx工作进程的用户和组
worker_processes [number | auto]; #启动Nginx工作进程的数量,一般设为和CPU核心数相同
worker_cpu_affinity 0001 0010 0100 1000;
#将Nginx工作进程绑定到指定的CPU核心,默认Nginx是不进行进程绑定的,绑定并不是意味着当前nginx进
#程独占以一核心CPU,但是可以保证此进程不运行在其他核心上,这就极大减少了nginx的工作进程在不同的
#cpu核心上的来回跳转,减少了CPU对进程的资源分配与回收以及内存管理等,因此可以有效的提升nginx服务
#器的性能。
#CPU MASK: 00000001:0号CPU
# 00000010:1号CPU
# 10000000:7号CPU
#示例
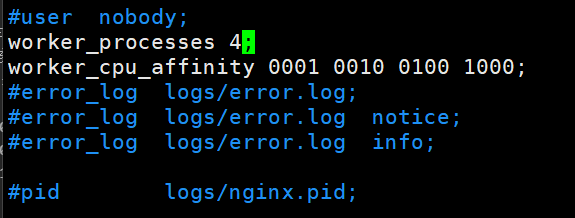
worker_processes 4; #4个工作进程
worker_cpu_affinity 0001 0010 0100 1000; #每个工作进程对应的cpu
错误日志记录的配置
[root@nginx-node1 ~]# vim /usr/local/nginx/conf/nginx.conf
#错误日志记录配置,语法:error_log file [debug | info | notice | warn | error | crit | alert | emerg]
#error_log logs/error.log;
#error_log logs/error.log notice;
error_log /usr/local/nginx/logs/error.log error;
pid文件保存路径
[root@nginx-node1 ~]# vim /usr/local/nginx/conf/nginx.conf
#pid文件保存路径
pid /usr/local/nginx/logs/nginx.pid;
worker_priority 0;                  #工作进程优先级,-20~20(19)
worker_rlimit_nofile 65536;         #所有worker进程能打开的文件数量上限,
                                    #包括:Nginx的所有连接(例如与代理服务器的连接等)
                                    #而不仅仅是与客户端的连接
                                    #另一个考虑因素是实际的并发连接数不能超过系统级别的最大打开文件数的限制
                                    #最好与ulimit -n 或者limits.conf的值保持一致,
修改pam限制
#修改可以打开的文件数量
root@nginx-node1 ~]# ulimit -a
real-time non-blocking time (microseconds, -R) unlimited
core file size (blocks, -c) 0
data seg size (kbytes, -d) unlimited
scheduling priority (-e) 0
file size (blocks, -f) unlimited
pending signals (-i) 14261
max locked memory (kbytes, -l) 8192
max memory size (kbytes, -m) unlimited
open files (-n) 1024
pipe size (512 bytes, -p) 8
POSIX message queues (bytes, -q) 819200
real-time priority (-r) 0
stack size (kbytes, -s) 8192
cpu time (seconds, -t) unlimited
max user processes (-u) 100000
virtual memory (kbytes, -v) unlimited
file locks (-x) unlimited
[root@Nginx ~]# vim /etc/security/limits.conf
* - nofile 100000
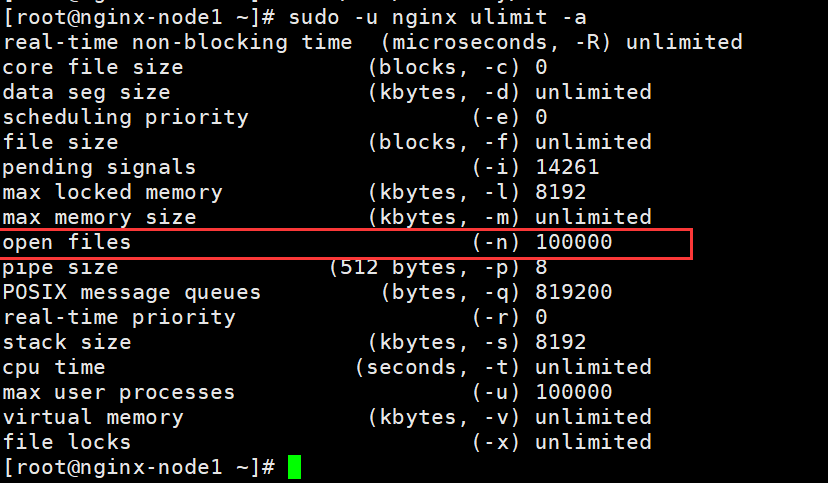
#查看
[root@nginx-node1 ~]# sudo -u nginx ulimit -a
real-time non-blocking time (microseconds, -R) unlimited
core file size (blocks, -c) 0
data seg size (kbytes, -d) unlimited
scheduling priority (-e) 0
file size (blocks, -f) unlimited
pending signals (-i) 14261
max locked memory (kbytes, -l) 8192
max memory size (kbytes, -m) unlimited
open files (-n) 100000
pipe size (512 bytes, -p) 8
POSIX message queues (bytes, -q) 819200
real-time priority (-r) 0
stack size (kbytes, -s) 8192
cpu time (seconds, -t) unlimited
max user processes (-u) 100000
virtual memory (kbytes, -v) unlimited
file locks (-x) unlimited
[root@nginx-node1 ~]# vim /usr/local/nginx/conf/nginx.conf
daemon off; #前台运行Nginx服务用于测试、docker等环境。
master_process off|on; #是否开启Nginx的master-worker工作模式,仅用于开发调试场景,默认为on
events {
worker_connections 65535; #设置单个工作进程的最大并发连接数
use epoll; #使用epoll事件驱动,
#Nginx支持众多的事件驱动,
#比如:select、poll、epoll,只能设置在events模块中设置
accept_mutex on; #on为同一时刻一个请求轮流由work进程处理,
#而防止被同时唤醒所有worker
#避免多个睡眠进程被唤醒的设置,默认为off
#新请求会唤醒所有worker进程,此过程也称为"惊群"
#因此nginx刚安装完以后要进行适当的优化。建议设置为on
multi_accept on; #on时Nginx服务器的每个工作进程可以同时接受多个新的网络连接
#此指令默认为off,
#即默认为一个工作进程只能一次接受一个新的网络连接
#打开后几个同接受多个。建议设置为on
}
示例: 实现 nginx 的高并发配置
#下载一个测试的软件
[root@nginx-node1 ~]# yum install httpd-tools -y
[root@nginx-node1 ~]# sudo -u nginx ulimit -a
real-time non-blocking time (microseconds, -R) unlimited
core file size (blocks, -c) 0
data seg size (kbytes, -d) unlimited
scheduling priority (-e) 0
file size (blocks, -f) unlimited
pending signals (-i) 14261
max locked memory (kbytes, -l) 8192
max memory size (kbytes, -m) unlimited
open files (-n) 1024
pipe size (512 bytes, -p) 8
POSIX message queues (bytes, -q) 819200
real-time priority (-r) 0
stack size (kbytes, -s) 8192
cpu time (seconds, -t) unlimited
max user processes (-u) 100000
virtual memory (kbytes, -v) unlimited
file locks (-x) unlimited
#测试,发现文件太多受不了了
[root@nginx-node1 ~]# ab -c 500 -n 10000 http://172.25.254.100/
This is ApacheBench, Version 2.3 <$Revision: 1903618 $>
Copyright 1996 Adam Twiss, Zeus Technology Ltd, http://www.zeustech.net/
Licensed to The Apache Software Foundation, http://www.apache.org/
Benchmarking 172.25.254.100 (be patient)
socket: Too many open files (24)
#添加数量
[root@nginx-node1 ~]# vim /etc/security/limits.conf
* - nofile 100000
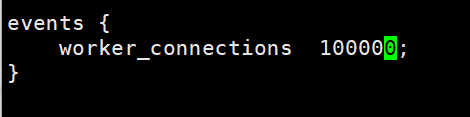
[root@nginx-node1 ~]# vim /usr/local/nginx/conf/nginx.conf
events {
worker_connections 100000;
}
#重启nginx
[root@nginx-node1 ~]# nginx -s reload
[root@nginx-node1 ~]# ab -c 500 -n 10000 http://172.25.254.100/
3.3 http 配置块
http {
    #在响应报文中将指定的文件扩展名映射至MIME对应的类型
    include       mime.types;
    default_type  application/octet-stream;    #除mime.types中的类型外
                                              #指定其它文件的默认MIME类型,浏览器一般会提示下载
                                             # types {
                                                 #text/html html;
                                                 #image/gif gif;
                                                 #image/jpeg jpg;
                                             #}
.........
}示例:识别php文件为text/html
[root@Nginx ~]# vim /usr/local/nginx/html/lee.php
<?php
phpinfo();
?>
[root@Nginx ~]# curl -I 172.25.254.100/lee.php
HTTP/1.1 200 OK
Server: nginx/1.26.1
Content-Type: application/octet-stream
Content-Length: 24
Last-Modified: Fri, 19 Jul 2024 09:38:52 GMT
Connection: keep-alive
ETag: "669a342c-18"
Accept-Ranges: bytes
[root@Nginx ~]# vim /usr/local/nginx/conf/nginx.conf
default_type text/html;
[root@Nginx ~]# nginx -s reload
[root@Nginx ~]# curl -I 172.25.254.100/lee.php
HTTP/1.1 200 OK
Server: nginx/1.26.1
Date: Fri, 19 Jul 2024 09:49:49 GMT
Content-Type: text/html
Content-Length: 24
Last-Modified: Fri, 19 Jul 2024 09:38:52 GMT
Connection: keep-alive
ETag: "669a342c-18"
Accept-Ranges: bytes
3.4 核心配置示例
基于不同的IP、不同的端口以及不用得域名实现不同的虚拟主机,依赖于核心模块
ngx_http_core_module实现。
3.4.1 新建一个 PC web 站点
[root@nginx-node1 ~]# vim /usr/local/nginx/conf/nginx.conf
#修改为epol模型,并且写一个子配置了路径
events {
worker_connections 100000;
use epoll;
}
http {
include mime.types;
default_type application/octet-stream;
#log_format main '$remote_addr - $remote_user [$time_local] "$request" '
# '$status $body_bytes_sent "$http_referer" '
# '"$http_user_agent" "$http_x_forwarded_for"';
#access_log logs/access.log main;
sendfile on;
#tcp_nopush on;
#keepalive_timeout 0;
keepalive_timeout 65;
#gzip on;
include "/usr/local/nginx/conf.d/*.conf";
。。。。。
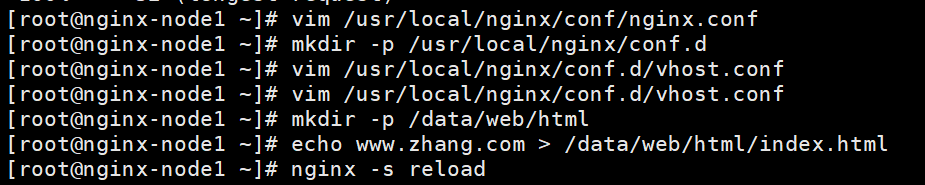
[root@nginx-node1 ~]# mkdir -p /usr/local/nginx/conf.d
#编写子配置文件
[root@nginx-node1 ~]# vim /usr/local/nginx/conf.d/vhost.conf
server{
listen 80;
server_name www.zhang.com;
root /data/web/html;
index index.html;
}
[root@nginx-node1 ~]# mkdir -p /data/web/html
[root@nginx-node1 ~]# echo www.zhang.com > /data/web/html/index.html
[root@nginx-node1 ~]# nginx -s reload
#浏览器访问www.zhang.com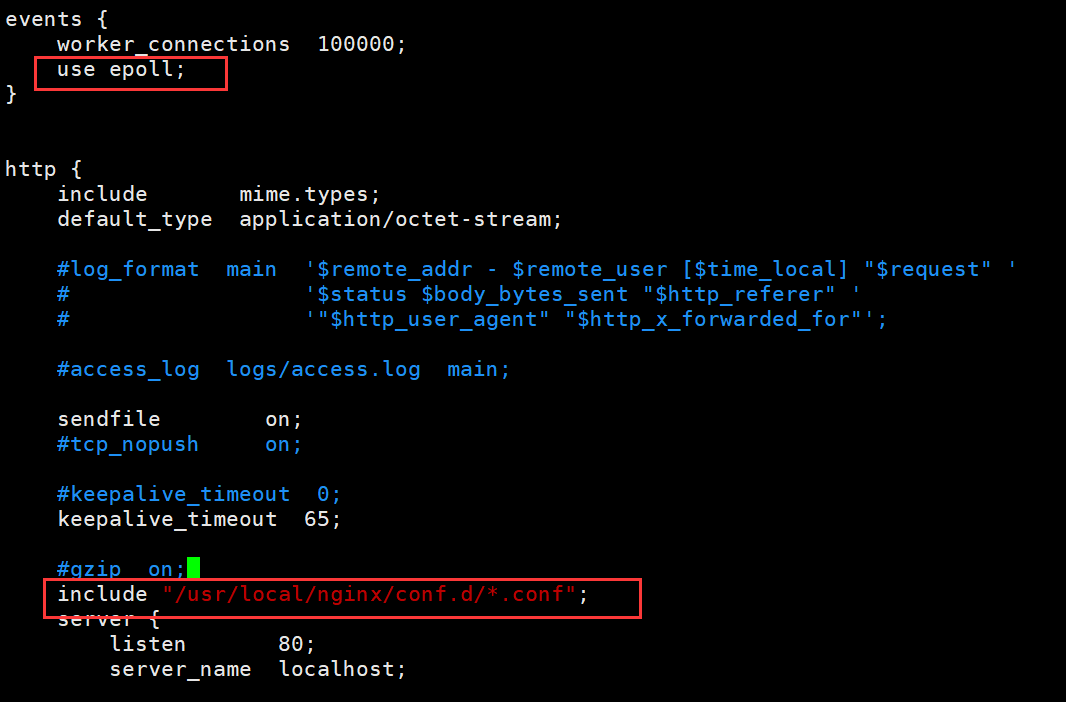

3.4.2 root 与 alias
root
root:指定web的家目录,在定义location的时候,文件的绝对路径等于root+location
root示例:
[root@nginx-node1 ~]# vim /usr/local/nginx/conf.d/vhost.conf
server{
   listen 80;
   server_name www.zhang.com;
   root /data/web/html;
   index index.html;
   location /test1 {
       root /data/web/;
   }
}
[root@nginx-node1 ~]# mkdir -p /data/web/test1
[root@nginx-node1 ~]# echo hahahahaha > /data/web/test1/index.html
[root@nginx-node1 ~]# nginx -s reload

#浏览器访问www.zhang.com/test1/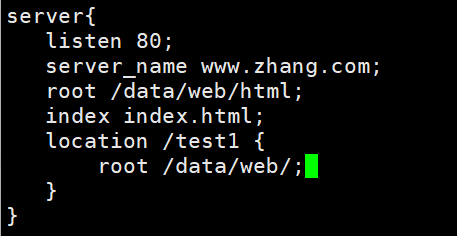


alias
alias:定义路径别名,会把访问的路径重新定义到其指定的路径,文档映射的另一种机制;仅能用于location上下文,此指令使用较少
alias是真实的文件路径,location 会在路径的基础上添加location 后面的路径
alias要有斜杠都要有斜杠,要没斜杠都没有斜杠
alias示例:
[root@nginx-node1 ~]# vim /usr/local/nginx/conf.d/vhost.conf
server{
listen 80;
server_name www.zhang.com;
root /data/web/html;
index index.html;
location /test1 {
root /data/web/;
}
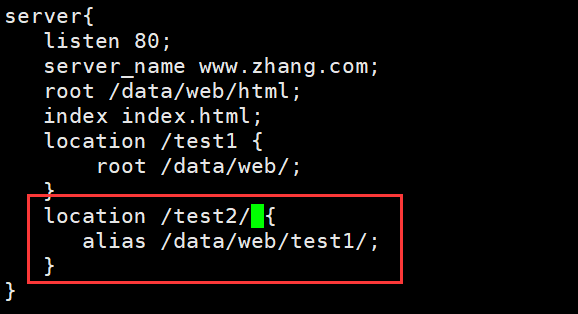
location /test2 {
alias /data/web/test1;
}
}
或者:(注意:alias要有斜杠都要有斜杠,要没斜杠都没有斜杠)
server{
listen 80;
server_name www.zhang.com;
root /data/web/html;
index index.html;
location /test1 {
root /data/web/;
}
location /test2/ {
alias /data/web/test1/;
}
}
[root@nginx-node1 ~]# nginx -s reload
#浏览器访问www.zhang.com/test2/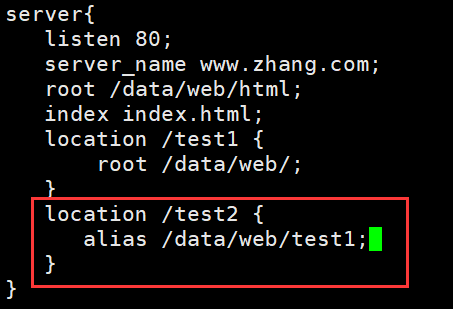

注意:location中使用root指令和alias指令的意义不同
root #给定的路径对应于location中的/uri左侧的/
alias #给定的路径对应于location中的/uri的完整路径
3.4.3 location 的详细使用
·在一个server中location配置段可存在多个,用于实现从uri到文件系统的路径映射;
·ngnix会根据用户请求的URI来检查定义的所有location,按一定的优先级找出一个最佳匹配,
·而后应用其配置在没有使用正则表达式的时候,nginx会先在server中的多个location选取匹配度最高的一个uri
·uri是用户请求的字符串,即域名后面的web文件路径
·然后使用该location模块中的正则url和字符串,如果匹配成功就结束搜索,并使用此location处理此请求。
uri:
![]()
#语法规则:
location [ = | ~ | ~* | ^~ ] uri { ... }
= 	#用于标准uri前,需要请求字串与uri精确匹配,大小敏感,如果匹配成功就停止向下匹配并立即处理请求

^~ 	#用于标准uri前,表示包含正则表达式,并且匹配以指定的正则表达式开头
      #对uri的最左边部分做匹配检查,不区分字符大小写

~ 	#用于标准uri前,表示包含正则表达式,并且区分大小写

~* 	#用于标准uri前,表示包含正则表达式,并且不区分大写不带符号 #匹配起始于此uri的所有的uri

\ 	#用于标准uri前,表示包含正则表达式并且转义字符。可以将 . * ?等转义为普通符号

#匹配优先级从高到低:
对文件匹配:
= > (~ = ~*) > 不带符号 > ^~
对目录匹配:
(~* = ~) > 不带符号 > ^~ > = (注意=不支持目录) 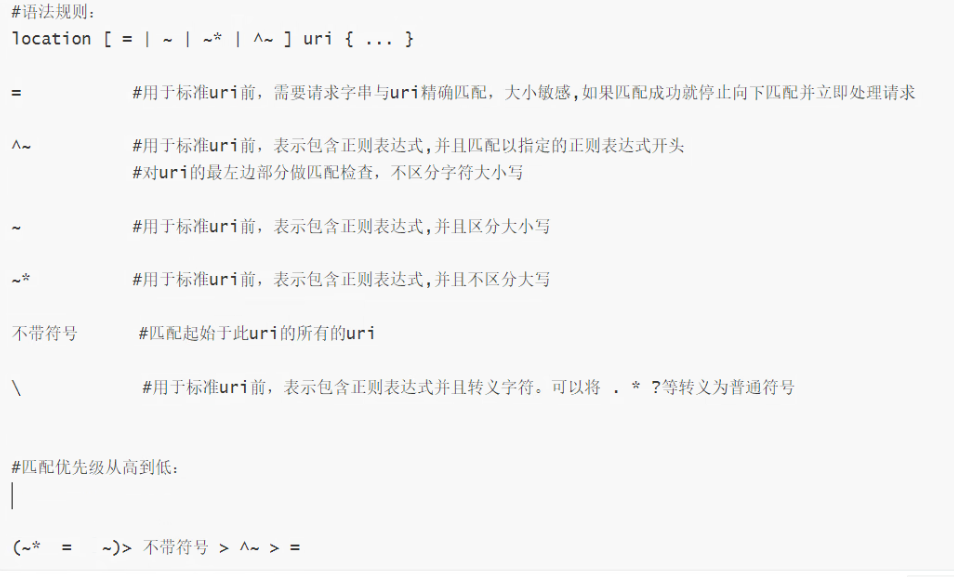
3.4.3.1 匹配案例-精确匹配 (=或者不加)
1.不加
[root@nginx-node1 ~]# vim /usr/local/nginx/conf.d/vhost.conf
server{
   listen 80;
   server_name www.zhang.com;
   root /data/web/html;
   index index.html;
   location /test {
       root /data/web;
   }
}

[root@nginx-node1 ~]# mkdir /data/web/test -p
[root@nginx-node1 ~]# echo test page > /data/web/test/index.html
[root@nginx-node1 ~]# nginx -s reload


2.加等号(等号只能匹配文件)
[root@nginx-node1 ~]# vim /usr/local/nginx/conf.d/vhost.conf
server{
   listen 80;
   server_name www.zhang.com;
   root /data/web/html;
   index index.html;
   location /test {
       root /data/web;
   }
   location = /test1/index.html {
       root /data/web;
   }
}
[root@nginx-node1 ~]# nginx -s reload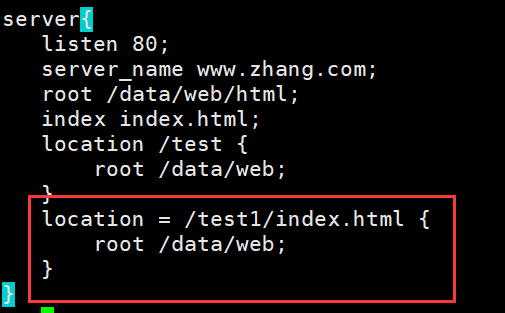

3.比较两者优先级
[root@nginx-node1 ~]# mkdir /data/web1/test -p
[root@nginx-node1 ~]# mkdir /data/web2/test -p
[root@nginx-node1 ~]# echo web1 > /data/web1/test/index.html
[root@nginx-node1 ~]# echo web2 > /data/web2/test/index.html
[root@nginx-node1 ~]# vim /usr/local/nginx/conf.d/vhost.conf
server{
   listen 80;
   server_name www.zhang.com;
   root /data/web/html;
   index index.html;
   location /test {
       root /data/web1;
   }
   location = /test {
       root /data/web2;
   }
}
[root@nginx-node1 ~]# nginx -s reload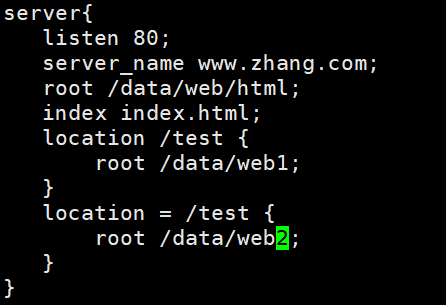

所以什么都不加的优先级高
3.4.3.2以什么开头(^~)
[root@nginx-node1 ~]# vim /usr/local/nginx/conf.d/vhost.conf
server{
   listen 80;
   server_name www.zhang.com;
   root /data/web/html;
   index index.html;
   location /test {
       root /data/web1;
   }
   location = /test {
       root /data/web2;
   }
   location ^~ /t {
       root /data/web1;
   }
}
[root@nginx-node1 ~]# nginx -s reload
[root@nginx-node1 ~]# mkdir -p /data/web1/text1
[root@nginx-node1 ~]# mkdir -p /data/web1/tee
[root@nginx-node1 ~]# echo text1 > /data/web1/text1/index.html
[root@nginx-node1 ~]# echo tee > /data/web1/tee/index.html
[root@nginx-node1 ~]# mkdir -p /data/web1/lee
[root@nginx-node1 ~]# echo lee > /data/web1/lee/index.html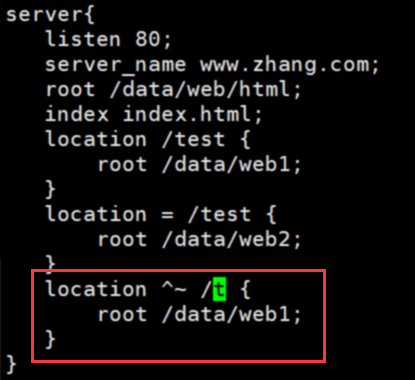

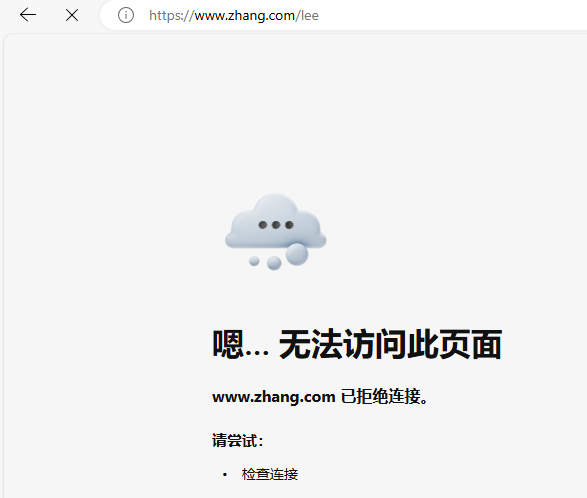
访问不以t开头无法访问
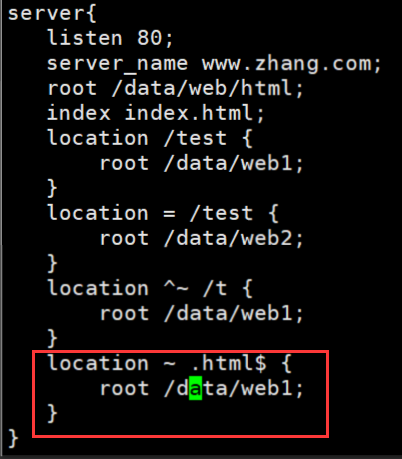
3.4.3.3以什么结尾(~ $)
[root@nginx-node1 ~]# vim /usr/local/nginx/conf.d/vhost.conf
server{
   listen 80;
   server_name www.zhang.com;
   root /data/web/html;
   index index.html;
   location /test {
       root /data/web1;
   }
   location = /test {
       root /data/web2;
   }
   location ^~ /t {
       root /data/web1;
   }
   location ~ .html$ {
       root /data/web1;
   }
}

[root@nginx-node1 ~]# nginx -s reload

如果想要省下目录
[root@nginx-node1 ~]# vim /usr/local/nginx/conf.d/vhost.conf
server{
   listen 80;
   server_name www.zhang.com;
   root /data/web/html;
   index index.html;
   location ~ .html$ {
       root /data/web1/lee;
   }
}
[root@nginx-node1 ~]# nginx -s reload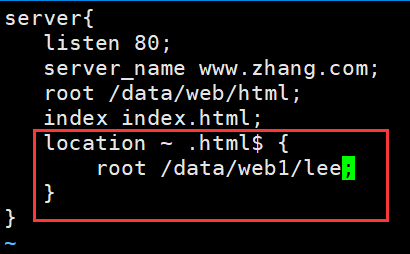

查找文件名后缀的方法
[root@nginx-node1 ~]# vim /usr/local/nginx/conf.d/vhost.conf
server{
   listen 80;
   server_name www.zhang.com;
   root /data/web/html;
   index index.html;
   location /test {
       root /data/web1;
   }
   location = /test {
       root /data/web2;
   }
   location ^~ /t {
       root /data/web1;
   }
   location ~ .(html|css|php)$ {
       root /data/web1;
   }
}
[root@nginx-node1 ~]# nginx -s reload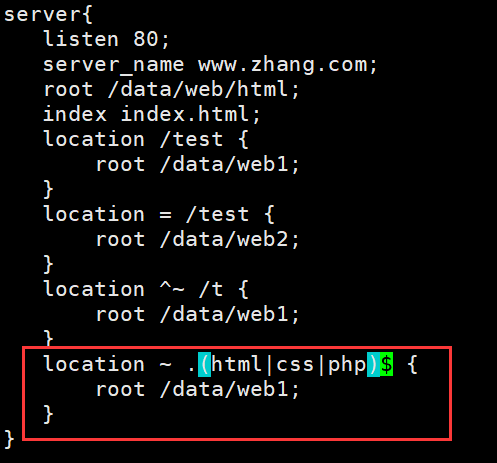
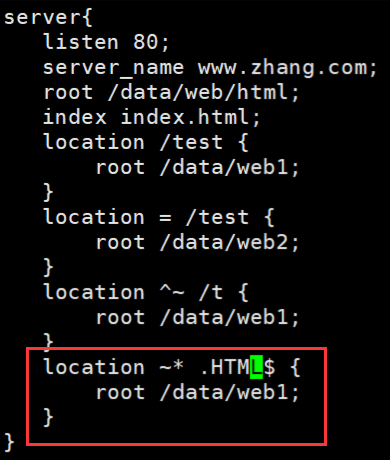
3.4.3.4区分大小写(~*)
~ 实现区分大小写的模糊匹配
[root@nginx-node1 ~]# vim /usr/local/nginx/conf.d/vhost.conf
server{
   listen 80;
   server_name www.zhang.com;
   root /data/web/html;
   index index.html;
   location /test {
       root /data/web1;
   }
   location = /test {
       root /data/web2;
   }
   location ^~ /t {
       root /data/web1;
   }
   location ~* \.HTML$  {
       root /data/web1;
   }
}
[root@nginx-node1 ~]# nginx -s reload

3.4.3.5测试优先级
目录的:
[root@nginx-node1 ~]# vim /usr/local/nginx/conf.d/vhost.conf
server{
   listen 80;
   server_name www.zhang.com;
   root /data/web/html;
   index index.html;
   location /test {
       root /data/web1;
   }
   location = /test {
       root /data/web2;
   }
   location ^~ /t {
       root /data/web3;
   }
   location ~ .html$ {
       root /data/web4;
   }
   location ~* .HTML$ {
       root /data/web5;
   }
}
[root@nginx-node1 ~]# nginx -s reload
[root@nginx-node1 ~]# mkdir -p /data/web{1..5}
[root@nginx-node1 ~]# mkdir -p /data/web{1..5}/test
[root@nginx-node1 ~]# echo web1 > /data/web1/test/index.html
[root@nginx-node1 ~]# echo web2 > /data/web2/test/index.html
[root@nginx-node1 ~]# echo web3 > /data/web3/test/index.html
[root@nginx-node1 ~]# echo web4 > /data/web4/test/index.html
[root@nginx-node1 ~]# echo web5 > /data/web5/test/index.html

访问: http://www.zhang.com/test/index.html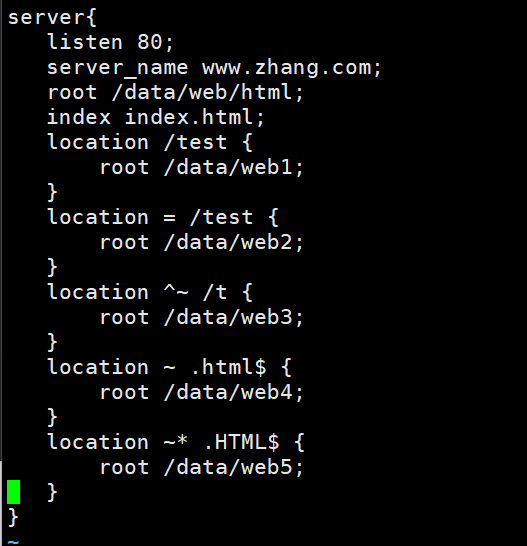
最优先

注释掉4后再访问

取消4的注释4和5交换位置再次实验,5在4的前面

所以说4和5的优先级相同,区别在于放的位置谁靠前谁优
注释掉4和5

注释掉1和和4和5

总结:~和~*优先级相同,其次是不带符号的,然后是^~,最后是=(=只能匹配文件)
文件的:
[root@nginx-node1 ~]# vim /usr/local/nginx/conf.d/vhost.conf
server{
   listen 80;
   server_name www.zhang.com;
   root /data/web/html;
   index index.html;
   location /index.html {
       root /data/web1/test;
   }
   location = /index.html {
       root /data/web2/test;
   }
   location ^~ /i {
       root /data/web3/test;
   }
   location ~ /index.html {
       root /data/web4/test;
   }
   location ~* /index.html {
       root /data/web5/test;
   }
}

[root@nginx-node1 ~]# nginx -s reload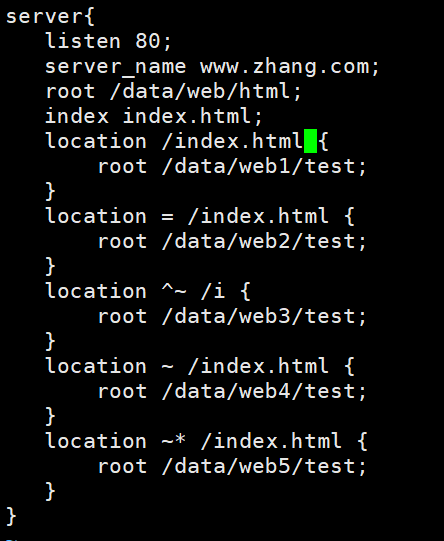
测试知:= > (~ = ~*) > 不带符号 > ^~

3.4.3.6 生产使用案例
#直接匹配网站根会加速Nginx访问处理
location = /index.html {
  ......;
}
location / {
  ......;
}
#静态资源配置方法1
location ^~ /static/ {
  ......;
}
#静态资源配置方法2,应用较多
location ~* \.(gif|jpg|jpeg|png|css|js|ico)$ {
  ......;
}
#多应用配置
location ~* /app1 {
  ......;
}
location ~* /app2 {
  ......;
}
3.4.4 Nginx 账户认证功能
由 ngx_http_auth_basic_module 模块提供此功能
htpasswd
-c 创建passwdfile.如果passwdfile 已经存在,那么它会重新写入并删去原有内容.
-n 不更新passwordfile,直接显示密码
-m 使用MD5加密(默认)
-d 使用CRYPT加密(默认)
-p 使用普通文本格式的密码
-s 使用SHA加密
-b 命令行中一并输入用户名和密码而不是根据提示输入密码,可以看见明文,不需要交互
-D 删除指定的用户
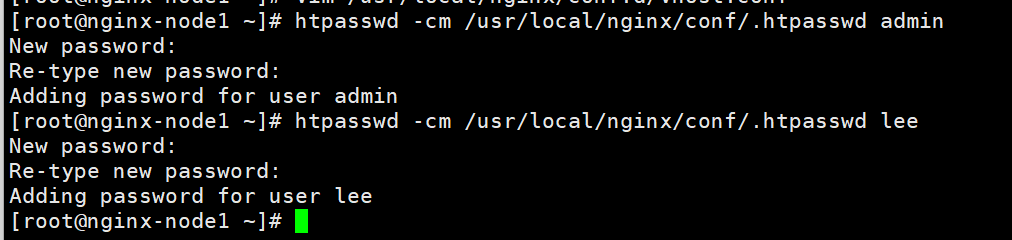
#创建认证的用户和密码
[root@nginx-node1 ~]# htpasswd -cm /usr/local/nginx/conf/.htpasswd admin
New password:
Re-type new password:
Adding password for user admin
[root@nginx-node1 ~]# htpasswd -cm /usr/local/nginx/conf/.htpasswd lee
New password:
Re-type new password:
Adding password for user lee
#配置账号认证功能
[root@nginx-node1 ~]# mkdir /data/web/lee
[root@nginx-node1 ~]# echo lee > /data/web/lee/index.html
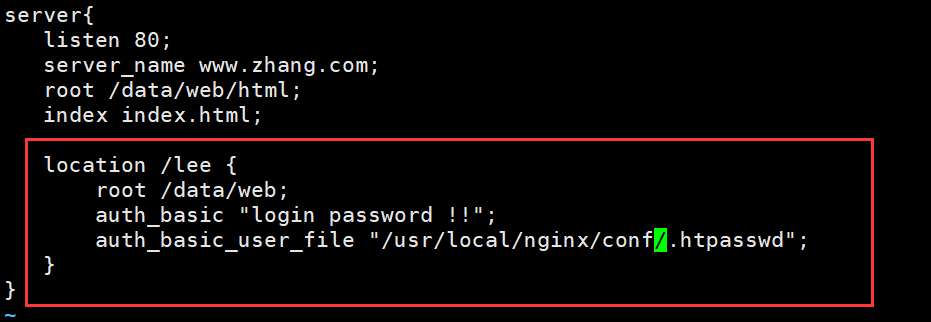
server{
listen 80;
server_name www.zhang.com;
root /data/web/html;
index index.html;
location /lee {
root /data/web;
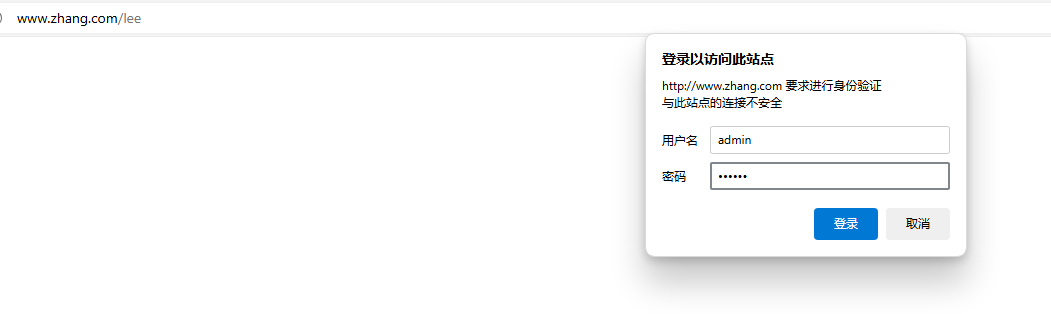
auth_basic "login password !!"; #这里是验证时的提示信息,他是认证域的提示信息,无法查看
auth_basic_user_file "/usr/local/nginx/conf/.htpasswd";
}
}
[root@nginx-node1 ~]# nginx -s reload

3.4.5 自定义错误页面
自定义错误页,同时也可以用指定的响应状态码进行响应, 可用位置:http, server, location, if in location
error_page code ... [=[response]] uri;
code是状态码
示例:
listen 80;
server_name www.timinglee.org;
error_page 500 502 503 504 /error.html;
location = /error.html {
  root /data/nginx/html;
}
#重启nginx并访问不存在的页面进行测试
示例:自定义错误页面
[root@nginx-node1 ~]# vim /usr/local/nginx/conf.d/vhost.conf
server{
   listen 80;
   server_name www.zhang.com;
   root /data/web/html;
   index index.html;
   error_page 404 /40x.html;

   location /lee {
       root /data/web;
       auth_basic "login password !!";
       auth_basic_user_file "/usr/local/nginx/conf/.htpasswd";
   }

   location = /40x.html{
       root /data/web/errorpage;
   }
}
[root@nginx-node1 ~]# nginx -s reload

[root@nginx-node1 ~]# mkdir -p /data/web/errorpage
[root@nginx-node1 ~]# echo errorpage > /data/web/errorpage/40x.html   #注意创建的文件是40x.html

#浏览器访问:www.zhang.com/leea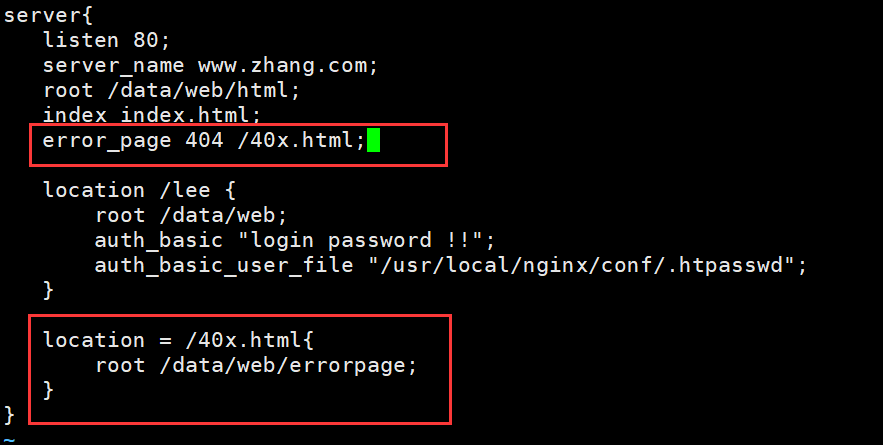

3.4.6 自定义错误日志
原本的日志文件位置
[root@nginx-node1 ~]# ll /usr/local/nginx/logs/
总用量 7732
-rw-r--r-- 1 root root 7885097  8月 16 11:56 access.log
-rw-r--r-- 1 root root   23737  8月 16 11:56 error.log
-rw-r--r-- 1 root root       6  8月 15 23:34 nginx.pid
可以自定义错误日志
Syntax: error_log file [level];
Default:
error_log logs/error.log error;
Context: main, http, mail, stream, server, location
level: debug, info, notice, warn, error, crit, alert, emerg
示例:
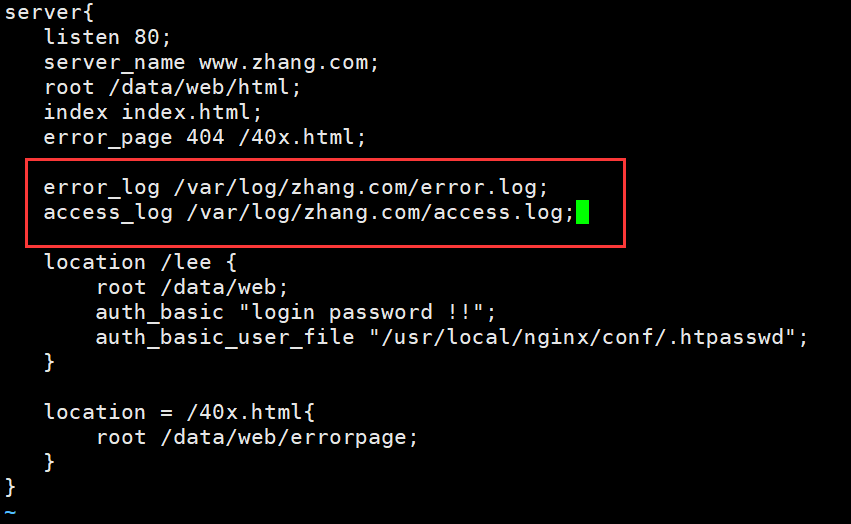
[root@nginx-node1 ~]# vim /usr/local/nginx/conf.d/vhost.conf
server{
   listen 80;
   server_name www.zhang.com;
   root /data/web/html;
   index index.html;
   error_page 404 /40x.html;

   error_log /var/log/zhang.com/error.log;
   access_log /var/log/zhang.com/access.log;

   location /lee {
       root /data/web;
       auth_basic "login password !!";
       auth_basic_user_file "/usr/local/nginx/conf/.htpasswd";
   }

   location = /40x.html{
       root /data/web/errorpage;
   }
}
[root@nginx-node1 ~]# mkdir -p /var/log/zhang.com

[root@nginx-node1 ~]# nginx -s reload

#测试,重启nginx并访问不存在的页面进行测试并验证是在指定目录生成新的日志文件
浏览器访问:http://www.zhang.com/

#查看日志
[root@nginx-node1 ~]# cd /var/log/zhang.com/
[root@nginx-node1 zhang.com]# ls
access.log  error.log
[root@nginx-node1 zhang.com]# cat access.log
172.25.254.1 - lee [16/Aug/2024:14:10:05 +0800] "GET /leeas HTTP/1.1" 404 10 "-" "Mozilla/5.0 (Windows NT 10.0; Win64; x64) AppleWebKit/537.36 (KHTML, like Gecko) Chrome/127.0.0.0 Safari/537.36"
3.4.7 检测文件是否存在
try_files会按顺序检查文件是否存在,返回第一个找到的文件或文件夹(结尾加斜线表示为文件夹),如果所有文件或文件夹都找不到,会进行一个内部重定向到最后一个参数。只有最后一个参数可以引起一个内部重定向,之前的参数只设置内部URI的指向。最后一个参数是回退URI且必须存在,否则会出现内部500错误。
语法格式
Syntax: try_files file ... uri;
try_files file ... =code;
Default: —
Context: server, location
示例: 如果不存在页面, 就转到default.html页面
[root@nginx-node1 ~]# vim /usr/local/nginx/conf.d/vhost.conf
server{
   listen 80;
   server_name www.zhang.com;
   root /data/web/html;
   index index.html;
   error_page 404 /40x.html;

   error_log /var/log/zhang.com/error.log;
   access_log /var/log/zhang.com/access.log;

   try_files $uri $uri.html $uri/index.html /error/default.html;

   location /lee {
       root /data/web;
       auth_basic "login password !!";
       auth_basic_user_file "/usr/local/nginx/conf/.htpasswd";
   }

   location = /40x.html{
       root /data/web/errorpage;
   }
}
[root@nginx-node1 ~]# nginx -s reload
#先浏览器访问www.zhang.com

#删除文件
[root@nginx-node1 ~]# mv /data/web/html/index.html /data/web/html/index.html111
[root@nginx-node1 ~]# nginx -s reload
#浏览器访问www.zhang.com,会发现报错

#添加/error/default.html的文件
[root@nginx-node1 ~]# mkdir /data/web/html/error
[root@nginx-node1 ~]# echo error-haha >  /data/web/html/error/default.html
[root@nginx-node1 ~]# nginx -s reload
#浏览器访问www.zhang.com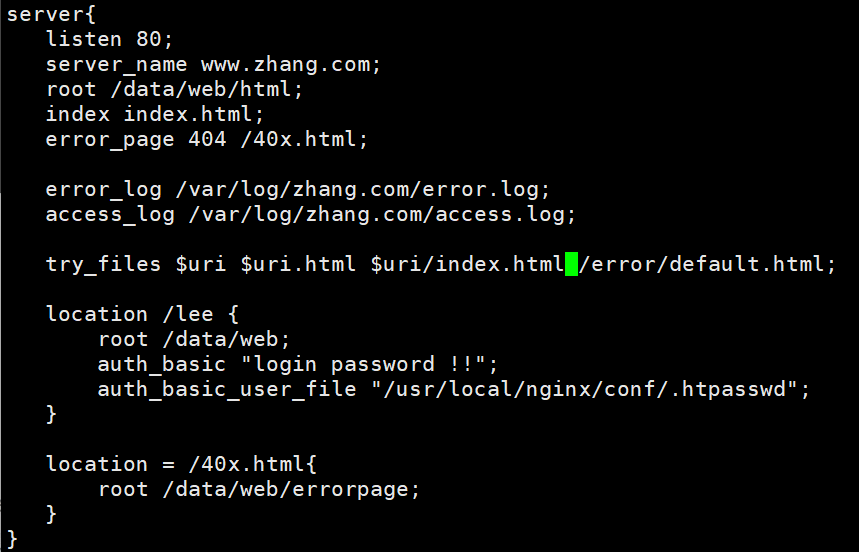
未改之前

改动之后,未添加/error/default.html中的文件

添加后

3.4.8 长连接配置
keepalive_timeout timeout [header_timeout]; #设定保持连接超时时长,0表示禁止长连接,默认为75s
                                           #通常配置在http字段作为站点全局配置
keepalive_requests 数字;        #在一次长连接上所允许请求的资源的最大数量
                                #默认为100次,建议适当调大,比如:500
示例:
[root@nginx-node1 ~]# vim /usr/local/nginx/conf/nginx.conf
.....
#keepalive_timeout 0;
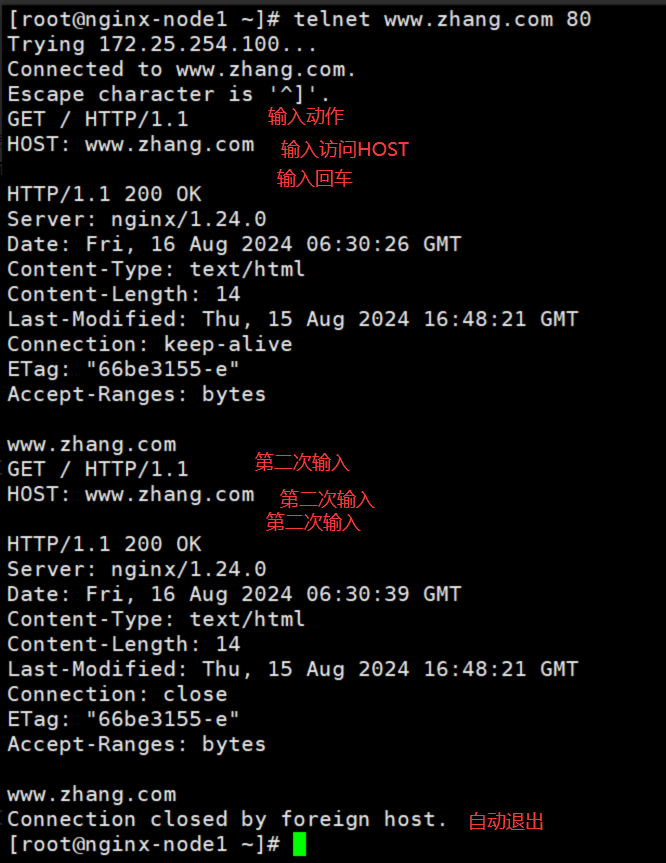
keepalive_timeout 65; #链接后等待的时间 如果写成keepalive_timeout 65 60; 那么65为我保持的时间,60为客户看见的保持的时间
keepalive_requests 2; #长链接中请求发起的次数
....
[root@nginx-node1 ~]# nginx -s reload
#下载测试工具
[root@nginx-node1 ~]# dnf install telnet -y
#测试
[root@nginx-node1 ~]# telnet www.zhang.com 80
Trying 172.25.254.100...
Connected to www.zhang.com.
Escape character is '^]'.
GET / HTTP/1.1 ##输入动作
HOST: www.zhang.com ##输入访问HOST
##输入回车
HTTP/1.1 200 OK
Server: nginx/1.24.0
Date: Fri, 16 Aug 2024 06:30:26 GMT
Content-Type: text/html
Content-Length: 14
Last-Modified: Thu, 15 Aug 2024 16:48:21 GMT
Connection: keep-alive
ETag: "66be3155-e"
Accept-Ranges: bytes
www.zhang.com
GET / HTTP/1.1 #第二次操作
HOST: www.zhang.com #第二次操作
#第二次操作
HTTP/1.1 200 OK
Server: nginx/1.24.0
Date: Fri, 16 Aug 2024 06:30:39 GMT
Content-Type: text/html
Content-Length: 14
Last-Modified: Thu, 15 Aug 2024 16:48:21 GMT
Connection: close
ETag: "66be3155-e"
Accept-Ranges: bytes
www.zhang.com
Connection closed by foreign host. #自动断开链接
[root@nginx-node1 ~]#

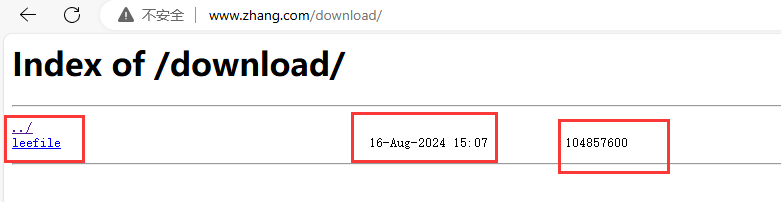
3.4.9 作为下载服务器配置
ngx_http_autoindex_module 模块处理以斜杠字符 "/" 结尾的请求,并生成目录列表,可以做为下载服务配置使用
相关指令:
autoindex on | off;                         #自动文件索引功能,默为off
autoindex_exact_size on | off;              #计算文件确切大小(单位bytes),off 显示大概大小(单位K、M),默认on
autoindex_localtime on | off ;              #显示本机时间而非GMT(格林威治)时间,默认off
autoindex_format html | xml | json | jsonp;  #显示索引的页面文件风格,默认html
limit_rate rate;                        #限制响应客户端传输速率(除GET和HEAD以外的所有方法),单位B/s,bytes/second,
                                        #默认值0,表示无限制,此指令由ngx_http_core_module提供
set $limit_rate 4k;                     #也可以通变量限速,单位B/s,同时设置,此项优级高.
示例:实现下载站点
#建立下载目录
[root@nginx-node1 ~]# mkdir /data/web/download
#将本地的/dev/zero整盘备份到/data/web/download/leefile count=100指仅拷贝100个块;bs=1M指块大小为1M。
[root@nginx-node1 ~]# dd if=/dev/zero of=/data/web/download/leefile bs=1M count=100
记录了100+0 的读入
记录了100+0 的写出
104857600字节(105 MB,100 MiB)已复制,0.0495107 s,2.1 GB/s
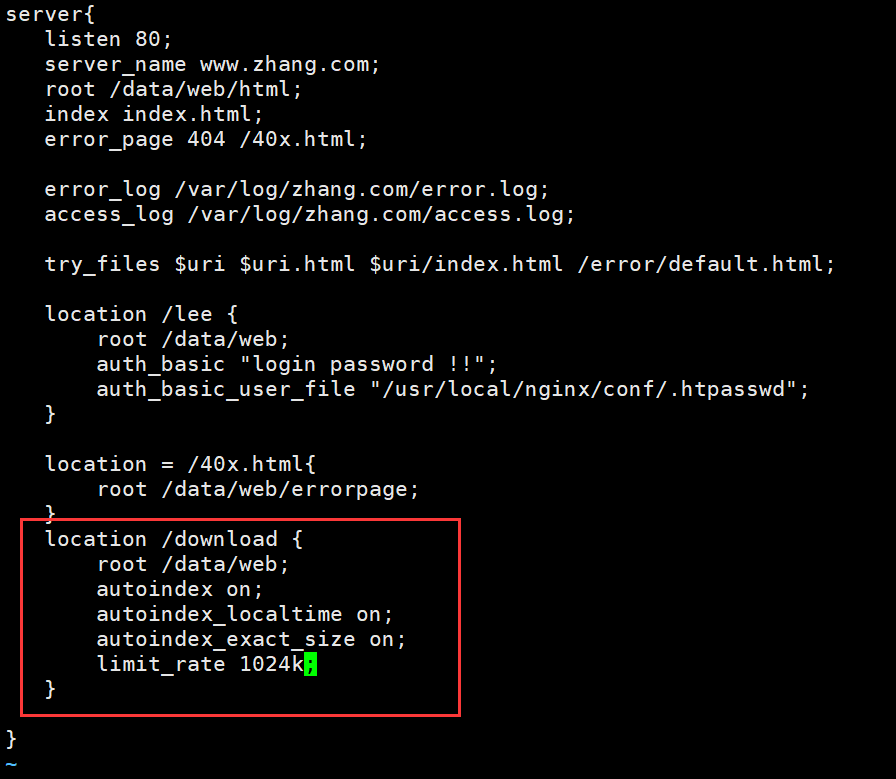
[root@nginx-node1 ~]# vim /usr/local/nginx/conf.d/vhost.conf
server{
listen 80;
server_name www.zhang.com;
root /data/web/html;
index index.html;
error_page 404 /40x.html;
error_log /var/log/zhang.com/error.log;
access_log /var/log/zhang.com/access.log;
try_files $uri $uri.html $uri/index.html /error/default.html;
location /lee {
root /data/web;
auth_basic "login password !!";
auth_basic_user_file "/usr/local/nginx/conf/.htpasswd";
}
location = /40x.html{
root /data/web/errorpage;
}
location /download {
root /data/web;
autoindex on; #自动索引功能
autoindex_localtime on; #on表示显示本机时间而非GMT(格林威治)时间,默为为off显示GMT时间
autoindex_exact_size on; #计算文件确切大小(单位bytes),此为默认值,off只显示大概大小(单位kb、mb、gb)
limit_rate 1024k; #限速,默认不限速
}
}
[root@nginx-node1 ~]# nginx -s reload
dd命令介绍:
dd:用指定大小的块拷贝一个文件,并在拷贝的同时进行指定的转换。
if=文件名:输入文件名,缺省为标准输入。即指定源文件。< if=input file >
of=文件名:输出文件名,缺省为标准输出。即指定目的文件。< of=output file >
bs=bytes:同时设置读入/输出的块大小为bytes个字节
count=blocks:仅拷贝blocks个块,块大小等于ibs指定的字节数。
小拓展:
· /dev/null : 在类Unix系统中,/dev/null,或称空设备,是一个特殊的设备文件,它丢弃一切写入其中的数据(但报告写入操作成功),读取它则会立即得到一个EOF。
在程序员行话,尤其是Unix行话中,/dev/null 被称为位桶(bit bucket)或者黑洞(black hole)。空设备通常被用于丢弃不需要的输出流,或作为用于输入流的空文件。这些操作通常由重定向完成。
· /dev/zero : 在类UNIX 操作系统中, /dev/zero 是一个特殊的文件,当你读它的时候,它会提供无限的空字符(NULL, ASCII NUL, 0x00)。
其中的一个典型用法是用它提供的字符流来覆盖信息,另一个常见用法是产生一个特定大小的空白文件。BSD就是通过mmap把/dev/zero映射到虚地址空间实现共享内存的。可以使用mmap将/dev/zero映射到一个虚拟的内存空间,这个操作的效果等同于使用一段匿名的内存(没有和任何文件相关)。
四 Nginx 高级配置
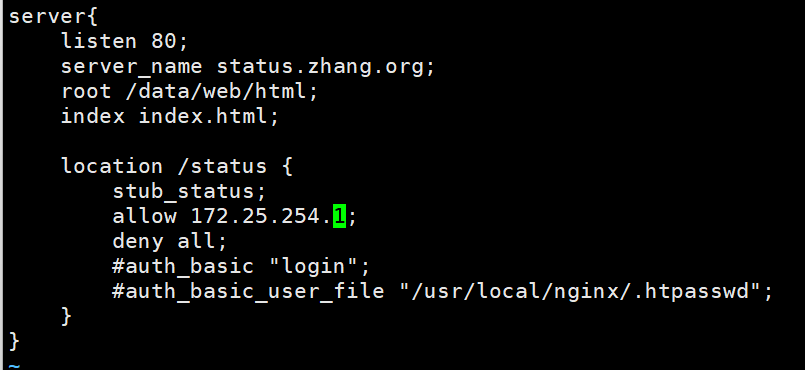
4.1 Nginx 状态页
·基于nginx 模块 ngx_http_stub_status_module 实现,
·在编译安装nginx的时候需要添加编译参数 --with-http_stub_status_module
·否则配置完成之后监测会是提示法错误
注意: 状态页显示的是整个服务器的状态,而非虚拟主机的状态
[root@nginx-node1 ~]# vim /usr/local/nginx/conf.d/status.conf
server{
    listen 80;
    server_name status.zhang.org;
    root /data/web/html;
    index index.html;

    location /status {
        stub_status;
        #如果只看状态页一下内容可以不写
        allow 172.25.254.1;  #指定ip访问
        deny all;          #否认所有
        #auth_basic "login";         #弹出人证窗口
        #auth_basic_user_file "/usr/local/nginx/conf/.htpasswd";  #含有用户名和密码的文件
    }
}


[root@nginx-node1 ~]# nginx -s reload

ctive connections: #当前处于活动状态的客户端连接数
#包括连接等待空闲连接数=reading+writing+waiting
accepts: #统计总值,Nginx自启动后已经接受的客户端请求连接的总数。
handled: #统计总值,Nginx自启动后已经处理完成的客户端请求连接总数
#通常等于accepts,除非有因worker_connections限制等被拒绝的连接
requests: #统计总值,Nginx自启动后客户端发来的总的请求数
Reading: #当前状态,正在读取客户端请求报文首部的连接的连接数
#数值越大,说明排队现象严重,性能不足
Writing: #当前状态,正在向客户端发送响应报文过程中的连接数,数值越大,说明访问量很大
Waiting: #当前状态,正在等待客户端发出请求的空闲连接数
4.2 Nginx 压缩功能
Nginx支持对指定类型的文件进行压缩然后再传输给客户端,而且压缩还可以设置压缩比例,压缩后的文件大小将比源文件显著变小,样有助于降低出口带宽的利用率,降低企业的IT支出,不过会占用相应的CPU资源。
Nginx对文件的压缩功能是依赖于模块 ngx_http_gzip_module,默认是内置模块
Nginx 的压缩功能(如 gzip 压缩)并不直接改变服务器上存储的文件大小。Nginx 压缩是在响应发送给客户端(如浏览器)的过程中动态进行的,这意味着原始文件(如 CSS、JavaScript、HTML等)在服务器上的存储大小保持不变。
配置指令如下:
#启用或禁用gzip压缩,默认关闭
gzip on | off;

#压缩比由低到高从1到9,默认为1,值越高压缩后文件越小,但是消耗cpu比较高。基本设定未4或者5
gzip_comp_level 4;

#禁用IE6 gzip功能,早期的IE6之前的版本不支持压缩(可不写)
gzip_disable "MSIE [1-6]\.";

#gzip压缩的最小文件,小于设置值的文件将不会压缩
gzip_min_length 1k;

#启用压缩功能时,协议的最小版本,默认HTTP/1.1
gzip_http_version 1.0 | 1.1;

#指定Nginx服务需要向服务器申请的缓存空间的个数和大小,平台不同,默认:32 4k或者16 8k;
gzip_buffers number size;

#指明仅对哪些类型的资源执行压缩操作;默认为gzip_types text/html,不用显示指定,否则出错
gzip_types mime-type ...;

#如果启用压缩,是否在响应报文首部插入“Vary: Accept-Encoding”,一般建议打开
gzip_vary on | off;

#预压缩,即直接从磁盘找到对应文件的gz后缀的式的压缩文件返回给用户,无需消耗服务器CPU
#注意: 来自于ngx_http_gzip_static_module模块
gzip_static on | off;
vim /usr/local/nginx/conf/nginx.conf

示例:
[root@nginx-node1 ~]# echo hello hahaha > /data/web/html/small.html
[root@nginx-node1 ~]# du -sh /usr/local/nginx/logs/access.log
7.6M /usr/local/nginx/logs/access.log
[root@nginx-node1 ~]# cat /usr/local/nginx/logs/access.log > /data/web/html/big.html
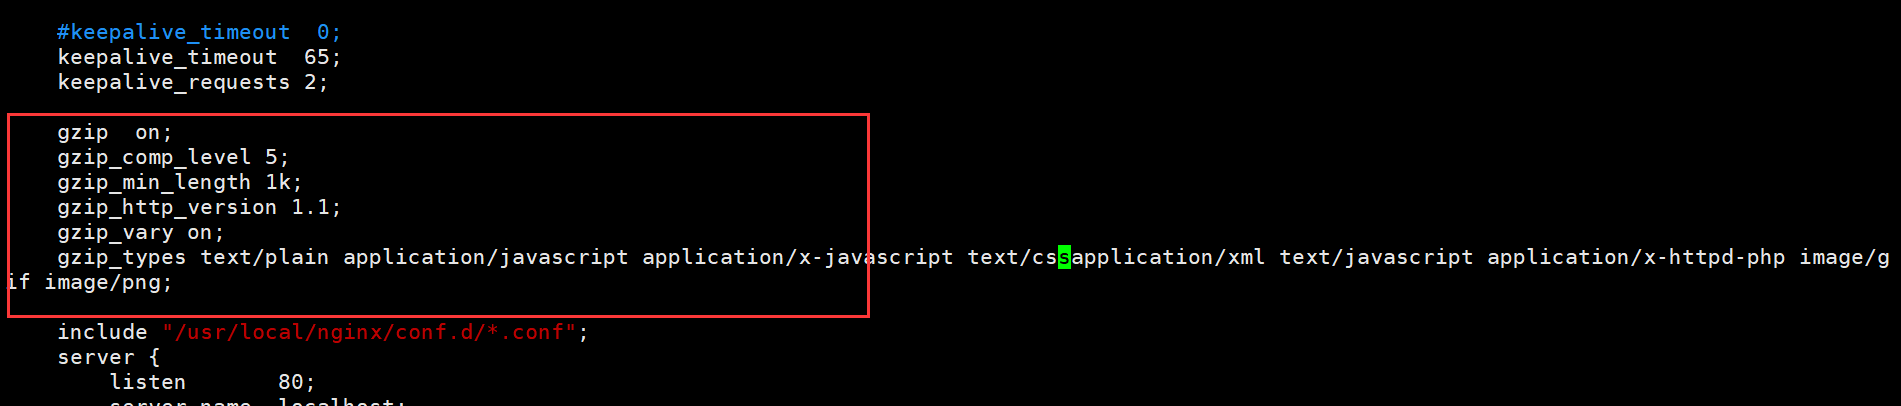
[root@nginx-node1 ~]# vim /usr/local/nginx/conf/nginx.conf
gzip on;
gzip_comp_level 5; #压缩比
gzip_min_length 1k; #最小压缩文件大小
gzip_http_version 1.1; #协议的最小版本
gzip_vary on; #是否在响应报文首部插入“Vary:
gzip_types text/plain application/javascript application/x-javascript text/cssapplication/xml text/javascript application/x-httpd-php image/gif image/png; #压缩哪些文件
[root@nginx-node1 ~]# nginx -s reload
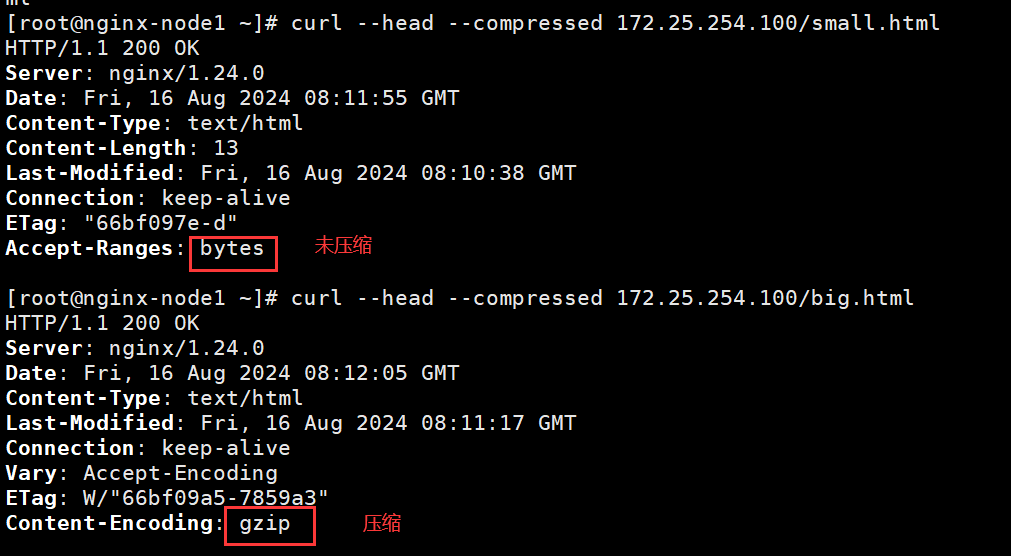
#查看效果,--head只显示响应头
[root@nginx-node1 ~]# curl --head --compressed 172.25.254.100/small.html
HTTP/1.1 200 OK
Server: nginx/1.24.0
Date: Fri, 16 Aug 2024 08:11:55 GMT
Content-Type: text/html
Content-Length: 13
Last-Modified: Fri, 16 Aug 2024 08:10:38 GMT
Connection: keep-alive
ETag: "66bf097e-d"
Accept-Ranges: bytes
[root@nginx-node1 ~]# curl --head --compressed 172.25.254.100/big.html
HTTP/1.1 200 OK
Server: nginx/1.24.0
Date: Fri, 16 Aug 2024 08:12:05 GMT
Content-Type: text/html
Last-Modified: Fri, 16 Aug 2024 08:11:17 GMT
Connection: keep-alive
Vary: Accept-Encoding
ETag: W/"66bf09a5-7859a3"
Content-Encoding: gzip
小拓展:du命令
du 会显示指定的目录或文件所占用的磁盘空间。
- -a或-all 显示目录中个别文件的大小。
- -b或-bytes 显示目录或文件大小时,以byte为单位。
- -c或--total 除了显示个别目录或文件的大小外,同时也显示所有目录或文件的总和。
- -D或--dereference-args 显示指定符号连接的源文件大小。
- -h或--human-readable 以K,M,G为单位,提高信息的可读性。
- -H或--si 与-h参数相同,但是K,M,G是以1000为换算单位。
- -k或--kilobytes 以1024 bytes为单位。
- -l或--count-links 重复计算硬件连接的文件。
- -L<符号连接>或--dereference<符号连接> 显示选项中所指定符号连接的源文件大小。
- -m或--megabytes 以1MB为单位。
- -s或--summarize 仅显示指定目录或文件的总大小,而不显示其子目录的大小。
- -S或--separate-dirs 显示个别目录的大小时,并不含其子目录的大小。
- -x或--one-file-xystem 以一开始处理时的文件系统为准,若遇上其它不同的文件系统目录则略过。
- -X<文件>或--exclude-from=<文件> 在<文件>指定目录或文件。
- --exclude=<目录或文件> 略过指定的目录或文件。
- --max-depth=<目录层数> 超过指定层数的目录后,予以忽略。
- --help 显示帮助。
- --version 显示版本信息。
4.3 Nginx的版本隐藏
用户在访问nginx的时候,我们可以从报文中获得nginx的版本,相对于裸漏版本号的nginx,我们把其隐藏起来更安全
[root@Nginx nginx-1.26.1]# vim src/core/nginx.h
#define nginx_version 1026001
#define NGINX_VERSION "1.0"
#define NGINX_VER "HAHA/" NGINX_VERSION
4.4 Nginx 变量使用
nginx的变量可以在配置文件中引用,作为功能判断或者日志等场景使用
变量可以分为内置变量和自定义变量
内置变量是由nginx模块自带,通过变量可以获取到众多的与客户端访问相关的值。
4.4.1 内置变量
官方文档
http://nginx.org/en/docs/varindex.html常用内置变量
$remote_addr;
#存放了客户端的地址,注意是客户端的公网IP

$args;
#变量中存放了URL中的所有参数
#例如:https://search.jd.com/Search?keyword=手机&enc=utf-8
#返回结果为: keyword=手机&enc=utf-8

$is_args
#如果有参数为? 否则为空
$document_root;
#保存了针对当前资源的请求的系统根目录,例如:/webdata/nginx/timinglee.org/lee。

$document_uri;
#保存了当前请求中不包含参数的URI,注意是不包含请求的指令
#比如:http://lee.timinglee.org/var?\id=11111会被定义为/var
#返回结果为:/var

$host;
#存放了请求的host名称
limit_rate 10240;
echo $limit_rate;
#如果nginx服务器使用limit_rate配置了显示网络速率,则会显示,如果没有设置, 则显示0

$remote_port;
#客户端请求Nginx服务器时随机打开的端口,这是每个客户端自己的端口

$remote_user;
#已经经过Auth Basic Module验证的用户名

$request_body_file;
#做反向代理时发给后端服务器的本地资源的名称

$request_method;
#请求资源的方式,GET/PUT/DELETE等

$request_filename;
#当前请求的资源文件的磁盘路径,由root或alias指令与URI请求生成的文件绝对路径,
#如:webdata/nginx/timinglee.org/lee/var/index.html

$request_uri;
#包含请求参数的原始URI,不包含主机名,相当于:$document_uri?$args,
#例如:/main/index.do?id=20190221&partner=search

$scheme;
#请求的协议,例如:http,https,ftp等

$server_protocol;
#保存了客户端请求资源使用的协议的版本,例如:HTTP/1.0,HTTP/1.1,HTTP/2.0等

$server_addr;
#保存了服务器的IP地址

$server_name;
#虚拟主机的主机名

$server_port;
#虚拟主机的端口号

$http_user_agent;
#客户端浏览器的详细信息

$http_cookie;
#客户端的所有cookie信息

$cookie_<name>
#name为任意请求报文首部字部cookie的key名

$http_<name>
#name为任意请求报文首部字段,表示记录请求报文的首部字段,ame的对应的首部字段名需要为小写,如果有
横线需要替换为下划线
#示例:
echo $http_user_agent;
echo $http_host;

$sent_http_<name>
#name为响应报文的首部字段,name的对应的首部字段名需要为小写,如果有横线需要替换为下划线,此变量有
问题
echo $sent_http_server;

$arg_<name>
#此变量存放了URL中的指定参数,name为请求url中指定的参数
echo $arg_id;
示例:
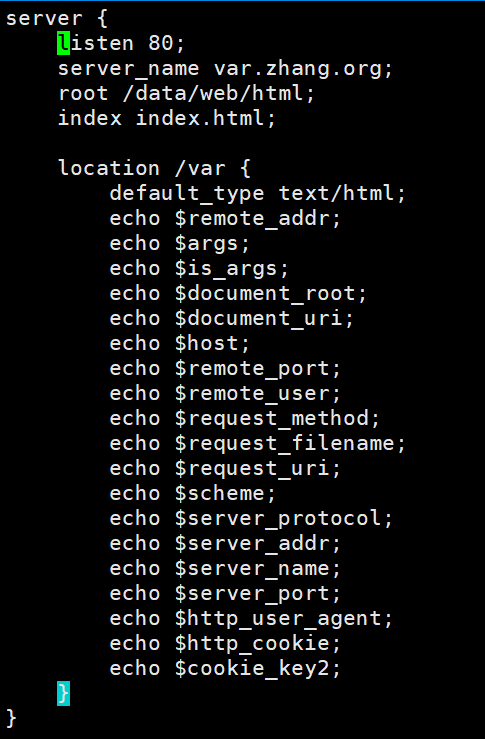
[root@nginx-node1 ~]# vim /usr/local/nginx/conf.d/var.conf
server {
listen 80;
server_name var.zhang.org;
root /data/web/html;
index index.html;
location /var {
default_type text/html;
echo $remote_addr;
echo $args;
echo $is_args;
echo $document_root;
echo $document_uri;
echo $host;
echo $remote_port;
echo $remote_user;
echo $request_method;
echo $request_filename;
echo $request_uri;
echo $scheme;
echo $server_protocol;
echo $server_addr;
echo $server_name;
echo $server_port;
echo $http_user_agent;
echo $http_cookie;
echo $cookie_key2;
}
}
[root@nginx-node1 ~]# nginx -s reload
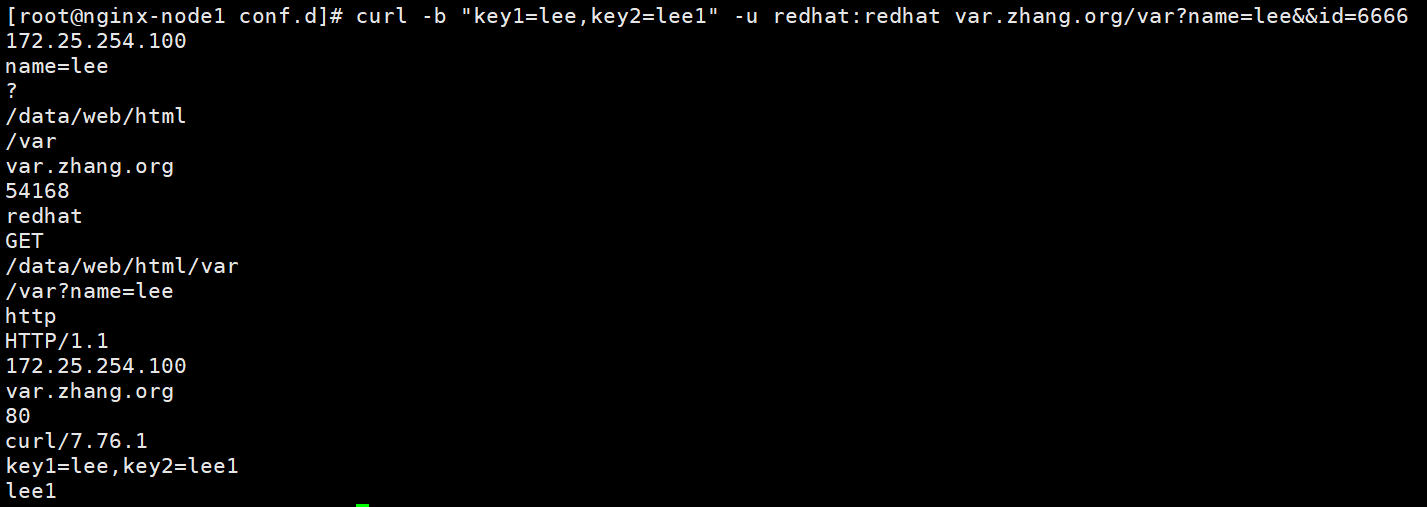
[root@nginx-node1 ~]# curl -b "key1=lee,key2=lee1" -u redhat:redhat var.zhang.org/var?name=lee&&id=6666
172.25.254.100
name=lee
?
/data/web/html
/var
var.zhang.org
34958
redhat
GET
/data/web/html/var
/var?name=lee
http
HTTP/1.1
172.25.254.100
var.zhang.org
80
curl/7.76.1
key1=lee,key2=lee1
lee1
4.4.2 自定义变量
假如需要自定义变量名称和值,使用指令set $variable value;
语法格式:
Syntax: set $variable value;
Default: —
Context: server, location, if
示例:
[root@nginx-node1 ~]# vim /usr/local/nginx/conf.d/var.conf
server {
    listen 80;
    server_name var.zhang.org;
    root /data/web/html;
    index index.html;

    location /var {
        default_type text/html;
        set $timinglee lee;
        echo $timinglee;
    }
}

[root@nginx-node1 ~]# nginx -s reload
[root@nginx-node1 ~]#  curl -b "key1=lee,key2=lee1" -u lee:lee var.zhang.org/var?name=lee&&id=6666
lee

五 Nginx Rewrite 相关功能
·Nginx服务器利用 ngx_http_rewrite_module 模块解析和处理rewrite请求
·此功能依靠 PCRE(perl compatible regular expression),因此编译之前要安装PCRE库
·rewrite是nginx服务器的重要功能之一,用于实现URL的重写,URL的重写是非常有用的功能
·比如它可以在我们改变网站结构之后,不需要客户端修改原来的书签,也无需其他网站修改我们的链接,就可以设置为访问
·另外还可以在一定程度上提高网站的安全性。
5.1 ngx_http_rewrite_module 模块指令
官方文档: https://nginx.org/en/docs/http/ngx_http_rewrite_module.html
5.1.1 if 指令 (判断)
官方文档:
https://nginx.org/en/docs/http/ngx_http_rewrite_module.html#if用于条件匹配判断,并根据条件判断结果选择不同的Nginx配置,可以配置在server或location块中进行配置,Nginx的if语法仅能使用if做单次判断,不支持使用if else或者if elif这样的多重判断,用法如下:
if (条件匹配) {
  action
}
使用正则表达式对变量进行匹配,匹配成功时if指令认为条件为true,否则认为false,变量与表达式之间使用以下符号链接:
= 		#比较变量和字符串是否相等,相等时if指令认为该条件为true,反之为false
!=	 	#比较变量和字符串是否不相等,不相等时if指令认为条件为true,反之为false
~ 		#区分大小写字符,可以通过正则表达式匹配,满足匹配条件为真,不满足匹配条件为假
!~ 		#区分大小写字符,判断是否匹配,不满足匹配条件为真,满足匹配条件为假

~* 		#不区分大小写字符,可以通过正则表达式匹配,满足匹配条件为真,不满足匹配条件为假
!~* 	#不区分大小字符,判断是否匹配,满足匹配条件为假,不满足匹配条件为真

-f 和 !-f 	#判断请求的文件是否存在和是否不存在
-d 和 !-d 	#判断请求的目录是否存在和是否不存在
-x 和 !-x 	#判断文件是否可执行和是否不可执行
-e 和 !-e 	#判断请求的文件或目录是否存在和是否不存在(包括文件,目录,软链接)

#注意:
#如果$变量的值为空字符串或0,则if指令认为该条件为false,其他条件为true。
#nginx 1.0.1之前$变量的值如果以0开头的任意字符串会返回false
示例:
[root@nginx-node1 ~]# vim /usr/local/nginx/conf.d/vars.conf
server {
    listen 80;
    server_name var.zhang.org;
    root /data/web/html;
    index index.html;

    location /test2 {
    if ( !-e $request_filename ){
        echo "$request_filename is not exist";
       }
    }

    location /test10 {
    if ( !-e $request_filename ){
        echo "$request_filename is not exist";
       }
    }

}
[root@nginx-node1 ~]# nginx -s reload
[root@nginx-node1 ~]# curl var.zhang.org/test2/
test2
[root@nginx-node1 ~]# curl var.zhang.org/test10/
/data/web/html/test10/ is not exist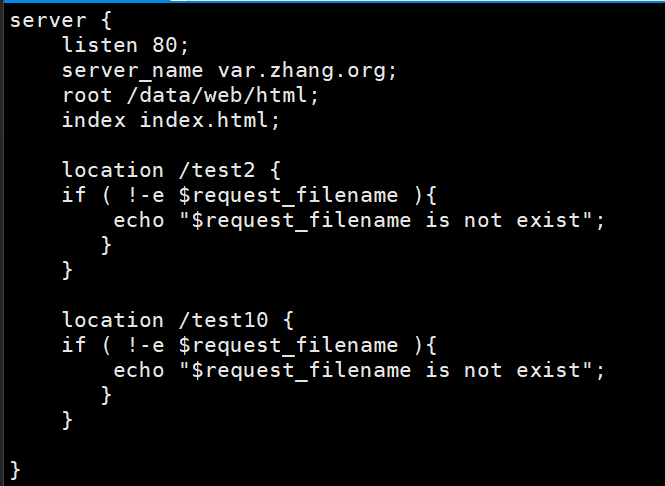

5.1.2 set 指令 (设置)
指定key并给其定义一个变量,变量可以调用Nginx内置变量赋值给key
另外set定义格式为set $key value,value可以是text, variables和两者的组合。
[root@nginx-node1 ~]# vim /usr/local/nginx/conf.d/vars.conf
server {
    listen 80;
    server_name var.zhang.org;
    root /data/web/html;
    index index.html;

    location /test10{
      set $name haha;
      echo $name;
    }

}
[root@nginx-node1 ~]# nginx -s reload

#测试
[root@nginx-node1 ~]# curl var.zhang.org/test10/
haha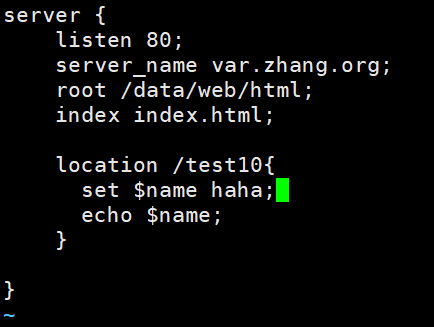

5.1.3 break 指令 (中断)
用于中断当前相同作用域(location)中的其他Nginx配置与该指令处于同一作用域的Nginx配置中,位于它前面的配置生效位于后面的 ngx_http_rewrite_module 模块中指令就不再执行
Nginx服务器在根据配置处理请求的过程中遇到该指令的时候,回到上一层作用域继续向下读取配置,、该指令可以在server块和locationif块中使用
注意: 如果break指令在location块中后续指令还会继续执行,只是不执行 ngx_http_rewrite_module模块的指令,其它指令还会执行
使用语法如下:
[root@nginx-node1 ~]# vim /usr/local/nginx/conf.d/vars.conf
server {
listen 80;
server_name var.zhang.org;
root /data/web/html;
index index.html;
location /nobreak{
default_type text/html;
set $name hehe;
echo $name;
set $id 777;
echo $id;
}
location /break{
default_type text/html;
set $name hehe;
echo $name;
break;
set $id 777;
echo $id;
}
}
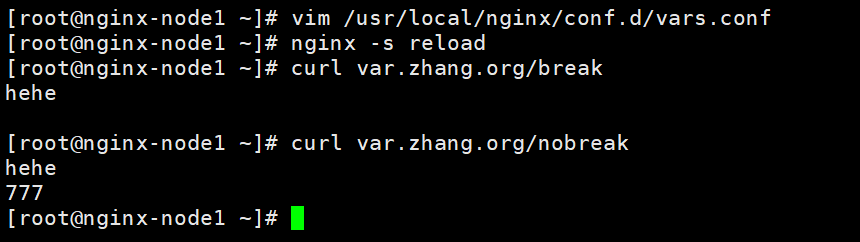
[root@nginx-node1 ~]# nginx -s reload
[root@nginx-node1 ~]# curl var.zhang.org/break
hehe
[root@nginx-node1 ~]# curl var.zhang.org/nobreak
hehe
777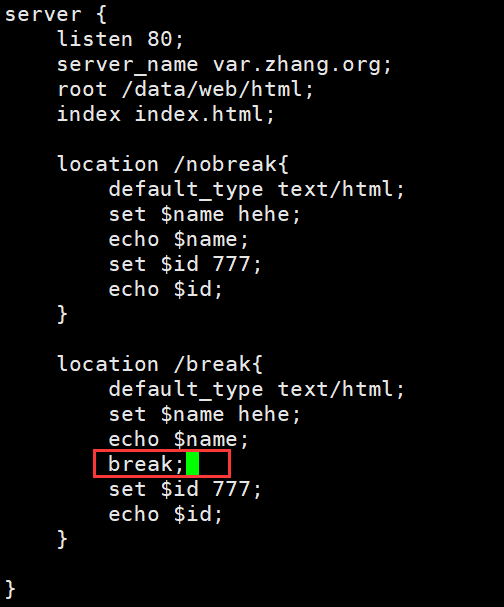
5.1.4 return 指令 (返回)
return用于完成对请求的处理,并直接向客户端返回响应状态码,比如:可以指定重定向URL(对于特殊重定向状态码,301/302等) 或者是指定提示文本内容(对于特殊状态码403/500等),处于此指令后的所有配置都将不被执行,return可以在server、if 和 location块进行配置
语法格式:
return code; #返回给客户端指定的HTTP状态码
return code [text]; #返回给客户端的状态码及响应报文的实体内容
#可以调用变量,其中text如果有空格,需要用单或双引号
return code URL; #返回给客户端的URL地址
示例:
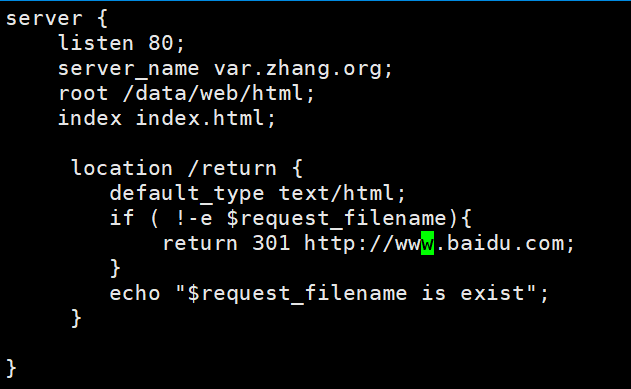
[root@nginx-node1 ~]# vim /usr/local/nginx/conf.d/vars.conf
server {
listen 80;
server_name var.zhang.org;
root /data/web/html;
index index.html;
location /return {
default_type text/html;
if ( !-e $request_filename){
return 301 http://www.baidu.com;
}
echo "$request_filename is exist";
}
}
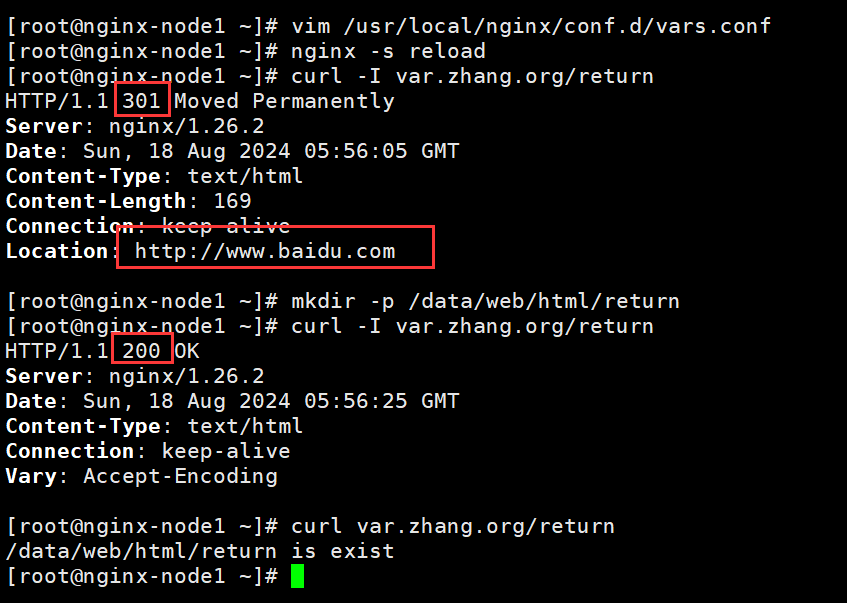
[root@nginx-node1 ~]# nginx -s reload
[root@nginx-node1 ~]# curl -I var.zhang.org/return
HTTP/1.1 301 Moved Permanently
Server: nginx/1.26.2
Date: Sun, 18 Aug 2024 05:56:05 GMT
Content-Type: text/html
Content-Length: 169
Connection: keep-alive
Location: http://www.baidu.com
#创建文件
[root@nginx-node1 ~]# mkdir -p /data/web/html/return
[root@nginx-node1 ~]# curl -I var.zhang.org/return
HTTP/1.1 200 OK
Server: nginx/1.26.2
Date: Sun, 18 Aug 2024 05:56:25 GMT
Content-Type: text/html
Connection: keep-alive
Vary: Accept-Encoding
[root@nginx-node1 ~]# curl var.zhang.org/return
/data/web/html/return is exist
5.2 rewrite 指令
通过正则表达式的匹配来改变URI,可以同时存在一个或多个指令,按照顺序依次对URI进行匹配,
rewrite主要是针对用户请求的URL或者是URI做具体处理
官方文档:
https://nginx.org/en/docs/http/ngx_http_rewrite_module.html#rewrite语法格式 :
rewrite regex replacement [flag];rewrite将用户请求的URI基于regex所描述的模式进行检查,匹配到时将其替换为表达式指定的新的URI
注意:如果在同一级配置块中存在多个rewrite规则,那么会自下而下逐个检查;被某条件规则替换完成后,会重新一轮的替换检查,隐含有循环机制,但不超过10次;如果超过,提示500响应码,[flag]所表示的标志位用于控制此循环机制如果替换后的URL是以http://或https://开头,则替换结果会直接以重定向返回给客户端, 即永久重定向301
正则表达式格式
. 		#匹配除换行符以外的任意字符
\w 		#匹配字母或数字或下划线或汉字
\s	  #匹配任意的空白符
\d    #匹配数字
\b    #匹配单词的开始或结束
^     #匹配字付串的开始
$     #匹配字符串的结束
*     #匹配重复零次或更多次
+     #匹配重复一次或更多次
?     #匹配重复零次或一次
(n)   #匹配重复n次
{n,}  #匹配重复n次或更多次
{n,m} #匹配重复n到m次
*?    #匹配重复任意次,但尽可能少重复
+?    #匹配重复1次或更多次,但尽可能少重复
??    #匹配重复0次或1次,但尽可能少重复
{n,m}?    #匹配重复n到m次,但尽可能少重复
{n,}?     #匹配重复n次以上,但尽可能少重复
\W        #匹配任意不是字母,数字,下划线,汉字的字符
\S        #匹配任意不是空白符的字符
\D        #匹配任意非数字的字符
\B        #匹配不是单词开头或结束的位置
[^x]     #匹配除了x以外的任意字符
[^lee]   #匹配除了magedu 这几个字母以外的任意字符
5.2.1 rewrite flag 使用介绍
利用nginx的rewrite的指令,可以实现url的重新跳转,rewrite有四种不同的flag,分别是redirect(临时重定向302)、permanent(永久重定向301)、break和last。其中前两种是跳转型的flag,后两种是代理型
·跳转型指由客户端浏览器重新对新地址进行请求
·代理型是在WEB服务器内部实现跳转
rewrite 格式
Syntax: rewrite regex replacement [flag]; #通过正则表达式处理用户请求并返回替换后的数据包。
Default: —
Context: server, location, if
flag 说明
redirect;
#临时重定向,重写完成后以临时重定向方式直接返回重写后生成的新URL给客户端
#由客户端重新发起请求;使用相对路径,或者http://或https://开头,状态码:302

permanent;
#重写完成后以永久重定向方式直接返回重写后生成的新URL给客户端
#由客户端重新发起请求,状态码:301

break;
#重写完成后,停止对当前URL在当前location中后续的其它重写操作
#而后直接跳转至重写规则配置块之后的其它配置,结束循环,建议在location中使用
#适用于一个URL一次重写

last;
#重写完成后,停止对当前URI在当前location中后续的其它重写操作,
#而后对新的URL启动新一轮重写检查,不建议在location中使用
#适用于一个URL多次重写,要注意避免出现超过十次以及URL重写后返回错误的给用户
5.2.2 rewrite案例: 域名永久与临时重定向
域名的临时的调整,后期可能会变,之前的域名或者URL可能还用、或者跳转的目的域名和URL还会跳转,这种情况浏览器不会缓存跳转,临时重定向不会缓存域名解析记录(A记录),但是永久重定向会缓存。
示例: 因业务需要,将访问源域名 var.zhang.org 的请求永久重定向到 www.zhang.com
location / {
  root /data/nginx/html/pc;
  index index.html;
  rewrite / http://www.timinglee.com permanent;
  #rewrite / http://www.timinglee.com redirect;
}
#重启Nginx并访问域名 http://www.timinglee.org 进行测试
301是永久的,302是临时的
[root@nginx-node1 ~]# vim /usr/local/nginx/conf.d/vars.conf
server {
listen 80;
server_name var.zhang.org;
root /data/web/html;
index index.html;
location / {
root /data/web/var;
index index.html;
#rewrite / http://www.zhang.com permanent;
#rewrite / http://www.zhang.com redirect;
}
}
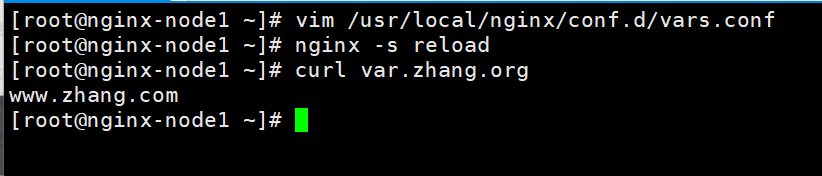
[root@nginx-node1 ~]# mkdir -p /data/web/var
[root@nginx-node1 ~]# echo www.zhang.com > /data/web/var/index.html
[root@nginx-node1 ~]# nginx -s reload
[root@nginx-node1 ~]# curl var.zhang.org
www.zhang.com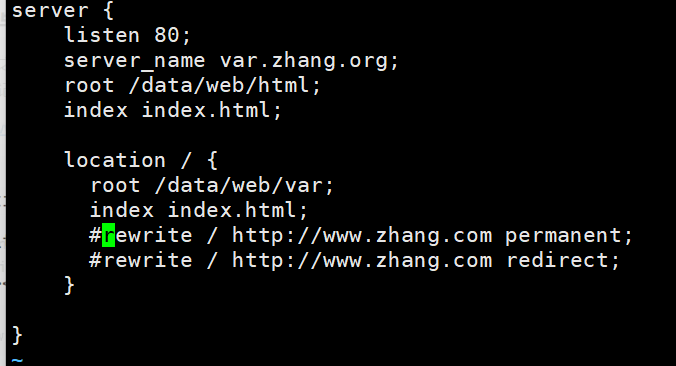
5.2.2.1 永久重定向301
域名永久型调整,即域名永远跳转至另外一个新的域名,之前的域名再也不使用,跳转记录可以缓存到客户端浏览器
永久重定向会缓存DNS解析记录, 浏览器中有 from disk cache 信息,即使nginx服务器无法访问,浏览器也会利用缓存进行重定向
比如: 京东早期的域名 www.360buy.com 由于与360公司类似,于是后期永久重定向到了 www.jd.com
示例:
永久重定向
[root@nginx-node1 ~]# vim /usr/local/nginx/conf.d/vars.conf
server {
    listen 80;
    server_name var.zhang.org;
    root /data/web/html;
    index index.html;

    location / {
      root /data/web/var;
      index index.html;
      rewrite / http://www.zhang.com permanent;
      #rewrite / http://www.zhang.com redirect;
    }

}
[root@nginx-node1 ~]# nginx -s reload
[root@nginx-node1 ~]# curl -I var.zhang.org
HTTP/1.1 301 Moved Permanently
Server: nginx/1.26.2
Date: Sun, 18 Aug 2024 03:19:00 GMT
Content-Type: text/html
Content-Length: 169
Connection: keep-alive
Location: http://www.zhang.com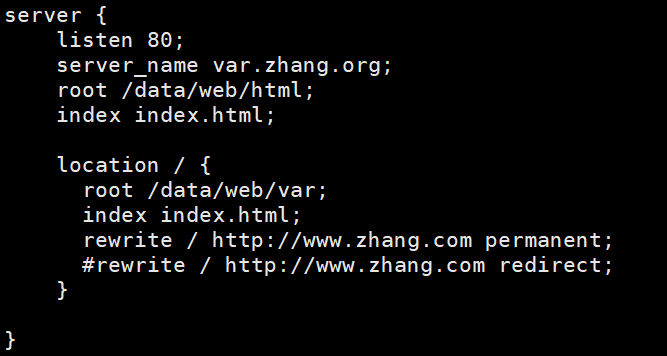
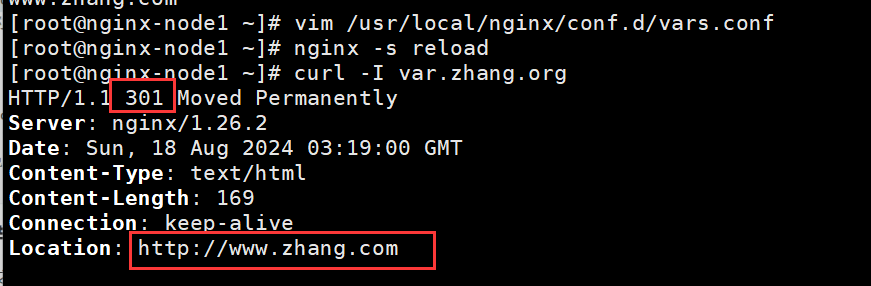
注意:curl不支持重定向
5.2.2.2 临时重定向302
域名临时重定向,告诉浏览器域名不是固定重定向到当前目标域名,后期可能随时会更改,因此浏览器不会缓存当前域名的解析记录,而浏览器会缓存永久重定向的DNS解析记录,这也是临时重定向与永久重定向最大的本质区别。
即当nginx服务器无法访问时,浏览器不能利用缓存,而导致重定向失败
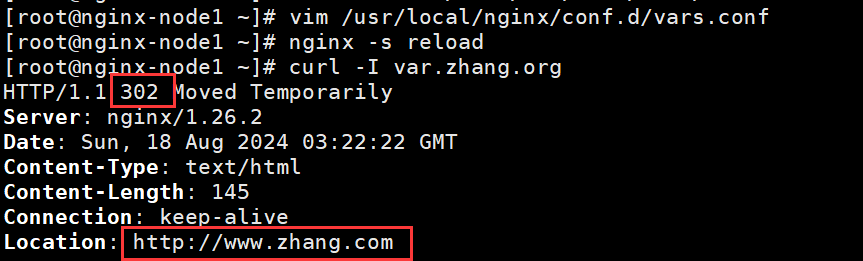
[root@nginx-node1 ~]# vim /usr/local/nginx/conf.d/vars.conf
server {
    listen 80;
    server_name var.zhang.org;
    root /data/web/html;
    index index.html;

    location / {
      root /data/web/var;
      index index.html;
      #rewrite / http://www.zhang.com permanent;
      rewrite / http://www.zhang.com redirect;
    }

}
      [root@nginx-node1 ~]# nginx -s reload
[root@nginx-node1 ~]# curl -I var.zhang.org
HTTP/1.1 302 Moved Temporarily
Server: nginx/1.26.2
Date: Sun, 18 Aug 2024 03:22:22 GMT
Content-Type: text/html
Content-Length: 145
Connection: keep-alive
Location: http://www.zhang.com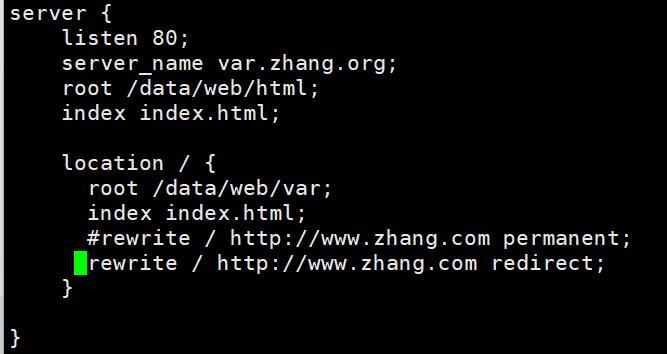
5.2.3 rewrite 案例: break 与 last
测试:
访问break请求被rewrite至test1,而访问test1转递请求再次被rewrite发送至test2,此测试last和break分别有什么区别
原本的情况
[root@nginx-node1 ~]# mkdir /data/web/html/{test1,test2,break,last} -p
[root@nginx-node1 ~]# echo test1 > /data/web/html/test1/index.html
[root@nginx-node1 ~]# echo test2 > /data/web/html/test2/index.html
[root@nginx-node1 ~]# echo break > /data/web/html/break/index.html
[root@nginx-node1 ~]# echo last > /data/web/html/last/index.html


[root@nginx-node1 ~]# vim /usr/local/nginx/conf.d/vars.conf
server {
    listen 80;
    server_name var.zhang.org;
    root /data/web/html;
    index index.html;

    location /break {
      root /data/web/html;
      rewrite ^/break/(.*) /test1/$1;
      rewrite ^/test1/(.*) /test2/$1;
    }

    location /last {
      root /data/web/html;
      rewrite ^/last/(.*) /test1/$1;
      rewrite ^/test1/(.*) /test2/$1;
    }
    location /test1 {
      root /data/web/html;
      default_type text/html;
      echo "hahahahahhaa";
    }
    location /test2 {
      root /data/web/html;
    }
}


[root@nginx-node1 ~]# nginx -s reload

#浏览器访问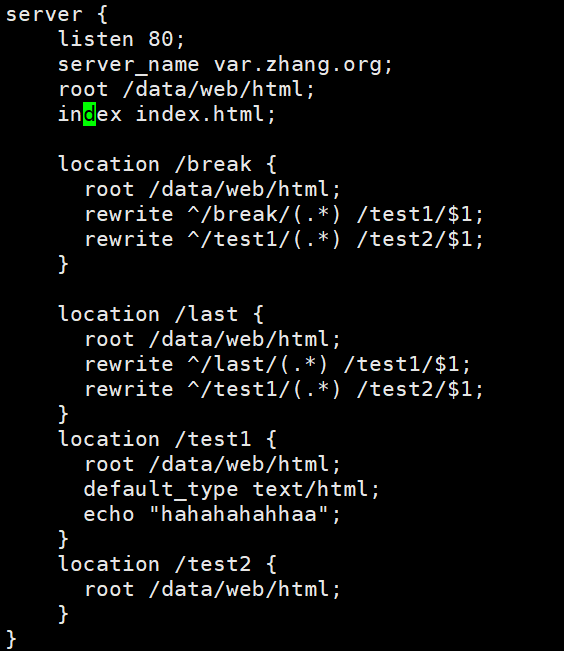


测试:break和last的区别
[root@nginx-node1 ~]# vim /usr/local/nginx/conf.d/vars.conf
server {
listen 80;
server_name var.zhang.org;
root /data/web/html;
index index.html;
location /break {
root /data/web/html;
rewrite ^/break/(.*) /test1/$1 break; #$1表示的是(.*) 的元素
rewrite ^/test1/(.*) /test2/$1;
}
location /last {
root /data/web/html;
rewrite ^/last/(.*) /test1/$1 last;
rewrite ^/test1/(.*) /test2/$1;
}
location /test1 {
root /data/web/html;
default_type text/html;
echo "hahahahahhaa";
}
location /test2 {
root /data/web/html;
}
}
[root@nginx-node1 ~]# nginx -s reload
#浏览器访问
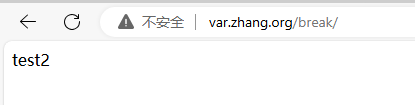
var.zhang.org/break/index.html
var.zhang.org/last/index.html
#注意查看区别,如果break不加index.html则无法访问到正确的路径
[root@nginx-node1 ~]# curl -L var.zhang.org
www.zhang.com
[root@nginx-node1 ~]# curl -L var.zhang.org/break
hahahahahhaa
[root@nginx-node1 ~]# curl -L var.zhang.org/break/index.html
test1
[root@nginx-node1 ~]# curl -L var.zhang.org/last
hahahahahhaa
[root@nginx-node1 ~]# curl -L var.zhang.org/last/index.html
hahahahahhaa
var.zhang.org/break/index.html


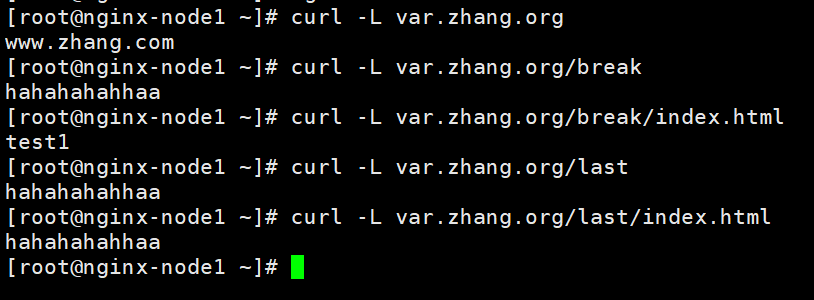
总结:break会中断后面的所有的location的内容,而last只会中断自己这个location的内容
5.2.4 rewrite案例: 自动跳转 https
案例:基于通信安全考虑公司网站要求全站 https,因此要求将在不影响用户请求的情况下将http请求全部自动跳转至 https,另外也可以实现部分 location 跳转
#制作证书和密钥
[root@nginx-node1 ~]# cd /usr/local/nginx/
[root@nginx-node1 nginx]# mkdir certs
[root@nginx-node1 nginx]# cd
[root@nginx-node1 ~]# openssl req -newkey rsa:2048 -nodes -sha256 -keyout /usr/local/nginx/certs/zhang.org.key -x509 -days 365 -out /usr/local/nginx/certs/zhang.org.crt
.......+.+..+....+.....+++++++++++++++++++++++++++++++++++++++++++++++++++++++++++++++++*..+.....+.......+...+..+...+....+..+.+++++++++++++++++++++++++++++++++++++++++++++++++++++++++++++++++*......+........+...+...+.......+.....+.......+...+.....+.......+.....+.+......+......+............+.....+......+.......+...+..+....+.....+.........+.+...+......+..+..........+...+..+............+..........+...+...+.....+.+........+...............+......+.+...+...........+....+..+.............+..+...+.......+...+.....+...+.......+...+..+.+..+.......+...........+.....................+.+............+..+.........+......+....+..+.......+..+.............+......+.........+..+.+.........+.....+...+..........+........+.............+.....+.......+.........+...+...........+.........+.......+........+.+.....+.+......+..+...+....+........+...+...+......+.........+.......+.................+...+...+.+........+.+......+...+...........+......+....+.....+.+.....+.+........+....+..+.+............+..+..........+++++++++++++++++++++++++++++++++++++++++++++++++++++++++++++++++
......+..............+.+....................+....+...+..+++++++++++++++++++++++++++++++++++++++++++++++++++++++++++++++++*..+............+++++++++++++++++++++++++++++++++++++++++++++++++++++++++++++++++*......+..+....+...........+....+........+.......+.......................+...+...+....+..+.+........................+..................+...+.........+...+...........+.......+........+....+.................+++++++++++++++++++++++++++++++++++++++++++++++++++++++++++++++++
-----
You are about to be asked to enter information that will be incorporated
into your certificate request.
What you are about to enter is what is called a Distinguished Name or a DN.
There are quite a few fields but you can leave some blank
For some fields there will be a default value,
If you enter '.', the field will be left blank.
-----
Country Name (2 letter code) [XX]:CN
State or Province Name (full name) []:shannxi
Locality Name (eg, city) [Default City]:xi`an
Organization Name (eg, company) [Default Company Ltd]:haha
Organizational Unit Name (eg, section) []:webserver
Common Name (eg, your name or your server's hostname) []:www,haha.org
Email Address []:haha@qq.com
[root@nginx-node1 ~]# cd /usr/local/nginx/certs
[root@nginx-node1 certs]# ls
zhang.org.crt zhang.org.key
[root@nginx-node1 certs]# cd
#编写配置文件
[root@nginx-node1 ~]# vim /usr/local/nginx/conf.d/hhost.conf
server{
listen 80;
listen 443 ssl;
server_name www.zhang.org;
root /data/web/html;
index index.html;
ssl_certificate /usr/local/nginx/certs/zhang.org.crt;
ssl_certificate_key /usr/local/nginx/certs/zhang.org.key;
ssl_session_cache shared:SSL:1m;
ssl_session_timeout 5m;
location / {
if ( $scheme = http ){
rewrite /(.*) https://$host/$1 redirect;
}
if ( !-e $request_filename ){
rewrite /(.*) https://$host/index.html redirect;
}
}
}
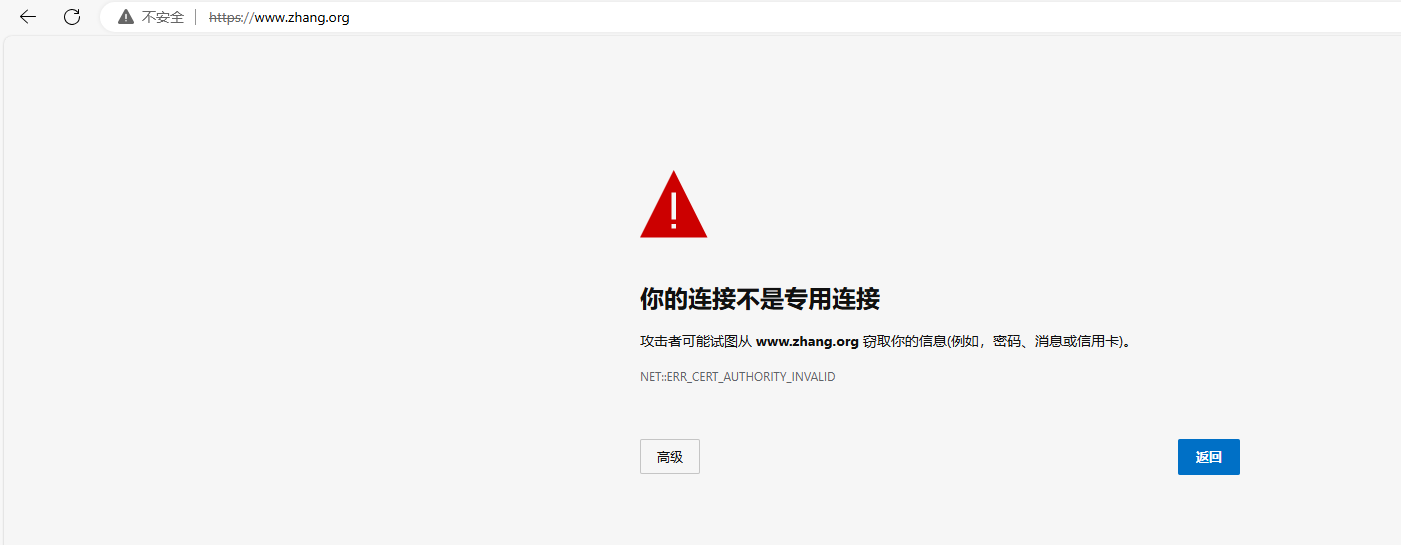
[root@nginx-node1 ~]# nginx -s reload
#浏览器访问www.zhang。org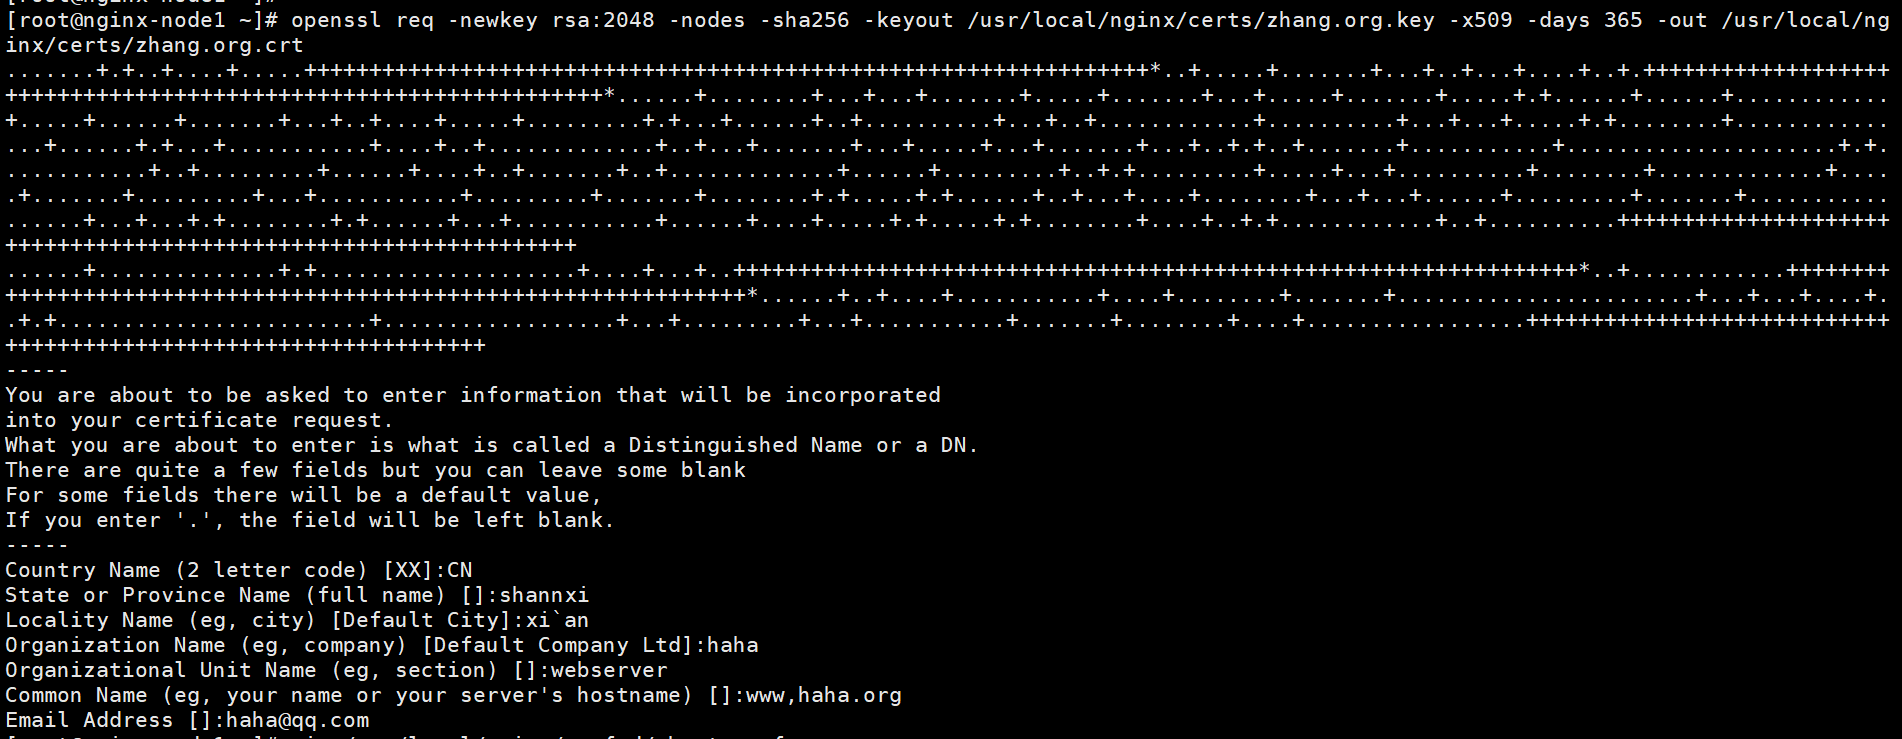


5.2.5 rewrite 案例: 判断文件是否存在
案例:当用户访问到公司网站的时输入了一个错误的URL,可以将用户重定向至官网首页
[root@nginx-node1 ~]# vim /usr/local/nginx/conf.d/hhost.conf
location / {
root /data/nginx/html/pc;
index index.html;
if (!-e $request_filename) {
  rewrite .* http://www.timinglee.org/index.html; #实现客户端浏览器的302跳转
  #rewrite .* /index.html; #web服务器内部跳转
  }
}
[root@nginx-node1 ~]# nginx -s reload
#访问测试
5.3 Nginx 防盗链
防盗链基于客户端携带的referer实现,referer是记录打开一个页面之前记录是从哪个页面跳转过来的标记信息,如果别人只链接了自己网站图片或某个单独的资源,而不是打开了网站的整个页面,这就是盗链,referer就是之前的那个网站域名,正常的referer信息有以下几种:
none:      #请求报文首部没有referer首部,
            #比如用户直接在浏览器输入域名访问web网站,就没有referer信息。

blocked:        #请求报文有referer首部,但无有效值,比如为空。

server_names:   #referer首部中包含本主机名及即nginx 监听的server_name。

arbitrary_string:  #自定义指定字符串,但可使用*作通配符。示例: *.timinglee.org www.timinglee.*

regular expression:    #被指定的正则表达式模式匹配到的字符串,要使用~开头,例如:~.*\.timinglee\.com
正常通过搜索引擎搜索web 网站并访问该网站的referer信息如下:
172.25.254.1 - - [22/Jul/2024:09:27:36 +0800] "GET /favicon.ico HTTP/1.1" 404 149
"http://lee.timinglee.org/" "Mozilla/5.0 (Windows NT 10.0; Win64; x64; rv:109.0)
Gecko/20100101 Firefox/115.0"
2024/07/22 09:27:36 [error] 34596#0: *205 open()
"/webdata/nginx/timinglee.org/lee/favicon.ico" failed (2: No such file or
directory), client: 172.25.254.1, server: lee.timinglee.org, request: "GET
/favicon.ico HTTP/1.1", host: "lee.timinglee.org", referrer:
"http://lee.timinglee.org/"
5.3.1 实现盗链
放置两个照片,一个在 /data/web/html/images中,一个在/data/web/html中
[root@nginx-node1 ~]# mkdir -p /data/web/html/images
[root@nginx-node1 ~]# cd /data/web/html
[root@nginx-node1 html]# ls
big.html  daolian.png  images      last    small.html  test2
break     error1       index.html  return  test1
[root@nginx-node1 html]# cd images/
[root@nginx-node1 images]# ls
ha.jpg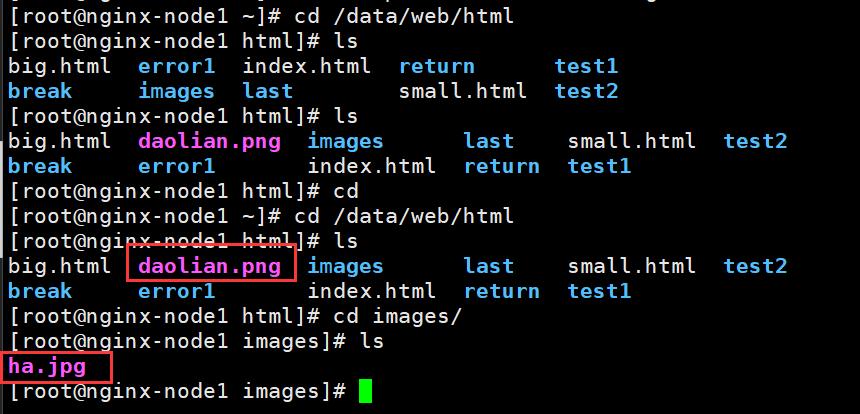
在一个web 站点盗链另一个站点的资源信息,比如:图片、视频等
#新建一个主机172.25.254.20,盗取另一台主机lee.timinglee.org/images/logo.png的图片
[root@daolian ~]# yum install httpd -y
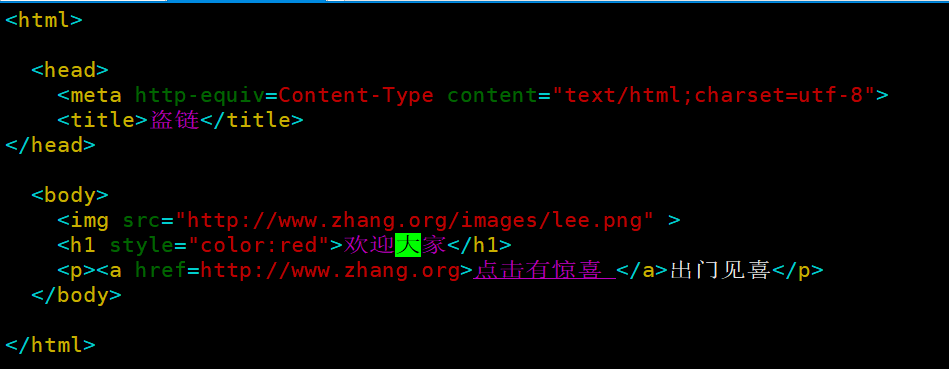
[root@daolian ~]# vim /var/www/html/index.html
<html>
<head>
<meta http-equiv=Content-Type content="text/html;charset=utf-8">
<title>盗链</title>
</head>
<body>
<img src="http://www.zhang.org/images/lee.png" >
<h1 style="color:red">欢迎大家</h1>
<p><a href=http://www.zhang.org>点击有惊喜 </a>出门见喜</p>
</body>
</html>
[root@daolian ~]# systemctl restart httpd

5.3.2 实现防盗链
基于访问安全考虑,nginx支持通过ngx_http_referer_module模块,检查访问请求的referer信息是否有效实现防盗链功能
官方文档:
https://nginx.org/en/docs/http/ngx_http_referer_module.html示例: 定义防盗链:
[root@nginx-node1 ~]# vim /usr/local/nginx/conf.d/hhost.conf
server{
       listen 80;
       server_name www.zhang.org;
       root /data/web/html;

       location /images  {
          valid_referers none blocked server_names *.zhang.org ~\.baidu\.;
          if ($invalid_referer){
             #return 403;
             rewrite ^/ http://lee.timinglee.org/daolian.png permanent;
           }
       }
}
[root@nginx-node1 ~]# nginx -s reload
#浏览器访问172.25.254.10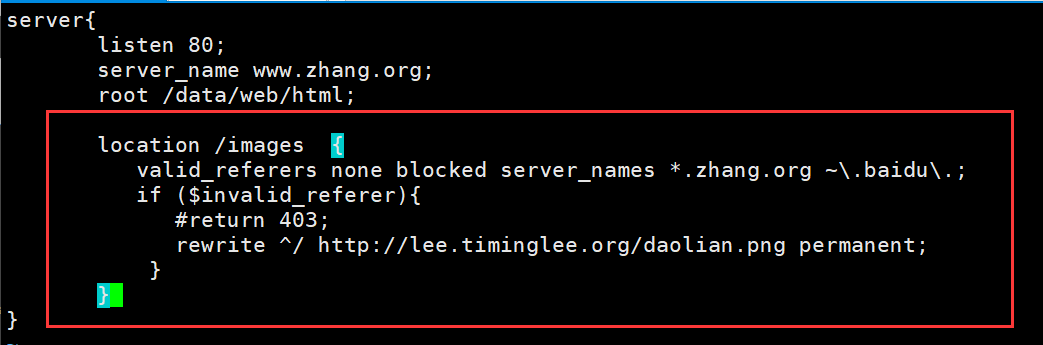
172.25.254.10再次访问,发现原本盗取的图片已经改变

六 Nginx 反向代理功能
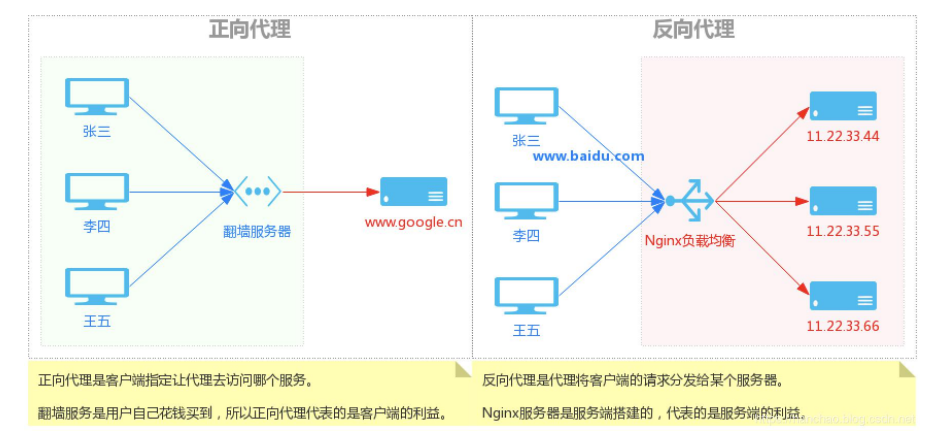
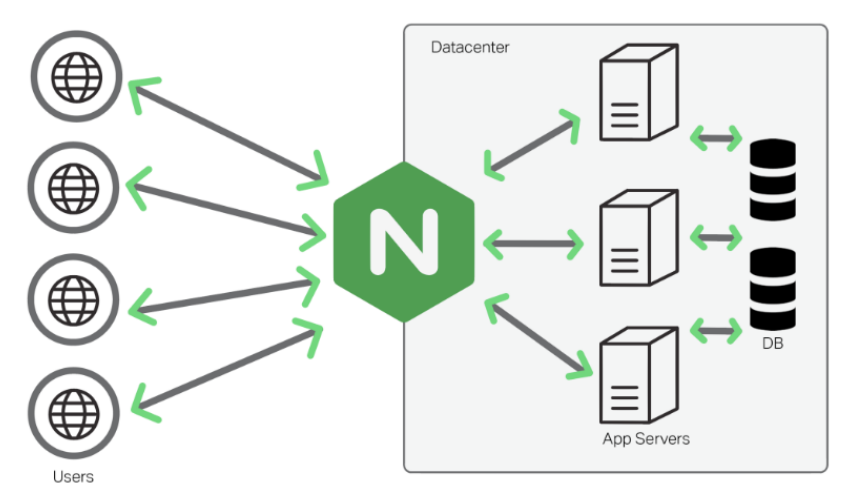
反向代理:reverse proxy,指的是代理外网用户的请求到内部的指定的服务器,并将数据返回给用户的一种方式,这是用的比较多的一种方式。
Nginx 除了可以在企业提供高性能的web服务之外,另外还可以将 nginx 本身不具备的请求通过某种预定义的协议转发至其它服务器处理,不同的协议就是Nginx服务器与其他服务器进行通信的一种规范,主要在不同的场景使用以下模块实现不同的功能
ngx_http_proxy_module:     #将客户端的请求以http协议转发至指定服务器进行处理
ngx_http_upstream_module   #用于定义为proxy_pass,fastcgi_pass,uwsgi_pass
                           #等指令引用的后端服务器分组

ngx_stream_proxy_module:   #将客户端的请求以tcp协议转发至指定服务器处理
ngx_http_fastcgi_module:   #将客户端对php的请求以fastcgi协议转发至指定服务器助理
ngx_http_uwsgi_module:     #将客户端对Python的请求以uwsgi协议转发至指定服务器处理
逻辑调用关系:
访问逻辑图:
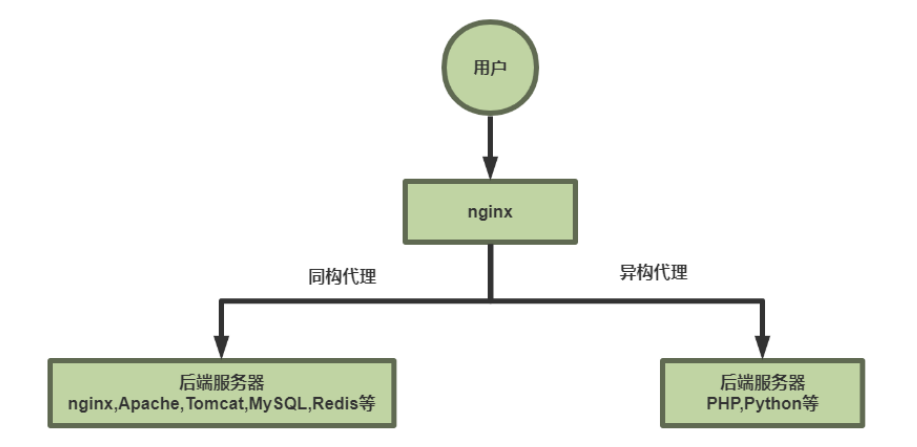
同构代理:用户不需要其他程序的参与,直接通过http协议或者tcp协议访问后端服务器 (访问的都是静态的)
异构代理:用户访问的资源时需要经过处理后才能返回的,比如php,python,等等,这种访问资源需要经过处理才能被访问
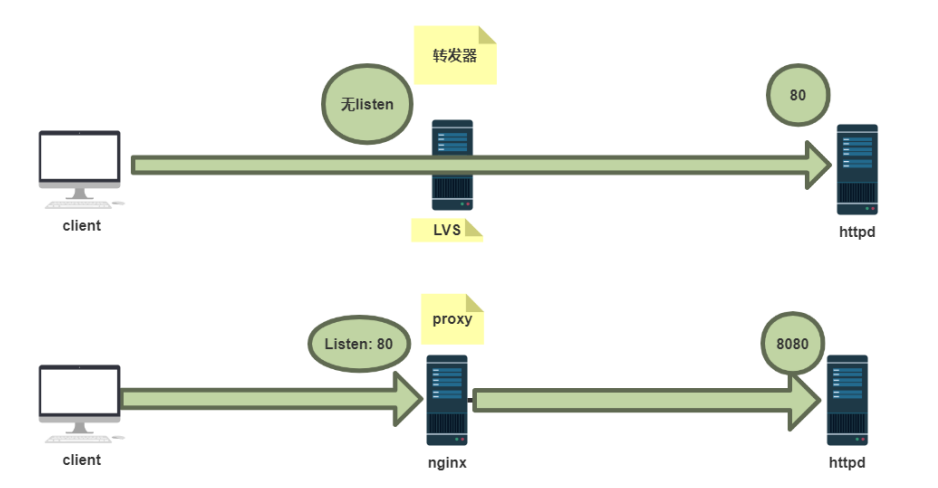
lvs不开端口,也不访问流量
nginx开端口
6.1 实现 http 反向代理
官方文档: https://nginx.org/en/docs/http/ngx_http_proxy_module.html,
6.1.1 http 协议反向代理
6.1.1.1 反向代理配置参数
#官方文档:https://nginx.org/en/docs/http/ngx_http_proxy_module.html#proxy_pass
proxy_pass;          #用来设置将客户端请求转发给的后端服务器的主机
                     #可以是主机名(将转发至后端服务做为主机头首部)、IP地址:端口的方式
                     #也可以代理到预先设置的主机群组,需要模块ngx_http_upstream_module支持

#示例:
location /web {
  index index.html;
  proxy_pass http://172.25.254.30:8080;   #8080后面无uri,即无 / 符号,
                                          #需要将location后面url 附加到proxy_pass指定的 url后面
                                          #此行为类似于root
                                         #proxy_pass指定的uri不带斜线将访问的/web
                                         #等于访问后端服务器
  proxy_pass http://172.25.254.40:8080/;  #8080后面有uri,即有 / 符号
                                          #相当于置换,即访问/web时实际返回proxy_pass后面uri内容
                                          #此行为类似于alias
                                          #proxy_pass指定的uri带斜线
                                          #等于访问后端服务器的
                                          #http://172.25.254.40:8080/index.html
                                          #内容返回给客户端
  }                                       # http://nginx/web/index.html ==>http://1:8080
#重启Nginx测试访问效果:
#curl -L http://www.zhang.org/web
#如果location定义其uri时使用了正则表达式模式(包括~,~*,但不包括^~),则proxy_pass之后必须不能使用uri
#即不能有/ ,用户请求时传递的uri将直接附加至后端服务器之后
server {
...
server_name HOSTNAME;
location ~|~* /uri/ {
  proxy_pass http://host:port; #proxy_pass后面的url 不能加/
}
...
}
http://HOSTNAME/uri/ --> http://host/uri/
proxy_hide_header field;    #用于nginx作为反向代理的时候
                            #在返回给客户端http响应时
                            #隐藏后端服务器相应头部的信息
                            #可以设置在http,server或location块

#示例: 隐藏后端服务器ETag首部字段
location /web {
  index index.html;
  proxy_pass http://10.0.0.18:8080/;
  proxy_hide_header ETag;
}
proxy_pass_header field; #透传
#默认nginx在响应报文中不传递后端服务器的首部字段Date, Server, X-Pad, X-Accel等参数
#如果要传递的话则要使用 proxy_pass_header field声明将后端服务器返回的值传递给客户端
#field 首部字段大小不敏感
#示例:透传后端服务器的Server和Date首部给客户端,同时不再响应报中显示前端服务器的Server字段
proxy_pass_header Server;
proxy_pass_header Date;proxy_pass_request_body on | off;
#是否向后端服务器发送HTTP实体部分,可以设置在http,server或location块,默认即为开启proxy_pass_request_headers on | off;
#是否将客户端的请求头部转发给后端服务器,可以设置在http,server或location块,默认即为开启proxy_set_header;
#可更改或添加客户端的请求头部信息内容并转发至后端服务器,比如在后端服务器想要获取客户端的真实IP的时候,就要更改每一个报文的头部
#示例:
location ~ /web {
proxy_pass http://172.25.254.20:80;
proxy_hide_header ETag;
proxy_pass_header Server;
proxy_pass_request_body on;
proxy_pass_request_headers on;
proxy_set_header X-Forwarded-For $remote_addr;
}
[root@apache20 ~]# vim /etc/httpd/conf/httpd.conf
LogFormat "\"%{X-Forwarded-For}i\" %l %u %t \"%r\" %>s %b \"%{Referer}i\" \"% {User-Agent}i\"" combined
访问后看后端服务器日志proxy_connect_timeout time;
#配置nginx服务器与后端服务器尝试建立连接的超时时间,默认为60秒
用法如下:proxy_connect_timeout 6s;
#60s为自定义nginx与后端服务器建立连接的超时时间,超时会返回客户端504响应码proxy_read_timeout time;
#配置nginx服务器向后端服务器或服务器组发起read请求后,等待的超时时间,默认60sproxy_send_timeout time;
#配置nginx项后端服务器或服务器组发起write请求后,等待的超时 时间,默认60sproxy_http_version 1.0;
#用于设置nginx提供代理服务的HTTP协议的版本,默认http 1.0proxy_ignore_client_abort off;
#当客户端网络中断请求时,nginx服务器中断其对后端服务器的请求。即如果此项设置为on开启,则服务器、会忽略客户端中断并一直等着代理服务执行返回,如果设置为off,则客户端中断后Nginx也会中断客户端请求并立即记录499日志,默认为off6.1.1.2 实战案例: 反向代理单台 web 服务器
需要三台主机
nginx:172.25.254.100
web10:172.25.254.10 有http
web20:172.25.254.20 有http
[root@web10 ~]# yum install httpd -y
[root@web10 ~]# echo web10 - 172.25.254.10 > /var/www/html/index.html
[root@web10 ~]# systemctl start httpd


[root@web20 ~]# yum install httpd -y
[root@web20 ~]# mkdir -p /var/www/html/static
[root@web20 ~]# echo web20 - 172.25.254.20 > /var/www/html/static/index.html
#端口修改为8080
[root@web20 ~]# vim /etc/httpd/conf/httpd.conf
Listen 8080
[root@web20 ~]# systemctl start httpd
要求:将用户对域 www.zhang.org 的请求转发给后端服务器处理
[root@nginx-node1 ~]# vim /usr/local/nginx/conf.d/http.conf
server {
  listen 80;
  server_name www.zhang1.org;
  location / {
    proxy_pass http://172.25.254.10:80;    #用来设置将客户端请求转发给的后端服务器的主机
  }
}
[root@nginx-node1 ~]# nginx -s reload
[root@nginx-node1 ~]# curl www.zhang1.org
web10 - 172.25.254.10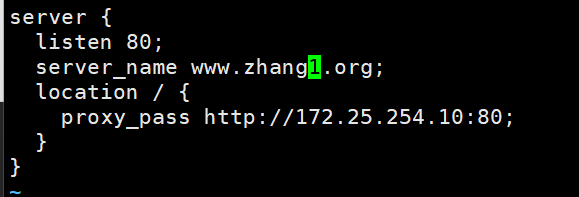

6.1.1.3 实战案例: 指定 location 实现反向代理
6.1.1.3.1 针对指定的 location
[root@nginx-node1 ~]# vim /usr/local/nginx/conf.d/http.conf
server {
  listen 80;
  server_name www.zhang1.org;
  location / {
    proxy_pass http://172.25.254.10:80;
  }
  location ~ /static {
    proxy_pass http://172.25.254.20:8080;
  }
}
[root@nginx-node1 ~]# nginx -s reload

[root@nginx-node1 ~]# curl www.zhang1.org
web10 - 172.25.254.10
[root@nginx-node1 ~]# curl www.zhang1.org/static/
web20 - 172.25.254.20 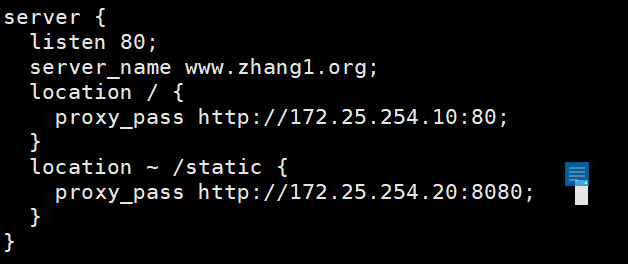
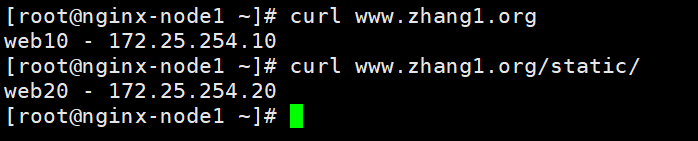
6.1.1.3.2 针对特定的资源实现代理
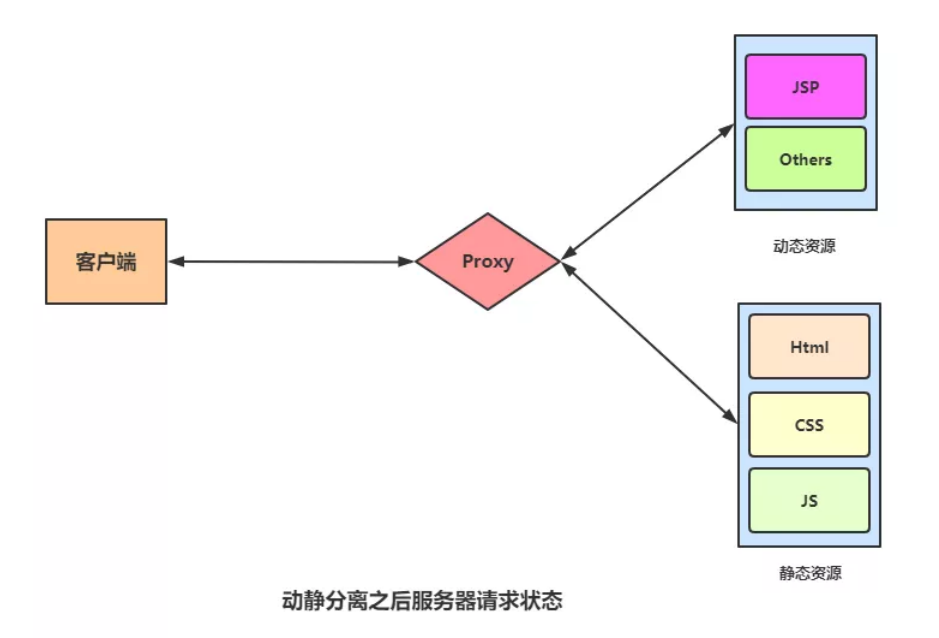
动静分离
#下载php
[root@web10 ~]# yum install php -y
[root@web10 ~]# systemctl restart httpd
[root@web10 ~]# vim /var/www/html/index.php
<?php
  phpinfo();
?>

[root@nginx-node1 ~]# vim /usr/local/nginx/conf.d/http.conf
server {
  listen 80;
  server_name www.zhang1.org;
  location ~ \.php$ {
    proxy_pass http://172.25.254.10:80;
  }
  location ~ /static {
    proxy_pass http://172.25.254.20:8080;
  }
}
[root@nginx-node1 ~]# nginx -s reload
#浏览器访问
  www.zhang1.org/index.php
  www.zhang1.org/static/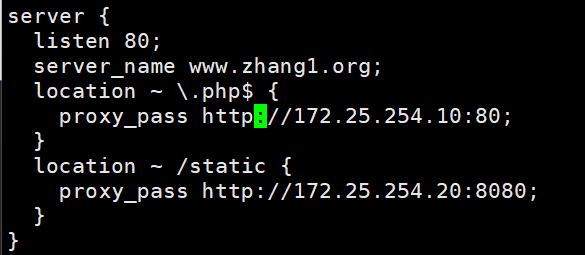

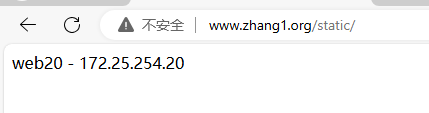
6.1.1.4 反向代理示例: 缓存功能
缓存需要配置的地方:
·在著配置文件配置定义缓存信息: vim /usr/local/nginx/conf/nginx.conf
proxy_cache_path /usr/local/nginx/proxy_cache levels=1:2:2 keys_zone=proxycache:20m inactive=120s max_size=1G;
·子配置文件中配置
server {
  listen 80;
  server_name www.zhang1.org;
  location ~ /static {
    proxy_pass http://172.25.254.20:8080;
    proxy_cache proxycache;        #名字为/usr/local/nginx/conf/nginx.conf中的keys_zone=proxycache
    proxy_cache_key $request_uri;
    proxy_cache_valid 200 302 301 10m;  #200 302 301 缓存10分钟
    proxy_cache_valid any 1m;           #其他的缓存1分钟
  }
}
缓存功能默认关闭状态,需要手动配置才能启用
proxy_cache zone_name | off; 默认off
#指明调用的缓存,或关闭缓存机制;Context:http, server, location
#zone_name 表示缓存的名称.需要由proxy_cache_path事先定义
proxy_cache_key string;
#缓存中用于“键”的内容,默认值:proxy_cache_key $scheme$proxy_host$request_uri;proxy_cache_valid [code ...] time;
#定义对特定响应码的响应内容的缓存时长,定义在http{...}中
示例:
proxy_cache_valid 200 302 10m;
proxy_cache_valid 404 1m;proxy_cache_path;
#定义可用于proxy功能的缓存;Context:http
proxy_cache_path path [levels=levels] [use_temp_path=on|off]
keys_zone=zone_name:size [inactive=time] [max_size=size] [manager_files=number]
[manager_sleep=time] [manager_threshold=time] [loader_files=number]
[loader_sleep=time] [loader_threshold=time] [purger=on|off]
[purger_files=number] [purger_sleep=time] [purger_threshold=time];
#示例:在http配置定义缓存信息
proxy_cache_path /var/cache/nginx/proxy_cache #定义缓存保存路径,proxy_cache会自动创建
levels=1:2:2 #定义缓存目录结构层次
#1:2:2可以生成2^4x2^8x2^8=2^20=1048576个目录
keys_zone=proxycache:20m #指内存中缓存的大小,主要用于存放key和metadata(如:使用次数)
#一般1M可存放8000个左右的key
inactive=120s #缓存有效时间
max_size=10g; #最大磁盘占用空间,磁盘存入文件内容的缓存空间最大值
#调用缓存功能,需要定义在相应的配置段,如server{...};或者location等
proxy_cache proxycache;
proxy_cache_key $request_uri; #对指定的数据进行MD5的运算做为缓存的key
proxy_cache_valid 200 302 301 10m; #指定的状态码返回的数据缓存多长时间
proxy_cache_valid any 1m; #除指定的状态码返回的数据以外的缓存多长时间,必须设置,
否则不会缓存
proxy_cache_use_stale error | timeout | invalid_header | updating | http_500 |
http_502 | http_503 | http_504 | http_403 | http_404 | off ; #默认是off
#在被代理的后端服务器出现哪种情况下,可直接使用过期的缓存响应客户端
#示例
proxy_cache_use_stale error http_502 http_503;
proxy_cache_methods GET | HEAD | POST ...;
#对哪些客户端请求方法对应的响应进行缓存,GET和HEAD方法总是被缓存
6.1.1.4.1 非缓存场景压测
[root@nginx-node1 ~]# ab -n1000 -c100 http://www.zhang1.org/static/index.html
.....
Concurrency Level:      100
Time taken for tests:   0.146 seconds
Complete requests:      1000
Failed requests:        0
Total transferred:      273000 bytes
HTML transferred:       22000 bytes
Requests per second:    6849.36 [#/sec] (mean)
Time per request:       14.600 [ms] (mean)
Time per request:       0.146 [ms] (mean, across all concurrent requests)
Transfer rate:          1826.05 [Kbytes/sec] received
.......
6.1.1.4.2 准备缓存配置
[root@nginx-node1 ~]# vim /usr/local/nginx/conf/nginx.conf
.....
proxy_cache_path /usr/local/nginx/proxy_cache levels=1:2:2 keys_zone=proxycache:20m inactive=120s max_size=1G;
.....
[root@nginx-node1 ~]# vim /usr/local/nginx/conf.d/http.conf
server {
  listen 80;
  server_name www.zhang1.org;
  location ~ \.php$ {
    proxy_pass http://172.25.254.10:80;
  }
  location ~ /static {
    proxy_pass http://172.25.254.20:8080;
    proxy_cache proxycache;  #名字为/usr/local/nginx/conf/nginx.conf中的keys_zone=proxycache
    proxy_cache_key $request_uri;
    proxy_cache_valid 200 302 301 10m;
    proxy_cache_valid any 1m;   #必须指定哪些响应码的缓存
  }
}
[root@nginx-node1 ~]# nginx -s reload
#发现有proxy_cache文件
[root@nginx-node1 ~]# cd /usr/local/nginx/
[root@nginx-node1 nginx]# ls
certs             conf    fastcgi_temp  logs         proxy_temp  scgi_temp
client_body_temp  conf.d  html          proxy_cache  sbin        uwsgi_temp


#再次测试
[root@nginx-node1 ~]# ab -n1000 -c100 http://www.zhang1.org/static/index.html

.......
Concurrency Level:      100
Time taken for tests:   0.087 seconds
Complete requests:      1000
Failed requests:        0
Total transferred:      273000 bytes
HTML transferred:       22000 bytes
Requests per second:    11433.41 [#/sec] (mean)
Time per request:       8.746 [ms] (mean)
Time per request:       0.087 [ms] (mean, across all concurrent requests)
Transfer rate:          3048.16 [Kbytes/sec] received
.......

#验证缓存目录结构及文件大小
[root@nginx-node1 ~]# tree /usr/local/nginx/proxy_cache/
/usr/local/nginx/proxy_cache/
├── 3
│   └── 6f
│       └── b9
│           └── 13ff6272220f8fc74e95385fb7db96f3
└── e
    └── 50
        └── 99
            └── 319432ef3663735a9d3cb4e0c1d9950e

6 directories, 2 files
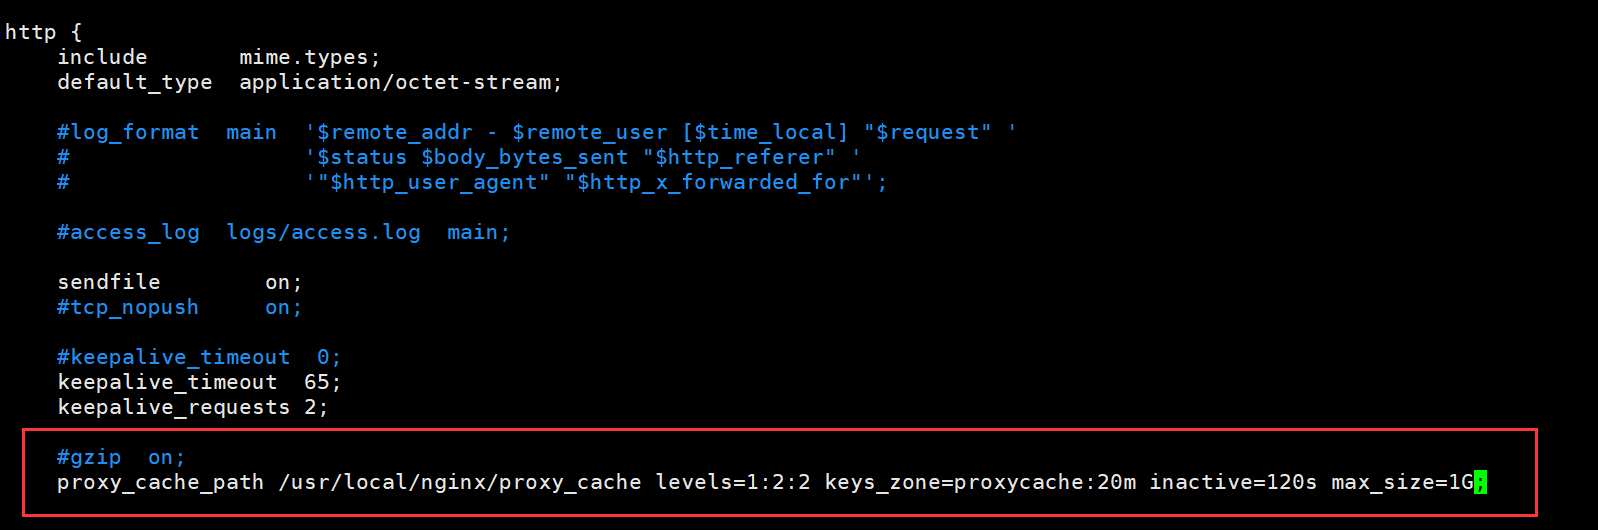
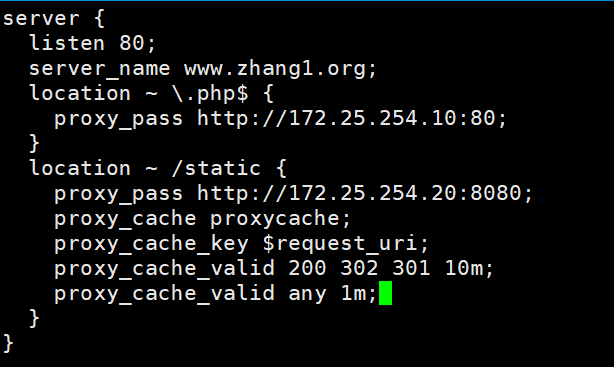


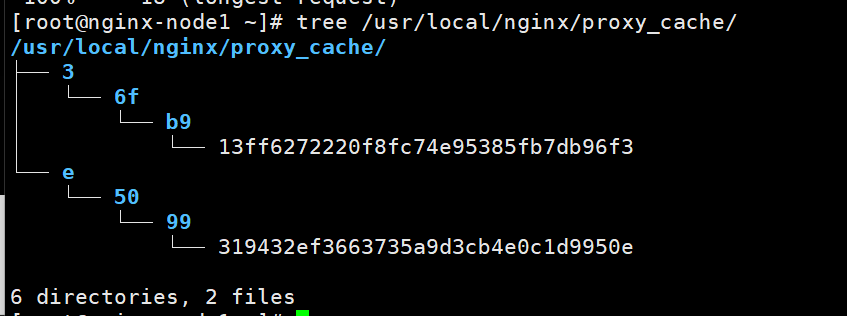
6.1.2 http 反向代理负载均衡
配置方法:
upstream webcluster{
  server 172.25.254.10:80 fail_timeout=15s max_fails=3;
  server 172.25.254.20:8080 fail_timeout=15s max_fails=3;
}

server {
  listen 80;
  server_name www.zhang1.org;
  location / {
    proxy_pass http://webcluster;
  }
}
在上一个节中Nginx可以将客户端的请求转发至单台后端服务器但是无法转发至特定的一组的服务器,而且不能对后端服务器提供相应的服务器状态监测,Nginx 可以基于ngx_http_upstream_module模块提供服务器分组转发、权重分配、状态监测、调度算法等高级功能
官方文档: https://nginx.org/en/docs/http/ngx_http_upstream_module.html
6.1.2.1 http upstream配置参数
#自定义一组服务器,配置在http块内
upstream name {
 server .....
 ......
}
#示例
upstream backend {
  server backend1.example.com weight=5;
  server 127.0.0.1:8080 max_fails=3 fail_timeout=30s;
  server unix:/tmp/backend3;
  server backup1.example.com backup;
}
server address [parameters];
#配置一个后端web服务器,配置在upstream内,至少要有一个server服务器配置。
#server支持的parameters如下:
weight=number #设置权重,默认为1,实现类似于LVS中的WRR,WLC等
max_conns=number #给当前后端server设置最大活动链接数,默认为0表示没有限制
max_fails=number #后端服务器的下线条件,当客户端访问时,对本次调度选中的后端服务器连续进行检测多少次,如果都失败就标记为不可用,默认为1次,当客户端访问时,才会利用TCP触发对探测后端服务器健康性检查,而非周期性的探测
fail_timeout=time #后端服务器的上线条件,对已经检测到处于不可用的后端服务器,每隔此时间间隔再次进行检测是否恢复可用,如果发现可用,则将后端服务器参与调度,默认为10秒
backup #设置为备份服务器,当所有后端服务器不可用时,才会启用此备用服务器
down #标记为down状态,可以平滑下线后端服务器
resolve #当server定义的是主机名的时候,当A记录发生变化会自动应用新IP而不用重启Nginx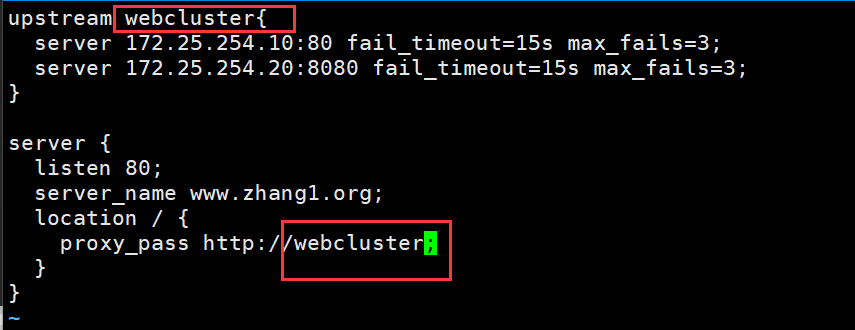
hash KEY [consistent];
#基于指定请求报文中首部字段或者URI等key做hash计算,使用consistent参数,将使用ketama一致性hash算法,适用于后端是Cache服务器(如varnish)时使用,consistent定义使用一致性hash运算,一致性hash基于取模运算hash $request_uri consistent;
#基于用户请求的uri做hash
hash $cookie_sessionid #基于cookie中的sessionid这个key进行hash调度,实现会话绑定ip_hash;
#源地址hash调度方法,基于的客户端的remote_addr(源地址IPv4的前24位或整个IPv6地址)做hash计算,以实现会话保持least_conn;
#最少连接调度算法,优先将客户端请求调度到当前连接最少的后端服务器,相当于LVS中的WLC6.1.2.2 反向代理示例: 后端多台 web服务器
环境说明:
172.25.254.100 #Nginx 代理服务器
172.25.254.10 #后端web A,Apache部署
172.25.254.20 #后端web B,Apache部署
部署后端 Apache服务器
[root@web10 ~]# yum install httpd -y
[root@web10 ~]# echo web10 - 172.25.254.10 > /var/www/html/index.html
[root@web10 ~]# systemctl start httpd


[root@web20 ~]# yum install httpd -y
[root@web20 ~]# mkdir -p /var/www/html/static
[root@web20 ~]# echo web20 - 172.25.254.20 > /var/www/html/static/index.html
#端口修改为8080
[root@web20 ~]# vim /etc/httpd/conf/httpd.conf
Listen 8080
[root@web20 ~]# systemctl start httpd
配置 nginx 反向代理
注意: 本节实验过程中先关闭缓存
注意:要写在server之外
[root@nginx-node1 ~]# vim /usr/local/nginx/conf.d/http.conf
upstream webcluster{
  server 172.25.254.10:80 fail_timeout=15s max_fails=3;
  server 172.25.254.20:8080 fail_timeout=15s max_fails=3;
}

server {
  listen 80;
  server_name www.zhang1.org;
  location / {
    proxy_pass http://webcluster;
  }
}
[root@nginx-node1 ~]# nginx -s reload

#测试
[root@nginx-node1 ~]# curl www.zhang1.org
web10 - 172.25.254.10
[root@nginx-node1 ~]# curl www.zhang1.org
web20 - 172.25.254.20
[root@nginx-node1 ~]# curl www.zhang1.org
web10 - 172.25.254.10
[root@nginx-node1 ~]# curl www.zhang1.org
web20 - 172.25.254.20
[root@nginx-node1 ~]# curl www.zhang1.org
web10 - 172.25.254.10
[root@nginx-node1 ~]# curl www.zhang1.org
web20 - 172.25.254.20
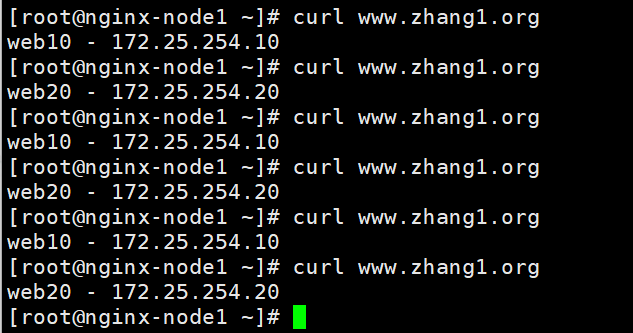
实战案例: 基于Cookie 实现会话绑定
ip_hash同一个客户端都到一个ip
[root@nginx-node1 ~]# vim /usr/local/nginx/conf.d/http.conf
upstream webcluster{
  ip_hash;
  server 172.25.254.10:80 fail_timeout=15s max_fails=3;
  server 172.25.254.20:8080 fail_timeout=15s max_fails=3;
}

server {
  listen 80;
  server_name www.zhang1.org;
  location / {
    proxy_pass http://webcluster;
  }
}
[root@nginx-node1 ~]# nginx -s reload

#测试
[root@nginx-node1 ~]# curl www.zhang1.org
web10 - 172.25.254.10
[root@nginx-node1 ~]# curl www.zhang1.org
web10 - 172.25.254.10
[root@nginx-node1 ~]# curl www.zhang1.org
web10 - 172.25.254.10
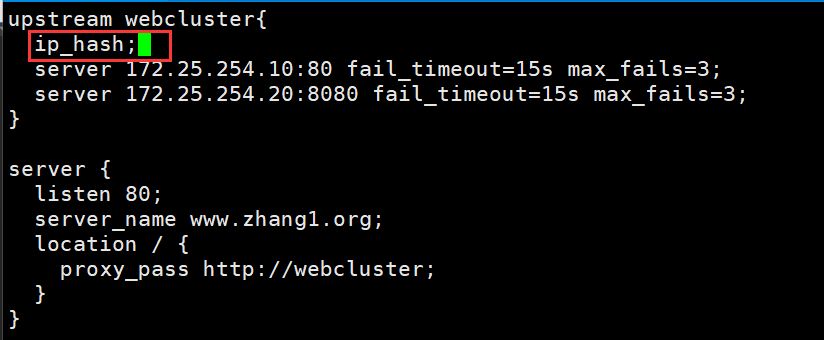
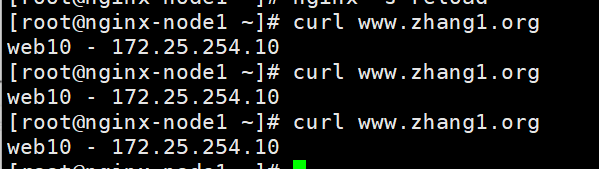
对uri进行hash
[root@nginx-node1 ~]# vim /usr/local/nginx/conf.d/http.conf
upstream webcluster{
  #ip_hash;
  hash $request_uri consistent;
  server 172.25.254.10:80 fail_timeout=15s max_fails=3;
  server 172.25.254.20:8080 fail_timeout=15s max_fails=3;
}

server {
  listen 80;
  server_name www.zhang1.org;
  location / {
    proxy_pass http://webcluster;
  }
}

[root@nginx-node1 ~]# nginx -s reload

#测试
[root@nginx-node1 ~]# curl www.zhang1.org
web20 - 172.25.254.20
[root@nginx-node1 ~]# curl www.zhang1.org
web20 - 172.25.254.20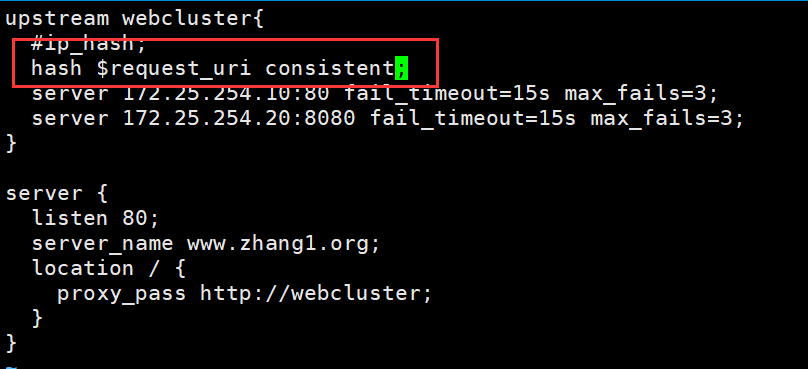
对cookie进行hash
是对lee的值进行hash
[root@nginx-node1 ~]# vim /usr/local/nginx/conf.d/http.conf
upstream webcluster{
  #ip_hash;
  #hash $request_uri consistent;
  hash $cookie_haha;
  server 172.25.254.10:80 fail_timeout=15s max_fails=3;
  server 172.25.254.20:8080 fail_timeout=15s max_fails=3;
}

server {
  listen 80;
  server_name www.zhang1.org;
  location / {
    proxy_pass http://webcluster;
  }
}

[root@nginx-node1 ~]# nginx -s reload

#测试
[root@nginx-node1 ~]# curl -b "haha=1" www.zhang1.org
web10 - 172.25.254.10
[root@nginx-node1 ~]# curl -b "haha=1" www.zhang1.org
web10 - 172.25.254.10
[root@nginx-node1 ~]# curl -b "haha=2" www.zhang1.org
web20 - 172.25.254.20
[root@nginx-node1 ~]# curl -b "haha=2" www.zhang1.org
web20 - 172.25.254.20
[root@nginx-node1 ~]# curl -b "haha=3" www.zhang1.org
web10 - 172.25.254.10
[root@nginx-node1 ~]# curl -b "haha=4" www.zhang1.org
web10 - 172.25.254.10
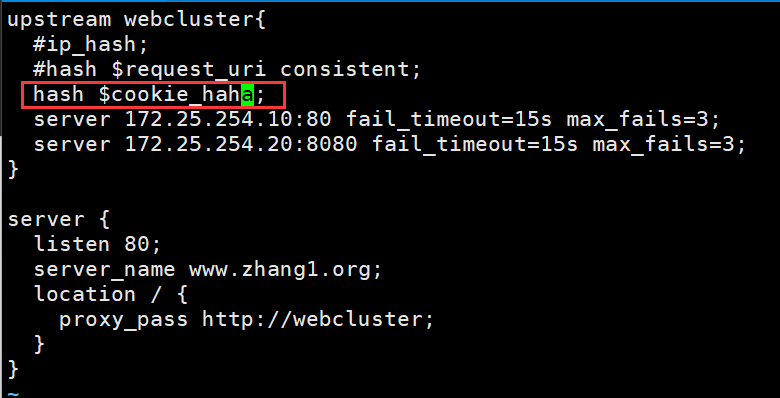
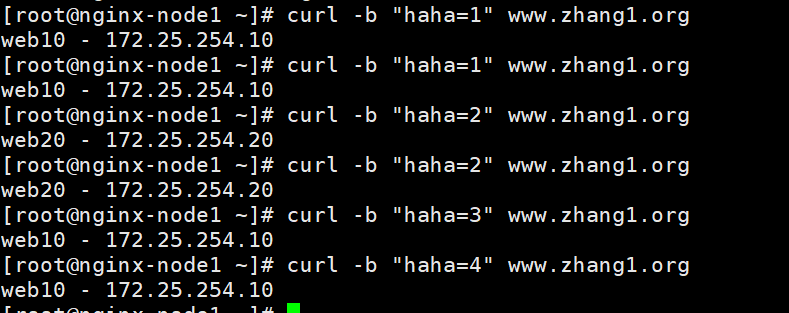
6.2 实现 Nginx 四层负载均衡
配置四层负载均衡方法:
stream {                        #定义stream相关的服务;Context:main
  upstream backend {            #定义后端服务器
    hash $remote_addr consistent;                 #定义调度算法
    server backend1.example.com:12345 weight=5;   #定义具体server
    server 127.0.0.1:12345 max_fails=3 fail_timeout=30s;
    server unix:/tmp/backend3;
  }
  server {                         #定义server
    listen 12345;                  #监听IP:PORT
    proxy_connect_timeout 1s;      #连接超时时间
    proxy_timeout 3s;              #转发超时时间
    proxy_pass backend;            #转发到具体服务器组
  }
}
例子:
stream{
    upstream dns {
        server 172.25.254.10:53 fail_timeout=15s max_fails=3;
        server 172.25.254.20:53 fail_timeout=15s max_fails=3;
    }

    server{
        listen 53 udp reuseport;
        proxy_timeout 20s;
        proxy_pass dns;
    }
}
Nginx在1.9.0版本开始支持tcp模式的负载均衡,在1.9.13版本开始支持udp协议的负载,udp主要用于DNS的域名解析,其配置方式和指令和http 代理类似,其基于ngx_stream_proxy_module模块实现tcp负载,另外基于模块ngx_stream_upstream_module实现后端服务器分组转发、权重分配、状态监测、调度算法等高级功能。
如果编译安装,需要指定 --with-stream 选项才能支持ngx_stream_proxy_module模块
官方文档:
https://nginx.org/en/docs/stream/ngx_stream_proxy_module.html
6.2.1 tcp负载均衡配置参数
#注意:tcp的负载均衡要卸载http语句块的外面
stream {                        #定义stream相关的服务;Context:main
  upstream backend {            #定义后端服务器
    hash $remote_addr consistent;                 #定义调度算法
    server backend1.example.com:12345 weight=5;   #定义具体server
    server 127.0.0.1:12345 max_fails=3 fail_timeout=30s;
    server unix:/tmp/backend3;
  }
  upstream dns {                     #定义后端服务器
    server 10.0.0.1:53;              #定义具体server
    server dns.example.com:53;
  }
  server {                         #定义server
    listen 12345;                  #监听IP:PORT
    proxy_connect_timeout 1s;      #连接超时时间
    proxy_timeout 3s;              #转发超时时间
    proxy_pass backend;            #转发到具体服务器组
  }
  server {
    listen 127.0.0.1:53 udp reuseport;
    proxy_timeout 20s;
    proxy_pass dns;
  }
  server {
    listen [::1]:12345;
    proxy_pass unix:/tmp/stream.socket;
  }
}
6.2.2 udp 负载均衡实例: DNS
#配置dns服务
[root@web10 ~]# yum install bind -y
[root@web20 ~]# yum install bind -y
[root@web10 ~]# vim /etc/named.conf
#做以下修改
.....
#       listen-on port 53 { 127.0.0.1; };
#       listen-on-v6 port 53 { ::1; };
.....
#       allow-query     { localhost; };
......
        dnssec-validation no;

[root@web10 ~]# vim /etc/named.rfc1912.zones
zone "zhang.org" IN {
        type master;
        file "zhang.org.zone";
        allow-update { none; };
};

[root@web10 ~]# cd /var/named/
[root@web10 named]# cp named.localhost zhang.org.zone -p
[root@web10 named]# vim zhang.org.zone
$TTL 1D
@       IN SOA  ns.zhang.org. root.zhang.org. (
                                        0       ; serial
                                        1D      ; refresh
                                        1H      ; retry
                                        1W      ; expire
                                        3H )    ; minimum
        NS      ns.zhang.org.
ns      A       172.25.254.10
www     A       172.25.254.10
[root@web10 named]# systemctl start named

#查看效果
[root@web10 named]# dig www.zhang.org @172.25.254.10

; <<>> DiG 9.16.23-RH <<>> www.zhang.org @172.25.254.10
;; global options: +cmd
;; Got answer:
;; ->>HEADER<<- opcode: QUERY, status: NOERROR, id: 38222
;; flags: qr aa rd ra; QUERY: 1, ANSWER: 1, AUTHORITY: 0, ADDITIONAL: 1

;; OPT PSEUDOSECTION:
; EDNS: version: 0, flags:; udp: 1232
; COOKIE: c64866eb31aca12f0100000066c23d7b344be2dbae39d4e7 (good)
;; QUESTION SECTION:
;www.zhang.org.			IN	A

;; ANSWER SECTION:
www.zhang.org.		86400	IN	A	172.25.254.10

;; Query time: 0 msec
;; SERVER: 172.25.254.10#53(172.25.254.10)
;; WHEN: Mon Aug 19 02:29:15 CST 2024
;; MSG SIZE  rcvd: 86

#将配置文件传给web20
[root@web10 named]# scp -p /etc/named.{conf,rfc1912.zones} root@172.25.254.20:/etc/

#查看权限
[root@web20 ~]# ll /etc/named.conf
-rw-r----- 1 root named 1724  8月 19 02:23 /etc/named.conf
[root@web20 ~]# ll /etc/named.rfc1912.zones
-rw-r----- 1 root named 1139  8月 19 02:26 /etc/named.rfc1912.zones

[root@web10 named]# scp -p /var/named/zhang.org.zone root@172.25.254.20:/var/named/zhang.org.zone
#修改配置
[root@web20 ~]# vim /var/named/zhang.org.zone
$TTL 1D
@       IN SOA  ns.zhang.org. root.zhang.org. (
                                        0       ; serial
                                        1D      ; refresh
                                        1H      ; retry
                                        1W      ; expire
                                        3H )    ; minimum
        NS      ns.zhang.org.
ns      A       172.25.254.20
www     A       172.25.254.20

#修改所属组
[root@web20 ~]# ll /var/named/
总用量 20
drwxrwx--- 2 named named    6  2月 13  2024 data
drwxrwx--- 2 named named    6  2月 13  2024 dynamic
-rw-r----- 1 root  named 2112  2月 13  2024 named.ca
-rw-r----- 1 root  named  152  2月 13  2024 named.empty
-rw-r----- 1 root  named  152  2月 13  2024 named.localhost
-rw-r----- 1 root  named  168  2月 13  2024 named.loopback
drwxrwx--- 2 named named    6  2月 13  2024 slaves
-rw-r----- 1 root  root   193  8月 19 02:36 zhang.org.zone
[root@web20 ~]# chgrp named /var/named/zhang.org.zone
[root@web20 ~]# ll /var/named/
总用量 20
drwxrwx--- 2 named named    6  2月 13  2024 data
drwxrwx--- 2 named named    6  2月 13  2024 dynamic
-rw-r----- 1 root  named 2112  2月 13  2024 named.ca
-rw-r----- 1 root  named  152  2月 13  2024 named.empty
-rw-r----- 1 root  named  152  2月 13  2024 named.localhost
-rw-r----- 1 root  named  168  2月 13  2024 named.loopback
drwxrwx--- 2 named named    6  2月 13  2024 slaves
-rw-r----- 1 root  named  193  8月 19 02:36 zhang.org.zone

#重启测试
[root@web20 ~]# systemctl start named
[root@web20 ~]# dig www.zhang.org @172.25.254.20

; <<>> DiG 9.16.23-RH <<>> www.zhang.org @172.25.254.20
;; global options: +cmd
;; Got answer:
;; ->>HEADER<<- opcode: QUERY, status: NOERROR, id: 20169
;; flags: qr aa rd ra; QUERY: 1, ANSWER: 1, AUTHORITY: 0, ADDITIONAL: 1

;; OPT PSEUDOSECTION:
; EDNS: version: 0, flags:; udp: 1232
; COOKIE: 3f5ee88a3d59c12f0100000066c23fdec03c522d161a2695 (good)
;; QUESTION SECTION:
;www.zhang.org.			IN	A

;; ANSWER SECTION:
www.zhang.org.		86400	IN	A	172.25.254.20

;; Query time: 0 msec
;; SERVER: 172.25.254.20#53(172.25.254.20)
;; WHEN: Mon Aug 19 02:39:26 CST 2024
;; MSG SIZE  rcvd: 86
配置dns的负载均衡
#添加一个tcp的子配置路径
[root@nginx-node1 ~]# vim /usr/local/nginx/conf/nginx.conf
.....
include "/usr/local/nginx/tcpconf.d/*.conf";
.....
[root@nginx-node1 ~]# cd /usr/local/nginx/tcpconf.d

#编写配置文件
[root@nginx-node1 tcpconf.d]# vim dns.conf
stream{
    upstream dns {
        server 172.25.254.10:53 fail_timeout=15s max_fails=3;
        server 172.25.254.20:53 fail_timeout=15s max_fails=3;
    }

    server{
        listen 53 udp reuseport;
        proxy_timeout 20s;
        proxy_pass dns;
    }
}
[root@nginx-node1 tcpconf.d]# nginx -s reload

[root@nginx-node1 nginx]# dig www.zhang.org @172.25.254.100

; <<>> DiG 9.16.23-RH <<>> www.zhang.org @172.25.254.100
;; global options: +cmd
;; Got answer:
;; ->>HEADER<<- opcode: QUERY, status: NOERROR, id: 1294
;; flags: qr aa rd ra; QUERY: 1, ANSWER: 1, AUTHORITY: 0, ADDITIONAL: 1

;; OPT PSEUDOSECTION:
; EDNS: version: 0, flags:; udp: 1232
; COOKIE: 8b8cf765b85493050100000066c2442f0a1af9f0eec6183d (good)
;; QUESTION SECTION:
;www.zhang.org.			IN	A

;; ANSWER SECTION:
www.zhang.org.		86400	IN	A	172.25.254.10

;; Query time: 0 msec
;; SERVER: 172.25.254.100#53(172.25.254.100)
;; WHEN: Sun Aug 18 21:23:05 CST 2024
;; MSG SIZE  rcvd: 86
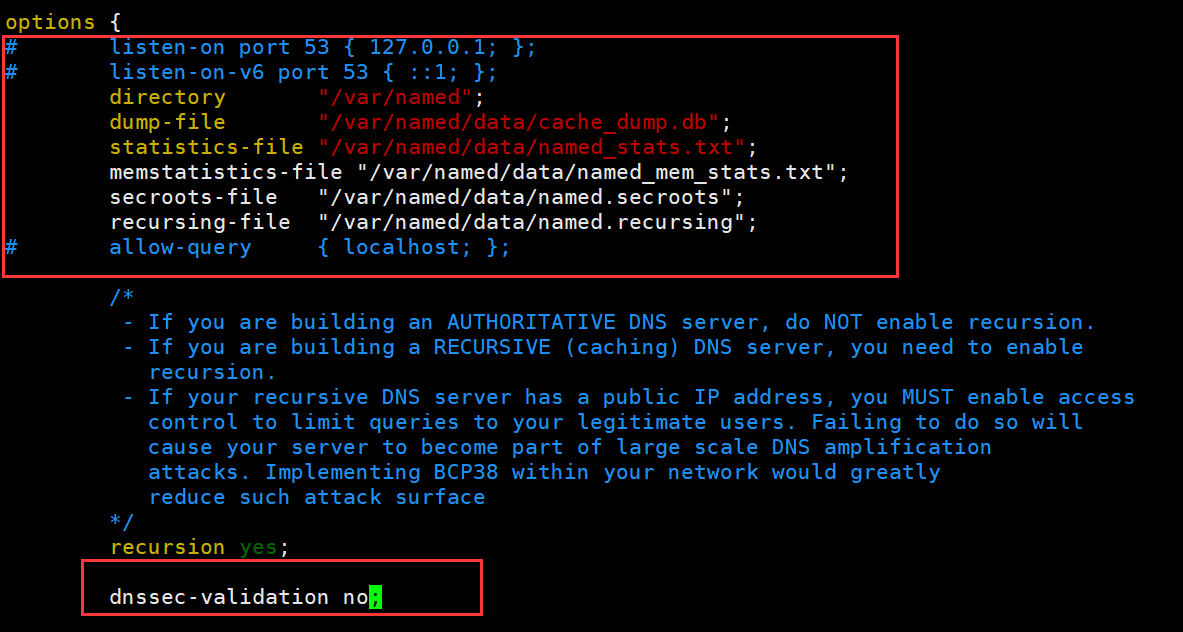
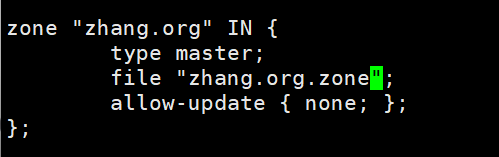
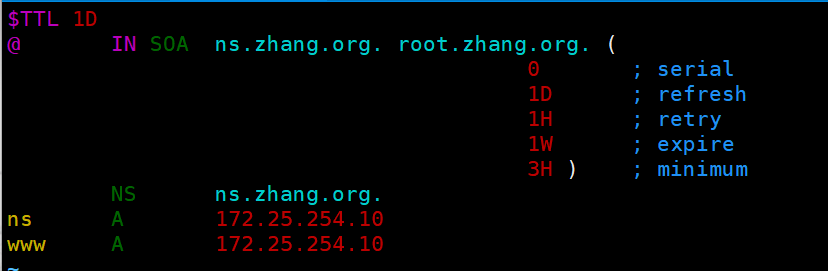
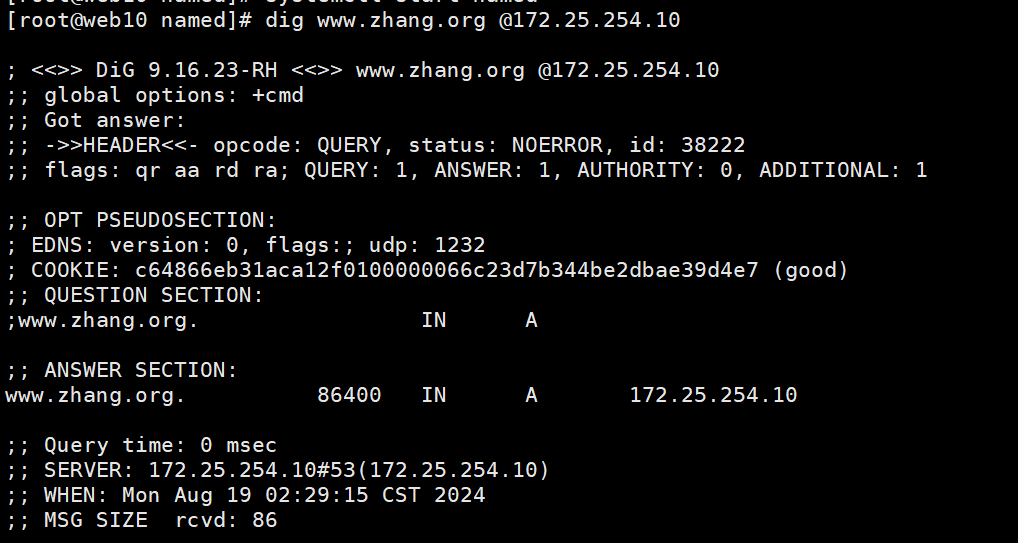
web2


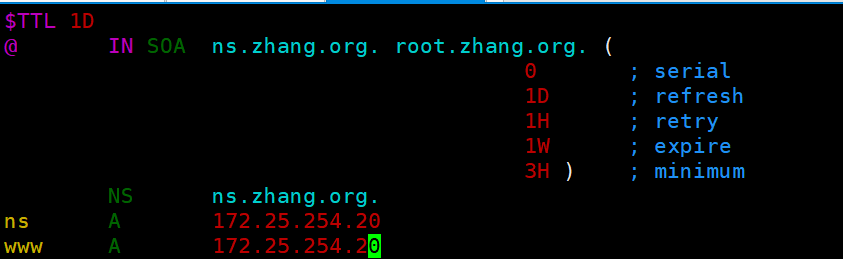
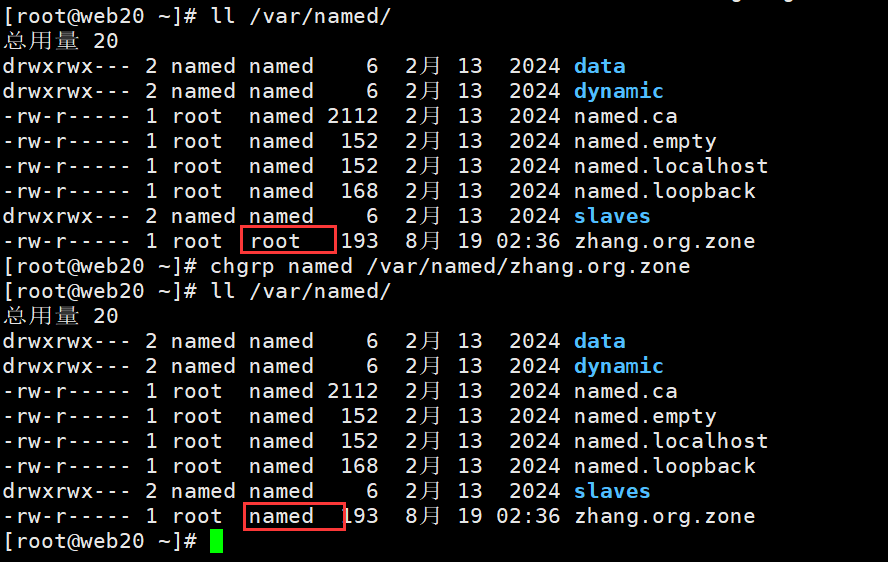
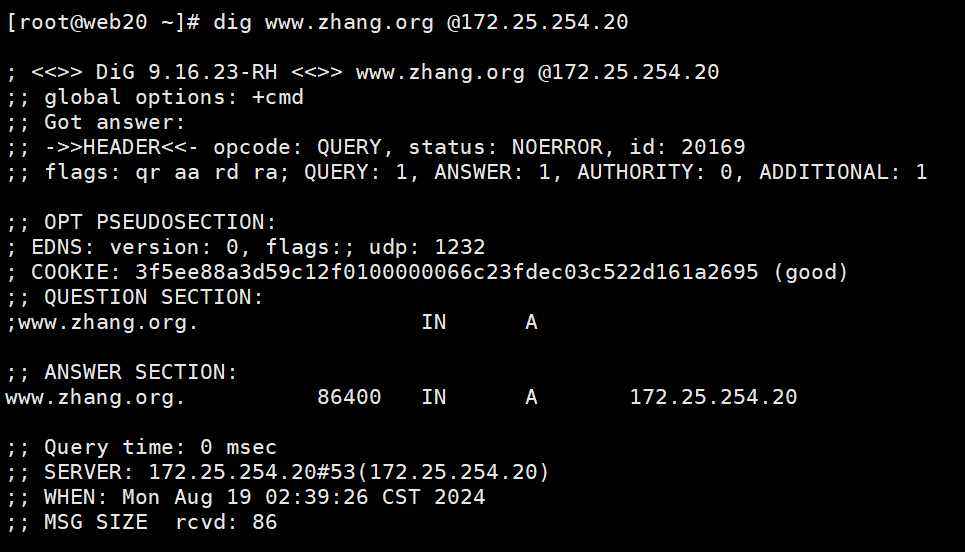
配置dns的负载均衡
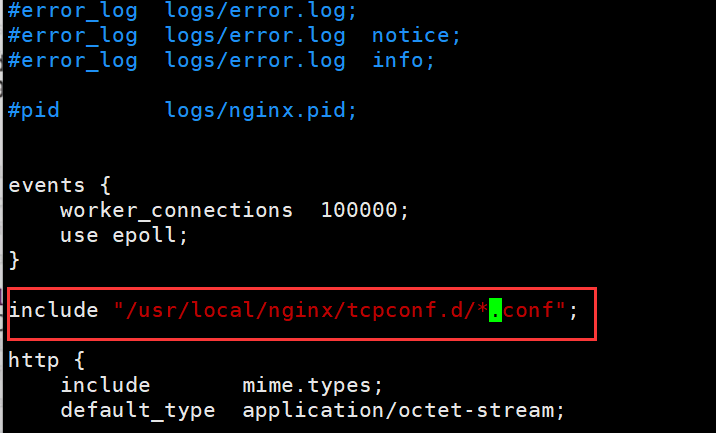
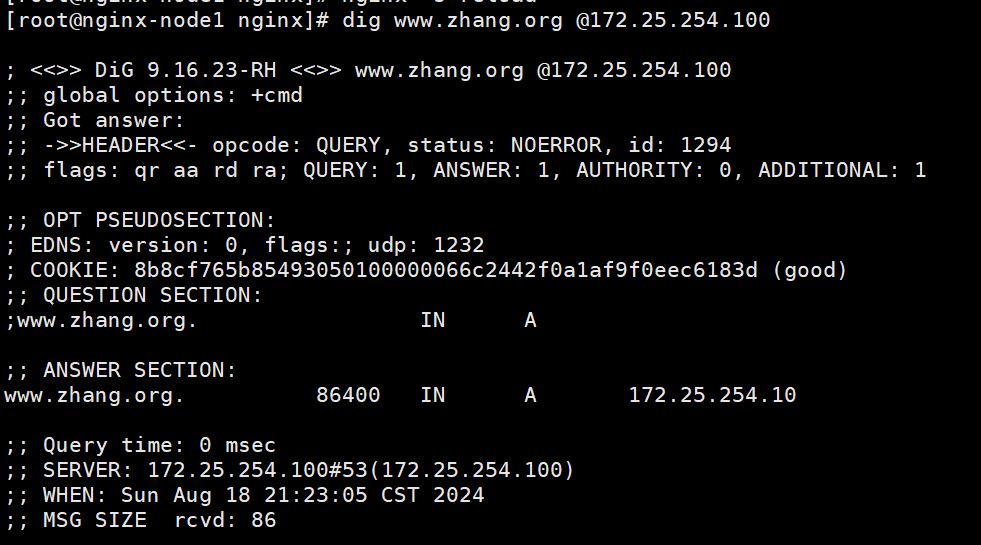
6.2.3 负载均衡实例: MySQL
后端服务器安装 MySQL
#下载mariadb-server
[root@web10 ~]# yum install mariadb-server -y
[root@web20 ~]# yum install mariadb-server -y

#添加id以便区分
[root@web10 ~]# vim /etc/my.cnf.d/mariadb-server.cnf
[mysqld]
server-id=10
datadir=/var/lib/mysql
socket=/var/lib/mysql/mysql.sock
log-error=/var/log/mariadb/mariadb.log
pid-file=/run/mariadb/mariadb.pid


[root@web20 ~]# vim /etc/my.cnf.d/mariadb-server.cnf
[mysqld]
server-id=10
datadir=/var/lib/mysql
socket=/var/lib/mysql/mysql.sock
log-error=/var/log/mariadb/mariadb.log
pid-file=/run/mariadb/mariadb.pid

#配置数据库
[root@web10 ~]# mysql
Welcome to the MariaDB monitor.  Commands end with ; or \g.
Your MariaDB connection id is 3
Server version: 10.5.22-MariaDB MariaDB Server

Copyright (c) 2000, 2018, Oracle, MariaDB Corporation Ab and others.

Type 'help;' or '\h' for help. Type '\c' to clear the current input statement.

MariaDB [(none)]> CREATE USER haha@"%" identified by "redhat";
Query OK, 0 rows affected (0.001 sec)

MariaDB [(none)]> GRANT ALL ON *.* TO haha@'%';
Query OK, 0 rows affected (0.001 sec)

MariaDB [(none)]> quit
Bye


[root@web20 ~]# mysql
Welcome to the MariaDB monitor.  Commands end with ; or \g.
Your MariaDB connection id is 3
Server version: 10.5.22-MariaDB MariaDB Server

Copyright (c) 2000, 2018, Oracle, MariaDB Corporation Ab and others.

Type 'help;' or '\h' for help. Type '\c' to clear the current input statement.

MariaDB [(none)]> create user haha@'%' identified by "redhat";
Query OK, 0 rows affected (0.001 sec)

MariaDB [(none)]> grant all on *.* to haha@'%';
Query OK, 0 rows affected (0.001 sec)

MariaDB [(none)]> quit
Bye
开始配置mysql的负载均衡
stream {
    upstream dns {
        server 172.25.254.10:53 fail_timeout=15s max_fails=3;
        server 172.25.254.20:53 fail_timeout=15s max_fails=3;
    }

    upstream mysql {
        server 172.25.254.10:3306 fail_timeout=15s max_fails=3;
        server 172.25.254.20:3306 fail_timeout=15s max_fails=3;
    }
    server {
        listen 3306;
        proxy_timeout 60s;
        proxy_pass mysql;
    }

    server {
        listen 53 udp reuseport;
        proxy_timeout 20s;
        proxy_pass dns;
    }
}
[root@nginx-node1 ~]# nginx -s reload


[root@nginx-node1 ~]# yum install mariadb -y
#测试
[root@nginx-node1 ~]# mysql -u haha -p -h 172.25.254.100
Enter password:
Welcome to the MariaDB monitor.  Commands end with ; or \g.
Your MariaDB connection id is 4
Server version: 10.5.22-MariaDB MariaDB Server

Copyright (c) 2000, 2018, Oracle, MariaDB Corporation Ab and others.

Type 'help;' or '\h' for help. Type '\c' to clear the current input statement.

MariaDB [(none)]> select @@server_id;
+-------------+
| @@server_id |
+-------------+
|          20 |
+-------------+
1 row in set (0.001 sec)

MariaDB [(none)]> exit
Bye
[root@nginx-node1 ~]# mysql -u haha -p -h 172.25.254.100
Enter password:
Welcome to the MariaDB monitor.  Commands end with ; or \g.
Your MariaDB connection id is 8
Server version: 10.5.22-MariaDB MariaDB Server

Copyright (c) 2000, 2018, Oracle, MariaDB Corporation Ab and others.

Type 'help;' or '\h' for help. Type '\c' to clear the current input statement.

MariaDB [(none)]> select @@server_id;
+-------------+
| @@server_id |
+-------------+
|          10 |
+-------------+
1 row in set (0.001 sec)

MariaDB [(none)]> 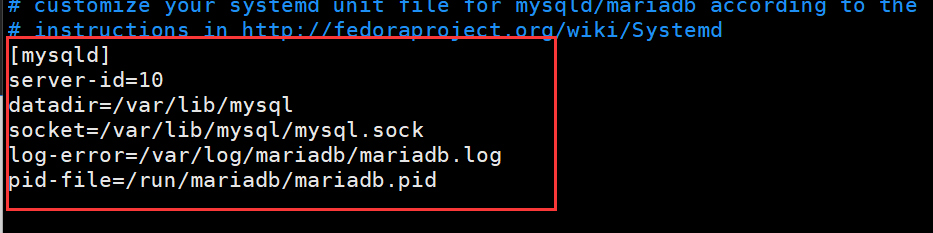
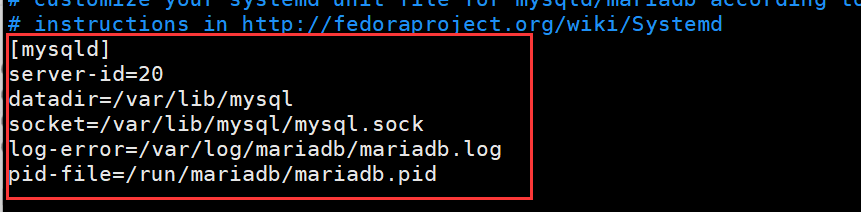
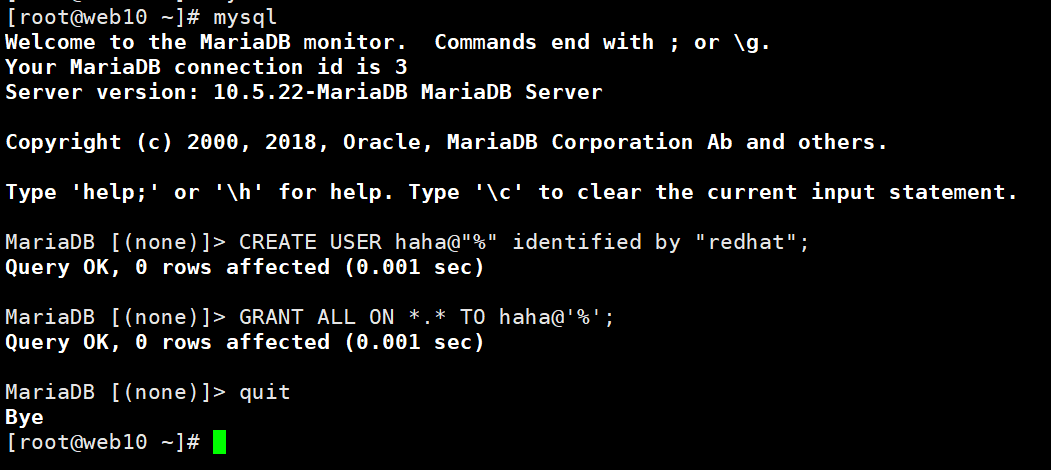
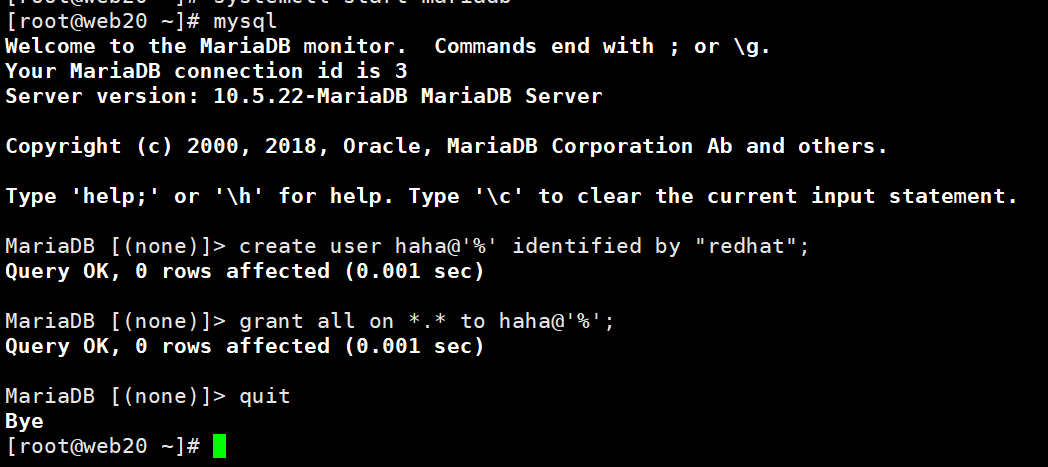
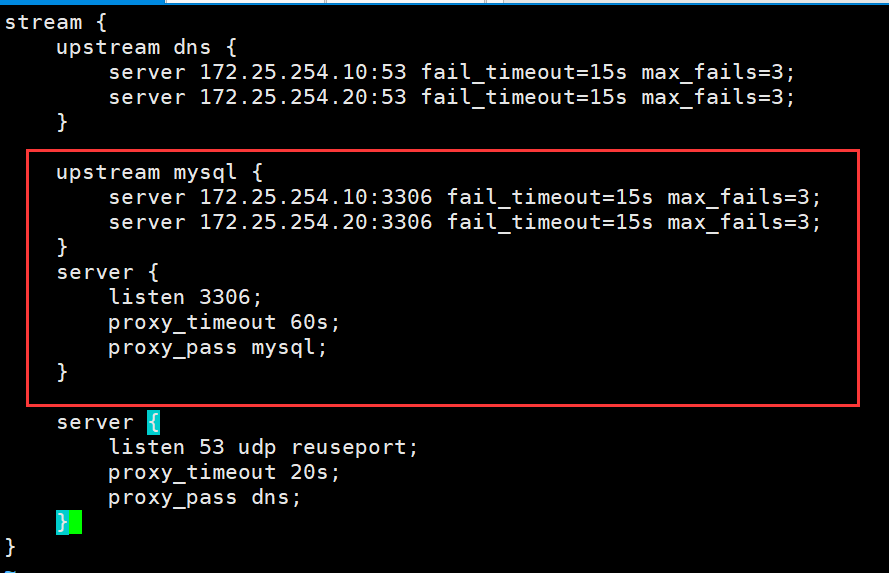
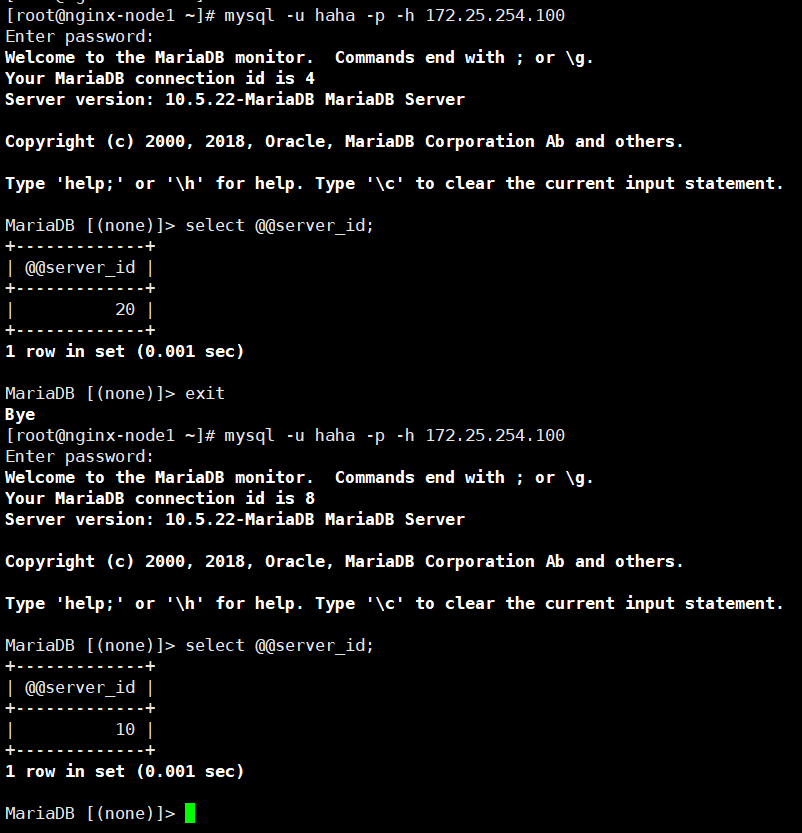
6.3 实现 FastCGI
环境需要的包echo-nginx-module-0.63.tar,memc-nginx-module-0.20.tar,srcache-nginx-module-0.33.tar
[root@nginx-node1 ~]# tar zxf memc-nginx-module-0.20.tar.gz
[root@nginx-node1 ~]# tar zxf srcache-nginx-module-0.33.tar.gz
安装新的nginx
[root@nginx-node1 nginx-1.26.2]# ./configure --prefix=/usr/local/nginx --add-module=/root/echo-nginx-module-0.63 --add-module=/root/memc-nginx-module-0.20 --add-module=/root/srcache-nginx-module-0.33 --user=nginx --with-http_v2_module --with-http_realip_module --with-http_stub_status_module --with-stream --with-stream_ssl_module --with-stream_realip_module --with-http_gzip_static_module --with-pcre --group=nginx
[root@nginx-node1 nginx-1.26.2]# make
[root@nginx-node1 nginx-1.26.2]# mkae install

CGI的由来:
最早的Web服务器只能简单地响应浏览器发来的HTTP请求,并将存储在服务器上的HTML文件返回给浏览器,也就是静态html文件,但是后期随着网站功能增多网站开发也越来越复杂,以至于出现动态技术,比如像php(1995年)、java(1995)、python(1991)语言开发的网站,但是nginx/apache服务器并不能直接运行 php、java这样的文件,apache实现的方式是打补丁,但是nginx缺通过与第三方基于协议实现,即通过某种特定协议将客户端请求转发给第三方服务处理,第三方服务器会新建新的进程处理用户的请求,处理完成后返回数据给Nginx并回收进程,最后nginx在返回给客户端,那这个约定就是通用网关接口(common gateway interface,简称CGI),CGI(协议) 是web服务器和外部应用程序之间的接口标准,是cgi程序和web服务器之间传递信息的标准化接口。

为什么会有FastCGI?
CGI协议虽然解决了语言解析器和 Web Server 之间通讯的问题,但是它的效率很低,因为 Web Server每收到一个请求都会创建一个CGI进程,PHP解析器都会解析php.ini文件,初始化环境,请求结束的时候再关闭进程,对于每一个创建的CGI进程都会执行这些操作,所以效率很低,而FastCGI是用来提高CGI性能的,FastCGI每次处理完请求之后不会关闭掉进程,而是保留这个进程,使这个进程可以处理多个请求。这样的话每个请求都不用再重新创建一个进程了,大大提升了处理效率。
什么是PHP-FPM?
PHP-FPM(FastCGI Process Manager:
·FastCGI进程管理器)是一个实现了Fastcgi的程序,并且提供进程管理的功能。
·进程包括master进程和worker进程。master进程只有一个,负责监听端口,接受来自web server的请求
·worker进程一般会有多个,每个进程中会嵌入一个PHP解析器,进行PHP代码的处理。
6.3.1 FastCGI配置指令
Nginx基于模块ngx_http_fastcgi_module实现通过fastcgi协议将指定的客户端请求转发至php-fpm处理,其配置指令如下:
fastcgi_pass address:port;
#转发请求到后端服务器,address为后端的fastcgi server的地址,可用位置:location, if inlocation
fastcgi_index name;
#fastcgi默认的主页资源,示例:fastcgi_index index.php;
fastcgi_param parameter value [if_not_empty];
#设置传递给FastCGI服务器的参数值,可以是文本,变量或组合,可用于将Nginx的内置变量赋值给自定义
key
fastcgi_param REMOTE_ADDR $remote_addr; #客户端源IP
fastcgi_param REMOTE_PORT $remote_port; #客户端源端口
fastcgi_param SERVER_ADDR $server_addr; #请求的服务器IP地址
fastcgi_param SERVER_PORT $server_port; #请求的服务器端口
fastcgi_param SERVER_NAME $server_name; #请求的server name
Nginx默认配置示例:
location ~ \.php$ {
root /scripts;
fastcgi_pass 127.0.0.1:9000;
fastcgi_index index.php;
fastcgi_param SCRIPT_FILENAME /scripts$fastcgi_script_name; #默认脚本路径
#fastcgi_param SCRIPT_FILENAME $document_root$fastcgi_script_name;
include fastcgi_params; #此文件默认系统已提供,存放的相对路径为
prefix/conf
}
6.3.2 FastCGI实战案例 : Nginx与php-fpm在同一服务器
编译安装更方便自定义参数或选项,所以推荐大家使用源码编译
官方网站:www.php.net
源码编译php
#安装环境配置,解决php依赖
[root@nginx-node1 ~]#  yum install -y bzip2 systemd-devel libxml2-devel sqlite-devel libpng-devel libcurl-devel oniguruma-devel
[root@nginx-node1 ~]# cd /mnt
[root@nginx-node1 mnt]# wget https://mirrors.aliyun.com/rockylinux/9.4/devel/x86_64/kickstart/Packages/o/oniguruma-devel-6.9.6-1.el9.5.x86_64.rpm
[root@nginx-node1 mnt]# ls
hgfs  oniguruma-devel-6.9.6-1.el9.5.x86_64.rpm
[root@nginx-node1 mnt]# yum install oniguruma-devel-6.9.6-1.el9.5.x86_64.rpm


[root@nginx-node1 ~]# tar -xvjf php-8.3.9.tar.bz2
[root@nginx-node1 ~]# cd php-8.3.9/
[root@nginx-node1 php-8.3.9]# ./configure --prefix=/usr/local/php --with-config-file-path=/usr/local/php/etc --enable-fpm --with-fpm-user=nginx --with-fpm-group=nginx --with-curl --with-iconv --with-mhash --with-zlib --with-openssl --enable-mysqlnd --with-mysqli --with-pdo-mysql --disable-debug --enable-sockets --enable-soap --enable-xml --enable-ftp --enable-gd --enable-exif --enable-mbstring --enable-bcmath --with-fpm-systemd
[root@nginx-node1 php-8.3.9]# make && make install
插件介绍:
#利用yum解决php依赖
[root@nginx-node1 ~]#  yum install -y bzip2 systemd-devel libxml2-devel sqlite-devel libpng-devel libcurl-devel oniguruma-devel
#解压源码并安装
[root@nginx-node1 php-8.3.9]# ./configure \
--prefix=/usr/local/php \ #安装路径
--with-config-file-path=/usr/local/php/etc \ #指定配置路径
--enable-fpm \ #用cgi方式启动程序
--with-fpm-user=nginx \ #指定运行用户身份
--with-fpm-group=nginx \
--with-curl \ #打开curl浏览器支持
--with-iconv \ #启用iconv函数,转换字符编码
--with-mhash \ #mhash加密方式扩展库
--with-zlib \ #支持zlib库,用于压缩http压缩传输
--with-openssl \ #支持ssl加密
--enable-mysqlnd \ #mysql数据库
--with-mysqli \
--with-pdo-mysql \
--disable-debug \ #关闭debug功能
--enable-sockets \ #支持套接字访问
--enable-soap \ #支持soap扩展协议
--enable-xml \ #支持xml
--enable-ftp \ #支持ftp
--enable-gd \ #支持gd库
--enable-exif \ #支持图片元数据
--enable-mbstring \ #支持多字节字符串
--enable-bcmath \ #打开图片大小调整,用到zabbix监控的时候用到了这个模块
--with-fpm-systemd #支持systemctl 管理cgi
php相关配置优化
[root@nginx-node1 ~]# cd /usr/local/php/
[root@nginx-node1 php]# ls
bin  etc  include  lib  php  sbin  var
[root@nginx-node1 ~]# cd /usr/local/php/etc
[root@nginx-node1 etc]# ls
php-fpm.conf.default  php-fpm.d
[root@nginx-node1 etc]# cp -p php-fpm.conf.default php-fpm.conf
[root@nginx-node1 etc]# vim php-fpm.conf
#打开
pid = run/php-fpm.pid  #指定pid文件存放位置

[root@nginx-node1 etc]# ls
php-fpm.conf  php-fpm.conf.default  php-fpm.d
[root@nginx-node1 etc]# cd php-fpm.d/
[root@nginx-node1 php-fpm.d]# ls
www.conf.default
[root@nginx-node1 php-fpm.d]# cp www.conf.default www.conf -p
[root@nginx-node1 php-fpm.d]# vim www.conf
listen = 0.0.0.0:9000

#生成php的主配置文件
[root@nginx-node1 php-fpm.d]# cd
[root@nginx-node1 ~]# cd php-8.3.9/
[root@nginx-node1 php-8.3.9]# cp php.ini-production /usr/local/php/etc/php.ini

#更改时区
[root@nginx-node1 php-8.3.9]# cd
[root@nginx-node1 ~]# cd /usr/local/php/etc
[root@nginx-node1 etc]# vim php.ini
#添加
date.timezone = Asia/Shanghai   #修改时区

#查看该配置什么时区的方法
[root@nginx-node1 etc]# timedatectl list-timezones | grep Asia/Shanghai
Asia/Shanghai

#复制php的启动脚本
[root@nginx-node1 etc]# cd /root/php-8.3.9/
[root@nginx-node1 php-8.3.9]# cd sapi/
[root@nginx-node1 sapi]# cd fpm/
[root@nginx-node1 fpm]# cp php-fpm.service /lib/systemd/system/

#注释掉默认只读的参数
[root@nginx-node1 fpm]# vim /lib/systemd/system/php-fpm.service
#ProtectSystem=full  #注释该内容

#重启php并查看端口
[root@nginx-node1 fpm]# systemctl daemon-reload
[root@nginx-node1 fpm]# systemctl start php-fpm
[root@nginx-node1 fpm]# netstat -antlupe | grep php
tcp 0 0 127.0.0.1:9000 0.0.0.0:* LISTEN 0 489642 197472/php-fpm: mas 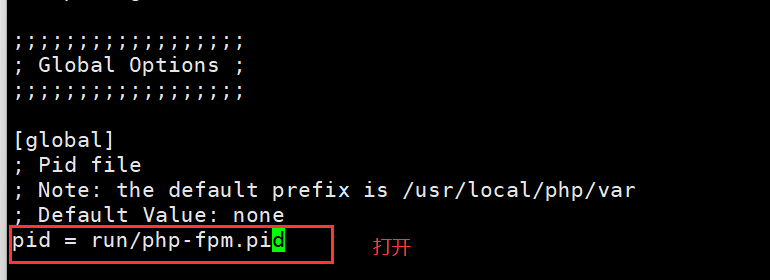
更改时区
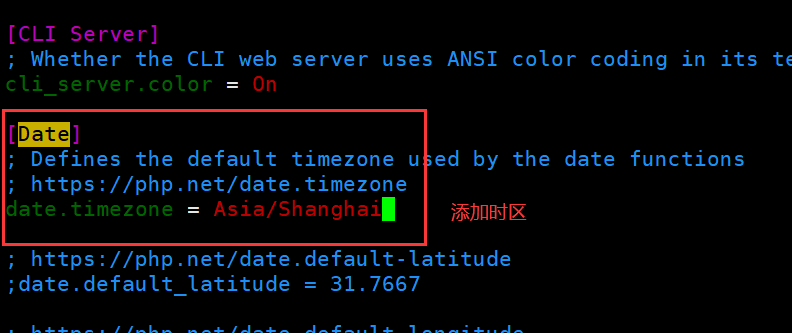
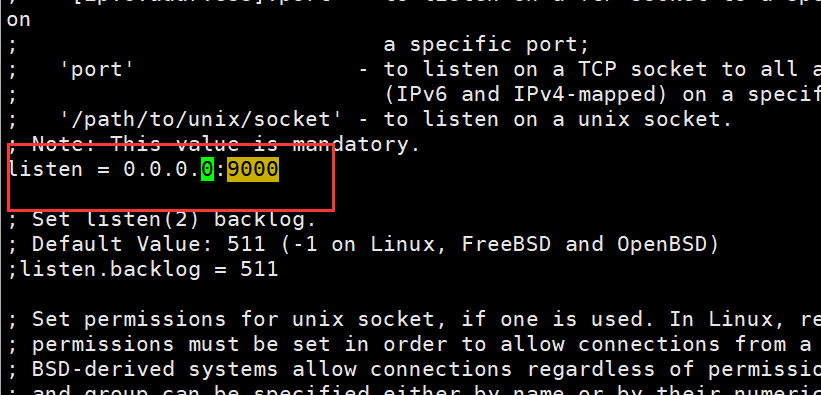
注释参数
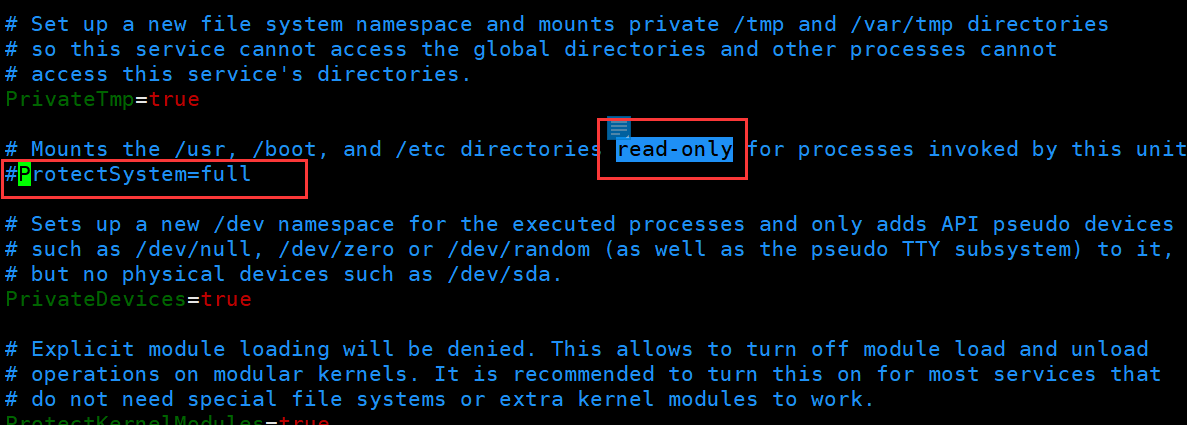
查看端口

添加php环境变量
[root@nginx-node1 fpm]# cd /usr/local/php/bin
[root@nginx-node1 bin]# pwd
/usr/local/php/bin
[root@nginx-node1 bin]# vim ~/.bash_profile
#添加
export PATH=$PATH:/usr/local/nginx/sbin:/usr/local/php/bin:/usr/local/php/sbin

[root@nginx-node1 bin]# source ~/.bash_profile
[root@nginx-node1 bin]# php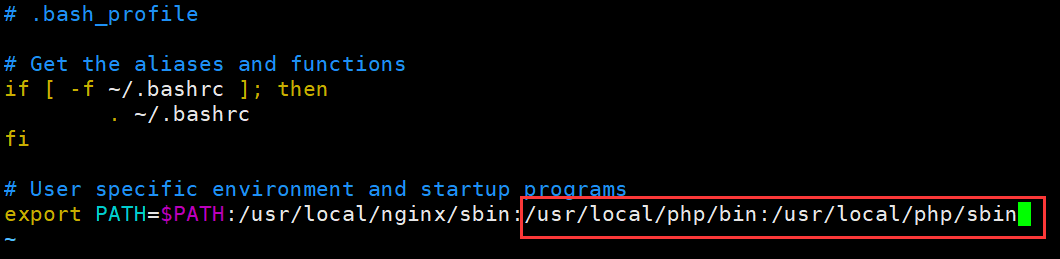
准备php测试页面
[root@nginx-node1 bin]# mkdir -p /data/web/
[root@nginx-node1 bin]# mkdir -p /data/web/php
#php测试页面
[root@nginx-node1 bin]# vim /data/web/php/index.php
<?php
phpinfo();
?>
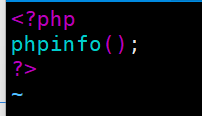
Nginx配置转发
Nginx安装完成之后默认生成了与fastcgi的相关配置文件,一般保存在nginx的安装路径的conf目录当中,比如/apps/nginx/conf/fastcgi.conf、/apps/nginx/conf/fastcgi_params。
[root@nginx-node1 ~]# cd /usr/local/nginx/
[root@nginx-node1 nginx]# mkdir conf.d
[root@nginx-node1 nginx]# vim conf/nginx.conf
#添加,在http的后面
    include "/usr/local/nginx/conf.d/*.conf";
[root@nginx-node1 nginx]# cd conf.d/
[root@nginx-node1 conf.d]# vim vhosts.conf
server {
    listen 80;
    server_name www.zhang.org;
    root /data/web/html;
    index index.html;

    location ~ \.php$ {
        root /data/web/php;
        fastcgi_pass 127.0.0.1:9000;
        fastcgi_index index.php;
        include fastcgi.conf;
    }
}
[root@nginx-node1 ~]# nginx -s reload
#此时可能会重启失败
#方法:
[root@nginx-node1 ~]# ps aux | grep nginx
#kill -9 进程号    杀掉进程重启即可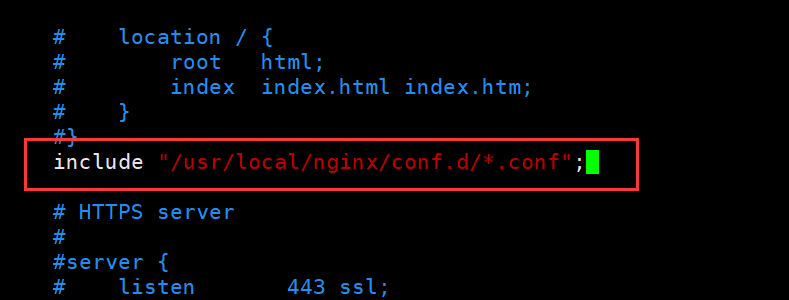
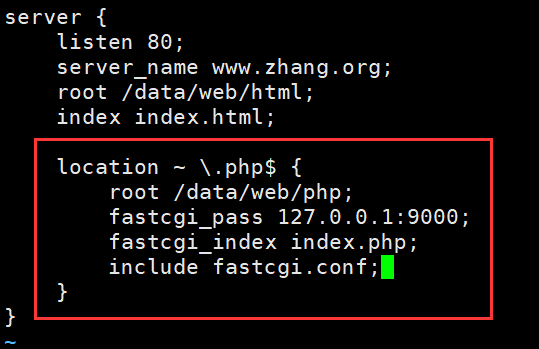
访问验证php测试页面
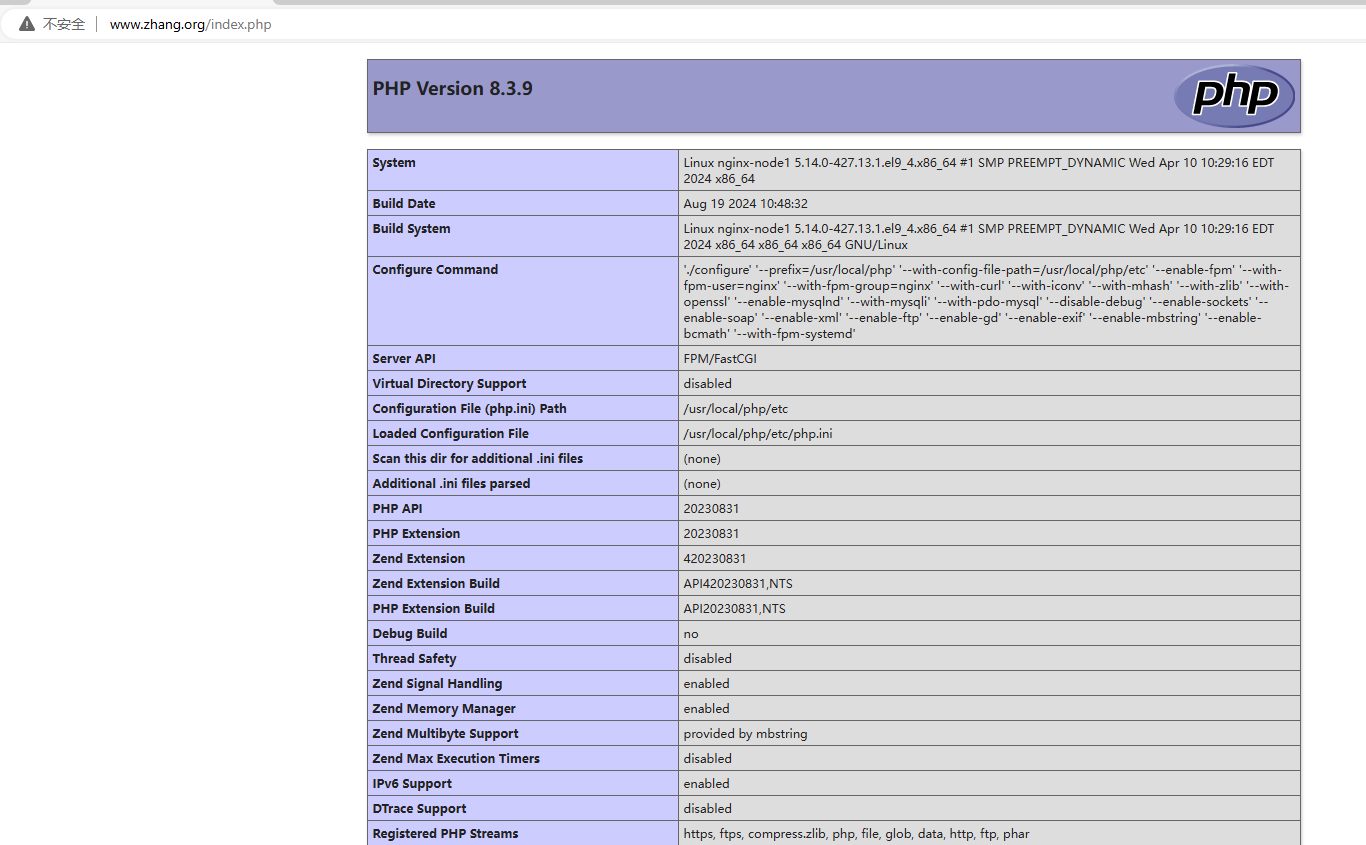
6.3.3 php的动态扩展模块(php的缓存模块)
软件下载:http://pecl.php.net/package/memcache
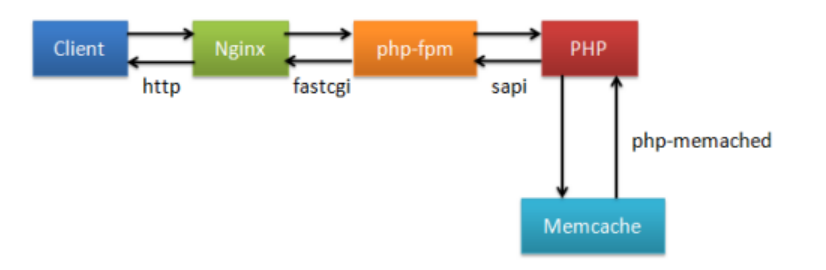
memcache是用来存储php取出的数据的
php大多数时候是用来做网页和数据库的交互的
安装memcache模块
[root@nginx-node1 ~]#tar zxf memcache-8.2.tgz
[root@nginx-node1 ~]# cd memcache-8.2/
[root@nginx-node1 memcache-8.2]# yum install autoconf
[root@nginx-node1 memcache-8.2]# phpize
[root@nginx-node1 memcache-8.2]# ./configure && make && make install
Installing shared extensions: /usr/local/php/lib/php/extensions/no-debug-nonzts-20230831/

[root@nginx-node1 memcache-8.2]# ls /usr/local/php/lib/php/extensions/no-debug-non-zts-20230831/
memcache.so opcache.so
复制测试文件到nginx发布目录中
[root@nginx-node1 ~]# cd memcache-8.2/
[root@nginx-node1 memcache-8.2]# ls
autom4te.cache  config.m4      CREDITS      LICENSE             modules
build           config.nice    docker       Makefile            README
config9.m4      config.status  Dockerfile   Makefile.fragments  run-tests.php
config.h        configure      example.php  Makefile.objects    src
config.h.in     configure.ac   include      memcache.la         tests
config.log      config.w32     libtool      memcache.php
[root@nginx-node1 memcache-8.2]# cp example.php memcache.php /data/web/php/
[root@nginx-node1 memcache-8.2]# cd
[root@nginx-node1 ~]# vim /data/web/php/memcache.php
$VERSION='$Id$';

define('ADMIN_USERNAME','haha');        // Admin Username
define('ADMIN_PASSWORD','redhat');      // Admin Password
define('DATE_FORMAT','Y/m/d H:i:s');
define('GRAPH_SIZE',200);
define('MAX_ITEM_DUMP',50);

$MEMCACHE_SERVERS[] = '127.0.0.1:11211'; // add more as an array

#$MEMCACHE_SERVERS[] = 'mymemcache-server2:11211'; // add more as an array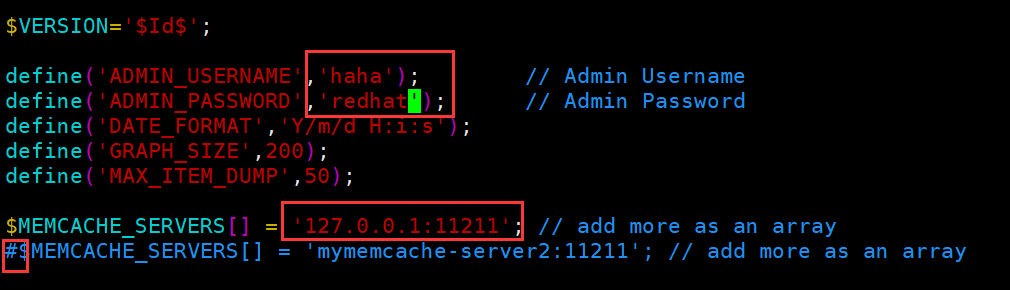
配置php加载memcache模块
[root@nginx-node1 ~]# vim /usr/local/php/etc/php.ini
;extension=zip
extension=memcache
;zend_extension=opcache
[root@nginx-node1 ~]# systemctl reload php-fpm
[root@nginx-node1 ~]# php -m | grep mem
memcache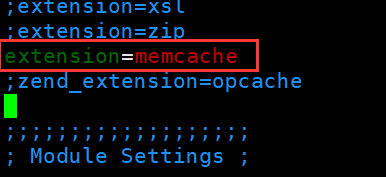

部署memcached
[root@nginx-node1 ~]# yum install memcached -y
[root@nginx-node1 ~]# systemctl enable --now memcached.service
[root@nginx-node1 ~]# netstat -antlupe | grep memcache
tcp 0 0 127.0.0.1:11211 0.0.0.0:* LISTEN
976 1037243 186762/memcached
[root@nginx-node1 ~]# cat /etc/sysconfig/memcached
PORT="11211"
USER="memcached"
MAXCONN="1024"
CACHESIZE="64"
OPTIONS="-l 127.0.0.1,::1"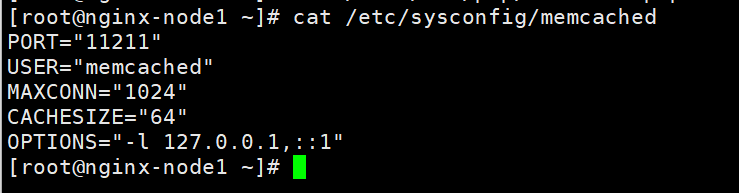
测试:
访问 http://www.zhang.org/example.php 不断刷新  #/example.php模拟数据的写入
访问 http://www.zhang.org/memcache.php 查看命中效果
账号haha,密码redhat

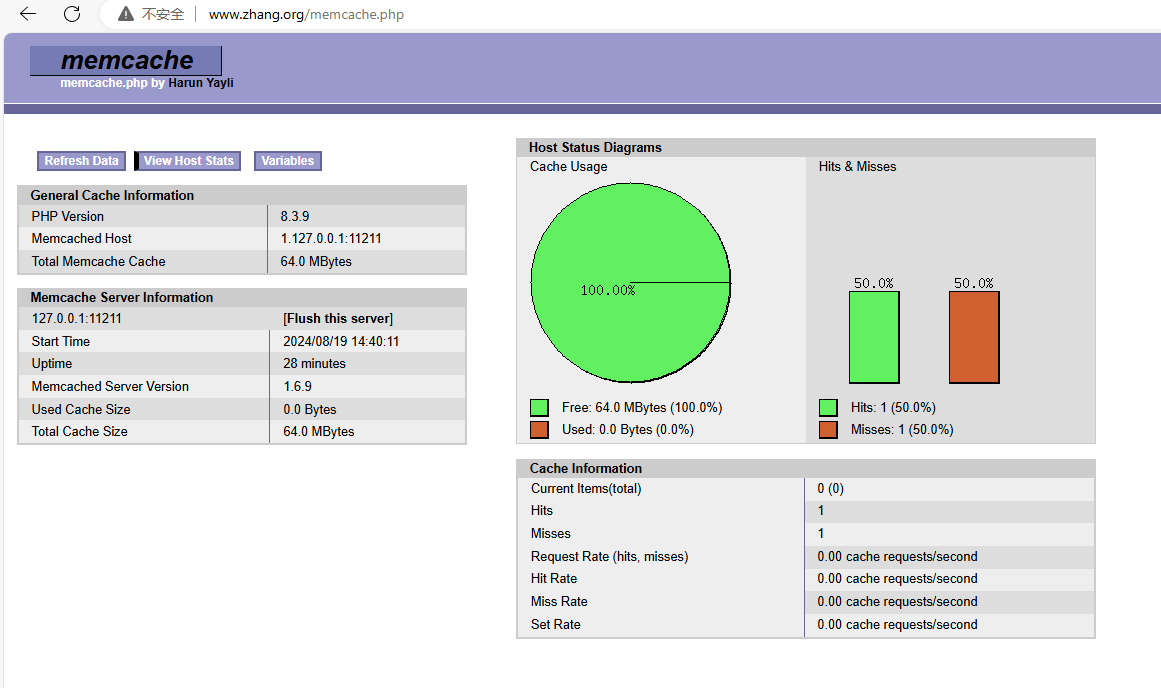
不断刷新

结果
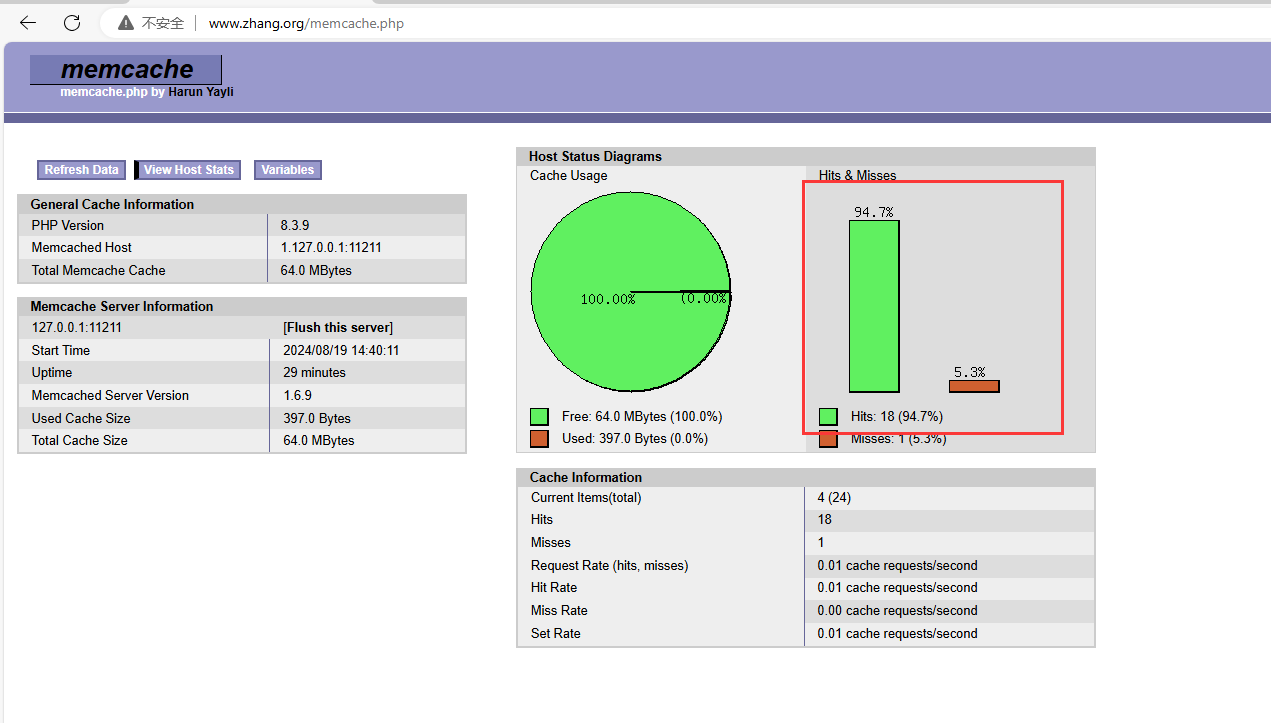
性能对比
[root@nginx-node1 ~]# ab -n500 -c10 http://www.zhang.org/index.php
Concurrency Level:      10
Time taken for tests:   0.260 seconds
Complete requests:      500
Failed requests:        49
   (Connect: 0, Receive: 0, Length: 49, Exceptions: 0)

#/example.php模拟数据的写入
[root@nginx-node1 ~]# ab -n500 -c10 http://www.zhang.org/example.php
Concurrency Level:      10
Time taken for tests:   0.355 seconds
Complete requests:      500
Failed requests:        0
ab -n500 -c10 http://www.zhang.org/index.php
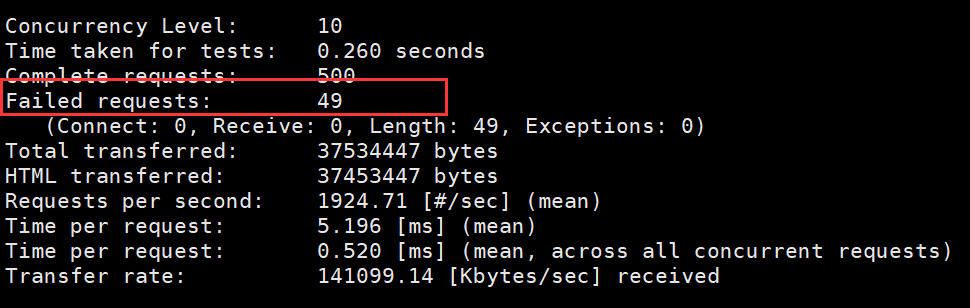
ab -n500 -c10 http://www.zhang.org/example.php
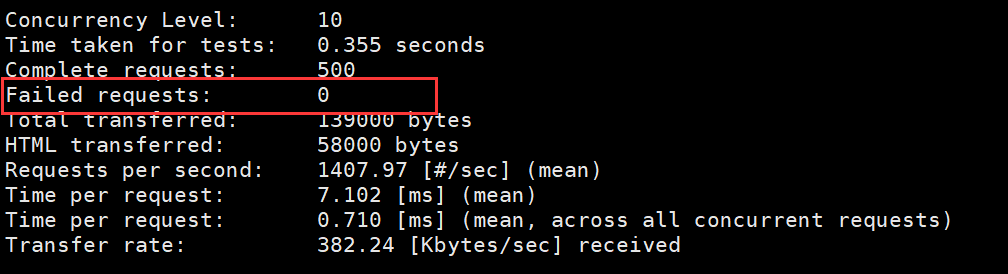

mysql存储数据
php/python处理的是mysql读取的数据
而memcache是存放php取的数据,当再次取相同的数据的时候php不需要再去取数据
6.3.4 php高速缓存
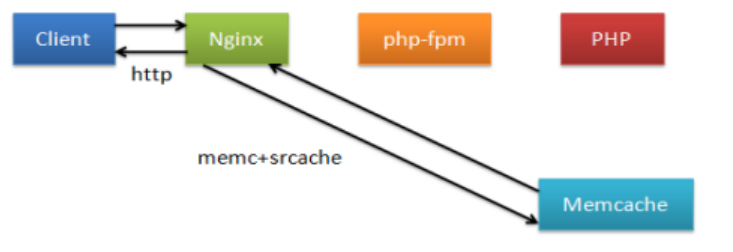
部署方法
在我们安装的nginx中默认不支持memc和srcache功能,需要借助第三方模块来让nginx支持此功能,所以nginx需要重新编译
#编译过程,已完成了,无需再次编译
[root@nginx-node1 ~]# rm -fr /usr/local/nginx/
[root@nginx-node1 ~]# tar zxf srcache-nginx-module-0.33.tar.gz
[root@nginx-node1 ~]# tar zxf memc-nginx-module-0.20.tar.gz
[root@nginx-node1 ~]# cd nginx-1.26.1/
[root@nginx-node1 nginx-1.26.1]# ./configure --prefix=/apps/nginx --user=nginx --group=nginx --with-http_ssl_module --with-http_v2_module --withhttp_realip_module --with-http_stub_status_module --with-http_gzip_static_module--with-pcre --with-stream --with-stream_ssl_module --with-stream_realip_module --add-module=/root/memc-nginx-module-0.20 --add-module=/root/srcache-nginx-module-0.33
[root@nginx-node1 nginx-1.26.1]# make && make install


#编写配置文件
[root@nginx-node1 ~]# vim /usr/local/nginx/conf.d/vhosts.conf
upstream memcache {
    server 127.0.0.1:11211;
    keepalive 512;
}

server {
    listen 80;
    server_name www.zhang.org;
    root /data/web/html;
    index index.html;

    location /memc {
        internal;
        memc_connect_timeout 100ms; #链接时间
        memc_send_timeout 100ms;    #发送时间
        memc_read_timeout 100ms;     #读取时间
        set $memc_key $query_string;    #使用内置变量$query_string来作为key
        set $memc_exptime 300;     #缓存失效时间300秒
        memc_pass memcache;        #memcache;模块
    }

    location ~ \.php$ {
        root /data/web/php;
        set $key $uri$args;     #设定key的值
        srcache_fetch GET /memc $key;    #检测mem中是否有要访问的php
        srcache_store PUT /memc $key;     #缓存为加载的php数据
        fastcgi_pass 127.0.0.1:9000;
        fastcgi_index index.php;
        include fastcgi.conf;
    }
}
[root@nginx-node1 ~]# nginx -s reload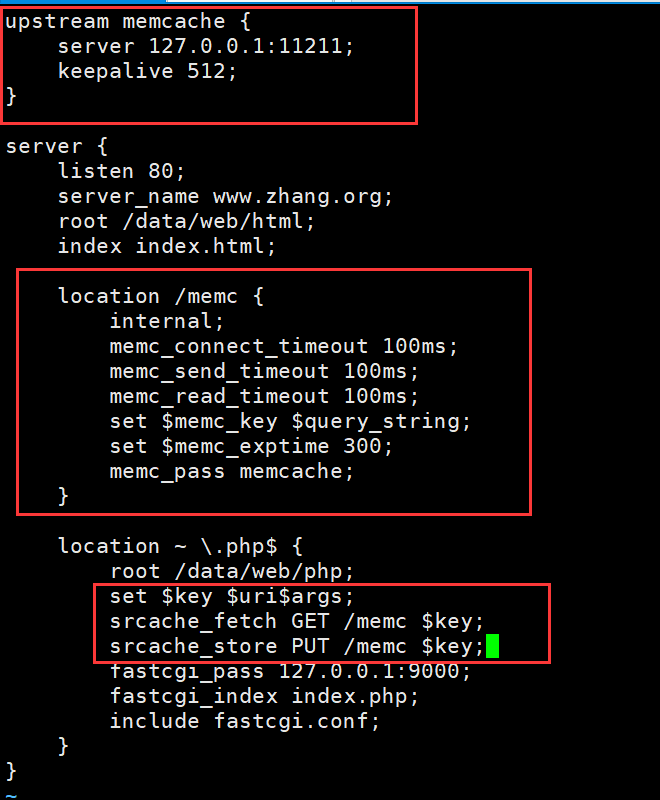

测试结果:
[root@nginx-node1 ~]# ab -n500 -c10 http://www.zhang.org/index.php
Concurrency Level:      10
Time taken for tests:   0.117 seconds
Complete requests:      500
Failed requests:        0
7 nginx 二次开发版本
7.1 openresty

Nginx 是俄罗斯人发明的, Lua 是巴西几个教授发明的,中国人章亦春把 LuaJIT VM 嵌入到 Nginx 中,实现了 OpenResty 这个高性能服务端解决方案
OpenResty® 是一个基于 Nginx 与 Lua 的高性能 Web 平台,其内部集成了大量精良的 Lua 库、第三方模块以及大多数的依赖项。用于方便地搭建能够处理超高并发、扩展性极高的动态 Web 应用、Web 服务和动态网关。
OpenResty® 通过汇聚各种设计精良的 Nginx 模块(主要由 OpenResty 团队自主开发),从而将Nginx有效地变成一个强大的通用 Web 应用平台。这样,Web 开发人员和系统工程师可以使用 Lua 脚本语言调动 Nginx 支持的各种 C 以及 Lua 模块,快速构造出足以胜任 10K 乃至 1000K 以上单机并发连接的高性能 Web 应用系统。
OpenResty 由于有功能强大且方便的的API,可扩展性更强,如果需要实现定制功能,OpenResty是个不错的选择
官网: http://openresty.org/cn/
7.2 编译安装 openresty
#停止nginx服务
[root@nginx-node1 ~]# systemctl stop nginx
[root@nginx-node1 ~]# netstat -antupe | grep nginx
tcp        0      0 0.0.0.0:80              0.0.0.0:*               LISTEN      0          501089     198067/nginx: maste
[root@nginx-node1 ~]# killall -9 nginx
[root@nginx-node1 ~]# netstat -antupe | grep nginx


[root@nginx-node1 ~]# tar zxf openresty-1.25.3.1.tar.gz
[root@nginx-node1 ~]# cd openresty-1.25.3.1/
[root@nginx-node1 openresty-1.25.3.1]# dnf -y install gcc pcre-devel openssl-devel perl
[root@nginx-node1 openresty-1.25.3.1]# ./configure --prefix=/usr/local/openresty --user=nginx --group=nginx --with-http_ssl_module --with-http_v2_module --with-http_realip_module --with-http_stub_status_module --with-http_gzip_static_module --with-pcre --with-stream --with-stream_ssl_module --with-stream_realip_module


 2904
2904

 被折叠的 条评论
为什么被折叠?
被折叠的 条评论
为什么被折叠?
 到【灌水乐园】发言


