Android详细教程(基础篇):二十七、Android Service详解

Service

Android第四大组件:Service

  • 掌握Service与Activity的区别
  • 掌握Service的定义及使用
  • 可以使用SerivceConnection接口绑定一个Service
  • 了解系统提供的Service程序。

Service与Activity最大的区别是一个有界面一个没有界面

10.1. Service的基本组成

在Android系统开发之中,Services是一个重要的组成部分。如果现在某些程序中的部分操作是很消耗时间的,那么可以将这些程序定义在Service之中,这样就可以完成程序的后台运行(也可以在不显示界面的形式下运行),即:Services实际上就相当于是一个没有图形界面的Activity程序,而且当用户要执行某些操作需要进行跨进程访问的时候也可以使用Service来完成。


继承结构:

java.lang.Object


android.content.Context


android.content.ContextWrapper


android.app.Service


Service的基本组成:

Service是一个没有UI界面的操作组件,主要的功能是为Activity程序提供一些必要的支持,例如:手机中的MP3播放软件,当回到桌面上的时候这些组件依然可以运行呢,实际上这些就属于Service的功能,在开发时用户只需要继承自android.app.Service类就可以完成Service程序的开发,在Service之中也有自己的生命周期方法。

10.2. Service的生命周期

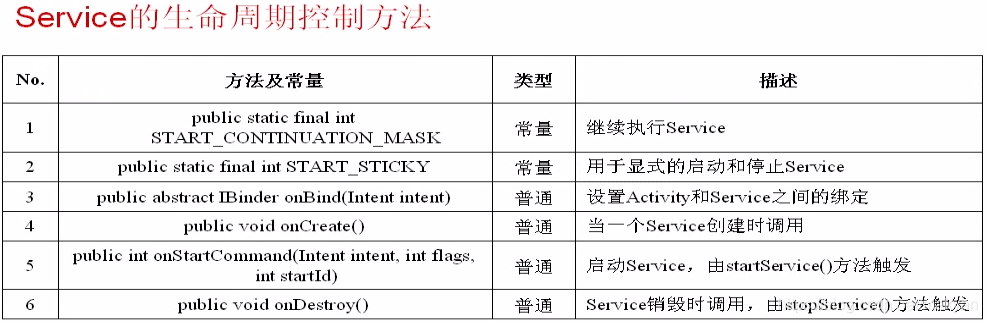
如果要想实现Service操作的话,也需要定义Service的子类,这个子类也要覆写Service中的相应方法。

10.3. Service也是一种组件,所以,它也需要在AndroidMainfest.xml文件中配置

示例:

组件配置

<LinearLayout xmlns:android="http://schemas.android.com/apk/res/android"

    xmlns:tools="http://schemas.android.com/tools"

    android:layout_width="match_parent"

    android:layout_height="match_parent"

    android:orientation="vertical"

    android:paddingBottom="@dimen/activity_vertical_margin"

    android:paddingLeft="@dimen/activity_horizontal_margin"

    android:paddingRight="@dimen/activity_horizontal_margin"

    android:paddingTop="@dimen/activity_vertical_margin"

    tools:context=".ServiceActivity" >

    <Button

        android:id="@+id/startService"

        android:layout_width="wrap_content"

        android:layout_height="wrap_content"

        android:text="启动Service" />

    <Button

        android:id="@+id/stopService"

        android:layout_width="wrap_content"

        android:layout_height="wrap_content"

        android:text="停止Service" />


</LinearLayout>

Service服务:

package com.makyan.service;

import android.app.Service;

import android.content.Intent;

import android.os.IBinder;

public class ServiceUtil extends Service {

            @Override

            public int onStartCommand(Intent intent, int flags, int startId) {

                       System.out.println("****Service onStartCommand");

                       return super.onStartCommand(intent, flags, startId);

            }

            public void onDestroy() {

                       System.out.println("****Service onDestroy");;;

            }

            public IBinder onBind(Intent arg0) {

                       return null;

            }

}

Activity:

package com.makyan.activity;

import android.app.Activity;

import android.content.Intent;

import android.os.Bundle;

import android.view.View;

import android.view.View.OnClickListener;

import android.widget.Button;

import com.example.serviceproject1.R;

import com.makyan.service.ServiceUtil;

public class ServiceActivity extends Activity {

            private Button startBut;

            private Button stopBut;

            @Override

            protected void onCreate(Bundle savedInstanceState) {

                       super.onCreate(savedInstanceState);

                       setContentView(R.layout.activity_service);

                       startBut = (Button) super.findViewById(R.id.startService);

                       stopBut = (Button) super.findViewById(R.id.stopService);

                       startBut.setOnClickListener(new StartOnClickListener());

                       stopBut.setOnClickListener(new StopOnClickListener());

            }

            class StartOnClickListener implements OnClickListener{

                       public void onClick(View arg0) {

                                   ServiceActivity.this.startService(new Intent(ServiceActivity.this,ServiceUtil.class));

                       }

            }

            class StopOnClickListener implements OnClickListener{

                       public void onClick(View arg0) {

                                   ServiceActivity.this.stopService(new Intent(ServiceActivity.this, ServiceUtil.class));

                       }

            }

}

AndroidMainfest.xml配置:

<?xml version="1.0" encoding="utf-8"?>

<manifest xmlns:android="http://schemas.android.com/apk/res/android"

    package="com.example.serviceproject1"

    android:versionCode="1"

    android:versionName="1.0" >

    <uses-sdk

        android:minSdkVersion="17"

        android:targetSdkVersion="17" />

    <application

        android:allowBackup="true"

        android:icon="@drawable/ic_launcher"

        android:label="@string/app_name"

        android:theme="@style/AppTheme" >

        <activity

            android:name="com.makyan.activity.ServiceActivity"

            android:label="@string/app_name" >

            <intent-filter>

                <action android:name="android.intent.action.MAIN" />

                <category android:name="android.intent.category.LAUNCHER" />

            </intent-filter>

        </activity>

        <service android:name="com.makyan.service.ServiceUtil"></service>

    </application>

</manifest>

10.4. Service完全解析

10.4.1. Service的基本用法

关于Service最基本的用法自然就是如何启动一个Service了,启动Service的方法和启动Activity很类似,都需要借助Intent来实现,

下面我们就通过一个具体的例子来看一下。

新建一个Android项目,项目名就叫ServiceTest,这里我选择使用4.0的API。

然后新建一个MyService继承自Service,并重写父类的onCreate()、onStartCommand()和onDestroy()方法,如下所示:

public class MyService extends Service {

         public static final String TAG = "MyService";

         @Override

         public void onCreate() {

                  super.onCreate();

                  Log.d(TAG, "onCreate() executed");

         }

         @Override

         public int onStartCommand(Intent intent, int flags, int startId) {

                  Log.d(TAG, "onStartCommand() executed");

                  return super.onStartCommand(intent, flags, startId);

         }

         @Override

         public void onDestroy() {

                  super.onDestroy();

                  Log.d(TAG, "onDestroy() executed");

         }

         @Override

         public IBinder onBind(Intent intent) {

                  return null;

         }

}

可以看到,我们只是在onCreate()、onStartCommand()和onDestroy()方法中分别打印了一句话,并没有进行其它

任何的操作。

然后打开或新建activity_main.xml作为程序的主布局文件,代码如下所示:

<LinearLayout xmlns:android="http://schemas.android.com/apk/res/android"

    android:layout_width="match_parent"

    android:layout_height="match_parent"

    android:orientation="vertical" >

    <Button

        android:id="@+id/start_service"

        android:layout_width="match_parent"

        android:layout_height="wrap_content"

        android:text="Start Service" />

    <Button

        android:id="@+id/stop_service"

        android:layout_width="match_parent"

        android:layout_height="wrap_content"

        android:text="Stop Service" />

</LinearLayout>

我们在布局文件中加入了两个按钮,一个用于启动Service,一个用于停止Service。

然后打开或新建MainActivity作为程序的主Activity,在里面加入启动Service和停止Service的逻辑,代码如下所示:


public class MainActivity extends Activity implements OnClickListener {

            private Button startService;

            private Button stopService;

            @Override

            protected void onCreate(Bundle savedInstanceState) {

                       super.onCreate(savedInstanceState);

                       setContentView(R.layout.activity_main);

                       startService = (Button) findViewById(R.id.start_service);

                       stopService = (Button) findViewById(R.id.stop_service);

                        startService.setOnClickListener(this);

                       stopService.setOnClickListener(this);

            }


            @Override

            public void onClick(View v) {

                       switch (v.getId()) {

                       case R.id.start_service:

                                   Intent startIntent = new Intent(this, MyService.class);

                                   startService(startIntent);

                                   break;

                       case R.id.stop_service:

                                   Intent stopIntent = new Intent(this, MyService.class);

                                   stopService(stopIntent);

                                   break;

                       default:

                                   break;

                       }

            }

}

可以看到,在Start Service按钮的点击事件里,我们构建出了一个Intent对象,并调用startService()方法来启动MyService

然后在Stop Serivce按钮的点击事件里,我们同样构建出了一个Intent对象,并调用stopService()方法来停止MyService

代码的逻辑非常简单,相信不需要我再多做解释了吧。

另外需要注意,项目中的每一个Service都必须在AndroidManifest.xml中注册才行,所以还需要编辑AndroidManifest.xml文件,

代码如下所示:

<?xml version="1.0" encoding="utf-8"?>

<manifest xmlns:android="http://schemas.android.com/apk/res/android"

    package="com.example.servicetest"

    android:versionCode="1"

    android:versionName="1.0" >


    <uses-sdk

        android:minSdkVersion="14"

        android:targetSdkVersion="17" />


    <application

        android:allowBackup="true"

        android:icon="@drawable/ic_launcher"

        android:label="@string/app_name"

        android:theme="@style/AppTheme" >


            ……


        <service android:name="com.example.servicetest.MyService" >

        </service>

    </application>


</manifest>

这样的话,一个简单的带有Service功能的程序就写好了,现在我们将程序运行起来,并点击一下Start Service按钮,可以看到

LogCat的打印日志如下:

MyService            onCreate() executed

MyService            onStartCommand() executed

也就是说,当启动一个Service的时候,会调用该Service中的onCreate()onStartCommand()方法。那么果我再点击一次Start Service按钮呢?这个时候的打印日志如下:

MyService            onStartCommand() executed

可以看到,这次只有onStartCommand()方法执行了,onCreate()方法并没有执行,为什么会这样呢?这是由于onCreate()方法只会在Service第一次被创建的时候调用,如果当前Service已经被创建过了,不管怎样调用startService()方法,onCreate()方法都不会再执行。因此你可以再多点击几次Start Service按钮试一次,每次都只会有onStartCommand()方法中的打印日志。我们还可以到手机的应用程序管理界面来检查一下MyService是不是正在运行,如下图所示:


可以看到,MyService正在运行,只是它的内部并没有执行任何的逻辑。

回到ServiceTest程序,然后点击一下Stop Service按钮就可以将MyService停止掉了。


10.4.2. ServiceActivity通信.

上面我们学习了Service的基本用法,启动Service之后,就可以在onCreate()onStartCommand()方法里去执行一些具体的逻辑了。不过这样的话ServiceActivity的关系并不大,只是Activity通知了Service一下:你可以启动了。然后Service就去忙自己的事情了。那么有没有什么办法能让它们俩的关联更多一些呢?比如说在Activity中可以指定让Service去执行什么任务。当然可以,只需要让ActivityService建立关联就好了。观察MyService中的代码,你会发现一直有一个onBind()方法我们都没有使用到,这个方法其实就是用于和Activity建立关联的,修改MyService中的代码,如下所示:

public class MyService extends Service {

            public static final String TAG = "MyService";

            private MyBinder mBinder = new MyBinder();

            @Override

            public void onCreate() {

                       super.onCreate();

                       Log.d(TAG, "onCreate() executed");

            }

            @Override

            public int onStartCommand(Intent intent, int flags, int startId) {

                       Log.d(TAG, "onStartCommand() executed");

                       return super.onStartCommand(intent, flags, startId);

            }

            @Override

            public void onDestroy() {

                       super.onDestroy();

                       Log.d(TAG, "onDestroy() executed");

            }

            @Override

            public IBinder onBind(Intent intent) {

                       return mBinder;

            }

            class MyBinder extends Binder {

                        public void startDownload() {

                                   Log.d("TAG", "startDownload() executed");

                                   // 执行具体的下载任务

                       }

            }

}

这里我们新增了一个MyBinder类继承自Binder类,然后在MyBinder中添加了一个startDownload()方法用于在后台执行下载任务,

当然这里并不是真正地去下载某个东西,只是做个测试,所以startDownload()方法只是打印了一行日志。然后修改activity_main.xml中的代码,在布局文件中添加用于绑定Service和取消绑定Service的按钮:

<LinearLayout xmlns:android="http://schemas.android.com/apk/res/android"

    android:layout_width="match_parent"

    android:layout_height="match_parent"

    android:orientation="vertical" >

    <Button

        android:id="@+id/start_service"

        android:layout_width="match_parent"

        android:layout_height="wrap_content"

        android:text="Start Service" />

    <Button

        android:id="@+id/stop_service"

        android:layout_width="match_parent"

        android:layout_height="wrap_content"

        android:text="Stop Service" />

    <Button

        android:id="@+id/bind_service"

        android:layout_width="match_parent"

        android:layout_height="wrap_content"

        android:text="Bind Service" />

    <Button

        android:id="@+id/unbind_service"

        android:layout_width="match_parent"

        android:layout_height="wrap_content"

        android:text="Unbind Service"

        />

</LinearLayout>

接下来再修改MainActivity中的代码,让MainActivityMyService之间建立关联,代码如下所示:

public class MainActivity extends Activity implements OnClickListener {

            private Button startService;

            private Button stopService;

            private Button bindService;

            private Button unbindService;

            private MyService.MyBinder myBinder;

            private ServiceConnection connection = new ServiceConnection() {

                       @Override

                       public void onServiceDisconnected(ComponentName name) {

                       }

                       @Override

                       public void onServiceConnected(ComponentName name, IBinder service) {

                                   myBinder = (MyService.MyBinder) service;

                                   myBinder.startDownload();

                       }

            };

            @Override

            protected void onCreate(Bundle savedInstanceState) {

                       super.onCreate(savedInstanceState);

                       setContentView(R.layout.activity_main);

                       startService = (Button) findViewById(R.id.start_service);

                       stopService = (Button) findViewById(R.id.stop_service);

                       bindService = (Button) findViewById(R.id.bind_service);

                       unbindService = (Button) findViewById(R.id.unbind_service);

                       startService.setOnClickListener(this);

                       stopService.setOnClickListener(this);

                       bindService.setOnClickListener(this);

                       unbindService.setOnClickListener(this);

            }

            @Override

            public void onClick(View v) {

                       switch (v.getId()) {

                       case R.id.start_service:

                                   Intent startIntent = new Intent(this, MyService.class);

                                   startService(startIntent);

                                   break;

                       case R.id.stop_service:

                                   Intent stopIntent = new Intent(this, MyService.class);

                                   stopService(stopIntent);

                                   break;

                       case R.id.bind_service:

                                   Intent bindIntent = new Intent(this, MyService.class);

                                   bindService(bindIntent, connection, BIND_AUTO_CREATE);

                                   break;

                       case R.id.unbind_service:

                                   unbindService(connection);

                                   break;

                       default:

                                   break;

                       }

            }


}

可以看到,这里我们首先创建了一个ServiceConnection的匿名类,在里面重写了onServiceConnected()方法和onServiceDisconnected()方法,

这两个方法分别会在ActivityService建立关联和解除关联的时候调用。在onServiceConnected()方法中,我们又通过向下转型得到了MyBinder的实例,

有了这个实例,ActivityService之间的关系就变得非常紧密了。现在我们可以Activity中根据具体的场景来调用MyBinder中的任何public方法,即实现了Activity指挥Service干什么Service就去干什么的功能。

当然,现在ActivityService其实还没关联起来了呢,这个功能是在Bind Service按钮的点击事件里完成的。可以看到,这里我们仍然是构建出了一个Intent对象,

然后调用bindService()方法将ActivityService进行绑定。bindService()方法接收三个参数,第一个参数就是刚刚构建出的Intent对象,第二个参数是前面创建出的ServiceConnection的实例,第三个参数是一个标志位,这里传入BIND_AUTO_CREATE表示在ActivityService建立关联后自动创建Service,这会使得MyService中的onCreate()方法得到执行,但onStartCommand()方法不会执行

然后如何我们想解除ActivityService之间的关联怎么办呢?调用一下unbindService()方法就可以了,这也是Unbind Service按钮的点击事件里实现的逻辑。现在让我们重新运行一下程序吧,在MainActivity中点击一下Bind Service按钮,LogCat里的打印日志如下图所示:

MyService            onCreate() executed

MyService            onStartCommand() executed

另外需要注意,任何一个Service在整个应用程序范围内都是通用的,即MyService不仅可以和MainActivity建立关联,还可以和任何一个Activity建立关联,而且在建立关联时它们都可以获取到相同的MyBinder实例。

10.4.3. 如何销毁Service

Service的基本用法这一部分,我们介绍了销毁Service最简单的一种情况,点击Start Service按钮启动Service,再点击Stop Service按钮停止Service,这样MyService就被销毁了,可以看到打印日志如下所示:

MyService            onCreate() executed

MyService            onStartCommand() executed

MyService            onDestroy() executed

那么如果我们是点击的Bind Service按钮呢?由于在绑定Service的时候指定的标志位是BIND_AUTO_CREATE,说明点击Bind Service按钮的时候Service也会被创建,这时应该怎么销毁Service呢?其实也很简单,点击一下Unbind Service按钮,将ActivityService的关联解除就可以了。先点击一下Bind Service按钮,再点击一下Unbind Service按钮,打印日志如下所示:

MyService            onCreate() executed

MyService            onStartDownload() executed

MyService            onDestroy() executed

以上这两种销毁的方式都很好理解。那么如果我们既点击了Start Service按钮,又点击了Bind Service按钮会怎么样呢?这个时候你会发现,不管你是单独点击Stop Service按钮还是Unbind Service按钮,Service都不会被销毁,必须要将两个按钮都点击一下,Service才会被销毁。也就是说,点击Stop Service按钮只会让Service停止,点击Unbind Service按钮只会让ServiceActivity解除关联,一个Service必须要在既没有和任何Activity关联又处于停止状态的时候才会被销毁。为了证实一下,我们在Stop ServiceUnbind Service按钮的点击事件里面加入一行打印日志:

public void onClick(View v) {

            switch (v.getId()) {

            case R.id.start_service:

                       Intent startIntent = new Intent(this, MyService.class);

                       startService(startIntent);

                       break;

            case R.id.stop_service:

                       Log.d("MyService", "click Stop Service button");

                       Intent stopIntent = new Intent(this, MyService.class);

                       stopService(stopIntent);

                       break;

            case R.id.bind_service:

                       Intent bindIntent = new Intent(this, MyService.class);

                       bindService(bindIntent, connection, BIND_AUTO_CREATE);

                       break;

            case R.id.unbind_service:

                       Log.d("MyService", "click Unbind Service button");

                       unbindService(connection);

                       break;

            default:

                       break;

            }

}

然后重新运行程序,先点击一下Start Service按钮,再点击一下Bind Service按钮,这样就将Service启动起来,并和Activity建立了关联。

然后点击Stop Service按钮后Service并不会销毁,再点击一下Unbind Service按钮,Service就会销毁了,打印日志如下所示:

MyService            onCreate() executed

MyService            onStartCommand() executed

MyService            onStartDownload() executed

MyService            click Stop Service button

MyService            click Unbind Service buttion

MyService            onDestroy() executed

我们应该始终记得在ServiceonDestroy()方法里去清理掉那些不再使用的资源,防止在Service被销毁后还会有一些不再使用的对象仍占用着内存。

10.4.4. ServiceThread的关系

不少Android初学者都可能会有这样的疑惑,ServiceThread到底有什么关系呢?什么时候应该用Service,什么时候又应该用Thread?答案可能会有点让你吃惊,因为ServiceThread之间没有任何关系!之所以有不少人会把它们联系起来,主要就是因为Service的后台概念。Thread我们大家都知道,是用于开启一个子线程,在这里去执行一些耗时操作就不会阻塞主线程的运行。而Service我们最初理解的时候,总会觉得它是用来处理一些后台任务的,一些比较耗时的操作也可以放在这里运行,这就会让人产生混淆了。但是,如果我告诉你Service其实是运行在主线程里的,你还会觉得它和Thread有什么关系吗?让我们看一下这个残酷的事实吧。在MainActivityonCreate()方法里加入一行打印当前线程id的语句:

Log.d("MyService", "MainActivity thread id is " + Thread.currentThread().getId());

然后在MyServiceonCreate()方法里也加入一行打印当前线程id的语句:

Log.d("MyService", "MyService thread id is " + Thread.currentThread().getId());

现在重新运行一下程序,并点击Start Service按钮,会看到如下打印日志:

MyService            MainActivity thread id is 1

MyService            MyService thread id is 1

可以看到,它们的线程id完全是一样的,由此证实了Service确实是运行在主线程里的,也就是说如果你在Service里编写了非常耗时的代码,程序必定会出现ANR的。你可能会惊呼,这不是坑爹么!?那我要Service又有何用呢?其实大家不要把后台和子线程联系在一起就行了,这是两个完全不同的概念。Android的后台就是指,它的运行是完全不依赖UI的。即使Activity被销毁,或者程序被关闭,只要进程还在,Service就可以继续运行。

比如说一些应用程序,始终需要与服务器之间始终保持着心跳连接,就可以使用Service来实现。你可能又会问,前面不是刚刚验证过Service是运行在主线程里的么?在这里一直执行着心跳连接,难道就不会阻塞主线程的运行吗?当然会,但是我们可以在Service中再创建一个子线程,然后在这里去处理耗时逻辑就没问题了。额,既然在Service里也要创建一个子线程,那为什么不直接在Activity里创建呢?这是因为Activity很难对Thread进行控制,当Activity被销毁之后,就没有任何其它的办法可以再重新获取到之前创建的子线程的实例。而且在一个Activity中创建的子线程,另一个Activity无法对其进行操作。但是Service就不同了,所有的Activity都可以与Service进行关联,然后可以很方便地操作其中的方法,即使Activity被销毁了,之后只要重新与Service建立关联,就又能够获取到原有的ServiceBinder的实例。因此,使用Service来处理后台任务,Activity就可以放心地finish,完全不需要担心无法对后台任务进行控制的情况。一个比较标准的Service就可以写成:

@Override

public int onStartCommand(Intent intent, int flags, int startId) {

            new Thread(new Runnable() {

                       @Override

                       public void run() {

                                   // 开始执行后台任务

                       }

            }).start();

            return super.onStartCommand(intent, flags, startId);

}

class MyBinder extends Binder {

            public void startDownload() {

                       new Thread(new Runnable() {

                                   @Override

                                   public void run() {

                                               // 执行具体的下载任务

                                   }

                       }).start();

            }

}


10.4.5. 创建前台Service

            Service几乎都是在后台运行的,一直以来它都是默默地做着辛苦的工作。但是Service的系统优先级还是比较低的,当系统出现内存不足情况时,就有可能会回收掉正在后台运行的Service。如果你希望Service可以一直保持运行状态,而不会由于系统内存不足的原因导致被回收,就可以考虑使用前台Service。前台Service和普通Service最大的区别就在于,它会一直有一个正在运行的图标在系统的状态栏显示,下拉状态栏后可以看到更加详细的信息,非常类似于通知的效果。当然有时候你也可能不仅仅是为了防止Service被回收才使用前台Service,有些项目由于特殊的需求会要求必须使用前台Service,比如说墨迹天气,它的Service在后台更新天气数据的同时,还会在系统状态栏一直显示当前天气的信息,如下图所示:

那么我们就来看一下如何才能创建一个前台Service吧,其实并不复杂,修改MyService中的代码,如下所示:

public class MyService extends Service {

            public static final String TAG = "MyService";

            private MyBinder mBinder = new MyBinder();

            @Override

            public void onCreate() {

                       super.onCreate();

                       Notification notification = new Notification(R.drawable.ic_launcher, "有通知到来", System.currentTimeMillis());

                       Intent notificationIntent = new Intent(this, MainActivity.class);

                       PendingIntent pendingIntent = PendingIntent.getActivity(this, 0, notificationIntent, 0);

                       notification.setLatestEventInfo(this, "这是通知的标题", "这是通知的内容",pendingIntent);

                       startForeground(1, notification);

                       Log.d(TAG, "onCreate() executed");

            }

            .........

}

这里只是修改了MyServiceonCreate()方法的代码。可以看到,我们首先创建了一个Notification对象,然后调用了它的setLatestEventInfo()

方法来为通知初始化布局和数据,并在这里设置了点击通知后就打开MainActivity。然后调用startForeground()方法就可以让MyService变成一个前台Service,并会将通知的图片显示出来。现在重新运行一下程序,并点击Start ServiceBind Service按钮,MyService就会以前台Service的模式启动了,并且在系统状态栏会弹出一个通栏图标,下拉状态栏后可以看到通知的详细内容,如下图所示。

好了,由于篇幅的原因,本篇文章就先写到这里。目前我们已经把关于Service的很多重要知识点都梳理完了,下一篇文章会承接这篇文章,介绍Android Service中剩下的一个非常重要且复杂的知识点 —— 远程Service的使用.

10.4.6. 远程Service的用法

  • Service中处理耗时操作出现ANR错误

通过10.4.4我们知道了,Service其实是运行在主线程里的,如果直接在Service中处理一些耗时的逻辑,就会导致程序ANR。

让我们来做个实验验证一下吧,修改上一篇文章中创建的ServiceTest项目,在MyService的onCreate()方法中让线程睡眠60秒,如下所示:

public class MyService extends Service {

            ......

            @Override

            public void onCreate() {

                       super.onCreate();

                       Log.d(TAG, "onCreate() executed");

                        try {

                                   Thread.sleep(60000);

                       } catch (InterruptedException e) {

                                   e.printStackTrace();

                       }

            }

            .....

}

重新运行后,点击一下Start Service按钮或Bind Service按钮,程序就会阻塞住并无法进行任何其它操作,过一段时间后就会弹出

ANR的提示框,如下图所示。


  • 解决在Service中处理耗时操作出现ANR错误的问题
  1. 在Service中开启线程去执行耗时任务
  2. 将Service转换成一个远程Service

之前我们提到过,应该在Service中开启线程去执行耗时任务,这样就可以有效地避免ANR的出现。如果将MyService转换成一个远程Service,还会不会有ANR的情况呢?

将一个普通的Service转换成远程Service其实非常简单,只需要在注册Service的时候将它的android:process属性指定成:remote就可以了,代码如下所示:

<?xml version="1.0" encoding="utf-8"?>

<manifest xmlns:android="http://schemas.android.com/apk/res/android"

    package="com.example.servicetest"

    android:versionCode="1"

    android:versionName="1.0" >

    ......

            <service

                android:name="com.example.servicetest.MyService"

                android:process=":remote" >

            </service>

</manifest>

现在重新运行程序,并点击一下Start Service按钮,你会看到控制台立刻打印了onCreate() executed的信息,而且主界面并没有阻塞住,也不会出现ANR。大概过了一分钟后,又会看到onStartCommand() executed打印了出来。

为什么将MyService转换成远程Service后就不会导致程序ANR了呢?


  • 使用远程Service时,ActivityService建立关联报错--原因,ActivityService已经不是在同一个线程里面

         这是由于,使用了远程Service后,MyService已经在另外一个进程当中运行了,所以只会阻塞该进程中的主线程,

并不会影响到当前的应用程序。那既然远程Service这么好用,干脆以后我们把所有的Service都转换成远程Service吧,

还省得再开启线程了。其实不然,远程Service非但不好用,甚至可以称得上是较为难用。一般情况下如果可以不使用远程

Service,就尽量不要使用它。

            下面就来看一下它的弊端吧,首先将MyService的onCreate()方法中让线程睡眠的代码去除掉,然后重新运行程序,

并点击一下Bind Service按钮,你会发现程序崩溃了!为什么点击Start Service按钮程序就不会崩溃,而点击Bind Service

按钮就会崩溃呢?这是由于在Bind Service按钮的点击事件里面我们会让MainActivity和MyService建立关联,但是目前

MyService已经是一个远程Service了,Activity和Service运行在两个不同的进程

当中,这时就不能再使用传统的建立关联的方式,程序也就崩溃了。

  • 使用AIDL来进行跨进程通信,解决Activity和远程Service建立关联

那么如何才能让Activity与一个远程Service建立关联呢?这就要使用AIDL来进行跨进程通信了(IPC)。

AIDL(Android Interface Definition Language)是Android接口定义语言的意思,它可以用于让某个Service与多个应用程序组件

之间进行跨进程通信,从而可以实现多个应用程序共享同一个Service的功能。

下面我们就来一步步地看一下AIDL的用法到底是怎样的。首先需要新建一个AIDL文件,在这个文件中定义好Activity需要与

Service进行通信的方法。

新建MyAIDLService.aidl文件,代码如下所示:

package com.example.servicetest;

interface MyAIDLService {

            int plus(int a, int b);

            String toUpperCase(String str);

}

package com.example.servicetest;
interface MyAIDLService {
 int plus(int a, int b);
 String toUpperCase(String str);
}

点击保存之后,gen目录下就会生成一个对应的Java文件,如下图所示:


然后修改MyService中的代码,在里面实现我们刚刚定义好的MyAIDLService接口,如下所示:

public class MyService extends Service {

            ......

            @Override

            public IBinder onBind(Intent intent) {

                       return mBinder;

            }


            MyAIDLService.Stub mBinder = new Stub() {

                       @Override

                       public String toUpperCase(String str) throws RemoteException {

                                   if (str != null) {

                                               return str.toUpperCase();

                                   }

                                   return null;

                       }

                       @Override

                       public int plus(int a, int b) throws RemoteException {

                                   return a + b;

                       }

            };

}

public class MyService extends Service {
 
 ......
 
 @Override
 public IBinder onBind(Intent intent) {
  return mBinder;
 }
 
 MyAIDLService.Stub mBinder = new Stub() {
 
  @Override
  public String toUpperCase(String str) throws RemoteException {
   if (str != null) {
    return str.toUpperCase();
   }
   return null;
  }
 
  @Override
  public int plus(int a, int b) throws RemoteException {
   return a + b;
  }
 };
 
}

这里先是对MyAIDLService.Stub进行了实现,重写里了toUpperCase()plus()这两个方法。这两个方法的作用分别是将一个字符串全部

转换成大写格式,以及将两个传入的整数进行相加。然后在onBind()方法中将MyAIDLService.Stub的实现返回。这里为什么可以这样写呢?

因为Stub其实就是Binder的子类,所以在onBind()方法中可以直接返回Stub的实现。接下来修改MainActivity中的代码,如下所示:

public class MainActivity extends Activity implements OnClickListener {

            private Button startService;

            private Button stopService;

            private Button bindService;

            private Button unbindService;

            private MyAIDLService myAIDLService;

            private ServiceConnection connection = new ServiceConnection() {

                       @Override

                       public void onServiceDisconnected(ComponentName name) {

                       }

                       @Override

                       public void onServiceConnected(ComponentName name, IBinder service) {

                                   myAIDLService = MyAIDLService.Stub.asInterface(service);

                                   try {

                                               int result = myAIDLService.plus(3, 5);

                                               String upperStr = myAIDLService.toUpperCase("hello world");

                                               Log.d("TAG", "result is " + result);

                                               Log.d("TAG", "upperStr is " + upperStr);

                                   } catch (RemoteException e) {

                                               e.printStackTrace();

                                   }

                       }

            };

            ......

}

public class MainActivity extends Activity implements OnClickListener {
 
 private Button startService;
 
 private Button stopService;
 
 private Button bindService;
 
 private Button unbindService;
 
 private MyAIDLService myAIDLService;
 
 private ServiceConnection connection = new ServiceConnection() {
 
  @Override
  public void onServiceDisconnected(ComponentName name) {
  }
 
  @Override
  public void onServiceConnected(ComponentName name, IBinder service) {
   myAIDLService = MyAIDLService.Stub.asInterface(service);
   try {
    int result = myAIDLService.plus(3, 5);
    String upperStr = myAIDLService.toUpperCase("hello world");
    Log.d("TAG", "result is " + result);
    Log.d("TAG", "upperStr is " + upperStr);
   } catch (RemoteException e) {
    e.printStackTrace();
   }
  }
 };
 
 ......
 
}

我们只是修改了ServiceConnection中的代码。可以看到,这里首先使用了MyAIDLService.Stub.asInterface()方法将传入的IBinder

对象传换成了MyAIDLService对象,接下来就可以调用在MyAIDLService.aidl文件中定义的所有接口了。这里我们先是调用了plus()方法,

并传入了35作为参数,然后又调用了toUpperCase()方法,并传入hello world字符串作为参数,最后将调用方法的返回结果打印出来。现在重新运行程序,并点击一下Bind Service按钮,可以看到打印日志如下所示:

TAG            result is 8

TAG            upperStr is HELLO WORLD

由此可见,我们确实已经成功实现跨进程通信了,在一个进程中访问到了另外一个进程中的方法。

不过你也可以看出,目前的跨进程通信其实并没有什么实质上的作用,因为这只是在一个Activity里调用了同一个应用程序的

Service里的方法。

  • 使用AIDL来进行跨进程通信,让一个应用程序去访问另一个应用程序中的Service

而跨进程通信的真正意义是为了让一个应用程序去访问另一个应用程序中的Service,以实现共享

Service的功能。那么下面我们自然要学习一下,如何才能在其它的应用程序中调用到MyService里的方法。

在上一篇文章中我们已经知道,如果想要让Activity与Service之间建立关联,需要调用bindService()方法,并将

Intent作为参数传递进去,在Intent里指定好要绑定的Service,示例代码如下:

Intent bindIntent = new Intent(this, MyService.class);

bindService(bindIntent, connection, BIND_AUTO_CREATE);

Intent bindIntent = new Intent(this, MyService.class);
bindService(bindIntent, connection, BIND_AUTO_CREATE);

这里在构建Intent的时候是使用MyService.class来指定要绑定哪一个Service的,但是在另一个应用程序中去绑定Service的时候

并没有MyService这个类,这时就必须使用到隐式Intent了。现在修改AndroidManifest.xml中的代码,给MyService加上一个action

如下所示:

<?xml version="1.0" encoding="utf-8"?>

<manifest xmlns:android="http://schemas.android.com/apk/res/android"

    package="com.example.servicetest"

    android:versionCode="1"

    android:versionName="1.0" >

    ......

    <service

        android:name="com.example.servicetest.MyService"

        android:process=":remote" >

        <intent-filter>

            <action android:name="com.example.servicetest.MyAIDLService"/>

        </intent-filter>

    </service>

</manifest>

<?xml version="1.0" encoding="utf-8"?>
<manifest xmlns:android="http://schemas.android.com/apk/res/android"
    package="com.example.servicetest"
    android:versionCode="1"
    android:versionName="1.0" >
 
    ......
 
    <service
        android:name="com.example.servicetest.MyService"
        android:process=":remote" >
        <intent-filter>
            <action android:name="com.example.servicetest.MyAIDLService"/>
        </intent-filter>
    </service>
 
</manifest>

这就说明,MyService可以响应带有com.example.servicetest.MyAIDLService这个actionIntent。现在重新运行一下程序,这样就把远程Service端的工作全部完成了。然后创建一个新的Android项目,起名为ClientTest,我们就尝试在这个程序中远程调用MyService中的方法。ClientTest中的Activity如果想要和MyService建立关联其实也不难,首先需要将MyAIDLService.aidl文件从ServiceTest项目中拷贝过来,注意要将原有的包路径一起拷贝过来,完成后项目的结构如下图所示:


然后打开或新建activity_main.xml,在布局文件中也加入一个Bind Service按钮:

<LinearLayout xmlns:android="http://schemas.android.com/apk/res/android"

    android:layout_width="match_parent"

    android:layout_height="match_parent"

    android:orientation="vertical">

   <Button

       android:id="@+id/bind_service"

       android:layout_width="match_parent"

       android:layout_height="wrap_content"

       android:text="Bind Service"

       />

</LinearLayout>

<LinearLayout xmlns:android="http://schemas.android.com/apk/res/android"
    android:layout_width="match_parent"
    android:layout_height="match_parent"
    android:orientation="vertical"
     >
 
   <Button 
       android:id="@+id/bind_service"
       android:layout_width="match_parent"
       android:layout_height="wrap_content"
       android:text="Bind Service"
       />
 
</LinearLayout>

接下来打开或新建MainActivity,在其中加入和MyService建立关联的代码,如下所示:

public class MainActivity extends Activity {

            private MyAIDLService myAIDLService;

            private ServiceConnection connection = new ServiceConnection() {

                       @Override

                       public void onServiceDisconnected(ComponentName name) {

                       }

                       @Override

                       public void onServiceConnected(ComponentName name, IBinder service) {

                                   myAIDLService = MyAIDLService.Stub.asInterface(service);

                                   try {

                                               int result = myAIDLService.plus(50, 50);

                                               String upperStr = myAIDLService.toUpperCase("comes from ClientTest");

                                               Log.d("TAG", "result is " + result);

                                               Log.d("TAG", "upperStr is " + upperStr);

                                   } catch (RemoteException e) {

                                       e.printStackTrace();

                                   }

                       }

            };

            @Override

            protected void onCreate(Bundle savedInstanceState) {

                       super.onCreate(savedInstanceState);

                       setContentView(R.layout.activity_main);

                       Button bindService = (Button) findViewById(R.id.bind_service);

                       bindService.setOnClickListener(new OnClickListener() {

                                   @Override

                                   public void onClick(View v) {

                                               Intent intent = new Intent("com.example.servicetest.MyAIDLService");

                                               bindService(intent, connection, BIND_AUTO_CREATE);

                                   }

                       });

            }

}

public class MainActivity extends Activity {
 
 private MyAIDLService myAIDLService;
 
 private ServiceConnection connection = new ServiceConnection() {
 
  @Override
  public void onServiceDisconnected(ComponentName name) {
  }
 
  @Override
  public void onServiceConnected(ComponentName name, IBinder service) {
   myAIDLService = MyAIDLService.Stub.asInterface(service);
   try {
    int result = myAIDLService.plus(50, 50);
    String upperStr = myAIDLService.toUpperCase("comes from ClientTest");
    Log.d("TAG", "result is " + result);
    Log.d("TAG", "upperStr is " + upperStr);
   } catch (RemoteException e) {
    e.printStackTrace();
   }
  }
 };
 
 @Override
 protected void onCreate(Bundle savedInstanceState) {
  super.onCreate(savedInstanceState);
  setContentView(R.layout.activity_main);
  Button bindService = (Button) findViewById(R.id.bind_service);
  bindService.setOnClickListener(new OnClickListener() {
   @Override
   public void onClick(View v) {
    Intent intent = new Intent("com.example.servicetest.MyAIDLService");
    bindService(intent, connection, BIND_AUTO_CREATE);
   }
  });
 }
 
}

这部分代码大家一定会非常眼熟吧?没错,这和在ServiceTestMainActivity中的代码几乎是完全相同的,只是在让ActivityService建立关联的时候我们使用了隐式Intent,将Intentaction指定成了com.example.servicetest.MyAIDLService在当前Activity和MyService建立关联之后,我们仍然是调用了plus()和toUpperCase()这两个方法,远程的MyService会对传入的参数进行处理并返回结果,然后将结果打印出来。这样的话,ClientTest中的代码也就全部完成了,现在运行一下这个项目,然后点击Bind Service按钮,此时就会去和远程的MyService建立关联,观察LogCat中的打印信息如下所示:

TAG            result is 100

TAG            upperStr is COMES FROM CLIENTTEST

跨进程通信功能已经完美实现了。不过还有一点需要说明的是,由于这是在不同的进程之间传递数据,Android对这类数据的格式支持是非常有限的,基本上只能传递Java的基本数据类型、字符串、List或Map等。那么如果我想传递一个自定义的类该怎么办呢?这就必须要让这个类去实现Parcelable接口,并且要给这个类也定义一个同名的AIDL文件。

10.5. 总结:

一个Service 是一段长生命周期的,没有用户界面的程序,可以用来开发如监控类程序。比较 好的一个例子就是一个正在从播放列表中播放歌曲的媒体播放器。在一个媒体播放器的应用中,应该会有多个activity,让使用者可以选择歌曲并播放歌 曲。然而,音乐重放这个功能并没有对应的activity,因为使用者当然会认为在导航到其它屏幕时音乐应该还在播放的。在这个例子中,媒体播放器这个 activity 会使用Context.startService()来启动一个service,从而可以在后台保持音乐的播放。同时,系统也将保持这个service 一直执行,直到这个service 运行结束。另外,我们还可以通过使用Context.bindService()方法,连接到一个service 上(如果这个service 还没有运行将启动它)。当连接到一个service 之后,我们还可以service 提供的接口与它进行通讯。拿媒体播放器这个例子来说,我们还可以进行暂停、重播等操作。

Service使用步骤如下:

       1>继承service类

       2>AndroidManifast.xml配置清单文件中<application>节点里对服务进行配置

              <service name=".SMSService"/>

3>服务不能自己运行,需要通过Contex.startService()或Contex.bindService()启动服务。启动服务的两种方式以及区别如下:

  • 通过 startService()方法启动的服务于调用者没有关系,即使调用者关闭了,服务仍然运行想停止服务要调用

Context.stopService(),此时系统会调用onDestory(),使用此方法启动时,服务首次启动系统先调用服务的

onCreate()-->onStart(),如果服务已经启动再次调用只会触发onStart()方法

  • 使用 bindService()启动的服务与调用者绑定,只要调用者关闭服务就终止,使用此方法启动时,服务首次启动

系统先调用服务的 onCreate()-->onBind(),如果服务已经启动再次调用不会再触发这2个方法,调用者退出时系统

会调用服务的 onUnbind()-->onDestory(),想主动解除绑定可使用Contex.unbindService(),系统依次调用

onUnbind()-->onDestory();


10.6. RPC机制(参见第十六章,RPC原理)

服务,从最直白的视角来看,就是剥离了界面的Activity,它们在很多Android的概念方面比较接近,都是

封装有一个完整的功能逻辑实现,只不过Service不抛头露脸,只是默默无声的做坚实的后盾。

但其实,换个角度来看,Android中的服务,和我们通常说的Windows服务,Web的后台服务又有一些相

近,它们通常都是后台长时间运行,接受上层指令,完成相关事务的模块。用运行模式来看,Activity是跳,从

一个跳到一个,呃...,这有点像模态对话框(或者还像web页面好了...),给一个输入(抑或没有...),然后不管不顾

的让它运行,离开时返回输出(同抑或没有...)。而Service不是,它是等,等着上层连接上它,然后产生一段持久

而缠绵的通信,这就像一个用了Ajax页面,看着没啥变化,偷偷摸摸的和Service不知眉来眼去多少回了。

但和一般的Service还是有所不同,Android的Service和所有四大组件一样,其进程模型都是可以配置的,

用方和发布方都可以有权利来选择是把这个组件运行在同一个进程下,还是不同的进程下。这句话,可以拿把指

甲刀刻进脑海中去,它凸显了Android的运行特征。如果一个Service,是有期望运行在于调用方不同进程的时候,

就需要利用Android提供的RPC机制,为其部署一套进程间通信的策略。


Android的RPC实现,如上图所示(好吧,也是从SDK中拿来主义的...),无甚稀奇,基于代理模式的一

个实现,在调用端和服务端都去生成一个代理类,做一些序列化和反序列化的事情,使得调用端和服务器端

都可以像调用一个本地接口一样使用RPC接口。

Android中用来做数据序列化的类是Parcel,参见:/reference/android/os/Parcel.html,封装了序列化的细节,

向外提供了足够对象化的访问接口,Android号称实现非常高效。

还有就是AIDL (Android Interface Definition Language) ,一种接口定义的语言,服务的RPC接口,可以用AIDL

来描述,这样,ADT就可以帮助你自动生成一整套的代理模式需要用到的类,都是想起来很乏力写起来很

苦力的那种。更多内容,可以再看看:guide/developing/tools/aidl.html,如果有兴致,可以找些其他RPC实现的

资料lou几眼。

关于Service的实现,还强推参看API Demos这个Sample里面的RemoteService实现。它完整的展示了实现一

个Service需要做的事情:那就是定义好需要接受的Intent,提供同步或异步的接口,在上层绑定了它后,通过这

些接口(很多时候都是RPC的...)进行通信。在RPC接口中使用的数据、回调接口对象,如果不是标准的系统实现

(系统可序列化的),则需要自定义aidl,所有一切,在这个Sample里都有表达,强荐。

Service从实现角度看,最特别的就是这些RPC的实现了,其他内容,都会接近于Activity的一些实现,也许

不再会详述了。

  • 0
    点赞
  • 4
    收藏
    觉得还不错? 一键收藏
  • 0
    评论

“相关推荐”对你有帮助么?

  • 非常没帮助
  • 没帮助
  • 一般
  • 有帮助
  • 非常有帮助
提交
评论
添加红包

请填写红包祝福语或标题

红包个数最小为10个

红包金额最低5元

当前余额3.43前往充值 >
需支付:10.00
成就一亿技术人!
领取后你会自动成为博主和红包主的粉丝 规则
hope_wisdom
发出的红包
实付
使用余额支付
点击重新获取
扫码支付
钱包余额 0

抵扣说明:

1.余额是钱包充值的虚拟货币,按照1:1的比例进行支付金额的抵扣。
2.余额无法直接购买下载,可以购买VIP、付费专栏及课程。

余额充值