


首先来看一下当应用层出现错误,默认的linux-kernel输出的错误信息。应用层代码如下:
#include <stdio.h>
#include <stdlib.h>
#include <signal.h>
extern int sigset(int signo);
int func_a(unsigned char* a, unsigned char * b, int c, int d);
int func_b(unsigned char* a);
int func_c(unsigned char* a);
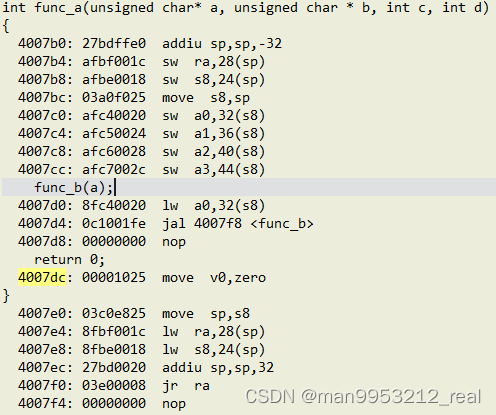
int func_a(unsigned char* a, unsigned char * b, int c, int d)
{
func_b(a);
return 0;
}
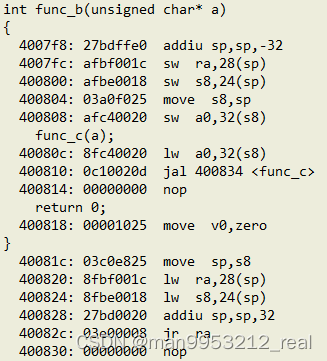
int func_b(unsigned char* a)
{
func_c(a);
return 0;
}
int func_c(unsigned char* a)
{
*a = "Hello";
return 0;
}
int main(int argc, char* argv[])
{
unsigned char* a;
unsigned char buffer[2];
a = NULL;
//*a = 1;
func_a(a, buffer, 2, 3);
return 0;
}在函数func_c中对空指针a赋值,导致异常,将内核打印打开,输出的错误信息如下:
# echo "8 4 1 7" >/proc/sys/kernel/printk
# ./main
do_page_fault(): sending SIGSEGV to main for invalid write access to 00000000
epc = 00400854 in main[400000+1000]
ra = 00400818 in main[400000+1000]Segmentation fault
看起来kernel对应用层引发的异常不够重视啊,我们来想办法改善一下。
当内核崩溃,将会执行异常处理程序,mips架构下溃函数执行流程是:
do_page_fault()->die()->show_registers()->show_stacktrace()->show_backtrace()
查看kernel源码,Fault.c (\linux-pdk2.8.0-20220401-auto\arch\mips\mm):
static void __kprobes __do_page_fault(struct pt_regs *regs, unsigned long write,
	unsigned long address)
{
    ...

bad_area_nosemaphore:
	/* User mode accesses just cause a SIGSEGV */
	if (user_mode(regs)) {
		tsk->thread.cp0_badvaddr = address;
		tsk->thread.error_code = write;
		if (show_unhandled_signals &&
		    unhandled_signal(tsk, SIGSEGV) &&
		    __ratelimit(&ratelimit_state)) {
			pr_info("\ndo_page_fault(): sending SIGSEGV to %s for invalid %s %0*lx",
				tsk->comm,
				write ? "write access to" : "read access from",
				field, address);
			pr_info("epc = %0*lx in", field,
				(unsigned long) regs->cp0_epc);
			print_vma_addr(" ", regs->cp0_epc);
			pr_info("ra  = %0*lx in", field,
				(unsigned long) regs->regs[31]);
			print_vma_addr(" ", regs->regs[31]);
			pr_info("\n");
		}
		current->thread.trap_nr = (regs->cp0_cause >> 2) & 0x1f;
		info.si_signo = SIGSEGV;
		info.si_errno = 0;
		/* info.si_code has been set above */
		info.si_addr = (void __user *) address;
		force_sig_info(SIGSEGV, &info, tsk);
		return;
	}

    ...
}
果然由usermode引发的异常打印的信息很有限。
不过kernel本身已经提供了很多打印现场的函数,我们在这里调用试试看效果。
下面函数打印了现场的寄存器信息及stack数据。
Traps.c (.\linux-pdk2.8.0-20220401-auto\arch\mips\kernel): :void show_registers(struct pt_regs *regs)
static void __kprobes __do_page_fault(struct pt_regs *regs, unsigned long write,
	unsigned long address)
{
    ...
		if (show_unhandled_signals &&
		    unhandled_signal(tsk, SIGSEGV) &&
		    __ratelimit(&ratelimit_state)) {
			pr_info("\ndo_page_fault(): sending SIGSEGV to %s for invalid %s %0*lx",
				tsk->comm,
				write ? "write access to" : "read access from",
				field, address);
			pr_info("epc = %0*lx in", field,
				(unsigned long) regs->cp0_epc);
			print_vma_addr(" ", regs->cp0_epc);
			pr_info("ra  = %0*lx in", field,
				(unsigned long) regs->regs[31]);
			print_vma_addr(" ", regs->regs[31]);
			pr_info("\n");

			show_registers(regs);	//Ben 230516#1
		}
    ...
}
加上这个函数后,输出结果如下:
# ./main
do_page_fault(): sending SIGSEGV to main for invalid write access to 00000000
epc = 00400854 in main[400000+1000]
ra = 00400818 in main[400000+1000]CPU: 0 PID: 1007 Comm: main Tainted: G O 4.4.261-as-release #9
task: 8fc4c028 ti: 8f402000 task.ti: 8f402000
$ 0 : 00000000 00000001 00000000 00000030
$ 4 : 00000000 7fe03344 00000002 00000003
$ 8 : 000191a0 00000000 00000000 726f7272
$12 : 0000000a 00000000 76f71350 00400628
$16 : 00000000 004008d0 004bd68b 00000000
$20 : 00000000 77383498 ffffffff 00000000
$24 : 00000000 00400870
$28 : 76f72e30 7fe032e0 7fe032e0 00400818
Hi : 000001a5
Lo : 00005e17
epc : 00400854 0x400854
ra : 00400818 0x400818
Status: 21008813 USER EXL IE
Cause : 0080000c (ExcCode 03)
BadVA : 00000000
PrId : 00019755 (MIPS 74Kc)
Modules linked in: wxa(O) vc1(O) mjpg(O)
Process main (pid: 1007, threadinfo=8f402000, task=8fc4c028, tls=770c3490)
Stack : 7fe03344 7fe032e8 00000000 770c4234 00000000 770bec88 00000001 00000000
7fe03308 004007dc 00000000 76b8bbe8 00000000 00400914 00000000 00000000
7fe03328 004008a8 00000000 7fe03344 00000002 00000003 004008d0 004bd68b
00000000 004d43c4 004a6a70 76e0b2a8 00000001 7fe03424 76f72e30 00000010
76f72e30 00000001 76e0b268 7fe03350 00000000 004008d0 004bd68b 00000000
...
Call Trace:
overCode: 24420a30 304300ff 8fc20008 <a0430000> 00001025 03c0e825 8fbe0004 27bd0008 03e00008
Segmentation fault
可以看到除了callstack,其他信息基本都由显示出来了。
结合应用代码的反汇编语句及Stack中的数据,我们已经可以解读出callstack,范例如下:
使用 $(OBJDUMP) -S main >main.dis 2>&1 生成的带source的反汇编代码(gcc -gdwarf),如下:
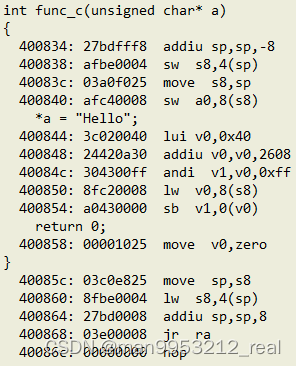

1. epc = 400854,找到出问题的函数为func_c,ra = 400818,其调用者为func_b。
2. 从func_c的反汇编代码看到 addiu sp,sp,-8,将stack指针往后推8字节(高地址),就是func_c的stack;
3. 从func_b的反汇编代码看到 addiu sp,sp,-32,将stack指针往后推32字节(高地址), 就是func_b的stack;其ra存储在sw ra,28(sp)的位置。从stack的这个位置找到func_b的ra,得到其调用者为func_a。
4. 从func_a的反汇编代码看到 addiu sp,sp,-32,将stack指针往后推32字节(高地址), 就是func_b的stack;其ra存储在sw ra,28(sp)的位置。从stack的这个位置找到func_a的ra,得到其调用者为main。
再往回溯就会发现main的调用者地址为76e0b2a8,并不在反汇编的代码区地址空间,这里不做深究,感兴趣的同学可以自行研究一下(应该是跟C语言跳转到main入口的方式有关系)。分析到这里已经能够定位应用层的整个逻辑了。
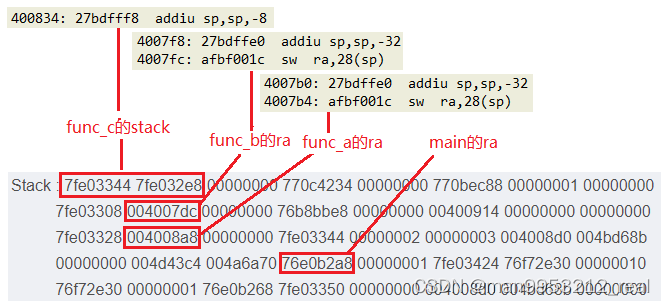
可以看到mips的stack回溯其实就是从stack中找到每个函数ra ,这在stack没有被破坏的情况下是比较有效的debug手段。
至于stack被破坏的情况,我们这里不做讨论,这需要os本身对线程stack有检查机制,再通过watch等手段去定位是哪里破坏了线程栈。
如果想直接用代码打印出函数调用情况,可以借鉴下面的思路:
MIPS的确是无法直观的从寄存器里找到当前情况下堆栈的底部,每个函数对应的栈的尺寸是由GCC计算出的,函数返回时的栈的恢复也是通过立即数的方式通过指令来实现,如(addiu sp,sp,40),这样我们做BackTrace最重要的一个问题就是确定每级函数的堆栈尺寸。
我觉得要确定每级函数的堆栈尺寸,只能通过解析机器码来实现。凑巧发现netbsd系统在内核代码中实现了对MIPS体系结构backtrace的支持,现在来分析下核心代码。
代码在:
但是这种思路有几个问题需要解决:
1. 确定当前函数的pc是通过搜寻函数上方的 jr ra 指令来完成的,当有些汇编函数没有这个指令时会出错(有些汇编函数直接用jump指令跳转到其他函数没有ra)。
2. 也可考虑修改逻辑判定语句 addiu sp,sp,-xx 为函数的pc,再确定当前函数栈的大小,并找到ra的位置(未实践,待验证)。
但这种方法只是锦上添花,只需要弄明白栈回溯的方法,完全可以用手工回溯,根本不需要将这些函数打印出来。
发散一下,当系统出现多线程死锁,我们如何回溯所有线程的任务栈?对linux来说,其实线程时弱进程的概念,我还没弄明白要通过哪些kernel中的变量来回溯所有的线程栈。
目前还只能通过gdb的方式来调试,打开gdb的方式如下:
(238条消息) buildroot下打开gdb调试_buildroot gdb_man9953212_real的博客-CSDN博客
写一个简单的例子来实操一下:
#include <stdio.h>
#include <stdlib.h>
#include <unistd.h>
#include <stddef.h>
#include <pthread.h>
#include <signal.h>
#include <errno.h>
#include <sys/syscall.h>

pthread_mutex_t mutex;
pthread_mutex_t mutex2;

pthread_t t4;

#define THREAD_NUM		3

typedef struct _st_thread_s_{
	pthread_t thrd;
	void *thrd_func;
	unsigned int thrd_ct;
}	st_thread_rs;

st_thread_rs con_thrd[THREAD_NUM];

void *func1(void *args)
{
	con_thrd[0].thrd_ct = 0;
  pthread_mutex_lock(&mutex);
  printf("t1 lock mytex\n");
  sleep(2);
  pthread_mutex_lock(&mutex2);
  printf("t1 lock mytex2\n");

 	while(1){
 		//printf("%u is running\n",pthread_self());
 		con_thrd[0].thrd_ct++;
 		printf("t1 is running,ct:%d\n",con_thrd[0].thrd_ct);
 		sleep(1);
 	}
  pthread_mutex_unlock(&mutex);
  printf("------%u done\n",pthread_self());
}

void *func2(void *args)
{
	con_thrd[1].thrd_ct = 0;
  pthread_mutex_lock(&mutex2);
  printf("t2 lock mytex2\n");
  sleep(2);
  pthread_mutex_lock(&mutex);
  printf("t2 lock mytex\n");

 	while(1){
 		con_thrd[1].thrd_ct++;
 		printf("t2 is running,ct:%d\n",con_thrd[1].thrd_ct);
 		sleep(2);
 	}
  pthread_mutex_unlock(&mutex);
  printf("------%u done\n",pthread_self());
}

void *func3(void *args)
{
	con_thrd[2].thrd_ct = 0;
 	while(1){
 		con_thrd[2].thrd_ct++;
 		//printf("t3 is running,ct:%d\n",con_thrd[2].thrd_ct);
 		sleep(1);
 	}
}

void *fun_deamon(void *args)
{
	unsigned int i;

 	while(1){
 		printf("t4 is running\n",pthread_self());

 		for(i=0; i<THREAD_NUM; i++)
 			printf("1.thread[%d].ct=%d\n",i,con_thrd[i].thrd_ct);

 		sleep(10);
 	}
}

int main()
{
	int ret;
	unsigned int i;

	pthread_mutex_init(&mutex,NULL);
	pthread_mutex_init(&mutex2,NULL);
	con_thrd[0].thrd_func = func1;
	con_thrd[1].thrd_func = func2;
	con_thrd[2].thrd_func = func3;

	for(i=0; i<THREAD_NUM; i++){
		ret = pthread_create(&con_thrd[i].thrd, NULL,con_thrd[i].thrd_func,NULL);
		if(ret != 0){
			printf("create thread_%d fail\n",i);
		}
	}

	sleep(10);
	ret = pthread_create(&t4, NULL, fun_deamon, NULL);
	if(ret != 0){
		printf("create t4 fail\n");
	}

	for(i=0; i<THREAD_NUM; i++)
		pthread_join(con_thrd[i].thrd,NULL);

	pthread_mutex_destroy(&mutex);
	pthread_mutex_destroy(&mutex2);
	return 0;
}
1. 在后台运行该应用。
#./test &
2. 使用ps查看应用的进程号。
1008 root ./test
3. 执行gdb attach 1008,启动gdb。
4. 执行thread apply all bt,查看所有的线程栈。
(gdb) thread apply all bt
unwind_stack_by_address l:581
unwind_stack_by_address l:581
unwind_stack_by_address l:581
unwind_stack_by_address l:581
unwind_stack_by_address l:581Thread 5 (Thread 0x76cff4a0 (LWP 1009)):
#0 __lll_lock_wait (futex=0x4111d8 <mutex2>, private=0) at lowlevellock.c:45
#1 0x77227afc in __GI___pthread_mutex_lock (mutex=0x4111d8 <mutex2>)
at pthread_mutex_lock.c:80
#2 0x00400a1c in func1 (args=0x0) at thread.c:31
#3 0x77224854 in start_thread (arg=0x0) at pthread_create.c:312
#4 0x7706767c in __thread_start ()
at ../sysdeps/unix/sysv/linux/mips/clone.S:144Thread 4 (Thread 0x764ff4a0 (LWP 1010)):
#0 __lll_lock_wait (futex=0x4111c0 <mutex>, private=0) at lowlevellock.c:45
#1 0x77227afc in __GI___pthread_mutex_lock (mutex=0x4111c0 <mutex>)
at pthread_mutex_lock.c:80
#2 0x00400ad8 in func2 (args=0x0) at thread.c:50
#3 0x77224854 in start_thread (arg=0x0) at pthread_create.c:312
#4 0x7706767c in __thread_start ()
at ../sysdeps/unix/sysv/linux/mips/clone.S:144Thread 3 (Thread 0x75cff4a0 (LWP 1011)):
#0 0x77029a14 in nanosleep () at ../sysdeps/unix/syscall-template.S:81
#1 0x77029604 in __sleep (seconds=0) at ../sysdeps/unix/sysv/linux/sleep.c:138
#2 0x00400b80 in func3 (args=0x0) at thread.c:68
---Type <return> to continue, or q <return> to quit---
#3 0x77224854 in start_thread (arg=0x0) at pthread_create.c:312
#4 0x7706767c in __thread_start ()
at ../sysdeps/unix/sysv/linux/mips/clone.S:144Thread 2 (Thread 0x754ef4a0 (LWP 1013)):
#0 0x77029a14 in nanosleep () at ../sysdeps/unix/syscall-template.S:81
#1 0x77029604 in __sleep (seconds=0) at ../sysdeps/unix/sysv/linux/sleep.c:138
#2 0x00400c28 in fun_deamon (args=0x0) at thread.c:82
#3 0x77224854 in start_thread (arg=0x0) at pthread_create.c:312
#4 0x7706767c in __thread_start ()
at ../sysdeps/unix/sysv/linux/mips/clone.S:144Thread 1 (Thread 0x77272350 (LWP 1008)):
#0 0x77225e70 in pthread_join (threadid=1993340064, thread_return=0x0)
at pthread_join.c:92
#1 0x00400dd8 in main () at thread.c:111
5. 可以用t n,跳转到对应的线程。
6. 使用 p mutex名称来查看mutex的状态,如果__lock值大于1,则该mutex有被多个线程锁住。
(gdb) p mutex
$1 = {__data = {__lock = 2, __count = 0, __owner = 1009, __kind = 0,
__nusers = 1, {__spins = 0, __list = {__next = 0x0}}},
__size = "\002\000\000\000\000\000\000\000\361\003\000\000\000\000\000\000\001\000\000\000\000\000\000", __align = 2}
(gdb) p mutex2
$2 = {__data = {__lock = 2, __count = 0, __owner = 1010, __kind = 0,
__nusers = 1, {__spins = 0, __list = {__next = 0x0}}},
__size = "\002\000\000\000\000\000\000\000\362\003\000\000\000\000\000\000\001\000\000\000\000\000\000", __align = 2}
详细的gdb指令可以上网路上搜索。


 509
509


 被折叠的 条评论
为什么被折叠?
被折叠的 条评论
为什么被折叠?
 到【灌水乐园】发言


