


Manio’s达芬奇Getting Started
作者:Manio www.manio.org manioster[at]gmail.com
修改日期:2008年11月
版本:1.0
环境
操作系统:ubuntu 8.04
PC:方正
设置
主机IP:192.168.160.23
目标板IP:192.168.160.40
- 连线与目标板启动
1. 使用2、3脚交叉的串口线,连接目标板与主机
2. 使用双机直连网线连接目标板与主机
3. 打开超级终端,设置串口通讯为
a) 波特率:9600(取决于UBOOT的设置,一般为9600)
b) 数据:8
c) 奇偶校验:无
d) 停止位:1
e) 流控制:无
4. 给开发板上电,迅速按下任意键停止启动过程,进入UBOOT操作界面。
二 tftp服务器安装与配置
1. 安装tftp
manio@ubuntu:/# sudo apt-get install tftpd-hpa
正在读取软件包列表... 完成
正在分析软件包的依赖关系树
Reading state information... 完成
下列新软件包将被安装:
tftpd-hpa
共升级了 0 个软件包,新安装了 1 个软件包,要卸载 0 个软件包,有 0 个软件未被升级。
需要下载 34.0kB 的软件包。
解压缩后会消耗掉 152kB 的额外空间。
获取:1 http://ubuntu.cn99.com/ hardy/main tftpd-hpa 0.43-1.1ubuntu1 [34.0kB]
下载 34.0kB,耗时 5s (5921B/s)
正在预设定软件包 ...
选中了曾被取消选择的软件包 tftpd-hpa。
(正在读取数据库 ... 系统当前总共安装有 112536 个文件和目录。)
正在解压缩 tftpd-hpa (从 .../tftpd-hpa_0.43-1.1ubuntu1_i386.deb) ...
正在设置 tftpd-hpa (0.43-1.1ubuntu1) ...
manio@ubuntu:/#
2. 设置tftpd
manio@ubuntu:~# sudo vim /etc/default/tftpd-hpa
| #Defaults for tftpd-hpa RUN_DAEMON="yes" |
3. 启动服务
manio@ubuntu:/# sudo /etc/init.d/tftpd-hpa start
Starting HPA's tftpd: in.tftpd.
manio@ubuntu:/# ps aux|grep tftp
root 26853 0.0 0.1 2196 288 ? Ss 17:26 0:00 /usr/sbin/in.tftpd -l -s /var/lib/tftpboot
root 26862 0.0 0.2 3180 748 pts/1 R+ 17:27 0:00 grep tftp
manio@ubuntu:/#
4. 查看服务是否开始工作
manio@ubuntu:/# netstat -pna|grep tft
udp 0 0 0.0.0.0:69 0.0.0.0:* 26853/in.tftpd
unix 2 [ ] DGRAM 164700 26853/in.tftpd
复制一个文件到/var/lib/tftpboot中,使用tftp下载
manio@ubuntu:~#sudo cp <FILEPATH>/file1 /var/lib/tftpboot
manio@ubuntu:~#tftp <本机IP>
tftp>get file1
tftp>
manio@ubuntu:~#ls
可以看到下载下来的file1文件
复制uImage到/var/lib/tftpboot,
在超级终端中的UBOOT界面中
EVM # tftp 0x80000000 uImage
可以将uImage装载到RAM的0x80000000位置。
| + emac_close + emac_ch_teardown - emac_ch_teardown + emac_ch_teardown - emac_ch_teardown - emac_close + emac_open act phy 0x0 - emac_open TFTP from server 192.168.160.23; our IP address is 192.168.160.40 Filename 'uImage'. Load address: 0x80000000 Loading: act phy 0x2 act phy 0x2 act phy 0x2 act phy 0x2 act phy 0x2 act phy 0x2 #act phy 0x2 act phy 0x2 act phy 0x2 act phy 0x2 ….. act phy 0x2 act phy 0x2 #act phy 0x2 act phy 0x2 act phy 0x2 act phy 0x2 act phy 0x2 act phy 0x2 act phy 0x2 act phy 0x2 act phy 0x2 act phy 0x2
done Bytes transferred = 1087680 (1098c0 hex) + emac_close + emac_ch_teardown - emac_ch_teardown + emac_ch_teardown - emac_ch_teardown - emac_close |
二 DHCP服务器安装与配置
以下操作适用于UBUNTU 8.04
对于7.10应使用
#sudo apt-get install dhcp
#sudo vim /etc/dhcpd.conf
1. 安装
#sudo apt-get install dhcp3-server
2. 配置
#sudo vim /etc/dhcp3/dhcpd.conf
要在此文件下给DHCPD设置子网,如果没有设置,在/var/log/syslog中会有错误提示:
No subnet declaration for eth0(本机ID地址)
设置成:
| subnet 192.168.160.0 netmask 255.255.255.0 { range 192.168.160.24 192.168.160.100; option broadcast-address 192.168.160.111; option routers prelude.fugue.com; } |
subnet 192.168.160.0 netmask 255.255.255.0设置的是子网的信息,DHCP服务器与目标板的IP应该要在同一个网段内。记住把DHCP服务器(即PC主机)的IP设在这个网段内。
range 192.168.160.24 192.168.160.100;表示在192.168.160.24~192.168.160.100分配IP
如果255.255.255.0写成了255.255.255.254,则在/var/log/syslog中会有错误提示:
range 192.168.160.24 192.168.160.100,netmask 255.255.255.254 spans multiple subnets.
子网掩码跨过了多个子网.
如果192.168.160.0写成192.168.160.23的话,则会出现:
address range 192.168.160.24 192.168.160.100 not on net 192.168.160.23/255.255.255.0!
这是因为 IP/NETMASK 这种子网的表示方法中,子网掩码为0的位,IP地址中相应的位一定要为0
设置好dhcpd.conf后
#sudo ifconfig eth0 192.168.160.23
来保证本机IP在dhcpd.conf设置的网段内
重启DHCP
#sudo /etc/init.d/dhcp3-server restart
3. 测试
在超级终端中的UBOOT界面中
EVM # dhcp
可以看到相应的成功信息。
三 NFS安装与配置
1. 安装
manio@ubuntu:/# sudo apt-get install nfs-common nfs-kernel-server
2. 配置
manio@ubuntu:~# sudo vim /etc/exports
/home/<useracct>/workdir/filesys *(rw,no_root_squash,no_all_squash,sync)
3. 启动nfs或者重新加载
启动nfs
manio@ubuntu:/# sudo /etc/init.d/nfs-kernel-server start
* Exporting directories for NFS kernel daemon...
exportfs: /etc/exports [1]: Neither 'subtree_check' or 'no_subtree_check' specified for export "192.168.1.0/24:/home/cache/netboot".
Assuming default behaviour ('no_subtree_check').
NOTE: this default has changed since nfs-utils version 1.0.x
...done.
* Starting NFS kernel daemon
...done.
如果是修改了/etc/exports 配置文件,不需要重新启动nfs服务器,只需要刷新一下,命令如下
manio@ubuntu:/# exportfs -r
exportfs: /etc/exports [1]: Neither 'subtree_check' or 'no_subtree_check' specified for export "192.168.1.0/24:/home/cache/netboot".
Assuming default behaviour ('no_subtree_check').
NOTE: this default has changed since nfs-utils version 1.0.x
4. 测试
挂载
manio@ubuntu:/# sudo mount <HOST IP>:/home/<useracct>/workdir/filesys /mnt
manio@ubuntu:/# df
看看结果
使用cd /mnt,使用ls就可以看到与/home/<useracct>/workdir/filesys文件夹下一样的内容。
manio@ubuntu:/# sudo umount /mnt
四 DaVinci开发环境的安装
1. 安装包介绍
❏ CD 1: Getting Started Guide. This CD includes demo applications,
Codec Engine software, example codec servers, and DVEVM
documentation. Contains the following files:
■ sprue66a.pdf (this manual)
■ dvevm_setuplinux_#_##_##_##.bin
■ mvl_lsp_setuplinux_#_##_##_##.bin
■ restore directory (Contains files used for hard drive recovery.
Contact TI Technical Worldwide Support if you need details.)
❏ CD 2: MontaVista Linux Pro v4.0 Target File System. The DVEVM
provides a preliminary demonstration version. Contains the file:
■ mvl_target_setuplinux_#_##_##_##.bin. This installation file
contains the MontaVista target file system. 这个安装包里是目标文件系统
❏ CD 3: MontaVista Linux Pro v4.0 System Tools. The version
provided with the DVEVM is the preliminary demonstration version.
Contains the following file:
■ mvl_setuplinux_#_##_##_##.bin. This installation file contains
the MontaVista Tool development tool chain.开发工具链
❏ CD 4: A/V Data. Contains sample A/V data in data.tar.gz.
私人备忘:wintech文件夹中的包含有CD1 CD2 CD3的内容,dvevm中的CD4文件夹下有data.tar.gz
2. 安装方法
参考Ti官方文档《Getting Started》中的4.3 Installing the Software。
需要注意的是,执行bin文件时应加上-console选项,使用字符界面进行安装。在ubuntu下无法使用图形系统进行安装。
#sudo ./mvl_setuplinux_#_##_##_##.bin –console
安装目录最好选用户的目录,免得被权限问题困扰。在这里我们假设安装在/home/manio/dvevm目录下。
五 内核与文件系统
关于存放位置
系统必须要用内核与文件系统。DaVinci有下面几个可以存放内核或文件地方:
FLASH(具有非易失性)
RAM(具有易失性,但速度较FLASH要快)
目标系统硬盘
主机
一般情况下有这么几种存储方式
内核放在FLASH中。
内核放在RAM中:可临时将内核从FLASH读到RAM,或通过TFTP从主机加载到RAM中。
关于这种方式的说明:
| An initial RAM disk relies on a boot loader (such as u-boot) to load it from non-volatile memory (such asNOR flash) to volatile memory, (such as DDR2) before booting up the kernel. The file system inside the RAM disk is referred to as an initial RAM disk file system, or initrd. This file system can be mounted as a root file system and the application can be executed from it. This is the kernel’s local storage. As it is installed on volatile memory, its contents are lost when the system is powered off. For most embedded systems, this is a desired run-time environment. If you must save some parameters generated during run time, you will require a NOR flash file system, which is outside the scope of this project. With the Davinci EVM platform, you can build a RAM disk file system using either the MontaVista®DevRocket™ IDE (available with the –L or -3L DVSDK packages), or command line scripts (available with DVEVM and all DVSDK software packages). |
目标文件放在RAM中:可临时将目标文件系统从FLASH读到RAM。
目标文件系统放在主机中:通过nfs使用放在主机上的目标文件系统
六 烧写内核与文件系统到FLASH并启动LINUX
我们要把内核和文件系统烧到FLASH中,这样,只要设置好UBOOT的环境变量,让其找到内核和文件系统在MEMORY中的位置,就可以启动LINUX了。
1. 配置UBOOT环境变量
如下
| bootdelay=3 baudrate=9600 bootm=2050000 bootfile=uImage filesize=1098c0 fileaddr=80000000 ipaddr=10.62.79.11 serverip=10.62.79.150 dnsip=204.152.186.142 bootargs=console=ttyS0,9600n8 root=/dev/ram0 rw initrd=0x80500000,6M bootcmd=cp.b 0x21698c0 0x80500000 0x21994a; bootm 0x2060000 stdin=serial stdout=serial stderr=serial ethaddr=00:0e:99:02:57:7a |
ipaddr=10.62.79.11 目标板的IP
serverip=10.62.79.150 TFTP服务器的IP
bootargs=console=ttyS0,9600n8 root=/dev/ram0 rw initrd=0x80500000,6M
initrd=0x80500000表示使用RAMDISK FILESYSTEM,即在RAM中的文件系统。如果要使用目标板硬盘或者通过NFS使用主机上的目标文件系统,则使用noinitrd。
bootargs中有个选项IP,可设置为ip=dhcp,则IP通过DHCP方式获取,也可设置为固定IP,则目标板的IP固定为指定IP。如,ip=192.168.160.30。
9600n8为系统加载内核后的串口工作方式,在目标板进入LINUX终端时,超级终端要使用的方式。
bootcmd=cp.b 0x21698c0 0x80500000 0x21994a; bootm 0x2060000
这是启动命令,先把文件系统从FLASH中复制到RAM中,再从FLASH启动内核。
设置好之后
EVM #saveenv
保存设置到FLASH
2. 编译内核和文件系统
参照《Building a Small Embedded Linux Kernel Example.pdf》,编译好内核uImage和文件系统ramdisk.gz
3. 将目标板与主机的串口和网络连接好,确保tftp服务器正常工作。将uImage和ramdisk.gz文件复制到/var/lib/tftpboot。设置文件权限为644,如没有读权限,使用tftp下载时会出现“permission denied”的提示。
4. 打开并设置好超级超端(设置方法在 “- 连线与目标板启动” 中)。
5. 启动目标板,在超级终端中使用flinfo命令
| HNU DAVINCI# flinfo
Bank # 1: CFI conformant FLASH (16 x 16) Size: 32 MB in 256 Sectors Erase timeout 16384 ms, write timeout 2 ms, buffer write timeout 5 ms, buffer s ize 32 Sector Start Addresses: 02000000 02020000 (RO) 02040000 02060000 02080000 020A0000 020C0000 020E0000 02100000 02120000 02140000 02160000 02180000 021A0000 021C0000 021E0000 02200000 02220000 02240000 02260000 …… |
可以查看到sector的起始地址信息。
查看tms320dm6446.pdf中的Table 2-3. Memory Map Summary,可以看到
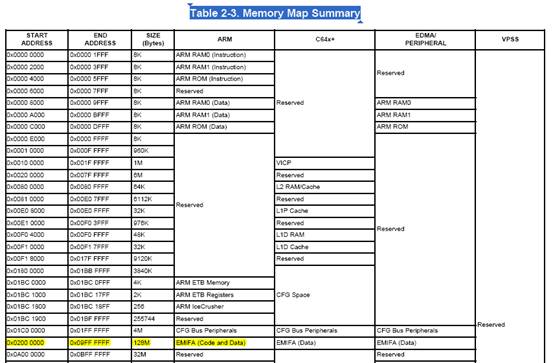
DaVinci使用平板地址,0x0200 0000之后的一段是EMIFA,对应的是FLASH地址。我们从flinfo命令中得到的sector起始地址中选一个,用来作存放内核的超始地址。比如,依据上面的信息,我们可以选择0x02060000作为存放内核的起始地址。注意,不能选择0x02050000,因为这不是sector的起始地址。
FLASH起始的一段存放了UBOOT。
6. 下载内核到RAM中
HNU DAVINCI#tftp 0x80000000 uImage
查看tms320dm6446.pdf中的Table 2-3. Memory Map Summary,可以看到
![]()
0x8000 0000对应的是DDR2 SDRAM,即RAM的起始地址。
完成后,可以看到
| act phy 0x2 act phy 0x2 act phy 0x2
done Bytes transferred = 1087680 (1098c0 hex) + emac_close + emac_ch_teardown - emac_ch_teardown + emac_ch_teardown - emac_ch_teardown - emac_close |
记录下
uImage的大小为1098c0 hex
7. 下载文件系统
HNU DAVINCI#tftp 0x80000000 ramdisk.gz
完成后
ramdisk.gz的大小为21994a hex
8. 计算在FLASH中的存放位置
依据前面所选择的FLASH中存放内核和文件系统的位置,以及内核和文件系统的大小,选择了下面的存储位置。

9. 将文件系统和内核烧到FLASH中
刚才已经将ramdisk.gz下载到RAM的0x8000 0000位置了,之前下载的uImage被覆盖了(下载uImage是为了得到它的大小,以便对之后的下载做安排,其实如果RAM够大的话,可以把内核和文件系统同时下载到RAM中,再烧到FLASH里的)。
EVM #protect off 0x2060000 +0x32320a
解除FLASH中0x2060000后0x32320a长度的保护。
注意:《Building a Small Embedded Linux Kernel Example.pdf》中,有多处把FLASH中的地址后多加一个“0”,如把0x2050000写成0x20500000。
EVM #erase 0x2060000 +0x32320a
擦除
EVM #cp.b 0x80000000 0x21698c0 0x21994A
cp.b的用法
cp.b 源起始地址 目标起始地址 要复制的长度
这样,就可以将文件系统ramdisk.gz烧入FLASH中
下面烧内核
从主机下载到RAM中
EVM #tftp 0x80000000 uImage
下载完成后,使用cp.b命令将uImage从RAM复制到FLASH中。
EVM #cp.b 0x80000000 0x2060000 0x1098c0
打开写保护
EVM #protect on 0x2060000 +0x32320a
10. 启动目标板
EVM #boot
LINUX的登陆用户名为root,没密码。
八 通过NFS使用主机上的目标文件系统启动
1. 建立目标文件系统
参考《Getting started》4.3.4 Exporting a Shared File System for Target Access
将目标文件系统复制到/home/manio/workdir/filesys
2. 配置主机的NFS服务器
参考前面的“三 NFS安装与配置”
3. UBOOT环境变量设置为:
| HNU DAVINCI# printenv bootdelay=3 baudrate=9600 bootm=2050000 bootfile=uImage dnsip=204.152.186.142 bootcmd=cp.b 0x21698c0 0x80500000 0x21994a; bootm 0x2060000 rootpath=/home/manio/WorkDir/filesys nfshost=192.168.160.23 filesize=21994a fileaddr=80000000 ipaddr=192.168.160.40 serverip=192.168.160.23 bootargs=console=ttyS0,9600n8 noinitrd rw ip=192.168.160.30 root=/dev/nfs nfsroo t=192.168.160.23:/home/manio/WorkDir/filesys,nolock mem=32M stdin=serial stdout=serial stderr=serial ethaddr=00:0e:99:02:57:7a
Environment size: 488/131068 bytes |
使用NFS的设置可参考《getting started.pdf》 4.3.5 Testing the Shared File Systemnfsroot设置为主机IP及目标文件系统在主机上的位置
4. 启动
EVM #boot
LINUX用户名为root


 2331
2331

 被折叠的 条评论
为什么被折叠?
被折叠的 条评论
为什么被折叠?
 到【灌水乐园】发言


