


node路由实现
利用switch实现
利用switch,case语句实现:
server.js:
const http = require("http")
const fs = require("fs")


http.createServer((req, res) => {
    const myURL = new URL(req.url, "http://127.0.0.1")
    // console.log(myURL.pathname)
    switch (myURL.pathname) {
        case "/login":
            res.writeHead(200, { "Content-Type": "text/html;charset=utf8" })
            res.write(fs.readFileSync("./static/login.html"), "utf-8")
            break;
        case "/home":
            res.writeHead(200, { "Content-Type": "text/html;charset=utf8" })
            res.write(fs.readFileSync("./static/home.html"), "utf-8")
            break;
        default:
            res.writeHead(404, { "Content-Type": "text/html;charset=utf8" })
            res.write(fs.readFileSync("./static/404.html"), "utf-8")
    }
    res.end()

}).listen(3000, () => {
    console.log("服务器启动成功")
})
写成模块
router.js
const fs = require("fs")

function route(res,pathname) {
   switch (pathname) {
        case "/login":
            res.writeHead(200, { "Content-Type": "text/html;charset=utf8" })
            res.write(fs.readFileSync("./static/login.html"), "utf-8")
            break;
        case "/home":
            res.writeHead(200, { "Content-Type": "text/html;charset=utf8" })
            res.write(fs.readFileSync("./static/home.html"), "utf-8")
            break;
        default:
            res.writeHead(404, { "Content-Type": "text/html;charset=utf8" })
            res.write(fs.readFileSync("./static/404.html"), "utf-8")
    }
}
module.exports = route
server.js
const http = require("http")
const route = require("./router")


http.createServer((req, res) => {
    const myURL = new URL(req.url, "http://127.0.0.1")
    // console.log(myURL.pathname)
    route(res,myURL.pathname)
    res.end()

}).listen(3000, () => {
    console.log("服务器启动成功")
})
另一种写法-更常用
将route写成对象模式
router.js:
const fs = require("fs")

const route = {
    "/login": (res) => {
        res.writeHead(200, { "Content-Type": "text/html;charset=utf8" })
            res.write(fs.readFileSync("./static/login.html"), "utf-8")
    },
    "/home": (res) => {
         res.writeHead(200, { "Content-Type": "text/html;charset=utf8" })
            res.write(fs.readFileSync("./static/home.html"), "utf-8")
    },
    "/404": (res) => {
          res.writeHead(404, { "Content-Type": "text/html;charset=utf8" })
            res.write(fs.readFileSync("./static/404.html"), "utf-8")
    },

}
module.exports = route
server.js:
const http = require("http")
const route = require("./router")


http.createServer((req, res) => {
    const myURL = new URL(req.url, "http://127.0.0.1")
    // console.log(myURL.pathname)
    try {
        route[myURL.pathname](res)
    } catch (err) {
         route["/404"](res)
    }
     res.end()

}).listen(3000, () => {
    console.log("服务器启动成功")
})
进一步改进
router.js
const fs = require("fs")


function render (res,path,type=""){
   res.writeHead(200, { "Content-Type": `${type?type:"text/html"};charset=utf8` })
            res.write(fs.readFileSync(path), "utf-8")
}
const route = {
    "/login": (res) => {
        render (res,"./static/login.html")
    },
    "/home": (res) => {
         render (res,"./static/home.html")
    },
    "/404": (res) => {
          res.writeHead(404, { "Content-Type": "text/html;charset=utf8" })
            res.write(fs.readFileSync("./static/404.html"), "utf-8")
    },
    "/favicon.ico": (res) => {
        render (res,"./static/favicon.ico","image/x-icon")
    }

}
module.exports = route
server.js
const http = require("http")
const route = require("./router")

function start (){
   http.createServer((req, res) => {
    const myURL = new URL(req.url, "http://127.0.0.1")
    // console.log(myURL.pathname)
    try {
        route[myURL.pathname](res)
    } catch (err) {
         route["/404"](res)
    }
     res.end()

}).listen(3000, () => {
    console.log("服务器启动成功")
})
}

module.exports = start
index.js(入口)
const server = require("./server")

server()
api文件的引入
前面所写的都返回值都是页面,前端发过来的请求也有可能是请求数据的,当然也可以直接放在route中,但是我们一般将请求数据的单独放在一个api.js文件中,专门用来处理请求数据的接口。
实现
api.js
const fs = require("fs")
function render(res, data, type = "") {
   res.writeHead(200, { "Content-Type": `${type?type:"application/json"};charset=utf8` })
   res.write(data)
}

const apiRouter = {
    "/api/login": (res) => {
        render(res,'{ok:1}')
    }
}

module.exports = apiRouter
router.js
const fs = require("fs")


function render (res,path,type=""){
   res.writeHead(200, { "Content-Type": `${type?type:"text/html"};charset=utf8` })
            res.write(fs.readFileSync(path), "utf-8")
}
const route = {
    "/login": (res) => {
        render (res,"./static/login.html")
    },
    "/home": (res) => {
         render (res,"./static/home.html")
    },
    "/404": (res) => {
          res.writeHead(404, { "Content-Type": "text/html;charset=utf8" })
            res.write(fs.readFileSync("./static/404.html"), "utf-8")
    },
    "/favicon.ico": (res) => {
        render (res,"./static/favicon.ico","image/x-icon")
    }

}
module.exports = route
server.js
const http = require("http")
const route = require("./router")
const apiRouter = require("./api")

const Router = {}

// route 和 apiRouter合并在一个对象中,使用方法Object.assign
Object.assign(Router, route)
Object.assign(Router,apiRouter)

function start (){
   http.createServer((req, res) => {
    const myURL = new URL(req.url, "http://127.0.0.1")
    // console.log(myURL.pathname)
    try {
        Router[myURL.pathname](res)
    } catch (err) {
        Router["/404"](res)
    }
     res.end()

}).listen(3000, () => {
    console.log("服务器启动成功")
})
}

module.exports = start
index.js
const server = require("./server")

server()
访问

改进
将对象的合并封装成函数提取出去。
router.js 和 api.js不变
server.js:
const http = require("http")
const route = require("./router")
const apiRouter = require("./api")

const Router = {}

// route 和 apiRouter合并在一个对象中,使用方法Object.assign
Object.assign(Router, route)
Object.assign(Router, apiRouter)

// express use
function use (obj){
   Object.assign(Router,obj)
}

function start (){
   http.createServer((req, res) => {
    const myURL = new URL(req.url, "http://127.0.0.1")
    // console.log(myURL.pathname)
    try {
        Router[myURL.pathname](res)
    } catch (err) {
        Router["/404"](res)
    }
     res.end()

}).listen(3000, () => {
    console.log("服务器启动成功")
})
}

exports.start = start
exports.use = use
index.js:
const server = require("./server")
const router = require("./router")
const apiRouter = require("./api")

// 合并路由,注册路由
server.use(router)
server.use(apiRouter)

server.start()
路由处理get和post请求
(1)前端:
- index.html
<!DOCTYPE html>
<html lang="en">
  <head>
    <meta charset="UTF-8" />
    <meta http-equiv="X-UA-Compatible" content="IE=edge" />
    <meta name="viewport" content="width=device-width, initial-scale=1.0" />
    <title>Document</title>
  </head>
  <body>
    Login
    <div>
      <div>
        用户名:
        <input type="text" id="username" />
      </div>
      <div>
        密码:
        <input type="password" id="password" />
      </div>
      <div>
        <button type="submit" id="login">登录-get</button>
        <button type="submit" id="loginpost">登录-post</button>
      </div>
    </div>

    <script type="text/javascript">
      var login = document.querySelector("#login");
      var loginpost = document.querySelector("#loginpost");
      var username = document.querySelector("#username");
      var password = document.querySelector("#password");

    //   get请求
      login.onclick = () => {
        fetch(
          `/api/login?username=${username.value}&password=${password.value}`
        )
          .then((res) => res.text())
          .then((res) => {
            console.log(res);
          });
      };

    //   post请求
      loginpost.onclick = () => {
        fetch(`/api/loginpost`, {
          method: "POST",
          body: JSON.stringify({
            username: username.value,
            password: password.value,
          }),
          headers: {
            "Content-Type": "application/json",
          },
        })
          .then((res) => res.text())
          .then((res) => {
             console.log(res);
          });
      };
    </script>
  </body>
</html>
(2)后端
- 后端入口:index.js
const server = require("./server")
const router = require("./router")
const apiRouter = require("./api")

// 合并路由
server.use(router)
server.use(apiRouter)

server.start()
- server.js
const http = require("http")
const route = require("./router")
const apiRouter = require("./api")

const Router = {}

// route 和 apiRouter合并在一个对象中,使用方法Object.assign
Object.assign(Router, route)
Object.assign(Router, apiRouter)

// express use
function use (obj){
   Object.assign(Router,obj)
}

function start (){
   http.createServer((req, res) => {
    const myURL = new URL(req.url, "http://127.0.0.1")

    try {
        Router[myURL.pathname](req,res)
    } catch (err) {
        Router["/404"](req,res)
    }

}).listen(3000, () => {
    console.log("服务器启动成功")
})
}

exports.start = start
exports.use = use
- router.js
const fs = require("fs")


function render (res,path,type=""){
   res.writeHead(200, { "Content-Type": `${type?type:"text/html"};charset=utf8` })
   res.write(fs.readFileSync(path), "utf-8")
   res.end()
}
const route = {
    "/login": (req,res) => {
        render (res,"./static/login.html")
    },
    "/home": (req,res) => {
         render (res,"./static/home.html")
    },
    "/404": (req,res) => {
          res.writeHead(404, { "Content-Type": "text/html;charset=utf8" })
            res.write(fs.readFileSync("./static/404.html"), "utf-8")
            res.end()
    },
    "/favicon.ico": (req,res) => {
        render (res,"./static/favicon.ico","image/x-icon")
    }

}
module.exports = route
- api.js:
const fs = require("fs")
function render(res, data, type = "") {
res.writeHead(200, { "Content-Type": `${type?type:"application/json"};charset=utf8` })
res.write(data)
res.end()
}
const apiRouter = {
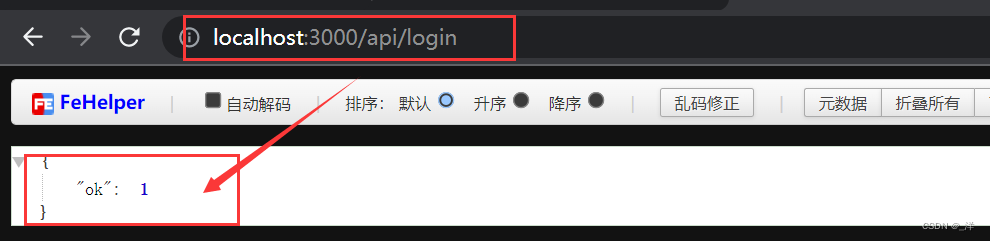
"/api/login": (req, res) => {
const myURL = new URL(req.url, "http://127.0.0.1")
if (myURL.searchParams.get("username") === 'yang' && myURL.searchParams.get("password") === '123456') {
render(res,`{"ok":1}`)
} else {
render(res,`{"ok":0}`)
}
},
"/api/loginpost": (req, res) => {
// 数据量一般比较大所以不能直接使用get获取数据
// 使用req.on监听并接受数据
var post=""
req.on("data", chunk => {
post += chunk
})
req.on("end", () => {
post = JSON.parse(post)
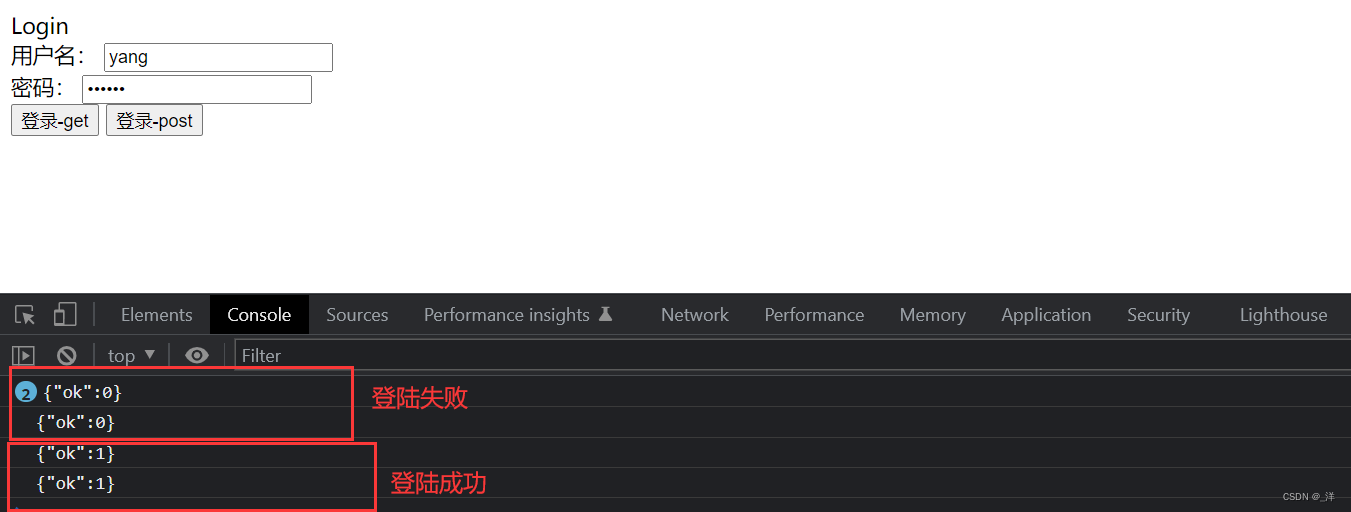
if (post.username === 'yang' && post.password === "123456") {
render(res, `{"ok":1}`)
} else {
render(res, `{"ok":0}`)
}
})
}
}
module.exports = apiRouter
运行:
- 启动后端index.js
- 浏览器输入:http://localhost:3000/login
- 登陆验证
路由-静态资源
像css,js这样的静态资源我们之前使用<link>标签可以直接引入。
但是放到服务器上,css的样式引入也是需要向服务器请求的,所以也需要对相应的请求进行路由处理。
一般在”404“路由中对静态资源进行判断:
(1)静态资源
static/css/login.css
body{
    background-color: brown;
}
static/js/login.js
var login = document.querySelector("#login");
      var loginpost = document.querySelector("#loginpost");
      var username = document.querySelector("#username");
      var password = document.querySelector("#password");

    //   get请求
      login.onclick = () => {
        fetch(
          `/api/login?username=${username.value}&password=${password.value}`
        )
          .then((res) => res.text())
          .then((res) => {
            console.log(res);
          });
      };

    //   post请求
      loginpost.onclick = () => {
        fetch(`/api/loginpost`, {
          method: "POST",
          body: JSON.stringify({
            username: username.value,
            password: password.value,
          }),
          headers: {
            "Content-Type": "application/json",
          },
        })
          .then((res) => res.text())
          .then((res) => {
             console.log(res);
          });
      };
(2)前端页面
login.html
<!DOCTYPE html>
<html lang="en">
  <head>
    <meta charset="UTF-8" />
    <meta http-equiv="X-UA-Compatible" content="IE=edge" />
    <meta name="viewport" content="width=device-width, initial-scale=1.0" />
    <title>Document</title>
    <link rel="stylesheet" href="/css/login.css">
  </head>
  <body>
    Login
    <div>
      <div>
        用户名:
        <input type="text" id="username" />
      </div>
      <div>
        密码:
        <input type="password" id="password" />
      </div>
      <div>
        <button type="submit" id="login">登录-get</button>
        <button type="submit" id="loginpost">登录-post</button>
      </div>
    </div>

    <script type='text/javascript' src='/js/login.js'></script>

  </body>
</html>
(3)node后端:
入口:index.js
const server = require("./server")
const router = require("./router")
const apiRouter = require("./api")

// 合并路由
server.use(router)
server.use(apiRouter)

server.start()
server.js:
const http = require("http")
const route = require("./router")
const apiRouter = require("./api")

const Router = {}

// route 和 apiRouter合并在一个对象中,使用方法Object.assign
Object.assign(Router, route)
Object.assign(Router, apiRouter)

// express use
function use (obj){
   Object.assign(Router,obj)
}

function start (){
   http.createServer((req, res) => {
    const myURL = new URL(req.url, "http://127.0.0.1")

    try {
        Router[myURL.pathname](req,res)
    } catch (err) {
        Router["/404"](req,res)
    }

}).listen(3000, () => {
    console.log("服务器启动成功")
})
}

exports.start = start
exports.use = use
接口:api.js
const fs = require("fs")
function render(res, data, type = "") {
   res.writeHead(200, { "Content-Type": `${type?type:"application/json"};charset=utf8` })
    res.write(data)
    res.end()
}

const apiRouter = {
    "/api/login": (req, res) => {
        const myURL = new URL(req.url, "http://127.0.0.1")
        if (myURL.searchParams.get("username") === 'yang' && myURL.searchParams.get("password") === '123456') {
            render(res,`{"ok":1}`)
        } else {
            render(res,`{"ok":0}`)
        }

    },
    "/api/loginpost": (req, res) => {
    //    数据量一般比较大所以不能直接使用get获取数据
    //    使用req.on监听并接受数据
        var post=""
        req.on("data", chunk => {
            post += chunk
        })
        req.on("end", () => {
            post = JSON.parse(post)
            if (post.username === 'yang' && post.password === "123456") {
                render(res, `{"ok":1}`)
            } else {
                render(res, `{"ok":0}`)
            }
        })

    }
}

module.exports = apiRouter
路由:router.js(在这里处理静态资源)
const fs = require("fs")
const path = require("path")
const mime =require("mime")

function render (res,path,type=""){
   res.writeHead(200, { "Content-Type": `${type?type:"text/html"};charset=utf8` })
    res.write(fs.readFileSync(path), "utf-8")
    res.end()
}
const route = {
    "/login": (req,res) => {
        render (res,"./static/login.html")
    },
    "/home": (req,res) => {
         render (res,"./static/home.html")
    },
     "/": (req,res) => {
         render (res,"./static/home.html")
    },
    "/404": (req, res) => {
        if (readStaticFile(req, res)) {
            return
        }
        res.writeHead(404, { "Content-Type": "text/html;charset=utf8" })
        res.write(fs.readFileSync("./static/404.html"), "utf-8")
        res.end()
    },
    // "/favicon.ico": (req,res) => {
    //     render (res,"./static/favicon.ico","image/x-icon")
    // }

}

// 静态资源管理
function readStaticFile(req, res) {
    const myURL = new URL(req.url, "http://127.0.0.1:3000")
    // 获取绝对路径
    // __dirname代表的是当前执行命令的绝对路径
    const pathname = path.join(__dirname, "/static", myURL.pathname)

    console.log(pathname)
    if (fs.existsSync(pathname)) {

        render(res,pathname,mime.getType(myURL.pathname.split(".")[1]))
        return true
    } else {
        return false
    }
}
module.exports = route
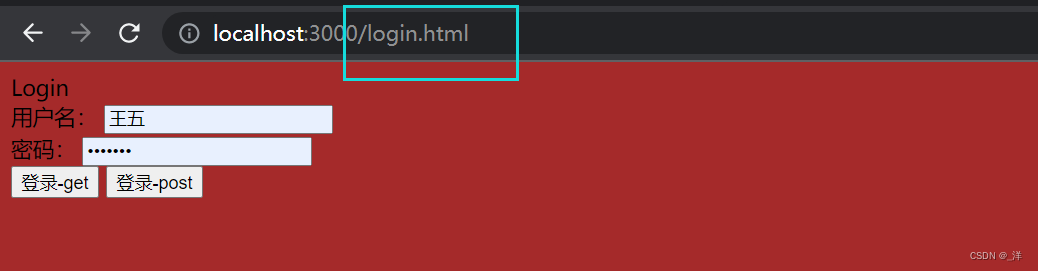
运行结果:
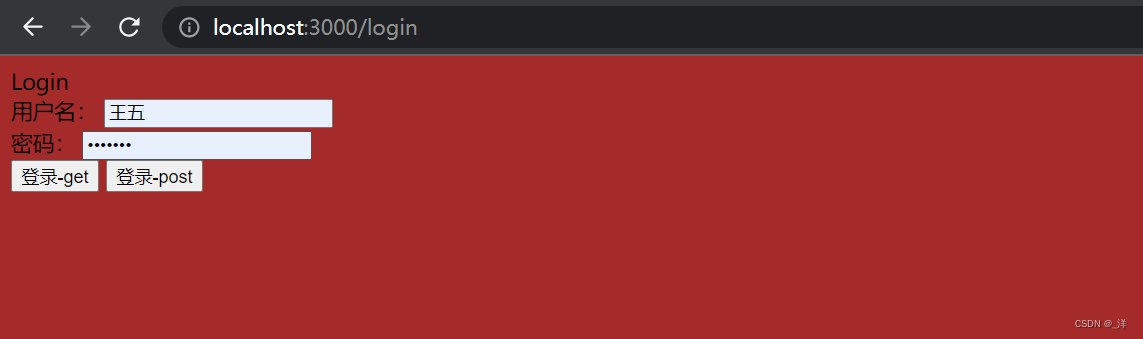
同时请求输入.login.html发现也可以,这是处理静态资源的结果:
补充
path模块
const path = require("path") 可以实现路径的拼接
eg:
const pathname = path.join(__dirname, "/static", myURL.pathname)
__dirname:C:\Users\86198\VScode\qianDuan\Node\路由
myURL.pathname:\css\login.css
输出:
C:\Users\86198\VScode\qianDuan\Node\路由\static\css\login.css
mime模块
只要传入文件的扩展名就可以返回对应的 Content-Type 对应的值
初始化:npm init
安装:npm i mime


 376
376


 被折叠的 条评论
为什么被折叠?
被折叠的 条评论
为什么被折叠?
 到【灌水乐园】发言


