Android 与SQlite 数据库操作(新手步骤)
一、搭建简易的界面
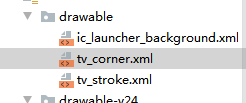
1 新建shape xml文件,定义一个圆角和边框

1.1 创建shape文件 tv_corner.xml
<?xml version="1.0" encoding="utf-8"?>
<shape xmlns:android="http://schemas.android.com/apk/res/android">
    <corners android:radius="20dp"/>
    <stroke android:color="@color/colorPrimaryDark"
            android:width="3dp"/>
</shape>

1.2 创建shape文件 tv_stroke.xml
<?xml version="1.0" encoding="utf-8"?>
<shape xmlns:android="http://schemas.android.com/apk/res/android">
    <corners android:radius="3dp"/>
    <stroke android:color="#28A62D"
            android:width="3dp"/>
</shape>
2 搭建简易页面 activity_main.xml
<?xml version="1.0" encoding="utf-8"?>
<LinearLayout xmlns:android="http://schemas.android.com/apk/res/android"
    xmlns:tools="http://schemas.android.com/tools"
    android:layout_width="match_parent"
    android:layout_height="match_parent"
    android:orientation="vertical"
    tools:context=".MainActivity">

    <TextView
        android:id="@+id/textView"
        android:layout_width="match_parent"
        android:layout_height="80dp"
        android:text="简易通讯录"
        android:textSize="40sp"
        android:textColor="#1051DD"
        android:gravity="center"/>

    <LinearLayout
        android:layout_width="match_parent"
        android:layout_height="84dp"
        android:orientation="horizontal">

        <TextView
            android:layout_width="wrap_content"
            android:layout_height="wrap_content"
            android:text="用户名:"
            android:textSize="30sp" />

        <EditText
            android:id="@+id/ed_name"
            android:layout_width="260dp"
            android:layout_height="wrap_content"
            android:background="@drawable/tv_stroke"
            android:hint="请输入用户名"
            android:textSize="30sp" />
    </LinearLayout>
    <LinearLayout
        android:layout_width="match_parent"
        android:layout_height="80dp"
        android:orientation="horizontal">
        <TextView
            android:layout_width="wrap_content"
            android:layout_height="wrap_content"
            android:text="手机号:"
            android:textSize="30sp"/>
        <EditText
            android:id="@+id/ed_phonenum"
            android:layout_width="260dp"
            android:layout_height="wrap_content"
            android:background="@drawable/tv_stroke"
            android:hint="请输入手机号"
            android:textSize="30sp"/>
    </LinearLayout>

    <LinearLayout
        android:layout_width="match_parent"
        android:layout_height="80dp"
        android:orientation="horizontal"
        tools:layout_editor_absoluteX="0dp">

        <Button
            android:id="@+id/bt_insert"
            android:layout_width="0dp"
            android:layout_height="60dp"
            android:layout_weight="1"
            android:textSize="20sp"
            android:background="@drawable/tv_corner"
            android:text="插入" />
2.1 界面截图

2.2 控件id截图

二、新建MyHelper.java

1 构造方法,调用SQLiteOpenHelper的构造方法,创建数据库“contacter”
    public MyHelper(Context context){

        super(context,"contacter",null,2);
    }
2 重写方法

package com.maaa.sqlite;
import android.content.Context;
import android.database.sqlite.SQLiteDatabase;
import android.database.sqlite.SQLiteOpenHelper;
public class MyHelper extends SQLiteOpenHelper {
public MyHelper(Context context){
super(context,"contacter.db",null,2);
}
@Override
public void onCreate(SQLiteDatabase db) {
db.execSQL("CREATE TABLE information (_id INTEGER PRIMARY KEY AUTOINCREMENT,name VARCHAR(20),phone VARCHAR(20))");
}
@Override
public void onUpgrade(SQLiteDatabase db, int oldVersion, int newVersion) {
}
}
三.搭建MainActivity.java框架
1.定义控件,创建点击事件框架
public class MainActivity extends AppCompatActivity implements View.OnClickListener {


    private EditText name,phonenum;
    private Button insert,query,updata,delete;
    private TextView show;

    private void init(){

        name = findViewById(R.id.ed_name);
        phonenum = findViewById(R.id.ed_phonenum);
        show = findViewById(R.id.tv_show);

        insert= findViewById(R.id.bt_insert);
        query = findViewById(R.id.bt_query);
        updata = findViewById(R.id.bt_updata);
        delete = findViewById(R.id.bt_delete);

        insert.setOnClickListener(this);
        query.setOn


 Android 与SQlite 数据库操作(新手步骤)搭建简易的界面新建shape xml文件,定义一个圆角和边框创建shape文件 tv_corner.xml创建shape文件 tv_stroke.xml搭建简易页面 activity_main.xml界面截图控件id截图新建MyHelper.java构造方法,调用SQLiteOpenHelper的构造方法,创建数据库“contacter”重写方法搭建MainActivity.java框架定义控件,创建点击事件框架创建MyHelper 对象实现增,改,删,
 最低0.47元/天 解锁文章


 3219
3219


 被折叠的 条评论
为什么被折叠?


