


方式一:实现DataSource接口
所需资源
- Spring boot
- Mybatis-plus
- MySql 数据库
SpringBoot配置多数据源
在pom文件中引入依赖
<?xml version="1.0" encoding="UTF-8"?>
<project xmlns="http://maven.apache.org/POM/4.0.0" xmlns:xsi="http://www.w3.org/2001/XMLSchema-instance"
  xsi:schemaLocation="http://maven.apache.org/POM/4.0.0 https://maven.apache.org/xsd/maven-4.0.0.xsd">
  <modelVersion>4.0.0</modelVersion>
  <parent>
    <groupId>org.springframework.boot</groupId>
    <artifactId>spring-boot-starter-parent</artifactId>
    <version>2.7.8</version>
    <relativePath/> <!-- lookup parent from repository -->
  </parent>
  <groupId>com.study</groupId>
  <artifactId>DataSourceDemo</artifactId>
  <version>0.0.1-SNAPSHOT</version>
  <name>DataSourceDemo</name>
  <description>Demo project for Spring Boot</description>
  <dependencies>
    <dependency>
      <groupId>org.springframework.boot</groupId>
      <artifactId>spring-boot-starter-web</artifactId>
    </dependency>
    <dependency>
      <groupId>com.baomidou</groupId>
      <artifactId>mybatis-plus-boot-starter</artifactId>
      <version>3.5.1</version>
    </dependency>
    <dependency>
      <groupId>mysql</groupId>
      <artifactId>mysql-connector-java</artifactId>
      <version>8.0.27</version>
      <scope>runtime</scope>
    </dependency>
    <dependency>
      <groupId>org.projectlombok</groupId>
      <artifactId>lombok</artifactId>
      <optional>true</optional>
    </dependency>
    <dependency>
      <groupId>org.springframework.boot</groupId>
      <artifactId>spring-boot-starter-test</artifactId>
      <scope>test</scope>
    </dependency>
  </dependencies>

  <build>
    <plugins>
      <plugin>
        <groupId>org.springframework.boot</groupId>
        <artifactId>spring-boot-maven-plugin</artifactId>
        <configuration>
          <excludes>
            <exclude>
              <groupId>org.projectlombok</groupId>
              <artifactId>lombok</artifactId>
            </exclude>
          </excludes>
        </configuration>
      </plugin>
    </plugins>
  </build>

</project>
在properties文件中定义数据源所需的数据
spring.datasource.type=com.zaxxer.hikari.HikariDataSource

spring.datasource.db1.driver-class-name=com.mysql.cj.jdbc.Driver
spring.datasource.db1.jdbc-url=jdbc:mysql://localhost:3306/mbatis?useSSL=true&serverTimezone=Asia/Shanghai
spring.datasource.db1.username=root
spring.datasource.db1.password=root

spring.datasource.db2.driver-class-name=com.mysql.cj.jdbc.Driver
spring.datasource.db2.jdbc-url=jdbc:mysql://localhost:3306/test?useSSL=true&serverTimezone=Asia/Shanghai
spring.datasource.db2.username=root
spring.datasource.db2.password=root

mybatis-plus.configuration.log-impl=org.apache.ibatis.logging.stdout.StdOutImpl
mybatis-plus.global-config.db-config.table-prefix=t_
mybatis-plus.global-config.db-config.id-type=auto
注意事项
各个版本的 springboot 配置 datasource 时参数有所变化,例如低版本配置数据库 url 时使用 url 属性,高版本使用 jdbc-url 属性,请注意区分。
定义多个数据源
@Configuration
public class DataSourceConfig {

    @Bean(name = "db1")
    @ConfigurationProperties(prefix = "spring.datasource.db1")
    public DataSource dataSource1(){
        HikariDataSource hikariDataSource = DataSourceBuilder.create().type(HikariDataSource.class).build();
        return hikariDataSource;
    }

    @Bean(name = "db2")
    @ConfigurationProperties(prefix = "spring.datasource.db2")
    public DataSource dataSource2(){
        HikariDataSource hikariDataSource = DataSourceBuilder.create().type(HikariDataSource.class).build();
        return hikariDataSource;
    }
}
@ConfigurationProperties注解用于将properties中指定的数据创建成指定的对象,但是,properties中的数据必须要与对象对象中的属性同名,不然无法由Spring Boot完成赋值。
由于我们要定义多个数据源,所以在Spring Boot数据源自动配置类中就无法确定导入哪个数据源来完成初始化,所以我们就需要禁用掉Spring Boot的数据源自动配置类,然后使用我们自定义的数据源配置类来完成数据源的初始化与管理。
@SpringBootApplication(exclude = DataSourceAutoConfiguration.class)
public class DataSourceDemoApplication {

    public static void main(String[] args) {
        SpringApplication.run(DataSourceDemoApplication.class, args);
    }

}
在启动类上声明需要禁用的自动配置类:exclude ={DataSourceAutoConfiguration.class}
实现DataSource接口
缺点:产生大量的代码冗余,在代码中存在硬编码。
@Component
@Primary //@Primary注解 == @Order(1),用于设置此类的注入顺序
public class DynamicDataSource implements DataSource {
    //使用ThreadLocal而不是String,可以在多线程的时候保证数据的可靠性
    public static ThreadLocal<String> flag = new ThreadLocal<>();

    @Resource(name = "db1")
    private DataSource dataSource1; // 注入第一个数据源
    @Resource(name = "db2")
    private DataSource dataSource2; // 注入第二个数据源

    public DynamicDataSource(){ // 使用构造方法初始化ThreadLocal的值
        flag.set("r");
    }
    @Override
    public Connection getConnection() throws SQLException {
        // 通过修改ThreadLocal来修改数据源,
        // 为什么通过修改状态就能改变已经注入的数据源? 这就得看源码了。
        if(flag.get().equals("r")){
            return dataSource1.getConnection();
        }
        return dataSource2.getConnection();
    }

    @Override
    public Connection getConnection(String username, String password) throws SQLException {
        return null;
    }

    @Override
    public <T> T unwrap(Class<T> iface) throws SQLException {
        return null;
    }

    @Override
    public boolean isWrapperFor(Class<?> iface) throws SQLException {
        return false;
    }

    @Override
    public PrintWriter getLogWriter() throws SQLException {
        return null;
    }

    @Override
    public void setLogWriter(PrintWriter out) throws SQLException {

    }

    @Override
    public void setLoginTimeout(int seconds) throws SQLException {

    }

    @Override
    public int getLoginTimeout() throws SQLException {
        return 0;
    }

    @Override
    public Logger getParentLogger() throws SQLFeatureNotSupportedException {
        return null;
    }
}
实现DataSource接口我们本质上只使用了一个方法,就是getConnection()这个无参的方法,但是DataSource接口中所有的方法我们也都需要实现,只是不用写方法体而已,也就是存在了很多的 “废方法” 。
@Primary注解 == @Order(1),用于设置此类的注入顺序。
测试
@SpringBootTest
class DataSourceDemoApplicationTests {
    @Autowired
    private DeptService deptService;

    @Test
    void contextLoads() {
    }
    @Test
    public void test01(){
        DynamicDataSource.flag.set("r");
        List<Dept> depts1 = deptService.list();
        System.out.println(depts1);
        DynamicDataSource.flag.set("w");
        List<Dept> depts2 = deptService.list();
        System.out.println(depts2);
    }
}
方式二:继承AbstractRoutingDataSource类
减少了代码的冗余,但是还是会存在硬编码。
所需资源(同方式一)
SpringBoot配置多数据源(同方式一)
继承AbstractRoutingDataSource类
@Component
@Primary //@Primary注解 == @Order(1),用于设置此类的注入顺序
public class DynamicDataSource extends AbstractRoutingDataSource {
    //使用ThreadLocal而不是String,可以在多线程的时候保证数据的可靠性
    public static ThreadLocal<String> flag = new ThreadLocal<>();

    @Resource(name = "db1")
    private DataSource dataSource1; // 注入第一个数据源
    @Resource(name = "db2")
    private DataSource dataSource2; // 注入第二个数据源

    public DynamicDataSource(){ // 使用构造方法初始化ThreadLocal的值
        flag.set("r");
    }
    @Override
    protected Object determineCurrentLookupKey() {
        return flag.get(); // 通过key获取数据源
    }
    @Override
    public void afterPropertiesSet() {
        Map<Object,Object> targetDataSource = new ConcurrentHashMap<>();
        targetDataSource.put("r",dataSource1);
        // 将第一个数据源设置为默认的数据源。
        super.setDefaultTargetDataSource(dataSource1);
        targetDataSource.put("w",dataSource2);
        // 将Map对象赋值给AbstrictRoutingDataSource内部的Map对象中。
        super.setTargetDataSources(targetDataSource);
        super.afterPropertiesSet();
    }
}
AbstrictRoutingDataSource的本质就是利用一个Map将数据源存储起来,然后通过Key来得到Value来修改数据源。
测试
@SpringBootTest
class AbstractRoutingDataSourceDemoApplicationTests {

    @Autowired
    private DeptService deptService;

    @Test
    void contextLoads() {
    }
    @Test
    public void test01(){
        DynamicDataSource.flag.set("r");
        List<Dept> depts1 = deptService.list();
        System.out.println(depts1);
        DynamicDataSource.flag.set("w");
        List<Dept> depts2 = deptService.list();
        System.out.println(depts2);
    }
}
方式三:使用Spring AOP+自定义注解的形式
Spring AOP + 自定义注解的形式是一种推荐的写法,减少代码的冗余且不存在硬编码。
此方法适合对指定功能操作指定数据库的模式。
所需资源(同方式一)
SpringBoot配置多数据源(同方式一)
导入依赖
<dependency>
  <groupId>org.springframework.boot</groupId>
  <artifactId>spring-boot-starter-aop</artifactId>
</dependency>
开启AOP支持
@SpringBootApplication(exclude = {DataSourceAutoConfiguration.class})
@EnableAspectJAutoProxy //开启Spring Boot对AOP的支持
public class AopDataSourceDemoApplication {

    public static void main(String[] args) {
        SpringApplication.run(AopDataSourceDemoApplication.class, args);
    }

}
定义枚举标识数据源
public enum DataSourceType {
    DB1,
    DB2
}
- 继承AbstractRoutingDataSource类
@Component
@Primary //@Primary注解 == @Order(1),用于设置此类的注入顺序
public class DynamicDataSource extends AbstractRoutingDataSource {
    //使用ThreadLocal而不是String,可以在多线程的时候保证数据的可靠性
    public static ThreadLocal<String> flag = new ThreadLocal<>();

    @Resource(name = "db1")
    private DataSource dataSource1; // 注入第一个数据源
    @Resource(name = "db2")
    private DataSource dataSource2; // 注入第二个数据源

    public DynamicDataSource(){ // 使用构造方法初始化ThreadLocal的值
        flag.set(DataSourceType.DB1.name());
    }

    @Override
    protected Object determineCurrentLookupKey() {
        return flag.get();
    }

    @Override
    public void afterPropertiesSet() {
        Map<Object,Object> targetDataSource = new ConcurrentHashMap<>();
        targetDataSource.put(DataSourceType.DB1.name(),dataSource1);
        targetDataSource.put(DataSourceType.DB2.name(),dataSource2);
        // 将第一个数据源设置为默认的数据源。
        super.setDefaultTargetDataSource(dataSource1);
        // 将Map对象赋值给AbstrictRoutingDataSource内部的Map对象中。
        super.setTargetDataSources(targetDataSource);
        super.afterPropertiesSet();
    }
}
自定义注解
@Target({ElementType.TYPE, ElementType.METHOD}) //限制在类和方法上
@Retention(RetentionPolicy.RUNTIME)
@Documented
public @interface TargetDataSource {
    DataSourceType value() default DataSourceType.DB1;
}
定义注解的实现类
@Component
@Aspect
@Slf4j
public class TargetDataSourceAspect {
    @Before("@within(TargetDataSource) || @annotation(TargetDataSource)")
    public void beforeNoticeUpdateDataSource(JoinPoint joinPoint){
        TargetDataSource annotation = null;
        Class<? extends Object> clazz = joinPoint.getTarget().getClass();
        if(clazz.isAnnotationPresent(TargetDataSource.class)){
            //判断类上是否标注着注解
            annotation = clazz.getAnnotation(TargetDataSource.class);
            log.info("类上标注着注解");
        }else {
            Method method = ((MethodSignature) joinPoint.getSignature()).getMethod();
            if (method.isAnnotationPresent(TargetDataSource.class)){
                //判断方法上是否标注着注解,若类或方法上都没有则报错
                annotation = method.getAnnotation(TargetDataSource.class);
            }else {
                throw new RuntimeException("@TargetDataSource注解只能用于类或者方法上, 错误出现在:[" +
                        clazz.toString() +" " + method.toString() + "];");
            }
        }
        DynamicDataSource.flag.set(annotation.value().name());
    }

    @Around("@within(TargetDataSource) || @annotation(TargetDataSource)")
    public Object aroundNoticeUpdateDataSource(ProceedingJoinPoint proceed){
        // 省略逻辑代码
        Object result = null;
        try {
            result = proceed.proceed();
        } catch (Throwable throwable) {
            throwable.printStackTrace();
        }
        return result;
    }
}
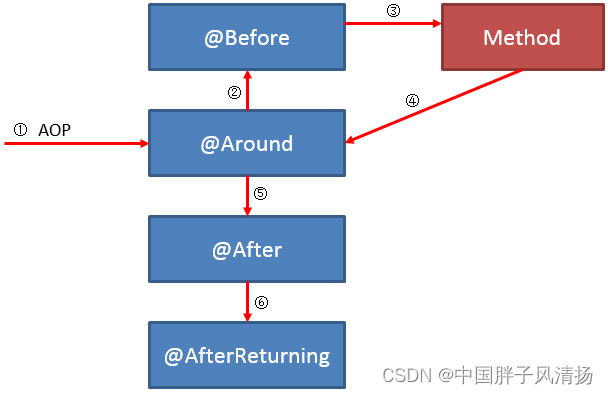
在有的博客中也会使用@Around环绕通知的方式,但是环绕通知需要执行joinPoint.process()方法来调用目标对象的方法,最后返回执行的值,不然得不到所需要的数据。
我这里使用了@Before前置通知,效果是一样的,因为@Around就会包含@Before。
ProceedingJoinPoint 对象只能在@Around环绕通知中使用,在其他通知中使用就会报错。
测试
@RestController
@TargetDataSource(DataSourceType.DB1) // 将注解标注在类上,表示本类中所有的方法都是使用数据源1
public class DeptController {
    @Autowired
    private DeptService deptService;

    @GetMapping(value = "/dept_list1")
    public List<Dept> dept1(){
        List<Dept> depts = deptService.list();
       return depts;
    }

    @GetMapping(value = "/dept_list2")
    public List<Dept> dept2(){
        List<Dept> depts = deptService.list();
        return depts;
    }
}
@RestController
public class Dept1Controller {
    @Autowired
    private DeptService deptService;

    @GetMapping(value = "/dept_list3")
    @TargetDataSource(DataSourceType.DB2) // 将注解标注在类上,表示本类中所有的方法都是使用数据源2
    public List<Dept> dept1(){
        List<Dept> depts = deptService.list();
        return depts;
    }

    @GetMapping(value = "/dept_list4")
    public List<Dept> dept2(){
        List<Dept> depts = deptService.list();
        return depts;
    }
}
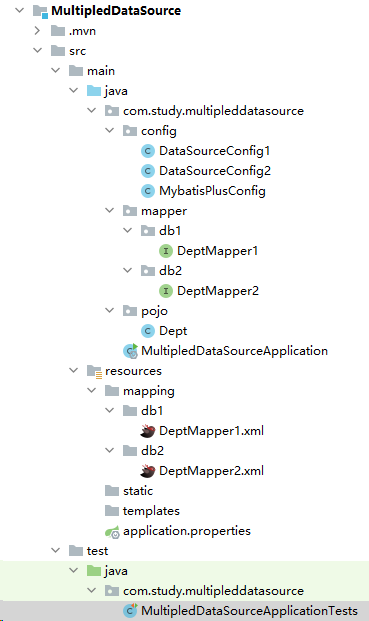
方式四:通过SqlSessionFactory指定的数据源来操作指定目录的XML文件(分包方式整合)
**使用此方法则不会与上面所述的类有任何关系,本方法会重新定义类。**本方法也是一种推荐的方法,适用于对指定数据库的操作,也就是适合读写分离。不会存在代码冗余和存在硬编码。
使用此种方法不会存在任何代码的冗余以及硬编码的存在,但是需要分层明确。
唯一的不足就是添加一个数据源就需要重新写一个类,而这个类中的代码大部分又是相同的。
注意事项
- 在 service 层中根据不同的业务注入不同的 dao 层
- 如果是主从复制- -读写分离:比如 db1 中负责增删改,db2 中负责查询。但是需要注意的是负责增删改的数据库必须是主库(master)
所需资源(同方式一)
SpringBoot配置多数据源(同方式一)
在pom文件中引入依赖
同方式一
在properties文件中定义数据源所需的数据
同方式一
定义多个数据源
@Configuration
@MapperScan(basePackages = "com.study.multipleddatasource.mapper.db1", sqlSessionFactoryRef = "db1SqlSessionFactory")
public class DataSourceConfig1 {
    @Primary // 表示这个数据源是默认数据源, 这个注解必须要加,因为不加的话spring将分不清楚那个为主数据源(默认数据源)
    @Bean(name = "db1")
    @ConfigurationProperties(prefix = "spring.datasource.db1") //读取application.properties中的配置参数映射成为一个对象
    public DataSource dataSource1(){
        HikariDataSource hikariDataSource = DataSourceBuilder.create().type(HikariDataSource.class).build();
        return hikariDataSource;
    }

    @Primary
    @Bean("db1SqlSessionFactory")
    public SqlSessionFactory db1SqlSessionFactory(@Qualifier("db1") DataSource dataSource) throws Exception {
        SqlSessionFactoryBean bean = new SqlSessionFactoryBean();
        bean.setDataSource(dataSource);
        // mapper的xml形式文件位置必须要配置,不然将报错:no statement (这种错误也可能是mapper的xml中,namespace与项目的路径不一致导致)
        bean.setMapperLocations(new PathMatchingResourcePatternResolver().getResources("classpath*:mapping/db1/*.xml"));
        return bean.getObject();
    }

    @Primary
    @Bean("db1SqlSessionTemplate")
    public SqlSessionTemplate db1SqlSessionTemplate(@Qualifier("db1SqlSessionFactory") SqlSessionFactory sqlSessionFactory){
        return new SqlSessionTemplate(sqlSessionFactory);
    }
}
@Configuration
@MapperScan(basePackages = "com.study.multipleddatasource.mapper.db2", sqlSessionFactoryRef = "db2SqlSessionFactory")
public class DataSourceConfig2 {
    @Primary // 表示这个数据源是默认数据源, 这个注解必须要加,因为不加的话spring将分不清楚那个为主数据源(默认数据源)
    @Bean(name = "db2")
    @ConfigurationProperties(prefix = "spring.datasource.db2") //读取application.properties中的配置参数映射成为一个对象
    public DataSource dataSource1(){
        HikariDataSource hikariDataSource = DataSourceBuilder.create().type(HikariDataSource.class).build();
        return hikariDataSource;
    }

    @Primary
    @Bean("db2SqlSessionFactory")
    public SqlSessionFactory db2SqlSessionFactory(@Qualifier("db2") DataSource dataSource) throws Exception {
        SqlSessionFactoryBean bean = new SqlSessionFactoryBean();
        bean.setDataSource(dataSource);
        // mapper的xml形式文件位置必须要配置,不然将报错:no statement (这种错误也可能是mapper的xml中,namespace与项目的路径不一致导致)
        bean.setMapperLocations(new PathMatchingResourcePatternResolver().getResources("classpath*:mapping/db2/*.xml"));
        return bean.getObject();
    }

    @Primary
    @Bean("db2SqlSessionTemplate")
    public SqlSessionTemplate db1SqlSessionTemplate(@Qualifier("db2SqlSessionFactory") SqlSessionFactory sqlSessionFactory){
        return new SqlSessionTemplate(sqlSessionFactory);
    }
}
- @MapperScan注解中的basePackages指向的是指定的Dao层。
- @MapperScan注解中sqlSessionFactoryRef 用来指定使用某个SqlSessionFactory来操作数据源。
- bean.setMapperLocations(
new PathMatchingResourcePatternResolver()
.getResources(“classpath*:mapper/db1/*.xml”)); 指向的是操作执行数据库的Mapper层。 - 项目目录结构
测试
@SpringBootTest
class MultipledDataSourceApplicationTests {
    @Autowired
    private DeptMapper1 deptMapper1;

    @Autowired
    private DeptMapper2 deptMapper2;

    @Test
    void contextLoads() {
    }
    @Test
    public void test01(){
        List<Dept> depts1 = deptMapper1.list();
        System.out.println(depts1);
        List<Dept> depts2 = deptMapper2.list();
        System.out.println(depts2);
    }
}
方式五:使用第三方插件+注解形式
所需资源
- spring-boot-starter-web
- mybatis-plus-boot-starter
- dynamic-datasource-spring-boot-starter # 配置动态数据源
- mysql-connector-java
- lombok
SpringBoot配置多数据源(同方式一)
在pom文件中引入依赖
方式一基础添加
<dependency>
  <groupId>com.baomidou</groupId>
  <artifactId>dynamic-datasource-spring-boot-starter</artifactId>
  <version>3.5.0</version>
</dependency>
在properties文件中定义数据源所需的数据
spring.datasource.type=com.zaxxer.hikari.HikariDataSource

# 配置默认数据库
spring.datasource.dynamic.primary=db1
# 配置数据源1
spring.datasource.dynamic.datasource.db1.driver-class-name=com.mysql.cj.jdbc.Driver
spring.datasource.dynamic.datasource.db1.url=jdbc:mysql://localhost:3306/mbatis?useSSL=true&serverTimezone=Asia/Shanghai
spring.datasource.dynamic.datasource.db1.username=root
spring.datasource.dynamic.datasource.db1.password=root
# 配置数据源2
spring.datasource.dynamic.datasource.db2.driver-class-name=com.mysql.cj.jdbc.Driver
spring.datasource.dynamic.datasource.db2.url=jdbc:mysql://localhost:3306/test?useSSL=true&serverTimezone=Asia/Shanghai
spring.datasource.dynamic.datasource.db2.username=root
spring.datasource.dynamic.datasource.db2.password=root

mybatis-plus.configuration.log-impl=org.apache.ibatis.logging.stdout.StdOutImpl
mybatis-plus.global-config.db-config.table-prefix=t_
mybatis-plus.global-config.db-config.id-type=auto
禁用掉Spring Boot的数据源自动配置类
@SpringBootApplication(exclude = {DataSourceAutoConfiguration.class})
public class ThirdPluginDataSourceApplication {

    public static void main(String[] args) {
        SpringApplication.run(ThirdPluginDataSourceApplication.class, args);
    }

}
测试(给使用非默认数据源添加注解@DS)
@DS 可以注解在方法上和类上,同时存在方法注解优先于类上注解。
注解在 service 实现或 mapper 接口方法上,不要同时在 service 和 mapper 注解。
@SpringBootTest
class ThirdPluginDataSourceApplicationTests {
    @Autowired
    private DeptMapper deptMapper;

    @Test
    void contextLoads() {
    }

    @DS("db1")
    @Test
    public void test01(){
        List<Dept> depts1 = deptMapper.selectList(null);
        System.out.println(depts1);
    }
}
总结
- 实现DataSource接口这种写法是不推荐的。
- 推荐使用Spring Boot + 自定义注解的方式与SqlSessionFactory方式。
另外,Spring AOP中各种通知的执行顺序如下图所示:
事务配置
开启事务管理功能
在项目入口类,添加以下注解开启事务管理功能。@EnableTransactionManagement
@SpringBootApplication(exclude = DataSourceAutoConfiguration.class)
@EnableTransactionManagement
public class DataSourceDemoApplication {

    public static void main(String[] args) {
        SpringApplication.run(DataSourceDemoApplication.class, args);
    }

}
配置事务管理器
@Configuration
public class DataSourceConfig {

    @Bean(name = "db1")
    @ConfigurationProperties(prefix = "spring.datasource.db1")
    public DataSource dataSource1(){
        HikariDataSource hikariDataSource = DataSourceBuilder.create().type(HikariDataSource.class).build();
        return hikariDataSource;
    }

    @Bean(name = "db2")
    @ConfigurationProperties(prefix = "spring.datasource.db2")
    public DataSource dataSource2(){
        HikariDataSource hikariDataSource = DataSourceBuilder.create().type(HikariDataSource.class).build();
        return hikariDataSource;
    }

    @Bean("db1TransactionManager")
    public PlatformTransactionManager db1TransactionManager(@Qualifier("db1") DataSource dataSource){
        return new DataSourceTransactionManager(dataSource);
    }

    @Bean("db2TransactionManager")
    public PlatformTransactionManager db2TransactionManager(@Qualifier("db2") DataSource dataSource){
        return new DataSourceTransactionManager(dataSource);
    }
}
使用
使用时只需在需要事务的方法添加注解@Transactional,并指定其value值即可。同样的,value值与相应的方法名相匹配即可。
@SpringBootTest
class DataSourceDemoApplicationTests {
    @Autowired
    private DeptService deptService;

    @Test
    void contextLoads() {
    }
    @Test
    public void test(){
        DynamicDataSource.flag.set("r");
        List<Dept> depts1 = deptService.list();
        System.out.println(depts1);
        DynamicDataSource.flag.set("w");
        List<Dept> depts2 = deptService.list();
        System.out.println(depts2);
    }
    @Transactional("db1TransactionManager")
    @Test
    public void test01(){
        DynamicDataSource.flag.set("r");
        List<Dept> depts1 = deptService.list();
        System.out.println(depts1);
    }
    @Transactional("db2TransactionManager")
    @Test
    public void test02(){
        DynamicDataSource.flag.set("w");
        List<Dept> depts2 = deptService.list();
        System.out.println(depts2);
    }
}
注意,@Transactional配置事务有很多限制,如方法必须为public,同一个类中无该注解的方法调用有注解的方法事务不生效等。该注解还可以配置在接口类等地方,具体用法请参考Spring官方文档相应章节http://docs.spring.io/spring-framework/docs/4.2.x/spring-framework-reference/html/transaction.html
Gitee代码链接:
https://gitee.com/zhangcijuan/DynamicDataSource
参考链接:
https://m.jb51.net/program/29100498g.htm
https://m.jb51.net/article/110734.htm


 838
838


 被折叠的 条评论
为什么被折叠?
被折叠的 条评论
为什么被折叠?
 到【灌水乐园】发言


