


参考链接:
http://www.cnblogs.com/top5/archive/2009/11/09/1599128.html
http://waringid.blog.51cto.com/65148/56014/
(1)安装文件下载
Helix Server是RealNetworks公司最新的流媒体服务平台,这个系统和微软的Window Media System不同,它并不是免费的,但在RealNetworks的网站(http://www.real.com ),还是提供有免费使用的Helix,不过有功能或时间上的限制。 这里笔者选用的是Helix Server Unlimited v11.0.1.1884 For Linux
http://download.csdn.net/download/qingwangyoucao/4112100
(2)安装过程
chmod +x helix-server-retail-11.01-rhel4-setup.bin
./ helix-server-retail-11.01-rhel4-setup.bin
Extracting files for Helix installation........................
Welcome to the Helix Server 11.0 (11.0.1.1884) Setup for UNIX
Setup will help you get Helix Server running on your computer.
[ Press [Enter] to continue... ]
#这里按回车继续#
If a Helix Server license key file has been sent to you,
please enter its directory path below. If you have not
received a Helix Server license key file, then this server
WILL NOT OPERATE until a license key file is placed in
the server's License directory. Please obtain a free
Basic Helix Server license or purchase a commercial license
from our website at http://www.real.com/. If you need
further assistance, please visit our on-line support area
at http://service.real.com/.
License Key File: []: 这是要许可证,可以先放下,等安装完再将许可证文件放入
这里我输入的地址:/root/longhui/helix/DistributedLicensing.lic
Installation and use of Helix Server requires
acceptance of the following terms and conditions:
Press [Enter] to display the license text...
按回车继续显示协议文本,此处略过……
Choose "Accept" to accept the terms of this
license agreement and continue with Helix Server setup.
If you do not accept these terms, enter "No"
and installation of Helix Server will be cancelled.
I accept the above license: [Accept]:
#此处回车默认即可
Enter the complete path to the directory where you want
Helix Server to be installed. You must specify the full
pathname of the directory and have write privileges to
the chosen directory.
Directory: [/root/helixserver]: /usr/helixserver
# 更改安装路径
Please enter a username and password that you will use
to access the web-based Helix Server Administrator and monitor.
Username []:
# 设置远程管理用户名
Username []:Password []:
# 设置密码
Confirm Password []:
#重新确认密码
这里用户名是root,密码123456
Please enter a port on which Helix Server will listen for
RTSP connections. These connections have URLs that begin
with "rtsp://"
Port [554]:
#此处回车默认即可
Please enter a port on which Helix Server will listen for
HTTP connections. These connections have URLs that begin
with "http://"
Port [80]:8080
#设置http传输端口,为避免和apache冲突,建议更改
Please enter a port on which Helix Server will listen for
MMS connections. These connections have URLs that begin
with "mms://"
Port [1755]:
# 此处回车默认即可
Helix Server will listen for Administrator requests on the
port shown. This port has been initialized to a random value
for security. Please verify now that this pre-assigned port
will not interfere with ports already in use on your system;
you can change it if necessary.
Port [11012]:11111
#更改远程管理访问的端口,系统默认的
You have selected the following Helix Server configuration:
Admin User/Password: traveller2/****
Encoder User/Password: traveller2/****
Monitor Password: ****
RTSP Port: 554
HTTP Port: 8080
MMS Port: 1755
Admin Port: 11111
Destination: /usr/helixserver
Enter [F]inish to begin copying files, or [P]revious to go
back to the previous prompts: [F]:
#如果以上设置你没意见,此处回车默认即可,否则按P重新设置
Copying Helix Server files....
Helix Server installation is complete.
If at any time you should require technical
assistance, please visit our on-line support area
at http://service.real.com/.
Cleaning up installation files...
Done.
# 安装完成
安装结果如下图:

3 启动Helix流媒体服务器
(1)启动服务器
首先进入安装目录。使用命令在后台启动:
Bin/rmserver rmserver.cfg &
启动过程可以看到服务器版本和系统平台的信息,如下:
./Bin/rmserver rmserver.cfg
Helix Server (c) 1995-2005 RealNetworks, Inc. All rights reserved.
Version: Helix Server 11.0 (11.0.1.1884) (Build 74277/5688)
Platform: linux-rhel4-i686
Using Config File: rmserver.cfg
Linux kernel version 2.6.18-8.el5 detected [glibc 2.5/NPTL 2.5]
Starting PID 2727 TID 3086657232/2727, procnum 0 (controller)
Creating Server Space...
Server has allocated 256 megabytes of memory
Starting TID 3084909440/2729, procnum 1 (timer)
Calibrating timers...
Interval timer enabled (10ms resolution).
Starting TID 3082812288/2730, procnum 2 (core)
Starting Helix Server 11.0 Core...
1 CPU Detected...
Testing File Descriptors...
Setting per-process descriptor capacity to 672(1003), 21...
Testing Mutex...(401.61 ops/usec)
Testing AtomicOps...(33.81 ops/usec)
I: Loading Plugins from /root/vw/Plugins...
I: slicensepln.so 0xcb1ec0 RealNetworks Licensing Plugin
……
(4)流媒体服器的相关设置1在浏览器中输入:http://192.168.1.70:11111/admin/index.html,当然,如果设了不同的端口请做相应的更改。
注意:ip为服务器ip地址,端口号为上面设置的。
2登录界面打开后输入用户名root,密码123456
3结合该文章最上面的第二个链接:加入新的媒体挂接点
目录是/videoh264
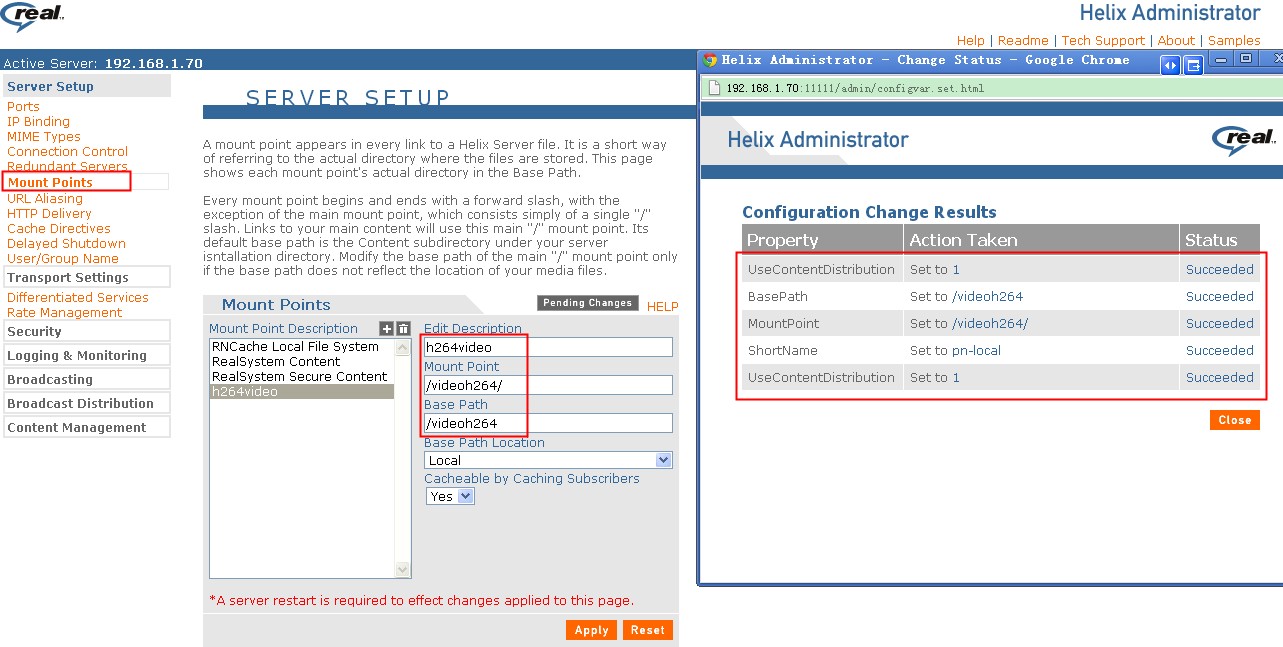
说是要重启,可以点击主页右上角的restart server按键就可以了。
(5)测试成功与否
在服务器/videoh264目录下放上视频文件
注意:不同端口分别用来提供不同格式的媒体服务的,一般的rm及rmvb的格式都是用rstp协议及554端口,而微软方面的如avi和wmv则是用的mms服务及1755端口(如果你在安装时没更改端口的话).
我在服务器上放的是wmv格式的视频文件,所以用的是mms服务的1755端口。我在windows xp上使用的播放器是vlc
播放地址mms://192.168.1.70:1755/videoh264/test2.wmv

播放画面:可以正常播放。
(6)系统启动时自动加载Helix服务器
如果想在启动Linux服务器时自动加载Helix服务。方法如下:开始菜单-首选项-更多首选项-会话-启动程序-增加-启动命令,右边的浏览指定确定。
但是发现了两个问题:
(1)对比了下,本地播放和流媒体播放,流媒体播放的时候图片会花,说明视频传输不完整。
(2)当点击暂定,再播放就不行了,必须停止后从新播放。


 2908
2908

 被折叠的 条评论
为什么被折叠?
被折叠的 条评论
为什么被折叠?
 到【灌水乐园】发言


