


通过本文,您将可以学习到 sonarqube、git\gitlab、shell、sonar-scanner、sonarlint
一、前言

sonarqube 是一款开源的静态代码扫描工具。
实际生产应用中,sonarqube 如何落地,需要考虑以下四个维度:
1、规则的来源
现在规则的来源主要有三个途径:
(1)sonar way 官方内置规则,支持多种语言
(2)应用市场插件
(3)自定义规则插件
自定义规则插件缺点是难度大、开发周期长、版本迭代兼容要自己维护,优点是可定制化、灵活性较高。
2、扫描的分支
sonarqube 社区版只支持对 main 或者叫 master 这一个分支进行扫描。不过可通过导入插件,增加对多分支的支持。
3、全量扫描or增量扫描
全量扫描是针对整个工程代码进行扫描。这是 sonarqube 默认的扫描行为。
增量扫描是针对当次提交代码进行扫描。需要自己开发 shell 脚本支持。
全量扫描的缺点是,每次都要针对整个工程代码进行扫描,扫描时间长。我能不能只针对我当前提交的代码进行扫描呢?这便是增量扫描。增量扫描的缺点是,开发难度大。
4、扫描的时机
现在主流的接入方式,有三种扫描时机:
(1)Jenkins流水线 git 拉取代码后,maven 构建项目前扫描。
扫描失败,中止流水线。
(2)gitlab CI 流水线
与 Jenkins 流水线类似,也是扫描失败,中止流水线。
(3) git commit
git 提交代码时触发扫描。包括客户端钩子和服务端钩子。
客户端钩子——pre-commit。开发人员 git commit 提交代码到本地仓库时触发扫描,扫描完获取报告,失败则拒绝提交。
服务端 git hook 分为三种,分别是:
- pre-receive(推送前)
- update
- post-receive(推送后)
这三个步骤就是我们本地 push 完代码服务端要做的事情,如图所示:
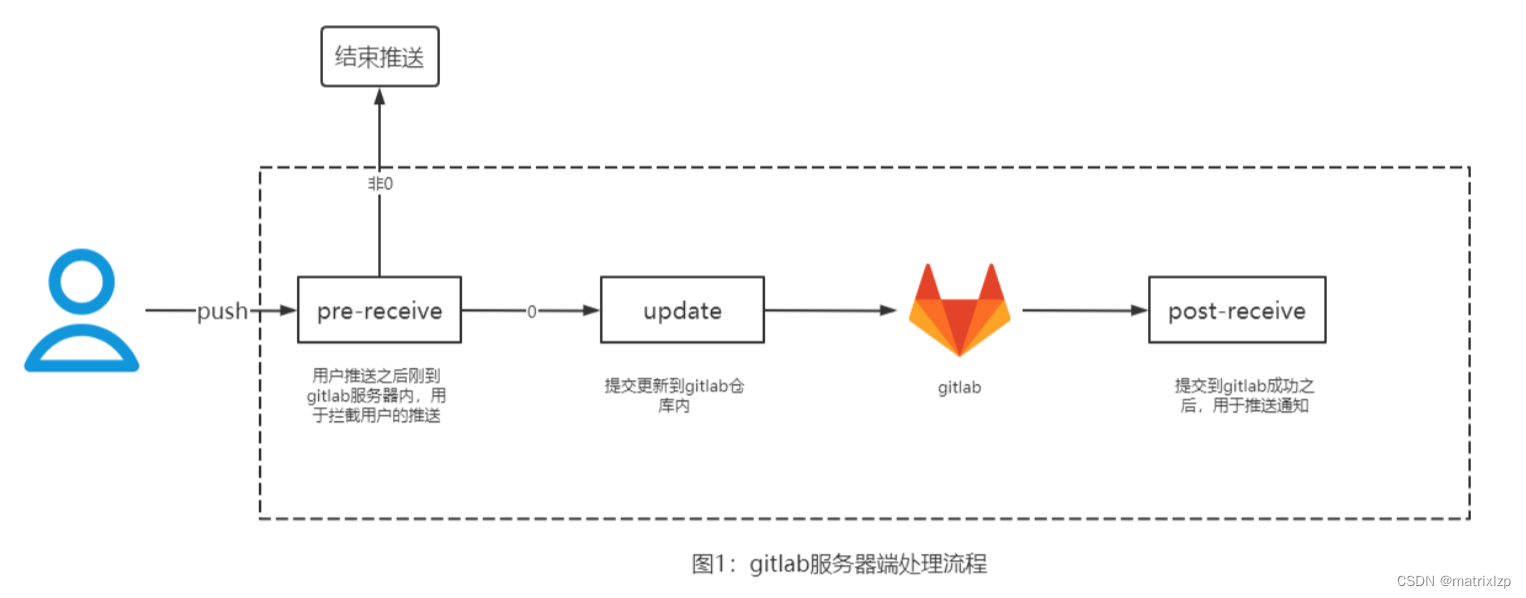
从质量保证 QA(Quality Assurance)的角度来说,代码扫描的时机,越早越好。如果是到项目构建的时候再来扫描,扫描不通过,就得打回去开发重新修改,修改完重新测试,重新启动流水线构建,整个周期会被拉长。
所以 pre-commit 和 pre-receive 的效果,会比代码已经进入仓库了,再来扫描的 Jenkins流水线、gitlab CI 流水线要好。
5、服务端or客户端?
服务端扫描 pre-receive 好,还是客户端扫描 pre-commit 好呢?
答案显而易见,服务端扫描好。
因为客户端扫描严重依赖开发人员本地环境下的 pre-commit 文件,如果这个文件被开发人员删除了,那客户端扫描无从谈起。而且如果扫描依赖一些软件,如 sonar-scanner,则每个开发的本地环境都需要安装,这个在项目比较大,开发人员比较多的时候,很难做到协调一致。

本文采用 pre-receive 钩子的方式,支持增量扫描与多分支扫描。
二、环境准备
1、一台装有 gitlab 的服务器。
gitlab 的安装,可以参考我的博文。docker 安装跟 Linux 裸机安装有所不同,推荐使用 docker 安装。
docker 下安装 gitlab_gitlab docker 安装没有initial_root_password文件-CSDN博客
2、一台装有 sonarqube 9.9 LTS 的服务器。
sonarqube 的安装,可以参考我的博文。docker compose 下安装 sonarqube(带多分支插件)_docker-compose sonarqube-CSDN博客
三、步骤
1、安装 sonar-scanner
- gitlab 是 docker 安装的情况
将 sonar-scanner-cli-5.0.1.3006-linux.zip 上传到 gitlab 服务器某一个文件夹下。
就比如 /usr/local/sonar
# 安装 unzip 命令
yum -y install unzip

# 解压 sonar-scanner-cli-5.0.1.3006-linux.zip
unzip sonar-scanner-cli-5.0.1.3006-linux.zip

# 给文件夹重命名
mv sonar-scanner-cli-5.0.1.3006-linux.zip sonar-scanner

# 查看当前有多少运行中的容器
docker ps

# 将 sonar-scanner 文件夹内容拷贝进 gitlab 容器 /usr/local/sonar-scanner 下
docker cp sonar-scanner gitlab:/usr/local/sonar-scanner
# 进入容器,查看 sonar-scanner 文件夹是否拷贝到位
docker exec -it gitlab /bin/bash
cd /usr/local
ls
# 修改 sonar-scanner 配置文件
cd sonar-scanner/conf
vi sonar-scanner.properties
sonar-scanner.properties 配置内容如下
#Configure here general information about the environment, such as SonarQube server connection details for example
#No information about specific project should appear here

#----- Default SonarQube server
# 该项可配可不配
sonar.host.url=http://你的sonarqubeIP:9000

#----- Default source code encoding
sonar.sourceEncoding=UTF-8
至此,sonar-scanner 安装完成。
- gitlab 是 Linux 裸机安装的情况
2、在 gitlab 管理中心找到项目的相对路径
以 root 用户登录 gitlab


拼接上 gitlab 的安装目录,就是项目的绝对路径
就比如我的 gitlab 是 docker 安装的,默认安装于 /srv/gitlab
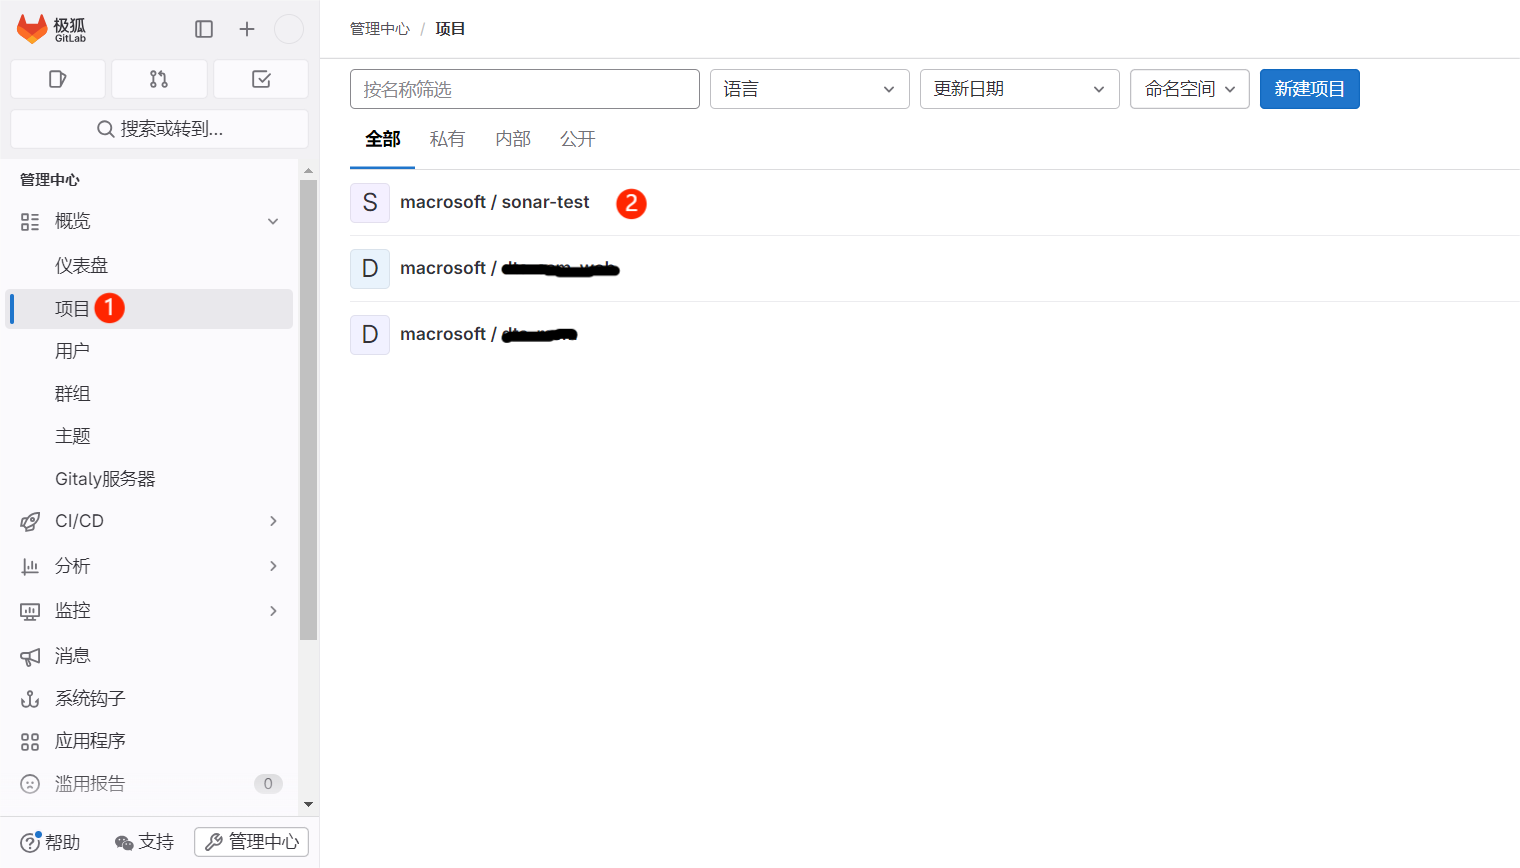
则我的项目 sonar-test,存放于宿主机目录

这个路径,其实是会挂载进容器的(这个后面就能知道)

3、创建服务端 hook 文件
在刚才找到的项目路径下,创建 custom_hooks 文件夹和 pre-receive 文件
# 创建 custom_hooks 文件夹
mkdir custom_hooks
# 进入 custom_hooks 文件夹
cd custom_hooks
# 创建 pre-receive 文件
touch pre-receive
# 修改 pre-receive 文件
vim pre-receive
pre-receive 文件内容如下:
#!/bin/bash

echo "开始代码扫描..."

GIT_VERSION=`git version`
echo "git版本是:$GIT_VERSION"

# 获取当前路径
BASE_PATH=`pwd`
echo "当前路径是:$BASE_PATH"

ACCOUNT=`whoami`
echo "当前账户是:$ACCOUNT"

# 从标准输入流读入参数
read normalInput
ARR=($normalInput)
OLD_REVISION=${ARR[0]}
CURRENT_REVISION=${ARR[1]}
BRANCH=${ARR[2]}

echo "旧修订ID:$OLD_REVISION"
echo "新修订ID:$CURRENT_REVISION"

echo "当前项目:$GL_PROJECT_PATH"
PROJECT_NAME=$(echo $GL_PROJECT_PATH | awk 'BEGIN{FS="/"}{print $NF}')
echo "项目名称:$PROJECT_NAME"

echo "当前分支:$BRANCH"
BRANCH_NAME=$(echo $BRANCH | awk 'BEGIN{FS="/"}{print $NF}')
echo "分支名称:$BRANCH_NAME"

export SONAR_SCANNER=/usr/local/sonar-scanner
PATH=$SONAR_SCANNER/bin:$PATH
export PATH

if [ $BRANCH_NAME = "develop" ]; then
		# 过滤出当前提交中的 java 文件
	FILES=`git diff --name-only $OLD_REVISION $CURRENT_REVISION  | grep -e "\.java$"`

	if [ -n "$FILES" ]; then
		SONARDIR=$BASE_PATH/"sonar"
		mkdir -p "${SONARDIR}"

		TEMPDIR=$BASE_PATH/"tmp"
		for FILE in ${FILES}; do
		   # 创建目录并舍弃输出
		   mkdir -p "${TEMPDIR}/`dirname ${FILE}`" >/dev/null
		   # 创建文件
		   git show $CURRENT_REVISION:$FILE > ${TEMPDIR}/${FILE}
		done;

		echo "进入临时文件夹"
		cd $TEMPDIR
		pwd

		SONAR_USER_HOME=$SONARDIR sonar-scanner -Dsonar.language=java -Dsonar.projectKey=$PROJECT_NAME -Dsonar.host.url=http://你的sonarqubeIP:端口 -Dsonar.login=你的项目Token -Dsonar.branch.name=$BRANCH_NAME -Dsonar.projectVersion=1.0 -Dsonar.java.binaries=./ -Dsonar.scm.disabled=true

		sleep 5s
		rt=$(curl -u '你的项目Token:' http://你的sonarqubeIP:端口/api/qualitygates/project_status?projectKey="$PROJECT_NAME"\&branch="$BRANCH_NAME" | awk -F ":" '{print $3}' | awk -F "," '{print $1}')
		echo "代码检测结果$rt"
		echo "删除临时文件夹"
		rm -rf $TEMPDIR
		if [ $rt = "\"ERROR\"" ];then
		  echo "代码检测失败,拒绝提交"
		  exit 1
		elif [ $rt = "\"OK\"" ];then
		  echo "代码检测成功,进入仓库"
		  exit 0
		fi
	fi


fi
说明:未完待续
4、修改文件权限
chmod 777 pre-receive
5、验证
(1) 新建质量配置
在 sonarqube 中,点击 Quality Profiles 质量配置
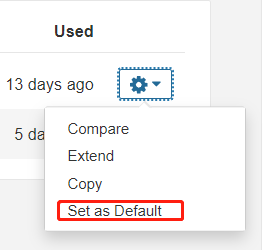
在 Filter profiles by 输入 Java,找到默认配置 Sonar way。打开右侧齿轮,点击 Copy。

新建一个质量配置,名字叫 test

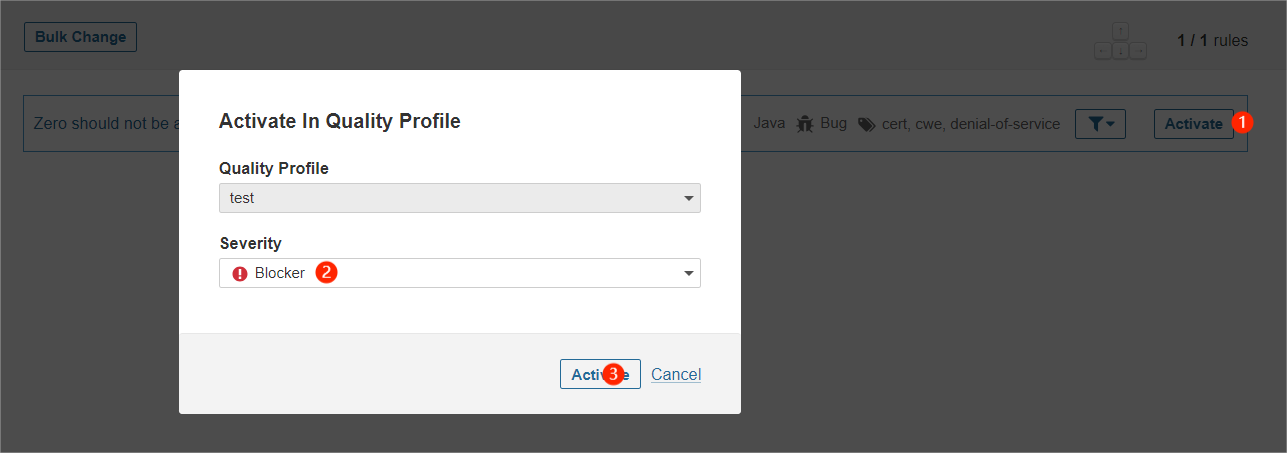
点击 Rules,将其他质量配置都去掉,只保留一条规则
Zero should not be a possible denominator 并设置为 Blocker 阻断
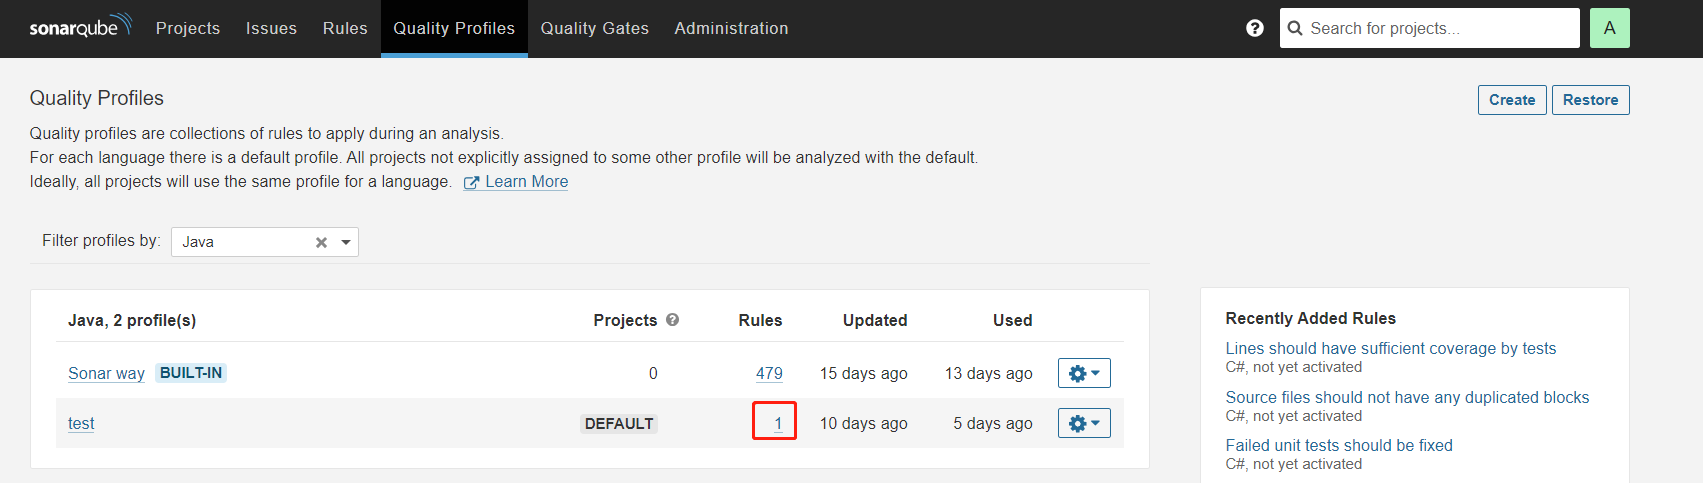
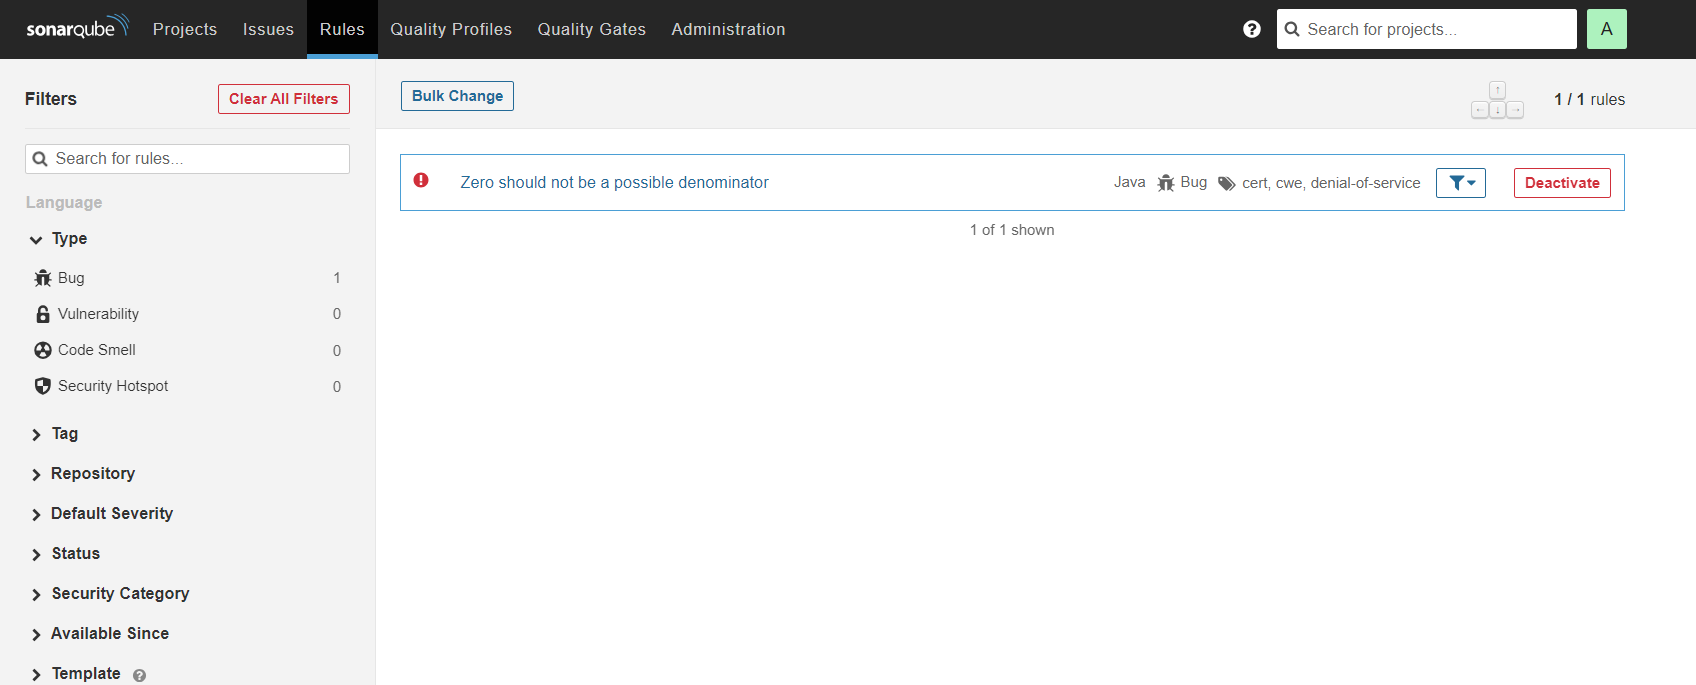
将 test 质量配置设置为 DEFAULT

(2) 新增质量阈
新增一个名叫 test 的质量阈
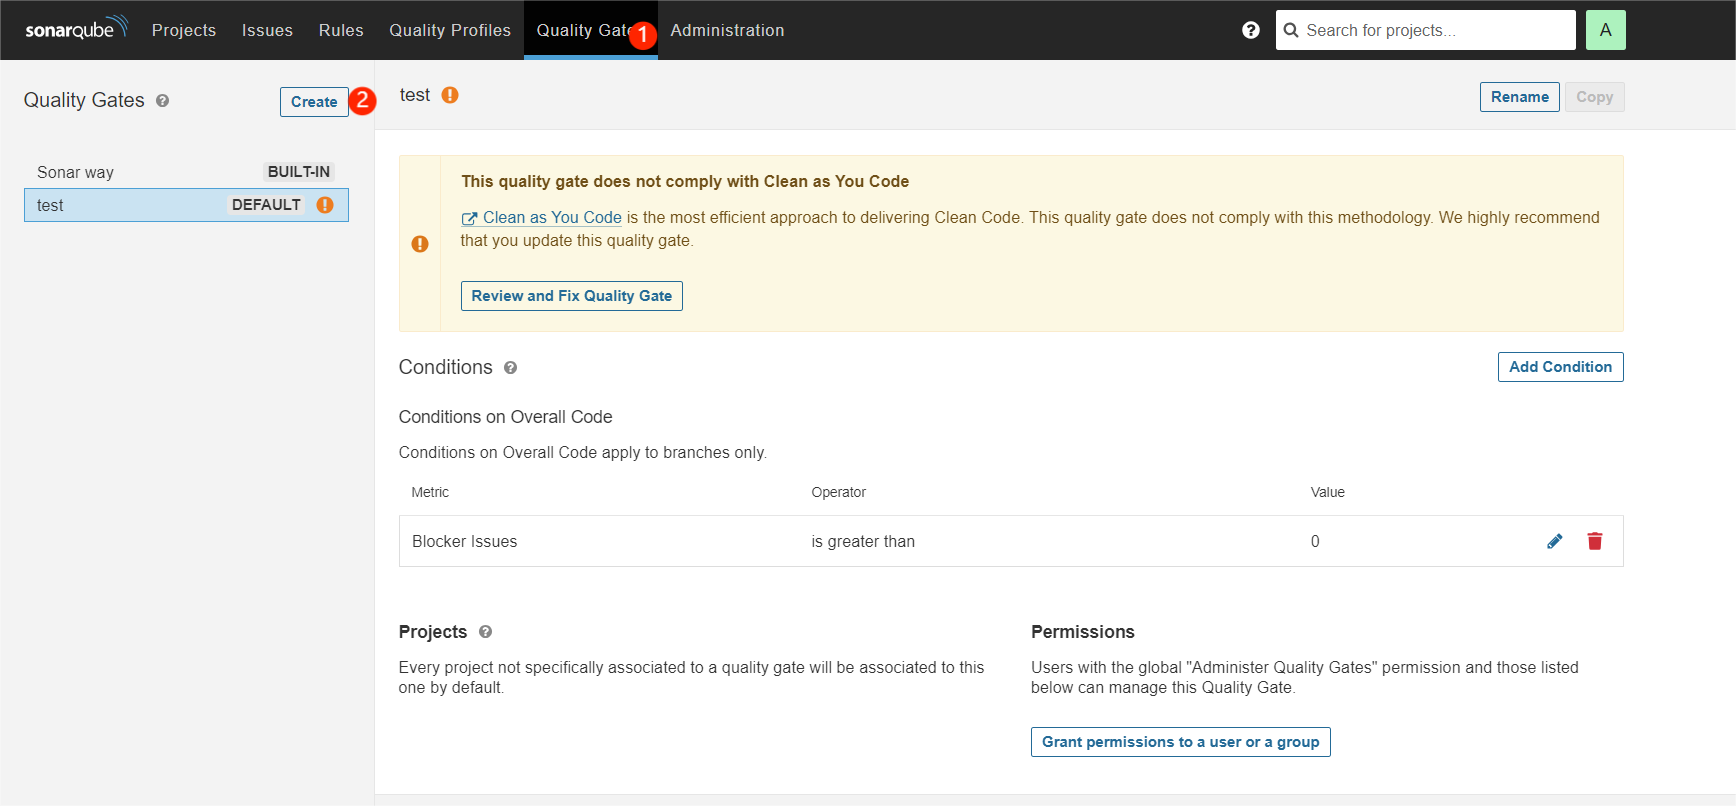
删除所有默认配置

增加一个针对所有代码(Overall Code)阻断问题(Blocker issues)大于(is greater than)0
的质量条件。表示代码检测中,只要出现一个以上阻断问题,代码检测就不通过。

(3)配置项目
打开项目配置,为项目添加一个 Java 语言的质量配置,选择我们刚才新建的 test
该质量配置,现在也是我们实例默认(DEFAULT)的质量配置。

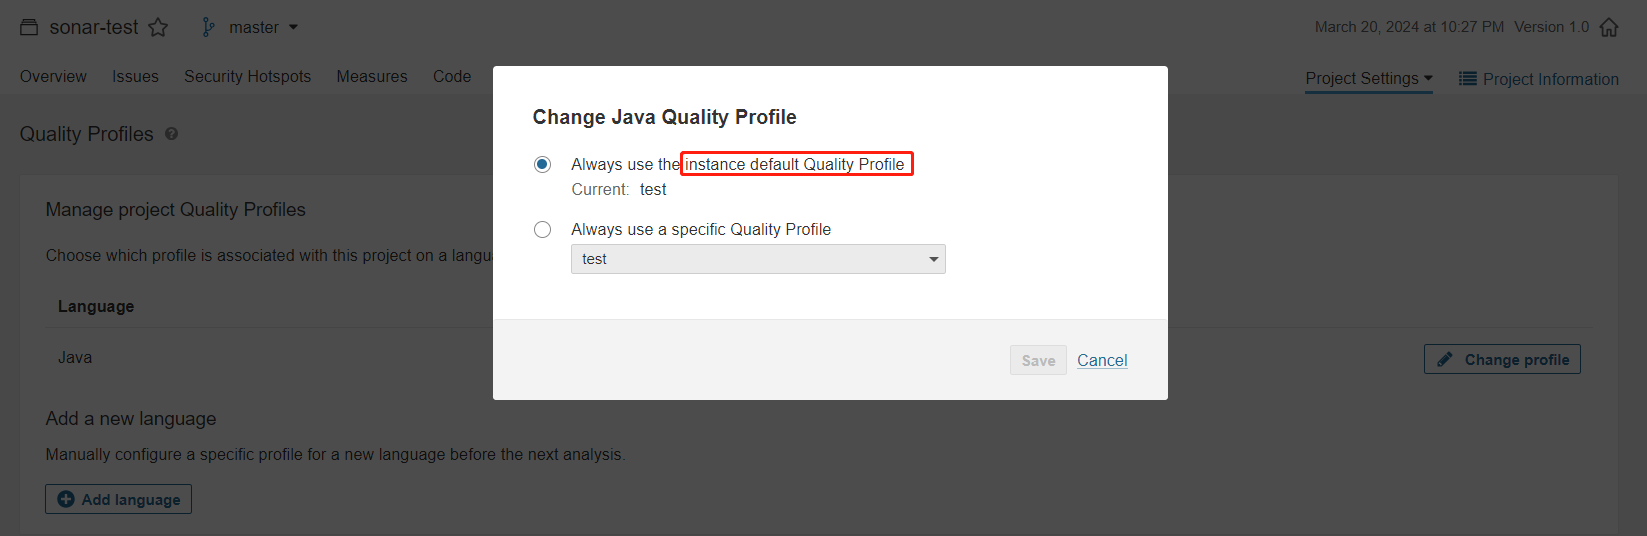
配置项目质量阈,选择我们刚才新建的 test,保存。

在项目里面随便写几行不符合规则的代码,然后 commit 到本地仓库,push 到远程仓库的时候,
会提示被拦截。
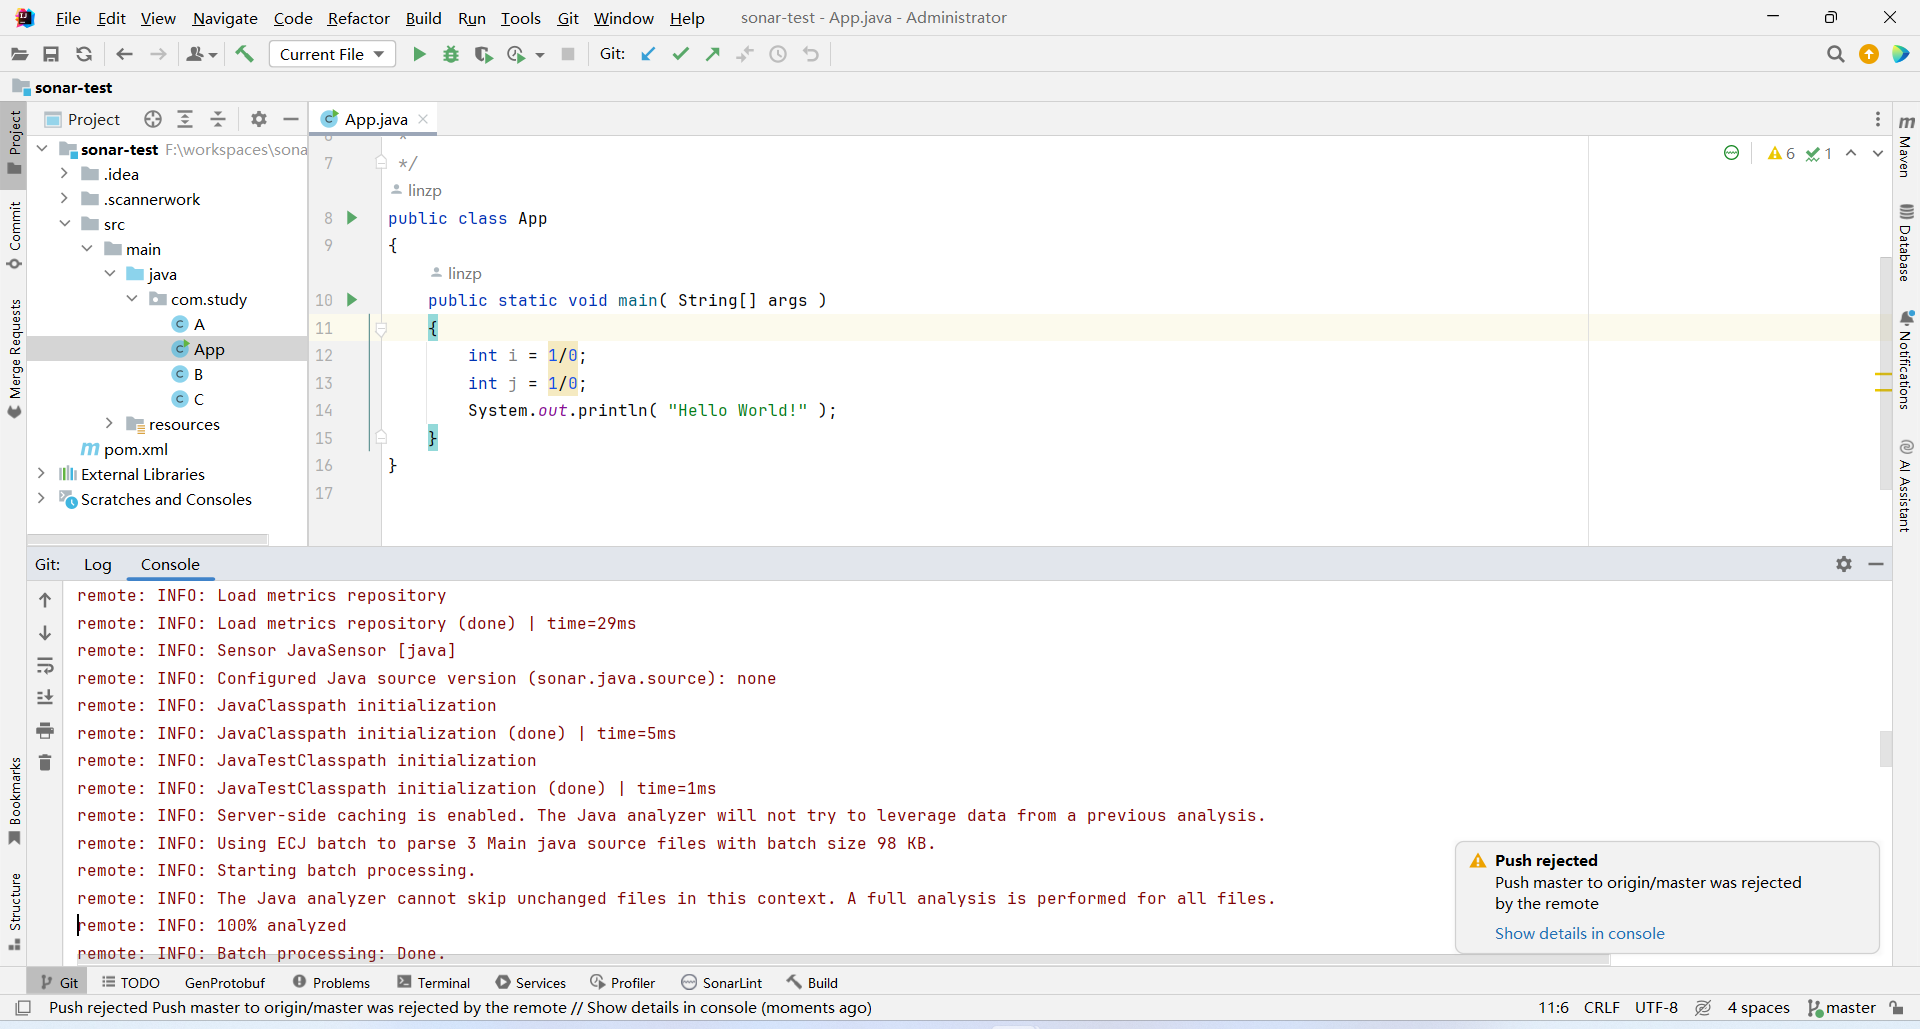
在 git Console 标签页,会看到我们 SHELL 脚本写的日志
Total 0 (delta 0), reused 0 (delta 0), pack-reused 0
remote: 开始代码扫描...
remote: git版本是:git version 2.43.0
remote: 当前路径是:/var/opt/gitlab/git-data/repositories/@hashed/6b/86/6b86b273ff34fce19d6b804eff5a3f5747ada4eaa22f1d49c01e52ddb7875b4b.git
remote: 当前账户是:git
remote: 旧修订ID:871ca52c316d810194a44657f6e3f46aee7fffb9
remote: 新修订ID:c83f9099f6bbd3ba04691cd7a9e315604923ba60
remote: 当前项目:macrosoft/sonar-test
remote: 项目名称:sonar-test
remote: 当前分支:refs/heads/master
remote: 分支名称:master
remote: 进入临时文件夹
remote: /var/opt/gitlab/git-data/repositories/@hashed/6b/86/6b86b273ff34fce19d6b804eff5a3f5747ada4eaa22f1d49c01e52ddb7875b4b.git/tmp
remote: INFO: Scanner configuration file: /usr/local/sonar-scanner/conf/sonar-scanner.properties
remote: INFO: Project root configuration file: NONE
remote: INFO: SonarScanner 5.0.1.3006
remote: INFO: Java 17.0.7 Eclipse Adoptium (64-bit)
remote: INFO: Linux 3.10.0-1062.18.1.el7.x86_64 amd64
remote: INFO: User cache: /var/opt/gitlab/git-data/repositories/@hashed/6b/86/6b86b273ff34fce19d6b804eff5a3f5747ada4eaa22f1d49c01e52ddb7875b4b.git/sonar/cache
remote: INFO: Analyzing on SonarQube server 9.9.4.87374
remote: INFO: Default locale: "en_US", source code encoding: "UTF-8"
remote: INFO: Load global settings
remote: INFO: Load global settings (done) | time=138ms
remote: INFO: Server id: 243B8A4D-AY4oeopTrXOQ26gUW39N
remote: INFO: User cache: /var/opt/gitlab/git-data/repositories/@hashed/6b/86/6b86b273ff34fce19d6b804eff5a3f5747ada4eaa22f1d49c01e52ddb7875b4b.git/sonar/cache
remote: INFO: Load/download plugins
remote: INFO: Load plugins index
remote: INFO: Load plugins index (done) | time=102ms
remote: INFO: Load/download plugins (done) | time=319ms
remote: INFO: Process project properties
remote: INFO: Process project properties (done) | time=1ms
remote: INFO: Execute project builders
remote: INFO: Execute project builders (done) | time=4ms
remote: INFO: Project key: sonar-test
remote: INFO: Base dir: /var/opt/gitlab/git-data/repositories/@hashed/6b/86/6b86b273ff34fce19d6b804eff5a3f5747ada4eaa22f1d49c01e52ddb7875b4b.git/tmp
remote: INFO: Working dir: /var/opt/gitlab/git-data/repositories/@hashed/6b/86/6b86b273ff34fce19d6b804eff5a3f5747ada4eaa22f1d49c01e52ddb7875b4b.git/tmp/.scannerwork
remote: INFO: Load project settings for component key: 'sonar-test'
remote: INFO: Load project settings for component key: 'sonar-test' (done) | time=25ms
remote: INFO: Load project branches
remote: INFO: Load project branches (done) | time=39ms
remote: INFO: Load branch configuration
remote: INFO: Load branch configuration (done) | time=13ms
remote: INFO: Load quality profiles
remote: INFO: Load quality profiles (done) | time=64ms
remote: INFO: Load active rules
remote: INFO: Load active rules (done) | time=1141ms
remote: INFO: Load analysis cache
remote: INFO: Load analysis cache (404) | time=15ms
remote: INFO: Branch name: master
remote: INFO: Load project repositories
remote: INFO: Load project repositories (done) | time=32ms
remote: INFO: Indexing files...
remote: INFO: Project configuration:
remote: INFO: 3 files indexed
remote: INFO: Quality profile for java: test
remote: INFO: ------------- Run sensors on module sonar-test
remote: INFO: Load metrics repository
remote: INFO: Load metrics repository (done) | time=29ms
remote: INFO: Sensor JavaSensor [java]
remote: INFO: Configured Java source version (sonar.java.source): none
remote: INFO: JavaClasspath initialization
remote: INFO: JavaClasspath initialization (done) | time=5ms
remote: INFO: JavaTestClasspath initialization
remote: INFO: JavaTestClasspath initialization (done) | time=1ms
remote: INFO: Server-side caching is enabled. The Java analyzer will not try to leverage data from a previous analysis.
remote: INFO: Using ECJ batch to parse 3 Main java source files with batch size 98 KB.
remote: INFO: Starting batch processing.
remote: INFO: The Java analyzer cannot skip unchanged files in this context. A full analysis is performed for all files.
remote: INFO: 100% analyzed
remote: INFO: Batch processing: Done.
remote: INFO: Did not optimize analysis for any files, performed a full analysis for all 3 files.
remote: INFO: No "Test" source files to scan.
remote: INFO: No "Generated" source files to scan.
remote: INFO: Sensor JavaSensor [java] (done) | time=2039ms
remote: INFO: Sensor JaCoCo XML Report Importer [jacoco]
remote: INFO: 'sonar.coverage.jacoco.xmlReportPaths' is not defined. Using default locations: target/site/jacoco/jacoco.xml,target/site/jacoco-it/jacoco.xml,build/reports/jacoco/test/jacocoTestReport.xml
remote: INFO: No report imported, no coverage information will be imported by JaCoCo XML Report Importer
remote: INFO: Sensor JaCoCo XML Report Importer [jacoco] (done) | time=5ms
remote: INFO: Sensor CSS Rules [javascript]
remote: INFO: No CSS, PHP, HTML or VueJS files are found in the project. CSS analysis is skipped.
remote: INFO: Sensor CSS Rules [javascript] (done) | time=2ms
remote: INFO: Sensor C# Project Type Information [csharp]
remote: INFO: Sensor C# Project Type Information [csharp] (done) | time=1ms
remote: INFO: Sensor C# Analysis Log [csharp]
remote: INFO: Sensor C# Analysis Log [csharp] (done) | time=34ms
remote: INFO: Sensor C# Properties [csharp]
remote: INFO: Sensor C# Properties [csharp] (done) | time=1ms
remote: INFO: Sensor SurefireSensor [java]
remote: INFO: parsing [/var/opt/gitlab/git-data/repositories/@hashed/6b/86/6b86b273ff34fce19d6b804eff5a3f5747ada4eaa22f1d49c01e52ddb7875b4b.git/tmp/target/surefire-reports]
remote: INFO: Sensor SurefireSensor [java] (done) | time=4ms
remote: INFO: Sensor HTML [web]
remote: INFO: Sensor HTML [web] (done) | time=10ms
remote: INFO: Sensor TextAndSecretsSensor [text]
remote: INFO: 3 source files to be analyzed
remote: INFO: 3/3 source files have been analyzed
remote: INFO: Sensor TextAndSecretsSensor [text] (done) | time=64ms
remote: INFO: Sensor VB.NET Project Type Information [vbnet]
remote: INFO: Sensor VB.NET Project Type Information [vbnet] (done) | time=3ms
remote: INFO: Sensor VB.NET Analysis Log [vbnet]
remote: INFO: Sensor VB.NET Analysis Log [vbnet] (done) | time=42ms
remote: INFO: Sensor VB.NET Properties [vbnet]
remote: INFO: Sensor VB.NET Properties [vbnet] (done) | time=0ms
remote: INFO: Sensor com.github.mc1arke.sonarqube.plugin.scanner.ScannerPullRequestPropertySensor
remote: INFO: Sensor com.github.mc1arke.sonarqube.plugin.scanner.ScannerPullRequestPropertySensor (done) | time=2ms
remote: INFO: Sensor IaC Docker Sensor [iac]
remote: INFO: 0 source files to be analyzed
remote: INFO: 0/0 source files have been analyzed
remote: INFO: Sensor IaC Docker Sensor [iac] (done) | time=149ms
remote: INFO: ------------- Run sensors on project
remote: INFO: Sensor Analysis Warnings import [csharp]
remote: INFO: Sensor Analysis Warnings import [csharp] (done) | time=3ms
remote: INFO: Sensor Zero Coverage Sensor
remote: INFO: Sensor Zero Coverage Sensor (done) | time=17ms
remote: INFO: Sensor Java CPD Block Indexer
remote: INFO: Sensor Java CPD Block Indexer (done) | time=38ms
remote: INFO: SCM Publisher is disabled
remote: INFO: CPD Executor 3 files had no CPD blocks
remote: INFO: CPD Executor Calculating CPD for 0 files
remote: INFO: CPD Executor CPD calculation finished (done) | time=0ms
remote: INFO: Analysis report generated in 137ms, dir size=97.8 kB
remote: INFO: Analysis report compressed in 55ms, zip size=16.8 kB
remote: INFO: Analysis report uploaded in 44ms
remote: INFO: ANALYSIS SUCCESSFUL, you can find the results at: http://47.120.3.240:9000/dashboard?id=sonar-test&branch=master
remote: INFO: Note that you will be able to access the updated dashboard once the server has processed the submitted analysis report
remote: INFO: More about the report processing at http://你的sonarqube:9000/api/ce/task?id=AY52Q8sMVWuDRjAxy0tr
remote: INFO: Analysis total time: 9.598 s
remote: INFO: ------------------------------------------------------------------------
remote: INFO: EXECUTION SUCCESS
remote: INFO: ------------------------------------------------------------------------
remote: INFO: Total time: 12.726s
remote: INFO: Final Memory: 19M/70M
remote: INFO: ------------------------------------------------------------------------
remote: % Total % Received % Xferd Average Speed Time Time Time Current
remote: Dload Upload Total Spent Left Speed
remote:
remote: 0 0 0 0 0 0 0 0 --:--:-- --:--:-- --:--:-- 0
remote: 100 370 0 370 0 0 14036 0 --:--:-- --:--:-- --:--:-- 14230
remote: 代码检测结果"ERROR"
remote: 删除临时文件夹
remote: 代码检测失败,拒绝提交
error: failed to push some refs to 'http://你的 sonarqube IP/macrosoft/sonar-test.git'
To http://47.119.174.163/macrosoft/sonar-test.git
! refs/heads/master:refs/heads/master [remote rejected] (pre-receive hook declined)
Done
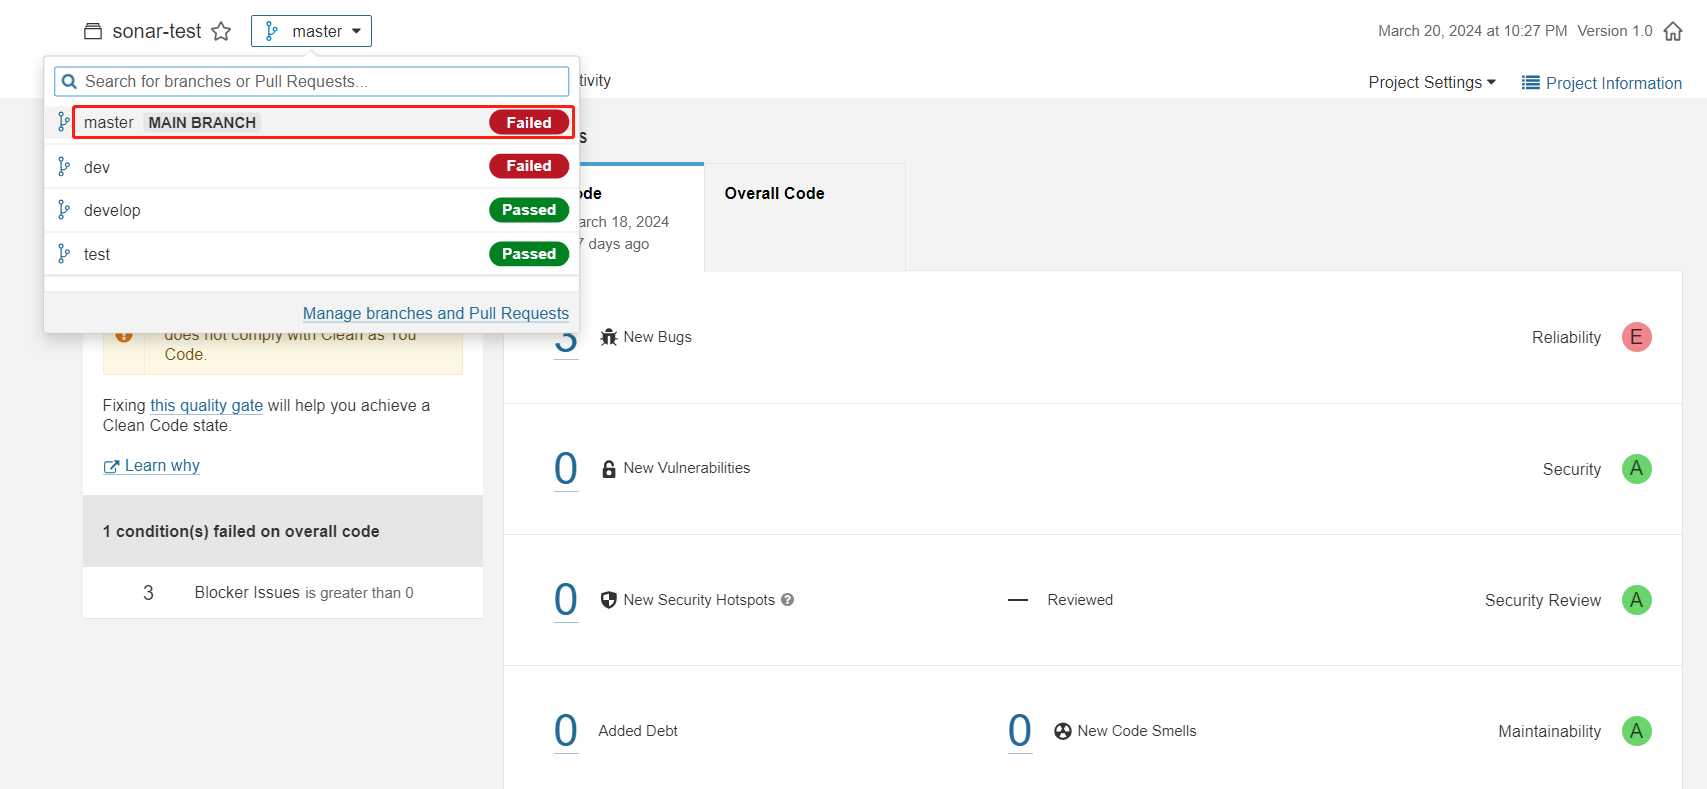
在 sonarqube 对应分支,就能看到检测失败,而且报错内容,就是我们代码写的内容。


 1万+
1万+


 被折叠的 条评论
为什么被折叠?
被折叠的 条评论
为什么被折叠?
 到【灌水乐园】发言


