


本文主要是研究Activity的View创建和显示,主体流程如下:
1.Activity初始化的时候需要获取WMS代理对象,并且创建Window以及进行参数配置。
2.在Activity的onCreate()里面通过setContentView()生成ViewTree。
3.在resume的时候将window添加到屏幕上,并且绘制布局。
1.1 ActivityThread -> handleLaunchActivity()
首先在Activiy中需要获取WMS的代理。
@Override
    public Activity handleLaunchActivity(ActivityClientRecord r, PendingTransactionActions pendingActions, Intent customIntent) {
        //...省略
        //此处是为了获取WMS的代理
        WindowManagerGlobal.initialize();

        final Activity a = performLaunchActivity(r, customIntent);
        //...省略
        return a;
    }
1.2 WindowManagerGlobal -> initialize()
获取WMS代理的过程。
    public static void initialize() {
        getWindowManagerService();
    }

    public static IWindowManager getWindowManagerService() {
        synchronized (WindowManagerGlobal.class) {
            if (sWindowManagerService == null) {
                sWindowManagerService = IWindowManager.Stub.asInterface(
                        ServiceManager.getService("window"));
                try {
                    if (sWindowManagerService != null) {
                        ValueAnimator.setDurationScale(
                                sWindowManagerService.getCurrentAnimatorScale());
                    }
                } catch (RemoteException e) {
                    throw e.rethrowFromSystemServer();
                }
            }
            return sWindowManagerService;
        }
    }
1.3 ActivityThread -> performLaunchActivity()
在这里创建Activity,并进行一些初始化的操作。
private Activity performLaunchActivity(ActivityClientRecord r, Intent customIntent) {
        //...
        //创建ContextImpl
        ContextImpl appContext = createBaseContextForActivity(r);
        Activity activity = null;
        try {
            //通过反射创建activity
            java.lang.ClassLoader cl = appContext.getClassLoader();
            activity = mInstrumentation.newActivity(
                    cl, component.getClassName(), r.intent);
            ...
        } catch (Exception e) {
            ...
        }

        try {
            Application app = r.packageInfo.makeApplication(false, mInstrumentation);
            ...
            if (activity != null) {
                CharSequence title = r.activityInfo.loadLabel(appContext.getPackageManager());
                Configuration config = new Configuration(mCompatConfiguration);
                if (r.overrideConfig != null) {
                    config.updateFrom(r.overrideConfig);
                }
                Window window = null;
                if (r.mPendingRemoveWindow != null && r.mPreserveWindow) {
                    window = r.mPendingRemoveWindow;
                    r.mPendingRemoveWindow = null;
                    r.mPendingRemoveWindowManager = null;
                }
                appContext.setOuterContext(activity);
                //此处执行attach(),进行window一些初始化操作
                activity.attach(...);

                //...
                //接下来继续执行activity生命周期
                if (r.isPersistable()) {
                    mInstrumentation.callActivityOnCreate(activity, r.state, r.persistentState);
                } else {
                    mInstrumentation.callActivityOnCreate(activity, r.state);
                }
                r.activity = activity;
            }
            r.setState(ON_CREATE);

            mActivities.put(r.token, r);

        } catch (Exception e) {
            //...
        }

        return activity;
    }
1.4 Activity -> attach()
在Activity初始化的时候,创建window并且配置wms。
final void attach(Context context, ActivityThread aThread,
            Instrumentation instr, IBinder token, int ident,
            Application application, Intent intent, ActivityInfo info,
            CharSequence title, Activity parent, String id,
            NonConfigurationInstances lastNonConfigurationInstances,
            Configuration config, String referrer, IVoiceInteractor voiceInteractor,
            Window window, ActivityConfigCallback activityConfigCallback) {
        attachBaseContext(context);

        mFragments.attachHost(null /*parent*/);
        //创建window,并设置相关参数以及回调(也就是activity本身)
        mWindow = new PhoneWindow(this, window, activityConfigCallback);
        mWindow.setWindowControllerCallback(this);
        mWindow.setCallback(this);
        mWindow.setOnWindowDismissedCallback(this);
        mWindow.getLayoutInflater().setPrivateFactory(this);
        if (info.softInputMode != WindowManager.LayoutParams.SOFT_INPUT_STATE_UNSPECIFIED) {
            mWindow.setSoftInputMode(info.softInputMode);
        }
        if (info.uiOptions != 0) {
            mWindow.setUiOptions(info.uiOptions);
        }
        //...省略activity初始化参数过程
        //window设置WMS代理
        mWindow.setWindowManager((WindowManager)context.getSystemService(Context.WINDOW_SERVICE), mToken, mComponent.flattenToString(), (info.flags & ActivityInfo.FLAG_HARDWARE_ACCELERATED) != 0);
        mWindowManager = mWindow.getWindowManager();
        mWindow.setColorMode(info.colorMode);
        //...
    }
attach()之后会通过Instrumentation去执行activity的生命周期OnCreate(),接下来会调用setContentView()。
2.1 Activity -> setContentView()
public void setContentView(@LayoutRes int layoutResID) {
    //此处获取getWindow()获取到的就是在attach中赋值的mWindow
    getWindow().setContentView(layoutResID);
    initWindowDecorActionBar();
}
获取的Window对象中的setContentView()是一个抽象方法,所以我们直接到子类PhoneWindow中去看实现。
2.2 PhoneWindow -> setContentView()
    @Override
    public void setContentView(int layoutResID) {
        //首先做好展示新页面的准备
        if (mContentParent == null) {
            //DecorView的初始化操作
            installDecor();
        } else if (!hasFeature(FEATURE_CONTENT_TRANSITIONS)) {
            //如果没有过渡动画,则直接清除其中的View
            mContentParent.removeAllViews();
        }
        //过渡动画,渲染新页面
        if (hasFeature(FEATURE_CONTENT_TRANSITIONS)) {
            final Scene newScene = Scene.getSceneForLayout(mContentParent, layoutResID, getContext());
            transitionTo(newScene);
        } else {
            //解析布局文件,并生成View树,mContentParent为View树的根节点
            mLayoutInflater.inflate(layoutResID, mContentParent);
        }
        //计算根视图的大小(比如说会根据状态栏来设置对应的高度和padding等)
        mContentParent.requestApplyInsets();
        //此处Callback是在acitivty.attach()中设置的,也就是说返回的callback就是activity
        final Callback cb = getCallback();
        if (cb != null && !isDestroyed()) {
            //调用acitivty中的onContentChanged()
            cb.onContentChanged();
        }
        mContentParentExplicitlySet = true;
    }
2.3 PhoneWindow -> installDecor()
初始化DecorView。
private void installDecor() {
        mForceDecorInstall = false;
        //初始化DecorView,与window进行关联
        if (mDecor == null) {
            mDecor = generateDecor(-1);
            mDecor.setDescendantFocusability(ViewGroup.FOCUS_AFTER_DESCENDANTS);
            mDecor.setIsRootNamespace(true);
            if (!mInvalidatePanelMenuPosted && mInvalidatePanelMenuFeatures != 0) {
                mDecor.postOnAnimation(mInvalidatePanelMenuRunnable);
            }
        } else {
            mDecor.setWindow(this);
        }
        //
        if (mContentParent == null) {
            //ViewTree的根结点,包含actionBar和contentView
            mContentParent = generateLayout(mDecor);
            //接下来是根据Feature去设置actionBar和contentView的相关属性以及一些过度动画
            //...省略
    }
这里面有两个比较重要的方法:
(1) mDecor = generateDecor(-1);
此处生成了一个与该window相关联的decorView。
protected DecorView generateDecor(int featureId) {
        Context context;
        if (mUseDecorContext) {
            Context applicationContext = getContext().getApplicationContext();
            if (applicationContext == null) {
                context = getContext();
            } else {
                context = new DecorContext(applicationContext, getContext());
                if (mTheme != -1) {
                    context.setTheme(mTheme);
                }
            }
        } else {
            context = getContext();
        }
        return new DecorView(context, featureId, this, getAttributes());
    }
(2) mContentParent = generateLayout(mDecor);
protected ViewGroup generateLayout(DecorView decor) {
        // Apply data from current theme.
        TypedArray a = getWindowStyle();

        //...省略获取style,系统版本,设置相关参数

        // Inflate the window decor.
        int layoutResource;
        int features = getLocalFeatures();
        //...接下来会根据features,得到对应的layoutResource
        layoutResource = R.layout.xxx;

        mDecor.startChanging();
        //inflate对应的布局到mDecor上
        mDecor.onResourcesLoaded(mLayoutInflater, layoutResource);

        ViewGroup contentParent = (ViewGroup)findViewById(ID_ANDROID_CONTENT);

        // ...省略对background和title进行相关参数设置

        mDecor.finishChanging();

        return contentParent;
    }
接下来看一下mDecor.onResourcesLoaded(mLayoutInflater, layoutResource);这个方法内部实现。
void onResourcesLoaded(LayoutInflater inflater, int layoutResource) {
        ...
        mDecorCaptionView = createDecorCaptionView(inflater);
        final View root = inflater.inflate(layoutResource, null);
        if (mDecorCaptionView != null) {
            //先确保mDecorCaptionView在mDecor上
            if (mDecorCaptionView.getParent() == null) {
                addView(mDecorCaptionView, new ViewGroup.LayoutParams(MATCH_PARENT, MATCH_PARENT));
            }
            //把刚刚渲染的布局添加到mDecorCaptionView上
            mDecorCaptionView.addView(root, new ViewGroup.MarginLayoutParams(MATCH_PARENT, MATCH_PARENT));
        } else {
            // Put it below the color views.
            addView(root, 0, new ViewGroup.LayoutParams(MATCH_PARENT, MATCH_PARENT));
        }
        mContentRoot = (ViewGroup) root;
        initializeElevation();
    }
此处,创建mDecorCaptionView,inflate刚刚传入的layoutResource,添加到mDecorView上。
接下来回到2.1,我们总结一下PhoneWindow.setContentView()都做了些什么:
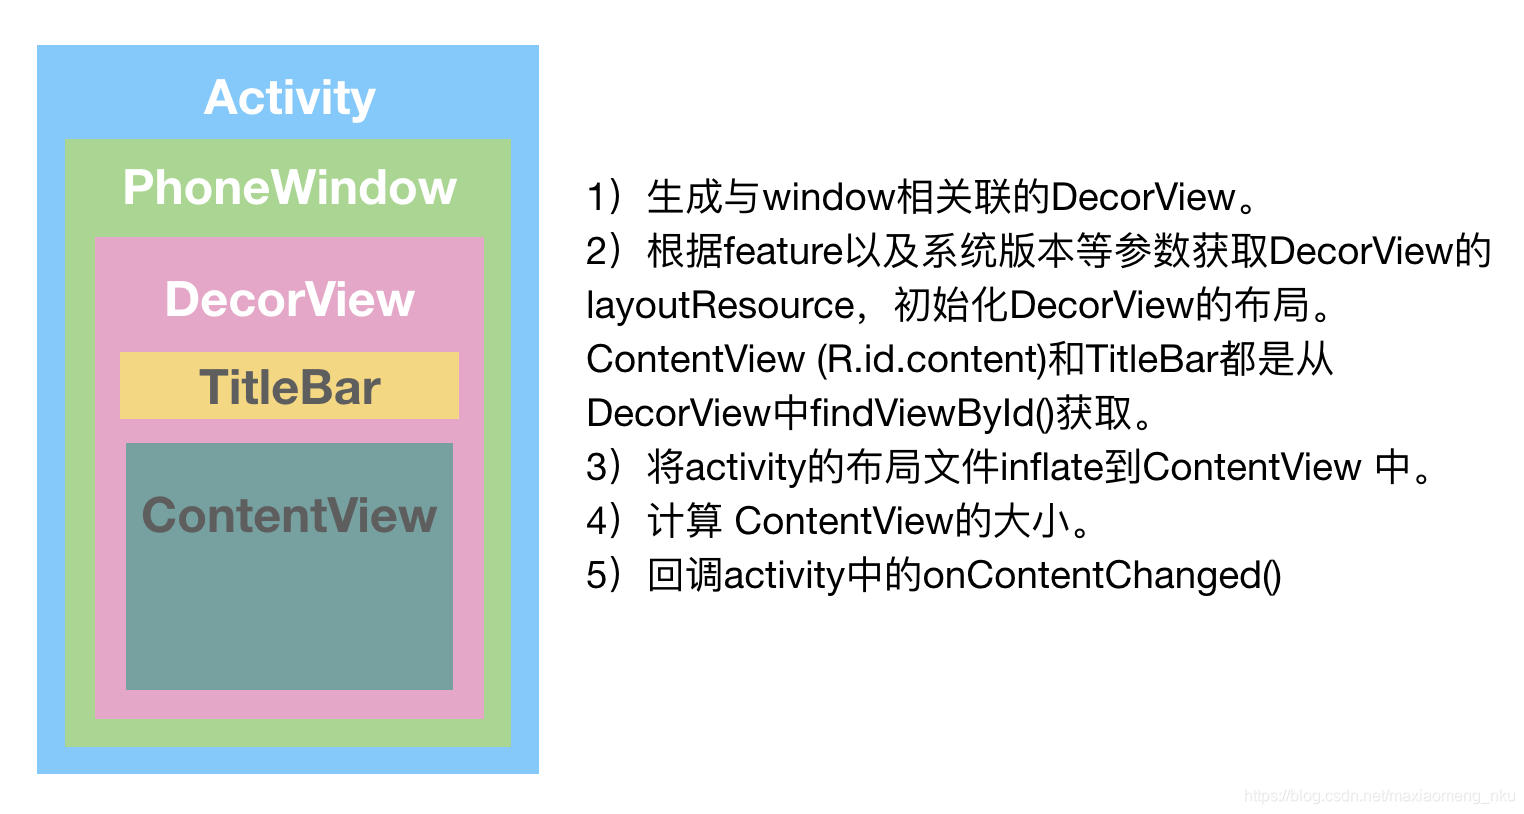
1)生成与window相关联的mDecorView。
2)根据feature以及系统版本等参数获取mDecorView的layoutResource,初始化mDecorView的布局。mContentView (R.id.content)和mTitle都是从mDecorView中findViewById()获取。
3)将activity的布局文件inflate到mContentParent中。
4)计算mContentParent的大小。
5)回掉activity中的onContentChanged()
至此,就完成了activity页面ViewTree的加载,接下来就是把这个页面显示出来。
执行完handleLaunchActivity()之后会依次继续执行handleStartActivity()和handleResumeActivity(),handleStartActivity()中没有太多逻辑就直接去回调activity的生命周期,所以接下来看一下handleResumeActivity()。
3.1 ActivityThread -> handleResumeActivity()
@Override
    public void handleResumeActivity(IBinder token, boolean finalStateRequest, boolean isForward, String reason) {
        final ActivityClientRecord r = performResumeActivity(token, finalStateRequest, reason);

        final Activity a = r.activity;
        //根据AMS来判断是否要显示Activity
        boolean willBeVisible = !a.mStartedActivity;
        if (!willBeVisible) {
            try {
                willBeVisible = ActivityManager.getService().willActivityBeVisible(
                        a.getActivityToken());
            } catch (RemoteException e) {
                throw e.rethrowFromSystemServer();
            }
        }
        if (r.window == null && !a.mFinished && willBeVisible) {
            r.window = r.activity.getWindow();
            //获取decorView
            View decor = r.window.getDecorView();
            decor.setVisibility(View.INVISIBLE);
            //获取WindowManager
            ViewManager wm = a.getWindowManager();
            WindowManager.LayoutParams l = r.window.getAttributes();
            //decorView与Activity关联
            a.mDecor = decor;
            l.type = WindowManager.LayoutParams.TYPE_BASE_APPLICATION;
            l.softInputMode |= forwardBit;
            if (r.mPreserveWindow) {
                a.mWindowAdded = true;
                r.mPreserveWindow = false;
                ViewRootImpl impl = decor.getViewRootImpl();
                if (impl != null) {
                    impl.notifyChildRebuilt();
                }
            }
            if (a.mVisibleFromClient) {
                if (!a.mWindowAdded) {
                    a.mWindowAdded = true;
                    //调用WindowManager去添加View
                    wm.addView(decor, l);
                } else {
                    a.onWindowAttributesChanged(l);
                }
            }
        } else if (!willBeVisible) {
            r.hideForNow = true;
        }

        //...会根据当前页面状态,如input状态等,更新decor的layoutParams
    }
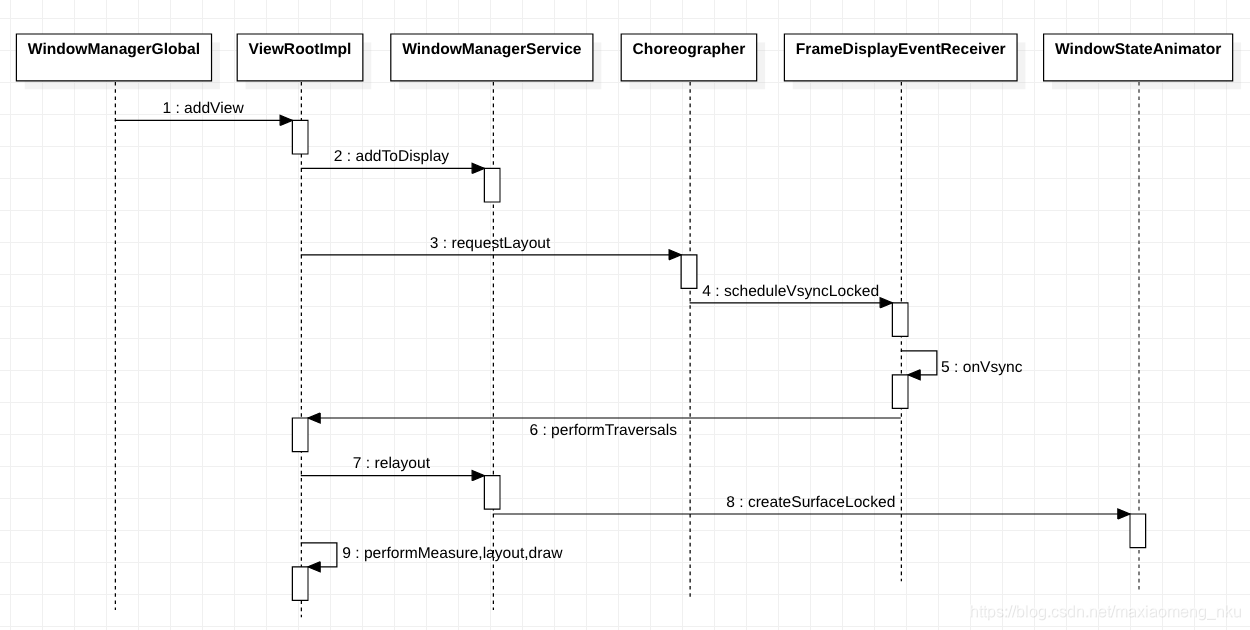
这里我们主要关注wm.addView(decor, l);
public interface ViewManager
{
    public void addView(View view, ViewGroup.LayoutParams params);
    public void updateViewLayout(View view, ViewGroup.LayoutParams params);
    public void removeView(View view);
}
public interface WindowManager extends ViewManager {
    ...
}
public final class WindowManagerImpl implements WindowManager {
    private final WindowManagerGlobal mGlobal = WindowManagerGlobal.getInstance();
    ...
    @Override
    public void addView(@NonNull View view, @NonNull ViewGroup.LayoutParams params) {
        applyDefaultToken(params);
        mGlobal.addView(view, params, mContext.getDisplay(), mParentWindow);
    }
    ...
}
wm是ViewManager对象,WindowManager继承了ViewManager,这两个都是接口类,真正实现了addView方法的是WindowManagerImpl,而此处调用了WindowManagerGlobal中的addView。
3.2 WindowManagerGlobal -> addView()
public void addView(View view, ViewGroup.LayoutParams params, Display display, Window parentWindow) {
        ViewRootImpl root;
        View panelParentView = null;

        synchronized (mLock) {
            //...省略系统参数设置

            int index = findViewLocked(view, false);
            //判断这个view是否已经添加过了
            if (index >= 0) {
                //移除
                if (mDyingViews.contains(view)) {
                    mRoots.get(index).doDie();
                } else {
                    throw new IllegalStateException("View " + view
                            + " has already been added to the window manager.");
                }
            }

            ...
            //创建ViewRootImpl,其内部持有
            root = new ViewRootImpl(view.getContext(), display);

            view.setLayoutParams(wparams);

            mViews.add(view);
            mRoots.add(root);
            mParams.add(wparams);

            // do this last because it fires off messages to start doing things
            try {
                //调用viewRootImpl.setView方法
                root.setView(view, wparams, panelParentView);
            } catch (RuntimeException e) {
                // BadTokenException or InvalidDisplayException, clean up.
                if (index >= 0) {
                    removeViewLocked(index, true);
                }
                throw e;
            }
        }
    }
3.3 ViewRootImpl -> setView()
public void setView(View view, WindowManager.LayoutParams attrs, View panelParentView) {
        synchronized (this) {
            if (mView == null) {
                mView = view;

                //...参数设置

                //将View存入mAttachInfo中
                mAttachInfo.mRootView = view;
                mAttachInfo.mScalingRequired = mTranslator != null;
                mAttachInfo.mApplicationScale =
                        mTranslator == null ? 1.0f : mTranslator.applicationScale;
                if (panelParentView != null) {
                    mAttachInfo.mPanelParentWindowToken
                            = panelParentView.getApplicationWindowToken();
                }
                mAdded = true;
                int res; /* = WindowManagerImpl.ADD_OKAY; */

                //进行ui布局
                requestLayout();
                //创建消息通道
                if ((mWindowAttributes.inputFeatures & WindowManager.LayoutParams.INPUT_FEATURE_NO_INPUT_CHANNEL) == 0) {
                    mInputChannel = new InputChannel();
                }
                mForceDecorViewVisibility = (mWindowAttributes.privateFlags & PRIVATE_FLAG_FORCE_DECOR_VIEW_VISIBILITY) != 0;
                try {
                    mOrigWindowType = mWindowAttributes.type;
                    mAttachInfo.mRecomputeGlobalAttributes = true;
                    collectViewAttributes();
                    //把window添加到屏幕上
                    res = mWindowSession.addToDisplay(mWindow, mSeq, mWindowAttributes, getHostVisibility(), mDisplay.getDisplayId(), mWinFrame, mAttachInfo.mContentInsets, mAttachInfo.mStableInsets, mAttachInfo.mOutsets, mAttachInfo.mDisplayCutout, mInputChannel);
                } catch (RemoteException e) {
                    ...
                } finally {
                    if (restore) {
                        attrs.restore();
                    }
                }
                //显示过渡
                if (mTranslator != null) {
                mTranslator.translateRectInScreenToAppWindow(mAttachInfo.mContentInsets);
                }
                mPendingOverscanInsets.set(0, 0, 0, 0);
                mPendingContentInsets.set(mAttachInfo.mContentInsets);
                mPendingStableInsets.set(mAttachInfo.mStableInsets);
                mPendingDisplayCutout.set(mAttachInfo.mDisplayCutout);
                mPendingVisibleInsets.set(0, 0, 0, 0);
                mAttachInfo.mAlwaysConsumeNavBar = (res & WindowManagerGlobal.ADD_FLAG_ALWAYS_CONSUME_NAV_BAR) != 0;
                mPendingAlwaysConsumeNavBar = mAttachInfo.mAlwaysConsumeNavBar;

                //...省略异常情况处理

                //配置消息通道
                if (view instanceof RootViewSurfaceTaker) {
                    mInputQueueCallback =
                        ((RootViewSurfaceTaker)view).willYouTakeTheInputQueue();
                }
                if (mInputChannel != null) {
                    if (mInputQueueCallback != null) {
                        mInputQueue = new InputQueue();
                        mInputQueueCallback.onInputQueueCreated(mInputQueue);
                    }
                    mInputEventReceiver = new WindowInputEventReceiver(mInputChannel,
                            Looper.myLooper());
                }
                //view就是最初传进来的DecorView
                view.assignParent(this);

                //...省略参数配置
            }
        }
    }
此处我们关注两个重点步骤
1)requestLayout(); 和2)mWindowSession.addToDisplay
由于requestLayout()内部是通过发送消息的方式实现,不会立刻执行,所以我们先看一下(2)做了什么。
3.4 WMS -> addToDisplay()
mWindowSession其实就是WMS的一个代理,最终会调用到WMS中的addWindow()
public int addWindow(Session session, IWindow client, int seq, LayoutParams attrs, int viewVisibility, int displayId, Rect outFrame, Rect outContentInsets, Rect outStableInsets, Rect outOutsets, DisplayCutout.ParcelableWrapper outDisplayCutout, InputChannel outInputChannel) {
       ...
    synchronized(mWindowMap) {
        // 获取DisplayContent(用来描述一块屏幕)
        final DisplayContent displayContent = getDisplayContentOrCreate(displayId);

        ....

        AppWindowToken atoken = null;
        final boolean hasParent = parentWindow != null;
        //displayContent中有一个表来保存WindowToken,相同组件的window会对应同一个windowToken,比如同一个activity的window,展示的时候会按照z轴的顺序来展示在一起
        WindowToken token = displayContent.getWindowToken(
                hasParent ? parentWindow.mAttrs.token : attrs.token);
        final int rootType = hasParent ? parentWindow.mAttrs.type : type;

        boolean addToastWindowRequiresToken = false;

        if (token == null) {
            ....

            final IBinder binder = attrs.token != null ? attrs.token : client.asBinder();
            final boolean isRoundedCornerOverlay =
                    (attrs.privateFlags & PRIVATE_FLAG_IS_ROUNDED_CORNERS_OVERLAY) != 0;
            // 如果未能从displayContent获取到WindowToken则新建一个WindowToken
            token = new WindowToken(this, binder, type, false, displayContent,
                    session.mCanAddInternalSystemWindow, isRoundedCornerOverlay);
        } else if (rootType >= FIRST_APPLICATION_WINDOW && rootType <= LAST_APPLICATION_WINDOW) {
            // 如果Window的类型为APPLICATION_WINDOW则将WindowToken转为AppWindowToken
            atoken = token.asAppWindowToken();
            ...

        // 创建WindowState在WMS端对应着要添加的Window
        final WindowState win = new WindowState(this, session, client, token, parentWindow, appOp[0], seq, attrs, viewVisibility, session.mUid, session.mCanAddInternalSystemWindow);

        ...

        // 为Window开启消息通道
        final boolean openInputChannels = (outInputChannel != null
                && (attrs.inputFeatures & INPUT_FEATURE_NO_INPUT_CHANNEL) == 0);
        if  (openInputChannels) {
            win.openInputChannel(outInputChannel);
        }

        ...

        // 调用WindowState的attach函数,会创建一个SurfaceSession对象,后续通过这个session与SurfaceFlinger交互
        win.attach();
        mWindowMap.put(client.asBinder(), win);

        ...

        // 将新建的WindowState添加到WindowToken,实际上是添加到他的父类WindowContainer中
        win.mToken.addWindow(win);
        ...

    return res;
}
Window已经添加到了屏幕上,现在我们回到setView()中的requestLayout()。
3.5 ViewRootImpl -> requestLayout()
@Override
    public void requestLayout() {
        if (!mHandlingLayoutInLayoutRequest) {
            //检查是否是主线程
            checkThread();
            mLayoutRequested = true;
            scheduleTraversals();
        }
    }
    void scheduleTraversals() {
        if (!mTraversalScheduled) {
            //把mTraversalScheduled置为true表示已经发起重绘消息,执行的时候会置为false,防止多次安排重绘
            mTraversalScheduled = true;
            mTraversalBarrier = mHandler.getLooper().getQueue().postSyncBarrier();
            //添加type为Choreographer.CALLBACK_TRAVERSAL类型的callback
            mChoreographer.postCallback(
                    Choreographer.CALLBACK_TRAVERSAL, mTraversalRunnable, null);
            if (!mUnbufferedInputDispatch) {
                scheduleConsumeBatchedInput();
            }
            notifyRendererOfFramePending();
            pokeDrawLockIfNeeded();
        }
    }
此处会通过mChoreographer去post一个callbackType为Choreographer.CALLBACK_TRAVERSAL的runnable,接下来我们看看这个callback什么时候会执行。
private void postCallbackDelayedInternal(int callbackType,
            Object action, Object token, long delayMillis) {
        synchronized (mLock) {
            final long now = SystemClock.uptimeMillis();
            final long dueTime = now + delayMillis;
            //根据callbackType存储
            mCallbackQueues[callbackType].addCallbackLocked(dueTime, action, token);
            //此处传入的dueTime == now,所以执行scheduleFrameLocked(now)
            if (dueTime <= now) {
                scheduleFrameLocked(now);
            } else {
                Message msg = mHandler.obtainMessage(MSG_DO_SCHEDULE_CALLBACK, action);
                msg.arg1 = callbackType;
                msg.setAsynchronous(true);
                mHandler.sendMessageAtTime(msg, dueTime);
            }
        }
    }
    private void scheduleFrameLocked(long now) {
        if (!mFrameScheduled) {
            mFrameScheduled = true;
            if (USE_VSYNC) {
                if (DEBUG_FRAMES) {
                    Log.d(TAG, "Scheduling next frame on vsync.");
                }
                //如果是在主线程,则直接发起一次vsync事件,否则则发消息通知主线程尽快发起一次vsync事件
                if (isRunningOnLooperThreadLocked()) {
                    scheduleVsyncLocked();
                } else {
                    Message msg = mHandler.obtainMessage(MSG_DO_SCHEDULE_VSYNC);
                    msg.setAsynchronous(true);
                    mHandler.sendMessageAtFrontOfQueue(msg);
                }
            } else {
                ...
            }
        }
    }
    //处理消息的mHandler是FrameHandler
    private final class FrameHandler extends Handler {
        public FrameHandler(Looper looper) {
            super(looper);
        }

        @Override
        public void handleMessage(Message msg) {
            switch (msg.what) {
                case MSG_DO_FRAME:
                    doFrame(System.nanoTime(), 0);
                    break;
                case MSG_DO_SCHEDULE_VSYNC:
                    //这里最终会调用DisplayEventReceiver
                    doScheduleVsync();
                    break;
                case MSG_DO_SCHEDULE_CALLBACK:
                    doScheduleCallback(msg.arg1);
                    break;
            }
        }
    }
    public abstract class DisplayEventReceiver{
        public void scheduleVsync() {
            //native方式去发起Vsync事件
            nativeScheduleVsync(mReceiverPtr);
        }

    // Called from native code.
    @SuppressWarnings("unused")
        private void dispatchVsync(long timestampNanos, int builtInDisplayId, int frame) {
            //分发Vsync事件
            onVsync(timestampNanos, builtInDisplayId, frame);
        }
    }
DisplayEventReceiver是抽象类,onVsync()由FrameDisplayEventReceiver实现。
private final class FrameDisplayEventReceiver extends DisplayEventReceiver
            implements Runnable {

        @Override
        public void onVsync(long timestampNanos, int builtInDisplayId, int frame) {
            ...
            Message msg = Message.obtain(mHandler, this);
            msg.setAsynchronous(true);
            mHandler.sendMessageAtTime(msg, timestampNanos / TimeUtils.NANOS_PER_MS);
        }

        @Override
        public void run() {
            mHavePendingVsync = false;
            //此处最终会刚刚传入的Choreographer.CALLBACK_TRAVERSAL类型的callback
            doFrame(mTimestampNanos, mFrame);
        }
    }
分发Vsync事件,最终会执行我们刚刚传入的那个callback -> TraversalRunnable,内部直接调用了doTraversal()方法。
void doTraversal() {
        if (mTraversalScheduled) {
            mTraversalScheduled = false;
            mHandler.getLooper().getQueue().removeSyncBarrier(mTraversalBarrier);

            performTraversals();

            if (mProfile) {
                Debug.stopMethodTracing();
                mProfile = false;
            }
        }
    }
3.6 继续看performTraversals(),这个方法内部代码很长,我们只节选重点部分来看。
private void performTraversals() {
    ...
    final View host = mView;

    if (mFirst || windowShouldResize || insetsChanged ||
              viewVisibilityChanged || params != null) {
        ...

          try {
              ...
              relayoutResult = relayoutWindow(params, viewVisibility, insetsPending);
          }
          ...

        if (!mStopped) {
            boolean focusChangedDueToTouchMode = ensureTouchModeLocally(
                            (relayoutResult&WindowManagerGlobal.RELAYOUT_RES_IN_TOUCH_MODE) != 0);
            if (focusChangedDueToTouchMode || mWidth != host.getMeasuredWidth()
                        || mHeight != host.getMeasuredHeight() || contentInsetsChanged) {
                //获取测量模式
                int childWidthMeasureSpec = getRootMeasureSpec(mWidth, lp.width);
                int childHeightMeasureSpec = getRootMeasureSpec(mHeight, lp.height);

                // 根据测量模式进行测量。
                performMeasure(childWidthMeasureSpec, childHeightMeasureSpec);
                ......
                layoutRequested = true;
            }
        }
    }

    final boolean didLayout = layoutRequested && !mStopped;
    boolean triggerGlobalLayoutListener = didLayout || attachInfo.mRecomputeGlobalAttributes;
    if (didLayout) {
        //布局
        performLayout(lp, desiredWindowWidth, desiredWindowHeight);

        // By this point all views have been sized and positioned
        ......
    }
    ......      boolean cancelDraw = attachInfo.mTreeObserver.dispatchOnPreDraw() || viewVisibility != View.VISIBLE;
    if (!cancelDraw && !newSurface) {
        if (!skipDraw || mReportNextDraw) {
            ...
            //绘制
            performDraw();
        }
    }
    ...
}
3.7 接下来我们主要看一下relayoutWindow()方法。
private int relayoutWindow(WindowManager.LayoutParams params, int viewVisibility, boolean insetsPending) throws RemoteException {
    ...

    long frameNumber = -1;
    if (mSurface.isValid()) {
        frameNumber = mSurface.getNextFrameNumber();
    }
    //通过WindowSession调用WMS的relayout()方法
    int relayoutResult = mWindowSession.relayout(mWindow, mSeq, params, (int) (mView.getMeasuredWidth() * appScale + 0.5f), (int) (mView.getMeasuredHeight() * appScale + 0.5f), viewVisibility, insetsPending ? WindowManagerGlobal.RELAYOUT_INSETS_PENDING : 0, frameNumber, mWinFrame, mPendingOverscanInsets, mPendingContentInsets, mPendingVisibleInsets, mPendingStableInsets, mPendingOutsets, mPendingBackDropFrame, mPendingDisplayCutout, mPendingMergedConfiguration, mSurface);

    //...省略translate过程
    return relayoutResult;
}
3.8 WMS -> relayout()
public int relayoutWindow(Session session, IWindow client, int seq, LayoutParams attrs, int requestedWidth, int requestedHeight, int viewVisibility, int flags, long frameNumber, Rect outFrame, Rect outOverscanInsets, Rect outContentInsets, Rect outVisibleInsets, Rect outStableInsets, Rect outOutsets, Rect outBackdropFrame, DisplayCutout.ParcelableWrapper outCutout, MergedConfiguration mergedConfiguration, Surface outSurface) {
        int result = 0;
        //...权限校验

        synchronized(mWindowMap) {
            WindowState win = windowForClientLocked(session, client, false);
            //...参数设置

            //根据view以及app状态判断是否需要relayout
            // We should only relayout if the view is visible, it is a starting window, or the associated appToken is not hidden.
            final boolean shouldRelayout = viewVisibility == View.VISIBLE && (win.mAppToken == null || win.mAttrs.type == TYPE_APPLICATION_STARTING || !win.mAppToken.isClientHidden());
            if (!shouldRelayout && winAnimator.hasSurface() && !win.mAnimatingExit) {
                result |= RELAYOUT_RES_SURFACE_CHANGED;
                if (!win.mWillReplaceWindow) {
                    //退出上一个页面的动画
                    focusMayChange = tryStartExitingAnimation(win, winAnimator, isDefaultDisplay, focusMayChange);
                }
            }

            // We may be deferring layout passes at the moment, but since the client is interested in the new out values right now we need to force a layout.
            mWindowPlacerLocked.performSurfacePlacement(true /* force */);

            if (shouldRelayout) {
                //会根据之前windowState的状态来调整过度动画,屏幕状态,以及surface大小等
                result = win.relayoutVisibleWindow(result, attrChanges, oldVisibility);

                try {
                    //创建SurfaceControl
                    result = createSurfaceControl(outSurface, result, win, winAnimator);
                } catch (Exception e) {
                    ...
                }
        //...
        //一些参数设置,状态更新
        return result;
    }

private int createSurfaceControl(Surface outSurface, int result, WindowState win, WindowStateAnimator winAnimator) {
    WindowSurfaceController surfaceController;
    // 创建surfaceController
    surfaceController = winAnimator.createSurfaceLocked(win.mAttrs.type, win.mOwnerUid);

    if (surfaceController != null) {
        surfaceController.getSurface(outSurface);
    } else {
        // For some reason there isn't a surface.  Clear the
        // caller's object so they see the same state.
        outSurface.release();
    }

    return result;
}
3.9 WindowStateAnimator -> createSurfaceLocked()
WindowSurfaceController createSurfaceLocked(int windowType, int ownerUid) {
    final WindowState w = mWin;

    ...

    mTmpSize.set(0, 0, 0, 0);
    // 计算Surface的大小
    calculateSurfaceBounds(w, attrs);
    final int width = mTmpSize.width();
    final int height = mTmpSize.height();

    ...
        // 创建WindowSurfaceController
        mSurfaceController = new WindowSurfaceController(mSession.mSurfaceSession, attrs.getTitle().toString(), width, height, format, flags, this, windowType, ownerUid);

        setOffsetPositionForStackResize(false);
        mSurfaceFormat = format;

        w.setHasSurface(true);

        ....
}
void getSurface(Surface outSurface) {
        outSurface.copyFrom(mSurfaceControl);
}
WindowSurfaceController初始化的时候会在内部创建一个SurfaceControl,
SurfaceControl会通过native方法得到一个native层的surfaceControl的指针。
WindowSurfaceController在getSurface的时候会调用Surface的copyFrom方法,通过刚刚获取到的surfaceControl的指针,创建一块surface,native层的surface指针存在outSurface中的mNativeObject里面,应用层就获取到了这块surface。
接下来继续执行performMeasure,layout,draw,activity就可以显示在屏幕上啦~
这一部分的整体流程如下:
最后,我们来关注几个问题
1.首先整理一下几个关键的类:
PhoneWindow:Window的实现类,放View的一个容器。是应用端的概念。
WindowState:同样代表window,是WMS端的概念。
DecorView :FrameLayout,是ViewTree的根布局。
ViewRootImpl:持有WindowSession对象,与WMS交互。同时,WMS持有IWindow对象,可以回调ViewRootImpl。
Choreographer:以消息的方式安排绘制,会在Vsync信号来临时执行performTravsals()。
2.View的requestLayout和invalidate
来看一下源码:
public void requestLayout() {
        ...
        //在这里设置了标志位PFLAG_FORCE_LAYOUT
        mPrivateFlags |= PFLAG_FORCE_LAYOUT;
        mPrivateFlags |= PFLAG_INVALIDATED;
        //会一直调用parent的requestLayout
        if (mParent != null && !mParent.isLayoutRequested()) {
            mParent.requestLayout();
        }
        ...
    }
发现在requestLayout中设置了两个标志位PFLAG_FORCE_LAYOUT和PFLAG_INVALIDATED。一直调用parent的requestLayout,最终会调用到ViewRootImpl,接下来就去执行measure()。
public final void measure(int widthMeasureSpec, int heightMeasureSpec) {
    ...
    //判断标志位
    final boolean forceLayout = (mPrivateFlags & PFLAG_FORCE_LAYOUT) == PFLAG_FORCE_LAYOUT;

    ...
    if (forceLayout || needsLayout) {
            ...
            //调用onMeasure方法
            onMeasure(widthMeasureSpec, height
            MeasureSpec);
            ...

        //设置PFLAG_LAYOUT_REQUIRED标记位,用于layout方法
        mPrivateFlags |= PFLAG_LAYOUT_REQUIRED;
    }
    ...
}
执行完onMeasure的时候会添加PFLAG_LAYOUT_REQUIRED,在layout()方法里面同样会判断标志位。
而invalidate方法没有标记PFLAG_FORCE_LAYOUT,所以不会执行测量和布局流程,也就是只会调用onDraw方法,不会调用onMeasure和onLayout方法。
3.连续调用requestLayout
在执行requestLayout()的时候会设置mTraversalScheduled作为flag,所以每次Vsync信号期间,只会发起一次重绘。


 471
471


 被折叠的 条评论
为什么被折叠?
被折叠的 条评论
为什么被折叠?
 到【灌水乐园】发言


