


一、概念
1、IOC:控制反转,是一种思想,【获得依赖对象的过程】被反转了,由IOC容器进行控制。
控制反转,控制权的转移,即应用程序本身不负责对依赖对象的创建和维护,而由外部容器负责创建和维护
2、DI:依赖注入,是IOC的一种实现,所谓依赖注入,就是由IOC容器在运行期间,动态将某种依赖关系注入到对象之中
3、spring官方给出的spring IOC 容器图

二、好处
1、不必自己创建对象、管理对象之间的依赖关系了
2、依赖注入能够将组件及其协作的其他组件解耦
三、实践
说明1:Bean容器初始化(即加载application.xml配置文件)
说明2:Spring应用上下文中所有的bean都会给定一个ID,默认为类名的第一个字母变为小写
1.1 bean发现、bean装配
最佳实践:
①尽可能的使用自动化配置机制,显示配置越少越好
②当你必须要显式配置bean的时候(比如,有些源码不是由你来维护的,而当你需要为这些代码配置bean的时候),我推荐使用类型安全并且比XML更加强大的JavaConfig。JavaConfig是更好的方案,因为它更为强大、类型安全并且对重构友好。
③只有当你想要使用便利的XML命名空间,并且在JavaConfig中没有同样的实现时,才应该使用XML。
1.1.1 方式1:在java代码中【显式】的配置
1、适用场景
- 想要将第三方类库装配到你的应用中:此时必须显示的配置
2、使用说明
- JavaConfig中不应该包含业务逻辑
- JavaConfig也不应该侵入到业务逻辑代码之中
- 通常会将JavaConfig放到单独的包中,使它与其他的应用程序逻辑分离开来,这样对于它的意图就不会产生困惑了
3、使用方式
1)发现并创建bean
- JavaConfig类需要适用@Configuration注解进行标记
@Configuration注解:表明这个类是一个配置类,该类应该包含在Spring应用上下文中如何创建bean的细节
@Bean注解:JavaConfig中创建一个方法,这个方法会创建所需类型的实例,然后给这个方法添加@Bean注解,方法中实现返回bean实例的逻辑,方法体返回了一个bean的实例。这里是使用Java来进行描述的,因此我们可以发挥Java提供的所有功能,只要最终生成一个bean实例即可
@Bean(name = "给bean一个id,而不使用默认值,默认值为修饰方法首字母小写")
package com.mzj.springframework.ioc._02_JavaConfig;

import org.springframework.context.annotation.Bean;
import org.springframework.context.annotation.ComponentScan;
import org.springframework.context.annotation.Configuration;

@Configuration
//@ComponentScan  //将隐式的自动扫码功能关闭,采用JavaConfig中显示的配置
public class CDPlayerConfig {

    @Bean
    public CompactDisc compactDisc() {
        return new SgtPeppers();
    }

    /**
     * 不推荐使用这种方式进行依赖注入:Spring会拦截对compactDisc()的调用并 确保返回的是Spring所创建的bean,也就是Spring本身在调 用compactDisc()时所创建的CompactDiscbean。
     *
     * 同时因为spring默认的bean是单例的,所以多次调用compactDisc()返回的是相同实例,这与看倒的代码不一致,所以不推荐
     * @return
     */
//    @Bean
//    public CDPlayer cdPlayer() {
//        return new CDPlayer(compactDisc());
//    }

    @Bean
    public CDPlayer cdPlayer(CompactDisc compactDisc) {//当 Spring调用cdPlayer()创建CDPlayer bean的时候,它会自动装配 一个CompactDisc到方法中。
        return new CDPlayer(compactDisc);
    }

}
2)注入
采用JavaConfig方式时,bean之间的依赖关系,spring会通过JavaConfig中带有@Bean的方法参数(依赖)在其容器中进行查找,并自动完成依赖的创建:
@Bean
    public CDPlayer cdPlayer(CompactDisc compactDisc) {//当 Spring调用cdPlayer()创建CDPlayer bean的时候,它会自动装配 一个CompactDisc到方法中。
        return new CDPlayer(compactDisc);
}1.1.2 方式2:基于注解的、【隐式】的、bean发现机制和自动装配
spring从组件扫描、自动装配来实现自动化装配。
1、组件扫描:spring会自动发现应用上下文中创建的bean
2、自动装配:spring自动建立bean之间的依赖
组件扫描
1、通过注释标记类:告知Spring要为这个类创建bean
@Component注解:这个简单的注解表明该类会作为组件类,并告知Spring要为这个类创建bean。
- @Component("给bean一个id,而不使用默认值")
2、在Spring中启用组件扫描
@ComponentScan注解:在Spring中启用组件扫描。让spring去寻找带有@Component注解的类
- @ComponentScan("pictureeditor.gdi"):扫描包
- @ComponentScan(basePackages="pictureeditor.gdi"):扫描包
- @ComponentScan(basePackages={"pictureeditor.gdi","package2"}):扫描多个包
- @ComponentScan(basePackageClasses={A.class,B.class}):除了将包设置为简单的String类型之外,还可以设置扫描指定类,这些类所在的包将会作为组件扫描的基础包,可以在包中创建一个用来进行扫描的空标记接口以防止扫描的业务类以后被去掉
|
如果没有其他配置的话,
@ComponentScan
默认会扫描与配置类相 同的包。因为CDPlayerConfig
类位于
soundsystem
包中,因此Spring将会扫描这个包以及这个包下的所有子包,查找带有@Component
注解的类。
|
<?xml version="1.0" encoding="UTF-8"?>
<beans xmlns="http://www.springframework.org/schema/beans"
  xmlns:xsi="http://www.w3.org/2001/XMLSchema-instance"
  xmlns:context="http://www.springframework.org/schema/context"
  xmlns:c="http://www.springframework.org/schema/c"
  xmlns:p="http://www.springframework.org/schema/p"
  xsi:schemaLocation="http://www.springframework.org/schema/beans http://www.springframework.org/schema/beans/spring-beans.xsd
		http://www.springframework.org/schema/context http://www.springframework.org/schema/context/spring-context.xsd">

  <context:component-scan base-package="pictureeditor.gdi" />

</beans>
自动装配
说明1:自动装配就是让Spring自动满足bean依赖的一种方法,在满足依赖的过程中,会在Spring应用上下文中寻找匹配某个bean需求的其他bean
说明2:不管是构造器、Setter方法还是其他的方法,Spring都会尝试满足方法参数上所声明的依赖。
说明3:装配规则①假如有且只有一个bean匹配依赖需求的话,那么这个bean将会被装配进来;②如果没有匹配的bean,那么在应用上下文创建的时候,Spring会抛出一个异常。为了避免异常的出现,你可以将@Autowired的required属性设置为false;③如果有多个bean都能满足依赖关系的话,Spring将会抛出一个异常,表明没有明确指定要选择哪个bean进行自动装配
@Autowired注解
- @Autowired(required = false)避免找不到依赖时spring抛出异常:把required属性设置为false时,你需要谨慎对待。如果在你的代码中没有进行null检查的话,这个处于未装配状态的属性 有可能会出现NullPointerException
方式:为了声明要进行自动装配,我们可以借助Spring的”@Autowired注解“
1、可以使用在构造器上如:
package com.mzj.springframework.ioc._01_componentScan;
import org.springframework.beans.factory.annotation.Autowired;
import org.springframework.stereotype.Component;

@Component
public class CDPlayer implements MediaPlayer {

  private CompactDisc cd;

  @Autowired
  public CDPlayer(CompactDisc cd) {
    this.cd = cd;
  }

  public void play() {
    cd.play();
  }

}
2、可以使用在set方法上:注意,这里@Autowired注解应用的set方法可以随意命名,不一定叫setXXX

特殊说明:@Autowired与@Component注解是spring的注解,可以使用java的依赖注入规范中注解:@Inject与@Named注解代替,以减少与spring的偶合程度。spring同时支持@Autowired与@Component、@Inject与@Named,@Inject和@Autowired之间有着一些细微的差别,但是在大多数场景下,它们都是可以互相替换的。在@Inject和@Autowired中,我没有特别强烈的偏向性。实际上,在有的项目中,我会发现我同时使用了这两个注解。

1.1.3 方式3:直接在spring配置文件中【显式】配置bean
1、适用场景
- 想要将第三方类库装配到你的应用中:此时必须显示的配置
- 基于XML的配置是spring最初提供的配置方式,针对一些已有系统,大部分使用XML进行配置
2、使用说明
- 缺点:XML配置并不能在编译器检查配置信息的正确性:通过借助IDE可以检查
3、使用方式
1)发现并创建bean
配置文件通过使用<bean>元素并指定class属性
spring-ioc.xml
<?xml version="1.0" encoding="UTF-8"?>
<beans xmlns="http://www.springframework.org/schema/beans"
    xmlns:xsi="http://www.w3.org/2001/XMLSchema-instance"
    xsi:schemaLocation="http://www.springframework.org/schema/beans
        http://www.springframework.org/schema/beans/spring-beans.xsd" >

	<bean id="oneInterface" class="com.mzj.springframework.ioc.interfaces.OneInterfaceImpl"></bean>

 </beans>
OneInterfaceImpl.java
package com.mzj.springframework.ioc.interfaces;

public class OneInterfaceImpl implements OneInterface {

	public void say(String arg) {
		System.out.println("ServiceImpl say: " + arg);
	}

}
OneInterface.java
package com.mzj.springframework.ioc.interfaces;

public interface OneInterface {
	public void say(String arg);
}
2)注入
在XML中声明DI时,会有多种可选的配置方案和风格:构造器注入、设置注入
最佳实践:对强依赖使用构造器注入,而对可选性的依赖使用设置注入
①构造器注入:
方式1:<constructor-arg>元素
bean对象注入:ref属性,通过引用bean的id,实现构造器注入
字面值注入:value属性:通过直接设置字符串,实现字符串构造器注入
<?xml version="1.0" encoding="UTF-8"?>
<beans xmlns="http://www.springframework.org/schema/beans"
       xmlns:xsi="http://www.w3.org/2001/XMLSchema-instance"
       xsi:schemaLocation="http://www.springframework.org/schema/beans http://www.springframework.org/schema/beans/spring-beans.xsd">

    <bean id="compactDisc" class="com.mzj.springframework.ioc._03_XmlConfig.SgtPeppers" />

    <bean id="mediaPlayer" class="com.mzj.springframework.ioc._03_XmlConfig.CDPlayer">
        <constructor-arg ref="compactDisc" />
        <constructor-arg value="abc" />
    </bean>

</beans>
涉及的类、接口均没有spring相关注解
方式2:使用Spring 3.0所引入的c-命名空间:作为<constructor-arg>元素的替代方案
bean对象注入:【c:cd-ref】,其中cd是构造函数参数名
字面值注入:【c:str="abcd"】,其中str是构造函数参数名
<?xml version="1.0" encoding="UTF-8"?>
<beans xmlns="http://www.springframework.org/schema/beans"
       xmlns:xsi="http://www.w3.org/2001/XMLSchema-instance"
       xmlns:c="http://www.springframework.org/schema/c"
       xsi:schemaLocation="http://www.springframework.org/schema/beans http://www.springframework.org/schema/beans/spring-beans.xsd">

    <bean id="compactDisc" class="com.mzj.springframework.ioc._03_XmlConfig.SgtPeppers"/>

    <bean id="mediaPlayer" class="com.mzj.springframework.ioc._03_XmlConfig.CDPlayer"
          c:cd-ref="compactDisc" c:str="abcd">
    </bean>

</beans>
其中【c:cd-ref】还有其他表达方式:


字面值注入也具有通过构造器参数列表顺序号、省略顺序号的使用特性。
以上两种构造器注入的方式<constructor-arg>缺点:冗长,c-命名空间缺点:支持的功能要比前者少:装配集合上:在装配集合方面,<constructor-arg>比c-命名空间的属性更有优势。目前,使用c-命名空间的属性无法实现装配集合的功能。
装配集合
<?xml version="1.0" encoding="UTF-8"?>
<beans xmlns="http://www.springframework.org/schema/beans"
       xmlns:xsi="http://www.w3.org/2001/XMLSchema-instance"
       xmlns:c="http://www.springframework.org/schema/c"
       xsi:schemaLocation="http://www.springframework.org/schema/beans http://www.springframework.org/schema/beans/spring-beans.xsd">

    <bean id="sgtPeppers" class="com.mzj.springframework.ioc._03_XmlConfig.collection.SgtPeppers"/>

    <bean id="mediaPlayer" class="com.mzj.springframework.ioc._03_XmlConfig.collection.CDPlayer4Collection">
        <constructor-arg value="abcde"/>
        <constructor-arg>
            <list>
                <value>12</value>
                <value>34</value>
                <value>56</value>
            </list>
        </constructor-arg>
        <constructor-arg>
            <list>
                <ref bean="sgtPeppers" />
                <ref bean="sgtPeppers" />
                <ref bean="sgtPeppers" />
            </list>
        </constructor-arg>
    </bean>

</beans>
package com.mzj.springframework.ioc._03_XmlConfig.collection;

import com.mzj.springframework.ioc._03_XmlConfig.MediaPlayer;

import java.util.List;

public class CDPlayer4Collection implements MediaPlayer {

  private String str;

  private List<String> stringList;

  private List<SgtPeppers> sgtPeppersList;

  public CDPlayer4Collection(String str, List<String> stringList, List<SgtPeppers> sgtPeppersList) {
    this.stringList = stringList;
    this.str = str;
    this.sgtPeppersList = sgtPeppersList;
  }

  public void play() {
    System.out.println(stringList);
    System.out.println(sgtPeppersList);
  }

}
package com.mzj.springframework.ioc._03_XmlConfig.collection;

public class SgtPeppers {

  private String title = "title for collection";
  private String artist = "The Beatles";

  public String toString() {
    return "Playing " + title + " by " + artist + this.hashCode();
  }

}
测试代码:
package com.mzj.springframework.ioc._03_XmlConfig;

import com.mzj.springframework.ioc._03_XmlConfig.collection.CDPlayer4Collection;
import org.springframework.context.support.ClassPathXmlApplicationContext;

/**
 * @Auther: mazhongjia
 * @Date: 2020/3/10 16:08
 * @Version: 1.0
 */
public class ConstructorArgCollectionMain {
    public static void main(String[] args) {
        ClassPathXmlApplicationContext classPathXmlApplicationContext = new ClassPathXmlApplicationContext("com/mzj/springframework/ioc/_03_XmlConfig/cdplayer-config4Collection.xml");
        CDPlayer4Collection cdPlayer4Collection = (CDPlayer4Collection) classPathXmlApplicationContext.getBean("mediaPlayer");
        cdPlayer4Collection.play();
    }
}
输出结果

可见,装配集合如果是对象引用,则默认对象是单例的。
除了<List>,也可以使用<set>
②设置注入(通过setter方法):
方式1:<property>元素
<?xml version="1.0" encoding="UTF-8"?>
<beans xmlns="http://www.springframework.org/schema/beans"
       xmlns:xsi="http://www.w3.org/2001/XMLSchema-instance"
       xsi:schemaLocation="http://www.springframework.org/schema/beans http://www.springframework.org/schema/beans/spring-beans.xsd">

    <bean id="compactDisc" class="com.mzj.springframework.ioc._03_XmlConfig.setter.SgtPeppers"/>

    <bean id="mediaPlayer" class="com.mzj.springframework.ioc._03_XmlConfig.setter.CDPlayer">
<!--        其中name值对应CDPlayer类中有set方法的属性名称        -->
        <property name="cd" ref="compactDisc"/>
    </bean>

</beans>
测试代码:
package com.mzj.springframework.ioc._03_XmlConfig;

import com.mzj.springframework.ioc._03_XmlConfig.setter.CDPlayer;
import org.springframework.context.support.ClassPathXmlApplicationContext;

/**
 * @Auther: mazhongjia
 * @Date: 2020/3/10 16:08
 * @Version: 1.0
 */
public class SetterMain {
    public static void main(String[] args) {
        ClassPathXmlApplicationContext classPathXmlApplicationContext = new ClassPathXmlApplicationContext("com/mzj/springframework/ioc/_03_XmlConfig/setter/cdplayer-config.xml");
//        ClassPathXmlApplicationContext classPathXmlApplicationContext = new ClassPathXmlApplicationContext("soundsystem/ConstructorArgReferenceTest-context.xml");
        CDPlayer cdPlayer = (CDPlayer) classPathXmlApplicationContext.getBean("mediaPlayer");
        cdPlayer.play();
    }
}
涉及到的bean:
package com.mzj.springframework.ioc._03_XmlConfig.setter;

public class CDPlayer {

    private SgtPeppers cd;

    public void setCd(SgtPeppers cd) {
        this.cd = cd;
    }

    public void play() {
        cd.play();
    }

}
package com.mzj.springframework.ioc._03_XmlConfig.setter;

public class SgtPeppers {

    private String title = "Sgt. Pepper's Lonely Hearts Club Band";
    private String artist = "The Beatles";

    public void play() {
        System.out.println("Playing " + title + " by " + artist);
    }

}
测试结果:

方式2:p-命名空间,作为<property>元素的替代方案
与构造器注入替代方案类似,语法如下:

设置注入也可以注入字面量、list、set等特性,这与构造器参数非常类似(以上property元素、p-命名空间两种方式都支持,其中注入集合命名空间不支持),这里略,方式为:
 <property name="str" value="abc"/>
 <property name="list1">
    <list>
        <value>12</value>
        <value>34</value>
        <value>56</value>
    </list>
 </property>
扩展:虽然,不能使用命令空间注入集合,但是可以使用Spring util-命名空间中的一些功能来简化:util-命名空间所提供的功能之一就是<util:list>元素,它会创建一个列表的bean。
示例略。
1.1.4 混合配置
1、最佳实践:实际项目中,经常同时将【自动化配置】和【显示配置】混合在一起使用,即便你更喜欢通过JavaConfig实现显式配置,但有时候XML却是最佳方案。
2、混合配置过程中需要了解的知识点:
- spring中,这些配置都不是互斥的。同时至少需要通过一个显示配置来启动组件扫描和自动装配。
- 自动装配(Autowired)、JavaConfig中通过@Bean注解的方法接受的参数(JavaConfig方式的依赖注入bean的创建),并不在意要装配的bean的发现/创建方式:
- ①通过组件扫描获得的:XML<context:component-scan>或者JavaConfig的@ComponentScan注解
- ②通过JavaConfig配置的——@Bean注解
- ③通过XML中配置的——<bean>标签
- JavaConfig中使用@Import和@ImportResource来拆分JavaConfig类(当一个JavaConfig类过于庞大)
- JavaConfig中引用JavaConfig配置:
- 在@Configuration类中通过@Import(XXX.class,YYY.class)注解引入其他JavaConfig类
- 方式1:在Configuration类B中import依赖的Configuration类A
- 示例代码:com.mzj.springframework.ioc._04_MixConfig.JavaConfigImportJavaConfig._1
- 方式2:创建一个更高级别的Configuration类C,在类C中importA与B
- 示例代码:com.mzj.springframework.ioc._04_MixConfig.JavaConfigImportJavaConfig._2
- 方式1:在Configuration类B中import依赖的Configuration类A
- 在@Configuration类中通过@Import(XXX.class,YYY.class)注解引入其他JavaConfig类
- JavaConfig中引用XML配置:
- 在@Configuration类中通过@ImportResource(“classpath:XXX.xml”)注解引入其他XML
- 代码示例:com.mzj.springframework.ioc._04_MixConfig.JavaConfigImportXml
- 在@Configuration类中通过@ImportResource(“classpath:XXX.xml”)注解引入其他XML
- XML配置中可以使用<import>元素来拆分XML配置(当一个XML过于庞大)
- XML配置中引用JavaConfig配置
- 通过<import>标签只能引入其他XML配置
- 通过<bean>标签可以引入其他JavaConfig配置
- 代码示例:com.mzj.springframework.ioc._04_MixConfig.XmlImportJavaConfig
3、混合配置最佳实践:
1.2 依赖包
    <dependency>
      <groupId>org.springframework</groupId>
      <artifactId>spring-beans</artifactId>
      <version>${springframe.version}</version>
    </dependency>

    <dependency>
      <groupId>org.springframework</groupId>
      <artifactId>spring-context</artifactId>
      <version>${springframe.version}</version>
    </dependency>

    <dependency>
      <groupId>org.springframework</groupId>
      <artifactId>spring-test</artifactId>
      <version>${springframe.version}</version>
    </dependency>
1.3 Spring配置文件加载方式
方式1:本地文件
FileSystemXmlApplicationContext context = new FileSystemXmlApplicationContext("E:\\workspace\\springframeworkbeginner\\src\\main\\resources\\spring-ioc.xml"); 方式2:放在classpath下
ClassPathXmlApplicationContext context = new ClassPathXmlApplicationContext("classpath:spring-context.xml");方式3:web应用中依赖servlet或者listener进行加载

1.4 bean的高级装配
1.4.1 环境与profile
本小节示例代码:com.mzj.springframework.ioc._05_advance.profile
1、解决的问题:在不同的环境中某个bean会有所不同,采用不同实现:生产环境使用数据源为通过jndi注入的数据源,而开发环境使用H2数据源。
解决了Spring bean要跨各种部署环境的通用问题,在运行时,通过将环境相关的bean与当前激活的 profile进行匹配,Spring能够让相同的部署单元跨多种环境运行,而 不需要进行重新构建。
2、解决方案:配置profile bean
3、原理:spring3.1版本开始支持bean profile的功能,这里的bean profile是逻辑上的概念,不同的bean profile代表不同环境,如生产、开发,要使用profile,你首先要将所有不同的bean定义整理到一个或多个profile之中,在将应用部署到每个环境时,要确保对应的profile处于激活(active)的状态。没有指定profile的bean始终都会被创建,与激活哪个profile没有关系;
4、激活profile
-
如果设置了spring.profiles.active属性的话,那么它的值就会用来确定哪个profile 是激活的。
-
但如果没有设置spring.profiles.active属性的话,那Spring 将会查找 spring.profiles.default 的值
-
如果 spring.profiles.active 和 spring.profiles.default均没有设置的话,那就没有激活的profile ,因此只会创建那些没有定义在profile 中的 bean
-
设置上述属性方式如下:
- 作为DispatcherServlet的初始化参数;
- 作为Web应用的上下文参数;
- 作为JNDI条目;
- 作为环境变量;
- 作为JVM的系统属性;
- 在集成测试类上,使用@ActiveProfiles注解设置
5、使用(JavaConfig):
- JavaConfig进行配置时通过在Configuration增加类级别的@Profile("XXX")注解,标识出这个配置中创建的bean只有在XXX profile激活时才会创建,其中XXX为dev、prod等代表不同环境的字符串;然后通过上述激活方式(其中之一)在运行时设置(激活)当前环境。
package com.mzj.springframework.ioc._05_advance.profile;

import org.springframework.context.annotation.Bean;
import org.springframework.context.annotation.Configuration;
import org.springframework.context.annotation.Profile;
import org.springframework.jdbc.datasource.embedded.EmbeddedDatabase;
import org.springframework.jdbc.datasource.embedded.EmbeddedDatabaseBuilder;
import org.springframework.jdbc.datasource.embedded.EmbeddedDatabaseType;

import javax.sql.DataSource;

@Configuration
@Profile("dev")
public class DevelopmentProfileConfig {

    @Bean
    public DataSource dataSource(){
        EmbeddedDatabase embeddedDatabase = new EmbeddedDatabaseBuilder()
                .setType(EmbeddedDatabaseType.H2)
                .addScript("classpath:com/mzj/springframework/ioc/_05_advance/schema.sql")
                .addScript("classpath:com/mzj/springframework/ioc/_05_advance/test-data.sql")
                .build();
        return embeddedDatabase;
    }
}
package com.mzj.springframework.ioc._05_advance.profile;

import org.springframework.context.annotation.Bean;
import org.springframework.context.annotation.Configuration;
import org.springframework.context.annotation.Profile;
import org.springframework.jdbc.datasource.embedded.EmbeddedDatabase;
import org.springframework.jdbc.datasource.embedded.EmbeddedDatabaseBuilder;
import org.springframework.jdbc.datasource.embedded.EmbeddedDatabaseType;
import org.springframework.jndi.JndiObjectFactoryBean;

import javax.sql.DataSource;

@Configuration
@Profile("prod")
public class ProductionProfileConfig {

    @Bean
    public DataSource dataSource() {
        JndiObjectFactoryBean jndiObjectFactoryBean = new JndiObjectFactoryBean();
        jndiObjectFactoryBean.setJndiName("jdbc/myDS");
        jndiObjectFactoryBean.setResourceRef(true);
        jndiObjectFactoryBean.setProxyInterface(DataSource.class);
        return (DataSource) jndiObjectFactoryBean.getObject();
    }
}
package com.mzj.springframework.ioc._05_advance.profile;

import org.springframework.context.annotation.Configuration;
import org.springframework.context.annotation.Import;

@Configuration
@Import({DevelopmentProfileConfig.class,ProductionProfileConfig.class})
public class AllInOneConfig {

}
测试代码:
package com.mzj.springframework.ioc._05_advance.profile;

import org.junit.Test;
import org.junit.runner.RunWith;
import org.springframework.beans.factory.annotation.Autowired;
import org.springframework.test.context.ActiveProfiles;
import org.springframework.test.context.ContextConfiguration;
import org.springframework.test.context.junit4.SpringJUnit4ClassRunner;

import javax.sql.DataSource;

public class DataSourceConfigTest {

  @RunWith(SpringJUnit4ClassRunner.class)
  @ContextConfiguration(classes=AllInOneConfig.class)

  @ActiveProfiles("dev")
  public static class DevDataSourceTest {

    @Autowired
    private DataSource dataSource;

    @Test
    public void shouldBeEmbeddedDatasource() {
      System.out.println(dataSource);
    }
  }

}
测试结果:

- spring3.1只能在类上使用@Profile注解,从spring3.2开始,可以在方法级别使用@Profile注解:
package com.myapp;

import javax.sql.DataSource;

import org.springframework.context.annotation.Bean;
import org.springframework.context.annotation.Configuration;
import org.springframework.context.annotation.Profile;
import org.springframework.jdbc.datasource.embedded.EmbeddedDatabaseBuilder;
import org.springframework.jdbc.datasource.embedded.EmbeddedDatabaseType;
import org.springframework.jndi.JndiObjectFactoryBean;

@Configuration
public class DataSourceConfig {

  @Bean
  @Profile("dev")
  public DataSource embeddedDataSource() {
    return new EmbeddedDatabaseBuilder()
        .setType(EmbeddedDatabaseType.H2)
        .addScript("classpath:schema.sql")
        .addScript("classpath:test-data.sql")
        .build();
  }

  @Bean
  @Profile("prod")
  public DataSource jndiDataSource() {
    JndiObjectFactoryBean jndiObjectFactoryBean = new JndiObjectFactoryBean();
    jndiObjectFactoryBean.setJndiName("jdbc/myDS");
    jndiObjectFactoryBean.setResourceRef(true);
    jndiObjectFactoryBean.setProxyInterface(javax.sql.DataSource.class);
    return (DataSource) jndiObjectFactoryBean.getObject();
  }

}- 通过<beans>元素的profile属性,注意,这里时beans元素的属性,而不是bean
-
还可以在根 <beans> 元素中嵌套定义 <beans> 元素,而不是为每个环境都创建一个profile XML 文件。这能够将所有的 profile bean 定义放到同一个XML 文件中:
<?xml version="1.0" encoding="UTF-8"?>
<beans xmlns="http://www.springframework.org/schema/beans"
  xmlns:xsi="http://www.w3.org/2001/XMLSchema-instance" xmlns:jdbc="http://www.springframework.org/schema/jdbc"
  xmlns:jee="http://www.springframework.org/schema/jee" xmlns:p="http://www.springframework.org/schema/p"
  xsi:schemaLocation="
    http://www.springframework.org/schema/jee
    http://www.springframework.org/schema/jee/spring-jee.xsd
    http://www.springframework.org/schema/jdbc
    http://www.springframework.org/schema/jdbc/spring-jdbc.xsd
    http://www.springframework.org/schema/beans
    http://www.springframework.org/schema/beans/spring-beans.xsd">

  <beans profile="dev">
    <jdbc:embedded-database id="dataSource" type="H2">
      <jdbc:script location="classpath:schema.sql" />
      <jdbc:script location="classpath:test-data.sql" />
    </jdbc:embedded-database>
  </beans>

  <beans profile="prod">
    <jee:jndi-lookup id="dataSource"
      lazy-init="true"
      jndi-name="jdbc/myDatabase"
      resource-ref="true"
      proxy-interface="javax.sql.DataSource" />
  </beans>
</beans>- 所有的配置文件都会放到部署单元之中(如WAR文件),但是只有profile属性与当前激活profile相匹配的配置文件才会被用到
8、扩展:配置多个生效的profile
- spring.profiles.active和spring.profiles.default设置多个profile名称时,以逗号分隔。
- 当然,同时启用dev和prod profile可能也没有太大的意义,不过你可以同时设置多个彼此不相关的profile
1.4.2 条件化的bean
1、解决问题
更多、更细粒度的控制一个bean的创建条件
Profile bean是在运行时条件化创建bean的一种方式,但是Spring 4提供了一种更为通用的方式,通过这种方式能够声明某些bean的创建与否要依赖于给定条件的输出结果。结合使用@Conditional注解和 Spring Condition接口的实现,能够为开发人员提供一种强大和灵活的机制,实现条件化地创建bean。
2、Spring版本:4.0以上
3、使用方式
@Conditional注解:可以用到带有@Bean注解的方法上使用,可以给@Conditional注解设置一个实现Condition接口的类的class参数,Condition接口唯一的方法为:
boolean matches(ConditionContext context, AnnotatedTypeMetadata metadata);- 如果matches()方法返回true,那么就会创建带有@Conditional注解的bean。如果matches()方法返回false,将不会创建这些bean。
- 通过matches()方法参数获取到的信息可以用来实现该方法的逻辑
- ConditionContext接口:条件上下文,可以获取如下信息
package org.springframework.context.annotation;

import org.springframework.beans.factory.config.ConfigurableListableBeanFactory;
import org.springframework.beans.factory.support.BeanDefinitionRegistry;
import org.springframework.core.env.Environment;
import org.springframework.core.io.ResourceLoader;

/**
 * Context information for use by {@link Condition}s.
 *
 * @author Phillip Webb
 * @author Juergen Hoeller
 * @since 4.0
 */
public interface ConditionContext {

	/**
	 * Return the {@link BeanDefinitionRegistry} that will hold the bean definition
	 * should the condition match, or {@code null} if the registry is not available.
	 */
	BeanDefinitionRegistry getRegistry();

	/**
	 * Return the {@link ConfigurableListableBeanFactory} that will hold the bean
	 * definition should the condition match, or {@code null} if the bean factory
	 * is not available.
	 */
	ConfigurableListableBeanFactory getBeanFactory();

	/**
	 * Return the {@link Environment} for which the current application is running,
	 * or {@code null} if no environment is available.
	 */
	Environment getEnvironment();

	/**
	 * Return the {@link ResourceLoader} currently being used, or {@code null} if
	 * the resource loader cannot be obtained.
	 */
	ResourceLoader getResourceLoader();

	/**
	 * Return the {@link ClassLoader} that should be used to load additional classes,
	 * or {@code null} if the default classloader should be used.
	 */
	ClassLoader getClassLoader();

}
| 接口方法说明:
|
-
AnnotatedTypeMetadata接口: 能够让我们检查带有 @Bean 注解的方法上还有什么其他的注解
public interface AnnotatedTypeMetadata {

	boolean isAnnotated(String annotationName);

	Map<String, Object> getAnnotationAttributes(String annotationName);

	Map<String, Object> getAnnotationAttributes(String annotationName, boolean classValuesAsString);

	MultiValueMap<String, Object> getAllAnnotationAttributes(String annotationName);

	MultiValueMap<String, Object> getAllAnnotationAttributes(String annotationName, boolean classValuesAsString);

}
| 接口方法说明:
|
4、扩展
之前提到的@Profile注解,Spring4进行了重构,新的实现就是通过@Conditional注解实现的:
@Target({ElementType.TYPE, ElementType.METHOD})
@Retention(RetentionPolicy.RUNTIME)
@Documented
@Conditional(ProfileCondition.class)
public @interface Profile {

	/**
	 * The set of profiles for which the annotated component should be registered.
	 */
	String[] value();

}
其中的ProfileCondition:
/*
 * Copyright 2002-2013 the original author or authors.
 *
 * Licensed under the Apache License, Version 2.0 (the "License");
 * you may not use this file except in compliance with the License.
 * You may obtain a copy of the License at
 *
 *      http://www.apache.org/licenses/LICENSE-2.0
 *
 * Unless required by applicable law or agreed to in writing, software
 * distributed under the License is distributed on an "AS IS" BASIS,
 * WITHOUT WARRANTIES OR CONDITIONS OF ANY KIND, either express or implied.
 * See the License for the specific language governing permissions and
 * limitations under the License.
 */

package org.springframework.context.annotation;

import org.springframework.core.type.AnnotatedTypeMetadata;
import org.springframework.util.MultiValueMap;

/**
 * {@link Condition} that matches based on the value of a {@link Profile @Profile}
 * annotation.
 *
 * @author Chris Beams
 * @author Phillip Webb
 * @author Juergen Hoeller
 * @since 4.0
 */
class ProfileCondition implements Condition {

	@Override
	public boolean matches(ConditionContext context, AnnotatedTypeMetadata metadata) {
		if (context.getEnvironment() != null) {
			MultiValueMap<String, Object> attrs = metadata.getAllAnnotationAttributes(Profile.class.getName());
			if (attrs != null) {
				for (Object value : attrs.get("value")) {
					if (context.getEnvironment().acceptsProfiles(((String[]) value))) {
						return true;
					}
				}
				return false;
			}
		}
		return true;
	}

}
1.4.3 处理自动装配的歧义性
1、解决问题
使用spring自动装配时,如果不仅有一个bean能够匹配结果的话Spring会抛出NoUniqueBeanDefinitionException
2、其他说明
更常见的情况是给定的类型只有一个实现类,因此自动装配能够很好地运行
3、原理
当确实发生歧义性的时候,Spring提供了多种可选方案来解决这样的问题。你可以将可选bean中的某一个设为首选(primary)的

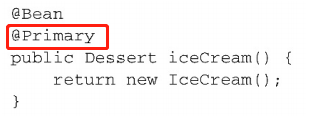
方式3:通过<bean>元素的primary属性进行设置( 自动装配+XML配bean置使用)

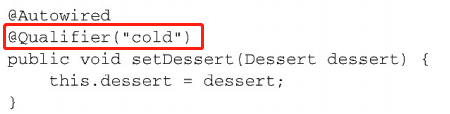
方式:@Qualifier注解:与@Autowired和@Inject协同使用

@Autowired
@Qualifier("${beanName}")
private MyBean myBean;
),但是这种设置是不生效的,可以使用@Resources注解,并使用name属性替代@Autowired+@Qualifier:
1)通过@Resources注解自动注入,并设置name属性指定唯一实现,属性值读取配置文件的transport.type属性
@Resource(name="${transport.type}")
private GDITransport gdiTransport;
2)引入外部配置文件
方式一:单独一个配置类读取配置项
@Component
@PropertySource({"classpath:gdiAttribute.properties"})
public class GdiAttribute {

    @Value("${transport.type}")
    private String transportType;

     public String getTransportType() {
        return transportType;
    }
}
方式二:在JavaConfig类中读取配置项
@Configuration
@PropertySource(value= {"classpath:/gdiAttribute.properties"})
public class JavaConfig {

...
}
3)在不同实现类中设置bean的唯一ID
@Service(value = "tcp")
@Slf4j
public class TcpTransport extends AbstractGDITransport {
    ...
}
4)在gdiAttribute.properties配置文件中设置配置项值:
#传输类型
transport.type=http
这样,就可以通过修改外部配置文件,来在不同环境中应用不同的Service实现了。。
说明:其实@Qualifier注解的参数是一个复杂的限定符:
-
如果没有指定其他的限定符的话,所有的bean都会给定一个默认的限定符,这个限定符与 bean 的 ID 相同
-
缺点:如果类改名,会导致致限定符失效
-
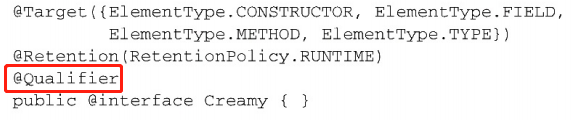
- 使用自定义的限定符:可以为bean设置自己的限定符,而不是依赖于将bean ID作为限定符。在这里所需要做的就是在bean声明上添加@Qualifier注解:

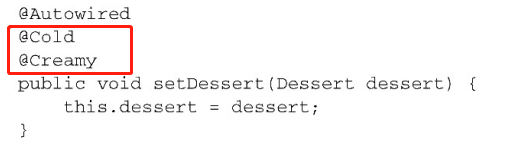
- 使用自定义的限定符注解:原理:一个自定义注解,使用@Qualifier注解进行修饰使之成为一个自定义的限定符注解,可以根据bean的特征,分别定义不同的自定义的限定符注解,然后用这些注解对bean进行修饰,得到bean修饰与注入时的唯一性
- 使用自定义的限定符存在问题:如果多个bean都具备相同特性的话会自定义相同名称的限定符,又会造成歧义了
此时,增加新的特性使之可以区分,并将特性定义成自定义的限定符注解:


1.4.4 bean的作用域(生命周期)
本小节示例代码: com.mzj.springframework.ioc._05_advance.scope
1、解决问题
一个bean对象,使用(可见)范围
2、作用域种类
- 单例(Singleton):在整个应用中,只创建bean的一个实例。
- 原型(Prototype):每次注入或者通过Spring应用上下文获取的时候,都会创建一个新的bean实例。
- 会话(Session):在Web应用中,为每个会话创建一个bean实例。
- 请求(Rquest):在Web应用中,为每个请求创建一个bean实例。
3、其他说明
- bean默认:单例,不管给定的一个bean被注入到其他bean多少次,每次所注入的都是同一个实例
- 类如果保持一些状态,重用是不安全的,就要定义为其他作用域类型
4、使用方式
默认是singleton,如果要选择其他作用域,要使用@Scope注解,可以在使用@Component或@Bean的地方一起使用@Scope注解:
1)发现bean的方式为:组件扫描时
<?xml version="1.0" encoding="UTF-8"?>
<beans xmlns="http://www.springframework.org/schema/beans"
       xmlns:xsi="http://www.w3.org/2001/XMLSchema-instance"
       xmlns:context="http://www.springframework.org/schema/context"
       xsi:schemaLocation="http://www.springframework.org/schema/beans http://www.springframework.org/schema/beans/spring-beans.xsd
		http://www.springframework.org/schema/context http://www.springframework.org/schema/context/spring-context.xsd">

    <context:component-scan base-package="com.mzj.springframework.ioc._05_advance.scope" />

</beans>
@Component(value = "myBean1234")
@Scope(ConfigurableBeanFactory.SCOPE_PROTOTYPE)
public class MyBeanPrototype {
}package com.mzj.springframework.ioc._05_advance.scope;
import org.springframework.stereotype.Component;
@Component(value = "myBean123")
public class MyBean {
}
也可以使用@Scope("prototype"),但是使用SCOPE_PROTOTYPE常量更 加安全并且不易出错
package com.mzj.springframework.ioc._05_advance.scope;

import org.springframework.context.support.ClassPathXmlApplicationContext;

//@RunWith(SpringJUnit4ClassRunner.class)
//@ContextConfiguration(locations = { "classpath*:com/mzj/springframework/ioc/_05_advance/scope/scope.xml" })
public class ScopeTest {

//    @Autowired
//    private MyBean myBean;
//
//    @Test
//    public void testScope(){
//
//    }

    public static void main(String[] args) {
        ClassPathXmlApplicationContext classPathXmlApplicationContext = new ClassPathXmlApplicationContext("com/mzj/springframework/ioc/_05_advance/scope/scope.xml");
        MyBean myBean1 = (MyBean) classPathXmlApplicationContext.getBean("myBean123");
        System.out.println(myBean1);
        MyBean myBean2 = (MyBean) classPathXmlApplicationContext.getBean("myBean123");
        System.out.println(myBean2);

        MyBeanPrototype myBeanPrototype1 = (MyBeanPrototype) classPathXmlApplicationContext.getBean("myBean1234");
        System.out.println(myBeanPrototype1);
        MyBeanPrototype myBeanPrototype2 = (MyBeanPrototype) classPathXmlApplicationContext.getBean("myBean1234");
        System.out.println(myBeanPrototype2);;
    }

}
输出:
com.mzj.springframework.ioc._05_advance.scope.MyBean@192d3247
com.mzj.springframework.ioc._05_advance.scope.MyBean@192d3247
com.mzj.springframework.ioc._05_advance.scope.MyBeanPrototype@3ecd23d9
com.mzj.springframework.ioc._05_advance.scope.MyBeanPrototype@569cfc36
2)发现bean的方式为:JavaConfig时
在Configuration类的@Bean方法增加@Scope注解:

3)发现bean的方式为:XML时
使用<bean>元素的scope属性来设置作用域:

5、扩展
1)Web应用的两个作用域:使用会话和请求作用域
=====下面以session进行说明,请求作用域(request)也类似=====
<dependency>
<groupId>org.springframework</groupId>
<artifactId>spring-web</artifactId>
<version>${springframe.version}</version>
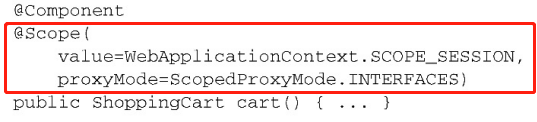
</dependency>proxyMode属性:
proxyMode=ScopedProxyMode.INTERFACES,这个属性解决了将会话或请求作用域的bean注入到单例bean中所遇到的问题:
问题:比如一个singleten级别的beanA依赖这个session级别的ShoppingCart类,在spring容器启动时会创建类A的实例,此时还不能创建ShoppingCart类,因为当前还没有用户登陆,没有session,此种场景下,spring会根据proxyMode属性的设置(①依据接口创建代理还是②使用cglib依据类创建代理)先创建一个ShoppingCart对象的代理,当类A调用ShoppingCart的方法时,代理会对其进行懒解析并将调用委托给会话作用域内真正的ShoppingCart bean。
- proxyMode=ScopedProxyMode.INTERFACES:表明这个代理要实现ShoppingCart接口(如果ShoppingCart是接口而不是类的话,这个设置是可以的)
- proxyMode=ScopedProxyMode.TARGET_CLASS:如果ShoppingCart是类的话,就要设置这个值,以此来表明要生成目标
类扩展的方式创建代理(通过cglib )
在XML中声明作用域、及代理
声明作用域方式:通过<bean>元素的scope属性设置bean的作用域
声明代理方式:使用spring aop命名空间的<aop:scoped-proxy>元素,默认情况下,它会使用CGLib创建目标类的代理。但是我们也可以将proxy-target-class属性设置为false,进而要求它生成基于接口的代理:


使用这个元素,需要增加如下命名空间(IDE会自动添加的):

1.4.5 运行时注入
本小节示例代码:com.mzj.springframework.ioc._05_advance.runtimeInject
1、解决问题
避免硬编码方式注入(无论是JavaConfig还是XML方式),如下面两种硬编码注入:


2、说明
spring提供两种运行时注入的机制:
①Environment动态获取外部属性
②属性占位符(Property placeholder)
③Spring表达式语言(SpEL)
3、使用方式
1)Environment动态获取外部属性
使用@PropertySource注解和Environment:
下面例子展现了一个基本的Spring配置类,它使用外部的属性来装配Mybean
package com.mzj.springframework.ioc._05_advance.runtimeInject;

import org.springframework.beans.factory.annotation.Autowired;
import org.springframework.context.annotation.Bean;
import org.springframework.context.annotation.Configuration;
import org.springframework.context.annotation.PropertySource;
import org.springframework.core.env.Environment;

/**
 * @Auther: mazhongjia
 * @Date: 2020/3/16 12:48
 * @Version: 1.0
 */
@Configuration
@PropertySource("classpath:com/mzj/springframework/ioc/_05_advance/app.properties")
public class Config4RuntimeInject {

    @Autowired
    Environment environment;

    @Bean
    public MyBean createMyBean(){
        return new MyBean(environment.getProperty("abc"));
    }

}
abc=1234567package com.mzj.springframework.ioc._05_advance.runtimeInject;
import org.junit.Test;
import org.junit.runner.RunWith;
import org.springframework.beans.factory.annotation.Autowired;
import org.springframework.test.context.ContextConfiguration;
import org.springframework.test.context.junit4.SpringJUnit4ClassRunner;
@RunWith(SpringJUnit4ClassRunner.class)
@ContextConfiguration(classes=Config4RuntimeInject.class)
public class RuntimeInjectTest {
@Autowired
MyBean myBean;
@Test
public void play() {
System.out.println(myBean);
}
}
输出:
![]()

②其他方法1:(属性相关方法)
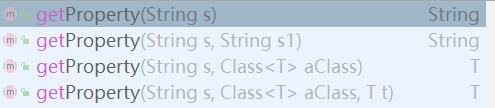
- getRequiredProperty()方法:如果disc.title或disc.artist属性没有定义的话,将会抛出IllegalStateException异常
-
containsProperty()方法:检查一下某个属性是否存在
-
getPropertyAsClass()方法:想将属性解析为类

-
String[] getActiveProfiles() :返回激活 profile 名称的数组;
-
String[] getDefaultProfiles():返回默认 profile 名称的数组;
-
boolean acceptsProfiles(String... profiles):如果environment 支持给定 profile 的话,就返回 true 。
2)属性占位符(Property placeholder)
为了使用占位符,需要进行如下配置:
i)使用JavaConfig时:在Configuration类中增加一个返回PropertySourcesPlaceholderConfigurer的bean:

使它能够基于Spring Environment及其属性源来解析占位符(未验证:还需要使用@PropertySource注解指定外部配置文件)。
ii)使用xml配置时:在xml配置文件中增加如下元素(引入特点配置文件):
<context:property-placeholder
location="com/mzj/springframework/ioc/_05_advance/app.properties" />使用方式1:XML中使用属性占位符${XXXX}

按照这种方式,XML配置没有使用任何硬编码的值,它的值是从配置文件以外的一个源中解析得到的。
xml配置文件:
<?xml version="1.0" encoding="UTF-8"?>
<beans xmlns="http://www.springframework.org/schema/beans"
       xmlns:xsi="http://www.w3.org/2001/XMLSchema-instance"
       xmlns:context="http://www.springframework.org/schema/context"
       xsi:schemaLocation="http://www.springframework.org/schema/beans http://www.springframework.org/schema/beans/spring-beans.xsd
		http://www.springframework.org/schema/context http://www.springframework.org/schema/context/spring-context.xsd">

<!--    <context:component-scan base-package="com.mzj.springframework.ioc._05_advance.scope" />-->

    <!--1、spring xml配置文件中 引入外部配置文件-->
    <context:property-placeholder
            location="com/mzj/springframework/ioc/_05_advance/app.properties" />

    <!--2、通过属性占位符(Property placeholder):${XXX}方式运行时注入配置文件中属性-->
    <bean class="com.mzj.springframework.ioc._05_advance.runtimeInject.propertyPlaceholder.MyBean">
        <constructor-arg value="${abc}"/>
    </bean>
</beans>
bean:
package com.mzj.springframework.ioc._05_advance.runtimeInject.propertyPlaceholder;

import org.springframework.stereotype.Component;

/**
 * @Auther: mazhongjia
 * @Date: 2020/3/16 12:51
 * @Version: 1.0
 */
@Component
public class MyBean {

    private String message;

    public MyBean(String message){
        this.message = message;
    }

    @Override
    public String toString() {
        final StringBuffer sb = new StringBuffer("MyBean{");
        sb.append("message='").append(message).append('\'');
        sb.append('}');
        return sb.toString();
    }
}
测试类:
package com.mzj.springframework.ioc._05_advance.runtimeInject;

import com.mzj.springframework.ioc._05_advance.runtimeInject.propertyPlaceholder.MyBean;
import org.junit.Test;
import org.junit.runner.RunWith;
import org.springframework.beans.factory.annotation.Autowired;
import org.springframework.test.context.ContextConfiguration;
import org.springframework.test.context.junit4.SpringJUnit4ClassRunner;

/**
 * @Auther: mazhongjia
 * @Date: 2020/3/16 14:02
 * @Version: 1.0
 */
@RunWith(SpringJUnit4ClassRunner.class)
//这种方式也可以:@ContextConfiguration("classpath:com/mzj/springframework/ioc/_05_advance/runtimeInject/propertyPlaceholde/propertyPlaceholde.xml")C
@ContextConfiguration(locations = { "classpath*:com/mzj/springframework/ioc/_05_advance/runtimeInject/propertyPlaceholde/propertyPlaceholde.xml" })
public class PropertyPlaceholderTest {

    @Autowired
    MyBean myBean;

    @Test
    public void test(){
        System.out.println(myBean);
    }
}
运行结果:
![]()
使用方式2:如果我们依赖于【组件扫描】和【自动装配】来创建和初始化应用组件的话,那么就没有指定占位符的配置文件或类了。在这种情况下,我们可以在bean上使用【@Value注解】,它的使用方式与@Autowired注解非常相似。
<?xml version="1.0" encoding="UTF-8"?>
<beans xmlns="http://www.springframework.org/schema/beans"
       xmlns:xsi="http://www.w3.org/2001/XMLSchema-instance"
       xmlns:context="http://www.springframework.org/schema/context"
       xsi:schemaLocation="http://www.springframework.org/schema/beans http://www.springframework.org/schema/beans/spring-beans.xsd
		http://www.springframework.org/schema/context http://www.springframework.org/schema/context/spring-context.xsd">


    <!--1、spring xml配置文件中 引入外部配置文件-->
    <context:property-placeholder
            location="com/mzj/springframework/ioc/_05_advance/app.properties" />

    <!--2、如果我们依赖于组件扫描和自动装配来创建和初始化应用组件的话, 那么就没有指定占位符的配置文件或类了。在这种情况下,我们可以 使用@Value注解,它的使用方式与@Autowired注解非常相似。-->
    <context:component-scan base-package="com.mzj.springframework.ioc._05_advance.runtimeInject.propertyPlaceholder._4Auto" />

</beans>
bean:
package com.mzj.springframework.ioc._05_advance.runtimeInject.propertyPlaceholder._4Auto;

import org.springframework.beans.factory.annotation.Value;
import org.springframework.stereotype.Component;

/**
 * @Auther: mazhongjia
 * @Date: 2020/3/16 12:51
 * @Version: 1.0
 */
@Component
public class MyBean {

    private String message;

    //3、使用@Value注解注入外部配置文件中属性
    public MyBean(@Value("${abc}") String message){
        this.message = message;
    }

    @Override
    public String toString() {
        final StringBuffer sb = new StringBuffer("MyBean{");
        sb.append("message='").append(message).append('\'');
        sb.append('}');
        return sb.toString();
    }
}
测试类:
package com.mzj.springframework.ioc._05_advance.runtimeInject;

import com.mzj.springframework.ioc._05_advance.runtimeInject.propertyPlaceholder._4Auto.MyBean;
import org.junit.Test;
import org.junit.runner.RunWith;
import org.springframework.beans.factory.annotation.Autowired;
import org.springframework.test.context.ContextConfiguration;
import org.springframework.test.context.junit4.SpringJUnit4ClassRunner;

/**
 * @Auther: mazhongjia
 * @Date: 2020/3/16 14:02
 * @Version: 1.0
 */
@RunWith(SpringJUnit4ClassRunner.class)
@ContextConfiguration(locations = { "classpath*:com/mzj/springframework/ioc/_05_advance/runtimeInject/propertyPlaceholde/propertyPlaceholde4Auto.xml" })
public class PropertyPlaceholder4AutoTest {

    @Autowired
    MyBean myBean;

    @Test
    public void test(){
        System.out.println(myBean);
    }
}
运行结果:
![]()
总结:解析外部属性能够将值的处理推迟到运行时,但是它的关注点在于根据名称解析来自于Spring Environment和属性源的属性。而Spring表达式语言提供了一种更通用的方式在运行时计算所要注入的值。
3)使用spring表达式语言进行装配
见附录:spring表达式(SpEL)
附录:SpEL
1、作用
它能够在运行时计算要注入到bean属性中的值:
它能够以一种强大和简洁的方式将值装配到bean属性和构造器参数中,在这个过程中所使用的表达式会在运行时计算得到值,SpEL能够用在依赖注入以外的其他地方。例如:
- Spring Security支持使用SpEL表达式定义安全限制规则。
- 在Spring MVC应用中使用Thymeleaf模板作为视图的话,那么这些模板可以使用SpEL表达式引用模型数据。
2、特性
- 使用bean的ID来引用bean;
- 调用方法和访问对象的属性;
- 对值进行算术、关系和逻辑运算;
- 正则表达式匹配;
- 集合操作。
3、语法
4、用法
定义SpEL表达式
1)表示字面值
#{1}这个表达式的计算结果就是数字1
#{3.1415}
#{9.87E4}表示浮点值,第二个是表示:98,700
#{'mazhongjia'}表示string字面值
#{true}表示布尔类型值
2)在表达式中使用Java中类型(调用Java中代码)
#{T(System).currentTimeMillis()}它的最终结果是计算表达式的那一刻当前时间的毫秒数。T()表达式会将java.lang.System视为Java中对应的类型,因此可以调用 其static修饰的currentTimeMillis()方法。
T(java,lang.Math)3)引用bean、属性和方法
#{myBean}
#{myBean.attr1}
#{myBean.method1()}
#{myBean.method1().method2()}
#{myBean.method1()?.method2()}
以下每一行对应上面示例说明:
- 引用myBean:此功能可以使用SpEL将一个bean装配到另外一个bean的属性中
- 会计算得到ID为myBean的bean的attr1属性
- 调用myBean的method1方法
-
对于被调用方法的返回值来说,我们同样可以调用它的方法
- 为了避免method1返回null出现的空指针,可以使用类型安全的运算符:【?.】这个运算符能够在访问它右边的内容之前,确保它所对应的元素不是null。所以,如果method1()的返回值是null的话,那么SpEL将不会调用method2()方法。表达式的返回值会是null。
#{systemProperties['mySystemAttr1']}引用系统中mySystemAttr1属性
5)SpEL运算符
|
运算符类型
|
运 算 符
|
|
算术运算
|
+
、
-
、
*
、
/
、
%
、
^
|
|
比较运算
|
<
、
>
、
==
、
<=
、
>=
、
lt
、
gt
、
eq
、
le
、
ge
|
|
逻辑运算
|
and
、
or
、
not
、
│
|
|
条件运算
|
?: (ternary)
、
?: (Elvis)
|
|
正则表达式
|
matches
|
例子1:
#{2 * T(java.lang.Math).PI * mybean.attr1}id为mybean的bean的attr1属性。
其他spEL运算符的组合使用略,这里只罗列出功能点。
-
当使用 String 类型的值时, “+” 运算符执行的是连接操作,与在 Java 中是一样的
-
比较运算符有两种形式:符号形式和文本形式。在大 多数情况下,符号运算符与对应的文本运算符作用是相同的
-
正则表达式:当处理文本时,有时检查文本是否匹配某种模式是非常有用的
-
SpEL中最令人惊奇的一些技巧是与集合和数组相关的。最简单的事 情可能就是引用列表中的一个元素了
6)SpEL表达式引用外部配置文件
方式1:
配置文件:
abc=123spring配置文件
<?xml version="1.0" encoding="UTF-8"?>
<beans xmlns="http://www.springframework.org/schema/beans"
       xmlns:xsi="http://www.w3.org/2001/XMLSchema-instance"
       xmlns:context="http://www.springframework.org/schema/context"
       xsi:schemaLocation="http://www.springframework.org/schema/beans http://www.springframework.org/schema/beans/spring-beans.xsd
		http://www.springframework.org/schema/context http://www.springframework.org/schema/context/spring-context.xsd">


    <context:component-scan base-package="com.mzj.springframework.ioc._05_advance.runtimeInject.spEL" />

    <!-- 1、定义一个bean  专门用于获取properties中的值 -->
    <bean id="configProperties" class="org.springframework.beans.factory.config.PropertiesFactoryBean">
        <property name="locations">
            <list>
                <value>classpath:com/mzj/springframework/ioc/_05_advance/app.properties</value>
            </list>
        </property>
    </bean>

    <!-- 2、Spring的动态变量,能在bean中直接调用 -->
    <bean id="propertyPlaceholderConfigurer" class="org.springframework.beans.factory.config.PropertyPlaceholderConfigurer">
        <property name="properties" ref="configProperties" />
    </bean>
</beans>
注入:
package com.mzj.springframework.ioc._05_advance.runtimeInject.spEL;

import org.springframework.beans.factory.annotation.Value;
import org.springframework.stereotype.Component;

/**
 * @Auther: mazhongjia
 * @Date: 2020/3/16 12:51
 * @Version: 1.0
 */
@Component
public class MyBean {

    private String message;

    /**
     * spEL引用外部properties配置文件
     *
     * 这里的configProperties对应spEL.xml的bean的id
     * @param message
     */
    public MyBean(@Value("#{configProperties['abc']}") String message){
        this.message = message;
    }

    @Override
    public String toString() {
        final StringBuffer sb = new StringBuffer("MyBean{");
        sb.append("message='").append(message).append('\'');
        sb.append('}');
        return sb.toString();
    }
}
测试类:
package com.mzj.springframework.ioc._05_advance.runtimeInject;

import com.mzj.springframework.ioc._05_advance.runtimeInject.spEL.MyBean;
import org.junit.Test;
import org.junit.runner.RunWith;
import org.springframework.beans.factory.annotation.Autowired;
import org.springframework.test.context.ContextConfiguration;
import org.springframework.test.context.junit4.SpringJUnit4ClassRunner;

/**
 * @Auther: mazhongjia
 * @Date: 2020/3/16 14:02
 * @Version: 1.0
 */
@RunWith(SpringJUnit4ClassRunner.class)
@ContextConfiguration(locations = { "classpath*:com/mzj/springframework/ioc/_05_advance/spEL/spEL.xml" })
public class SpELTest {

    @Autowired
    MyBean myBean;

    @Test
    public void test(){
        System.out.println(myBean);
    }
}
运行结果:
![]()
方式2:
配置文件:
index.version=v1添加一个java bean用于读取properties文件中的配置:
@Component("config")
public class Config {

    @Value("${index.version}")
    public String indexVersion;

    public String getIndexVersion() {
        return indexVersion;
    }

    public void setIndexVersion(String indexVersion) {
        this.indexVersion = indexVersion;
    }
}
spring配置文件添加注解扫描:
<context:annotation-config />
<context:component-scan base-package="com.***.config"/>
spring配置加载properties:
<context:property-placeholder location="classpath:config.properties"/>spEL中实现注入
@Value("#{config.indexVersion}")
public String version;
使用SpEL表达式
1)组件扫描方式

-
可以将 SpEL 表达式传入 <property>(XML方式的设值注入)
-
或<constructor-arg> 的 value 属性中(XML方式的构造器注入)
-
或者将其作为 p- 命名空间或c-命名空间条目的值(XML方式的设值注入、构造器注入的替代方式)
spEL使用建议
到此,springIOC的讲解就到此结束了。


 1761
1761

 被折叠的 条评论
为什么被折叠?
被折叠的 条评论
为什么被折叠?
 到【灌水乐园】发言


