


引言
我们知道Activity是用来的显示界面的地方,但是Activity是如何启动的?Activity如何与AMS建立联系?Activity跟Window、DecorView、ViewRootImpl又有怎样的联系? 我们设置的布局如何与Activity建立联系?这些问题都困扰着我们,为了看清Activity的本质我们从源码出发,从根本上解决以上的问题。
下面的源码是基于6.0.1进行分析,推荐一个在线看Android源码的地方androidxref
1.从startActivity出发与AMS建立联系
如何启动一个Activty大家肯定都知道调用startActivity(Intent intent)方法,那么我们就从该方法出发吧:
Activity#startActivity(Intent intent)
    @Override
    public void startActivity(Intent intent) {
        this.startActivity(intent, null);
    }
调用startActivity的另一个重载方法:
Activity#startActivity(Intent intent, @Nullable Bundle options)
   @Override
    public void startActivity(Intent intent, @Nullable Bundle options) {
        if (options != null) {
            startActivityForResult(intent, -1, options);
        } else {
            startActivityForResult(intent, -1);
        }
    }
该方法中第二个参数options作用是设置Activty的启动动画,因为我们没有设置动画所以执行startActivityForResult(intent, -1)方法,然后该方法最终调用startActivityForResult(Intent intent, int requestCode, Bundle options)方法:
Activity#startActivityForResult(Intent intent, int requestCode, Bundle options)
public void startActivityForResult(Intent intent, int requestCode, @Nullable Bundle options) {
if (mParent == null) {
Instrumentation.ActivityResult ar =
mInstrumentation.execStartActivity(
this, mMainThread.getApplicationThread(), mToken, this,
intent, requestCode, options);
if (ar != null) {
mMainThread.sendActivityResult(
mToken, mEmbeddedID, requestCode, ar.getResultCode(),
ar.getResultData());
}
if (requestCode >= 0) {
// If this start is requesting a result, we can avoid making
// the activity visible until the result is received. Setting
// this code during onCreate(Bundle savedInstanceState) or onResume() will keep the
// activity hidden during this time, to avoid flickering.
// This can only be done when a result is requested because
// that guarantees we will get information back when the
// activity is finished, no matter what happens to it.
mStartedActivity = true;
}
cancelInputsAndStartExitTransition(options);
// TODO Consider clearing/flushing other event sources and events for child windows.
} else {
if (options != null) {
mParent.startActivityFromChild(this, intent, requestCode, options);
} else {
// Note we want to go through this method for compatibility with
// existing applications that may have overridden it.
mParent.startActivityFromChild(this, intent, requestCode);
}
}
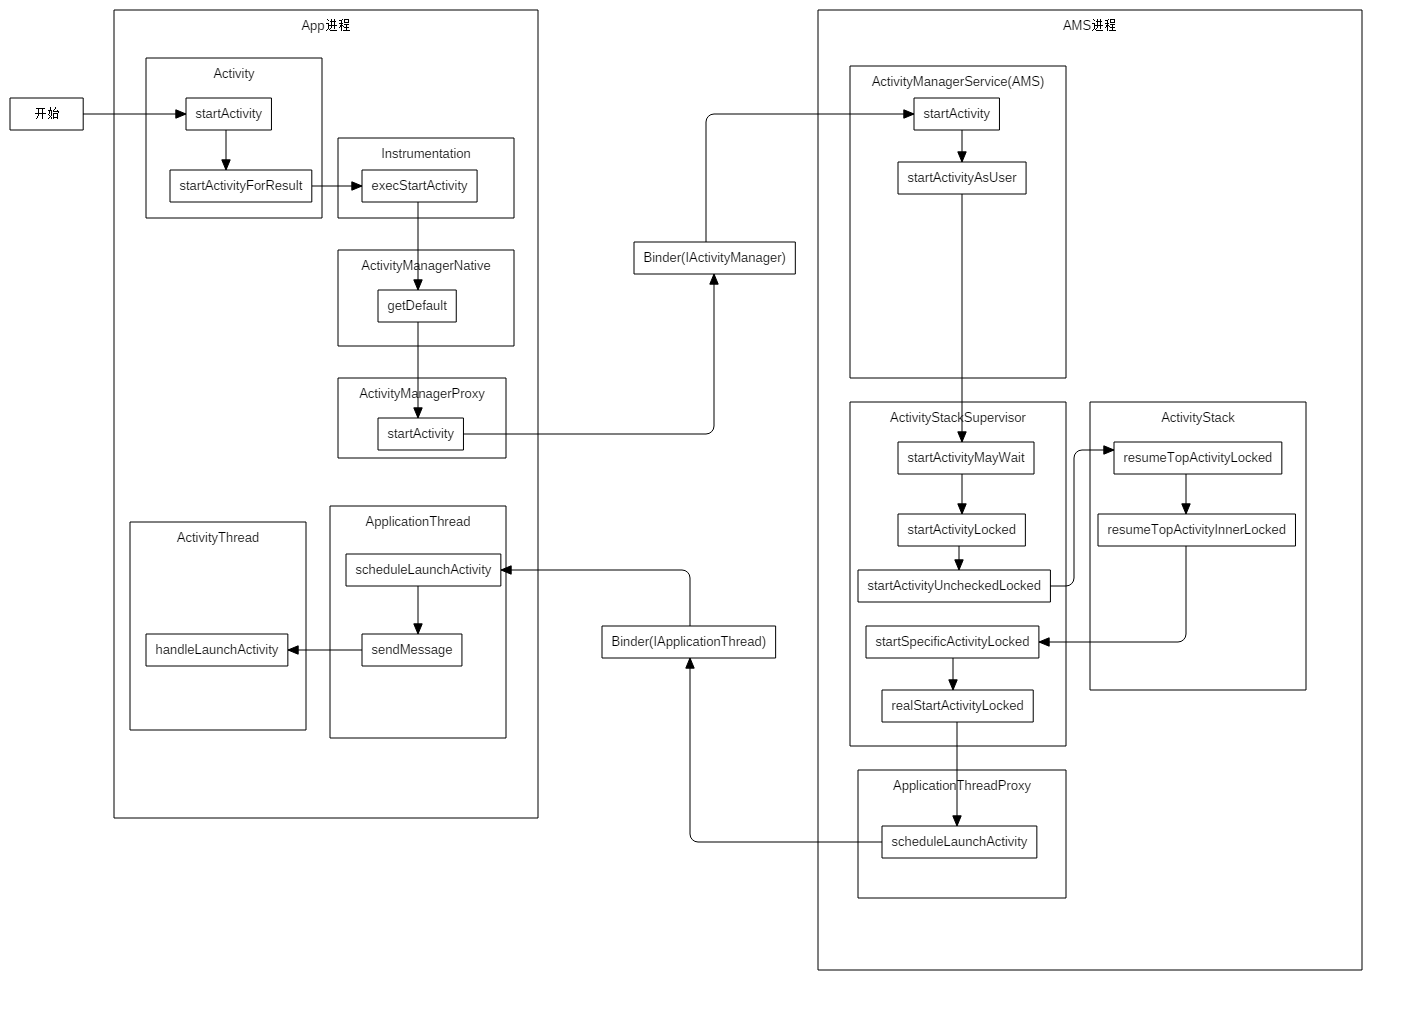
}所有启动Activity的方法最终都会调用该方法。如果启动的Activity结束后需要返回结果给本Activity,requestCode的数值不能小于0,因为我们不需要结果所以requestCode为-1。进入该方法中,首先判断mParent是否为空,mParent其实是一个ActivityGroup(ActivityGroup继承Activty), ActivityGroup是Activity的容器,可以包含多个嵌套进来的Activty,不过ActivityGroup在API 13中已被弃用,推荐使用Fragment来代替。所以mParent一般都为null,继续往下走执行Instrumentation的execStartActivity方法:
Instrumentation#execStartActivity
public ActivityResult execStartActivity(
            Context who, IBinder contextThread, IBinder token, Activity target,
            Intent intent, int requestCode, Bundle options) {
        IApplicationThread whoThread = (IApplicationThread) contextThread;

        //...

        try {

        //...

            int result = ActivityManagerNative.getDefault()
                .startActivity(whoThread, who.getBasePackageName(), intent,
                        intent.resolveTypeIfNeeded(who.getContentResolver()),
                        token, target != null ? target.mEmbeddedID : null,
                        requestCode, 0, null, options);
            checkStartActivityResult(result, intent);
        } catch (RemoteException e) {
            throw new RuntimeException("Failure from system", e);
        }
        return null;
    }
上面我只截取关键的代码,其他省略的代码用//…表示。在该方法中我要介绍一个很重要的类ActivityManagerService简称AMS,AMS运行在系统进程中,它负责统一调度各个应用程序的Activity和Service,就如现在要打开一个新的Activity也需要它来进行调度。因为AMS属于不同的进程,所以与它通信需要使用Binder来进行。ActivityManagerService继承自抽象类ActivityManagerNative,而ActivityManagerNative继承Binder类并实现IActivityManager接口,所以AMS是个Binder类并实现了IActivityManager接口。在上面的代码中通过ActivityManagerNative.getDefault()获取了实现了IActivityManager接口的本地代理类ActivityManagerProxy,通过ActivityManagerProxy以Binder的方式调用远程AMS中的目标方法,从而达到与AMS的进行通信的目的。见以下的代码:
ActivityManagerNative#getDefault
  static public IActivityManager getDefault() {
        return gDefault.get();
    }
通过gDefault的get方法获得,我们继续往下看:
ActivityManagerNative#gDefault
private static final Singleton<IActivityManager> gDefault = new Singleton<IActivityManager>() {
        protected IActivityManager create() {
            IBinder b = ServiceManager.getService("activity");
            if (false) {
                Log.v("ActivityManager", "default service binder = " + b);
            }
            IActivityManager am = asInterface(b);
            if (false) {
                Log.v("ActivityManager", "default service = " + am);
            }
            return am;
        }
    };
Singleton是单例的封装类,通过get获取对象的时候,如果对象还未创建则调用create方法进行创建,否则返回之前创建的对象。在上面的create方法中我们看到通过ServiceManager的getService方法获取了一个AMS的Binder对象。ServiceManage.getServicer方法用于获取系统中各种服务的Binder对象,比如ActivityManagerService(AMS),WindowManagerService(WMS)等等,如果要获取WMS只要把参数”activity”换成”window”即可,获取Binder对象后会保存在ServiceManager中的HashMap中作为缓存,以便后面直接获取。继续上面的代码,获取AMS的Binder对象后,通过asInterface方法,把Binder对象封装成ActivityManagerProxy类,它作为本地客户端的代理类负责与AMS进行通信:
ActivityManagerNative#asInterface
 static public IActivityManager asInterface(IBinder obj) {
        if (obj == null) {
            return null;
        }
        IActivityManager in =
            (IActivityManager)obj.queryLocalInterface(descriptor);
        if (in != null) {
            return in;
        }
        return new ActivityManagerProxy(obj);
    }
因此调用ActivityManagerProxy对象的startActivity方法实际是调用远程AMS中的startActivity方法:
ActivityManagerService#startActivity
   @Override
    public final int startActivity(IApplicationThread caller, String callingPackage,
            Intent intent, String resolvedType, IBinder resultTo, String resultWho, int requestCode,
            int startFlags, ProfilerInfo profilerInfo, Bundle options) {
        return startActivityAsUser(caller, callingPackage, intent, resolvedType, resultTo,
            resultWho, requestCode, startFlags, profilerInfo, options,
            UserHandle.getCallingUserId());
    }
AMS中的方法startActivity方法调用了startActivityAsUser方法,startActivityAsUser中调用了ActivityStackSupervisor类的startActivityMayWait方法,startActivityMayWait中调用startActivityLocked方法,在startActivityLocked方法中调用startActivityUncheckedLocked方法,在startActivityUncheckedLocked方法中又调用ActivityStack的resumeTopActivityLocked方法,接着又调用resumeTopActivityInnerLocked方法,在该方法中又调用了ActivityStackSupervisor的startSpecificActivityLocked方法,在该方法中又调用了realStartActivityLocked方法,最后在该方法中利用ProcessRecord的thread变量执行了scheduleLaunchActivity方法。
这里有人要问了ActivityStackSupervisor是什么,ActivityStack是什么 怎么他们之前调来调去的?
我们知道AMS是负责调度各个应用程序的组件,每一个Activity在AMS中以ActivityRecord类表示,存储Activity的任务栈在AMS中以TaskRecord类表示,每个 ActivityRecord 会对应到一个 TaskRecord,每个进程在AMS中以ProcessRecord类表示。AMS中利用ActivityStackSupervisor和ActivityStack对ActivityRecord、TaskRecord进行管理,也就是管理Activity栈和Activity之间切换。至于这两个类如何管理如何调度,我们这里就不详述。
在上面最后我们调用了ProcessRecord的thread变量的scheduleLaunchActivity方法,ProcessRecord代表一个应用进程,而thread是一个ApplicationThreadProxy类,ApplicationThreadProxy类是应用进程在AMS进程中的代理类,ApplicationThreadProxy封装了从App进程传递过来的Binder对象,AMS利用这个Binder对象跟应用进程进行通信。该Binder对象的接口类型是IApplicationThread,在该接口中定义许多管理Activity和Service的方法,抽象类ApplicationThreadNative继承了IApplicationThread接口,而ApplicationThread继承了ApplicationThreadNative类,所以ApplicationThread是IApplicationThread接口的真正的实现类。而ApplicationThread类是ActivityThread类的内部类,而ActivityThread是App进程的主线程,所以ApplicationThread运行在App进程的主线程中。
这时候有人要疑问了,这个IApplicationThread类型的Binder是什么时候传递给AMS的,这里我们就要去主线程中找答案了,我们知道java中启一个程序需要从main方法开始,Android既然是基于java的语言,启动一个应用程序也需要从main方法开始吧,既然ActivityThread是主线程,那么主线程肯定有main方法开始吧,见如下:
ActivityThread#main
public static void main(String[] args) {

         //.....
        //初始化Looper
        Looper.prepareMainLooper();
        //创建ActivityThread对象
        ActivityThread thread = new ActivityThread();
        thread.attach(false);
        //为主线程设置handler对象
        if (sMainThreadHandler == null) {
            sMainThreadHandler = thread.getHandler();
        }
        //进入消息循环
        Looper.loop();
        throw new RuntimeException("Main thread loop unexpectedly exited");
    }
在main方法中,我们创建了ActivityThread,并执行了attach方法:
ActivityThread#attach
 private void attach(boolean system) {
        sCurrentActivityThread = this;
        mSystemThread = system;
        if (!system) {
            //进入到此语句中
            //....
            final IActivityManager mgr = ActivityManagerNative.getDefault();
           //与AMS进行通信
            try {
                mgr.attachApplication(mAppThread);
            } catch (RemoteException ex) {
                // Ignore
            }
            // ....
        } else {
          // ...
        }
        // ...
    }
发现没有在该方法中获取与AMS通信的Binder接口IActivityManager,调用了attachApplication方法,并传入mAppThread变量,mAppThread是什么?见如下:
public final class ActivityThread {
  //...
 final ApplicationThread mAppThread = new ApplicationThread();
  //...
}
没错mAppThread就是一个ApplicationThread对象,在创建ActivityThread时,内部也创建了一个ApplicationThread对象。这也说明每一个进程都都与之相对应的ApplicationThread对象,用于与AMS进行通信。
AMS通过attachApplication方法获取到ApplicationThread的Binder对象后,就会把这个对象封装在ProcessRecord类的thread变量中,有兴趣的可以自己看看attachApplication方法中的代码。
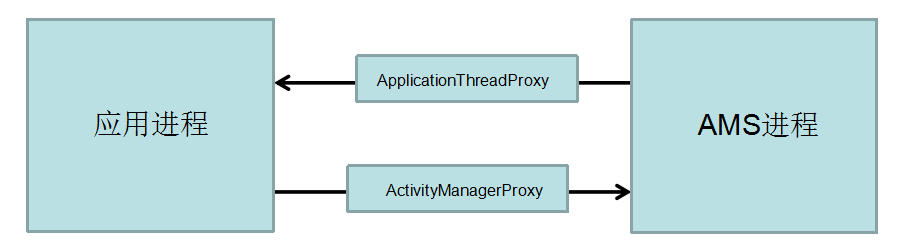
在上面我说过如果App进程要与AMS进程进行通信,App进程需要利用本地代理类ActivityManagerProxy方可调用远程AMS中的目标方法,而反之如果AMS进程要与App进程进行通信,AMS进程也需要利用本地代理类的ApplicationThreadProxy方可调用App进程中的方法,关系如下:
上面AMS中我们调用了ProcessRecord的thread变量的scheduleLaunchActivity,实际上是调用了App进程中ApplicationThread的scheduleLaunchActivity方法:
ApplicationThread#scheduleLaunchActivity
        @Override
        public final void scheduleLaunchActivity(Intent intent, IBinder token, int ident,
                ActivityInfo info, Configuration curConfig, Configuration overrideConfig,
                CompatibilityInfo compatInfo, String referrer, IVoiceInteractor voiceInteractor,
                int procState, Bundle state, PersistableBundle persistentState,
                List<ResultInfo> pendingResults, List<ReferrerIntent> pendingNewIntents,
                boolean notResumed, boolean isForward, ProfilerInfo profilerInfo) {
            updateProcessState(procState, false);
            ActivityClientRecord r = new ActivityClientRecord();
            r.token = token;
            r.ident = ident;
            r.intent = intent;
            r.referrer = referrer;
            r.voiceInteractor = voiceInteractor;
            r.activityInfo = info;
            r.compatInfo = compatInfo;
            r.state = state;
            r.persistentState = persistentState;
            r.pendingResults = pendingResults;
            r.pendingIntents = pendingNewIntents;
            r.startsNotResumed = notResumed;
            r.isForward = isForward;
            r.profilerInfo = profilerInfo;
            r.overrideConfig = overrideConfig;
            updatePendingConfiguration(curConfig);
            sendMessage(H.LAUNCH_ACTIVITY, r);
        }
在scheduleLaunchActivity方法中我们把AMS中传递过来的信息封装成一个ActivityClientRecord对象,然后利用sendMessage发送一条消息给Handler处理。为什么要利用Handler呢?因为被远程调用的方法是运行在Binder线程池中的,然后我们接下来的操作需要再主线程中执行,所以我们利用Handler切换到主线程中去执行,我们根据标识LAUNCH_ACTIVITY看看,在Handler中执行了那些方法:
ActivityThread#H
private class H extends Handler {
public static final int LAUNCH_ACTIVITY = 100;
public static final int PAUSE_ACTIVITY = 101;
public static final int PAUSE_ACTIVITY_FINISHING= 102;
public static final int STOP_ACTIVITY_SHOW = 103;
public static final int STOP_ACTIVITY_HIDE = 104;
public static final int SHOW_WINDOW = 105;
//...
public void handleMessage(Message msg) {
switch (msg.what) {
case LAUNCH_ACTIVITY: {
Trace.traceBegin(Trace.TRACE_TAG_ACTIVITY_MANAGER, "activityStart");
final ActivityClientRecord r = (ActivityClientRecord) msg.obj;
r.packageInfo = getPackageInfoNoCheck(
r.activityInfo.applicationInfo, r.compatInfo);
handleLaunchActivity(r, null);
Trace.traceEnd(Trace.TRACE_TAG_ACTIVITY_MANAGER);
} break;
//...
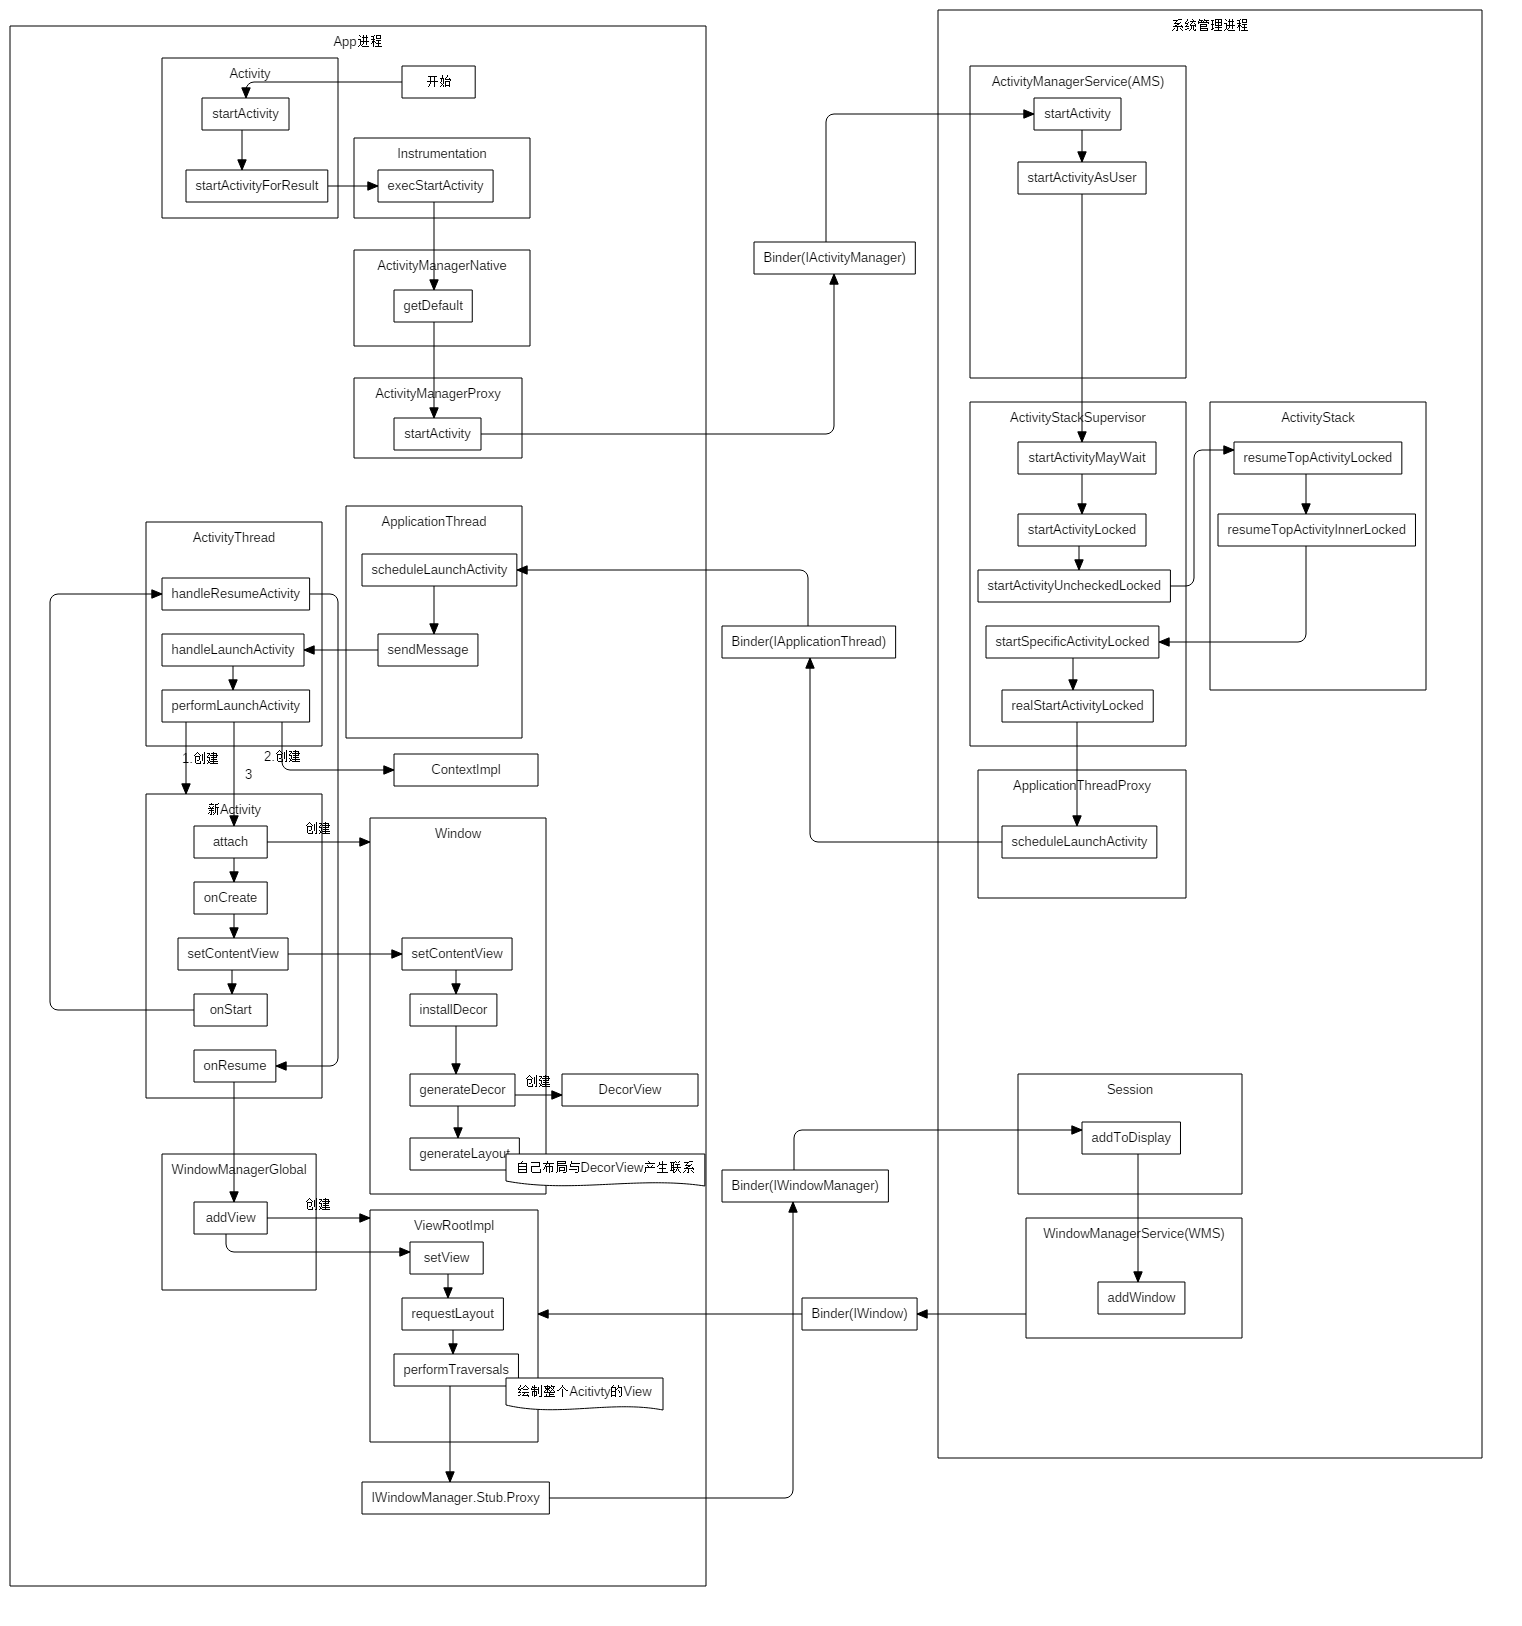
}该Handler就只有一个字H,在handleMessage我们发现LAUNCH_ACTIVITY标识所调用的方法是handleLaunchActivity,从这个方法开始新的Activity才会真正的被实例化。至此与App进程与AMS进程的通信也先告一段落,我们来画个图梳理下:
2.创建Activity
ActivityThread#handleLaunchActivity
private void handleLaunchActivity(ActivityClientRecord r, Intent customIntent) {
       //...
       // Initialize before creating the activity
        WindowManagerGlobal.initialize();
        Activity a = performLaunchActivity(r, customIntent);
        if (a != null) {
          //...
            handleResumeActivity(r.token, false, r.isForward,
                    !r.activity.mFinished && !r.startsNotResumed);
           //...
        }
     //...
}
在handleLaunchActivity中WindowManagerGlobal.initialize()代码从系统中获取了WindowManagerService的Binder对象,这又是有一个系统的服务,这个后面再说。接下来performLaunchActivity方法主要用来生成一个Activity,并间接执行Activity中onCreate和onStart的方法。而后面的handleResumeActivity方法则用来执行Activity的onResume方法,并把Activity的Window与WindowManger进行相关联,并进行View的绘制,这个我们方法我们会后面再讲,首先先讲performLaunchActivity方法:
ActivityThread#performLaunchActivity
 private Activity performLaunchActivity(ActivityClientRecord r, Intent customIntent) {

        //...
        Activity activity = null;
        try {
            java.lang.ClassLoader cl = r.packageInfo.getClassLoader();
            activity = mInstrumentation.newActivity(
                    cl, component.getClassName(), r.intent);
           //...
        } catch (Exception e) {
           //...
        }
           //...
            if (activity != null) {
                 //...
                activity.attach(appContext, this, getInstrumentation(), r.token,
                        r.ident, app, r.intent, r.activityInfo, title, r.parent,
                        r.embeddedID, r.lastNonConfigurationInstances, config,
                        r.referrer, r.voiceInteractor);
                //...
                if (r.isPersistable()) {
                    mInstrumentation.callActivityOnCreate(activity, r.state, r.persistentState);
                } else {
                    mInstrumentation.callActivityOnCreate(activity, r.state);
                }

                r.activity = activity;
                r.stopped = true;
                if (!r.activity.mFinished) {
                    activity.performStart();
                    r.stopped = false;
                }
                if (!r.activity.mFinished) {
                    if (r.isPersistable()) {
                        if (r.state != null || r.persistentState != null) {
                            mInstrumentation.callActivityOnRestoreInstanceState(activity, r.state,
                                    r.persistentState);
                        }
                    } else if (r.state != null) {
                        mInstrumentation.callActivityOnRestoreInstanceState(activity, r.state);
                    }
                }
                 //...
                }
            }
              //...
            mActivities.put(r.token, r);
        } catch (SuperNotCalledException e) {
            throw e;
        } catch (Exception e) {
           //...
        }
        return activity;
    }
上面的代码第一步首先利用了类加载器ClassLoader在Instrumentation的newActivity方法中实例化了一个Activity,见如下简单粗暴:
Instrumentation#newActivity
public Activity newActivity(ClassLoader cl, String className,
            Intent intent)
            throws InstantiationException, IllegalAccessException,
            ClassNotFoundException {
        return (Activity)cl.loadClass(className).newInstance();
}
继续回到performLaunchActivity的方法中,实例化Activity后,利用createBaseContextForActivity方法创建了一个ContextImpl对象,ContextImpl继承了抽象类Context,对Context的操作最终由ContextImpl实现。然后通过attach方法把ContextImpl传入Activity中,当然还包括当前线程对象、当前Activity的token(一个IBinder对象,Application是没有token的)、Instrumentation对象、Application等。执行attatch后调用Instrumentation的callActivityOnCreate方法间接的调用了Activity的onCreate方法。再下来activity.performStart()则间接调用了Activity的onStart方法。再往下,如果你处理在Activity异常终止情况下数据保存的操作,那么Activity被杀死后再次启动时则会执行onRestoreInstanceState方法,也就是上面代码中的mInstrumentation.callActivityOnRestoreInstanceState这步操作。接着mActivities.put(r.token, r)操作则把当前的Activity的封装对象ActivityClientRecord放入ArrayMap集合中便于管理。
从performLaunchActivity方法中我们可以很清晰的看见一个activity的创建和生命周期调用的过程:

3.创建Window
还记得上面Activity的实例化后进行进行的一步操作是什么吗,没错就是attach,我们看看Activity在attach中进行了哪些操作,见如下:
 final void attach(Context context, ActivityThread aThread,
            Instrumentation instr, IBinder token, int ident,
            Application application, Intent intent, ActivityInfo info,
            CharSequence title, Activity parent, String id,
            NonConfigurationInstances lastNonConfigurationInstances,
            Configuration config, String referrer, IVoiceInteractor voiceInteractor) {
        attachBaseContext(context);
        //...
        mWindow = new PhoneWindow(this);
        mWindow.setCallback(this);
        //...

        mUiThread = Thread.currentThread();
        mMainThread = aThread;
        mInstrumentation = instr;
        mToken = token;
        mIdent = ident;
        mApplication = application;
        mIntent = intent;
        mReferrer = referrer;
        mComponent = intent.getComponent();
        mActivityInfo = info;
        mTitle = title;
        mParent = parent;
        mEmbeddedID = id;
        mLastNonConfigurationInstances = lastNonConfigurationInstances;

        mWindow.setWindowManager(
                (WindowManager)context.getSystemService(Context.WINDOW_SERVICE),
                mToken, mComponent.flattenToString(),
                (info.flags & ActivityInfo.FLAG_HARDWARE_ACCELERATED) != 0);
        //...
         mWindowManager = mWindow.getWindowManager();
        //...
    }
attach方法中,首先调用了attachBaseContext方法,把ContextImpl赋予当前Activity变量mBase持有,由mBase负责实现Context的所有操作。接着在方法中还会创建一个Window对象,由PhoneWindow实例化而来,在这里我们要先介绍下Window 和WindowManager的概念:
Window是view的管理者,view的事件分发、绘制等都需要Window来进行传递。Activity、Dialog和Toast都是一个Window,只要跟View有关那就一定存在Window,但是要记住Window只是一个管理者,真正显示的还是View。Window是一个抽象类,它的实现类是PhoneWindow,我们通过WindowManager来对Window进行访问,而WindowManger实际是通过WindowManagerService来实现Window的操作,而WindowManger与WindowManagerService之间是利用IPC的进行通信的。
实例化Windowh后并利用setCallback设置Windows的回调接口,我们看下Callback接口中的方法:
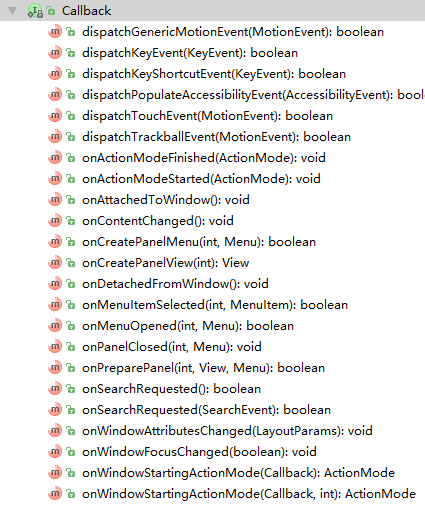
Activity需要实现回调接口中的全部方法。Callback接口很有用,当Window接收到外界的状态改变时就会调用Activity的方法,这样在Activity就可以及时响应外界的变化了。
4.Activity布局加入Window
在调用attach方法后,会接着调用Activity的onCreate方法,在该方法中我们通常要进行setContentView操作,把自己的布局视图放进Activity中,那么我们的布局是如何与Activity进行联系的呢? Activity的setContentView方法实际上是调用了Window的setContentView方法,见如下:
Activity#setContentView
 public void setContentView(@LayoutRes int layoutResID) {
        getWindow().setContentView(layoutResID);
        initWindowDecorActionBar();
 }
getWindow()获取的就是我们在attach中生成的Window(PhoneWindow),这里有要注意一下Window是一个抽象类,而PhoneWindow则继承了Window并实现了相关的功能,而目前PhoneWindow也唯一一个Window的衍生类(在手机中),所以现在说的Window实际上就是PhoneWindow。原来setContentView实际上是利用Window来进行的操作,在进行解析之前,我要先介绍PhoneWindow中的几个成员变量:
public class PhoneWindow extends Window implements MenuBuilder.Callback {
 //...
private DecorView mDecor;
private ViewGroup mContentParent;
private ViewGroup mContentRoot;
 //...
}- mDecor,DecorView是PhoneWindow的内部类,继承了FrameLayout,所以DecorView是一个View,而且是一个最顶级的View,我们在Activity所设置的View都要放在DecorView中。
- mContentRoot 一个ViewGroup,通常情况下是一个LinearLayout,分为上下两个部分(根据Activity设定的主题而定),上部是标题栏如ActionBar,而下部分则是内容栏,我们自己布局就放在这内容栏当中。这整个LinearLayout就是mContentRoot ,它是DecorView 的直接子view。
- mContentParent 就是上面说过的内容栏,是一个ViewGroup,供存放我们自己的布局,而mContentParent 的id为content,这样大家就理解了我们设置布局的时候为啥不叫setView而叫setContentView了吧。
可能大家现在对这几个变量还有些模糊,没关系我们继续往下分析,继续PhoneWindow中的setContentView方法:
PhoneWindow#setContentView
@Override
public void setContentView(int layoutResID) {
if (mContentParent == null) {
installDecor();
} else if (!hasFeature(FEATURE_CONTENT_TRANSITIONS)) {
mContentParent.removeAllViews();
}
if (hasFeature(FEATURE_CONTENT_TRANSITIONS)) {
final Scene newScene = Scene.getSceneForLayout(mContentParent, layoutResID,
getContext());
transitionTo(newScene);
} else {
mLayoutInflater.inflate(layoutResID, mContentParent);
}
//...
final Callback cb = getCallback();
if (cb != null && !isDestroyed()) {
cb.onContentChanged();
}
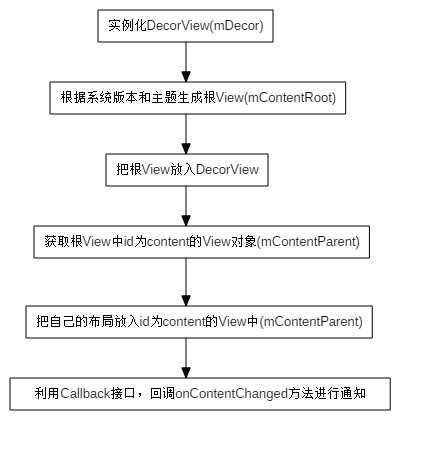
}新建Window后,因为mContentParent为null,所以我们执行installDecor方法
PhoneWindow#installDecor
 private void installDecor() {
    if (mDecor == null) {
            mDecor = generateDecor();
            //...
        }
    if (mContentParent == null) {
          mContentParent = generateLayout(mDecor);
           //...
      }
}
installDecor方法中有两步主要操作:
1.创建DecorView
因为mDecor空,所以我们利用generateDecor方法创建一个DecorView,也就是最顶级View.
PhoneWindow#generateDecor
 protected DecorView generateDecor() {
        return new DecorView(getContext(), -1);
 }
DecorView的类定义:
private final class DecorView extends FrameLayout implements RootViewSurfaceTaker2.根据Theme选择相应的布局,并加入DecorView中
有了DecorView后,因为mContentParent 还是为null,所以我们继续generateDecor方法
PhoneWindow#generateLayout
 protected ViewGroup generateLayout(DecorView decor) {
         //...
        //第一步
        int layoutResource;
        int features = getLocalFeatures();
        // System.out.println("Features: 0x" + Integer.toHexString(features));
        if ((features & (1 << FEATURE_SWIPE_TO_DISMISS)) != 0) {
            layoutResource = R.layout.screen_swipe_dismiss;
        } else if ((features & ((1 << FEATURE_LEFT_ICON) | (1 << FEATURE_RIGHT_ICON))) != 0) {
            if (mIsFloating) {
                TypedValue res = new TypedValue();
                getContext().getTheme().resolveAttribute(
                        R.attr.dialogTitleIconsDecorLayout, res, true);
                layoutResource = res.resourceId;
            } else {
                layoutResource = R.layout.screen_title_icons;
            }
            // XXX Remove this once action bar supports these features.
            removeFeature(FEATURE_ACTION_BAR);
            // System.out.println("Title Icons!");
        } else if ((features & ((1 << FEATURE_PROGRESS) | (1 << FEATURE_INDETERMINATE_PROGRESS))) != 0
                && (features & (1 << FEATURE_ACTION_BAR)) == 0) {
            // Special case for a window with only a progress bar (and title).
            // XXX Need to have a no-title version of embedded windows.
            layoutResource = R.layout.screen_progress;
            // System.out.println("Progress!");
        } else if ((features & (1 << FEATURE_CUSTOM_TITLE)) != 0) {
            // Special case for a window with a custom title.
            // If the window is floating, we need a dialog layout
            if (mIsFloating) {
                TypedValue res = new TypedValue();
                getContext().getTheme().resolveAttribute(
                        R.attr.dialogCustomTitleDecorLayout, res, true);
                layoutResource = res.resourceId;
            } else {
                layoutResource = R.layout.screen_custom_title;
            }
            // XXX Remove this once action bar supports these features.
            removeFeature(FEATURE_ACTION_BAR);
        } else if ((features & (1 << FEATURE_NO_TITLE)) == 0) {
            // If no other features and not embedded, only need a title.
            // If the window is floating, we need a dialog layout
            if (mIsFloating) {
                TypedValue res = new TypedValue();
                getContext().getTheme().resolveAttribute(
                        R.attr.dialogTitleDecorLayout, res, true);
                layoutResource = res.resourceId;
            } else if ((features & (1 << FEATURE_ACTION_BAR)) != 0) {
                layoutResource = a.getResourceId(
                        R.styleable.Window_windowActionBarFullscreenDecorLayout,
                        R.layout.screen_action_bar);
            } else {
                layoutResource = R.layout.screen_title;
            }
            // System.out.println("Title!");
        } else if ((features & (1 << FEATURE_ACTION_MODE_OVERLAY)) != 0) {
            layoutResource = R.layout.screen_simple_overlay_action_mode;
        } else {
            // Embedded, so no decoration is needed.
            layoutResource = R.layout.screen_simple;
            // System.out.println("Simple!");
        }
       //...
       //第二步
        View in = mLayoutInflater.inflate(layoutResource, null);
        decor.addView(in, new ViewGroup.LayoutParams(MATCH_PARENT, MATCH_PARENT));
        mContentRoot = (ViewGroup) in;
        ViewGroup contentParent = (ViewGroup)findViewById(ID_ANDROID_CONTENT);
        if (contentParent == null) {
            throw new RuntimeException("Window couldn't find content container view");
        }
       //...
       return contentParent;
}
在上面的方法第一步会根据系统版本以及主题选择相应的布局layoutResource,不知道大家发现没有,虽然有很多种布局,但是这些布局的开头都是以screen开头,如screen_simple、screen_custom_title、screen_action_bar等等,然后第二步根据我们选出的布局利用
View in = mLayoutInflater.inflate(layoutResource, null);加载出该布局所对应的View对象,然后执行decor.addView把该View放到了DecorView中,然后把该View
赋予了mContentRoot变量,注意了layoutResource所加载的View对象就保存在上面所说的mContentRoot变量中,接着调用findViewById方法来获取layoutResource中id为content的View对象:
Window#findViewById
public View findViewById(@IdRes int id) {
        return getDecorView().findViewById(id);
}
其中查找的ID_ANDROID_CONTENT定义如下:
public static final int ID_ANDROID_CONTENT = com.android.internal.R.id.content因为layoutResource的View对象已经被加入到DecorView中,对DecorView进行查找与在layoutResource进行查找是一样的。那么layoutResource的布局中一定有id为content的View对象吗?答案是肯定的,我们随便找一个如screen_simple.xml:
<LinearLayout xmlns:android="http://schemas.android.com/apk/res/android"
    android:orientation="vertical"
    android:fitsSystemWindows="true">
    <!-- Popout bar for action modes -->
    <ViewStub android:id="@+id/action_mode_bar_stub"
              android:inflatedId="@+id/action_mode_bar"
              android:layout="@layout/action_mode_bar"
              android:layout_width="match_parent"
              android:layout_height="wrap_content"
              android:theme="?attr/actionBarTheme" />
    <FrameLayout
        android:layout_width="match_parent"
        android:layout_height="?android:attr/windowTitleSize"
        style="?android:attr/windowTitleBackgroundStyle">
        <TextView android:id="@android:id/title"
            style="?android:attr/windowTitleStyle"
            android:background="@null"
            android:fadingEdge="horizontal"
            android:gravity="center_vertical"
            android:layout_width="match_parent"
            android:layout_height="match_parent" />
    </FrameLayout>
    <FrameLayout android:id="@android:id/content"
        android:layout_width="match_parent"
        android:layout_height="0dip"
        android:layout_weight="1"
        android:foregroundGravity="fill_horizontal|top"
        android:foreground="?android:attr/windowContentOverlay" />
</LinearLayout>
以LinearLayout分为上下两部分,上部分为标题栏,下部分为内容栏,而内容栏的id就为content且一般 为FrameLayout类型,我们自己的布局就是放在内容栏中。
继续回到中generateLayout方法,获取到id为content的View后,会把该View进行返回,然后返回到installDecor中,并把该View赋予mContentParent变量,也就是
我们上面所说的,见如下:
 private void installDecor() {
     //...
    if (mContentParent == null) {
          mContentParent = generateLayout(mDecor);
           //...
      }
}
执行installDecor方法后,我们又回到了PhoneWindow中setContentView方法:
   @Override
    public void setContentView(int layoutResID) {

        if (mContentParent == null) {
            installDecor();
        } else if (!hasFeature(FEATURE_CONTENT_TRANSITIONS)) {
            mContentParent.removeAllViews();
        }
        if (hasFeature(FEATURE_CONTENT_TRANSITIONS)) {
            final Scene newScene = Scene.getSceneForLayout(mContentParent, layoutResID,
                    getContext());
            transitionTo(newScene);
        } else {
            mLayoutInflater.inflate(layoutResID, mContentParent);
        }
         //...

        final Callback cb = getCallback();
        if (cb != null && !isDestroyed()) {
            cb.onContentChanged();
        }
    }
在这个方法中接下来执行了 mLayoutInflater.inflate(layoutResID, mContentParent);就把我们的自己的布局放入到了id为content的view当中了。接着获取了Window的
Callback 接口,调用了onContentChanged方法,因为在attach中我们的Activity已经实现了该接口,所以Activity中的onContentChanged会被执行,表示setContentView已经执行完毕。
至始至终setContenView已经分析完毕,整个setContenView所执行的过程如下:
下图描述了整个Activity布局层级与上述变量的关系:

为了更进一步验证我们的布局是否如上所示,我们建立一个App来进行验证:
首先我们app的布局如下所示:
<?xml version="1.0" encoding="utf-8"?>
<LinearLayout
    xmlns:android="http://schemas.android.com/apk/res/android"
    xmlns:tools="http://schemas.android.com/tools"
    android:layout_width="match_parent"
    android:layout_height="match_parent"
    android:orientation="vertical"
    android:id="@+id/ll"
   >


<Button
    android:layout_width="match_parent"
    android:text="click"
    android:id="@+id/btn"
    android:onClick="click"
    android:layout_height="wrap_content"/>

</LinearLayout>
把Activity的Theme设置为 android:theme=”@style/Theme.AppCompat.NoActionBar”然后打开hierarchyviewer,查看该应用的布局层级:
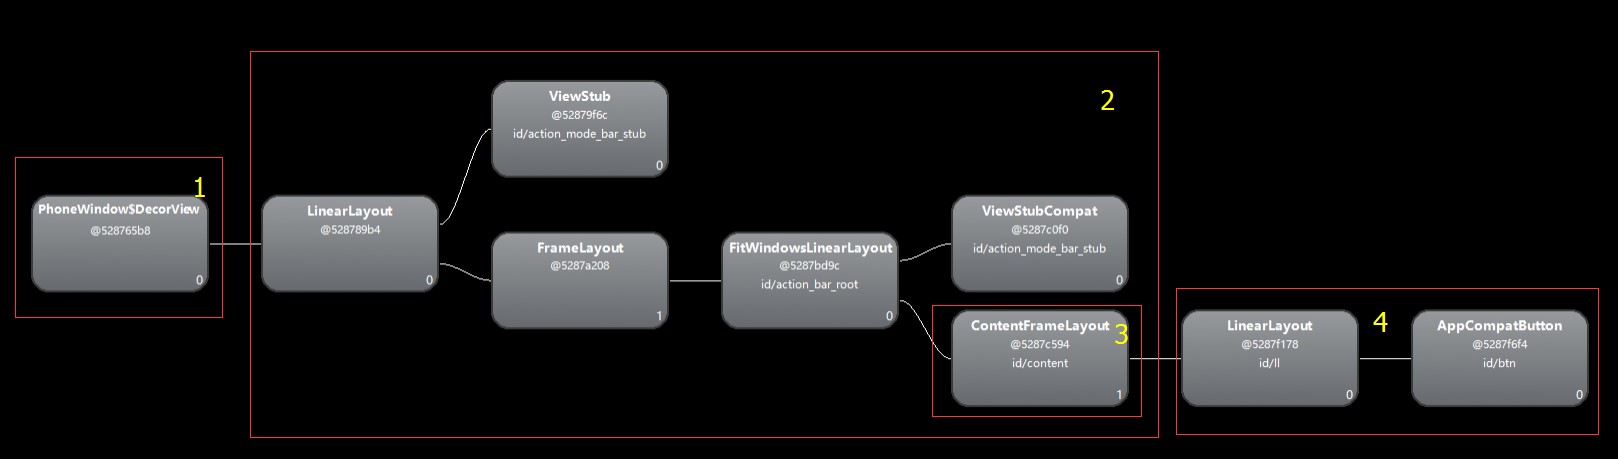
我用红圈把他们圈起来,分别对应上图的4个部分,第一部分就DecorView,第二部分是mContentRoot,第三部分是mContentParent,第四部分是自己的布局,跟我们上面所画的图的一致。这里还要注意一点mContentParent不一定就是mContentRoot的直接子View,中间可能还有许多层级,就如上图所示。
5.布局的绘制与WMS建立联系
在上面的分析中,我们的Window和DecorView都已经进行了初始化,而且我们的布局也已经加入了其中,可是我们Activity的Window还没和外部建立联系,导致无法Window接收到外部的信息,而且我们的布局也需要进行绘制才能显示在屏幕上吧,这些操作都还没有进行,下面会为大家一一讲解。还记得最上面的handleLaunchActivity方法中我只给大家讲解了performLaunchActivity方法,而Activity的生命周期也只执行到了onStart方法了,而onReusme方法此时还没有被调用,所以接下来继续讲解了handleResumeActivity方法:
ActivityThread#handleResumeActivity
  final void handleResumeActivity(IBinder token,
            boolean clearHide, boolean isForward, boolean reallyResume) {
   //...
   ActivityClientRecord r = performResumeActivity(token, clearHide);
   //...
}
handleResumeActivity中首先执行了performResumeActivity方法,继续往下:
ActivityThread#performResumeActivity
public final ActivityClientRecord performResumeActivity(IBinder token,
            boolean clearHide) {
     ActivityClientRecord r = mActivities.get(token);
     //...
     if (r != null && !r.activity.mFinished) {
     //...
      if (r.pendingIntents != null) {
          deliverNewIntents(r, r.pendingIntents);
          r.pendingIntents = null;
      }
      if (r.pendingResults != null) {
          deliverResults(r, r.pendingResults);
          r.pendingResults = null;
      }
      r.activity.performResume();
      //..
    }
      return r;
}
在这个方法中我们会根据Activity的token从mActivities集合中取出Activity的封装类ActivityClientRecord,如果r.pendingIntents不为null,则会执行deliverNewIntents方法,这个方法中调用了Instrumentation的callActivityOnNewIntent方法,从而最终调用了Activity方法的onNewIntent方法。onNewIntent方法主要用于某些特定的启动模式下 会被调用, 如singleTop启动模式,如果某个activity为该启动模式,并且该activity已经启动并且位于栈顶,如果再次启动相同的activity,则不会重新实例化一个Activity,而是继续复用栈顶的Activity,并调用onNewIntent方法把启动的intent进行传入,这就是onNewIntent方法的作用,而且这里我们也可以看出虽然Activity不重新实例,但是Activity的onResume方法仍会执行,而且是在onNewIntent方法之后。继续往下走,如果r.pendingResults 不为null那么则会执行deliverResults方法,该方法实际上是调用了Activity的onActivityResult方法,大家对这个方法不陌生吧,我这里就不详讲了。接着继续执行了Activity的performResume()方法,见如下:
Activity#performResume
final void performResume() {

        performRestart();
        //...

        // mResumed is set by the instrumentation
        mInstrumentation.callActivityOnResume(this);

         //...

        onPostResume();
         //...
}
在performResume方法中,首先执行了performRestart方法,该方法会调用Activity的onRestart方法,当然调用该方法的前提是onStop的生命周期有被调用过。接着
mInstrumentation.callActivityOnResume(this);这步才是真正的调用了Activity的onResume方法,最后onPostResume方法则调用了PhoneWindow的makeActive方法,设置mIsActive变量为true,表示已激活,并调用onActive方法。
我们这里可以顺便总结下从handleResumeActivity开始执行后activity的生命周期中方法的调用顺序:

虽然已经调用了onResume方法,但是Window还未被添加到WindowManager中,继续往下走,还是在handleResumeActivity方法中:
ActivityThread#handleResumeActivity
final void handleResumeActivity(IBinder token,
            boolean clearHide, boolean isForward, boolean reallyResume) {
       //...
        ActivityClientRecord r = performResumeActivity(token, clearHide);
        if (r != null) {
            final Activity a = r.activity;

           //...
            if (r.window == null && !a.mFinished && willBeVisible) {
                r.window = r.activity.getWindow();
                View decor = r.window.getDecorView();
                decor.setVisibility(View.INVISIBLE);
                ViewManager wm = a.getWindowManager();
                WindowManager.LayoutParams l = r.window.getAttributes();
                a.mDecor = decor;
                l.type = WindowManager.LayoutParams.TYPE_BASE_APPLICATION;
                l.softInputMode |= forwardBit;
                if (a.mVisibleFromClient) {
                    a.mWindowAdded = true;
                    wm.addView(decor, l);
                }
          //....
    }
performResumeActivity执行完成后,首先获取Activity中的Window对象和DecorView对象,把DecorView设为不可见,然后再获取Activity中的WindowManager,并通过wm.addView(decor, l);把DecorView添加到WindowManager,这样Activity的Window就和WindowManager联系起来了,Window就可以开始真正的接收到外界的信息了。
这时候有人会问为什么不是添加Window到WindowManager中,而是添加View到WindowManager中呢? 其实WindowManager在初始化的时候就已经获取了Window对象,在addView的时候就会一同加入进去。大家还记得Activity中的WindowManager是什么时候创建的吗?没错就attach方法中,执行Window的setWindowManager时建立的,里面有句关键的代码如下:
Window#setWindowManager
public void setWindowManager(WindowManager wm, IBinder appToken, String appName,
            boolean hardwareAccelerated) {
         //...
        mWindowManager = ((WindowManagerImpl)wm).createLocalWindowManager(this);
    }
WindowManager只是一个接口类,而真正的实现类则是WindowManagerImpl,它通过createLocalWindowManager创建一个全新的WindowManagerImpl对象,同时把Window传入保存,这样当我们调用WindowManager的addView时只要传入View和参数就可以了 ,WindowManagerImpl类如下:
WindowManagerImpl
public final class WindowManagerImpl implements WindowManager {
    private final WindowManagerGlobal mGlobal = WindowManagerGlobal.getInstance();
    private final Display mDisplay;
    private final Window mParentWindow;
    private IBinder mDefaultToken;
    public WindowManagerImpl(Display display) {
        this(display, null);
    }
    private WindowManagerImpl(Display display, Window parentWindow) {
        mDisplay = display;
        mParentWindow = parentWindow;
    }
    public WindowManagerImpl createLocalWindowManager(Window parentWindow) {
        return new WindowManagerImpl(mDisplay, parentWindow);
    }

    //...
    @Override
    public void addView(@NonNull View view, @NonNull ViewGroup.LayoutParams params) {
        applyDefaultToken(params);
        mGlobal.addView(view, params, mDisplay, mParentWindow);
    }
    @Override
    public void updateViewLayout(@NonNull View view, @NonNull ViewGroup.LayoutParams params) {
        applyDefaultToken(params);
        mGlobal.updateViewLayout(view, params);
    }

    @Override
    public void removeView(View view) {
        mGlobal.removeView(view, false);
    }
    @Override
    public void removeViewImmediate(View view) {
        mGlobal.removeView(view, true);
    }
    @Override
    public Display getDefaultDisplay() {
        return mDisplay;
    }
}
WindowManagerImpl这个类十分简单(我省略一些无关紧要的方法),它实现了WindowManager的接口,并实现了增删改三大操作的方法,分别是addView、removeView、updateViewLayout,这三个方法的作用从字意上就看得很清楚了,不过这几个方法真正执行者还是WindowManagerGlobal类,全局只有一个WindowManagerGlobal实例,从 WindowManagerGlobal mGlobal = WindowManagerGlobal.getInstance();就可以看出,一个应用中所有Window的增删改都是由它实现的,还记得Activity还未实例化前我们最先执行的WindowManagerGlobal.initialize();该代码就是获得远程WindowManagerService的接口,为WindowManagerGlobal中增删改操作做准备。
既然我们把DecoView和Window都放入了WindowManagerGlobal 中,那么我们看看WindowManagerGlobal的addView执行了哪些操作:
WindowManagerGlobal#addView
public void addView(View view, ViewGroup.LayoutParams params,
            Display display, Window parentWindow) {

              //...
        ViewRootImpl root;
        View panelParentView = null;
       //...
       root = new ViewRootImpl(view.getContext(), display);
       view.setLayoutParams(wparams);
       mViews.add(view);
       mRoots.add(root);
       mParams.add(wparams);

        // do this last because it fires off messages to start doing things
        try {
            root.setView(view, wparams, panelParentView);
        } catch (RuntimeException e) {
          //...
        }
    }
在这里要先介绍下WindowManagerGlobal中的4个集合
 private final ArrayList<View> mViews = new ArrayList<View>();
    private final ArrayList<ViewRootImpl> mRoots = new ArrayList<ViewRootImpl>();
    private final ArrayList<WindowManager.LayoutParams> mParams =new ArrayList<WindowManager.LayoutParams>();
    private final ArraySet<View> mDyingViews = new ArraySet<View>();
mViews 存储Window所对应的View,mRoots存储Windows所对应的ViewRootImpl,mParams 对应Window的布局参数,mDyingViews 存储正在被删除的View。
在addView方法中首先实例化一个ViewRootImpl对象,View的绘制过程就由它来完成。然后为View设置布局参数,再把View对象、ViewRootIml、View布局参数分别放入上面的所说的那几个集合当中,最后执行ViewRootImpl的setView方法:
ViewRootImpl#setView
public void setView(View view, WindowManager.LayoutParams attrs, View panelParentView) {
        synchronized (this) {
            if (mView == null) {
                mView = view;

                       //...
                mAdded = true;
                requestLayout();

                try {
                    mOrigWindowType = mWindowAttributes.type;
                    mAttachInfo.mRecomputeGlobalAttributes = true;
                    collectViewAttributes();
                    res = mWindowSession.addToDisplay(mWindow, mSeq, mWindowAttributes,
                            getHostVisibility(), mDisplay.getDisplayId(),
                            mAttachInfo.mContentInsets, mAttachInfo.mStableInsets,
                            mAttachInfo.mOutsets, mInputChannel);
                } catch (RemoteException e) {
                   //...
                } finally {

                   //...
                }
                //...
            }
        }
    }
在setView中有两步比较重要的操作
第一步就是View的绘制:
View的绘制主要是调用requestLayout方法:
ViewRootImpl#requestLayout
 @Override
    public void requestLayout() {
        if (!mHandlingLayoutInLayoutRequest) {
            checkThread();
            mLayoutRequested = true;
            scheduleTraversals();
        }
    }
checkThread()主要用于检测调用setView的线程和实例该对象的线程是不是同一个,如果不是同一个则抛出异常,因为我们的ViewRootImpl是在主线程中实例化的,所以这就保证了setView方法调用只能在主线程调用,保证View的绘制只能在主线程中执行。接着执行scheduleTraversals方法,最终该方法调用了performTraversals方法,该方法也View真正开始绘制的地方:
ViewRootImpl #performTraversals
private void performTraversals() {
    //...
   performMeasure(childWidthMeasureSpec, childHeightMeasureSpec);
   //...
   performLayout(lp, desiredWindowWidth, desiredWindowHeight);
  //...
   performDraw();
   //...
}
我们知道一个view的绘制要先经过onMeasure、onLayout和onDraw等方法,而这个过程是谁调用的呢?就是在performTraversals方法中执行的,首先执行performMeasure方法会执行DecorView的measure方法,measure方法中又会调用onMeasure方法,在onMeasure方法中又会依次调用子View的measure方法,依次类推,最终整个View树都会执行measure过程,同理performLayout和performDraw方法也是这样执行的。执行了performTraversals方法后我们整个View就会全部的绘制在了屏幕上。
DecorView绘制后,我们继续执行setView中的第二步操作 :
res = mWindowSession.addToDisplay(mWindow, mSeq, mWindowAttributes,
                            getHostVisibility(), mDisplay.getDisplayId(),
                            mAttachInfo.mContentInsets, mAttachInfo.mStableInsets,
                            mAttachInfo.mOutsets, mInputChannel);
mWindowSession是IWindowSession类型,在ViewRootImpl构造方法通过mWindowSession = WindowManagerGlobal.getWindowSession();获取。IWindowSession也是一个aidl接口,由Session类实现了该接口。Session类代表了一个活跃的客户端会话,每个进程都独有一个Session用于与WindowManager进行交互。
Session#addToDisplay
final class Session extends IWindowSession.Stub
  implements IBinder.DeathRecipient {
 final WindowManagerService mService;
 //...
@Override
 public int addToDisplay(IWindow window, int seq, WindowManager.LayoutParams attrs,
           int viewVisibility, int displayId, Rect outContentInsets, Rect outStableInsets,
          Rect outOutsets, InputChannel outInputChannel) {
         return mService.addWindow(this, window, seq, attrs, viewVisibility, displayId,
               outContentInsets, outStableInsets, outOutsets, outInputChannel);
    }
 //...
}
在Session中通过addToDisplay方法成功的把Window与WindowManagerService(WMS)建立了联系,这样Window就可以通过WindowManager接收到外部的信息了。
注意addToDisplay方法中还传入了一个window变量,window是IWIndow类型,IWIndow用于WMS回调ViewRootImpl中的方法,这刚好与IWindowSession相反。
Window添加后,继续在handleResumeActivity中调用Activity方法makeVisible,执行其中的 mDecor.setVisibility(View.VISIBLE);语句,使整个View真正的显示出来,这时候用户就可以看到了整个Activity并可以与Activity进行交互了,到此整个Activity产生的过程就整体上分析完了。
总结
一张图总结下:


 607
607


 被折叠的 条评论
为什么被折叠?
被折叠的 条评论
为什么被折叠?
 到【灌水乐园】发言


