


1.环境
Centos 7,zookeeper-3.4.12
2.zookeeper集群环境搭建
在上一篇博客zookeeper单机环境搭建中介绍了如何搭建zookeeper单机环境,集群环境搭建其实就是将单机的zookeeper文件拷贝到各个节点,并修改一些配置。
首先,在主节点上搭建好单机zk后,在${ZK_HOME}/conf/zoo.cfg中增加配置,为了快速搭建,这里只配置最基本的项目,后面的博客中再专门针对参数配置进行详细分析,配置文件如下:
# The number of ticks that can pass between
# sending a request and getting an acknowledgement
# The number of milliseconds of each tick
tickTime=2000
# The number of ticks that the initial
# synchronization phase can take
initLimit=10
# The number of ticks that can pass between
# sending a request and getting an acknowledgement
syncLimit=5
# the directory where the snapshot is stored.
# do not use /tmp for storage, /tmp here is just
# example sakes.
dataDir=/data/zookeeper
# the port at which the clients will connect
clientPort=2181
# the maximum number of client connections.
# increase this if you need to handle more clients
#maxClientCnxns=60
#
# Be sure to read the maintenance section of the
# administrator guide before turning on autopurge.
#
# http://zookeeper.apache.org/doc/current/zookeeperAdmin.html#sc_maintenance
#
# The number of snapshots to retain in dataDir
#autopurge.snapRetainCount=3
# Purge task interval in hours
# Set to "0" to disable auto purge feature
#autopurge.purgeInterval=1
server.1=master:2888:3888
server.2=slave1:2888:3888
server.3=slave2:2888:3888
其中,clientPort,dataDir,tickTime为zk的最小配置,搭建单机环境必备的最小配置。
initLimit,syncLimit为集群环境额外增加的配置,此处不再详细阐述各配置含义。
重点是最下面的三行集群节点配置,格式为server.id=host:port:port,需要在各个节点dataDir对应目录下创建一个myid的文件,该文件仅包含一个数字,范围1-255,表示该zk节点的唯一标识,与节点配置中的id对应。host可填写ip或主机名,第一个port是各个节点间的通信端口,第二个port是选举leader的端口。
配置完后,将zk安装目录复制到各个节点,在各节点对应的dataDir下创建myid,并写入节点对应的id即可。
至此,完成集群的安装和配置。
在master节点上,运行zkServer.sh start,发现启动失败,查看日志(如果没有单独配置日志路径,则默认与dataDir路径一致)发现与其他节点连接失败

检查防火墙已关闭,上网搜索发现stackoverflow上一个高票解决方案https://stackoverflow.com/questions/30940981/zookeeper-error-cannot-open-channel-to-x-at-election-address,是将节点配置中当前节点host改为0.0.0.0,理由是因为配置了公网ip导致。尝试后发现依然不行,后来看到这篇博客https://blog.csdn.net/shirdrn/article/details/7183503找到了解决办法,原来是打开方式不对,尴尬。
之前Stack Overflow上的办法应该是针对公网ip的解决办法,而笔者的所有节点是同一局域网内,故不需要修改节点ip为0.0.0.0,直接使用主机名即可。正确的打开方式,是需要在每个节点上各自启动zk,而不像hadoop那样,直接在主节点上可以启动所有节点。所以,上面错误是因为只启动了一个节点,不能进行选举造成的,当依次启动所有节点后,zk选举完成后,即可正常运行。
为了方便,准备一个一次启动集群的shell脚本,vim /opt/shell/zk_cluster.sh
#参数传递
usage="Usage: $0 (start|stop|status)"
if [ $# -lt 1 ]; then
  echo $usage
  exit 1
fi
behave=$1
echo "$behave zkServer cluster"
#主机名称
for i in master slave1 slave2
do
#使用ssh进行启动
ssh root@$i "/opt/zk/bin/zkServer.sh $behave"
done
exit 0
chmod u+x /opt/shell/zk_cluster.sh
在master上运行脚本,/opt/shell/zk_cluster.sh start,所有节点依次正常启动。
/opt/shell/zk_cluster.sh status,查看所有节点状态
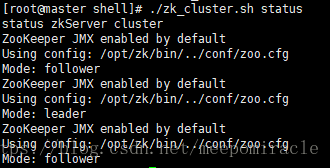
发现集群已正常选举leader,
执行zkCli.sh -server master:2181,能正常连接。


 552
552


 被折叠的 条评论
为什么被折叠?
被折叠的 条评论
为什么被折叠?
 到【灌水乐园】发言


