转载自:
http://blog.csdn.net/super_mt/article/details/50628208
本文是使用Eclipse将Android项目打成Library包提供给其它应用使用,Library包不用像Jar包一样注意资源引用的问题,Library包会将源码裸露给其它应用,资源文件复制到目标应用的相应位置即可,注意不要有重名。
1. 用Eclipse新建Android项目时会有Make this project as a library选项,如下图:
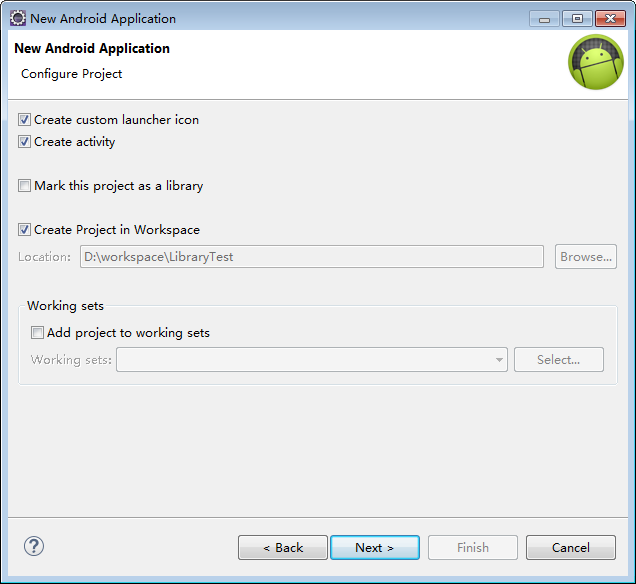
我们默认没有选择Make this project as a library选项,直接创建一个Android项目,名字为LibraryTest,该项目只有一个类LibraryTestActivity,定义了一个按钮,点击会弹出toast提示,内容如下
- package com.example.librarytest;
-
- import android.app.Activity;
- import android.os.Bundle;
- import android.view.Menu;
- import android.view.MenuItem;
- import android.view.View;
- import android.view.View.OnClickListener;
- import android.widget.Button;
- import android.widget.Toast;
-
- public class LibraryTestActivity extends Activity {
- private Button bn;
-
- @Override
- protected void onCreate(Bundle savedInstanceState) {
- super.onCreate(savedInstanceState);
- setContentView(R.layout.activity_librarytest);
- bn = (Button) findViewById(R.id.bn);
- bn.setOnClickListener(new OnClickListener(){
-
- @Override
- public void onClick(View v) {
-
- Toast.makeText(LibraryTestActivity.this, "LibraryTest", Toast.LENGTH_SHORT).show();
- }
-
- });
-
- }
- }
该Activity对应的layout名为activity_librarytest.xml,只布局了一个Button按钮,layout的内容如下:
- <LinearLayout xmlns:android="http://schemas.android.com/apk/res/android"
- android:layout_width="match_parent"
- android:layout_height="match_parent"
- android:orientation="vertical" >
-
- <Button
- android:id="@+id/bn"
- android:layout_width="wrap_content"
- android:layout_height="wrap_content"
- android:text="LibraryTest" />
-
- </LinearLayout>
将该项目编辑好了之后,
右键该项目,选择Properties--->Android--->Library,选中Is Library,点击Apply,OK
。如下图所示:
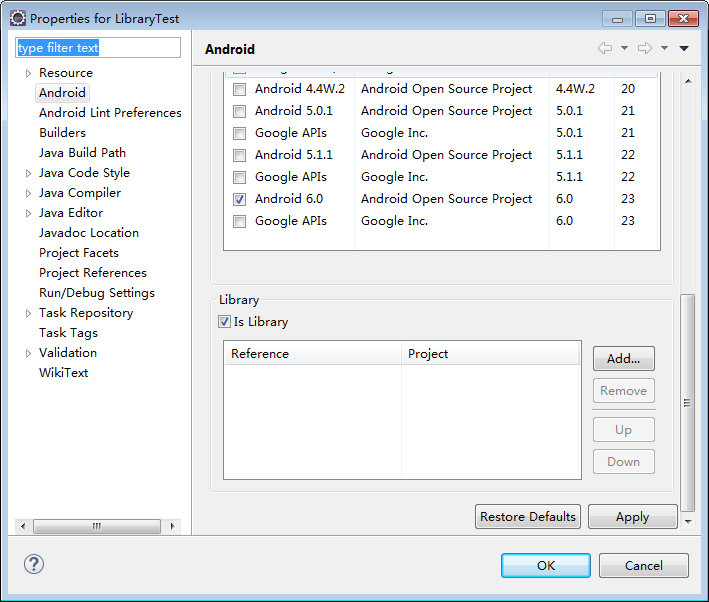
这样,该项目就成为了一个Library了。打开该项目下的project.properties文件,会看到存在android.library=true
(我们也可以选择该项目下的project.properties文件,打开,添加命令android.library=true,将该项目设为Library)
2. 新建一个Android测试项目,该项目名为LibraryDemo,该项目设置了一个按钮,点击按钮,会使用Intent打开上述Library的LibraryTestActivity。测试项目LibraryDemo的MainActivity.java的内容如下:
- package com.example.librarydemo;
-
- import com.example.librarytest.LibraryTestActivity;
-
- import android.app.Activity;
- import android.content.Intent;
- import android.os.Bundle;
- import android.view.Menu;
- import android.view.MenuItem;
- import android.view.View;
- import android.view.View.OnClickListener;
- import android.widget.Button;
-
- public class MainActivity extends Activity {
-
- private Button bn;
-
- @Override
- protected void onCreate(Bundle savedInstanceState) {
- super.onCreate(savedInstanceState);
- setContentView(R.layout.activity_main);
- bn = (Button) findViewById(R.id.bn);
- bn.setOnClickListener(new OnClickListener() {
-
- @Override
- public void onClick(View v) {
-
- Intent intent = new Intent();
- intent.setClass(MainActivity.this, LibraryTestActivity.class);
- startActivity(intent);
- }
-
- });
- }
- }
该Activity对应的布局文件和LibraryTestActivity的布局文件一样,如下所示:
- <RelativeLayout xmlns:android="http://schemas.android.com/apk/res/android"
- android:layout_width="match_parent"
- android:layout_height="match_parent" >
-
- <Button
- android:id="@+id/bn"
- android:layout_width="wrap_content"
- android:layout_height="wrap_content"
- android:text="@string/hello_world" />
-
- </RelativeLayout>
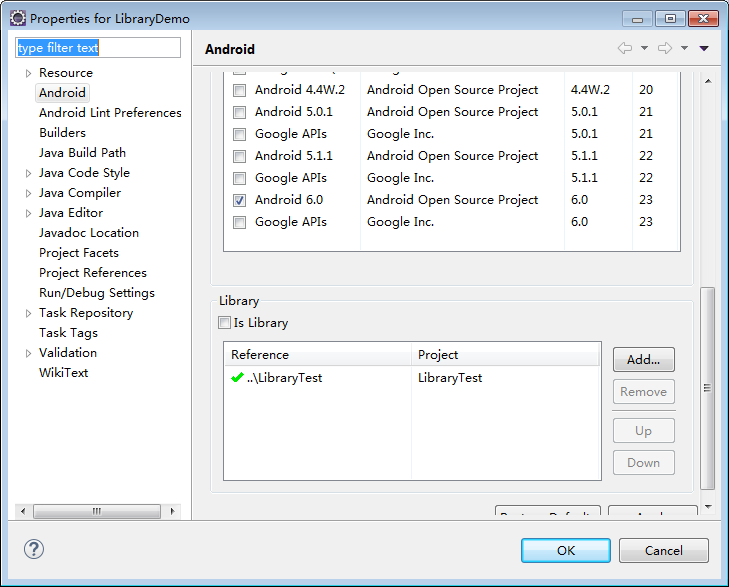
编辑好了之后,右键该项目,选择Properties--->Android--->Library,点击Add,选择上文生成的Library,点击OK,Apply,OK。这样,在LibraryDemo的目录结构中,多出了一个Android Dependencies,里面有我们的librarytest.jar,可以看到里面的内容,里面只有.class文件,没有资源文件。(观察下测试项目LibraryDemo目录中的project.properties文件,发现多了android.library.reference.1=../LibraryTest)
3. 这样,我们就把library导入到测试项目中了,注意还需要将资源文件及AndroidManifest所需的内容放入测试项目,我需要将LibraryTest的activity_librarytest.xml放入测试项目LibraryDemo的layout目录中,并且在测试项目LibraryDemo的AndroidManifest.xml文件中添加activity声明:
<activity android:name="com.example.librarytest.LibraryTest"></activity>
4. 然后启动LibraryDemo,点击按钮,就可以进入LibraryTest生成的Library的LibraryTestActivity,点击里面的按钮,就会有toast提示。


 259
259

 被折叠的 条评论
为什么被折叠?
被折叠的 条评论
为什么被折叠?
 到【灌水乐园】发言


