


WebView的内存泄露。
当你要用webview的时候,记得最好 另外单独开一个进程 去使用webview 并且当这个 进程结束时,请手动调用System.exit(0)。这是目前对于webview 内存泄露 最好的解决方案。使用此方法 所有因为webview引发的 资源无法释放等问题 全部可以解决。
getSettings().setBuiltInZoomControls(true) 引发的crush。
这个方法调用以后 如果你触摸屏幕 弹出那个提示框还没消失的时候 你如果activity结束了 就会报错了。3.0以上 4.4以下很多手机会出现这种情况所以为了规避他,我们通常是在activity的onDestroy方法里手动的将webiew设置成 setVisibility(View.GONE)
3.onPageFinished 函数到底有用没有?
多数开发者都是参考的http://stackoverflow.com/questions/3149216/how-to-listen-for-a-webview-finishing-loading-a-url-in-android 这个上面的高票答案。
但其实根据我自己观察,这个函数并没有什么卵用,有的时候是提前结束,有的时候就迟迟无法结束,你信这个函数 还不如信上帝,甚至于onProgressChanged这个函数
都比onPageFinished 要准一些。如果你的产品经理坚持你一定要实现这种功能的话,我建议你 提早结束他,否则卡在那用户迟迟动不了 这种体验不好。
有空的同学可以跟一下源码,onPageFinished 在不同的内核里 调用的时机都不一样。说实话 我也很醉。。。这个问题 有完美解决方案的 请知会我一下。。。
4.后台无法释放js 导致耗电。
这个可能很少有人知道,我也是被投诉过 才了解,在有的手机里,你如果webview加载的html里 有一些js 一直在执行比如动画之类的东西,如果此刻webview 挂在了后台
这些资源是不会被释放 用户也无法感知。。。导致一直占有cpu 耗电特别快,所以大家记住了,如果遇到这种情况 请在onstop和onresume里分别把setJavaScriptEnabled();
给设置成false和true。
5.如果实在不想用开额外进程的方式解决webview 内存泄露的问题,那么下面的方法很大程度上可以避免这种情况

 1     public void releaseAllWebViewCallback() {
 2         if (android.os.Build.VERSION.SDK_INT < 16) {
 3             try {
 4                 Field field = WebView.class.getDeclaredField("mWebViewCore");
 5                 field = field.getType().getDeclaredField("mBrowserFrame");
 6                 field = field.getType().getDeclaredField("sConfigCallback");
 7                 field.setAccessible(true);
 8                 field.set(null, null);
 9             } catch (NoSuchFieldException e) {
10                 if (BuildConfig.DEBUG) {
11                     e.printStackTrace();
12                 }
13             } catch (IllegalAccessException e) {
14                 if (BuildConfig.DEBUG) {
15                     e.printStackTrace();
16                 }
17             }
18         } else {
19             try {
20                 Field sConfigCallback = Class.forName("android.webkit.BrowserFrame").getDeclaredField("sConfigCallback");
21                 if (sConfigCallback != null) {
22                     sConfigCallback.setAccessible(true);
23                     sConfigCallback.set(null, null);
24                 }
25             } catch (NoSuchFieldException e) {
26                 if (BuildConfig.DEBUG) {
27                     e.printStackTrace();
28                 }
29             } catch (ClassNotFoundException e) {
30                 if (BuildConfig.DEBUG) {
31                     e.printStackTrace();
32                 }
33             } catch (IllegalAccessException e) {
34                 if (BuildConfig.DEBUG) {
35                     e.printStackTrace();
36                 }
37             }
38         }
39     }
在webview的 destroy方法里 调用这个方法就行了。
6.另外很多人 不知道webview 实际上有自己一套完整的cookie机制的,利用好这个 可以大大增加对客户端的访问速度。


实际上cookie就是存放在这个表里的。
很多人都想要一个效果:网页更新cookie 设置完cookie以后 不刷新页面即可生效。这个在2.3以下和2.3以上要实现的方法不太一样,所以要做一次兼容
 1
 4     public void updateCookies(String url, String value) {
 5         if (Build.VERSION.SDK_INT <= Build.VERSION_CODES.GINGERBREAD_MR1) { // 2.3及以下
 6             CookieSyncManager.createInstance(getContext().getApplicationContext());
 7         }
 8         CookieManager cookieManager = CookieManager.getInstance();
 9         cookieManager.setAcceptCookie(true);
10         cookieManager.setCookie(url, value);
11         if (Build.VERSION.SDK_INT <= Build.VERSION_CODES.GINGERBREAD_MR1) {
12             CookieSyncManager.getInstance().sync();
13         }
14     }
1.加载长图,如新浪微博里面的长微博,这种图,特别大,如果项目中使用的图片缩放控件,要注意所使用的第三方加载(如:Glide,Picasso),因其内部已经做过压缩处理,导致长图特别模糊,单独某张卡片的加载 可不使用。自己单独实现压缩方法。
/**
 * 图片压缩工具类
 *
 * @author
 */
public class BitmapCompressUtils {
    public static final String CONTENT = "content";
    public static final String FILE = "file";

    /**
     * 图片压缩参数
     *
     * @author Administrator
     */
    public static class CompressOptions {
        public static final int DEFAULT_WIDTH = 400;
        public static final int DEFAULT_HEIGHT = 800;

        public int maxWidth = DEFAULT_WIDTH;
        public int maxHeight = DEFAULT_HEIGHT;
        /**
         * 压缩后图片保存的文件
         */
        public File destFile;
        /**
         * 图片压缩格式,默认为jpg格式
         */
        public CompressFormat imgFormat = CompressFormat.JPEG;

        /**
         * 图片压缩比例 默认为30
         */
        public int quality = 30;

        public Uri uri;
        public String path;
    }

    public Bitmap compressFromUri(Context context,
                                  CompressOptions compressOptions) {

        // uri指向的文件路径
        // String filePath = getFilePath(context, compressOptions.uri);
        String filePath = compressOptions.path;
        if (null == filePath) {
            return null;
        }

        BitmapFactory.Options options = new BitmapFactory.Options();
        options.inJustDecodeBounds = true;

        Bitmap temp = BitmapFactory.decodeFile(filePath, options);

        int actualWidth = options.outWidth;
        int actualHeight = options.outHeight;

        int desiredWidth = getResizedDimension(compressOptions.maxWidth,
                compressOptions.maxHeight, actualWidth, actualHeight);
        int desiredHeight = getResizedDimension(compressOptions.maxHeight,
                compressOptions.maxWidth, actualHeight, actualWidth);

        options.inJustDecodeBounds = false;
        options.inSampleSize = findBestSampleSize(actualWidth, actualHeight,
                desiredWidth, desiredHeight);

        Bitmap bitmap = null;

        Bitmap destBitmap = BitmapFactory.decodeFile(filePath, options);

        // If necessary, scale down to the maximal acceptable size.
      /*  if (destBitmap.getWidth() > desiredWidth
                || destBitmap.getHeight() > desiredHeight) {
            bitmap = Bitmap.createScaledBitmap(destBitmap, desiredWidth,
                    desiredHeight, true);
            destBitmap.recycle();
        } else {
            bitmap = destBitmap;
        }*/
        bitmap = destBitmap;
        // compress file if need
        if (null != compressOptions.destFile) {
            compressFile(compressOptions, bitmap);
        }

        return bitmap;
    }

    /**
     * compress file from bitmap with compressOptions
     *
     * @param compressOptions
     * @param bitmap
     */
    private void compressFile(CompressOptions compressOptions, Bitmap bitmap) {
        OutputStream stream = null;
        try {
            stream = new FileOutputStream(compressOptions.destFile);
        } catch (FileNotFoundException e) {
            Log.e("ImageCompress", e.getMessage());
        }

        bitmap.compress(compressOptions.imgFormat, compressOptions.quality,
                stream);
    }

    private static int findBestSampleSize(int actualWidth, int actualHeight,
                                          int desiredWidth, int desiredHeight) {
        double wr = (double) actualWidth / desiredWidth;
        double hr = (double) actualHeight / desiredHeight;
        double ratio = Math.min(wr, hr);
        float n = 1.0f;
        while ((n * 1.5) <= ratio) {
            n *= 1.5;
        }

        return (int) n;
    }

    private static int getResizedDimension(int maxPrimary, int maxSecondary,
                                           int actualPrimary, int actualSecondary) {
        // If no dominant value at all, just return the actual.
        if (maxPrimary == 0 && maxSecondary == 0) {
            return actualPrimary;
        }

        // If primary is unspecified, scale primary to match secondary's scaling
        // ratio.
        if (maxPrimary == 0) {
            double ratio = (double) maxSecondary / (double) actualSecondary;
            return (int) (actualPrimary * ratio);
        }

        if (maxSecondary == 0) {
            return maxPrimary;
        }

        double ratio = (double) actualSecondary / (double) actualPrimary;
        int resized = maxPrimary;
        if (resized * ratio > maxSecondary) {
            resized = (int) (maxSecondary / ratio);
        }
        return resized;
    }

    /**
     * 获取文件的路径
     *
     * @param
     * @return
     */
    private String getFilePath(Context context, Uri uri) {

        String filePath = null;

        if (CONTENT.equalsIgnoreCase(uri.getScheme())) {

            Cursor cursor = context.getContentResolver().query(uri,
                    new String[]{Images.Media.DATA}, null, null, null);

            if (null == cursor) {
                return null;
            }

            try {
                if (cursor.moveToNext()) {
                    filePath = cursor.getString(cursor
                            .getColumnIndex(Images.Media.DATA));
                }
            } finally {
                cursor.close();
            }
        }

        // 从文件中选择
        if (FILE.equalsIgnoreCase(uri.getScheme())) {
            filePath = uri.getPath();
        }

        return filePath;
    }
    // 流转File
    public static File Stream2File(InputStream stream, String Filename) {
        File file = null;
        FileOutputStream fileOutputStream = null;
        try {
            file = new File(Constant.DOWNLOAD_IMAGE_PATH+Filename);
            fileOutputStream = new FileOutputStream(file);
            int length;
            byte[] buf = new byte[1024];
            while((length =stream.read(buf,0,buf.length)) !=-1){
                fileOutputStream.write(buf,0,length);
                fileOutputStream.flush();
            }

        } catch (IOException e) {
            e.printStackTrace();
        }finally {
            if(fileOutputStream !=null){
                try {
                    fileOutputStream.close();
                } catch (IOException e) {
                    e.printStackTrace();
                }
            }
            if(stream !=null){
                try {
                    stream.close();
                } catch (IOException e) {
                    e.printStackTrace();
                }
            }
        }
        return file;
    }
}
加载图片如下:<pre name="code" class="java">path为图片url</pre><p></p><pre> int subPostion = path.lastIndexOf("/");
final String fileName = path.substring(subPostion,path.length());
File file = new File(Constant.DOWNLOAD_IMAGE_PATH+fileName);
if(file.exists()){
BitmapCompressUtils compress = new BitmapCompressUtils();
BitmapCompressUtils.CompressOptions options = new BitmapCompressUtils.CompressOptions();
options.path = file.getAbsolutePath();
options.maxWidth=Constant.PHONE_WHITH;
options.maxHeight=Constant.PHONE_HEIGHT;
Bitmap map = compress.compressFromUri(mContext, options);
view.setImageBitmap(map);
}else {
AsyncThread.getInstance().start(new AsyncThread.OnListener() {
@Override
public Object doInBackground() {
// httpURLConnection方式解析
Bitmap map = null;
try {
URL url = new URL(path);
HttpURLConnection conn = (HttpURLConnection) url.openConnection();
conn.setDoInput(true);
conn.connect();
InputStream is = conn.getInputStream();
File file = BitmapCompressUtils.Stream2File(is, fileName);
BitmapCompressUtils compress = new BitmapCompressUtils();
BitmapCompressUtils.CompressOptions options = new BitmapCompressUtils.CompressOptions();
options.path = file.getAbsolutePath();
options.maxWidth = Constant.PHONE_WHITH;
options.maxHeight = Constant.PHONE_HEIGHT;
map = compress.compressFromUri(mContext, options);
} catch (Exception e) {
e.printStackTrace();
}
return map;
}
@Override
public void doFinish(Object object) {
Bitmap bitmap = (Bitmap) object;
//scaleView.setBackground(bd);
Log.e("bitmap", bitmap.getHeight() + "");
view.setImageBitmap(bitmap);
// ll_root.addView(imageViewTouch);
}
@Override
public void error(Exception e) {
e.printStackTrace();
}
});
}2.然后就是数据库增加字段要考虑周全,版本号, onUpgrade要考虑不同版本升级到最新版本,若添加字段忘记升级版本号(低级错
误!该打)要在升级方法中判断。
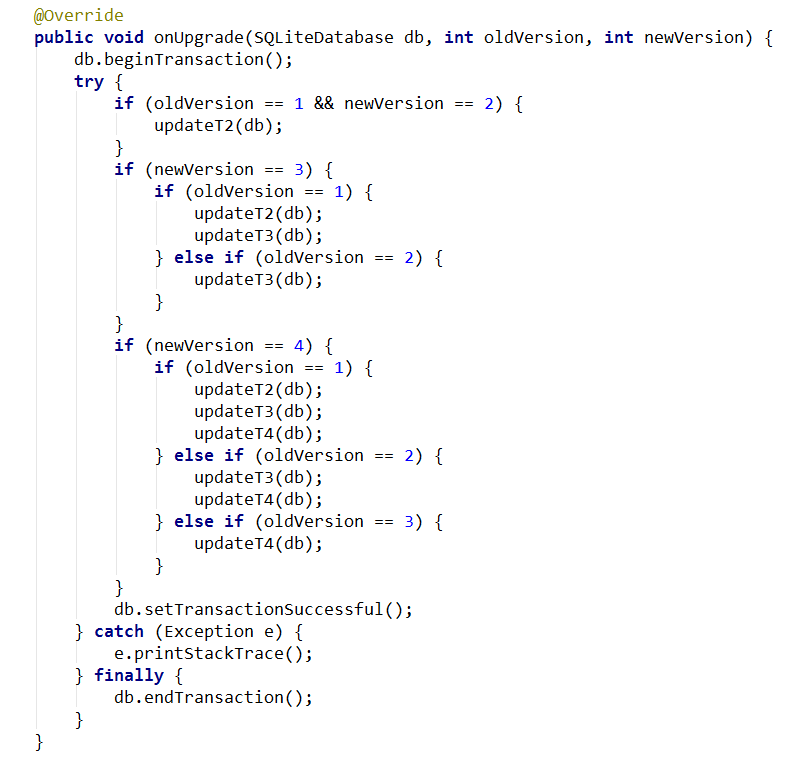
方法如下:
    /**
     * 检查表中某列是否存在
     *
     * @param db
     * @param tableName  表名
     * @param columnName 列名
     * @return
     */
    private boolean checkColumnExists(SQLiteDatabase db, String tableName
            , String columnName) {
        boolean result = false;
        Cursor cursor = null;
        try {
            //查询一行
            cursor = db.rawQuery("SELECT * FROM " + tableName + " LIMIT 0"
                    , null);
            result = cursor != null && cursor.getColumnIndex(columnName) != -1;
        } catch (Exception e) {
            e.printStackTrace();
        } finally {
            if (null != cursor && !cursor.isClosed()) {
                cursor.close();
            }
        }

        return result;
}-
Activity之间跳转的生命周期问题 :
背景 :有两个Activity A和B,A跳转到B,全局静态属性BitmapUtil.drr记录了文件的路径数据;A跳转到B时,A在onDestroy里清空drr数据,请问B在onCreate方法和onResume方法里读取到的drr数据是不是为空?测试结果:A跳转到B, A在onDestroy里清空了BitmapUtil.drr数据,导致在B的onCreate方法读取drr数据不为空,但onResume方法中读取的drr数据为空;
-
视频播放全屏底部白条问题 : 自己调整布局 以及设置 正确的参数 :
surface_view.getHolder().setFixedSize(mSurfaceViewWidth, mSurfaceViewHeight); -
代码设置TextView的字体大小 :记住默认是以SP为单位的,所以不用再转px了。
-
setOnScrollListener 滑动监听: ListView第一次初始化就会调用onScroll方法,坑啊
-
postDelayed 方法中运行的Runable是主线程调了Runnable的run方法而已,细节忘了,坑。。。。
postDelayed(new Runnable() {
@Override
public void run() {
}
},1000); -
更新umeng : 从4.6升级到5.0版 真的如官方所说,变化很大,很多api没有了 更新谨慎之
-
设置 android:allowBackup=”false” 这个属性存在bug,模式是true,在正式发布app的时候设置为false,但一般项目引用多个第三方库的时候,会存在坑
多个冲突,导致打包APP失败,查看日志也找到了google给出的建议,如下:Suggestion: add ‘tools:replace=”android:allowBackup”’ to element at AndroidManifest.xml:89:5-1052:19 to override.
所以添加 :
8.使用优测,发现一些安全漏洞和一些bug 但TM按照给出的修改建议,修改bug后,再测试还是有相同的漏洞,表示很坑啊。。。。
9.TextView 同时显示表情和文字, 可能存在表情被遮挡部分或者文字表情不居中显示bug, 操蛋,这个调试了好久,尝试过设置表情大小,文字大小,发现都不能根本解决问题,调试好久,
最终发现设置TextView的高度为wrap_content是不行的,要设置为相应的高度值 ,比如20dp 就OK了
10.自定义属性和support:appcompat-v7:22.2.0包属性冲突 : 根本的解决方法都是更改自定义控件的属性,但因为我的项目中大量使用了这个控件,以及项目紧张,
所以找了一个暂时的解决方法
最后,我抽空写了一个java程序,修改了所有使用这个控件的属性方法,从源头解决方法
-
APP启动显示默认的启动页面(跟微信类似) : 关键代码 android:theme=”@style/AppSplash”
-
Android 开发的时候在Application开启 严格模式,会查找到很多问题代码:
-
butterknife 插件使用: 鼠标点到R.layout.activity_main布局 ,再右键Generate–》ButterKnife 选项
-
MuritaleDex :这个是65536的问题,APP项目功能越来越多,引用越来越多第三方的Jar包的时候,就有很大的概率触发这个问题。Android5.0以上的系统,不需要担心这个问题。
compile ‘com.android.support:multidex:1.0.1’//引用multidex库
-
leak canary 内存泄漏检测工具 :下面这段代码这能放在项目APP的build文件中,而不能放在任何第三放的aar的build文件中。
真心坑!
LeakCanary工作原理
•RefWatcher.watch()创建一个KeyedWeakReference到监控的对象。
•接下来,在后台线程中检测这个引用是否被清除,如果没有将会触发GC。
•如果引用仍然没有清除,将heap内存dump到一个.hprof的文件存放到手机系统里。
•HeapAnalyzerService在另外一个独立的进程中启动,使用HeapAnalyzer解析heap内存通过HAHA这个项目
•HeapAnalyzer计算出到GC ROOTs的最短强引用路径决定是否发生Leak,然后建立导致泄漏的引用链。 结果被回传到应用程序进程的DisplayLeakService中,然后显示一个泄漏的通知。
16 . Android高级开发之性能优化典范 值得一看 ,开发规范很重要
17 . LinearLayout中设置android:orientation=”horizontal” ,它的高度以第一个view的高度为准,导致高度不对,解决方法:
在第一个View的外层添加一个LinearLayout ,设置高度为 android:layout_height=”match_parent”
18.multidex引发的后遗症, 当修改MAinActivity的FindFragment为InfoFragment时,会包Dex包中不存在InfoFragment类,其实是因为手机上的dex是旧的dex包,导致没有更新所致,
解决方法是删除掉手机上的APP,然后Clean一下AS工具,重新安装App即可
19.复制保留旧的XML布局文件,时间久了发现后面无法删除,查了好久都没发现什么问题导致,今天终于一点点删除XML布局文件的内容,删除到最后,发现有几个不能删除,一删除就编译错误,
查看最新的XML布局代码中,没有这几个内容,再看Activity中代码,发现在点击事件中,还留存着这几个Id,我擦,原来就是这个问题。
20 . 以后不要保留旧的XML文件 ,容易引发乱七八糟的bug,坑
21 . 融云刷新用户信息无效问题:
不能直接在你实现的类里异步请求更新userinfo,你看日志的会发现,其实融云根本没调用户接口请求,暂时没有去查原因,我的解决方法是通过EventBus消息传到MainActivity中再请求userinfo,然后更新userinfo,解决了更新用户信息的问题。


 2410
2410

 被折叠的 条评论
为什么被折叠?
被折叠的 条评论
为什么被折叠?
 到【灌水乐园】发言


