


参考文章
Storyboards Tutorial in iOS 7: Part 1
Storyboards Tutorial in iOS 7: Part 2
背景知识
Storyboard 在iOS5时引入,它能节约你创建UI的时间,先看一张storyboard的图:

看到它,你就像看到了一张设计图,一切已胸有成竹!
storyboard与常规nib(nib文件后来改名叫xib文件,小伙伴不用纠结它是啥)文件相比,有很多优势:
-
与散落的nib相比,storyboard能给你一种全局感。
-
storyboard可以描述各种场景之间的过渡,这种过渡被称作"segue",你通过简单的ctrl-dragging就能搞定,减少代码量。
-
storyboard支持table view的prototype cell,这意味着你可以在storyboard中编辑cell,减少代码量。
当然,世界上没有完美的东西,由于Interface Builder还不够强大,所以,有些nib能做到的,storyboard还不能。而且,你需要一个更大的显示器~
storyboard 把 view controller叫做:“scene”.
启动storyboard的系统预设
在工程plist中

storyboard操作
(iOS有所谓的三大container view controller,分别是Tab Bar Controller,Navigation Controller,Split View Controller )
注意:在缩放的时候无法拖拽控件到画板。
1.更改初始化视图控制器
- 选择初始化view controller,选中相应view controller ->
Attributes inspector,勾选Is Initial View Controller,如图
initial view controller
- 直接拖拽初始化箭头到相应视图控制器
如果更改了初始化的view controller,会发现初始化箭头发生移动,如图:
初始化箭头移动
2.添加Navigation Controller
- 选中要添加Navigation Controller的视图控制器,在Xcode menubar选择
Editor\Embed In\Navigation Controller - 从Object Library拖拽
在storyboard的画板上,会虚拟出一个Navigation Controller的scene,它当然不是一个真的UINavigationBar对象,而是虚拟一个,方便我们操作和理解。
当我们点击与Navigation Controller连接的视图控制器,点击Attributes inspector,会发现Simulated Metrics,如图:

Inferred是storyboard的缺省设置,这意味着该视图控制器在Navigation Controller中时,会展示一个navigation bar (当然,在其他container view controller中,会展示相对的bar,比如,在一个tab bar controller中会展示一个tab bar).Simulated Metrics并不能用于runtime.
3.创建relationship segue
如图所示:

Ctrl-drag,从tab bar controller 连到navigation controller,松手,弹出 popup menu,如图:

选择Relationship Segue – view controllers,结果如图:

4.命名tabbar controller和navigation controller中的bar item
并非在tabbar controller 里,而是在与其相连、对应的controller里,如图:

同理,修改navigation bar,也是在对应的controller里,而不是虚拟的navigation controller,如图:

5.自定义UI类
就像你不用storyboard一样,创建一个类,当然,就不要勾选xib选项了,从storyboard的object library中拖拽出它的父类UI,在此UI的Indentity inspector中,将这个类与UI绑定,如图:

6.在storyboard中找到相应的视图控制器
举例,找到tab bar controller第一个tab————一个带有导航栏的视图控制器,
 UITabBarController *tabBarController = (UITabBarController *)self.window.rootViewController;
    UINavigationController *navigationController = [tabBarController viewControllers][0];
    PlayersViewController *playersViewController = [navigationController viewControllers][0];
7.Prototype cells
我们用static cells,一般是这样的:
- (UITableViewCell *)tableView:(UITableView *)tableView cellForRowAtIndexPath:(NSIndexPath *)indexPath
{
    static NSString *CellIdentifier = @"Cell";

    UITableViewCell *cell = [tableView dequeueReusableCellWithIdentifier:CellIdentifier];
    if (cell == nil) {
        cell = [[UITableViewCell alloc] initWithStyle:UITableViewCellStyleDefault
                                      reuseIdentifier:CellIdentifier];
    }

    // Configure the cell...
    return cell;
}
用Prototype cells是这样的:
- (UITableViewCell *)tableView:(UITableView *)tableView cellForRowAtIndexPath:(NSIndexPath *)indexPath
{
    UITableViewCell *cell = [tableView dequeueReusableCellWithIdentifier:@"PlayerCell"];

    // Configure the cell...

    return cell;
}
我们选中控制器的tableview空间,第一个就是cell的选择,如图:
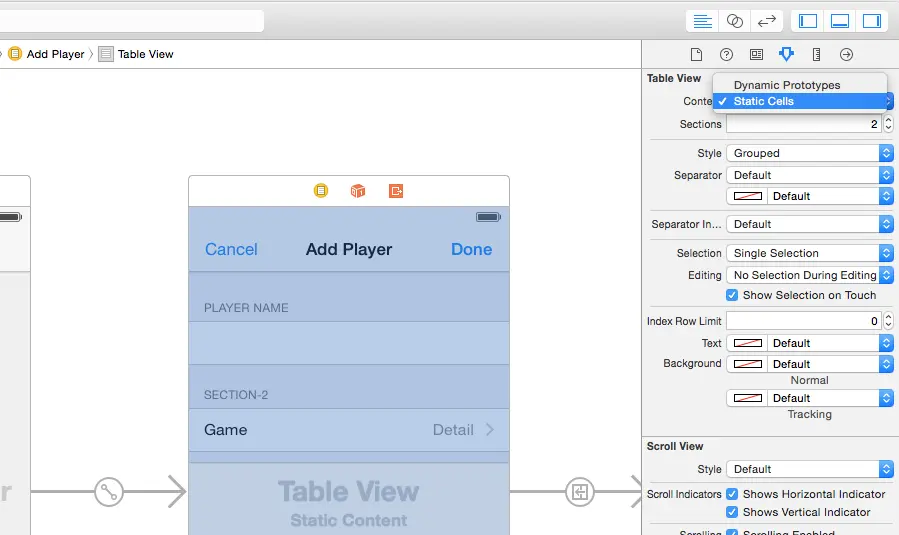
默认是prototype cell.
有没有想过把prototype cell 用在不同的table view 中?我这样想过,了解了一下,发现目前storyboard还不支持,如果想曲线救国,实现起来挺复杂的,参见Reusable UITableView's prototype cell。
8.Static Cell
如果用static cell,我们就不用为tableview创建data source,因为它就是个静态的cell,不需重用,所以,你可以把该cell上的UI控件拖拽到对应的controller(Prototype cell是不行的),如图:


9.添加bar button item 到导航栏
拖拽一个bar button item 到拥有导航栏的控制器上,而不是那个虚拟的navigation controller.
10.segue
我们在前面说过container view controller 有一种relationship segue,它表示一个container view controller上所拥有的view controller,另外,就是用于view controller之间过渡的segue,它可以由button,cell,gesture等等来触发。
它的优势在于,节省很多代码量,很直观,你不用再写什么方法,或者像xib那样连接诸如IBAcation之类的东西。
- 操作segue
例如:
- (void)prepareForSegue:(UIStoryboardSegue *)segue sender:(id)sender
{
    if ([segue.identifier isEqualToString:@"AddPlayer"]) {

        UINavigationController *navigationController = segue.destinationViewController;
        PlayerDetailsViewController *playerDetailsViewController = [navigationController viewControllers][0];
        playerDetailsViewController.delegate = self;
    }
} 注意:记得给segue添加Identifier
转载自:http://www.jianshu.com/p/2ec2c19f183e


 2万+
2万+


 被折叠的 条评论
为什么被折叠?
被折叠的 条评论
为什么被折叠?
 到【灌水乐园】发言


