


在上次介绍了Zabbixd 的安装,安装之后接下来介绍zabbix如何监控mysql
环境:Zabbix-Server:PS01,192.168.199.151
MySQL服务器:PS02,192.168.199.152
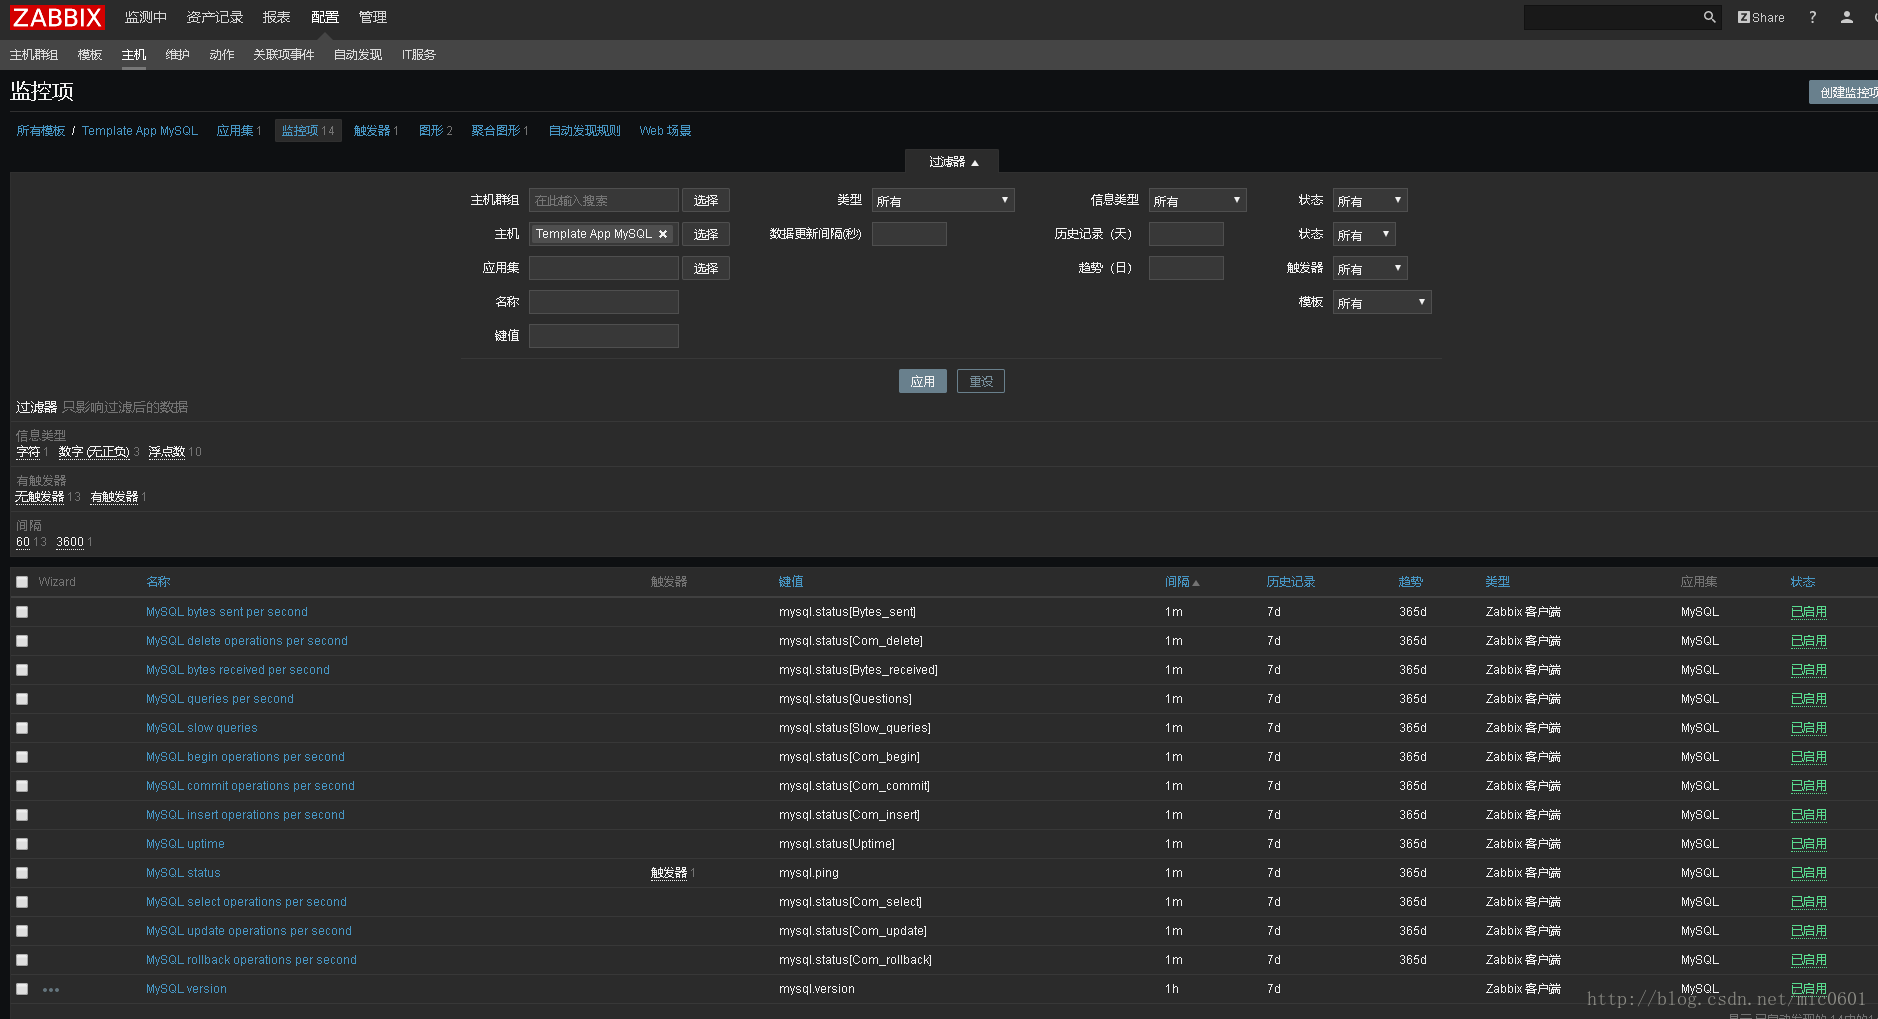
zabbix提供了很多监控模版,其中就有关于MYSQL的模版
首先需要在
MySQL服务器安装zabbix-agent
同样安装zabbix的yum源
# rpm -ivh http://repo.zabbix.com/zabbix/3.2/rhel/7/x86_64/zabbix-release-3.2-1.el7.noarch.rpm
# yum -y install zabbix-agent
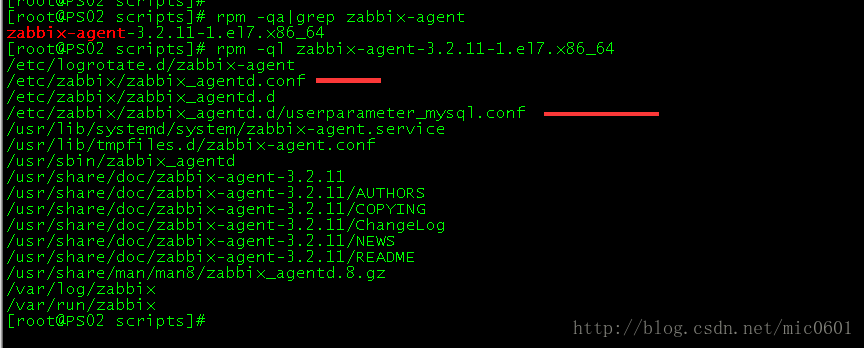
zabbix-agent产生相关文件和目录
/etc/zabbix/zabbix_agentd.conf ## zabbix-agent配置文件
/etc/zabbix/zabbix_agentd.d/userparameter_mysql.conf ## mysql的监控配置文件
接下来修改 zabbix-agent配置文件 /etc/zabbix/zabbix_agentd.conf
PidFile=/var/run/zabbix/zabbix_agentd.pid  ## zabbix-agent服务进程
LogFile=/var/log/zabbix/zabbix_agentd.log	## zabbix-agent 日志
Server=192.168.199.151	## 配置为zabbix-server的IP,多个ip使用逗号分隔
ServerActive=192.168.199.151	## zabbix 主动监控server的ip地址
Hostname=PS02	## Hostname为被监控的MYSQL主机名,必须和zabbix web上配置的一直,否则zabbix主动监控无法正常工作
Include=/etc/zabbix/zabbix_agentd.d/*.conf  ## 加载zabbix-agent监控的配置文件
修改
mysql的监控配置文件/etc/zabbix/zabbix_agentd.d/userparameter_mysql.conf
#注释掉行,重新写 UserParameter=mysql.status[*]
UserParameter=mysql.status[*],/etc/zabbix/chk_mysql.sh $1
修改UserParameter=mysql.ping行
UserParameter=mysql.ping,HOME=/etc/zabbix mysqladmin -uroot -pxxpassword ping | grep -c alive ## mysqladmin后面是一串命令,可以讲mysqladmin -uroot -pxxpassword ping 在本地执行,看看是否得到mysqld is alive
# For all the following commands HOME should be set to the directory that has .my.cnf file with password information.

# Flexible parameter to grab global variables. On the frontend side, use keys like mysql.status[Com_insert].
# Key syntax is mysql.status[variable].
#UserParameter=mysql.status[*],echo "show global status where Variable_name='$1';" | HOME=/etc/zabbix mysql -N | awk '{print $$2}'

# Flexible parameter to determine database or table size. On the frontend side, use keys like mysql.size[zabbix,history,data].
# Key syntax is mysql.size[<database>,<table>,<type>].
# Database may be a database name or "all". Default is "all".
# Table may be a table name or "all". Default is "all".
# Type may be "data", "index", "free" or "both". Both is a sum of data and index. Default is "both".
# Database is mandatory if a table is specified. Type may be specified always.
# Returns value in bytes.
# 'sum' on data_length or index_length alone needed when we are getting this information for whole database instead of a single table
UserParameter=mysql.size[*],bash -c 'echo "select sum($(case "$3" in both|"") echo "data_length+index_length";; data|index) echo "$3_length";; free) echo "data_free";; esac)) from informati
on_schema.tables$([[ "$1" = "all" || ! "$1" ]] || echo " where table_schema=\"$1\"")$([[ "$2" = "all" || ! "$2" ]] || echo "and table_name=\"$2\"");" | HOME=/etc/zabbix mysql -N'

UserParameter=mysql.ping,HOME=/etc/zabbix mysqladmin -uroot -pxxpassword ping | grep -c alive
UserParameter=mysql.status[*],/etc/zabbix/chk_mysql.sh $1
UserParameter=mysql.version,mysql -V# vim /etc/zabbix/chk_mysql.sh
#!/bin/bash
# -------------------------------------------------------------------------------
# FileName: check_mysql.sh
# Revision: 1.0
# Date: 2018/01/05
# Author: SakuraGaara
# Email: mic0601@163.com
# Description:
# Notes: ~
# 用户名
MYSQL_USER='root'
# 密码
MYSQL_PWD='xxpassword'
# 主机地址/IP
MYSQL_HOST='127.0.0.1'
# 端口
MYSQL_PORT='3306'
# 数据连接
MYSQL_CONN="/usr/local/percona-server/bin/mysqladmin -u${MYSQL_USER} -h${MYSQL_HOST} -P${MYSQL_PORT}"
# 参数是否正确
if [ $# -ne "1" ];then
echo "arg error!"
fi
# 获取数据
case $1 in
Uptime)
result=`${MYSQL_CONN} status|cut -f2 -d":"|cut -f1 -d"T"`
echo $result
;;
Com_update)
result=`${MYSQL_CONN} extended-status |grep -w "Com_update"|cut -d"|" -f3`
echo $result
;;
Slow_queries)
result=`${MYSQL_CONN} status |cut -f5 -d":"|cut -f1 -d"O"`
echo $result
;;
Com_select)
result=`${MYSQL_CONN} extended-status |grep -w "Com_select"|cut -d"|" -f3`
echo $result
;;
Com_rollback)
result=`${MYSQL_CONN} extended-status |grep -w "Com_rollback"|cut -d"|" -f3`
echo $result
;;
Questions)
result=`${MYSQL_CONN} status|cut -f4 -d":"|cut -f1 -d"S"`
echo $result
;;
Com_insert)
result=`${MYSQL_CONN} extended-status |grep -w "Com_insert"|cut -d"|" -f3`
echo $result
;;
Com_delete)
result=`${MYSQL_CONN} extended-status |grep -w "Com_delete"|cut -d"|" -f3`
echo $result
;;
Com_commit)
result=`${MYSQL_CONN} extended-status |grep -w "Com_commit"|cut -d"|" -f3`
echo $result
;;
Bytes_sent)
result=`${MYSQL_CONN} extended-status |grep -w "Bytes_sent" |cut -d"|" -f3`
echo $result
;;
Bytes_received)
result=`${MYSQL_CONN} extended-status |grep -w "Bytes_received" |cut -d"|" -f3`
echo $result
;;
Com_begin)
result=`${MYSQL_CONN} extended-status |grep -w "Com_begin"|cut -d"|" -f3`
echo $result
;;
*)
echo "Usage:$0(Uptime|Com_update|Slow_queries|Com_select|Com_rollback|Questions|Com_insert|Com_delete|Com_commit|Bytes_sent|Bytes_received|Com_begin)"
;;
esac# chmod +x /etc/zabbix/chk_mysql.sh# systemctl start zabbix-agent
之后在zabbix-server端执行测试,看是否能获取监控数据
# zabbix_get -s 192.168.199.152 -p 10050 -k "mysql.status[Uptime]"
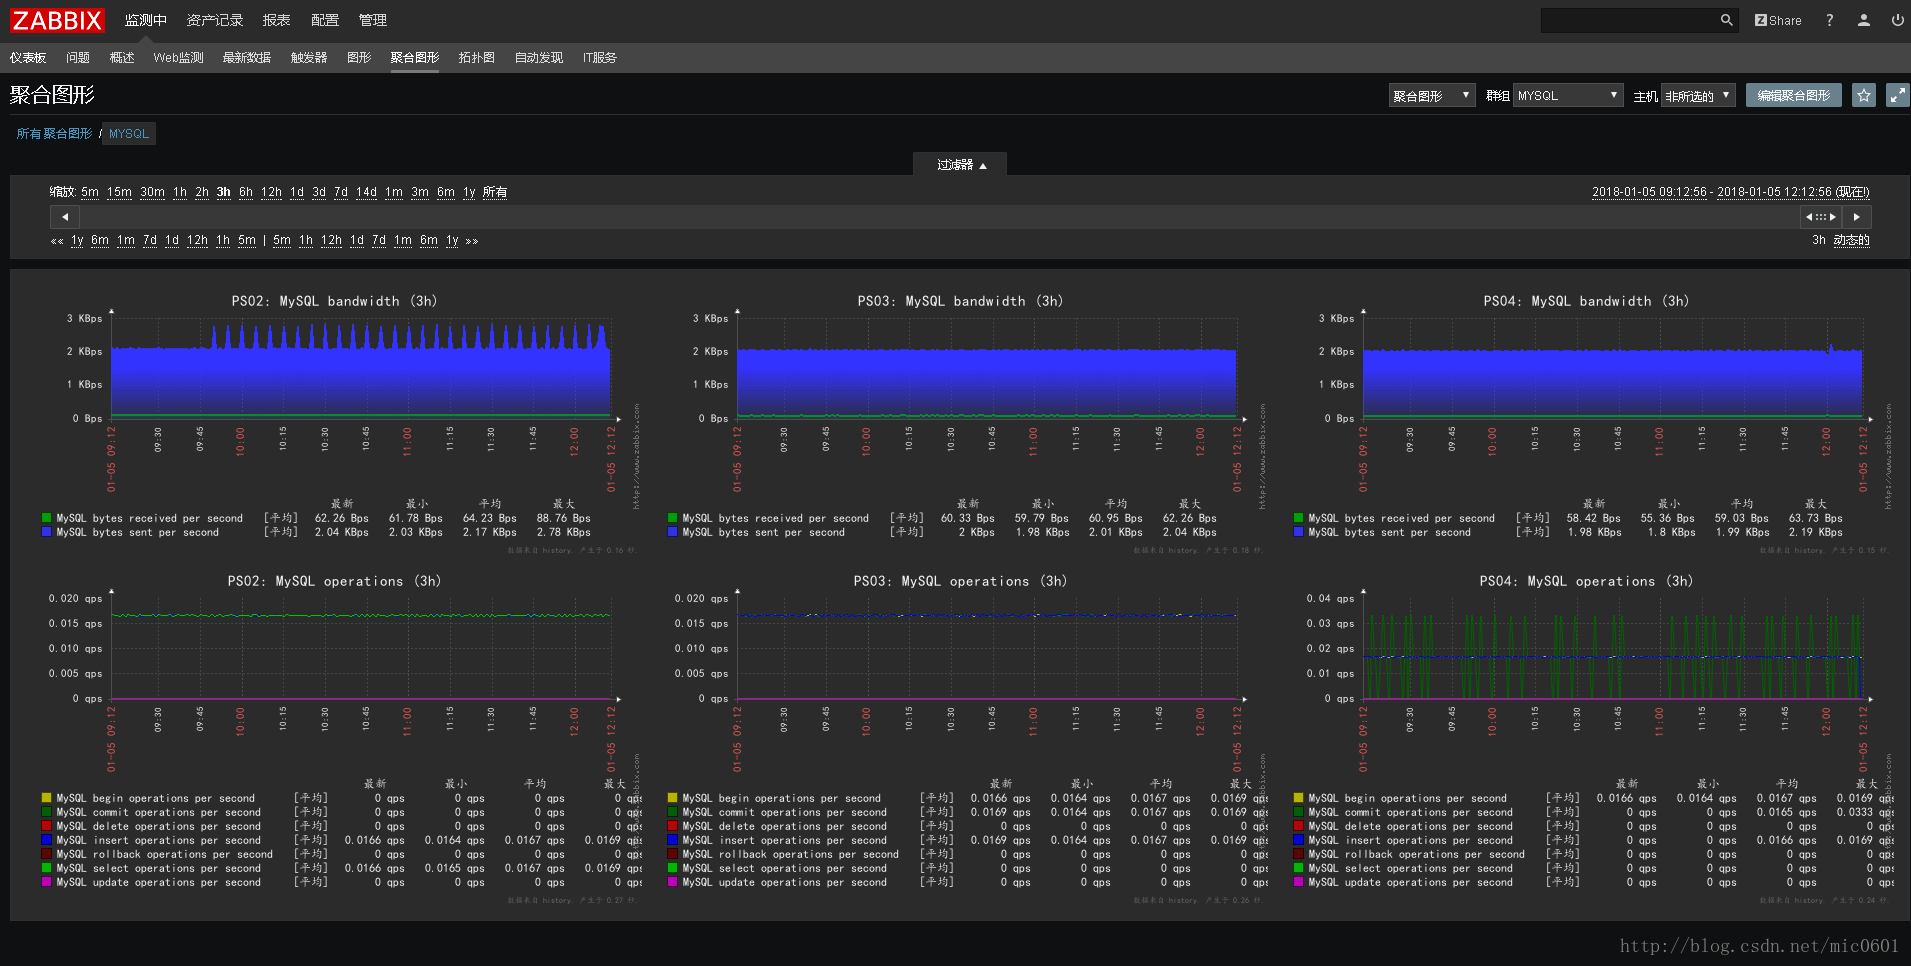
获取数据没有问题,就可以在web中添加MYSQL服务器监控了
--------- 问题总结 ---------
1,开启zabbix-agent服务时失败,报错
Job for zabbix-server.service failed because a fatal signal was delivered to the control process. See "systemctl status zabbix-server.service" and "journalctl -xe" for details.
关闭selinux
# vim /etc/selinux/config
SELINUX=disabled
# setenforce 02,在zabbix_get的时候,出现mysqladmin: [Warning] Using a password on the command line interface can be insecure.
这样会影响脚本获取数据,这是因为mysqladmin提示不让密码明文显示在命令行中
解决方案:
打开mysql配置文件,在[client]添加user,password

[client]
user=zabbix
password= zabbix
port= 3306
# mysql_config_editor set --login-path=local --host=127.0.0.1 --user=zabbix --password
# service mysqld restart


 700
700

 被折叠的 条评论
为什么被折叠?
被折叠的 条评论
为什么被折叠?
 到【灌水乐园】发言


