


Jupyter Notebook当前版本为6.3.0。
概述
Jupyter Notebook默认是以token来验证身份的。当在命令行使用jupyter notebook命令启动Jupyter Notebook服务器时,会自动生成一个token用来验证身份。
PS C:\Users\Administrator> jupyter notebook
[I 21:48:21.163 NotebookApp] Serving notebooks from local directory: C:\Users\Administrator
[I 21:48:21.163 NotebookApp] The Jupyter Notebook is running at:
[I 21:48:21.164 NotebookApp] http://localhost:8888/?token=da83de690be95fec7863b97942cc1fadfdaba7ab430809a8
[I 21:48:21.164 NotebookApp]  or http://127.0.0.1:8888/?token=da83de690be95fec7863b97942cc1fadfdaba7ab430809a8
[I 21:48:21.164 NotebookApp] Use Control-C to stop this server and shut down all kernels (twice to skip confirmation).
[C 21:48:21.275 NotebookApp]
    To access the notebook, open this file in a browser:
        file:///C:/Users/Administrator/AppData/Roaming/jupyter/runtime/nbserver-1808-open.html
    Or copy and paste one of these URLs:
        http://localhost:8888/?token=da83de690be95fec7863b97942cc1fadfdaba7ab430809a8
     or http://127.0.0.1:8888/?token=da83de690be95fec7863b97942cc1fadfdaba7ab430809a8
当更换浏览器或者注销(logout)之后,再次打开http://localhost:8888/会跳转到http://localhost:8888/login,如下图所示。
通过上面命令行内容或者jupyter notebook list可获取当前token。
PS C:\Users\Administrator> jupyter notebook list
Currently running servers:
http://localhost:8888/?token=da83de690be95fec7863b97942cc1fadfdaba7ab430809a8 :: C:\Users\Administrator

设置密码
在上面的登录页面中可以在输入Token之后设置密码。
在Jupyter Notebook 6.0之后的版本中,使用jupyter notebook password命令设置密码可能更简单。
PS C:\Users\Administrator> jupyter notebook password
Enter password:
Verify password:
[NotebookPasswordApp] Wrote hashed password to C:\Users\Administrator\.jupyter\jupyter_notebook_config.json
在输入密码后,提示经过哈希后的密码保存在C:\Users\Administrator\.jupyter\jupyter_notebook_config.json。
jupyter_notebook_config.json文件内容为:
{
  "NotebookApp": {
    "password": "sha1:1fa311682b41:cd33fc2cc572b7df960690bbad8a7f4264198740"
  }
}
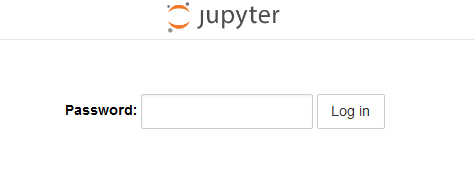
设置密码后,再次使用jupyter notebook命令启动Jupyter Notebook服务器时,会出现如下页面提示输入密码。
再次运行jupyter notebook list可发现当前Jupyter Notebook服务器地址不再显示token。
PS C:\Users\Administrator> jupyter notebook list
Currently running servers:
http://localhost:8888/ :: C:\Users\Administrator
取消密码登录
最简单粗暴的方法就是删掉jupyter_notebook_config.json文件,但是该文件是jupyter的整体配置文件,如果有其他设置的话,删除不太方便。可以单独把"password": "sha1:1fa311682b41:cd33fc2cc572b7df960690bbad8a7f4264198740"密码这个键值对删除。
然后再启动Jupyter Notebook服务器,验证方式就会改回token方式。


 415
415

 被折叠的 条评论
为什么被折叠?
被折叠的 条评论
为什么被折叠?
 到【灌水乐园】发言


