


电话应用框架
Android电话模块是一个典型的分层结构设计,如下:
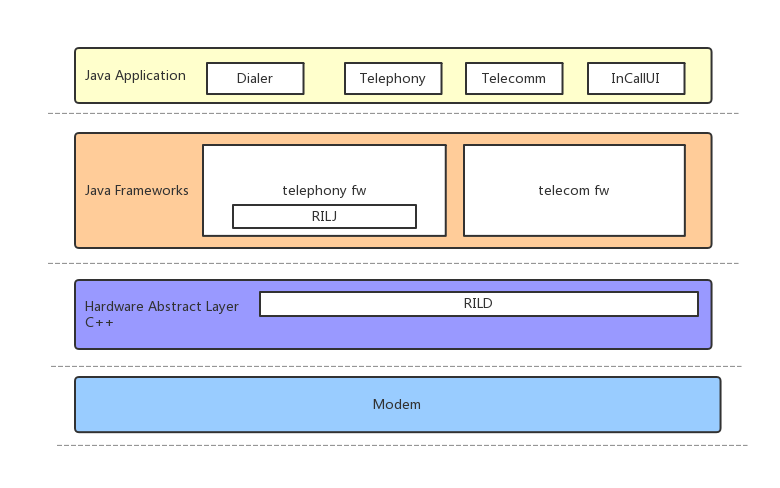
电话框架分为4个层次,分别为:应用层、框架层(framework层,简称fw)、RIL(Radio Interface Layer)、modem。
应用层:app应用,包括Dialer.apk、TeleService.apk、Telecom.apk、InCallUI.apk。
其中Dialer.apk跑在com.android.dialer进程中,TeleService.apk跑在常驻进程com.android.phone进程中,Telecom.apk跑在system进程中、InCallUI.apk跑在com.android.incallui进程中。
框架层:包括telephony fw、telecom fw。Code分别位于frameworks/opt/telephony、frameworks/base/telecomm。
RIL:位于User Libraries层中的HAL层,提供AP(Application Processor,应用处理器)和BP(Baseband Processor,基带处理器)之间的通信功能。RIL通常分为RILJ、RILC,RILJ即为java的RIL.java,code位于框架层,RILC才是真正的RIL层。Android的RIL驱动模块,在hardware/ril目录下,一共分rild,libril.so以及librefrence_ril.so三个部分。
Modem:位于BP,负责实际的无线通信能力处理
实现各进程交互的aidl:

拨号流程框架流程

-
packages/apps/Dialer/java/com/android/dialer/dialpadview/DialpadFragment.java
用户点击拨号盘的拨号按钮,此时开始呼叫长征第一步,dialpadfragment的onclick方法会响应点击事件。
  @Override
  public void onClick(View view) {
    int resId = view.getId();
    if (resId == R.id.dialpad_floating_action_button) {
      view.performHapticFeedback(HapticFeedbackConstants.VIRTUAL_KEY);
      handleDialButtonPressed();
    }
找到拨号界面对应的l ayout 界面布局文件dialer/dialpadview/res/layout/dialpad_fragment.xml ,其中就包含了打开拨号盘的浮动按钮,其定义如下

在该类中 运行:handleDialButtonPressed(); 方法,判断是否号码是否为空,是否非法等情况


10 之前没有这一步,直接调用 DialerUtils.startActivityWithErrorToast() 方法
携带Intent.ACTION_CALL的Intent Action会走到TelecomUtil placeCall流程,否则直接context.startActivity(intent);
    public static void startActivityWithErrorToast(
            final Context context, final Intent intent, int msgId) {
        try {
            if ((Intent.ACTION_CALL.equals(intent.getAction()))) {

                    placeCallOrMakeToast(context, intent);
            } else {
                context.startActivity(intent);
startActivityWithErrorToast() 方法 调用下列方法
hasCallPhonePermission()会检查是否有呼叫权限,是否有Manifest.permission.CALL_PHONE)权限:
    private static void placeCallOrMakeToast(Context context, Intent intent) {

        final boolean hasCallPermission = TelecomUtil.placeCall(context, intent);
        if (!hasCallPermission) {

            Toast.makeText(context, "Cannot place call without Phone permission", Toast.LENGTH_SHORT)
                    .show();
        }
} public static boolean placeCall(Context context, Intent intent) {
if (hasCallPhonePermission(context)) {
getTelecomManager(context).placeCall(intent.getData(), intent.getExtras());
return true;
}
return false;
}TelecomManager.placeCall主要获取TelecomService的Binder接口,跨进程进入到TelecomService(system进程)内部,至此 com.android.dialer 进程的工作暂时完成
  private static TelecomManager getTelecomManager(Context context) {
    return (TelecomManager) context.getSystemService(Context.TELECOM_SERVICE);
}Telecom Manager 获取ITelecomService 服务并调用其placeCall 方法继续传递intent 发出通话呼叫请求,将涉及第一次跨进程的服务调用。
    public void placeCall(Uri address, Bundle extras) {
        ITelecomService service = getTelecomService();
        if (service != null) {
            if (address == null) {
                Log.w(TAG, "Cannot place call to empty address.");
            }
            try {
                service.placeCall(address, extras == null ? new Bundle() : extras,
                        mContext.getOpPackageName());
            } catch (RemoteException e) {
                Log.e(TAG, "Error calling ITelecomService#placeCall", e);
            }
        }
    }
其中,getTelecomService() 方法
    private ITelecomService getTelecomService() {
        if (mTelecomServiceOverride != null) {
            return mTelecomServiceOverride;
        }
        return ITelecomService.Stub.asInterface(ServiceManager.getService(Context.TELECOM_SERVICE));
    }
调用ITelecomService的placeCall方法,此处是aidl调用,对应的我们需要找到接收的地方,按照命名规则应该是TelecomServiceImpl:
创建UserCallIntentProcessorFactory,调用processIntent方法处理呼叫:
private final ITelecomService.Stub mBinderImpl = new ITelecomService.Stub() {

        @Override
        public void placeCall(Uri handle, Bundle extras, String callingPackage) {
            try {
                synchronized (mLock) {
                    final UserHandle userHandle = Binder.getCallingUserHandle();
                    long token = Binder.clearCallingIdentity();
                    try {
                        final Intent intent = new Intent(Intent.ACTION_CALL, handle);
                        mUserCallIntentProcessorFactory.create(mContext, userHandle)
                                .processIntent(
                                        intent, callingPackage, hasCallAppOp && hasCallPermission);
                    }
                }
            }
        }
}
processIntent判断是否是呼叫请求:
    public void processIntent(Intent intent, String callingPackageName,
            boolean canCallNonEmergency, boolean isLocalInvocation) {
        // Ensure call intents are not processed on devices that are not capable of calling.
        if (!isVoiceCapable()) {
            return;
        }

        String action = intent.getAction();

        if (Intent.ACTION_CALL.equals(action) ||
                Intent.ACTION_CALL_PRIVILEGED.equals(action) ||
                Intent.ACTION_CALL_EMERGENCY.equals(action)) {
            processOutgoingCallIntent(intent, callingPackageName, canCallNonEmergency,
                    isLocalInvocation);
        }
}- Intent.ACTION_CALL: 可以拨打普通呼叫
public static final String ACTION_CALL = "android.intent.action.CALL";
- Intent.ACTION_CALL_PRIVILEGED:可以拨打任意类型号码
public static final String ACTION_CALL_PRIVILEGED = "android.intent.action.CALL_PRIVILEGED";
- Intent.ACTION_CALL_EMERGENCY:可以拨打紧急呼叫
public static final String ACTION_CALL_EMERGENCY = "android.intent.action.CALL_EMERGENCY";
processOutgoingCallIntent方法:
private void processOutgoingCallIntent(Intent intent, String callingPackageName,
            boolean canCallNonEmergency, boolean isLocalInvocation) {
        ------
        ------

        int videoState = intent.getIntExtra(
                TelecomManager.EXTRA_START_CALL_WITH_VIDEO_STATE,
                VideoProfile.STATE_AUDIO_ONLY);
        Log.d(this, "processOutgoingCallIntent videoState = " + videoState);

        intent.putExtra(CallIntentProcessor.KEY_IS_PRIVILEGED_DIALER,
                isDefaultOrSystemDialer(callingPackageName));

        // Save the user handle of current user before forwarding the intent to primary user.
        intent.putExtra(CallIntentProcessor.KEY_INITIATING_USER, mUserHandle);

        sendIntentToDestination(intent, isLocalInvocation, callingPackageName);
    }
sendIntentToDestination 方法:
    private boolean sendIntentToDestination(Intent intent, boolean isLocalInvocation,
            String callingPackage) {
        intent.putExtra(CallIntentProcessor.KEY_IS_INCOMING_CALL, false);
        intent.setFlags(Intent.FLAG_RECEIVER_FOREGROUND);
        if (isLocalInvocation) {
            // We are invoking this from TelecomServiceImpl, so TelecomSystem is available.  Don't
            // bother trampolining the intent, just sent it directly to the call intent processor.
            // TODO: We should not be using an intent here; this whole flows needs cleanup.
            Log.i(this, "sendIntentToDestination: send intent to Telecom directly.");
            synchronized (TelecomSystem.getInstance().getLock()) {
                TelecomSystem.getInstance().getCallIntentProcessor().processIntent(intent,
                        callingPackage);
            }
        } else {
            // We're calling from the UserCallActivity, so the TelecomSystem is not in the same
            // process; we need to trampoline to TelecomSystem in the system server process.
            Log.i(this, "sendIntentToDestination: trampoline to Telecom.");
            TelecomManager tm = (TelecomManager) mContext.getSystemService(Context.TELECOM_SERVICE);
            tm.handleCallIntent(intent);
        }
        return true;
    }
安卓10 这里去除了以前的广播机制
调用getTelecomSystem方法返回TelecomSystem对象,调用getCallIntentProcessor()返回CallIntentProcessor对象,然后调用processIntent方法
    public void processIntent(Intent intent, String callingPackage) {
        final boolean isUnknownCall = intent.getBooleanExtra(KEY_IS_UNKNOWN_CALL, false);
        Log.i(this, "onReceive - isUnknownCall: %s", isUnknownCall);

        Trace.beginSection("processNewCallCallIntent");
        if (isUnknownCall) {
            processUnknownCallIntent(mCallsManager, intent);
        } else {
            processOutgoingCallIntent(mContext, mCallsManager, intent, callingPackage);
        }
        Trace.endSection();
    }
processOutgoingCallIntent方法,调用CallsManager的startOutgoingCall()方法创建Call,后new NewOutgoingCallIntentBroadcaster,调用processIntent()方法:
CallsManager 创建Call, 链接,监听Call状态
下面先分析 startOutgoingCall()方法,
再分析 new NewOutgoingCallIntentBroadcaster,的processIntent()方法
    static void processOutgoingCallIntent(
            Context context,
            CallsManager callsManager,
            Intent intent,
            String callingPackage) {

--------

        // Send to CallsManager to ensure the InCallUI gets kicked off before the broadcast returns

// 先执行此处代码,更新 ui 界面
        CompletableFuture<Call> callFuture = callsManager
                .startOutgoingCall(handle, phoneAccountHandle, clientExtras, initiatingUser,
                        intent, callingPackage);

        final Session logSubsession = Log.createSubsession();
        callFuture.thenAccept((call) -> {
            if (call != null) {
                Log.continueSession(logSubsession, "CIP.sNOCI");
                try {

// 实际的,将上层信息下发到telephony, ril
                    sendNewOutgoingCallIntent(context, call, callsManager, intent);
                } finally {
                    Log.endSession();
                }
            }
        });
    }
其中的 sendNewOutgoingCallIntent 方法如下定义:‘
    static void sendNewOutgoingCallIntent(Context context, Call call, CallsManager callsManager,
            Intent intent) {
        // Asynchronous calls should not usually be made inside a BroadcastReceiver because once
        // onReceive is complete, the BroadcastReceiver's process runs the risk of getting
        // killed if memory is scarce. However, this is OK here because the entire Telecom
        // process will be running throughout the duration of the phone call and should never
        // be killed.
        final boolean isPrivilegedDialer = intent.getBooleanExtra(KEY_IS_PRIVILEGED_DIALER, false);

        NewOutgoingCallIntentBroadcaster broadcaster = new NewOutgoingCallIntentBroadcaster(
                context, callsManager, call, intent, callsManager.getPhoneNumberUtilsAdapter(),
                isPrivilegedDialer);

        // If the broadcaster comes back with an immediate error, disconnect and show a dialog.
        NewOutgoingCallIntentBroadcaster.CallDisposition disposition = broadcaster.evaluateCall();
        if (disposition.disconnectCause != DisconnectCause.NOT_DISCONNECTED) {
            disconnectCallAndShowErrorDialog(context, call, disposition.disconnectCause);
            return;
        }

        broadcaster.processCall(disposition);
} public void processCall(CallDisposition disposition) {
if (disposition.callImmediately) {
boolean speakerphoneOn = mIntent.getBooleanExtra(
TelecomManager.EXTRA_START_CALL_WITH_SPEAKERPHONE, false);
int videoState = mIntent.getIntExtra(
TelecomManager.EXTRA_START_CALL_WITH_VIDEO_STATE,
VideoProfile.STATE_AUDIO_ONLY);
placeOutgoingCallImmediately(mCall, disposition.callingAddress, null,
speakerphoneOn, videoState);
// Don't return but instead continue and send the ACTION_NEW_OUTGOING_CALL broadcast
// so that third parties can still inspect (but not intercept) the outgoing call. When
// the broadcast finally reaches the OutgoingCallBroadcastReceiver, we'll know not to
// initiate the call again because of the presence of the EXTRA_ALREADY_CALLED extra.
}其中 placeOutgoingCallImmediately 代码:
    private void placeOutgoingCallImmediately(Call call, Uri handle, GatewayInfo gatewayInfo,
            boolean speakerphoneOn, int videoState) {
        Log.i(this,
                "Placing call immediately instead of waiting for OutgoingCallBroadcastReceiver");
        // Since we are not going to go through "Outgoing call broadcast", make sure
        // we mark it as ready.
        mCall.setNewOutgoingCallIntentBroadcastIsDone();
        mCallsManager.placeOutgoingCall(call, handle, gatewayInfo, speakerphoneOn, videoState);
    }
先执行了 startOutgoingCall 方法 ,然后再 执行 broadcaster. processCall () 方法
备注:
这里先设置一个分支,先分析 callsManager.startOutgoingCall 方法
CallsManager 的拨号处理流程
CallsManager.statOutgoingCall 的主要逻辑是创建、更新和保存Call 对象
startOutgoingCall 新建一个(或者重用) call, 将CallsManager绑定监听该 call, 然后通知 callsManager 的监听者, 添加了一个 call
Call startOutgoingCall(Uri handle, PhoneAccountHandle phoneAccountHandle, Bundle extras) {
        Call call = getNewOutgoingCall(handle);

        // 如果是MMI 号码
        if ((isPotentialMMICode(handle) || isPotentialInCallMMICode) && !needsAccountSelection) {
            // 让CallsManager监听call的行为
            call.addListener(this);

        } else if (!mCalls.contains(call)) {
            // 确保Call不会重复添加(getNewOutgoingCall有重用机制)

            // 添加call, 然后callsManager通知监听者,添加了一个call
            addCall(call);
        }

        return call;
    }
addCall 方法:addCall 添加call, 然后callsManager通知监听者,添加了一个call

CallsManager对象将保存多个Call 对象到mCalls 集合中, Call 对
 最低0.47元/天 解锁文章


 2074
2074


 被折叠的 条评论
为什么被折叠?
被折叠的 条评论
为什么被折叠?
 到【灌水乐园】发言


