


前言
在Cesium的学习中,学会读文档十分重要!!!在这里附上中文文档Cesium中文文档1.95
上一篇笔记讲解了点和线的绘制,这次我们来学习一下如何绘制面及点线面绘制工具的封装。面的绘制过程与前面线的大致一致,都是先注册鼠标左击事件,左击更新绘制面,鼠标移动动态绘制面,右击结束绘制。
而点线面的绘制代码的封装则是为了代码的复用,后续许多地方将用到代码此代码,如小车的运动轨迹绘制,积云的大量生成等。
一、面的绘制
1.1、面的鼠标左击事件
与线一样,通过CallbackProperty事件来实现线的动态更新,为了方便显示,我们在面的边缘添加了线,因此,我们要判断,当只绘制了一个点时,只绘制这个点到鼠标的线,不绘制面,当大于一个点时,才开始绘制面。
drawHandler.setInputAction((e) => {
  let p = viewer.scene.pickPosition(e.position);
  if (!p) return;
  points.push(p);
  if (points.length == 1) {
    //一个顶点+移动点
    viewer.entities.add({
      polyline: {
        positions: new Cesium.CallbackProperty(() => {
          let c = Array.from(points);
          if (mousePos) {
            c.push(mousePos);
          }
          return c;
        }, false),
        clampToGround: true, //贴地
        width: 3,
        material: new Cesium.PolylineDashMaterialProperty({
          color: Cesium.Color.YELLOW,
        }),
      },
    });
  } else {
    viewer.entities.removeAll();
    //两个顶点+移动点
    viewer.entities.add({
      polygon: {
        hierarchy: new Cesium.CallbackProperty(() => {
          let poss = Array.from(points);
          if (mousePos) {
            poss.push(mousePos);
          }
          return new Cesium.PolygonHierarchy(poss);
        }, false),
        material: Cesium.Color.RED.withAlpha(0.4),
        clampToGround: true,
      },
      polyline: {
        positions: new Cesium.CallbackProperty(() => {
          let c = Array.from(points);
          if (mousePos) {
            c.push(mousePos);
            c.push(c[0]); //与第一个点相连
          }
          return c;
        }, false),
        clampToGround: true, //贴地
        width: 3,
        material: new Cesium.PolylineDashMaterialProperty({
          color: Cesium.Color.YELLOW,
        }),
      },
    });
  }
}, Cesium.ScreenSpaceEventType.LEFT_CLICK);
面的属性与线也类似。
1.2、面的鼠标移动事件
这里和线一样,更改鼠标的坐标就好了。
drawEventHandler.setInputAction((e) => {
  let p = this.viewer.scene.pickPosition(e.endPosition);
  if (!p) return;
  mousePosition = p;//存鼠标的位置
}, Cesium.ScreenSpaceEventType.MOUSE_MOVE);
1.3、面的鼠标右击事件
鼠标右击时则把前面两个事件清除,把之前的面和线也清除,最后重新再绘制points中的点。
drawHandler.setInputAction((e) => {
  let p = viewer.scene.pickPosition(e.position);
  if (!p) return;
  points.push(points[0]);
  drawEventHandler.removeInputAction(Cesium.ScreenSpaceEventType.LEFT_CLICK);
  drawEventHandler.removeInputAction(Cesium.ScreenSpaceEventType.MOUSE_MOVE);
  viewer.entities.removeAll();
  const polygonEntity = viewer.entities.add({
    polyline: {
      positions: points,
      clampToGround: true, //贴地
      width: 3,
      material: new Cesium.PolylineDashMaterialProperty({
        color: Cesium.Color.YELLOW,
      }),
      depthFailMaterial: new Cesium.PolylineDashMaterialProperty({
        color: Cesium.Color.YELLOW,
      }),
    },
    polygon: {
      material: Cesium.Color.RED.withAlpha(0.4),
      clampToGround: true,
    },
  });
}, Cesium.ScreenSpaceEventType.LEFT_DOUBLE_CLICK);
二、点线面的绘制代码的封装
前面写了这么久,我们发现点线面的绘制其实不难实现,但是代码量却异常的多,以后如果再调用,则还需写这么多代码。这样写代码,不不仅繁琐,还不利于我们维护,因此我们将其封装成一个绘制工具类。后面使用的时候直接引入该类名,就可以通过其创建一个绘制对象了。
import * as Cesium from 'cesium';

export default class DrawEntityGraphic {
    }
2.1构造函数
在每个类里面都有一个构造器,即初始化时传的参数。其中dataSource用来存放CustomDataSource对象,相当于一个新空间,与原来的entities隔离开来,方便数据管理,比如当我们需要删除所有的线对象是,调用removeAll时,就不会把其他实体给移除了。
  constructor(viewer) {
    this.viewer = viewer;// Cesium.Viewer实例
    this._drawEventHandler = null;// 绘制事件处理器
    this._drawType = '';// 绘制类型
    this._dataSource = null;// 数据容器
    this._points = [];// 点集合
    this._mousePosition = null;// 鼠标位置
    this._dynamicEntity = null; // 用于存储动态绘制的临时实体
  }
2.2、激活绘制功能。
紧接着,我们需要一个激活函数,用来将上面的值赋值,以及初始化事件。
   /**
  * 激活绘制模式
  * @param { 'point' | 'line' | 'polygon' } drawType 绘制类型
    * @param { Function } [callback] 绘制完成后的回调函数
      */
  activate(drawType, callback) {
    this.clearAll();
    this._drawType = drawType;
    this._dataSource = new Cesium.CustomDataSource('_drawDataSource');
    this.viewer.dataSources.add(this._dataSource);
    this._initDrawEvents(callback);
  }
上面这里的初始化函数还没有实现,我们这里是要根据不同的绘制类型,来初始化不同的事件。其中,参数为回调函数,这个回调函数是为了当右击完成后,即绘制完成时,触发一个事件,比如,小车开始运动,绘制积云等。
/**
  * 初始化绘图事件监听
  * @param { Function } callback 完成回调
    */
  _initDrawEvents(callback) {
    this.viewer.scene.globe.depthTestAgainstTerrain = true;

    this._drawEventHandler = new Cesium.ScreenSpaceEventHandler(this.viewer.scene.canvas);

    // 公共事件处理
    const eventConfig = {
      point: {
        leftClick: this._handlePointLeftClick.bind(this),
      },
      line: {
        leftClick: this._handleLineLeftClick.bind(this),
        mouseMove: this._handleMouseMove.bind(this),
        rightClick: this._handleLineRightClick.bind(this, callback),
      },
      polygon: {
        leftClick: this._handlePolygonLeftClick.bind(this),
        mouseMove: this._handleMouseMove.bind(this),
        rightClick: this._handlePolygonRightClick.bind(this, callback),
      }
    };

    const config = eventConfig[this._drawType];
    Object.entries(config).forEach(([event, handler]) => {
      const cesiumEvent = this._getCesiumEventType(event);
      this._drawEventHandler.setInputAction(handler, cesiumEvent);
    });
  }

  /**
  * 获取Cesium事件类型
  * @param { String } event 事件名称
    */
  _getCesiumEventType(event) {
    const eventMap = {
      leftClick: Cesium.ScreenSpaceEventType.LEFT_CLICK,
      rightClick: Cesium.ScreenSpaceEventType.RIGHT_CLICK,
      mouseMove: Cesium.ScreenSpaceEventType.MOUSE_MOVE,
    };
    return eventMap[event];
  }
2.3、处理左击事件
接下来,则是分别实现点线面的左击事件。其中,每个事件都有一个creat...函数,这里我们根据不同实现不同的函数。(后面实现)。在面的绘制中,如果当前点==1,则是绘制线。大于1才开始绘制面。
/**
  * 处理点绘制的左键点击
  */
  _handlePointLeftClick(e) {
    const position = this.viewer.scene.pickPosition(e.position);
    if (!position) return;

    const cartographic = Cesium.Cartographic.fromCartesian(position);
    const point = [
      Cesium.Math.toDegrees(cartographic.longitude),
      Cesium.Math.toDegrees(cartographic.latitude),
      cartographic.height + 10000 // 可配置化高度偏移
    ];

    this._dataSource.entities.add(this._createPointEntity(point));
  }

  /**
  * 处理线绘制的左键点击
  */
  _handleLineLeftClick(e) {
    const position = this.viewer.scene.pickPosition(e.position);
    if (!position) return;

    this._points.push(position);

    if (this._points.length === 1) {
      this._dynamicEntity = this._dataSource.entities.add(this._createDynamicPolyline());
    }
  }

  /**
  * 处理多边形绘制的左键点击
  */
  _handlePolygonLeftClick(e) {
    const position = this.viewer.scene.pickPosition(e.position);
    if (!position) return;

    this._points.push(position);

    if (this._points.length === 1) {
      this._dynamicEntity = this._dataSource.entities.add(this._createDynamicPolyline());
    } else {
      this._updatePolygonEntities();
    }
  }
2.4、处理鼠标移动事件
面和线的鼠标移动事件都相同,使用我们只需要一个事件。
  /**
  * 处理鼠标移动事件
  */
  _handleMouseMove(e) {
    this._mousePosition = this.viewer.scene.pickPosition(e.endPosition);
  }
2.5、处理右击事件
在右击事件中,不需要把鼠标移动到点加上去,因此,我们需要把之前的绘制删去,如何重新绘制最终的形状。回调函数的使用也是在这里。
 /**
  * 处理线绘制的右键点击
  */
  _handleLineRightClick(callback) {
    if (this._points.length < 2) return;

    this._cleanup();
    const lineEntity = this._dataSource.entities.add(this._createFinalPolyline());
    callback?.(this._points, lineEntity);
  }

  /**
  * 处理多边形绘制的右键点击
  */
  _handlePolygonRightClick(callback) {
    if (this._points.length < 3) return;

    this._points.push(this._points[0]); // 闭合多边形
    this._cleanup();

    const polygonEntity = this._dataSource.entities.add(this._createFinalPolygon());
    callback?.(this._points, polygonEntity);
  }
2.6、点线面的绘制
然后,我们将上面没有实现的绘制事件给实现。
  /**
  * 创建点实体
  */
  _createPointEntity(position) {
    return {
      position: Cesium.Cartesian3.fromDegrees(...position),
      point: {
        color: Cesium.Color.WHITE,
        pixelSize: 10,
        outlineColor: Cesium.Color.BLUE,
        outlineWidth: 1,
      }
    };
  }

  /**
  * 创建动态折线实体
  */
  _createDynamicPolyline() {
    return {
      polyline: {
        positions: new Cesium.CallbackProperty(() =>
          this._points.concat(this._mousePosition || []), false),
        clampToGround: true,
        width: 3,
        material: new Cesium.PolylineGlowMaterialProperty({
          color: Cesium.Color.AQUA,
        }),
      }
    };
  }

  /**
  * 创建最终折线实体
  */
  _createFinalPolyline() {
    return {
      polyline: {
        positions: this._points,
        clampToGround: true,
        width: 3,
        material: new Cesium.PolylineGlowMaterialProperty({
          color: Cesium.Color.AQUA,
        }),
      }
    };
  }

  /**
  * 更新多边形相关实体
  */
  _updatePolygonEntities() {
    this._dataSource.entities.remove(this._dynamicEntity);

    this._dynamicEntity = this._dataSource.entities.add({
      polygon: {
        hierarchy: new Cesium.CallbackProperty(() =>
          new Cesium.PolygonHierarchy(this._points.concat(this._mousePosition || [])), false),
        material: Cesium.Color.SKYBLUE.withAlpha(0.4),
        clampToGround: true,
      },
      polyline: {
        positions: new Cesium.CallbackProperty(() => {
          const pts = this._points.concat(this._mousePosition || []);
          return pts.length > 1 ? pts.concat([pts[0]]) : pts;
        }, false),
        clampToGround: true,
        width: 3,
        material: new Cesium.PolylineGlowMaterialProperty({
          color: Cesium.Color.AQUA,
        }),
      },
    });
  }

  /**
  * 创建最终多边形实体
  */
  _createFinalPolygon() {
    return {
      polygon: {
        hierarchy: this._points,
        material: Cesium.Color.SKYBLUE.withAlpha(0.4),
        clampToGround: true,
      },
      polyline: {
        positions: this._points,
        clampToGround: true,
        width: 3,
        material: new Cesium.PolylineGlowMaterialProperty({
          color: Cesium.Color.AQUA,
        }),
      }
    };
  }
2.7、资源释放
当entities里的实体不再需要时,要及时释放掉,不然会可能导致cesium很卡。这里就是把实体及相关事件全部释放。
  /**
  * 清理临时数据
  */
  _cleanup() {
    this._drawEventHandler?.destroy();
    this._drawEventHandler = null;
    this._mousePosition = null;
  }

  /**
  * 清除所有绘制内容
  */
  clearAll() {
    this._cleanup();
    if (this._dataSource) {
      this.viewer.dataSources.remove(this._dataSource);
      this._dataSource = null;
    }
    this._points = [];
    this._dynamicEntity = null;
  }
三、封装类使用案例
这个类的使用步骤就三步,首先新建对象,然后调用激活函数,最后释放资源。
这里我用vue3及element的按钮来演示,先新建对象,然后当点击按钮时调用激活函数,即可以开始绘制,最后当切换页面时释放资源(也可以是其他时候,如清除按钮)。这里我用pinia管理了viewer,在其他组件里将其引入。
<template>
<el-button :icon="Location" @click="addPolygon()"></el-button>
</template>
<script setup>
import useStore from '@/stores';
import DrawEntityGraphic from '@/utils/drawEntityGraphic';
import { Location } from '@element-plus/icons-vue';
import { onUnmounted } from 'vue';
const { viewer } = useStore();
const drawEntityGraphic = new DrawEntityGraphic(viewer);
onUnmounted(() => {
drawEntityGraphic.clearAll();
});
const addPolygon = () => {
drawEntityGraphic.activate('polygon');
};
</script>
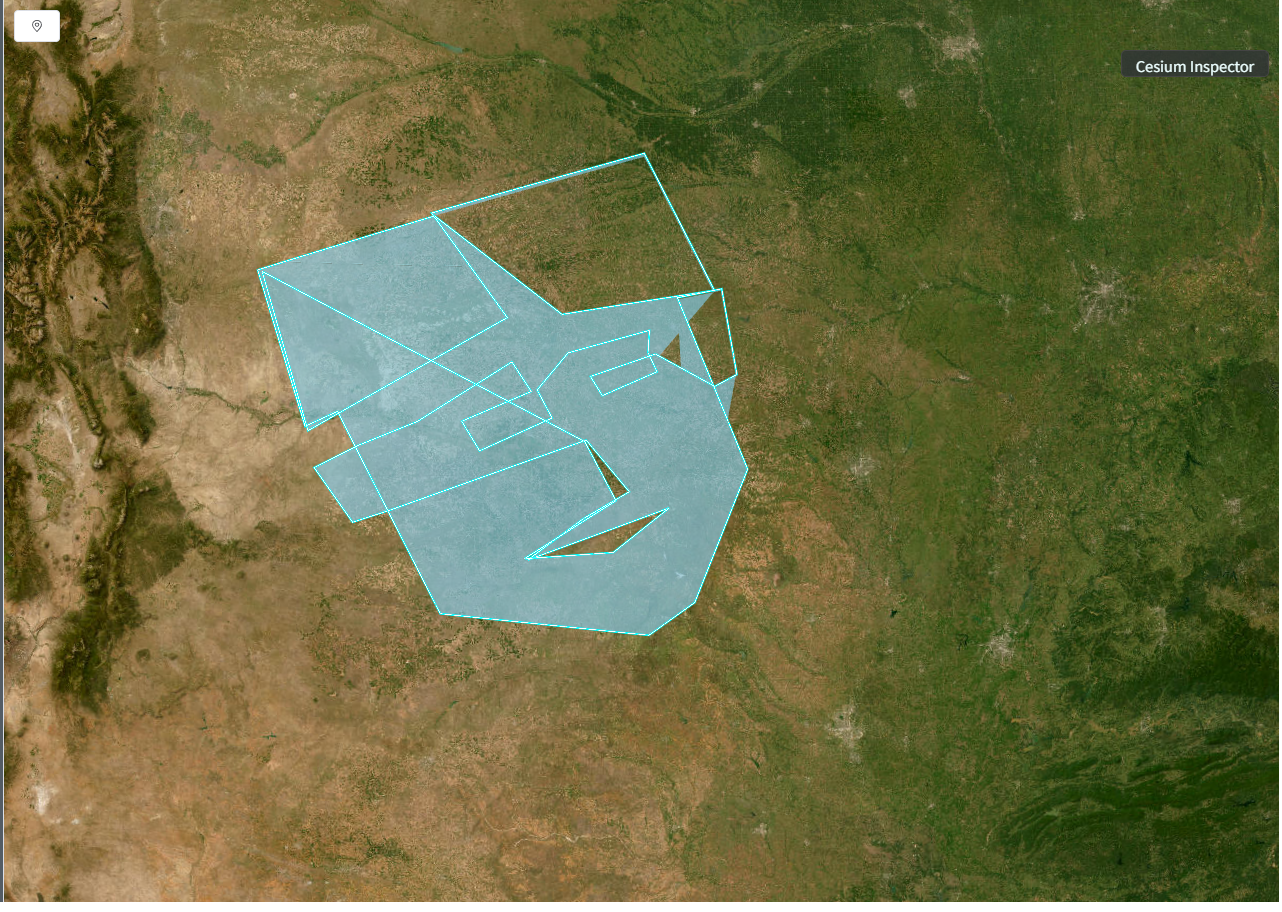
<style scoped></style>最终运行效果如下。
如果喜欢我的文章的话,请点一个免费的赞和关注吧!


 859
859

 被折叠的 条评论
为什么被折叠?
被折叠的 条评论
为什么被折叠?
 到【灌水乐园】发言


